Tag Archive | Pental Sunburst Metalic Med Gel Pen – Gold

North Pole Greetings!!


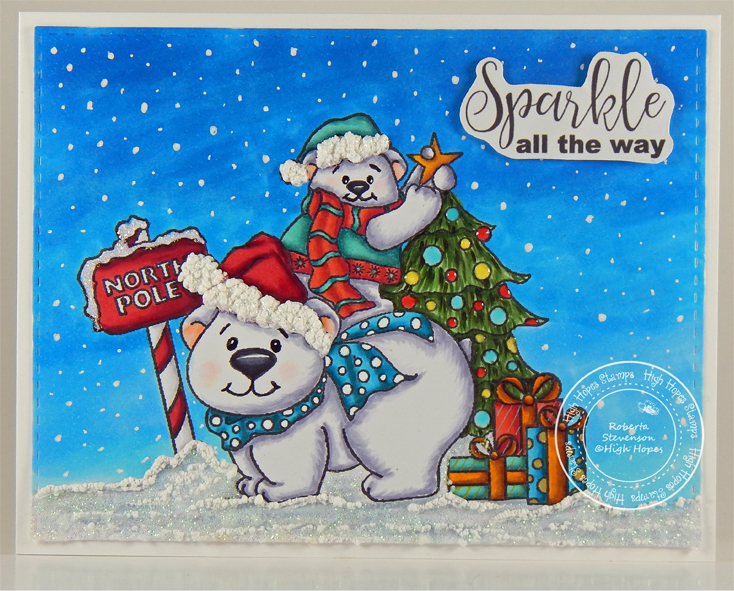
It’s Wednesday, and this week, I made a Christmas card using High Hopes Rubber Stamps North Pole Penguin – TDG008 for the main image and Seasons Greetings – F300A, for the sentiment. Christmas is getting nearer and this little penguin is helping Santa deliver some of your presents this year!

To make my card this week, I began with a card base from Crate Paper – Boxed Cards – Mittens & Mistletoe (5.5″ x 4.25″). Tim Holtz Distress Ink – Rustic Wilderness and a finger dauber were used to ink around all of the edges. With my Cuttlebug and dies from My Favourite Things – Die-namics – Elegant Rectangle Stax, I die cut a large rectangle out of Forever In Time – Texture Rouge paper and a smaller one out of Copic Marker X-Press It Blending Card cardstock. U-Line double-sided tape was added to the large rectangle and it was popped up onto the base card.

The image was stamped onto the smaller rectangle using my MISTI – Most Incredible Stamping Tool and Memento – Tuxedo Black ink. I coloured in the image and then with a paint brush and a small mixture of DecoArt Glamour Dust, FolkArt – Extreme Glitter Acrylic Paint and Delta Ceramcoat – White, I added in the first layer of snow. A little more DecoArt Glamour Dust was added to it while it was still wet. This dried pretty quickly and Cosmic Shimmer Fluffy Stuff and more glitter were added to give the snow some texture. I also added this to the hat, pompom and sign. Lastly, I added some Crystal – Stickles because you can never have enough glitter. LOL! Wink of Stella – Clear was added to the bows, side of the ball on the pole and down the entire pole. Pental Sunburst Metalic Med Gel Pen – Gold and Wink of Stella – Clear were added to the pink present dots. Once everything was dry, I stamped the sentiment using my MISTI and VersaMark ink. Ranger Embossing Powder White – Extra Fine Detail was applied over top of the ink and then heat embossed with Marvy Uchida – Embossing Heat Tool. The snow in the sky was created using a Gelly Roll Sakura #10 Pen. I applied U-Line double-sided tape to the back of the image and popped it up on top of the larger rectangle. To complete my card, I added in 4 YNS – Holly Jolly Sparkly Gumdrops in the corners.

Card Recipe:

Stamps: North Pole Penguin – TDG008 (High Hopes Rubber Stamps)

Sentiment: Seasons Greetings – F300A (High Hopes Rubber Stamps)

Inks: Memento – Tuxedo Black, Tim Holtz Distress Ink – Rustic Wilderness, VersaMark

Paper: Copic Marker X-Press It Blending Card, Crate Paper – Boxed Cards – Mittens & Mistletoe (5.5″ x 4.25″), Forever In Time – Texture Rouge

Die Cuts: My Favourite Things – Die-namics – Elegant Rectangle Stax – MFT-1268

Embossing Powder: Ranger Embossing Powder White – Extra Fine Detail

Tools: MISTI – Most Incredible Stamping Tool, U-Line double-sided tape, Cosmic Shimmer Fluffy Stuff, Crystal – Stickles, Pental Sunburst Metalic Med Gel Pen – Gold, DecoArt Glamour Dust, FolkArt – Extreme Glitter Acrylic Paint, Delta Ceramcoat – White, Cuttlebug, Wink of Stella – Clear, Marvy Uchida – Embossing Heat Tool, YNS – Holly Jolly Sparkly Gumdrops

Image coloured with Copic Markers:

Penguin: W9, W7, W5, W3, W00, E15, YR14, Y17, Y11, RV00, EE42, E41, E40, Colorless Blender (Eyes: Gelly Roll Sakura #10 Pen, Sakura Glaze – Black)

Hat, Scarf, Sign and Ribbon: R59, R37, R35

Presents: BG72, BG57, BG32, BG11, YR24, YR23, YR21, YR08, YG07, YG05, YG03, RV14, RV13, RV10

Pole: R46, R14, R08, C1, C00, Colorless Blender

Sky: B99, B97, B95, B93

Hope you like it and have a fantastic week!

You can find lots of inspiration from the Design Team Divas at the High Hopes blog, and the High Hopes Rubber Stamps Facebook Fan page plus you can also follow us on
Instagram, Twitter and Pinterest.

Wizard


Sharing a card I made today using KLM Digital Design –  Owl Gnome from the new August 2022 release. This image comes with 2 other sentiments as well, “Owl-ways friends” and “Have a wicked Day!”. Creating the spiral background with Stickles Glitter Gel was a little out of my comfort zone, but I love how the background turned out. I thought it went very well with this image and sentiment. What do you think?

To make my card this week, I started with creating my background first. I wanted to create a mystical background and I couldn’t quite decide between using white or black for the base. I finally decided to try black and I fell in love with the results. A Colorful Life Designs – Striped Spiral Stencil was placed over top of Recollections – Black cardstock. Using a spatula for even coverage over the stencil, Stickles Glitter Gel – Galaxy, Aquarius and Pegasus were added to the spirals. I carefully lifted off the stencil and set the background aside to dry. Once it was all dry, I felt that is was missing something. I didn’t like just the solid black behind and in between the spirals, so I decided to add in guess what? More glitter! LOL! This time, using my small spatula, I added Stickles Glitter Gel – Moon Dust over top of everything. This created the magical effect that I was looking for and I could still see the colourful spirals. Once again, the background was set aside to dry.

The image and sentiment were imported into Microsoft Word and printed out onto Copic Marker X-Press It Blending Card. The image was coloured in and then I fussy cut all around it and the sentiment words. Using my Xyron Create a Sticker, I ran the sentiment words through it and then applied it to a scrap piece of Recollections – Purple Passions cardstock. Once again, I fussy cut around the sentiment words leaving a small border. I applied U-Line double-sided tape to the back of the image and sentiment pieces.

The card was now ready to assemble. I created the base card using Hammermill – Premium Colour 100 lb. cardstock, cut and scored to be 5.5″ x 5.5″. I cut down the background piece that I had created earlier to be the same size and then using double-sided tape adhered it to the base. I added a little bit of glue to the U-Line double sided tape that I had applied earlier to the backs of the sentiment pieces and main image and then popped them up onto the background to complete the card.

Card Recipe:

Stamp and Sentiment:  Owl Gnome – KLM Digital Designs

Inks: HP Printer Grayscale

Paper: Copic Marker X-Press It Blending Card, Hammermill – Premium Colour 100 lb., Recollections – Black, Recollections – Purple Passions 8.5″ x 11″

Stencil: A Colorful Life Designs – Striped Spiral Stencil

Stickles Glitter Gel: Moon Dust, Galaxy, Aquarius, Pegasus

Miscellaneous: U-Line – 2 sided tape, Xyron Create a Sticker, Gelly Roll Sakura #8 Pen, Pental Sunburst Metalic Med Gel Pen – Gold, Pental Sunburst Metalic Med Gel Pen – Silver

Image coloured with Copic Markers:

Skin: E21, E11, E00, E000

Beard: C3, C2, C1, C0

Clothing and Hat: BV29, BV27, BV23, V17, V15, V12, B79, B69, B66, Y17, Y08, Pental Sunburst Metalic Med Gel Pen – Gold, Pental Sunburst Metalic Med Gel Pen – Silver (Outline of Spider Web)

Shoes: 100, C8, C6, C4, C2

Staff:  E29, E27, E25, E23, E21

Owl: E95, E97, E55, E53, E51, E15, E11, Y38, Y35, Y32, YR21, C8, C6, 100, B63, YR23, YR21, Eyes (Gelly Roll Sakura #8 Pen)

Grass: YG17, YG13, YG03

Hope you like it and have a great week!

You can find more cards to inspire you at KLM Designs, KLM Digital Design Team and KLM Digital Designs on the Facebook Fan page from the rest of our design team.

Mermaid and Friends!!


Today, I’m sharing a card that I made using Mermaids & Friends Fran’s Clear Stamps & Cutting Dies Stampendous Set – CSD18.

To make this card I used a base of 5.5″ x 4.25″ using Hammermill – Premium Colour 100 lb. cardstock. I cut a piece of coral cardstock to the size of 5-3/8″ x 4-1/8″ and adhered it directly to the base using double-sided tape. I created my own background paper using Crayola chalk, water and American Crafts Vicki Boutin Mixed Media Foundations Paper cut to the size of 5.25″ x 4″. Once the paper was dry, I embossed the whole background with Emboss It – Clear ink and then added Ranger – Clear Super Fine Detail embossing powder. I heat embossed this with my Marvy Uchida – Embossing Heat Tool. I did this same technique with the paper that I used to cut out coral with my Anna Griffin Empress Mini Machine and Elizabeth Craft Designs – Seaweed dies. For the main background, I added some sand to the bottom using Seth Apter – Baked Texture – Dirty Sand and my Ranger HEAT IT Craft Tool. This process takes a little longer, but it allows you to just sprinkle the embossing powder on top and then heat from the bottom first and then on top. I think this gave it a more natural look. Using U-Line double-sided tape, I added the chalk embossed background to the base card.

The images were stamped using my MISTI and Memento – Tuxedo Black ink. I coloured in the images using copic markers. For the pearl, I coloured it in using Cosmic Shimmer Opal Blaze Touch Tip – Turquoise Peach and then embossed it with Ranger – Holographic Embossing Powder and heat set it with Marvy Uchida – Embossing Heat Tool. Clear – Wink of Stella was added over top of the bikini top and the fin to make them glitter. Unfortunately, you can’t see that in this photo. Once the images were coloured, I die cut the turtle and the mermaid using the dies that came with the stamp using my Anna Griffin Empress Mini Machine.

My card was now ready to assemble. I added U-Line double-sided tape to the backs of the 2 images and all of the buttons. I removed the backs from the buttons earlier. I popped each of the characters and added a second layer of tape to the mermaid and then popped it up on the card as well. To finish it off, I added in some bubbles using Your Next Stamp Gumdrops – Crystal Clear And Sparkle Gumdrops. The crown was coloured in with Pental Sunburst Metalic Med Gel Pen – Gold.

Card Recipe:

Stamps: Mermaids & Friends Fran’s Clear Stamps & Cutting Dies Stampendous Set – CSD18.

Inks: Memento – Tuxedo Black, Emboss It – Clear ink

Paper: Copic Marker X-Press It Blending Card, American Crafts Vicki Boutin Mixed Media Foundations Paper 12″X12″ – Smooth White – 140lb, Hammermill – Premium Colour 100 lb.

Die Cuts: Mermaids & Friends Fran’s Clear Stamps & Cutting Dies Stampendous Set – CSD18, Elizabeth Craft Designs – Seaweed (1752)

Embossing Powder: Ranger – Clear Super Fine Detail embossing powder, Ranger – Holographic, Seth Apter – Baked Texture – Dirty Sand

Tools: MISTI – Most Incredible Stamping Tool, Marvy Uchida – Embossing Heat Tool, U-Line double-sided tape, Crayola Chalk, Water, Your Next Stamp Gumdrops – Crystal Clear And Sparkle Gumdrops, Pental Sunburst Metalic Med Gel Pen – Gold, Dress It Up – Ocean’s Alive, Cosmic Shimmer Opal Blaze Touch Tip – Turquoise Peach, Ranger HEAT IT Craft Tool, Clear – Wink of Stella, Anna Griffin Empress Mini Machine

Image coloured with Copic Markers:

Skin: E21, E11, E04, E00, E000, R30, R20

Hair: E15, Y38, Y21, V09, V04, V01

Fintail: V000, BG32, BG10, BG01

Bikini Top: RV66, RV63, RV558

Turtle: E97, YG11, YG07, BG34

Hope you like it and have a great week!

Birthday Wishes!!


It’s Wednesday, and this week, I made a card using High Hopes Rubber Stamps Fairy Flight – SLF036  for the image and Birthday Wishes – FDG024  for the sentiment. There are a lot of birthdays in our family during March, friends too, and this little birthday fairy is on her way to grant one of them their special birthday wishes.

To make my card this week, I began with a card base of Hammermill – Premium Colour 100 lb. cardstock, cut and scored to be 5.5″ x 4.25″. Scrapbook.com – Roses Smooth Cardstock was adhered to the base using double-side tape.  I die cut Creative Memories – Mermaid Cove Designer Paper Pack using my Cuttlebug and My Creative Time – Rectangle Frame Layers and adhered it to the rose background using double-sided tape. Using Gina Marie Designs – Petite Looped Lace Rectangle Die Set, I die cut Copic Marker X-Press It Blending Card.

The image and sentiment were then stamped with my MISTI and Memento – Tuxedo Black ink onto the Copic Marker X-Press It Blending Card cardstock. The image was coloured in with Copic Markers. I added some stars onto the dress with Gelly Roll Sakura #5 Pen and then used Wink of Stella – Clear over top of the flower, dress, shoes and wings. Using R85 and R83 Copic markers, I went around the edges of the die cut for the image to create a solid border. I fussy cut around the sentiment and ran it through my Xyron Create a Sticker. I attached the sentiment to Scrapbook.com – Peppermint Smooth Cardstock and fussy cut around it again. The card was now ready to finish being assembled. I applied U-Line double-sided tape to the back of the coloured image and sentiment and popped them up onto the card. Lastly, I added in some YNS Gumdrops to complete the card.

Card Recipe:

Stamps: Fairy Flight – SLF036 (High Hopes Rubber Stamps)

Sentiment: Birthday Wishes – FDG024 (High Hopes Rubber Stamps)

Inks: Memento – Tuxedo Black

Paper: Copic Marker X-Press It Blending Card, Hammermill – Premium Colour 100 lb., Scrapbook.com – Peppermint Smooth Cardstock – 4.25″ x 5.5″, Scrapbook.com – Roses Smooth Cardstock – 4.25″ x 5.5″, Creative Memories – Mermaid Cove Designer Paper Pack

Die Cuts: My Creative Time – Rectangle Frame Layers, Gina Marie Designs – Petite Looped Lace Rectangle Die Set

Tools: MISTI – Most Incredible Stamping Tool, U-Line double-sided tape, Cuttlebug, Wink of Stella – Clear, Pental Sunburst Metalic Med Gel Pen – Gold, Gelly Roll Sakura #5 Pen, Xyron Create a Sticker, YNS Gumdrops

Image coloured with Copic Markers:

Skin: E21, E11, E04, E00, E000, R22, R20, (Eyes – Gelly Roll Sakura #5 Pen)

Hair: E47, E44, E43, E41

Dress, Shoes and Heart: R85, R83, R81, RV00, RV000, E15, YR24, Y35, Y08, Wink of Stella – Clear, Gelly Roll Sakura #5 Pen

Wings: B000, BG000, RV0000, V0000, Y000, Wink of Stella – Clear

Wand and Flower: R85, R83, R81, RV00, RV000, E15, YR24, Y35, Y19, Y08, Wink of Stella – Clear, Pental Sunburst Metalic Med Gel Pen – Gold

Socks: C1, C00

Hope you like it and have a fantastic week!

You can find lots of inspiration from the Design Team Divas at the High Hopes blog, and the High Hopes Rubber Stamps Facebook Fan page plus you can also follow us on
Instagram, Twitter and Pinterest.

Hello Winter!!!


It’s Wednesday, and this week, I made a Christmas CAS card using Penguin Tag – SDG003 by High Hopes Rubber Stamps for the main image and Hello Winter – FDG007 (High Hopes Rubber Stamps) for the sentiment. Winter is now here and these little penguins couldn’t wait to start enjoying it.

I’d like to take this time to also wish everyone a Very Merry Christmas and A Happy New Year!

To make my card this week, I began with a card base of Hammermill – Premium Colour 100 lb. cardstock, cut and scored to be 5.5″ x 4.25″.  I cut the background paper from Craft Consortium – Polar Playtime to be the same and attached it directly to the base. Tim Holtz Distress Ink – Picked Raspberry was used to ink around the outside of the card. Using my MISTI and Memento – Tuxedo Black ink, I stamped the image and sentiment onto Copic Marker X-Press It Blending Card cardstock. I coloured in the image with Copic markers and the little berries with a Pental Sunburst Metalic Med Gel Pen – Gold. I used Sakura Glaze – Black and Gelly Roll Sakura #10 Pen was used for the eyes and little dots on the hat.) Clear – Wink of Stella was applied over top of the candy canes and candy cane border. Once this was all complete, I fussy cut around the image and then coloured in around it with Copic B01. I ran the image through my Xyron Creative Station and attached it to some Hot Pink cardstock. Once again, I fussy cut around the image and then popped it up on to the card using U-Line double-sided tape. Lastly, Gelly Roll Sparkle Pen was applied to the little blue snowflakes and dots on the background paper to finish off the card.

Card Recipe:

Stamp: Penguin Tag – SDG003 (High Hopes Rubber Stamps)

Sentiment: Hello Winter – FDG007 (High Hopes Rubber Stamps)

Inks: Memento – Tuxedo Black, Tim Holtz Distress Ink – Picked Raspberry

Paper: Copic Marker X-Press It Blending Card, Hammermill – Premium Colour 100 lb., Craft Consortium – Polar Playtime (6″ x 6″), Hot Pink cardstock

Tools: MISTI – Most Incredible Stamping Tool, U-Line double-sided tape, Gelly Roll Sakura #10 Pen, Pental Sunburst Metalic Med Gel Pen – Gold, Sakura Glaze – Black, Gelly Roll Sparkle Pen, Clear – Wink of Stella, Xyron Creative Station

Image coloured with Copic Markers:

Penguin: W9, W7, W5, W3, W0, E15, YR14, Y17, Y11, R30, E42, E41, E40 (Eyes – Sakura Glaze – Black, Gelly Roll Sakura #10 Pen)

Hat, Pom Pom and Bow Tie: RV14, RV13, RV11, RV10, G14, YG23, YG11, Gelly Roll Sakura #10 Pen

Holly and Leaves: G14, YG23, YG11, R59, R37, R35

Candy Cane and Border: C1, C0, R59, R37, R35, Colorless Blender, Clear – Wink of Stella

Berries: Pental Sunburst Metalic Med Gel Pen – Gold

Hope you like it and have a fantastic week!

You can find lots of inspiration from the Design Team Divas at the High Hopes blog, and the High Hopes Rubber Stamps Facebook Fan page plus you can also follow us on
Instagram, Twitter and Pinterest.

Christmas Wreath!!!


It’s Wednesday, and this week, I made a Christmas card using Wreath – TDG012 by High Hopes Rubber Stamps for the main image and Merry Christmas – FDG008 (High Hopes Rubber Stamps) for the sentiment. We love to decorate our home with Christmas wreaths outside and on our door! Do you decorate with Christmas wreaths too?

To make my card this week, I began with a card base of Hammermill – Premium Colour 100 lb. cardstock, cut and scored to be 5″ x 5″. I die cut Recollections – Burgundy to be the same size as the base and adhered it to the card using double-sided tape. DCWV – Holiday Cheer was cut to the size of 4.75″ x 4.75″ and a Sharpie – Medium Point Gold Water based paint was used to go around all of the edges. This was adhered to the base background using liquid glue. I die cut Copic Marker X-Press It Blending Card with my Cuttlebug and Crafting Desert Diva’s – Stitched in Circle Dies. With my MISTI and Memento – Tuxedo Black ink, I stamped the image onto the die cut and the sentiment onto Copic Marker X-Press It Blending Card cardstock. I coloured the image in with Copic markers and coloured in some of the berries with a Pental Sunburst Metalic Med Gel Pen – Gold. A Gelly Roll Sakura #5 Pen was used to add the little white dots on all of the red berries. Once the image was coloured in, I used the Sharpie – Medium Point Gold Water based paint to go around the scalloped part of the circle. I cut around the sentiment to the size of 1.25 x 2-1/8″ and then used a corner punch. Once again, I went around the edges with a Sharpie – Medium Point Gold Water based paint pen. I adhered the the finished image and sentiment to the base card using U-Line double-sided tape. Lastly, I applied Nuvo Crystal Drops – Autumn Red to complete the card.

Card Recipe:

Stamp: Wreath – TDG012 (High Hopes Rubber Stamps)

Sentiment: Merry Christmas – FDG008 (High Hopes Rubber Stamps)

Inks: Memento – Tuxedo Black

Paper: Copic Marker X-Press It Blending Card, Hammermill – Premium Colour 100 lb., DCWV – Holiday Cheer (6″ x 6″), Recollections – Burgundy

Die Cut: Crafting Desert Diva’s – Stitched in Circle Dies (Retired)

Nuvo Crystal Drops: Autumn Red

Tools: MISTI – Most Incredible Stamping Tool, U-Line double-sided tape, Gelly Roll Sakura #5 Pen, Sharpie – Medium Point Gold Water based paint

Image coloured with Copic Markers:

Wreath: G99, G21, YG67, YG17, R39, R27, R22, E27, E25, E23, G99, Pental Sunburst Metalic Med Gel Pen – Gold, Gelly Roll Sakura #5 Pen

Background: BG000, BG0000, Sharpie – Medium Point Gold Water based paint

Hope you like it and have a fantastic week!

You can find lots of inspiration from the Design Team Divas at the High Hopes blog, and the High Hopes Rubber Stamps Facebook Fan page plus you can also follow us on
Instagram, Twitter and Pinterest.

Sparkle All The Way!!!


It’s Wednesday, and this week, I made a Christmas card using Snowbear Friends – TDG009 by High Hopes Rubber Stamps for the main image and Sparkle – FDG011 (High Hopes Rubber Stamps) for the sentiment. This month we are celebrating our new Woodland Winter Release at High Hopes Stamps.

To make my card this week, I began with a card base of Hammermill – Premium Colour 100 lb. cardstock, cut and scored to be 5.5″ x 4.25″. I die cut Copic Marker X-Press It Blending Card with my Cuttlebug and My Creative Time – Rectangle Frame Layers. With my MISTI and Memento – Tuxedo Black ink, I stamped the image onto the die cut and the sentiment onto Copic Marker X-Press It Blending Card. I coloured the image in with Copic markers and added in the snow in the sky with Gelly Roll Sakura #10 Pen. I added in the tree decorations using a combination of Nuvo Crystal Drops: Red Berry, Dandelion Yellow and Carribean Dream. Pental Sunburst Metalic Med Gel Pen – Silver and Pental Sunburst Metalic Med Gel Pen – Gold were used to create stripes and colour in circles on the presents. Cosmic Shimmer Fluffy Stuff was applied to the brim of their hats and pom-poms and heat embossed with my Marvy Uchida – Embossing Heat Tool. A little bit of Stickles – Diamond was added onto top of the brims and pompoms to make them sparkly.  I added in the snow on the bottom using a spatula and Nuvo Glimmer Paste – Moonstone and let it dry. Once it was dry, I added in some Cosmic Shimmer Fluffy Stuff to give the snow a little more texture. This too, was heat embossed with my Marvy Uchida – Embossing Heat Tool. I adhered the image to the base card using double-sided tape and Stickles – Diamond was added to the top and side of the sign to complete the card.

Card Recipe:

Stamp: Snowbear Friends – TDG009 (High Hopes Rubber Stamps)

Sentiment: Sparkle – FDG011 (High Hopes Rubber Stamps)

Inks: Memento – Tuxedo Black

Paper: Copic Marker X-Press It Blending Card, Hammermill – Premium Colour 100 lb.

Die Cut: My Creative Time – Rectangle Frame Layers

Nuvo Crystal Drops: Red Berry, Dandelion Yellow, Carribean Dream

Tools: MISTI – Most Incredible Stamping Tool, Marvy Uchida – Embossing Heat Tool, Gelly Roll Sakura #10 Pen, Cosmic Shimmer Fluffy Stuff, Stickles Diamond, Nuvo Glimmer Paste – Moonstone

Image coloured with Copic Markers:

Polar Bears: BV23, BV20, B60, R02, R00, RV00, C9, C7, C5

Hats and Scarves: R59, R46, R37, R35, R14, R08, BG72, BG57, BG32, BG11, BG09, BG05, BG02, BG01, Cosmic Shimmer Fluffy Stuff

Tree: G99, G21, YG67, YG17

Sign: R59, R37, R35, C2, C1, C00

Gifts and Bows: BG72, BG57, BG32, BG11, BG09, BG05, BG02, BG01, R46, R14, R08, E15, Y28, Y26, Y17, Pental Sunburst Metalic Med Gel Pen – Silver, Pental Sunburst Metalic Med Gel Pen – Gold

Sky: B06, B05, B04, B03, B02, B01

Snow: C3, C00, BV20, B000, Nuvo Glimmer Paste – Moonstone, Stickles – Diamond

Hope you like it and have a fantastic week!

You can find lots of inspiration from the Design Team Divas at the High Hopes blog, and the High Hopes Rubber Stamps Facebook Fan page plus you can also follow us on
Instagram, Twitter and Pinterest.