Tag Archive | Stickles – Crystal

Holiday Wishes!!


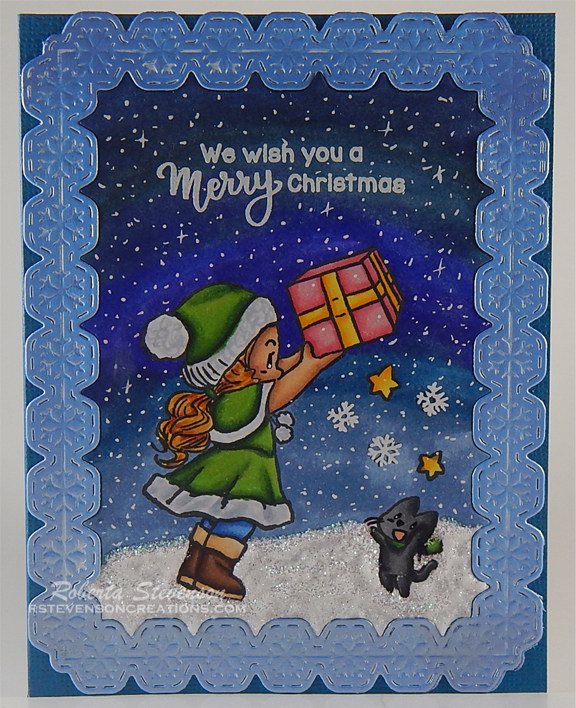
Today, I’m sharing a Christmas card that I made using Dreamerland Crafts stamps called Holiday Wishes – D18031 May all of your holiday wishes come true this season for you and your loved ones!

To create this card I began by making a base of 5.5″ x 4.25″ using Hammermill – Premium Colour 100 lb. cardstock. Recollections – Stardust Christmas paper was cut to be the same size as the base and then adhered to the card using double-sided tape. Lawn Fawn – Sparkle Cardstock in “Pixie Dust” paper was cut to 5.5″ x 1.25″ x 5.5″ x .75″. With my hands I tore along the top of both pieces to give the snow some texture. I applied double-sided tape to the larger piece and adhered it directly to the card. U-Line double-sided tape was applied to the smaller piece and it was popped up over top of the larger piece.

The base card was placed into my MISTI and the sentiment from Kraftin’ Kimmie Stamps – The Magic of Christmas was stamped onto it using VersaMark ink. Recollections Detail Embossing Powder – Silver was applied over top of the ink and then heat embossed using a Marvy Uchida – Embossing Heat Tool. I removed this from the MISTI and stamped the main image with Memento – Tuxedo Black ink onto Copic Marker X-Press It Blending Card cardstock. The image was coloured in and then fussy cut. With a black marker, I inked around all of the edges and then added U-Line Double-sided tape to the back of the image and popped it up onto the card and snow. Cosmic Shimmer Fluffy Stuff was placed under the couple’s boots and then heat embossed using a Marvy Uchida – Embossing Heat Tool to puff it up. Stickles – Diamond was then added over top of the fluffy snow to create more sparkle. Finally, to complete the card, Stickles – Crystal was applied to the centre of the stars in the sky.

Card Recipe:

Stamps: Holiday Wishes – D18031 – Dreamerland Crafts

Sentiment: Kraftin’ Kimmie Stamps – The Magic of Christmas

Inks: Memento – Tuxedo Black, VersaMark

Paper: Copic Marker X-Press It Blending Card, Hammermill – Premium Colour 100 lb., Lawn Fawn – Sparkle Cardstock in “Pixie Dust” (8.5″ x 11″), Recollections – Stardust Christmas (12″ x 12″)

Embossing Powder: Recollections Detail Embossing Powder – Silver

Tools and Miscellaneous: MISTI – Most Incredible Stamping Tool, Marvy Uchida – Embossing Heat Tool, U-Line double-sided tape, Cuttlebug, Cosmic Shimmer Fluffy Stuff, Stickles – Diamond, Stickles – Crystal

Image coloured with Copic Markers:

Skin: E21, E11, E04, E00, E000, R30, R22, R20

Hair: E47, E44, E43, E15, Y38, Y15, YR21

Jeans: B26, B23, B21

Girl’s Hat and Scarf and Boy’s Sweater: G99, YG67, YG17

Girl’s Coat and Boy’s Hat and Scarf: R59, R37, R35

Boy’s Jacket and Boots: E29, E27, E25, E23, E21

Hope you like it and have a great week!

You can find more cards to inspire you at Dreamerland Crafts and Pointer Scrapbooking on the Facebook Fan pages from the rest of our design team.

If Kisses Were Snowflakes


Sharing a Christmas card that I made today using KLM Digital Design –  Snowball Gnome from the new November 2022 release. This image comes with 2 other sentiments as well, “You’re the Jolly to my Holly” and “Baby It’s Cold Outside”.

To make my card this week, I started with a 6″ x 6″ card base using AC Cardstock – White. Using double-sided tape, I attached the patterned cardstock of the same size from Signature Collection by Sara Davies – Winter Wonderland.  The image and sentiment were imported into Microsoft Word and printed out onto Copic Marker X-Press It Blending Card. Using my Cuttlebug and Gina Marie Designs – Big and Little Pierced Chain Oval Layered Dies, I die cut the image and then coloured it in. With a Gelly Roll Sakura #10 Pen, I added snow into the sky. Stickles – Diamond was added to the snow on the ground and snowballs to add some sparkle. Stickles – Crystal was added around the oval and the coloured image was set aside to dry. I fussy cut around the sentiment and then ran the pieces through a Xyron Create a Sticker. The pieces were adhered to Recollections – Black cardstock and then fussy cut again. After everything was dry, U-Line double-sided tape was added to the back of the sentiment pieces and the image. These were all popped up onto the background paper. I added Recollections – Snowflake Specialty Polyester Glitter and a dab of Stickles – Crystal was added to the centre of the snowflakes to finish off the card.

Card Recipe:

Stamp and Sentiment:  Snowball Gnome – KLM Digital Designs

Inks: HP Printer Grayscale

Paper: Copic Marker X-Press It Blending Card, AC Cardstock – White, Recollections – Black cardstock, Signature Collection by Sara Davies – Winter Wonderland (6″x6″)

Die Cuts: Gina Marie Designs – Big and Little Pierced Chain Oval Layered Dies

Stickles: Diamond and Crystal

Miscellaneous: U-Line double-sided tape, Recollections – Snowflake Specialty Polyester Glitter, Gelly Roll Sakura #10 Pen

Image coloured with Copic Markers:

Skin: E21, E11, E04, E00, E000

Beard: W5, W4, W3, W1, W00

Clothing and Hat: R59, R37, R35

Boots and Glove: C9, C7, C5, C1

Sky: B02, B01, B00, B000

Snow and Snowballs: BV20, C00, Colorless Blender, Stickles Diamond

Outer Edge of the Oval: B99

Hope you like it and have a great week!

You can find more cards to inspire you at KLM Designs, KLM Digital Design Team and KLM Digital Designs on the Facebook Fan page from the rest of our design team.

Christmas Dragon


Come and check us out on Passionate Paper Creations & Friends FB group
as we are currently sponsoring Lee Holland ArtLee Holland Illustration Inspiration Facebook Group for the month of November.

Check out the Etsy store for more fantastic designs from Lee Holland Art. You can click on any of the links above or you can click here too:  https://www.etsy.com/ca/shop/leehollandart. There is a 50% off Black Friday sale going on. You should check it out!

Jump over to Passionate Paper Creations & Friends. Not a Member? Come Join! https://bit.ly/2VwG9iz.

If you are not a member just click join. We are a fun loving group with a lot of inspiration.

Lee Holland Art has been sponsoring us throughout the month of November at  Passionate Paper Creations & Friends FB group site!! Today, I’m featuring this adorable dragon image from Lee Holland Art called Reindeer Antlers Christmas Dragon. Thank you Lee Holland Art for sponsoring us and having such amazing fun designs to choose from. I love all of your little dragons.


For the base card, I used AC Cardstock – White and cut it and scored it to be 6″ x 6″. For the background, I cut Creative Memories – Mermaid Cove Designer Paper to the same size as the base card. The image using HP High Quality Grayscale was printed onto Copic Marker X-Press It Blending Card. Using my Cuttlebug and Essentials by Tattered Lace Dies – Easel Slider dies, the printed image and Hot Buy – Recollections Ombre Brights Paper were both die cut. The sentiment was stamped using my Misti, VersaMark Ink and sentiment stamps from Lawn Fawn – “Offset Sayings – Christmas” and Lawn Fawn “Winter Skies”. Ranger Super Fine Gold Embossing powder was applied to the stamped sentiments and then heat set with a Marvy Uchida – Embossing Heat Tool.

I cut the sentiment down to be 3-3/8″ x 1-2/8″ and then used W R Memory Keepers – Crop-A-Dile Corner Chomper to create .25″ corners. Using a Sharpie – Gold Medium Point – Water Based Paint pen, I went around all of the edges of the cuts with the exception of the image die cut. The image was coloured in with Copic markers and then I used a Gelly Roll Sakura #10 Pen to create the snow in the sky and a combination of Stickles – Crystal, Stickles – Waterfall and Cosmic Shimmer Fluffy Stuff which was applied prior to the Stickles being added.

The card was now ready to be assembled. I applied U-Line double-sided tape to the backs of the coloured image and cut frame to pop them up. I doubled up the tape for behind the sentiment. The base paper was applied directly to the card base using double-sided tape. I peeled off the tape from the backings of the elements and popped them all up onto the base card to finish it off.

Card Recipe:

Stamp: Reindeer Antlers Christmas Dragon – Lee Holland Art

Sentiments: Offset Sayings – Christmas – Lawn Fawn,  Winter Skies – Lawn Fawn

Inks: HP High Quality Grayscale, Versamark

Paper: Copic Marker X-Press It Blending Card, AC Cardstock – White, Creative Memories – Mermaid Cove Designer Paper Pack, Hammermill – Premium Colour 100 lb., Hot Buy – Recollections Ombre Brights Paper Pack (12″ x 12″)

Die Cuts: Essentials by Tattered Lace Dies – Easel Slider

Miscellaneous: U-Line double-sided tape, Sharpie – Gold Medium Point – Water Based Paint, Stickles – Crystal, Stickles – Waterfall, Gelly Roll Sakura #10 Pen, W R Memory Keepers – Crop-A-Dile Corner Chomper Cosmic Shimmer Fluffy Stuff, Marvy Uchida – Embossing Heat Tool

Image coloured with Copic Markers:

Dragon: BG72, BG57, BG32, BG11, BG09, BG05, BG02, BG01, V15, V12, V06. V000, G14, YG23, YG11, YG03, YG01

Box: E27, E25, E23

Ornaments: R59, R37, R35, E15, Y35, YR24, Y08, YG67, YG17, YG21, E35, E34, E33, E31

Sky: B05, B04, B02, B01, Gelly Roll Sakura #10 Pen

Snow: B60, C1, Stickles – Crystal, Stickles – Waterfall, Cosmic Shimmer Fluffy Stuff

Hope you like it and have a great week!

Wish You A Merry Christmas


Today, I’m featuring a Christmas card from Dreamerland Crafts new Christmas release called We Wish You A Merry Christmas – D20012. This card features a little kitten helping his friend celebrate the joy of Christmas giving.

To create this card, I first die-cut some Copic Marker X-Press It Blending Card using my Cuttlebug and Creative Expressions – Festive Frames – Snowball. I separated the 2 pieces of the die-cut and using my MISTI and Memento – Tuxedo Black, I stamped the image onto the paper and  coloured it in with Copic markers. I stamped the sentiment using VersaMark ink. The sentiment was then embossed with Ranger Embossing Powder White – Extra Fine Detail and Marvy Uchida – Embossing Heat Tool was used to heat set the embossing powder. Once this was done, I added all of the snowflakes in the sky using a Gelly Roll Sakura #10 Pen and also Gelly Roll Sakura #8 Pen. For the snow on the ground, I used a mixture of Nuvo Glitter Accents – Fresh Snowfall and Stickles – Crystal. This was then set aside for a few hours to dry.

For the frame, I used Cosmic Shimmer Opal Polish – Summer Sky. It was my first time using this polish and I just love how it turned out. Once the snow on the image was dry, I flipped the 2 die-cuts over and attached them back together using some clear tape on the back.

The card was now ready to assemble. For the card base I used The Paper Studio – Primary Base Colours 4.25″ x 5.5″. I added some double-sided tape and some glue to the backing of the finished frame and image and attached it directly to the card base.

Card Recipe:

Stamp and Sentiment:  We Wish You A Merry Christmas – D20012 (Dreamerland Crafts)

Inks: Memento – Tuxedo Black, VersaMark

Paper: Copic Marker X-Press It Blending Card, The Paper Studio – Primary Base Colours 4.25″ x 5.5″

Opal Polish: Cosmic Shimmer – Summer Sky

Glitter \ Snow: Nuvo Glitter Accents – Fresh Snowfall, Stickles – Crystal

Die Cuts: Creative Expressions – Festive Frames – Snowball – CED3146

Tools: MISTI – Most Incredible Stamping Tool, Marvy Uchida – Embossing Heat Tool, Gelly Roll Sakura #8 Pen, 3M VHB – 2 sided tape, Cuttlebug, Gelly Roll Sakura #10 Pen

Image coloured with Copic Markers:

Face: E21, E11, E04, E00, E000, R22, R20, Eyes – Sakura Glaze – Black, Gelly Roll Sakura #5 Pen

Hair: E15, Y38, Y21, YR23

Hat, Cape and Coat:  G29, YG17, YG05, YG03, BV20, C1, C0

Pants: B26, B23, B21

Boots: E53, E51, E50, E29, E27, E25, E23

Present: R14, R13, R11

Bow and Girl’s Scarf: R59, R39, R37, R35

Kitten and Scarf: N10, N8, N6, N4, N3, G29, YG17, YG05, YG03, R32, R20, Eyes – Sakura Glaze – Black, Gelly Roll Sakura #5 Pen

Present: Y17, Y15, Y08, Y04, Y17, Y15, Y13

Stars: Y17, Y15, Y13

Sky: B99, B97, B79, B69, B39, B37, B34, Gelly Roll Sakura #10 Pen, Gelly Roll Sakura #8 Pen

Hope you like it and have a great week!

You can find more cards to inspire you at Dreamerland Crafts and Pointer Scrapbooking on the Facebook Fan pages from the rest of our design team.