Tag Archive | Doodlebug – Milk and Cookies (6″x6″) paper pad

Lovin’ From My Oven!!


It’s Wednesday, and this week, I made a Christmas card using High Hopes Rubber Stamps Baking Ginger – S225 for the image and Lovin’ From My Oven – G198 for the sentiment as we are celebrating Christmas in July this month. I always remember my mom baking so many varieties of cookies and other sweets at Christmas time. We especially had fun helping her decorate all of the gingerbread cookies.

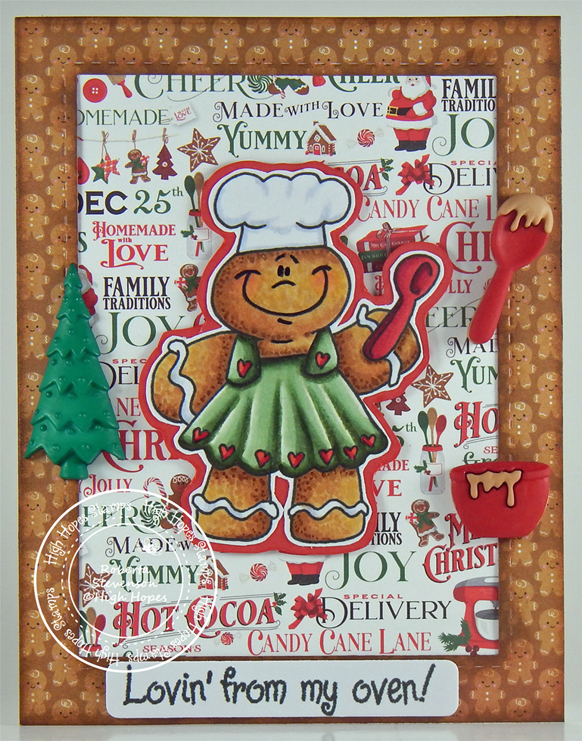
To make my card this week, I began with a card base of Hammermill – Premium Colour 100 lb. cardstock, cut and scored to be 5.5″ x 4.25″. Using my Cuttlebug, My Creative Time – Rectangle Frame Dies and My Creative Time – Rectangle Frame Layers, I die cut Doodlebug – Milk and Cookies for the Gingerbreads and Carta Bella – Christmas Cheer for the inside panel. Tim Holtz Distress Ink – Vintage Photo was used to go around the inside and outside edges of the gingerbread patterned background. I applied some washi tape to both fronts of the pieces and then turned them around and used double-sided tape to keep them together. I adhered the combined background to the base card and then removed the washi tape.

The image and sentiment were both stamped onto Copic Marker X-Press It Blending Card using my MISTI – Most Incredible Stamping Tool and Memento – Tuxedo Black ink. The image was coloured in with Copic Markers. I die cut the sentiment using my Cuttlebug and Poppystamps – Christmas Quotes. The image was fussy cut around with scissors and then I put it through my Xyron Creative Station so that it would lay flat when I adhered it to some red Scrapbook.com – Peppermint Smooth Cardstock. After adhering it, I once again fussy cut around the image leaving a fine border. Using R24 Copic Marker, I inked around all of the edges. I applied U-Line double-sided tape to the back of this piece and popped it up into the centre of the patterned rectangle. I also applied U-Line double-sided tape to the back of the sentiment and popped it up at the bottom of the card. Lastly, I cut the button holes off of 3 Dress It Up – Holiday Collection – Christmas Cookies and using liquid glue, adhered them to the card.

Card Recipe:

Stamp: Baking Ginger – S225 (High Hopes Rubber Stamps)

Sentiment: Lovin’ From My Oven – G198 (High Hopes Rubber Stamps)

Inks: Memento – Tuxedo Black, Tim Holtz Distress Ink – Vintage Photo

Paper: Copic Marker X-Press It Blending Card, Hammermill – Premium Colour 100 lb., Carta Bella – Christmas Cheer by Susan Duncan (6″x6″), Doodlebug – Milk and Cookies (6″x6″), Scrapbook.com – Peppermint Smooth Cardstock – 4.25″ x 5.5″

Die Cuts: My Creative Time – Rectangle Frame Dies, My Creative Time – Rectangle Frame Layers, Poppystamps – Christmas Quotes

Tools: MISTI – Most Incredible Stamping Tool, U-Line double-sided tape, Cuttlebug, Dress It Up – Holiday Collection – Christmas Cookies, Xyron Creative Station

Image coloured with Copic Markers:

Gingerbread: Y21, E57, E35, E33, E31, R22, R20, B60, BV20, Colorless Blender, Eyes (Sakura Glaze – Black)

Hat: B60, BV20, Colorless Blender

Apron: G99, YG67, YG63, YG61, R29, R24

Spoon: R59, R37, R35

Background: Y04, Y02, Y00

Hope you like it and have a fantastic week!

You can find lots of inspiration from the Design Team Divas at the High Hopes blog, and the High Hopes Rubber Stamps Facebook Fan page plus you can also follow us on
Instagram, Twitter and Pinterest.

Buddy’s Present


It’s Wednesday, and this week I’m sharing another Christmas card featuring Buddy’s Gift Block – R161 from (High Hopes Rubber Stamps) with the sentiment Sm. Christmas Script – F051 (High Hopes Rubber Stamps). Buddy and his little birdie friend are all set for Christmas with his gift all wrapped up for you? How soon do you start wrapping presents for Christmas?

To create the card this week, I stamped the main image and then coloured it in with Copic Markers. Once it was all coloured in, I fussy cut around it and used a black marker to go around all of the edges. I used some 2-sided tape and placed it onto some white cardstock. Then I used my cutter  to cut a thin border all around the image. I repeated this process with some red cardstock and edged around all of the sides with Tim Holtz Distress Ink – Barn Door. I added some Stickles – Sea Glass around the inside border, Stickles – Icicle for the hat and pom-pom and some Clear – Wink of Stella to the all of the baubles and set everything aside to dry.

For the sentiment, I cut the the stamp in half so that I could place it on 2 lines. To stamp the sentiment, I used my MISTI, Versa Fine – Onyx Black ink and Ranger – Clear Super Fine Detail embossing powder. The powder was heat set using Marvy Uchida – Embossing Heat Tool.

For the base card I started out with white cardstock folded in half to create a 5.5″ x 4.25″ card. Doodlebug – Milk and Cookies paper was used for the background. I fussy cut along the bottom following the flow of the words. Some red cardstock was glued from the back onto the background paper and then I followed the flow of the previous cut to create a thin border. I repeated this process with some green cardstock. Once all of the 3 layers were complete, I cut the piece to be approximately 5-1/8″ x 3.25″. Tim Holtz Distress Ink – Mowed Lawn was used to go around all of the edges.

To assemble the card, I glued the combined background layers onto the base card.  The main image and frame created earlier were added using 3M VHB – 2 sided tape to complete the card.

Card Recipe:

Stamp: Buddy’s Gift Block – R161 (High Hopes Rubber Stamps)

Sentiment: Sm. Christmas Script- F051 (High Hopes Rubber Stamps)

Inks: Memento – Tuxedo Black, Versa Fine – Onyx Black, Tim Holtz Distress Ink – Mowed Lawn, Tim Holtz Distress Ink – Barn Door

Paper: Copic Marker X-Press It Blending Card, Doodlebug – Milk and Cookies (6″x6″)

Stickles: Icicle, Sea Glass

Embossing Powder: Ranger – Clear Super Fine Detail

Tools and Miscellaneous: MISTI – Most Incredible Stamping Tool, Marvy Uchida – Embossing Heat Tool

Image coloured with Copic Markers:

Bear: E35, E34, E33, E31, E27, E25, E23, R22, R20, Sakura Glaze – Black, Gelly Roll Sakura #5 Pen

Present and Bow: B16, B05, B02, YG17, YG06, YG05, YG03, YG01

Baubles: B16, B05, B02, B00, G46, G29, G28, G24, R59, R39, R37, R35, Pental Sunburst Metalic Med Gel Pen, Atayou Spica – Gold 11, Clear – Wink of Stella

Cardinal: R27, R24, R08, Y17

Hat: R59, R39, R37, R35

Background: R81

Checkered Frame: G29, G28, G24

Hope you like it and have a fantastic week!

You can find lots of inspiration from the Design Team Divas at the High Hopes blog, and the High Hopes Rubber Stamps Facebook Fan page plus you can also follow us on
Instagram, Twitter and Pinterest.