Tag Archive | Pental Sunburst Metalic Med Gel Pen

Time to Celebrate!!


Today, I’m sharing a Christmas card using Dreamerland Crafts stamps called Let’s Celebrate – D19074 for the main image and Christmas Snow Scene – M18313 for the background. For the sentiment, I used Holiday Sentiments Set 001 – D163001


To make this card I used a base of 5.5″ x 4.25″ using Hammermill – Premium Colour 100 lb. cardstock. My Cuttlebug and My Creative Time – Rectangle Frame Layers Die were used to die-cut Copic Marker X-Press It Blending Cardstock. Using the background stamps, I stamped the background using my MISTI and Memento – Summer Sky ink. I coloured in the sky, trees and house with Copic markers and then added some snow using Gelly Roll Sakura #8 Pen. Once this was done, I added Gina K Designs – Glitz Glitter Gel – Iridescent to the remainder of the die cut for the sparkling snow. I added a little bit more where the boys feet would land and set it aside to dry. Once again, I used my MISTI and Memento – Tuxedo Black ink and stamped the main images. I coloured them in with Copic markers and then applied Ranger – Emboss It Pen Clear to the fur trims for the hats and clothing. I applied WOW! Sparkling Snow Embossing Glitter to the inked areas and then heat embossed everything with my Marvy Heat Embossing Tool. For the pompoms, I applied Cosmic Shimmer Fluffy Stuff and then heat embossed the liquid for it to puff up. For the present, I added some gold swirls using a Pental Sunburst Metalic Med Gel Pen. Then I fussy cut around the images leaving a thin white border. I stamped the sentiment using my MISTI and Lawn Fawn – Peacock Ink on to the base card. Then I stamped it again, this time using Versamark ink and then added Ranger – Clear Super Fine Detail embossing powder and heat embossed it.

The card was now ready to assemble. Using double-sided tape, I attached the background to the scalloped border. I added 3M double-sided tape to the back of the scalloped border and popped it up onto the base card. Using 3M double-sided tape, I popped up the main image and present onto the background. A little more of the Stickles – Diamond was added to snow where his feet are to complete the card.

Card Recipe:

Stamps: Let’s Celebrate – D19074 – Dreamerland Crafts, Christmas Snow Scene – M18313 – Dreamerland Crafts

Sentiment: Holiday Sentiments Set 001 – DS163001 – Dreamerland Crafts

Inks: Memento – Tuxedo Black, Versamark, Lawn Fawn – Peacock Ink, Memento – Summer Sky ink

Paper: Copic Marker X-Press It Blending Card, Hammermill – Premium Colour 100 lb., Hot Buy – Recollections – Jewel Tones

Die Cuts: My Creative Time – Rectangle Frame Layers, Gina Marie Designs – Nested Scalloped Stitched Rectangles

Stickles: Diamond

Embossing Powder: WOW! Sparkling Snow Embossing Glitter, Cosmic Shimmer Fluffy Stuff, Ranger – Clear Super Fine Detail embossing powder

Tools: MISTI – Most Incredible Stamping Tool, Cuttlebug,  Marvy Heat Embossing Tool, Sakura Glaze – Black, Gelly Roll Sakura #8 Pen, Gelly Roll Sakura #5 Pen, 3M VHB – 2 sided tape and Pental Sunburst Metalic Med Gel Pen

Image coloured with Copic Markers:

All Eyes and Small Noses:  Sakura Glaze – Black pen, Gelly Roll Sakura #5 Pen

Skin: E21, E11, E00, E000, R30, R22, R20

Hair: E47, E44, E43

Clothing and Hat: B37, B14, B12

Mitts: YG67, YG63, YG61

Boots: C8, C6, C4, C2, C1

Bear: E57, E55, E53, E51

Pig: E95, E93, R00, R000

Rabbit: C2, C1, C00, R30, R20

Present and Bow: BG09, BG05, BG02, BG01, E15, Y38, Y15, Y08

House: E40, E41, E30, E18, E15, Y04

Trees: G99, G21, YG67, YG17

Sky: B04, B02, B01, B00

Hope you like it and have a great week!

You can find more cards to inspire you at Dreamerland Crafts and Pointer Scrapbooking on the Facebook Fan pages from the rest of our design team.

Think Snow!!!


It’s Wednesday, and this week, I made a card using Snowman Stumble – TT014 by High Hopes Rubber Stamps for the main image and Think Snow 2 – FF047 (High Hopes Rubber Stamps) for the sentiment. I grew up skating at the outdoor rink directly across the street from my house. We couldn’t wait to get home from school and throw on our skates. The rinks were always full of children from the neighbourhood. We would either play rink games or hockey. I think there was a rink every couple of blocks. As soon as we’d finish eating, we were back on the ice again. Our parents were always yelling at us to come inside at the end of the day. How times have changed. LOL!

To make my card this week, I began with a card base made from Hammermill – Premium Colour 100 lb. cut and scored to be 5.5″ x 4.25″. My Cuttlebug and My Creative Time – Rectangle Frame Dies were used to die cut Hot Buy Craft Smart – Holiday Glitz Glitter Paper to be the same size as the base card. With a Picket Fence – Blending Brush and a mixture of Tim Holtz Distress Ink – Blueprint Sketch and Tim Holtz Distress Ink – Salty Ocean, I created the background sky. I applied this directly to the glitter background paper. Once this was done, I applied this directly to the base using double-sided tape. Next, Nellie’s Choice – Nature Scene Dies – NSD001 – Mountains were used to die cut the tree scenery using Momenta – Cardstock and using a small dauber I added in some darker touches of green using Tim Holtz Distress Inks – Peeled Paint. The pond was die cut using Whimsy Stamps – Wavy Nested Frame Dies Set and Copic Marker X-Press It Blending Card. I inked the image and sentiment using my MISTI and Memento – Tuxedo Black. Lastly, I die cut the sentiment using Joy Crafts – Labels and Tags and inked around the edges with my Picket Fence – Blending Brush and the ink that was still on it from doing the sky.

I coloured in the image with Copic markers and added in some highlights on the skate blades with Pental Sunburst Metalic Med Gel Pen. I inked the image a second time onto the Hot Buy Craft Smart – Holiday Glitz Glitter Paper for the snowman body and fussy cut around it. Once it was coloured in with Copics, I ran it through my Xyron Create a Sticker and attached it to the base stamped image.

The card was now ready to assemble. Part of the pond was cut off at the top before it was attached it to the sparkly background using glue and double-sided tape. Next, I added some 3M VHB – 2 sided tape to the back of the trees and applied it over top of where the sky ended and the pond met. To create the snow around the pond and in between the trees, pond and snow, I used Cosmic Shimmer Fluffy Stuff and added some DecoArt Glamour Dust while it was still wet. Marvy Uchida – Embossing Heat Tool was used to heat the liquid and make it puff up to look like fluffy snow. I added some Stickles – Diamond to the pompom. Using a Gelly Roll Sakura #10 Pen and Sharpie Water Based Paint – White – Extra Fine Point pen, I created the snow in the sky. Lastly, to finish off the card, I added 3M VHB – 2 sided tape to the sentiment and applied it to the card.

Card Recipe:

Stamp: Snowman Stumble – TT014 (High Hopes Rubber Stamps)

Sentiment: Think Snow 2 – FF047 (High Hopes Rubber Stamps)

Inks: Memento – Tuxedo Black, Tim Holtz Distress Ink – Blueprint Sketch, Tim Holtz Distress Ink – Salty Ocean, Tim Holtz Distress Inks – Peeled Paint

Paper: Copic Marker X-Press It Blending Card, Hammermill – Premium Colour 100 lb., Momenta – Cardstock, Hot Buy Craft Smart – Holiday Glitz Glitter Paper 12″ x 12″

Die Cuts: My Creative Time – Rectangle Frame Dies, Nellie’s Choice – Nature Scene Dies – NSD001 – Mountains, Whimsy Stamps – Wavy Nested Frame Dies Set (WSD382), Joy Crafts – Labels and Tags

Stickles: Diamond

Tools: MISTI – Most Incredible Stamping Tool, 3M VHB – 2 sided tape, Gelly Roll Sakura #10 Pen, Sharpie Water Based Paint – White – Extra Fine Point, DecoArt Glamour Dust, Cosmic Shimmer Fluffy Stuff, Marvy Uchida – Embossing Heat Tool, Cuttlebug, Picket Fence – Blending Brush, Pental Sunburst Metalic Med Gel Pen, Xyron Create a Sticker

Image coloured with Copic Markers:

Snowman: B60, R30, R20, YR21, YR16, YR15, Colorless Blender

Hat: BG72, BG57, BG32, BG11, Gelly Roll Sakura #10 Pen

Mitts and Skates: C3, C2, C1, C00, BG09, BG05, BG02, BG01

Ice: B00, B000, B000

Hope you like it and have a fantastic week!

You can find lots of inspiration from the Design Team Divas at the High Hopes blog, and the High Hopes Rubber Stamps Facebook Fan page plus you can also follow us on
Instagram, Twitter and Pinterest.

Sunshine and Seashells!!


Sharing a card I made today using KLM Digital Designs – Seascape Gnome from the May releases. This image also comes with 2 more sentiments, “Seas Every Opportunity” and “Be Shore of Yourself”! I don’t know about you, but I love walking along a beach to collect seashells. It’s always so much fun!

To make the card, I first imported the image into Microsoft Word and printed it out onto Copic Marker X-Press It Blending Card and a second copy onto regular copy paper using my HP Printer. Using my Brother Scan and Cut, I cut out the image from the copy paper. I used this as a mask to put over my main image. With the mask in place, I used Tim Holtz Distress Inks: Salty Ocean, Broken China and Tumbled Glass along with cloud stencils I had created using Avery Elle – Pierced Clouds Die (D-05-01) set.

Once this was completed, I removed the mask and began to colour in the water and sand. It was now time to colour my gnome. I unfortunately colured the first layer for the bottom of the beard blue, thinking it was part of the robe he was wearing. Uggggh! I didn’t want to start over, so I just finished colouring the mustache with my Copic markers and then tried to see if I could use the same colours to colour over the blue. It  didn’t quite work out a 100%, so I decided to use my PrismaColor Pencils to colour over top of the Copic markers. This seemed to fix it. I moved on to finish the rest of image.

After I was satisfied with the colouring of the image, I trimmed it down to 5.25″ x 4″. I applied double-sided tape to the back of the image and adhered it to a card base of 5.5″ x 4.25″ to complete my card.

Card Recipe:

Stamp: Seascape Gnome – KLM Digital Designs

Inks: HP Printer Grayscale, Tim Holtz Distress Inks: Salty Ocean, Broken China and Tumbled Glass

Paper: Copic Marker X-Press It Blending Card, Hot Buy – Cards and Envelopes (5.5″ x 4.25″)

Die Cut Stencils: Avery Elle – Pierced Clouds Die (D-05-01)

Image coloured with Copic Markers:

Skin: E21, E11, E00, E000

Beard: E49, E47, E44, E43, E40, PrismaColor Pencils – Gingeroot (PC1084), Dark Brown (PC946), Sandbar Brown (PC1094), Cream (PC914)

Clothing: B16, B04, B02, B01

Hat: B16, B04, B02, B01, BG53, BG49, BG45, BG02, BG01, BG000, Smooch – Pool

Sand: E37, E35, E33, E31

Water: BG70, B93, B91, B52, B41, B02, B01, B000, BG11, BG10

Starfish: YR31, YR09, YR04

Conch: YR31, YR21, YR20, R00, R000

Seashell: YR02, YR01, YR00, YR000

Pail: BG53, BG49, BG45, Pental Sunburst Metalic Med Gel Pen

Lettering: Atyou Spica – Lemon (05)

Hope you like it and have a great week!

You can find more cards to inspire you at KLM Designs, KLM Digital Design Team and KLM Digital Designs on the Facebook Fan page from the rest of our design team.

Thank Ewe!!


Hi Everyone! On December 11, 2020, I went in to have Laparoscopic Hysterectomy Surgery. The surgery went really well with no complications and I was home on the same day. I had a lot of rest over the past month, recovering, sleeping long hours and sleeping peacefully knowing that I no longer had to worry. I started back to work remotely last week. It was a long awaited surgery and I was extremely happy to have been lucky enough to have it during these Covid times, as many surgery’s were being cancelled. I had been dealing with Pre-Cancer off and on for the past 12 years beginning in my late 40’s, having multiple smaller operations and taking medication. My aunt had died in her 50’s because she didn’t seek help from a doctor until it was too late and my mother was also diagnosed with Uterine Cancer in her early 50’s as well. Thankfully, my mom was just in the early stages and had the operation in time and has had no issues since. It’s amazing how far technology and science have come. Not long ago, you would have spent a minimum of 2 weeks in the hospital and then another 5 – 6 weeks to recover at home.

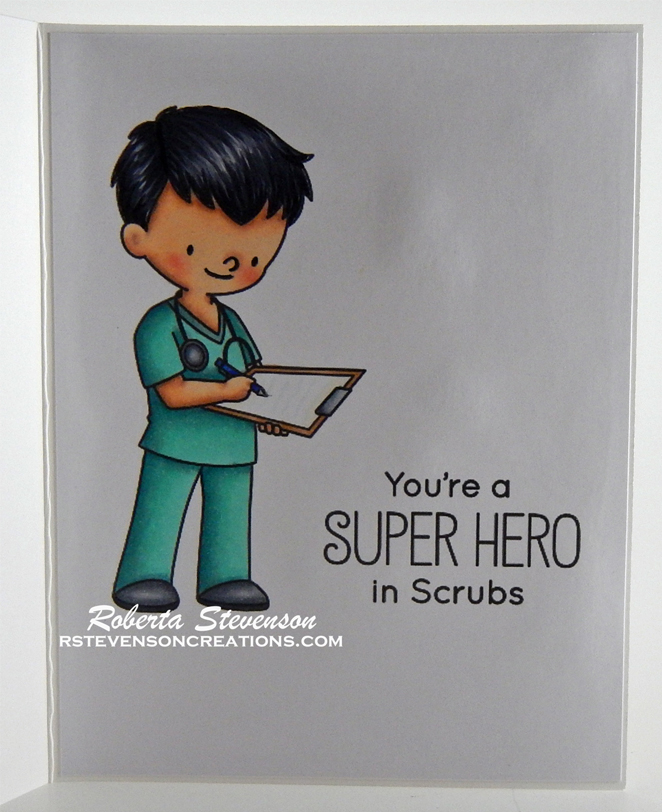
As a thank you to the surgeons and nurses that took such good care of me before, during and after my surgery, I made them all cards to express my thanks. I thought I would share them with you and hope you like them too.

All of the cards used Hammermill 5.5″ x 4.25″ for the base. For the front of my cards, I made them all the same using Wooly Lambs (Craftin Desert Divas) retired stamp for the sentiment and main image. I coloured it in with Copic markers and then stamped the image again onto Post-It note to used as a mask. I layered the mask over top of the lamb and used my cloud stencil that I made from Avery Elle – PiercedCloudsDie and Tim Holtz Distress Ink – Salty Ocean to create the clouds. The embossed front was made using Cuttlebug – Thank You Embossing Folder.

To make the inside of the nurses card, I used Proud Nurse Set – 4899 (Art Impressions) for the main image and top sentiment and Craftin Desert Divas – Tissue Time for the bottom sentiment. I coloured in the image with Copic markers.

For the inside of the cards for the surgeons, I printed out the stamps from MFT_BB090_SuperHeroinScrubs_Printable (My Favourite Things) and MFT_BB091_DoctorsOrders_Printable (My Favourite Things) for the images and sentiments using High Quality Grayscale. Then coloured them in with Copic Markers.


Card Recipe:

Stamps: Wooly Lambs (Craftin Desert Divas), Proud Nurse Set – 4899 (Art Impressions), MFT_BB091_DoctorsOrders_Printable (My Favourite Things), MFT_BB090_SuperHeroinScrubs_Printable (My Favourite Things)

Sentiments: Proud Nurse Set – 4899 (Art Impressions), Wooly Lambs (Craftin Desert Divas), Craftin Desert Divas – Tissue Time, MFT_BB090_SuperHeroinScrubs_Printable (My Favourite Things)

Inks: HP Printer Grayscale, Tim Holtz Distress Ink – Salty Ocean, Versa Fine – Onyx Black

Paper: Copic Marker X-Press It Blending Card, Hammermill – Premium Colour 100 lb.

Die Cut: Avery Elle – Custom Steel Dies – Made in the USA – D-05-01 PiercedCloudsDie, My Creative Time – Rectangle Frame Die Layers – MCT-D274, MFT_BB091_DoctorsOrders_Printable (My Favourite Things)

Embossing Folder: Cuttlebug – Thank You

Tools: 3M VHB – 2 sided tape, Ranger – Clear Super Fine Detail embossing powder, Marvy Uchida – Embossing Heat Tool

Image coloured with Copic Markers:

Lamb: B60, C5, C3, C1, B05, B04, B00, T7, T5, T3, R22, R20, Colorless Blender, Gelly Roll Sakura #10 Pen

Bell: YR24, YR23, Y15, Y11

Bow: R89, R85, R83, R81

Fence: E25, E23, E21, Pental Sunburst Metalic Med Gel Pen

Greenery: YG17, YG13, YG03, YG01

Flowers: V04, BV01, Y17, Y15, Y13, B02

Skin: E000, E00, E04, E11, E22, R22, R20

Hair: E18, E08, YR18, YR14, E47, E44, E43

Hat and Outfits: B29, B26, B24, B23, BG49, BG15, BG13, BG11

Shoes: B41, B21, B14, B12

Table and Chairs: E42, E41, E40, C5, C3, C1

Coffee Mugs and Coffee: B06, B05, B04, B02, E25, E23, E21

Stethescopes: R39, R37, R24, 100 – Black, C3, C1

Shadow: T3, T2, T1

Doctors:

Hair: E49, E47, E44, E43, 100, C7, C5

Scrubs: BG72, BG57, BG32, BG11

Coat: B60, C1, C00, Colorless Blender

Stethascope and Shoes: T5, C7, C5, C3, C1

Pen: B28, B26, Pental Sunburst Metalic Med Gel Pen

Clipboard: C5, C3, C1, E34, E33, YR30, B0000, Colorless Blender

Hope you like it and have a great week!

Buddy’s Present


It’s Wednesday, and this week I’m sharing another Christmas card featuring Buddy’s Gift Block – R161 from (High Hopes Rubber Stamps) with the sentiment Sm. Christmas Script – F051 (High Hopes Rubber Stamps). Buddy and his little birdie friend are all set for Christmas with his gift all wrapped up for you? How soon do you start wrapping presents for Christmas?

To create the card this week, I stamped the main image and then coloured it in with Copic Markers. Once it was all coloured in, I fussy cut around it and used a black marker to go around all of the edges. I used some 2-sided tape and placed it onto some white cardstock. Then I used my cutter  to cut a thin border all around the image. I repeated this process with some red cardstock and edged around all of the sides with Tim Holtz Distress Ink – Barn Door. I added some Stickles – Sea Glass around the inside border, Stickles – Icicle for the hat and pom-pom and some Clear – Wink of Stella to the all of the baubles and set everything aside to dry.

For the sentiment, I cut the the stamp in half so that I could place it on 2 lines. To stamp the sentiment, I used my MISTI, Versa Fine – Onyx Black ink and Ranger – Clear Super Fine Detail embossing powder. The powder was heat set using Marvy Uchida – Embossing Heat Tool.

For the base card I started out with white cardstock folded in half to create a 5.5″ x 4.25″ card. Doodlebug – Milk and Cookies paper was used for the background. I fussy cut along the bottom following the flow of the words. Some red cardstock was glued from the back onto the background paper and then I followed the flow of the previous cut to create a thin border. I repeated this process with some green cardstock. Once all of the 3 layers were complete, I cut the piece to be approximately 5-1/8″ x 3.25″. Tim Holtz Distress Ink – Mowed Lawn was used to go around all of the edges.

To assemble the card, I glued the combined background layers onto the base card.  The main image and frame created earlier were added using 3M VHB – 2 sided tape to complete the card.

Card Recipe:

Stamp: Buddy’s Gift Block – R161 (High Hopes Rubber Stamps)

Sentiment: Sm. Christmas Script- F051 (High Hopes Rubber Stamps)

Inks: Memento – Tuxedo Black, Versa Fine – Onyx Black, Tim Holtz Distress Ink – Mowed Lawn, Tim Holtz Distress Ink – Barn Door

Paper: Copic Marker X-Press It Blending Card, Doodlebug – Milk and Cookies (6″x6″)

Stickles: Icicle, Sea Glass

Embossing Powder: Ranger – Clear Super Fine Detail

Tools and Miscellaneous: MISTI – Most Incredible Stamping Tool, Marvy Uchida – Embossing Heat Tool

Image coloured with Copic Markers:

Bear: E35, E34, E33, E31, E27, E25, E23, R22, R20, Sakura Glaze – Black, Gelly Roll Sakura #5 Pen

Present and Bow: B16, B05, B02, YG17, YG06, YG05, YG03, YG01

Baubles: B16, B05, B02, B00, G46, G29, G28, G24, R59, R39, R37, R35, Pental Sunburst Metalic Med Gel Pen, Atayou Spica – Gold 11, Clear – Wink of Stella

Cardinal: R27, R24, R08, Y17

Hat: R59, R39, R37, R35

Background: R81

Checkered Frame: G29, G28, G24

Hope you like it and have a fantastic week!

You can find lots of inspiration from the Design Team Divas at the High Hopes blog, and the High Hopes Rubber Stamps Facebook Fan page plus you can also follow us on
Instagram, Twitter and Pinterest.

Dear Santa!


Hi Everyone! I’m participating in the 2020 Cat Lovers Blog Hop (#2020CatLoversHop) this year.

This is my third year joining the fun event. For six years, Her Peaceful Garden has been sponsoring The Cat Lover’s Blog Hop and it is a lot of fun.

Here is a third Christmas card that I have created for the hop using Christmas Kitten – GSD617 (Gerda Steiner Designs) for the main image and sentiment. These little kittens are getting into all kinds of trouble. It reminds me so much of when I had my little fur babies. LOL!

To make my card, I started with a base of 5.5″ x 4.25″. I cut some Copic Marker X-Press It Blending Card the same size and stamped on the fun images. Copic markers were used to colour the images in. Once this was done, I stamped the sentiments using Versa Fine – Onyx Black and applied Ranger – Clear Super Fine Detail embossing powder which I heat set with Marvy Uchida – Embossing Heat Tool.  I adhered the completed image to the base using double-sided tape. To finish off the card, I used some Clear – Wink of Stella to add a little bit of sparkle to all of the baubles and Stickles – Diamond for the hats.

THANK YOU so much to Her Peaceful Garden for hosting this event again this year and also a big THANK YOU to Gerda Steiner Designs for being a sponsor this year as well.

Card Recipe:

Stamp and Sentiment:  Christmas Kitten – GSD617 (Gerda Steiner Designs)

Inks: Memento – Tuxedo Black, Versa Fine – Onyx Black, Tim Holtz Distress Inks – Peeled Paint, Tim Holtz Distress Ink – Pine Needles

Paper: Copic Marker X-Press It Blending Card

Embossing Powder: Ranger – Clear Super Fine Detail embossing powder

Tools: MISTI – Most Incredible Stamping Tool, Diamond Stickles, Marvy Uchida – Embossing Heat Tool

Images coloured with Copic Markers:

Kittens: N8, N6, N4, R30, R22, R02, YG09, YG07, YG03, Sakura Glaze – Black for nose and eyes

Hats: BG49, BG18, BG09, BG07, BG05, BG02, R59, R39, R37, R35, C01, C0, Stickles – Diamond

Bobbles: B18, B06, B05, B04, R59, R39, R37, R35, Pental Sunburst Metalic Med Gel Pen, Clear – Wink of Stella

Pine Needles: G09, G07, G05, Tim Holtz Distress Inks – Peeled Paint, Tim Holtz Distress Ink – Pine Needles

Floor and Shadows: E49, E18, E15, E13, E11, C3

Hope you like it and have a fantastic week!

Meowy Christmas!


Hi Everyone! I’m participating in the 2020 Cat Lovers Blog Hop (#2020CatLoversHop) this year.

This is my third year joining the fun event. For six years, Her Peaceful Garden has been sponsoring The Cat Lover’s Blog Hop and it is a lot of fun.


Here is a second Christmas card that I have created for the hop using Deck The Halls – GSD438 (Gerda Steiner Designs) for the main image and sentiment. I have always had black cats, so that is why I mainly colour all cat images in shades of black. LOL!

To make my card, I started with a base of 5.5″ x 4.25″. I cut some Copic Marker X-Press It Blending Card the same sized and stamped on the main image. Copic markers were used to colour the image in. Then I used some Clear – Wink of Stella to add a little bit of sparkle to both of the baubles. For the background, I started with Copic colours BG01 and BG000. Then I blended in Tim Holtz Distress Inks with a sponge dauber working from the inside to the outside. Once this was done, I stamped the sentiment using Versa Fine – Onyx Black and applied Ranger – Clear Super Fine Detail embossing powder which I heat set with Marvy Uchida – Embossing Heat Tool.

The frame was die cut using my Cuttlebug, Crafter’s Companion Luxury Cardstock – Red cardstock and die cut called Hero Arts – Fancy Dies – Christmas Lights Border Fancy. I added some liquid glue onto the back and placed it on top of my finished image. To complete the card, I attached the main image to the base card.

Card Recipe:

Stamp and Sentiment:  Deck The Halls – GSD438 (Gerda Steiner Designs)

Inks: Memento – Tuxedo Black, Versa Fine – Onyx Black, Tim Holtz Distress Inks – Tumbled Glass, Tim Holtz Distress Inks – Broken China, Tim Holtz Distress Ink – Salty Ocean

Paper: Copic Marker X-Press It Blending Card, Crafter’s Companion Luxury Cardstock – Red – 8.5 x 11″

Die Cuts: Hero Arts – Fancy Dies – Christmas Lights Border Fancy – DI786

Embossing Powder: Ranger – Clear Super Fine Detail embossing powder

Tools: MISTI – Most Incredible Stamping Tool, Cuttlebug, 3M VHB – 2 sided tape, Diamond Stickles, Marvy Uchida – Embossing Heat Tool

Images coloured with Copic Markers:

Kitten: N8, N6, N4, R30, R22, Sakura Glaze – Black for nose and eyes

Lights: B69, B16, B12, BG01, Y35, Y15, Y11, Y08, R37, R35, R30, R22, YG09, YG05, YG01, G09, 100, Colorless Blender

Bobbles: BG09, BG07, BG05, R59, R39, R37, R35, Pental Sunburst Metalic Med Gel Pen, Clear – Wink of Stella

Background: BG01, BG000, Tim Holtz Distress Inks – Tumbled Glass, Tim Holtz Distress Inks – Broken China, Tim Holtz Distress Ink – Salty Ocean

Hope you like it and have a fantastic week!

Friends Together


Welcome Back Dreamerland Craft Fans!

Today, I’m sharing an inspirational card that I made using Mix and Match Clear Stamps – DCS 19096 to create the little scenes and also for the sentiment. I wanted to show a variety of scenes that you could make with this cute set and so for the first time for me ever, I created this little flip card.

Panel 1 – Bears hugging in the rain.

Panel 2: The rain has stopped and there is a beautiful rainbow for the little couple.

Panel 3 – The sun has come out and is now beaming.

Panel 4: I just love this adorable sentiment and it finishes off the little story of the 2 little bears hugging each other through all of the different types of weather.

Here is the flip card in action.


To make this card I used a base card of 4.25″ x 5.5″. DCWV – Pocket Blossom was cut to the same size and using double-sided tape was attached to the base card. Then, Tim Holtz Distress Ink – Salty Ocean was used to ink around all of the edges. I die cut X-Press It Blending Card using my Cuttlebug and dies from Lawn Fawn – Flippin’ Awesome. I used the largest square of the die set in order to have more room to create the scenes. The larger square was die cut using Recollection – White paper using My Creative Time – Rectangle Frame Dies. The die-cut for the mechanism of the Flip Card was also from Lawn Fawn – Flippin’ Awesome. So easy to use. I love this die set.

I created a mask of the bears so that I could add in the different elements on each panel. All of the images were coloured in with Copic Markers. For the rain, Memento – Bahama Blue ink was used. For the sunbeams, Kraftin’ Kimmie – Summer Sunshine, Kraftin’ Kimmie – Yummy Yellow and Kraftin’ Kimmie – Starburst Stencil were used.

Versa Fine – Onyx Black ink was used to stamp the sentiment and then Ranger – Clear Super Fine Detail embossing powder was applied. Marvy Uchida – Embossing Heat Tool was used to heat up the embossing powder.

Once all of the panels were completed, I die cut the sparkly blue paper using Lawn Fawn – Flippin’ Awesome – Add-On dies. The flipping mechanism was then attached to the sparkling blue paper. This was then attached directly to the base of the card.

Card Recipe:

Stamps and Sentiments:  Mix and Match Clear Stamps – DCS 19096 (Dreamerland Crafts)

Inks: Memento – Tuxedo Black, Versa Fine – Onyx Black, Kraftin’ Kimmie – Summer Sunshine, Kraftin’ Kimmie – Yummy Yellow, Memento – Bahama Blue, Tim Holtz Distress Ink – Salty Ocean

Paper: Copic Marker X-Press It Blending Card, DCWV – Pocket Blossom –  12″X12″ (30.5cmx30.5cm), Craft Thick Glitter Paper – 02-3022270

Die Cuts: My Creative Time – Rectangle Frame Dies, Lawn Fawn – Flippin’ Awesome, Lawn Fawn – Flippin’ Awesome – Add-On

Stencil: Kraftin’ Kimmie – Starburst Stencil

Tools: MISTI – Most Incredible Stamping Tool, Cuttlebug, Marvy Uchida – Embossing Heat Tool

Image coloured with Copic Markers:

Bears: E55, E53, E51, E35, E34, E33, E31, E29, E27, E25, E23, R20, R02, R00

Sky:  B01, B00, B000, B000

Hearts and Umbrella: R39, R37, R24, Pental Sunburst Metalic Med Gel Pen

Rainbow: V17, V15, V20, YR18, YR16, YR15, Y15, Y08, Y04

Clouds: B60, C0, Colorless Blender

Flowers: Y38, Y35, E15

Hope you like it and have a great week!

You can find more cards to inspire you at Dreamerland Crafts and Pointer Scrapbooking on the Facebook Fan pages from the rest of our design team.

Raccoon Gift


Welcome High Hopes Rubber Stamps Fans!

It’s Wednesday, and this month at High Hopes Rubber Stamps we are celebrating Christmas starting off with a brand new release. YAY!!!  This week, I used Raccoon Gift (RLF003)Snowglobe (ULF002)Evergreen Tree 1 (HLF001), Evergreen Tree 2 (HLF002) and Sm. Christmas Script (F051) for the sentiment.

I also used the Snow Globe class taught by Alyce from Kit and Clowder for inspiration for colouring the snow globe.

Card Recipe:

High Hopes Rubber Stamps: Raccoon Gift (RLF003), Snowglobe (ULF002), Evergreen Tree 1 (HLF001), Evergreen Tree 2 (HLF002)

Sentiment: Sm. Christmas Script (F051) (High Hopes Rubber Stamps)

Inks: Memento – Tuxedo Black, Versamark

Paper: Copic Marker X-Press It Blending Card, Recollections – Cards and Envelopes – “Frost”

Die Cuts: Sizzix Tim Holtz Alterations Snowflakes

Embossing Powder: Ranger Embossing Powder White – Extra Fine Detail

Tools: MISTI – Most Incredible Stamping Tool, Cuttlebug

Image coloured with Copic Markers:

Globe Base: E49, E47, E45, E43, E41

Glass: B91, BG10, B00, B000, Colorless Blender

Snow: BG000, B60, Colorless Blender, Gelly Roll Sakura #10 Pen, Gelly Roll Sakura #8 Pen, Spectrum Noir – Sparkles – Crystal Clear

Trees: G99, YG67, YG17, G21, E55, E57, E59

Raccoon: C10, C8, C5, C3, C1, C0, W7, W5, W3, W1, W0, R30, R01, Colorless Blender

Scarf: BG18, BG15, BG13

Gift: R59, R37, R35, Pental Sunburst Metalic Med Gel Pen

Ribbon: E15, YR24, Y35, Y18

Hope you like it and have a fantastic week!

You can find lots of inspiration from the Design Team Divas at the High Hopes blog, and the High Hopes Rubber Stamps Facebook Fan page plus you can also follow us on
Instagram, Twitter and Pinterest.