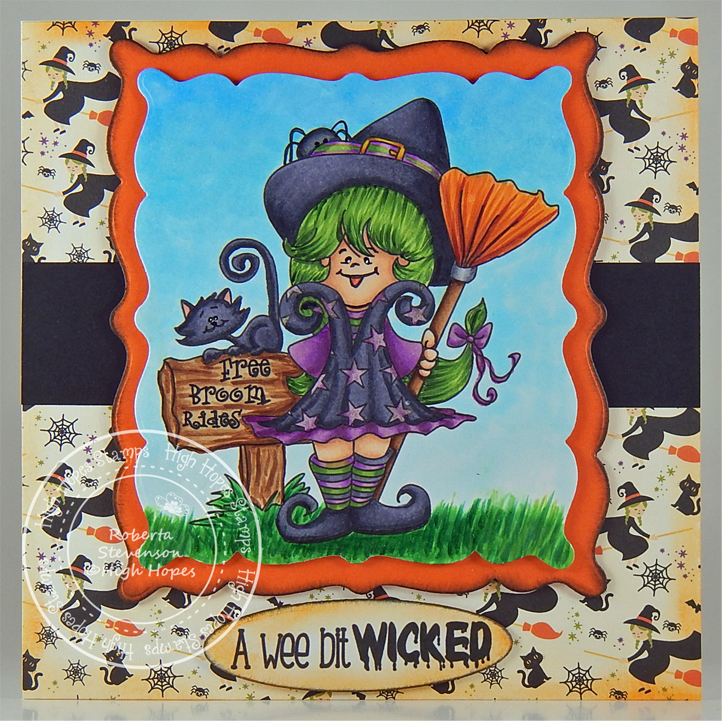
It’s Wednesday, and this week, I made a Hallowe’en card using High Hopes Rubber Stamps Kitty In Training – TT052 for the image and Happy Halloween Script – F232 for the sentiment. Hallowe’en is one of our favourite times of year and my husband likes to go all out decorating our front yard. I always have fun finding new animated toys to add to our decorations and love seeing the little trick or treaters faces light up when they come to our house.

To make my card this week, I began with a card base of Hammermill – Premium Colour 100 lb., cut and scored to be 5.5″ x 4.25″. I die cut the background paper from Pebbles – Boo! cardstock to be the same size and attached it to the base using double-sided tape. Using My Creative Time – Rectangle Frame Layers and my Anna Griffin Empress Mini Machine, I die cut Scrapbook.com – Brights Smooth Cardstock for the larger frame. Using the same machine, I die cut Copic Marker X-Press It Blending Card cardstock using My Creative Time – Rectangle Frame Dies. The thin stripes were die cut using Scrapbook.com – Rainbow Smooth Cardstock and PinkFresh Studio – Slim Stripes dies. Lastly, I cut a black strip using Recollections – Black cardstock to the size of 4.25″ x 1-3/8″.
I stamped the main image onto the Copic Marker X-Press It Blending Card die cut using my MISTI and Memento – Tuxedo Black ink and coloured it in. The sentiment was stamped onto a scrap piece of orange paper cardstock using my MISTI and Memento – Tuxedo Black and then it was die cut using my cutting machine and Gina K Designs – Sentiment Strips.
The card was now ready to assemble. I ran the thin strips through my Xyron Create a Sticker and adhered them to the black strip leaving small spaces in between them to be the same as the witch’s socks. I ran this whole piece through my Xyron Create a Sticker again so that it would lay completely flat when I adhered it to the base card. I added U-Line double-sided tape to the backs of the rectangles and sentiment and popped up all of the layers onto the card. Tim Holtz Distress Ink – Black Soot was used to ink around all of the edges of the card and Stickles – Diamond was added to the small dots at the top of the card above the stripe lines. Gelly Roll Sparkle Pen was added to the sky to create some sparkly stars.
Card Recipe:
Stamps: Kitty In Training – TT052 (High Hopes Rubber Stamps)
Sentiment: Happy Halloween Script – F232 (High Hopes Rubber Stamps)
Inks: Memento – Tuxedo Black, Tim Holtz Distress Ink – Black Soot
Paper: Copic Marker X-Press It Blending Card, Hammermill – Premium Colour 100 lb., Pebbles – Boo! (6×6 in / 15.2×15.2 cm), Scrapbook.com – Brights Smooth Cardstock (4.25″ x 5.5″), Scrapbook.com – Rainbow Smooth Cardstock (4.25″ x 5.5″), Recollections – Black cardstock
Die Cuts: My Creative Time – Rectangle Frame Layers, My Creative Time – Rectangle Frame Dies, Gina K Designs – Sentiment Strips, PinkFresh Studio – Slim Stripes
Tools: MISTI – Most Incredible Stamping Tool, U-Line double-sided tape, Anna Griffin Empress Mini Machine, Xyron Create a Sticker, Stickles – Diamond, Gelly Roll Sparkle Pen
Image coloured with Copic Markers:
Blacks: N10, N9, N7, N6, N5, N4, N3
Skin: E21, E11, E04, E00, E000, R30, R20
Hair and Stripes on Socks and Hat: G19, G14, RV66, RV55, RV53, Y19, B63, Y38, Y18
Pumpkins: E07, YR18, YR16, YR15, YR12, YR08
Tree Stump: E79, E27, E25, E23, E21
Broomstick: E35, E34, E33, C5, C3, C00, Y35, Y32, Y19, YR31
Leaves and Grass: G99, G94, G21, YG97, YG17, YG63
Sky: BV29, BV25, BV23. BV20, Gelly Roll Sparkle Pen
Hope you like it and have a fantastic week!
Check out more adorable images in the new “Spring Fever Release” at High Hopes Rubber Stamps!
You can find lots of inspiration from the Design Team Divas at the High Hopes blog, and the High Hopes Rubber Stamps Facebook Fan page plus you can also follow us on
Instagram, Twitter and Pinterest.