Tag Archive | Gelly Roll Stardust – Clear

Christmas Kitty Fun!!!


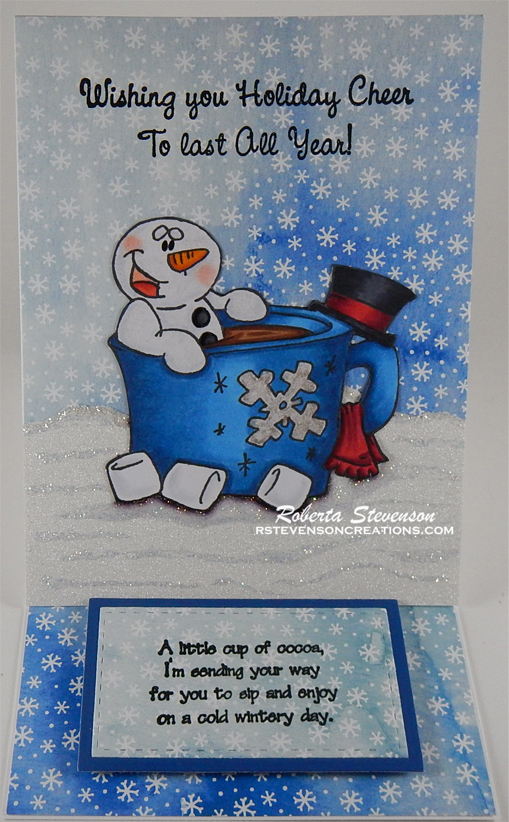
It’s Wednesday, and this week, I made a Christmas card using High Hopes Rubber Stamps Christmas Kitty Fun – S107 for the main image and Merry Christpaws – FLL006 for the sentiment. Our cats could never resist playing with our Christmas wrapping paper and playing in the boxes. I can’t even begin to count how many cardboard boxes they demolished over the years! LOL! Wishing you and all of your pets a very safe and joyous Merry Christmas and A Happy New Year!

To make my card this week, I began with a card base of 6″ x 6″ using AC Cardstock – White. I thought this patterned paper from Craft Smart – Hot Buy called Happy Pawlidays went perfect with this image and sentiment.

The image was stamped using my MISTI and Memento – Tuxedo Black ink onto Copic Marker X-Press It Blending Card cardstock and Lawn Fawn – Let It Shine Snowflakes patterned paper. I coloured in the image and then fussy cut around it. With a black marker, I inked around the outside of the image.  I ran the patterned paper through my Xyron Creative Station to make it like a sticker and then fussy cut around the gift paper and paper pieced it onto the coloured image. The entire image was then adhered to the card using liquid glue. I removed the backing from the remainder of the gift portions and applied them directly to the card base as well. A few extra white and sparkly dots were added onto the patterned gift paper using a Gelly Roll Sakura #8 Pen and Gelly Roll Stardust – Clear pen. Stickles – Diamond was applied to the hat, pompom, snowflakes and dots on the background patterned paper to add some extra sparkle.

Using my MISTI and VersaMark ink, I stamped the sentiment onto a scrap piece of red cardstock. Ranger Embossing Powder White – Extra Fine Detail was applied over top of the ink and then heat set with a Marvy Uchida – Embossing Heat Tool. This was die cut using my Cuttlebug and Pink & Main – Large Sentiment Strip Dies. The sentiment was popped up onto the top of the card using U-Line double-sided tape. Lastly, I glued on some embellishment buttons after removing the backings from Dress It Up – Holiday Collection – Itty Bitty Snowflakes and Dress It Up – Holiday Collection – Glitter Holly. Tim Holtz Distress Ink – Barn Door was inked around the outside edges of the card with a sponge dauber to finish it off.

Card Recipe:

Stamp: Christmas Kitty Fun – S107 (High Hopes Rubber Stamps)

Sentiment: Merry Christpaws – FLL006 (High Hopes Rubber Stamps)

Inks: Memento – Tuxedo Black, Tim Holtz Distress Ink – Barn Door, VersaMark

Paper: Copic Marker X-Press It Blending Card, Hammermill – Premium Colour 100 lb., Lawn Fawn – Let It Shine Snowflakes (6″ x 6″), Craft Smart – Hot Buy – Happy Pawlidays (12″ x 12″)

Die Cut: Pink & Main – Large Sentiment Strip Dies (PNM327)

Embossing Powder: Ranger Embossing Powder White – Extra Fine Detail

Tools and Embellishments: MISTI – Most Incredible Stamping Tool, U-Line double-sided tape, Xyron Creative Station, Dress It Up – Holiday Collection – Itty Bitty Snowflakes, Dress It Up – Holiday Collection – Glitter Holly, Marvy Uchida – Embossing Heat Tool, Gelly Roll Sakura #8 Pen, Gelly Roll Stardust – Clear, Sakura Glaze – Black, Stickles – Diamond, Cuttlebug

Image coloured with Copic Markers:

Kitty 1: E97, E95, E13, YR14, YR12, R02, R01, (Eyes and Nose – Sakura Glaze – Black)

Kitty 2: C8, C6, C4, C2, R02, R01, (Eyes and Nose – Sakura Glaze – Black)

Santa Hat: R59, R37, R35, BV23, BV20, Colorless Blender

Ribbon: R59, R37, R35, R20

Box: E35, E34, E33, E31

Paper Wrapping: YG07, YG03, Colorless Blender

Shadow: C1

Hope you like it and have a fantastic week!

You can find lots of inspiration from the Design Team Divas at the High Hopes blog, and the High Hopes Rubber Stamps Facebook Fan page plus you can also follow us on
Instagram, Twitter and Pinterest.

Wish Upon A Star!!


Today, I’m sharing a card using Dreamerland Crafts stamps called Being With Each Other – D17011.  This boy and his little kitty are enjoying the moment and wishing upon a star!

To make this card I used a base of 5.5″ x 4.25″ using Hammermill – Premium Colour 100 lb. I stamped the image using my MISTI and Memento – Tuxedo Black ink onto Copic Marker X-Press It Blending Card which was cut to the size of 5-1/8″ x 3-7/8″. I coloured in the image with Copic Markers and added some stars in the sky using Gelly Roll Sakura #5 Pen, Gelly Roll Sakura #8 Pen and Gelly Roll Stardust – Clear pen.  I adhered the completed image to the base card using double-sided tape.

Card Recipe:

Stamp: Being With Each Other – D17011 – Dreamerland Crafts

Inks: Memento – Tuxedo Black

Paper: Copic Marker X-Press It Blending Card, Hammermill – Premium Colour 100 lb.

Tools: MISTI – Most Incredible Stamping Tool, Gelly Roll Sakura #5 Pen, Gelly Roll Sakura #8 Pen and Gelly Roll Stardust – Clear

Image coloured with Copic Markers:

Skin: E21, E11, E00, E000, R30, R22, R20,

Hair: E47, E44, E43, E41, Sakura Glaze – Black – Eyes

Sweater: BG72, BG57, BG32, BG11, BG09, BG05, BG02, BG01, R46, R14, R08

Jeans: B26, B23, B21

Boots: E27, E25, E23, E21

Kitten: T7, T5, T3, R02

Grass: G99, YG67, YG17, G21

Night Sky and Moon: B99, B97, B95, B60, C7, C2, C1, C0, C00, BV23, BV20, Y000

Hope you like it and have a great week!

You can find more cards to inspire you at Dreamerland Crafts and Pointer Scrapbooking on the Facebook Fan pages from the rest of our design team.

Believe!!!


It’s Wednesday, and this week, I made a Christmas card using Believe Snowman – TFL006 and Snow Globe – ULF002 by High Hopes Rubber Stamps for the main image and North Pole Greetings – GLL005 (High Hopes Rubber Stamps) for the sentiment. It’s time to start believing the magic of Christmas and the joy that it brings to everyone!

To make my card this week, I began with a card base using AC Cardstock – White cut and folded to 6″ x 6″. The snowflake background is from Lawn Fawn – Let It Shine Snowflakes (6″ x 6″) paper pad. I applied this directly to the base using double-sided tape.

Using Lifestyle Crafts Cutting Dies – Nesting Circles and my Cuttlebug, I die cut a 3.75″ circle from Copic Marker X-Press It Blending Card paper. With my MISTI and Memento – Tuxedo Black ink, I stamped the snowman scene image onto it. I coloured in the image with Copic markers and then added some snow to the sky and snowman’s arms using a Gelly Roll Sakura #8 Pen. Sakura Glaze – Black was added to the eyes of the snowman and birds and the snowman’s mouth. With a Ranger – Emboss It Pen Clear, I added some ink to the top of the Snowman’s hat, sign, icicles, tops of the birdhouses and snow drifts and then heat embossed everything with WOW! Sparkling Snow Embossing Glitter and a Marvy Uchida – Embossing Heat Tool. Stickles – Diamond was added as an extra layer to the snow and Wink of Stella – Clear was applied over all the snowman. This was then set aside to dry.

With my MISTI and Memento – Summer Sky ink I stamped the top part of the globe onto Copic Marker X-Press It Blending Card paper. I cleaned off the stamp and this time, I used some Post-it Notes to hide the background inside the globe and inked the braided border for both the top and bottom of the base with Versamark ink. I applied Ranger Super Fine Detail Gold Embossing powder and heat embossed it using a Marvy Uchida – Embossing Heat Tool. With my globe image still in place on my MISTI, I removed the snowglobe stamp and added the sentiment turning up both ends of the stamp slightly to give the words some curvature. The sentiment was stamped using Versamark ink and then Ranger Super Fine Detail Gold Embossing powder was applied to it and then heat embossed using a Marvy Uchida – Embossing Heat Tool. The base was then coloured in using my Copic markers and a Gelly Roll Stardust – Clear pen was used to colour in the white areas to give it some glitter. I also added some of this pen to the tops of the snowman’s arms. With my scissors, I fussy cut around the entire snow globe.

The card was now ready to assemble. I attached 3M double-side tape to pop up the snow globe onto the main background and then added 3M double-sided tape to the back of the circle and centred it on the top part of the globe. Lastly, to finish off the card, I applied some Nuvo Crystal Drops – Caribbean Ocean, Violet Galaxy and Nuvo Glitter Drops – Sherbert Shimmer to some of the snowflakes on the base card.

Card Recipe:

Stamp: Believe Snowman – TFL006 (High Hopes Rubber Stamps), Snow Globe – ULF002 (High Hopes Rubber Stamps)

Sentiment: North Pole Greetings – GL005 (High Hopes Rubber Stamps)

Inks: Memento – Tuxedo Black, Memento – Summer Sky ink, Versamark

Paper: Copic Marker X-Press It Blending Card, AC Cardstock – White, Lawn Fawn – Let It Shine Snowflakes (6″ x 6″)

Die Cut: Lifestyle Crafts Cutting Dies – Nesting Circles

Stickles: Diamond

Nuvo: Crystal Drops – Caribbean Ocean, Violet Galaxy and Glitter Drops – Sherbert Shimmer

Embossing Powder:Ranger Super Fine Detail Gold Embossing powder, WOW! Sparkling Snow Embossing Glitter

Tools: MISTI – Most Incredible Stamping Tool, Marvy Uchida – Embossing Heat Tool, Cuttlebug, Gelly Roll Sakura #8 Pen, Ranger – Emboss It Pen Clear, Sakura Glaze – Black pen, Gelly Roll Stardust – Clear pen

Image coloured with Copic Markers:

Snowman: B60, C1, C00, Colorless Blender

Hat and Buttons: C10, C8, C6, C4

Arms and Sign: E27, E25, E23, E21

Scarves, Patches, Hat Band: RV66, RV63, RV55, BG09, BG07, BG02, BG01

Bird Houses: RV66, RV63, RV55, BG09, BG07, BG02, BG01, E27, E25, E23, E21

Birds: R46, R14, R08

Sky: B99, B97, B95, B93, B91

Snow: B60, C1, C00, B0000, BG0000, Colorless Blender

Snow Globe: R46, R14, R08

Hope you like it and have a fantastic week!

You can find lots of inspiration from the Design Team Divas at the High Hopes blog, and the High Hopes Rubber Stamps Facebook Fan page plus you can also follow us on
Instagram, Twitter and Pinterest.

Santa’s New Ride!!!


It’s Wednesday, and this week, I made a Christmas card using Flyin’ High Santa – T093 by High Hopes Rubber Stamps for the main image and Here Comes Santa Claus – G272 (High Hopes Rubber Stamps) for the sentiment. Santa’s giving his reindeer a rest this year as he checks out his new ride. LOL!

To make my card this week, I began with a card base of Hammermill – Premium Colour 100 lb. cardstock, cut and scored to be 5.5″ x 4.25″. I cut the background paper from Creative Memories – Glacier Paper Pack to be the same size and applied this directly to the base card using double-sided tape. I took a small scrap of Recollections – Black cardstock and ran it through my Xyron Create a Sticker so that it would become a sticker. With my Cuttlebug and Joy Crafts – Lin & Len Design 1201/0027, I die cut the silhouette out of the black paper and then peeled off the backing and placed it directly to the bottom of the card. Stampendous – Snowflakes – Chunky White was sprinkled over top of the card and melted from the bottom of the card using my Marvy Uchida – Embossing Heat Tool.

With my MISTI and Memento – Tuxedo Black ink, I stamped both the image and the sentiment onto Copic Marker X-Press It Blending Card. I cut the sentiment in half using my cutter and ran it through the Xyron Create a Sticker. I placed the sticker on top of some Recollections – Black cardstock and cut it again using my small cutting tool. I coloured in the image with Copic markers and then I fussy cut around it. With a Gelly Roll Sakura #8 Pen, I coloured in the candy cane swirls on the airplane and small circles. Once it was dry, I used Gelly Roll Stardust – Clear to go over the big yellow gumdrop, the swirls on the propeller, the candy cane swirls, small circles on the plane and the star on the tree to add some glitter. For Santa’s cuffs, coat trim and hat, I used Ranger – Emboss It Pen Clear and sprinkled on some WOW! Sparkling Snow Embossing Glitter. I heated this with my Marvy Uchida – Embossing Heat Tool and then repeated the process to give it more texture. For Santa’s pop pom, I applied a little bit of Cosmic Shimmer Fluffy Stuff and then heat embossed it with my Marvy Uchida – Embossing Heat Tool.

The Santa image and sentiment were both popped up onto the background using 3M double-sided tape to complete the card.

Card Recipe:

Stamp: Flyin’ High Santa – T093 (High Hopes Rubber Stamps)

Sentiment: Here Comes Santa Claus – G272 (High Hopes Rubber Stamps)

Inks: Memento – Tuxedo Black

Paper: Copic Marker X-Press It Blending Card, Hammermill – Premium Colour 100 lb., Creative Memories – Glacier Paper Pack (12″ x 12″), Recollections – Black cardstock

Die Cut: Joy Crafts – Lin & Len Design 1201/0027

Embossing Powder: WOW! Sparkling Snow Embossing Glitter, Stampendous – Snowflakes – Chunky White

Tools: MISTI – Most Incredible Stamping Tool, 3M – 2 sided tape, Gelly Roll Stardust – Clear, Xyron Create a Sticker, Cosmic Shimmer Fluffy Stuff, Cuttlebug, Marvy Uchida – Embossing Heat Tool, Gelly Roll Sakura #8 Pen, Sakura Glaze – Black Pen, Gelly Roll Sakura #5 Pen, Ranger – Emboss It Pen Clear

Image coloured with Copic Markers:

Eyes: Sakura Glaze – Black Pen, Gelly Roll Sakura #5 Pen

Skin: E21, E11, E00, E000, R30, R20

Beard: C1, C0, C00, Colorless Blender

Santa Hat, Clothing, Mitts: R59, R37, R35, YG67, YG63, YG61, WOW! Sparkling Snow Embossing Glitter, Cosmic Shimmer Fluffy Stuff

Airplane: R29, R27, R22, R17, G14, YG23, YG01, BG0000, C5, C3, C2, C1, C0, C00, Colorless Blender, Gelly Roll Stardust – Clear

Star and Present Bow: Y17, Y13, Y04, BG07, BG05, BG02, BG01, Gelly Roll Stardust – Clear

Christmas Tree, Propeller and Leaves: G14, YG23, YG01, Y17, Y13, Y04, Gelly Roll Stardust – Clear

Hope you like it and have a fantastic week!

You can find lots of inspiration from the Design Team Divas at the High Hopes blog, and the High Hopes Rubber Stamps Facebook Fan page plus you can also follow us on
Instagram, Twitter and Pinterest.

All Dressed Up!!


Sharing a card I made today using this adorable witch from All Dressed Up Digital Designs – Magical Day. This adorable little witch is all ready for Hallowe’en!

To make the card, I first imported the image and sentiment into Microsoft Word and printed them out onto Copic Marker X-Press It Blending Card. The image was coloured in with Copic markers and die cut with Hero Arts – Infinity Die Ovals.

For the base card, I used Hammermill – Premium Colour 100 lb. and cut it and scored it to be 5.5″ x 4.25″. On the left side, I used the following: Echo Park – I Love Halloween – Cut to the size of 5.5″ x 1.5″ and then I applied double-sided tape to the back and attached the spider Decorative Ribbon (07-3018478). Then, I used, double-sided tape and attached it directly to the base. I cut paper from the same paper pack to be 5.5″ x 2″ and inked around the edges with Tim Holtz Distress Ink – Carved Pumpkin. I applied this to the right side of the card using double-sided tape. For the centre, I cut orange cardstock to the size of 5.5″ x 1″ and Craft Consortium – Happy Haunting paper, cut to the size of 5.5″ x .75″. I inked all of the edges with Tim Holtz Distress Ink – Carved Pumpkin and then layered them using double-sided tape over top of the other 2 prints. I popped up the image over top of the background and added some Kraftin’ Kimmie Dots – Summer Dots and Kraftin’ Kimmie Dots – Polar Dots to finish off the card.

Card Recipe:

Stamp and sentiment: Magical Day – All Dressed Up Digital Stamps

Inks: HP Printer Grayscale, Tim Holtz Distress Ink – Carved Pumpkin

Paper: Copic Marker X-Press It Blending Card, Hammermill – Premium Colour 100 lb., Craft Consortium – Happy Haunting (6″ x 6″), Echo Park – I Love Halloween (6″ x 6″), Orange – Cardstock

Die Cuts: Hero Arts – Infinity Die Ovals

Embossing Powder: Ranger – Holographic

Miscellaneous: Ranger Emboss It Pen – Clear, Decorative Ribbon (07-3018478), Pop-Up Tape, Kraftin’ Kimmie Dots – Summer Dots, Kraftin’ Kimmie Dots – Polar Dots

Image coloured with Copic Markers:

Skin: E21, E11, E00, E000

Hair: V25, V17, V09, V04, BV08

Hat, Cat and Shoes: C8, C6, C4

Bows: YR68, YR31, YR18, Y38

Dress and Leggings: V17, V09, V04, YR68, YR18, Y38, G14, YG23, YG13, C8, C6, C4

Wings: YG0000, V000, YR000, Ranger – Holographic Embossing Powder, Ranger Emboss It Pen – Clear

Pumpkin: E08, YR16, YR14, YR12, C8, C6

Stars: V09, Atyou Spica – Lavender (01), Gelly Roll Stardust – Clear

Shadow: C2, C1, C0

Hope you like it and have a great week!

If you are a member of Passionate Paper Creations & Friends FB group
you can go to the top of the page and get a shopping discount.
If you are not a member just click join. We are a fun loving group with a lot of inspiration.

Free Broom Rides!!!


It’s Wednesday, and this week, I made a card using Free Broom Rides – TT017 by High Hopes Rubber Stamps for the main image and Wicked – FF052 (High Hopes Rubber Stamps) for the sentiment. Wouldn’t you love to go on a magical broom for a ride? I know I would.

To make my card this week, I began with a card base made from Hammermill – Premium Colour 100 lb. cut and scored to be 5.5″ x 5.5″. I cut the background paper from Echo Park – I Love Halloween paper pad to be the same size as the base and inked around the edges and onto the paper using Tim Holtz Distress Ink – Carved Pumpkin and a Picket Fence – Blending Brush. I applied this directly to the base card using double-sided tape. Using my Cuttlebug and Essentials by Tattered Lace Dies – Easel Slider dies, I die cut Copic Marker X-Press It Blending Card and orange cardstock. Using black cardstock I cut another piece to the size of 5.5″ x 1.25″. I applied this to the base using double-sided tape. I inked around the orange die cut with a Picket Fence – Blending Brush and Tim Holtz Distress Ink – Black Soot. I applied 3M VHB – 2 sided tape to the back of the orange die cut and applied it to the base.

The image and sentiment were then stamped using my MISTI and Memento – Tuxedo Black ink. I coloured in the image with Copic markers. The sentiment was die cut with my Cuttlebug and Whimsy – Quick Strips Die Set dies. I inked around the edges and on top by first using Tim Holtz Distress Ink – Carved Pumpkin with a Picket Fence – Blending Brush and then around the edges again, this time using Tim Holtz Distress Ink – Black Soot. To finish off the card, I applied 3M VHB – 2 sided tape to the back of the image and sentiment and popped them both up.

Card Recipe:

Stamp: Free Broom Rides – TT017 (High Hopes Rubber Stamps)

Sentiment: Wicked – FF052 (High Hopes Rubber Stamps)

Inks: Memento – Tuxedo Black, Tim Holtz Distress Ink – Black Soot, Tim Holtz Distress Ink – Carved Pumpkin

Paper: Copic Marker X-Press It Blending Card, Hammermill – Premium Colour 100 lb., Echo Park – I Love Halloween (6″x6″), Orange cardstock, Black Cardstock

Die Cuts:  Essentials by Tattered Lace Dies – Easel Slider, Whimsy – Quick Strips Die Set

Tools: MISTI – Most Incredible Stamping Tool, 3M VHB – 2 sided tape, Sakura Glaze – Black, Pen Gelly Roll Sakura #5 Pen, Gelly Roll Stardust – Clear, Picket Fence – Blending Brush

Image coloured with Copic Markers:

Skin: E21, E11, E00, E000, R30, R24, R20 (Eyes: Sakura Glaze – Black, Pen Gelly Roll Sakura #5 Pen)

Hair: YG67, YG23, YG17

Dress: BV29, BV25, BV23, V06, V04, V01, Gelly Roll Stardust – Clear

Socks: BV25, BV23, V04, V01, YG23, YG17

Boots, Cat and Hat: BV29, BV25, BV23, R30, R20, V04, V01, YG17, YG13, E15, YR24, Y08 (Eyes: Sakura Glaze – Black, Pen Gelly Roll Sakura #5 Pen)

Sign Post, Pole and Broom Handle: E37, E35, E34, E31

Broom: E08, YR18, YR15, YR12, YR02, E97, C5, C3, C1

Spider: C7, C5, C3 (Eyes: Sakura Glaze – Black)

Grass: G17, G14, G07

Sky: B02, B01, B00, B000, B000

Hope you like it and have a fantastic week!

You can find lots of inspiration from the Design Team Divas at the High Hopes blog, and the High Hopes Rubber Stamps Facebook Fan page plus you can also follow us on
Instagram, Twitter and Pinterest.

Sending You Tidings


Today, I’m featuring a Christmas card by Dreamerland Crafts using their stamp set called Sending You Tidings – D19072. Growing up in the North, we used to get a lot of snow. I always love looking out the window and seeing the snow fall and how beautiful it looks on the houses and trees. Driving in it, not so much, but everything else about winter, I love. LOL!

To make this card, I cut some Copic Marker X-Press It Blending Card to the size of 4.75″ x 3.5″ using my Cuttlebug and My Creative Time – Rectangle Frame Layers Dies. Then using my MISTI and Memento – Tuxedo Black, I stamped the image first onto the paper and then again on to Post-It Note to create a mask. I fussy cut around the mask and placed it to the side to use a little later. I then proceeded to colour in my image with Copic markers.

Once the colouring of the image was complete, I was ready to create the sky. To accomplish this, the mask that I had set aside earlier was placed over top of the coloured image. A mixture of Tim Holtz Distress Inks were then used: Black Soot, Chipped Sapphire, Blueprint Sketch and Dusty Concord inks. Once, the background was completed, I stamped the sentiment from the same stamp set using my MISTI and VersaMark ink. The sentiment was then embossed with Ranger Embossing Powder White – Extra Fine Detail and Marvy Uchida – Embossing Heat Tool was used to heat set the embossing powder.

I was now ready to add the final finishing touches. To do this, I added in the snowflakes and stars using Gelly Roll Sakura #10, #8 and #5 Pens. Stickles – Cool Mint was added to the little lady’s hat, pom-pom and coat cuffs. Gina K Designs – Glitz Glitter Gel was applied with a spatula along the bottom of the card to create some sparkling snow and also to the top of the chimney with a Q-Tip. I also coloured in the little snowflake in the sky with Gelly Roll Sakura #10 pen and then Gelly Roll Stardust – Clear to make it sparkle. I set the card aside to let the glitter dry for a few hours.

For the card base I used Recollections – Winter 4.25″ x 5.5 and edged around all of the sides with Tim Holtz Distress Ink – Iced Spruce. I die cut Hot Buy Craft Smart – Holiday Glitz Glitter Paper to the size 3.75″ x 5″ using My Creative Time – Rectangle Frame Dies and Cuttlebug. This was adhered directly onto the base using 3M VHB – 2 sided tape. Once the glitter was completely dry, I layered the completed image on top of the second layer using 3M VHB – 2 sided tape.

Card Recipe:

Stamp and Sentiment:  Sending You Tidings – D19072 (Dreamerland Crafts)

Inks: Memento – Tuxedo Black, VersaMark, Tim Holtz Distress Ink – Black Soot, Tim Holtz Distress Ink – Chipped Sapphire, Tim Holtz Distress Ink – Blueprint Sketch, Tim Holtz Distress Inks – Dusty Concord, Tim Holtz Distress Ink – Iced Spruce

Paper: Copic Marker X-Press It Blending Card, Hammermill – Premium Colour 100 lb., Hot Buy Craft Smart – Holiday Glitz Glitter Paper 12″ x 12″, Recollections – Winter 4.25″ x 5.5″ (Assorted Box of Cards)

Embossing Powder: Ranger Embossing Powder White – Extra Fine Detail

Die Cuts: My Creative Time – Rectangle Frame Die Layers – MCT-D274, My Creative Time – Rectangle Frame Dies

Tools: MISTI – Most Incredible Stamping Tool, Marvy Uchida – Embossing Heat Tool, Stickles – Cool Mint, Gelly Roll Sakura #8 Pen, 3M VHB – 2 sided tape, Cuttlebug

Image coloured with Copic Markers:

Face: E21, E11, E04, E00, E000, R22, R20, Eyes – Sakura Glaze – Black

Hair: E47, E44, E43

Hat, Jacket, Mitts, Bear’s Scarf:  BG49, BG15, BG13, BG11, Stickles – Cool Mint

Leggings: C7, C5

Boots: E27, E25, E23, E21

Bear: E35, E34, E33, E31, E30, R22, R20, Eyes and Noses – Sakura Glaze – Black

Bow and Girl’s Scarf: R59, R39, R37, R35

Present: Y17, Y15, Y08, Y04

Chimney: E99, E97, E08, E07, E13, C4, C2

Snow: Gina K Designs – Glitz Glitter Gel, Gelly Roll Sakura #8 Pen, Gelly Roll Sakura #5 Pen

Hope you like it and have a great week!

You can find more cards to inspire you at Dreamerland Crafts and Pointer Scrapbooking on the Facebook Fan pages from the rest of our design team.

Little Cup of Cocoa


Coffee Loving Cardmakers is currently hosting the 2020 Fall / Winter Coffee Lovers Blog Hop! For my Fourth entry into this hop, I chose this loveable snowman in a hot tub of Cocoa called Snow Yummy – S182  by High Hopes Rubber Stamps. For the sentiments I used High Hopes Rubber Stamps, Cup of Cocoa – M009 and Holiday All Year – H200.

The image was stamped with Memento – Tuxedo Black ink onto Copic Marker X-Press It Blending Card using my MISTI to give me a nice clean image. The image was coloured with copic markers and then I fussy cut around it. I used a black marker to go around all of the edges where I had cut out the image.

I cut Hammermill – Premium Colour 100 lb. paper to be 4.25″ x 11″. Then I scored the paper at 5.5″ and again at 8.25″. (2.75″ from the original score line). I cut another piece of the cardstock at 4.25″ x 5.5″ to be the front panel. I then cut Stampin’ Up – Snowflake Splendor Designer Series Paper to be 4.25″ x 5″ and used double-side tape to place it directly to the front panel piece. Hot Buy Craft Smart – Holiday Glitz Glitter Paper was used to create the snow. I cut it 4.25″ wide and then just tore a piece across the width to create the shape. I used double-sided tape to adhere this directly to the bottom of the front panel.

The sentiments were then added with Versa Fine – Onyx Black and embossed with Ranger – Clear Super Fine Detail embossing powder. This was then heat set with Marvy Uchida – Embossing Heat Tool. To create the rectangles, I used  My Creative Time – Rectangle Frame Layers  for the patterned paper and My Creative Time – Rectangle Frame Dies for the background rectangle using Hot Buy – Recollections – Jewel Tones. Next, I ran the small sentiment and the coloured image through my Xyron Creative Station to create stickers out of them. This made it easer to adhere the larger image to the background and the smaller sentiment to the larger rectangle.

The card was now ready to assemble. I applied double-sided tape to only the lower half of the scored card and then placed the finished scene panel onto it. I cut another piece of patterned paper at 4-1/8″ x 3″ and adhered it the lower half of the inside card. Then I popped up the sentiment using 3M VHB – 2 sided tape. I added some Wink of Stella – Clear  to the snowman to make him sparkle and Gelly Roll Stardust – Clear and the Wink of Stella – Clear to the large snowflake on the mug. Lastly, I added some Stickles – Diamond to add some texture to the snow.

Card Recipe:

Stamp: Snow Yummy – S182 (High Hopes Rubber Stamps)

Sentiments: Cup of Cocoa – M009 (High Hopes Rubber Stamps)Holiday All Year – H200 (High Hopes Rubber Stamps)

Inks: Memento – Tuxedo Black, Versa Fine – Onyx Black

Embossing Powder: Ranger – Clear Super Fine Detail embossing powder

Paper: Copic Marker X-Press It Blending Card, Hammermill – Premium Colour 100 lb., Stampin’ Up – Snowflake Splendor Designer Series Paper, Hot Buy Craft Smart – Holiday Glitz Glitter Paper 12″ x 12″

Die Cuts: My Creative Time – Rectangle Frame Layers, My Creative Time – Rectangle Frame Dies

Tools: MISTI – Most Incredible Stamping Tool, Cuttlebug, 3M VHB – 2 sided tape, Xyron Creative Station, Wink of Stella – Clear, Stickles – Diamond

Image coloured with Copic Markers:

Snowman: B60, BG000, YR18, YR14, Y08, C9, N8, N5, R30, R27, R24, R22, R20, Colorless Blender, Wink of Stella – Clear

Mug and Hot Cocoa: E23, E25, E27, B37, B14, B12, Wink of Stella – Clear and Gelly Roll Stardust – Clear

Hat and Scarf: C9, C7, C5, R59, R39, R37, R35

Hope you like it and have a great week!

Wishing You The Best


Today, I’m featuring a Christmas card by Dreamerland Crafts using their stamp set called Wishing You and Your Family – D19069. I decided to make the scene a snowy night, because when we were little, we used to go at dusk to pick up out our new tree. It was always so much fun!


To make this card, I cut some Copic Marker X-Press It Blending Card to the size of 5.5″ x 4.25″. Then using my MISTI and Memento – Tuxedo Black, I stamped the image first onto the paper and then again on to Post-It Note to create a mask. I fussy cut around the mask and placed it over top of the main image. To create my background I used Tim Holtz Distress Ink – Black Soot, Chipped Sapphire, Blueprint Sketch and Dusty Concord inks. Once they were all blended and I was satisfied with the look, I spritzed some water on top and then placed some paper towel over top to pick up some of the droplets.

I removed the mask and proceeded to colour in the main image with Copic markers. I stamped the sentiment from the same stamp set using my MISTI and VersaMark ink. The sentiment was then embossed with Ranger Embossing Powder White – Extra Fine Detail and Marvy Uchida – Embossing Heat Tool was used to heat set the embossing powder.

I was now ready to add the final finishing touches. To do this, I added in the snowflakes and stars using Gelly Roll Sakura #8 Pen and Stickles – Cool Mint to the little lady’s hat and scarf. Gina K Designs – Glitz Glitter Gel was applied with a spatula along the bottom of the card to create some sparkling snow. I set the card aside to let the glitter dry for a few hours.

Once everything was dry, I attached it to a white base card of 5.5″ x 4.25″ using Hammermill – Premium Colour 100 lb. paper with double-sided tape.

Card Recipe:

Stamp and Sentiment:  Wishing You and Your Family – D19069 (Dreamerland Crafts)

Inks: Memento – Tuxedo Black, VersaMark, Tim Holtz Distress Ink – Black Soot, Tim Holtz Distress Ink – Chipped Sapphire, Tim Holtz Distress Ink – Blueprint Sketch, Tim Holtz Distress Inks – Dusty Concord

Paper: Copic Marker X-Press It Blending Card, Hammermill – Premium Colour 100 lb.

Embossing Powder:  Ranger Embossing Powder White – Extra Fine Detail

Tools: MISTI – Most Incredible Stamping Tool, Marvy Uchida – Embossing Heat Tool, Stickles – Cool Mint, Gelly Roll Sakura #8 Pen

Image coloured with Copic Markers:

Face: E21, E11, E04, E00, E000, Eyes – Sakura Glaze – Black, Gelly Roll Sakura #5 Pen

Hair: E47, E44, E43

Jacket, Scarf and Mitts:  BG49, BG18, BG15, Stickles – Cool Mint

Car and Wheels: C10, C6, C8, C3, C1, C0, C00, R59, R39, R37, R35, R17, R14

Bears: E35, E34, E33, E31, E29, E27, E25, E23, Eyes and Noses – Sakura Glaze – Black, Gelly Roll Sakura #5 Pen

Bear’s Hat: R39, R37, R35, Gelly Roll Stardust – Clear

Tree and Star: G99, YG67, YG17, G21, W15, YR24, Y35, Y08

Background Inside Car: B66

Snow: Gina K Designs – Glitz Glitter Gel, Gelly Roll Sakura #8 Pen

Hope you like it and have a great week!

You can find more cards to inspire you at Dreamerland Crafts and Pointer Scrapbooking on the Facebook Fan pages from the rest of our design team.

Musical Penguin Parade


Hi There! Today I’d like to share a Christmas Card I made using Top Hat Penguin – RLF005 (High Hopes Rubber Stamps), Trumpet Penguin – RLF006 (High Hopes Rubber Stamps) and Flute Penguin – RLF002 (High Hopes Rubber Stamps). Musical Wishes – GLL014 (High Hopes Rubber Stamps) was chosen for the sentiment. I just love these adorable penguins and couldn’t resist putting them all together to create a musical penguin parade. LOL!

To make my card this week, I used Recollections – White cardstock for the base card which is 7.25″ x 7″. I scored the paper at 3.5″ to create the dimensions of 7.25″ x 3.5″. The red background was cut to the same size using Crafter’s Companion Luxury Cardstock – Red. The musical notes layer was cut from Craftsmart – Classic Village at 7″ x 3.25″. The snowy background was die cut to the same size in length using Recollections – Christmas Inkjet Printable Glitter Paper. I used My Creative Time – Tall Frame Dies, My Creative Time – Tall Frame Layers in order to achieve this. Once the snowy background paper was die cut, I tore along it in order to create the illusion of white snow drifts along the top of the snow. I adhered all of the layers with double-sided tape. Using my large Misti, I stamped the sentiment using Versa Fine – Onyx Black and embossed it with Ranger – Clear Super Fine Detail embossing powder. Marvy Uchida – Embossing Heat Tool was used to heat set the embossing powder.

I stamped all of the images onto Copic Marker X-Press It Blending Card using my Misti and Memento – Tuxedo Black ink. The images were then all coloured in with Copic markers and die cut using my Brother Scan and Cut machine. Then I ran all of the images through my Xyron Creative Station to make them all stickers. I placed them on the card and then used Stickles – Diamond to create some snow drifts. Clear – Wink of Stella was added to the Candy Cane to make it sparkle and also to all of the leaves and holly on the hats.

To complete the card, I edged all around the scene with Stickles – Sea Glass.

Card Recipe:

Stamp:  Top Hat Penguin – RLF005 (High Hopes Rubber Stamps), Trumpet Penguin – RLF006 (High Hopes Rubber Stamps), Flute Penguin – RLF002 (High Hopes Rubber Stamps)

Sentiment Background: Musical Wishes – GLL014 (High Hopes Rubber Stamps)

Inks: Memento – Tuxedo Black, Versa Fine – Onyx Black

Paper: Copic Marker X-Press It Blending Card, Recollections – Christmas Inkjet Printable Glitter Paper – 8.5 x 11″, Hot Buy Craftsmart – Classic Village – 12″ x 12″ paper, Crafter’s Companion Luxury Cardstock – Red – 8.5 x 11″

Die Cuts: My Creative Time – Tall Frame Dies, My Creative Time – Tall Frame Layers

Embossing Powder: Ranger – Clear Super Fine Detail embossing powder

Tools: MISTI – Most Incredible Stamping Tool, Cuttlebug,  Xyron Creative Station, Stickles – Sea Glass, Stickles – Diamond, Clear – Wink of Stella, Marvy Uchida – Embossing Heat Tool

Images coloured with Copic Markers:

Penguin Bodies: W9, W7, W5, W3, E15, Y17, YR16, YR15, E43, E42, E41, E40, R11, RV00, Colorless Blender, White Prismacolor Premier Pencil

Top Hats: C9, C8, C6, C3

Scarfs and Hat Bands: BG78, BG75, BG09, BG07, BG02

Vest and Mouse: R59, R39, R37, R24, C3, C1

Horn and Flute: E97, E23, Y17, Y15, Y11

Holly and Leaves: YG97, YG95, YG01, G21, R39, R24

Bird: Y19, Y15, Y11, YR15

Candy Cane: R37, R35, C1, C0, Colorless Blender, Clear – Wink of Stella

Hope you like it and have a fantastic week!

You can find lots of inspiration from the Design Team Divas at the High Hopes blog, and the High Hopes Rubber Stamps Facebook Fan page plus you can also follow us on
Instagram, Twitter and Pinterest.


All Dreams Come True


It’s Wednesday, and this week, High Hopes Rubber Stamps new release Dreamy Willa – SLF010 is looking up into the stars and sharing this special moment with her little friend. I thought All Dreams Come True – G011 (High Hopes Rubber Stamps) was the perfect sentiment to go with this adorable new image. Sometimes it’s nice to be just like Willa and just gaze up at the stars and just live in the peace and tranquility of the moment. Have you ever done this? I know I have.


To make my card this week, I started out with a base card of 6″ x 6″. Then I cut the main background the same size using Hot Buy Craft Smart – Moon Flower Magic. I just fell in love with this paper and thought it went so perfectly with the new image. I also die cut some miscellaneous cardstock that I had which had little stars and is navy blue using My Creative Time – Scalloped Stitched Oval Dies. I also, die cut the main image with the same set of dies out of Copic Marker X-Press It Blending Card. The sentiment was die cut using My Creative Time – Ribbon End Dies. All of the die cuts were then edged with Sharpie – Gold Medium Point – Water Based Paint.

Both the main image and sentiment were stamped using my Misti and Memento – Tuxedo Black ink. The image was then coloured in using Copic markers which I have listed below. Once the image was all coloured, I bumped up the background, image and sentiment with 3M VHB – 2 sided tape.

Card Recipe:

Stamp:  Dreamy Willa – SLF010 (High Hopes Rubber Stamps)

Sentiment Background: All Dreams Come True – G011 (High Hopes Rubber Stamps)

Inks: Memento – Tuxedo Black

Paper: Copic Marker X-Press It Blending Card, Hot Buy Craft Smart – Moon Flower Magic, Miscellaneous Cardstock

Die Cuts: My Creative Time – Scalloped Stitched Oval Dies, My Creative Time – Ribbon End Dies

Tools: MISTI – Most Incredible Stamping Tool, Cuttlebug, 3M VHB – 2 sided tape, Sharpie – Gold Medium Point – Water Based Paint

Image coloured with Copic Markers:

Willa: W5, W4, W3, W1, W0, W00, E93, R20, R02, B05, B04, B02, C0, Gelly Roll Sakura #10 Pen, Sakura Glaze – Black, Pigma Micron 01 black marker

Grass: YG17, YG13, YG03, YG01

Sky: B99, B97, B79, B69, B39, B37, B29, B28

Moon: BV23, C1, C0, Y0000, Colorless Blender

Lady Bug: R24, Sakura Glaze – Black, Gelly Roll Sakura #8 Pen, Pigma Micron 01 black marker

Stars: Gelly Roll Stardust – Clear

Hope you like it and have a fantastic week!

You can find lots of inspiration from the Design Team Divas at the High Hopes blog, and the High Hopes Rubber Stamps Facebook Fan page plus you can also follow us on
Instagram, Twitter and Pinterest.


Winter Birthday Wishes!


Sharing a card that I made for my sister-in-law. I was so happy when Polkadoodles came out with this new release for Winnie Winter Celebrations.

The stamp that I used to create this card is called Birthday Gifts – Winnie Winter Celebration (Polkadoodles).

I printed out the image on Copic Marker X-Press It Blending Card using Grayscale. By using Grayscale, your image won’t smudge when you go to colour it in. I coloured the image using Copic markers and then used Gelly Roll Sakura #10 Pen to create the snow in the sky and
Stickles – Diamond to create some texture in the snow.

For the squares die cutting, I used My Creative Time – Stitched Squares Inside and Out. I really love the colour combos of Recollections – Northern Lights paper pad. I popped up the cut out frame and coloured image using 3M VHB – 2 sided tape. Lastly, I die cut some snowflake borders using Snowflake Border Die (#YourNextStamp) and then just used glue on 1 half of each side of the snowflakes and then mounted them onto the paper. Lastly, I added some small purple gems into the centre of each snowflake and some larger purple perls to the top and bottom of the card to finish it off.

Card Recipe:

Stamp: Birthday Gifts – Winnie Winter Celebration (Polkadoodles)

Paper: Copic Marker X-Press It Blending Card, Recollections – Northern Lights – 6″ x 6″ (15.2 cm x 15.2 cm)

Die Cuts: Snowflake Border Die (#YourNextStamp), My Creative Time – Stitched Squares Inside and Out

Embellishments: Crafts – Self-adhesive Pearls (02-3006207), Nuo Ying Sticker – Rhinestone Selection, Stickles – Diamond, Gelly Roll Sakura #10 Pen

Image Coloured With Copic Markers:

Skin: E21, E11, E04, E00, E000, R22, R20

Eyes: Sakura Glaze – Black, Gelly Roll Sakura #5 Pen

Hat, Scarf, Coat, Boots: V09, V06, V04, V01, BG18, BG15, BG11, BG01, BG000, C5, C3, C1

Bird: E37, E35, E34, YR14, Y19

Squirrel: E57, E55, E53, E51, E50, R30, R02, C01, C0, Colorless Blender, Sakura Glaze – Black

Present and Bow: BG18, BG15, BG11, E15, Y38, Y19, Y08, Gelly Roll Stardust – Clear

Envelope: E41, E40, Colorless Blender

Holly Leaves: G99, YG67, YG17, G21

Candy Canes: R59, R37, R35, Gelly Roll Stardust – Clear

Ribbon: R27, R24, R22

Sky: B29, B28, B26, B24, B23, B21

Snow: BV20, C0, Colorless Blender

Snowflake: Gelly Roll Stardust – Clear

Nordic Night Snowy Delight!


Welcome High Hopes Rubber Stamps Fans!

It’s Wednesday, and today I’m sharing a card that I made using the image Nordic Snowman with Bird (TLF010) (High Hopes Rubber Stamps) from our latest Christmas release. I just love the serenity of this image.  I grew up in Northern Canada and have always loved snow. It’s always so beautiful watching it come down from the sky. Not so much fun when you have to shovel it or drive through a snow storm, but other than that, it is quite beautiful! LOL! Did you grow up where there was a lot of snow too?

To make my card, I first stamped the image using Memento – Tuxedo Black ink onto Copic Marker X-Press It Blending Card. Then I ran the stamped image through my Cuttlebug and die cut it with Craftin Desert Diva’s Fancy Frames.

I decided to colour in the sky first with various blue Copic markers. After I coloured in the sky, I added in the falling snow using Gelly Roll Sakura #10 Pen.

I thought the sweater looked Scandinavian, so I decided to colour it similar to some Scandinavian  sweaters that I’ve seen in the past. I used Sakura Glaze – Black pen to pop up the eyes and smile on the snowman and lastly added some Stickles – Diamond for the pom-poms on the hat and along the top of the snow on the sweater. I also coloured over top of the black snowflakes with Gelly Roll Sakura #10 Pen and Gelly Roll Sakura #5 Pen on the sweater and hat.

For the snow at the bottom of the snowman, I used the same die-cut, Craftin Desert Diva’s Fancy Frames, to cut out the base using Recollections – Christmas Inkjet Printable Glitter Paper. I then ran this same paper through my Cuttlebug again, this time using the die cut from Lawn Fawn – Stitched Hillside Borders. Next I popped it up on the image using 3M VHB – 2 sided tape.

I die-cut some patterned paper using Your Next Stamp – Stitched Rectangle Die Set (YNSD214) that I had in my stash and then popped up the coloured snowman image onto it using 3M VHB – 2 sided tape.

For the sentiment I used Winter Delight (G114) (High Hopes Rubber Stamps). I stamped the sentiment and then die-cut it out using Craftin Desert Diva’s – Tag Essentials Dies. Then I went around the border of the die-cut with Gelly Roll Stardust – Clear pen and drew in some small snowflakes.

I then die-cut some snowflakes using Poppy – Simple Snowflakes (Style 1931) from Recollections – Christmas Inkjet Printable Glitter Paper. Once the snowflakes were all cut out, I ran them through my small Xyron to make them into stickers.

To assemble the card, I started with a base of 6″ x 6″ white AC cardstock. Next I mounted American Crafts – Wonderland Collection paper for my background. I chose this particular pattern as I thought it matched the image so well. I attached the mounted snowman directly to the background paper using 2-sided tape. I popped up my sentiment using 3M VHB – 2 sided tape. Added my snowflakes and then finished off the card by adding in little gems in the centre of each snowflake and 1 on the sentiment.

Card Recipe:

Stamp:  Nordic Snowman with Bird (TLF010) (High Hopes Rubber Stamps)

Sentiment:  Winter Delight (G114) (High Hopes Rubber Stamps)

Inks: Memento – Tuxedo Black

Paper: Copic Marker X-Press It Blending Card, Recollections – Christmas Inkjet Printable Glitter Paper – 8.5 x 11″, AC Cardstock – White,

Die Cuts: Poppy – Simple Snowflakes (Style 1931), Craftin Desert Diva’s – Tag Essentials Dies, Craftin Desert Diva’s Fancy Frames, Lawn Fawn – Stitched Hillside Borders, American Crafts – Wonderland Collection – 6 x 6″ (15.2 x 15.2 cm) paper pack

Tools: MISTI – Most Incredible Stamping Tool, Cuttlebug, 3M VHB – 2 sided tape, Gelly Roll Stardust – Clear pen, Xyron, Forever in Time – Round Gemstone Stickers, Rhinestone Selection – Dress Up Sheet – Red, Stickles – Diamond,

Image coloured with Copic Markers:

Night Sky: B99, B97, B37, B34, B32, B29, B24, B21, Gelly Roll Sakura #10 Pen

Moose: E27, E25, E23, E35, E33

Snowman: E27, E25, E23, YR18, YR16, YR14, YR12, Y15, BV20, C0, Colorless Blender,

Sweater and Hat: R59, R37, R35, C4, C3, C2, E41, E40, Gelly Roll Sakura #10 Pen, Gelly Roll Sakura #5 Pen, Stickles – Diamond

Scarf: YG67, YG17, G21, R59, R37, R35

Cardinal: R59, R37, R35, Y17, Gelly Roll Sakura #5 Pen

Tree \ Holly Leaves: G99, YG67, YG17, G21, R59, R35

Hope you like it and have a fantastic week!

You can find lots of inspiration from the Design Team Divas at the High Hopes blog, and the High Hopes Rubber Stamps Facebook Fan page plus you can also follow us on
Instagram, Twitter and Pinterest.


North Pole Reindeer


Welcome High Hopes Rubber Stamps Fans!

It’s Wednesday, and this month at High Hopes Rubber Stamps we are celebrating Christmas starting off with a brand new release. YAY!!!  This week, I used North Pole Reindeer (High Hopes Rubber Stamps) and North Pole Greetings (High Hopes Rubber Stamps) for the sentiment.

Card Recipe:

Stamp:  North Pole Reindeer (High Hopes Rubber Stamps)

Sentiment: North Pole Greetings (High Hopes Rubber Stamps)

Inks: Memento – Tuxedo Black, Tim Holtz Distress Inks – Candied Apple

Paper: Copic Marker X-Press It Blending Card, Stampin’ Up – Signs of Santa, Green Cardstock

Die Cut: My Creative Time -Stitched Squares Inside and Out

Tools: MISTI – Most Incredible Stamping Tool, Cuttlebug

Image coloured with Copic Markers:

Reindeer: E33, E31, E30, E57, E55, E53, R20, Colorless Blender for texture

Pole: R59, R37, R35, W5, W3, W1, W0, W00, Colorless Blender, Gelly Roll Stardust – Clear

Scarf: BG78, BG18, BG15, BG11, Y38, Y15, Y13

Sky: B06, B05, B04, B02, Gelly Roll Sakura #8 Pen

Snow: Stickles – Icicle, WOW! Embossing Glitter – White Puff Twinkle


Hope you like it and have a fantastic week!

You can find lots of inspiration from the Design Team Divas at the High Hopes blog, and the High Hopes Rubber Stamps Facebook Fan page plus you can also follow us on
Instagram, Twitter and Pinterest.


Dancing Ballerinas


Welcome Back Dreamerland Craft Fans!

Dreamerland has just released some brand new stamps and today, I’m sharing a birthday card I made using Dancing Partners D19060 (Dreamerland Crafts Clear Stamps)!  The image was coloured with copic markers.

After colouring the images, I fussy cut around them and decided to have them dancing on clouds to add to the magic.


Card Recipe:

Stamp: Dancing Partners D19060 (Dreamerland Crafts Clear Stamps)

Inks: Memento – Tuxedo Black, Tim Holtz Distress Ink – Blueprint Sketch, Tim Holtz Distress Ink – Picked Raspberry, Tim Holtz Distress Ink – Wilted Violet

Paper: Copic Marker X-Press It Blending Card, Nana Vics Digitals – Ballerina #1 Digital Paper, Watercolour Paper

Die Cuts: Avery Elle – Custom Steel Dies – Made in the USA – D-05-01 PiercedCloudsDie

Tools: MISTI – Most Incredible Stamping Tool, Cuttlebug, 3M VHB – 2 sided tape

Image coloured with Copic Markers:

Skin: E000, E00, E04, E11, E21, R22, R20

Hair: E47, E44, E43

Dresses: V06, V04, V01, V000, B24, B21, B00, Spectrum Noir – Sparkles – Crystal Clear, Spectrum Noir – Sparkles – Orchid, Gelly Roll Stardust – Clear

Pig: E44, E04, E93, R20, R00, R000

Background: B04, B02, B00


Hope you like it and have a great week!

You can find more cards to inspire you at Dreamerland Crafts on the Facebook Fan page from the rest of our design team.