Tag Archive | Echo Park – I Love Halloween

All Dressed Up!!


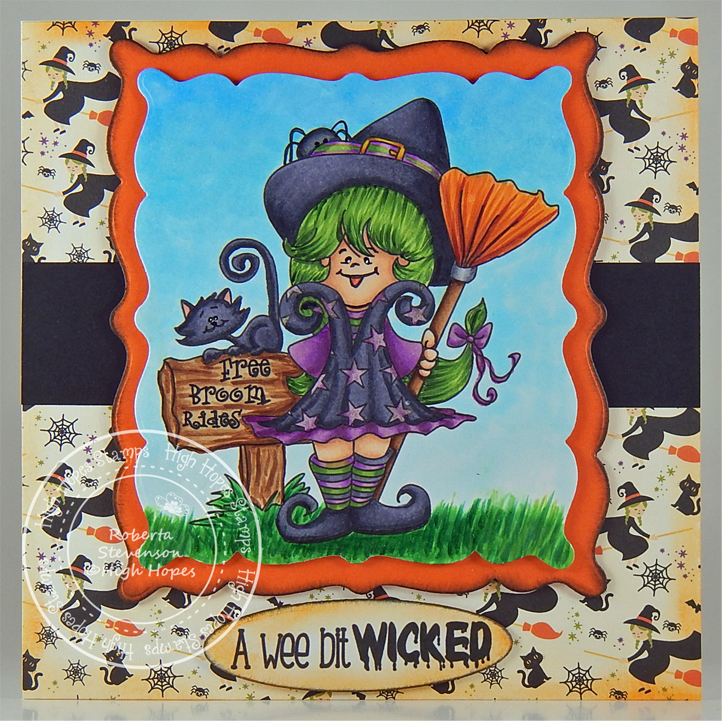
Sharing a card I made today using this adorable witch from All Dressed Up Digital Designs – Magical Day. This adorable little witch is all ready for Hallowe’en!

To make the card, I first imported the image and sentiment into Microsoft Word and printed them out onto Copic Marker X-Press It Blending Card. The image was coloured in with Copic markers and die cut with Hero Arts – Infinity Die Ovals.

For the base card, I used Hammermill – Premium Colour 100 lb. and cut it and scored it to be 5.5″ x 4.25″. On the left side, I used the following: Echo Park – I Love Halloween – Cut to the size of 5.5″ x 1.5″ and then I applied double-sided tape to the back and attached the spider Decorative Ribbon (07-3018478). Then, I used, double-sided tape and attached it directly to the base. I cut paper from the same paper pack to be 5.5″ x 2″ and inked around the edges with Tim Holtz Distress Ink – Carved Pumpkin. I applied this to the right side of the card using double-sided tape. For the centre, I cut orange cardstock to the size of 5.5″ x 1″ and Craft Consortium – Happy Haunting paper, cut to the size of 5.5″ x .75″. I inked all of the edges with Tim Holtz Distress Ink – Carved Pumpkin and then layered them using double-sided tape over top of the other 2 prints. I popped up the image over top of the background and added some Kraftin’ Kimmie Dots – Summer Dots and Kraftin’ Kimmie Dots – Polar Dots to finish off the card.

Card Recipe:

Stamp and sentiment: Magical Day – All Dressed Up Digital Stamps

Inks: HP Printer Grayscale, Tim Holtz Distress Ink – Carved Pumpkin

Paper: Copic Marker X-Press It Blending Card, Hammermill – Premium Colour 100 lb., Craft Consortium – Happy Haunting (6″ x 6″), Echo Park – I Love Halloween (6″ x 6″), Orange – Cardstock

Die Cuts: Hero Arts – Infinity Die Ovals

Embossing Powder: Ranger – Holographic

Miscellaneous: Ranger Emboss It Pen – Clear, Decorative Ribbon (07-3018478), Pop-Up Tape, Kraftin’ Kimmie Dots – Summer Dots, Kraftin’ Kimmie Dots – Polar Dots

Image coloured with Copic Markers:

Skin: E21, E11, E00, E000

Hair: V25, V17, V09, V04, BV08

Hat, Cat and Shoes: C8, C6, C4

Bows: YR68, YR31, YR18, Y38

Dress and Leggings: V17, V09, V04, YR68, YR18, Y38, G14, YG23, YG13, C8, C6, C4

Wings: YG0000, V000, YR000, Ranger – Holographic Embossing Powder, Ranger Emboss It Pen – Clear

Pumpkin: E08, YR16, YR14, YR12, C8, C6

Stars: V09, Atyou Spica – Lavender (01), Gelly Roll Stardust – Clear

Shadow: C2, C1, C0

Hope you like it and have a great week!

If you are a member of Passionate Paper Creations & Friends FB group
you can go to the top of the page and get a shopping discount.
If you are not a member just click join. We are a fun loving group with a lot of inspiration.

Free Broom Rides!!!


It’s Wednesday, and this week, I made a card using Free Broom Rides – TT017 by High Hopes Rubber Stamps for the main image and Wicked – FF052 (High Hopes Rubber Stamps) for the sentiment. Wouldn’t you love to go on a magical broom for a ride? I know I would.

To make my card this week, I began with a card base made from Hammermill – Premium Colour 100 lb. cut and scored to be 5.5″ x 5.5″. I cut the background paper from Echo Park – I Love Halloween paper pad to be the same size as the base and inked around the edges and onto the paper using Tim Holtz Distress Ink – Carved Pumpkin and a Picket Fence – Blending Brush. I applied this directly to the base card using double-sided tape. Using my Cuttlebug and Essentials by Tattered Lace Dies – Easel Slider dies, I die cut Copic Marker X-Press It Blending Card and orange cardstock. Using black cardstock I cut another piece to the size of 5.5″ x 1.25″. I applied this to the base using double-sided tape. I inked around the orange die cut with a Picket Fence – Blending Brush and Tim Holtz Distress Ink – Black Soot. I applied 3M VHB – 2 sided tape to the back of the orange die cut and applied it to the base.

The image and sentiment were then stamped using my MISTI and Memento – Tuxedo Black ink. I coloured in the image with Copic markers. The sentiment was die cut with my Cuttlebug and Whimsy – Quick Strips Die Set dies. I inked around the edges and on top by first using Tim Holtz Distress Ink – Carved Pumpkin with a Picket Fence – Blending Brush and then around the edges again, this time using Tim Holtz Distress Ink – Black Soot. To finish off the card, I applied 3M VHB – 2 sided tape to the back of the image and sentiment and popped them both up.

Card Recipe:

Stamp: Free Broom Rides – TT017 (High Hopes Rubber Stamps)

Sentiment: Wicked – FF052 (High Hopes Rubber Stamps)

Inks: Memento – Tuxedo Black, Tim Holtz Distress Ink – Black Soot, Tim Holtz Distress Ink – Carved Pumpkin

Paper: Copic Marker X-Press It Blending Card, Hammermill – Premium Colour 100 lb., Echo Park – I Love Halloween (6″x6″), Orange cardstock, Black Cardstock

Die Cuts:  Essentials by Tattered Lace Dies – Easel Slider, Whimsy – Quick Strips Die Set

Tools: MISTI – Most Incredible Stamping Tool, 3M VHB – 2 sided tape, Sakura Glaze – Black, Pen Gelly Roll Sakura #5 Pen, Gelly Roll Stardust – Clear, Picket Fence – Blending Brush

Image coloured with Copic Markers:

Skin: E21, E11, E00, E000, R30, R24, R20 (Eyes: Sakura Glaze – Black, Pen Gelly Roll Sakura #5 Pen)

Hair: YG67, YG23, YG17

Dress: BV29, BV25, BV23, V06, V04, V01, Gelly Roll Stardust – Clear

Socks: BV25, BV23, V04, V01, YG23, YG17

Boots, Cat and Hat: BV29, BV25, BV23, R30, R20, V04, V01, YG17, YG13, E15, YR24, Y08 (Eyes: Sakura Glaze – Black, Pen Gelly Roll Sakura #5 Pen)

Sign Post, Pole and Broom Handle: E37, E35, E34, E31

Broom: E08, YR18, YR15, YR12, YR02, E97, C5, C3, C1

Spider: C7, C5, C3 (Eyes: Sakura Glaze – Black)

Grass: G17, G14, G07

Sky: B02, B01, B00, B000, B000

Hope you like it and have a fantastic week!

You can find lots of inspiration from the Design Team Divas at the High Hopes blog, and the High Hopes Rubber Stamps Facebook Fan page plus you can also follow us on
Instagram, Twitter and Pinterest.

Frightfully Delightful!!!


It’s Wednesday, and this week, I made a card using Frankie – TT021 by High Hopes Rubber Stamps for the main image and Frightfully Delightful – FF054 (High Hopes Rubber Stamps) for the sentiment. Frankie is all set for Hallowe’en this year with his little pumpkin full of candy. We used to use a pillow case when we were younger to get a lot more goodies when we went Trick or Treating. LOL!

To make my card this week, I began with stamping the image and sentiment onto Copic Marker X-Press It Blending Card using my MISTI and Memento – Tuxedo Black ink. Using my Brother Scan and Cut, I cut around the image leaving a small white border. I coloured in the image and then used Copic C0 to go around all of the edges. I fussy cut around the sentiment and applied Copic Y17 around the edges. I put this through my Xyron Create a Sticker and then applied it to some scrap yellow cardstock. Once again, I fussy cut around the sentiment.

Using my Cricut Explore, I die cut the Haunted House from the Holiday Cakes Cricut Cartridge and the Haunted Tree from the October 31 Cricut Cartridge. I decided to cut the second layer of the haunted house out of Copic Marker X-Press It Blending Card rather than solid cardstock. This gave me the chance to colour in the windows, doors, shutters and moon the way I wanted to in order to make it more spooky with Copic Markers. The moon was coloured in with a mixture of Tim Holtz Distress Ink – Hickory Smoke, Tim Holtz Distress Ink – Fossilized Amber and Picket Fence Studio Blender Brushes. Using glue, I pieced everything together for the Haunted house.

My card was now ready to assemble. I started with a 6″ x 6″ base card made from AC Cardstock – White. I cut the bats background to the same size from Echo Park – I Love Halloween paper pack. I applied this directly to the base with double-sided tape. Using Tim Holtz Distress Ink – Hickory Smoke and a Picket Fence Studio Blender Brush I inked around all of the edges and across the top of the card to darken the sky a little bit. Next, I die cut the grass using my Cuttlebug, Lawn Fawn – Watercolor Wishes Rainbow paper and Lawn Fawn – Simple Stitched Hillside Borders. I applied this directly to the bottom of the card using liquid glue. I applied glue to the haunted tree and haunted house and then applied both of them directly to background. Frankie and the sentiment were both popped up on the card using 3M VHB – 2 sided tape.

Card Recipe:

Stamp: Frankie – TT021 (High Hopes Rubber Stamps)

Sentiment: Frightfully Delightful – FF054 (High Hopes Rubber Stamps)

Inks: Memento – Tuxedo Black, Tim Holtz Distress Ink – Hickory Smoke, Tim Holtz Distress Ink – Fossilized Amber

Paper: Copic Marker X-Press It Blending Card, AC Cardstock – White, Echo Park – I Love Halloween, Lawn Fawn – Watercolor Wishes Rainbow – 6″ x 6″

Die Cut:Lawn Fawn – Simple Stitched Hillside Borders – Lawn Cut

Cricut Die Cuts: – October 31 – Haunted Tree (#M3DCC2), Holiday Cakes – Haunted House – (#M40A62)

Tools: MISTI – Most Incredible Stamping Tool, 3M VHB – 2 sided tape, Sakura Glaze – Black Pen, Gelly Roll Sakura #5 Pen, Brother Scan and Cut, Xyron Create a Sticker and Picket Fence Studio Blender Brushes, Cricut Explore

Image coloured with Copic Markers:

Skin: BV23, BV20, G00, BG93, BG90, R29, R24 (Eyes: Sakura Glaze – Black Pen, Gelly Roll Sakura #5 Pen)

Hair: 100, B39, B32, C9, C7, C5, C3, PrismaColor Premier – Black

Jacket and Pants: V99, V95, V93, V91

Shirt: C9, C7, C5

Shoes: 100, C10, C9, C7, C5, C3

Bat: BV29, BV25, BV23 (Eyes: Sakura Glaze – Black Pen, Gelly Roll Sakura #5 Pen)

Pumpkin: E08, YR18, YR16, YR12, Y15, Y08, C10

Candy: V09, V06, V04, YG17, YG13, YG11

House Background: V17, V15, V09, V06, V04, Y17, Y08, Y04, C3, C2, BV20

Shadow below Frankie: YG17, YG13

Hope you like it and have a fantastic week!

You can find lots of inspiration from the Design Team Divas at the High Hopes blog, and the High Hopes Rubber Stamps Facebook Fan page plus you can also follow us on
Instagram, Twitter and Pinterest.

Vampire Treat!!!


It’s Wednesday, and this week, I made a card using Vampire Treat – TT022 by High Hopes Rubber Stamps for the main image and Happy Halloween – H232 (High Hopes Rubber Stamps) for the sentiment. Hard to believe Hallowe’en is just around the corner.

To make my card this week, I began with a card base made from Hammermill – Premium Colour 100 lb. cut and scored to be 5.5″ x 4.25″. I die-cut the bat background paper from Echo Park – I Love Halloween paper pad using my Cuttlebug and My Creative Time – Rectangle Frame Dies. The edges were inked with Tim Holtz Ranger Distress Oxide – Black Soot and then this piece was adhered directly to the base card using double-sided tape. The same dies were used to cut the orange cardstock and the edges were inked with Tim Holtz Distress Ink – Carved Pumpkin. Double-sided tape was added to the back of this piece and it was added directly to the bat background paper. Copic Marker X-Press It Blending Card was die cut with My Creative Time – Rectangle Frame Layers and the sentiment shape was die cut with Whimsy Stamps – Quick Strips Die Set. Tim Holtz Ranger Distress Oxide – Fossilized Amber was used to ink around the sentiment shape edges.

The image and sentiment were then stamped using my MISTI and Memento – Tuxedo Black ink. I coloured in the image with copic markers. I stamped out the image a second time and used my Brother Scan and Cut to cut it out so that I could use it as a mask to put over the coloured image. I also die cut a 1″ circle out of Inkadoo Stamping Mask Paper for the moon. I placed both masks onto the coloured image. I tore some masking tape in half vertically to create the grass pattern and then used the reverse to mask the grass while I did the sky. I saw this on a you-tube video and thought it was a cool technique. A mixture of Tim Holtz Ranger Distressed inks listed below were used to create the ground and sky. I removed all of the masks and then for the circle I used the reverse mask to section out just the circle centre and coloured in the moon with my Copic markers. To finish off the card, I applied 3M VHB – 2 sided tape to the back of the image and sentiment and popped them both up on the card.

Card Recipe:

Stamp: Vampire Treat – TT022 (High Hopes Rubber Stamps)

Sentiment: Happy Halloween – H232 (High Hopes Rubber Stamps)

Inks: Memento – Tuxedo Black, Tim Holtz Ranger Distress Oxide: Fossilized Amber, Blueprint Sketch, Wilted Violet, Twisted Citron, Peeled Paint, Black Soot and Seedless Preserves, Tim Holtz Distress Ink – Carved Pumpkin

Paper: Copic Marker X-Press It Blending Card, Hammermill – Premium Colour 100 lb., Echo Park – I Love Halloween (6″x6″), Orange cardstock

Die Cuts:  My Creative Time – Rectangle Frame Dies, My Creative Time – Rectangle Frame Layers, Whimsy Stamps – Quick Strips Die Set – WSD330

Tools: MISTI – Most Incredible Stamping Tool, 3M VHB – 2 sided tape, Sakura Glaze – Black, Pen Gelly Roll Sakura #5 Pen, Brother Scan and Cut, Inkadoo Stamping Mask Paper

Image coloured with Copic Markers:

Skin: E21, E11, E04, E00, E000, R30, R20 (Eyes: Sakura Glaze – Black, Pen Gelly Roll Sakura #5 Pen) (Teeth: Pen Gelly Roll Sakura #5 Pen)

Hair: BV29, BV25, BV23, C1

Cape and Bat Bow-Tie: R59, R29, R27, R24

Coat and Bat: BV29, BV25, BV23

Dracula Bow-Tie: C1, C00, Colorless Blender

Coffin Inside: V09, V06, V04, V01

Coffin: E29, E27, E25, E23

Trick or Treat Bag and Strap: YG17, E08, YR18, YR16, YR12

Shadow Under Coffin: C3, C2

Moon: Y000, Y02, BV20, C0, C00

Hope you like it and have a fantastic week!

You can find lots of inspiration from the Design Team Divas at the High Hopes blog, and the High Hopes Rubber Stamps Facebook Fan page plus you can also follow us on
Instagram, Twitter and Pinterest.

Have a Wicked Hallowe’en!!


Today I’m sharing a CAS card I made using  Three Witches (KLM Digital Designs) image from the October release. These adorable 3 little witches come with 3 different sentiments. One of them, I have used here. The others are “What’s Up Witches” and “Just Fab-boo-lous”. Have a fantastic Hallowe’en everyone and remember to stay safe.

I printed out the main image onto Copic Marker X-Press It Blending Card using my HP Printer. I used my Brother Scan and Cut to cut around the image and coloured it in with Copic markers.  The sentiment was printed out on orange cardstock. I fussy cut around the sentiment and then ran it through my Xyron Create a Sticker and attached it to some white paper. Then, I fussy cut around it again.

The base card is 6″ x 6″ American Crafts White paper. Using Echo Park – I Love Halloween paper, I cut it to 5-7/8th” x 5-7/8th” to give it a thin white border. I adhered it to the base using some glue so that I could move it into place easier. The coloured image and sentiment were both attached using 3M VHB – 2 sided tape.

Card Recipe:

Stamp and Sentiments: Three Witches (KLM Digital Designs)

Inks: HP Printer Grayscale

Paper: Copic Marker X-Press It Blending Card, Echo Park – I Love Halloween 6″x6″ Paper, AC Cardstock – White, Orange

Tools: 3M VHB – 2 sided tape, Xyron Create a Sticker

Image coloured with Copic Markers:

Skin: E000, E00, E04, E11, E21

Hair: E18, E08, YR18, YR15

Hat and Dress: V17, V09, BV29, BV25, BV23, BV08, BV04, BV02, BV01

Hat and Dress – Centre Witch: BV29, BV25, BV23, BV08, BV04, BV02, BV01, YG67, YG63, YG61

Candy Corn: YR16, YR15, YR12, C1, C0, Y19, Y15, Y06, Colorless Blender

Pumpkin: YR18, YR16, YR14, Y08, YG17, YG13, YG01

Broom: E37, E35, E34, YR31, YR24, YR23, Y32, C5, C3, C0

BOO: YR09, YR04

Hope you like it and have a great week!

You can find more cards to inspire you at KLM Designs, KLM Digital Design Team and KLM Digital Designs on the Facebook Fan page from the rest of our design team.

I Don’t Bite….Usually!!


Today I’m sharing  Vampire Gnome (KLM Digital Designs) image from the October release. This adorable little Gnome comes with 5 different sentiments. Two of them, I have used here. The others are “2020 Sucks”, “Bats About You” and “Don’t Let These Times Drain You”. I love this little gnome and with these fun sentiments, there are so many different cards that you can make.

I printed out the main image onto Copic Marker X-Press It Blending Card using my HP Printer. I used my Brother Scan and Cut to cut around the image and coloured it in with Copic markers.  I added some Clear – Wink of Stella to the stars, moon and coloured squares on his hat and gown. The sentiments were printed out on orange cardstock. I cut them and then inked around the edges with Tim Holtz Distress Ink – Spiced Marmalade.

For the oval, I used Echo Park – I Love Halloween paper and die cut using my Cuttlebug and My Creative Time – Scalloped Stitched Oval Dies. I also, used this paper on the top and bottom of my card. For the centre background, I used To Every Season – Stampin’ Up paper. I used some double-sided tape to join the top paper with stars to the haunted house background. Then I cut the background to 5.25″ x 4″ and inked around all of the edges with Tim Holtz Distress Ink – Black Soot. I also used the same ink to go around the edges of the oval.

To assemble the card, I began with an orange card base of 5.5″ x 4.25″ by using a pre-cut card by The Paper Studio – Primary Base Colours. The edges were all inked with Tim Holtz Distress Ink – Black Soot. The background was adhered to the base using double-sided tape. The image, sentiments and oval were both popped up using 3M VHB – 2 sided tape. Finally, some Recollections Bling Stickers were added as embellishments to finish off the card.

Card Recipe:

Stamp and Sentiments: Vampire Gnome (KLM Digital Designs)

Inks: HP Printer Grayscale, Tim Holtz Distress Ink – Black Soot, Tim Holtz Distress Ink – Spiced Marmalade

Paper: Copic Marker X-Press It Blending Card, To Every Season – Stampin’ Up, Echo Park – I Love Halloween, The Paper Studio – Primary Base Colours

Die Cuts: My Creative Time – Scalloped Stitched Oval Dies

Tools: 3M VHB – 2 sided tape, Cuttlebug, Recollections Bling Stickers, Clear – Wink of Stella

Image coloured with Copic Markers:

Skin: E000, E00, E04, E11, E21

Beard: W5, W4, W3, W2, W1, W0, W00

Cape and Hat: V09, V06, V04, E15, Y38, Y35, Y15, YR18, YR16, YR12, YG25, YG23, YG11, R59, R39, R37, R35

Bat: N10, N8, N6, Sakura Glaze – Black for the eyes

Hope you like it and have a great week!

You can find more cards to inspire you at KLM Designs, KLM Digital Design Team and KLM Digital Designs on the Facebook Fan page from the rest of our design team.