Tag Archive | Pebbles – Boo! (6×6 in / 15.2×15.2 cm)

Boo Pals!!


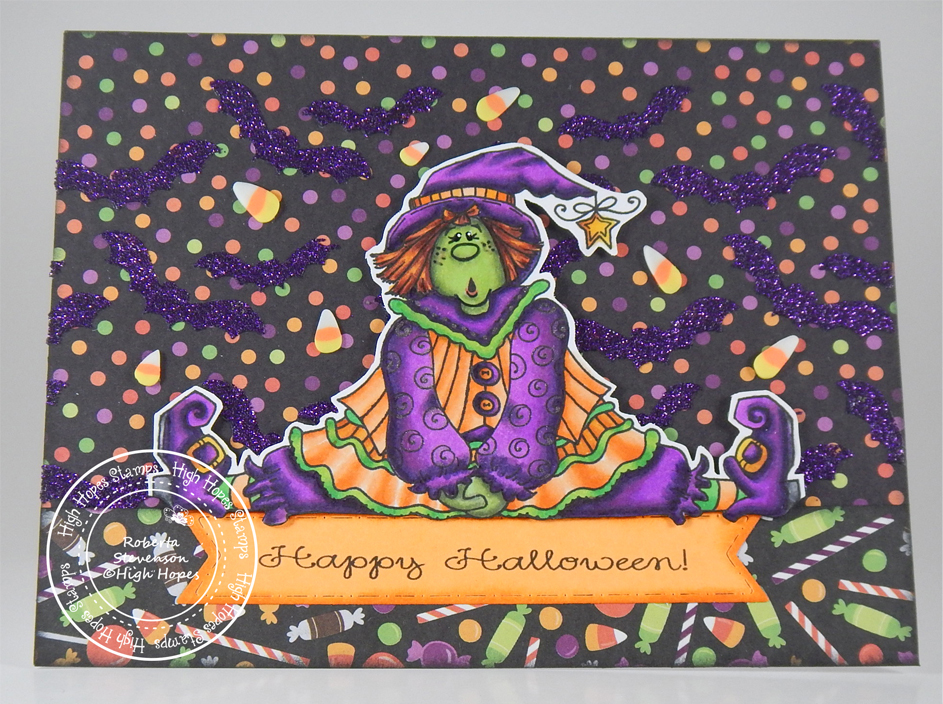
It’s Wednesday, and this week, I made a Hallowe’en card using High Hopes Rubber Stamps Boo Pals – SS007 for the image and Boo-tiful Day – E233 for the sentiment. Hallowe’en is now only a few months away! Wow! Where has this year gone? Time seems to be flying by so fast!

To make my card this week, I began with a card base of Hammermill – Premium Colour 100 lb. cardstock, cut and scored to be 5.5″ x 4.25″. I cut the background paper from Recollections – Black cardstock to be the same size as the base card and attached it using double-sided tape. Using My Creative Time – Rectangle Frame Layers and my Anna Griffin Empress Mini Machine, I die cut Doodlebug – Pumpkin Party cardstock. I just love these little ghosts. With a finger dauber and Tim Holtz Distress Ink – Villainous Potion, I inked around all of the edges of the die cut. U-Line double-side tape was applied to the back of this piece and I popped it up onto the base card. Using the same cutting machine, I die cut Copic Marker X-Press It Blending Card cardstock using Nestabilities Dies – Deckled Rectangles – Large.

I stamped the main image onto the Copic Marker X-Press It Blending Card die cut using my MISTI and Memento – Tuxedo Black ink and coloured it in. I created my own moon shape using a 2″ circle mask that I had created earlier with a Fiskars hand punch. The eyes and nose for the cat and ghost were added in using a Sakura Glaze – Black pen. I ran the coloured image through my Xyron Creative Station and attached it to Recollections – Black cardstock. I didn’t have a larger die of the same shape, so I put the piece that I had adhered together into my Brother Scan ‘N Cut and created a .08″ border around it. This created the small black border to make the image pop. The sentiment was stamped onto a scrap piece of Copic Marker X-Press It Blending Card cardstock using my MISTI and Memento – Tuxedo Black ink and then it was die cut using my cutting machine and Poppystamps – Christmas Quotes. Tim Holtz Distress Ink – Wilted Violet and a finger dauber were used to go around the die cut.

The card was now ready to assemble. I added U-Line double-sided tape to the back of the frame and sentiment and popped them both up onto the card to finish it off.

Card Recipe:

Stamps: Boo Pals – SS007 (High Hopes Rubber Stamps)

Sentiment: Boo-tiful Day – E233 (High Hopes Rubber Stamps)

Inks: Memento – Tuxedo Black, Tim Holtz Distress Ink – Wilted Violet, Tim Holtz Distress Ink – Villainous Potion

Paper: Copic Marker X-Press It Blending Card, Hammermill – Premium Colour 100 lb., Doodlebug – Pumpkin Party (12″ x 12″), Recollections – Black cardstock

Die Cuts: My Creative Time – Rectangle Frame Layers, Spellbinders Nestabilities Dies – Deckled Rectangles Large (S4-202), Poppystamps – Christmas Quotes

Tools: MISTI – Most Incredible Stamping Tool, U-Line double-sided tape, Anna Griffin Empress Mini Machine, Sakura Glaze – Black, Brother Scan ‘N Cut, Xyron Creative Station

Image coloured with Copic Markers:

Black Cat: C8, C6, C4, C3, R30, R22, (Eyes and Nose – Sakura Glaze – Black)

Ghost: BV20, C0, Colorless Blender, (Eyes and Nose – Sakura Glaze – Black)

Tombstone: W5, W3, W1, W0, 100

Grass: G99, G94, G21, YG97, YG17

Sky: BV29, BV25, BV23. BV20

Moon: BV23, BV20, C1, C0, C00, Y00, Colorless Blender

Hope you like it and have a spooktacular week!

You can find lots of inspiration from the Design Team Divas at the High Hopes blog, and the High Hopes Rubber Stamps Facebook Fan page plus you can also follow us on
Instagram, Twitter and Pinterest.

Kitty In Training!!


It’s Wednesday, and this week, I made a Hallowe’en card using High Hopes Rubber Stamps Kitty In Training – TT052 for the image and Happy Halloween Script – F232 for the sentiment. Hallowe’en is one of our favourite times of year and my husband likes to go all out decorating our front yard. I always have fun finding new animated toys to add to our decorations and love seeing the little trick or treaters faces light up when they come to our house.

To make my card this week, I began with a card base of Hammermill – Premium Colour 100 lb., cut and scored to be 5.5″ x 4.25″. I die cut the background paper from Pebbles – Boo! cardstock to be the same size and attached it to the base using double-sided tape. Using My Creative Time – Rectangle Frame Layers and my Anna Griffin Empress Mini Machine, I die cut Scrapbook.com – Brights Smooth Cardstock for the larger frame. Using the same machine, I die cut Copic Marker X-Press It Blending Card cardstock using My Creative Time – Rectangle Frame Dies. The thin stripes were die cut using Scrapbook.com – Rainbow Smooth Cardstock and PinkFresh Studio – Slim Stripes dies. Lastly, I cut a black strip using Recollections – Black cardstock to the size of 4.25″ x 1-3/8″.

I stamped the main image onto the Copic Marker X-Press It Blending Card die cut using my MISTI and Memento – Tuxedo Black ink and coloured it in. The sentiment was stamped onto a scrap piece of orange paper cardstock using my MISTI and Memento – Tuxedo Black and then it was die cut using my cutting machine and Gina K Designs – Sentiment Strips.

The card was now ready to assemble. I ran the thin strips through my Xyron Create a Sticker and adhered them to the black strip leaving small spaces in between them to be the same as the witch’s socks. I ran this whole piece through my Xyron Create a Sticker again so that it would lay completely flat when I adhered it to the base card. I added U-Line double-sided tape to the backs of the rectangles and sentiment and popped up all of the layers onto the card. Tim Holtz Distress Ink – Black Soot was used to ink around all of the edges of the card and Stickles – Diamond was added to the small dots at the top of the card above the stripe lines. Gelly Roll Sparkle Pen was added to the sky to create some sparkly stars.

Card Recipe:

Stamps: Kitty In Training – TT052 (High Hopes Rubber Stamps)

Sentiment: Happy Halloween Script – F232 (High Hopes Rubber Stamps)

Inks: Memento – Tuxedo Black, Tim Holtz Distress Ink – Black Soot

Paper: Copic Marker X-Press It Blending Card, Hammermill – Premium Colour 100 lb., Pebbles – Boo! (6×6 in / 15.2×15.2 cm), Scrapbook.com – Brights Smooth Cardstock (4.25″ x 5.5″), Scrapbook.com – Rainbow Smooth Cardstock (4.25″ x 5.5″), Recollections – Black cardstock

Die Cuts: My Creative Time – Rectangle Frame Layers, My Creative Time – Rectangle Frame Dies, Gina K Designs – Sentiment Strips, PinkFresh Studio – Slim Stripes

Tools: MISTI – Most Incredible Stamping Tool, U-Line double-sided tape, Anna Griffin Empress Mini Machine, Xyron Create a Sticker, Stickles – Diamond, Gelly Roll Sparkle Pen

Image coloured with Copic Markers:

Blacks: N10, N9, N7, N6, N5, N4, N3

Skin: E21, E11, E04, E00, E000, R30, R20

Hair and Stripes on Socks and Hat: G19, G14, RV66, RV55, RV53, Y19, B63, Y38, Y18

Pumpkins: E07, YR18, YR16, YR15, YR12, YR08

Tree Stump: E79, E27, E25, E23, E21

Broomstick: E35, E34, E33, C5, C3, C00, Y35, Y32, Y19, YR31

Leaves and Grass: G99, G94, G21, YG97, YG17, YG63

Sky: BV29, BV25, BV23. BV20, Gelly Roll Sparkle Pen

Hope you like it and have a fantastic week!

Check out more adorable images in the new “Spring Fever Release” at High Hopes Rubber Stamps!

You can find lots of inspiration from the Design Team Divas at the High Hopes blog, and the High Hopes Rubber Stamps Facebook Fan page plus you can also follow us on
Instagram, Twitter and Pinterest.

Witchy Poo’s Happy Hallowe’en!!!


It’s Wednesday, and Sitting Witchy Poo from (High Hopes Rubber Stamps) is back again to celebrate a Happy Hallowe’en and wondering what to do with all her candy.  My husband and I just LOVE Hallowe’en! We try to decorate our yard every year for the little ghosts and goblins who come to visit and we give out lots and lots of candy. Our front lawn gets turned into a grave yard for a day with spooky black cats, crows, skeletons, and more. On the porch we put out all of the animated little toys and of course the talking skeletons playing poker at the Bistro table. LOL! The children just love it and so do the parents! LOL!

To create the card this week, I stamped the main image and then coloured it with Copic Markers listed below. I fussy cut around Witchy Poo leaving just a little bit of white around the top of her body, but going directly to the line for the bottom of her. Flag Banner Dies from Craftin’ Desert Diva’s (restired) were used for the die cut and then the sentiment was stamped onto it. Tim Holtz Distress Ink – Carved Pumpkin was applied around the edges to create a frame around the orange cardstock.

To create the background, Pebbles – Boo! paper was used. I wanted to add something a little extra so I pulled out my Kraftin’ Kimmie – Bats and Moons Stencil and applied Nuvo Glimmer Paste – Amethyst Purple! I just love the way it turned out. The bottom piece of cardstock was cut at 1″ x 5.5″. Tim Holtz Distress Ink – Black Soot was used to go around all of the edges of the top and bottom piece.

Once everything was dry my card was ready to be assembled. I began with a standard white card base of 4.25″ x 5.5″. I mounted the coloured circles and bats cut at the same size directly on top of the base with 2-sided tape. I did the same with the candy on the very bottom. The image and the sentiment were both popped up with 3M VHB – 2 sided tape. Finally, to cover some of my paste boo-boos, I added in some candy corn from Dress My Craft – Dessert Mix.

Card Recipe:

Stamp: Sitting Witchy Poo – S151 (High Hopes Rubber Stamps)

Sentiment: Happy Halloween – H232 (High Hopes Rubber Stamps)

Inks: Memento – Tuxedo Black, Tim Holtz Distress Ink – Carved Pumpkin, Tim Holtz Distress Ink – Black Soot

Paper: Copic Marker X-Press It Blending Card, Pebbles – Boo! (6×6 in / 15.2×15.2 cm), Orange cardstock, White Cardstock

Die Cut: Craftin Desert Diva’s – Flag Banner Dies (Retired)

Stencil: Kraftin’ Kimmie – Bats and Moons

Tools and Miscellaneous: MISTI – Most Incredible Stamping Tool, Cuttlebug, Nuvo Glimmer Paste – Amethyst Purple, Dress My Craft – Dessert Mix

Image coloured with Copic Markers:

Skin: BG96, BG93, BG90, YG23, G40

Hair: E18, E08, YR18, YR14

Hat, Blouse, Pantaloons: V17, V09, V06, V04

Vest, Dress and Hat Band: YR68, YR65, YR18, YR15, YR12, YR00

Socks: YR18, YR15, YR12, YG09, YG07

Shoes: V17, V09, V06, V04, N6, N4, N2, E15, Y38, Y35, Y15

Star: E15, Y38, Y35, Y15

Hope you like it and have a spooktacular week!

You can find lots of inspiration from the Design Team Divas at the High Hopes blog, and the High Hopes Rubber Stamps Facebook Fan page plus you can also follow us on
Instagram, Twitter and Pinterest.


Witchy Poo and Crew!!


Welcome High Hopes Rubber Stamps Fans!

It’s Wednesday, and this month at High Hopes Rubber Stamps we are celebrating Hallowe’en.  This week, I used Boo Crew In Frame – P121 (High Hopes Rubber Stamps).

Card Recipe:

Stamp: Boo Crew In Frame – P121 (High Hopes Rubber Stamps)

Sentiment: Pebbles – Boo! (6×6 in / 15.2×15.2 cm)

Inks: Memento – Tuxedo Black, Tim Holtz Distress Ink – Black Soot

Paper: Copic Marker X-Press It Blending Card, Pebbles – Boo! (6×6 in / 15.2×15.2 cm)

Tools: MISTI – Most Incredible Stamping Tool, Black Sewing Thread, 3M VHB – 2 sided tape

Image coloured with Copic Markers:

Skin: BG96, BG93, BG90, YG23, G40

Hair: V17, RV04, YG23, YR02, RV93

Hat and Dress: V09, V06, V04, YR18, YR15, Clear – Wink of Stella

Bat: W7, W5, W3, W1, R22, R20

Ghost: C2, C0, Colourless Blender, R22, R20

Bow: YG13, YG11, YG09

Wood Frame: E39, E37, E35, E33

Eyes: Sakura Glaze – Black, Gelly Roll Sakura #5 Pen

Background: BV08, BV04, BV02, BV00

Hope you like it and have a fantastic week!

You can find lots of inspiration from the Design Team Divas at the High Hopes blog, and the High Hopes Rubber Stamps Facebook Fan page plus you can also follow us on
Instagram, Twitter and Pinterest.


Froggy’s Hallowe’en


Welcome High Hopes Rubber Stamps Fans!

It’s Wednesday, and this month at High Hopes Rubber Stamps we are celebrating Hallowe’en.  This week, I used Froggy Candy Label S157 (High Hopes Rubber Stamps). He’s using his wand to make some yummy Hallowe’en candy for everyone! What is your favourite candy? Mine is Smarties.

Card Recipe:

Stamp: Froggy Candy Label S157 (High Hopes Rubber Stamps)

Sentiments: Pebbles – Tricks and Treats (6×6 in / 15.2×15.2 cm)

Inks: Memento – Tuxedo Black

Paper: Copic Marker X-Press It Blending Card, Pebbles – Boo! (6×6 in / 15.2×15.2 cm)

Tools: MISTI – Most Incredible Stamping Tool, 3M VHB – 2 sided tape

Ribbon: Decorative Ribbon – 07-3018478

Image coloured with Copic Markers:

Frog: BG99, YG17, YG06, YG03, YG00, Colorless Blender

Hat: V25, V17, V09

Spider: W7, W5, W3, W1, Y18, Y06

Candy Corn: YR09, YR04, Y19

Circles: YR12, YR09, YR04, YG17, YG06, YG03

Night Sky: BV17, BV08, BV04, BV02

Candy Wall: V09, V06, V04, V01

Stars: Y18, Y15, Spectrum Noir Sparkle – Firefly, Wink of Stella – Clear

Stripes: YR16, BV29, Y38, Y35

Hope you like it and have a spooktacular week!

You can find lots of inspiration from the Design Team Divas at the High Hopes blog, and the High Hopes Rubber Stamps Facebook Fan page plus you can also follow us on
Instagram, Twitter and Pinterest.


Sweet Birthday Dreams


Welcome Dreamerland Fans!

Some of you may be new to my blog since Dreamerland Crafts is introducing the 2019 design team and today is my day! I was so excited to be asked to join the Dreamerland team this year.

For my card, I thought the little boy hugging his pillow with his little kitten on his back was adorable! It made me think of making a birthday card with him sleeping and dreaming about all of his wishes coming true.

Dreamerland Crafts – Birthday 08  was used to create the sentiment and  Dreamerland Crafts – ZZZ was used for the image.


Here is a close-up of the little boy image:

To make the card, I first die cut the image from Copic Marker X-Press It Blending Card using my Cuttlebug and die cut from Spellbinders Labels 17. Then I stamped the image onto it using my MISTI (Most Incredible Stamping Tool) with Memento Tuxedo Black ink.

Copics were then used to colour the image. I chose a starry background to represent night time for his dreaming! This was die cut with Spellbinders Labels 17 as well and then edged with Tim Holtz Distress Ink – Black Soot. Sentiment from Dreamerland Crafts – “ZZZ” was then stamped with Versa Fine – Onyx Black ink and then embossed with Ranger – Clear Super Fine Detail Embossing Powder and heated with Marvy Heat Embossing Tool.

For the sentiment, I used the die cut from My Creative Time – MCT 224. Sentiment was stamped with Versa Fine – Onyx Black ink and then embossed with Ranger – Clear Super Fine Detail Embossing Powder and heated with Marvy Heat Embossing Tool. Used Tim Holtz Distress Ink – Evergreen Bough around the border of the die cut.

Tim Holtz Distress Ink – Shabby Shutters was used for edging around the card.

Both the main image and Sentiment were popped up with  3M VHB 2-sided tape.

Card Recipe:

Stamps: Dreamerland Crafts – Birthday 08 – DS17059; Dreamerland Crafts – ZZZ – D19026

Hair: E47, E44, E43, R21, E25

Skin: E21, E11, E04, E00, E000, R22, R20

PJ’s: BG18, BG15, BG13, BG11

Kitten: C7, C5, C3, C1, R22, R20

Pillow: E27, E25, E23, E21

Blanket: YG25, YG23, YG21, Colourless Blender

Wall: B04, B02, B01, B00, B000

Background Paper: Pebbles – Boo! (6×6 in / 15.2×15.2 cm); Echo Park Paper Co. – Imagine That (6×6 in / 15.2×15.2 cm)

Inks: Tim Holtz Distress Ink – Shabby Shutters, Tim Holtz Distress Ink – Black Soot, Tim Holtz Distress Ink – Evergreen Bough, VersaMark – Onyx Black, Memento – Tuxedo Black

Embellishments: Echo Park Paper Co. Enamel Dots – Imagine That!

Dies: My Creative Time – Sentiment Label Dies – MCT 224; Spellbinders Labels 17

Thank you so much! I hope you like my card.