Tag Archive | Inkadoo Stamping Mask Paper

Pumpkin Buddies!!!


It’s Wednesday, and this week, I made a card using Pumpkin Buddies – TT020 by High Hopes Rubber Stamps for the main image and Happy Halloween Script – F232 (High Hopes Rubber Stamps) for the sentiment. These little Hallowe’en friends look like they’re getting ready to scare unsuspecting little ones this year. LOL!

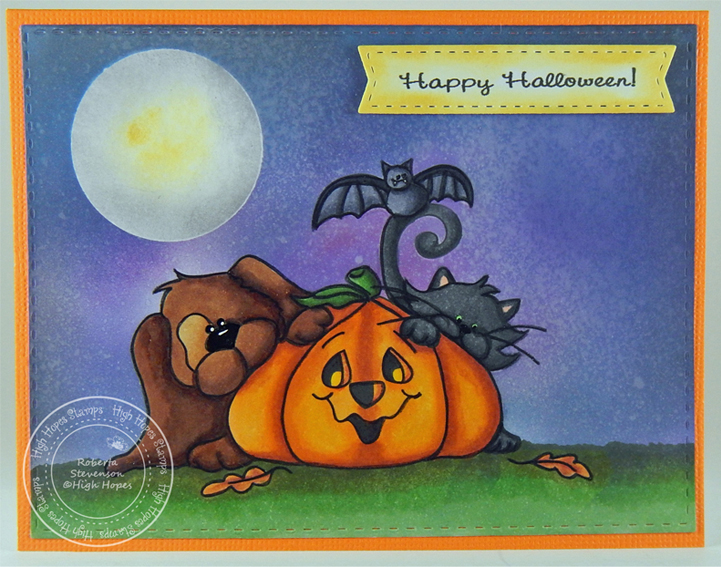
To make my card this week, I began with die-cutting Copic Marker X-Press It Blending Card with My Creative Time – Rectangle Frame Layers for the main image and Whimsy Stamps – Quick Strips Die Set for the sentiment. The image and sentiment were then stamped using my MISTI and Memento – Tuxedo Black ink onto the die cuts. The image and grass were coloured in with Copic markers. The nose and eyes for the characters were coloured in using Sakura Glaze – Black Pen and Gelly Roll Sakura #8 Pen. I stamped out the image a second time and used my Brother Scan and Cut to cut it out so that I could use it as a mask to put over the coloured image. I also die cut a 1.5″ circle out of Inkadoo Stamping Mask Paper for the moon.

I placed the mask over top of the coloured image and the moon masked circle onto the large rectangle before I inked in the sky using various Tim Holtz inks listed below. I watched a video on YouTube by Glitter Grunge Greetings for inspiration on how to create my night sky. Once the sky was complete, I removed the mask for the moon and used the outside paper that I had cut the moon from to protect the sky while I inked in the texture for it using Picket Fence Studio Blender Brushes, Tim Holtz Ranger Distress Oxide – Fossilized Amber and Tim Holtz Distress Ink – Hickory Smoke. I spritzed the moon and sky with some water. I removed all of the masks at this point and using double-sided tape, I applied the coloured image to my card base using The Paper Studio – Primary Base Colours 4.25″ x 5.5″. Lastly, I applied some Tim Holtz Ranger Distress Oxide – Fossilized Amber to the outside edges of my sentiment and pop it up on the card using 3M VHB – 2 sided tape.

Card Recipe:

Stamp: Pumpkin Buddies – TT020 (High Hopes Rubber Stamps)

Sentiment: Happy Halloween Script – F232 (High Hopes Rubber Stamps)

Inks: Memento – Tuxedo Black, Tim Holtz Ranger Distress Oxide: Fossilized Amber, Wilted Violet, Black Soot, Faded Jeans and Seedless Preserves, Tim Holtz Distress Ink – Stormy Sky, Chipped Sapphire, Tumbled Glass, Hickory Smoke

Paper: Copic Marker X-Press It Blending Card, The Paper Studio – Primary Base Colours 4.25″ x 5.5″

Die Cuts:  My Creative Time – Rectangle Frame Layers, Whimsy Stamps – Quick Strips Die Set – WSD330

Tools: MISTI – Most Incredible Stamping Tool, 3M VHB – 2 sided tape, Sakura Glaze – Black, Pen Gelly Roll Sakura #8 Pen, Brother Scan and Cut, Inkadoo Stamping Mask Paper, Picket Fence Studio Blender Brushes

Image coloured with Copic Markers:

Bat: BV29, BV25, BV23

Pumpkin: E08, YR18, YR16, YR12, Y04, G99, G21, YG67, YG19, Y17, Y15, Y08

Cat: N10, N6, N5, R30, R20, YG06

Dog: E29, E27, E25, E23, E34, E33, E31

Oak Leaves: E13, E07, YR27, YR12

Grass: G99, G21, YG67, YG19

Hope you like it and have a fantastic week!

You can find lots of inspiration from the Design Team Divas at the High Hopes blog, and the High Hopes Rubber Stamps Facebook Fan page plus you can also follow us on
Instagram, Twitter and Pinterest.

Vampire Treat!!!


It’s Wednesday, and this week, I made a card using Vampire Treat – TT022 by High Hopes Rubber Stamps for the main image and Happy Halloween – H232 (High Hopes Rubber Stamps) for the sentiment. Hard to believe Hallowe’en is just around the corner.

To make my card this week, I began with a card base made from Hammermill – Premium Colour 100 lb. cut and scored to be 5.5″ x 4.25″. I die-cut the bat background paper from Echo Park – I Love Halloween paper pad using my Cuttlebug and My Creative Time – Rectangle Frame Dies. The edges were inked with Tim Holtz Ranger Distress Oxide – Black Soot and then this piece was adhered directly to the base card using double-sided tape. The same dies were used to cut the orange cardstock and the edges were inked with Tim Holtz Distress Ink – Carved Pumpkin. Double-sided tape was added to the back of this piece and it was added directly to the bat background paper. Copic Marker X-Press It Blending Card was die cut with My Creative Time – Rectangle Frame Layers and the sentiment shape was die cut with Whimsy Stamps – Quick Strips Die Set. Tim Holtz Ranger Distress Oxide – Fossilized Amber was used to ink around the sentiment shape edges.

The image and sentiment were then stamped using my MISTI and Memento – Tuxedo Black ink. I coloured in the image with copic markers. I stamped out the image a second time and used my Brother Scan and Cut to cut it out so that I could use it as a mask to put over the coloured image. I also die cut a 1″ circle out of Inkadoo Stamping Mask Paper for the moon. I placed both masks onto the coloured image. I tore some masking tape in half vertically to create the grass pattern and then used the reverse to mask the grass while I did the sky. I saw this on a you-tube video and thought it was a cool technique. A mixture of Tim Holtz Ranger Distressed inks listed below were used to create the ground and sky. I removed all of the masks and then for the circle I used the reverse mask to section out just the circle centre and coloured in the moon with my Copic markers. To finish off the card, I applied 3M VHB – 2 sided tape to the back of the image and sentiment and popped them both up on the card.

Card Recipe:

Stamp: Vampire Treat – TT022 (High Hopes Rubber Stamps)

Sentiment: Happy Halloween – H232 (High Hopes Rubber Stamps)

Inks: Memento – Tuxedo Black, Tim Holtz Ranger Distress Oxide: Fossilized Amber, Blueprint Sketch, Wilted Violet, Twisted Citron, Peeled Paint, Black Soot and Seedless Preserves, Tim Holtz Distress Ink – Carved Pumpkin

Paper: Copic Marker X-Press It Blending Card, Hammermill – Premium Colour 100 lb., Echo Park – I Love Halloween (6″x6″), Orange cardstock

Die Cuts:  My Creative Time – Rectangle Frame Dies, My Creative Time – Rectangle Frame Layers, Whimsy Stamps – Quick Strips Die Set – WSD330

Tools: MISTI – Most Incredible Stamping Tool, 3M VHB – 2 sided tape, Sakura Glaze – Black, Pen Gelly Roll Sakura #5 Pen, Brother Scan and Cut, Inkadoo Stamping Mask Paper

Image coloured with Copic Markers:

Skin: E21, E11, E04, E00, E000, R30, R20 (Eyes: Sakura Glaze – Black, Pen Gelly Roll Sakura #5 Pen) (Teeth: Pen Gelly Roll Sakura #5 Pen)

Hair: BV29, BV25, BV23, C1

Cape and Bat Bow-Tie: R59, R29, R27, R24

Coat and Bat: BV29, BV25, BV23

Dracula Bow-Tie: C1, C00, Colorless Blender

Coffin Inside: V09, V06, V04, V01

Coffin: E29, E27, E25, E23

Trick or Treat Bag and Strap: YG17, E08, YR18, YR16, YR12

Shadow Under Coffin: C3, C2

Moon: Y000, Y02, BV20, C0, C00

Hope you like it and have a fantastic week!

You can find lots of inspiration from the Design Team Divas at the High Hopes blog, and the High Hopes Rubber Stamps Facebook Fan page plus you can also follow us on
Instagram, Twitter and Pinterest.

Just a Note To Say!!


Today, I’m sharing an inspirational card that I made using Dreamerland Crafts stamps called Farm 01 – D20017 and Just A Note To Say – DCS17038 for the main images and Mix and Match Clear Stamps – DCS19093 for the sentiment.

Above is a close-up of the card. Below is the card opened.

To make this card I used a base card of 11″ x 4.25″ using Hammermill – Premium Colour 100 lb. cardstock. I scored it at 2.75″ and 5.5″ to create an easel card. I stamped the fence, horses, pig and girl onto Inkadoo Stamping Mask Paper and fussy cut around them. Then I placed them onto Copic Marker X-Press It Blending Card cut at 5.5″ x 4.25″ for placement.

I removed the fence and using my MISTI and Memento – Tuxedo Black ink, I stamped the girl. I placed the girl mask over top of the stamped girl image and then stamped the fence, chicks, pig and farm house and fields. I stamped a horse and then placed the horse mask over it and stamped a second horse. Next, I removed the masks from the scene. I coloured all of the images and background in with Copic markers. I added double sided tape to the bottom portion of the easel card and attached the coloured image.

My Creative Time – Rectangle Frame Dies were used create the base background and Gina Marie Designs – Petite Looped Lace Rectangle dies were used to create the base for the sentiment. I stamped the sentiment using my MISTI and Versa Fine – Onyx Black ink. I added Ranger – Clear Super Fine Detail embossing powder and then heat embossed the powder with Marvy Uchida – Embossing Heat Tool. Tim Holtz Distress Ink – Peeled Paint ink was used to ink around the edges of both die cuts.

To complete the card, the large rectangle was added directly to the card using double-sided tape and 2 layers of 3M VHB – 2 sided tape were added to the back of the sentiment die cut and attached to the base card background.

Card Recipe:

Stamps: Farm 01 – D20017 (Dreamerland Crafts); Just A Note To Say – DCS17038 (Dreamerland Crafts)

Sentiment: Mix and Match Clear Stamps – DCS19093 (Dreamerland Crafts)

Inks: Memento – Tuxedo Black, Versa Fine – Onyx Black, Tim Holtz Distress Inks – Peeled Paint

Embossing Powder: Ranger – Clear Super Fine Detail embossing powder

Paper: Copic Marker X-Press It Blending Card, Hammermill – Premium Colour 100 lb., Momenta – Cardstock

Die Cut: Gina Marie Designs – Petite Looped Lace Rectangle, My Creative Time – Rectangle Frame Dies

Tools: MISTI – Most Incredible Stamping Tool, Cuttlebug, Marvy Uchida – Embossing Heat Tool, 3M VHB – 2 sided tape, Inkadoo Stamping Mask Paper

Image coloured with Copic Markers:

Skin: E000, E00, E04, E11, E21, R22, R20

Hair:  E47, E44, E43

Blouse and Scarf: V28, BV13, BV11, BV04, BV01, BV00, BV0000, Gelly Roll Sakura #8 Pen

Pants: B26, B23, B21

Boots: E27, E25, E23, E21

Feather and Paper: C7, C1, C0, C00

Horses: E59, E49, E37, E35, E33, E31, C7, C5

Pig: R20, R000, E93, E47

Chicken and Chicks: Y04, Y02, Y00, C2, C1, C00, YR12, R17

Barn and Silo: R39, R37, R35, Y08, Y04, C7, C5, C1, C0

Fence: E59, E27, E25, E23, E21

Grass: YG17, YG13, YG03, YG01

Sky: B02, B01, B00, B000, B0000, Colorless Blender

Ground: E37, E35, E33, E31

Hope you like it and have a great week!

You can find more cards to inspire you at Dreamerland Crafts and Pointer Scrapbooking on the Facebook Fan pages from the rest of our design team.

Love Every Little Moment


Welcome Back Dreamerland Craft Fans!

Today, I’m sharing a card that I made using Mix and Match Clear Stamps (DC19095) (Dreamerland Crafts)!  Love the images for this stamp. There are so many different scenes that can be created. I chose to do a night scene with the 2 best friends sharing the serenity of the night sky.

To make this card, I first die cut some Bristol paper and then drew in the hills with light pencil and traced around the stamps to get the general idea of placement. I created a masked image of the bear and bunny using Inkadoo Stamping Mask Paper and Post-It Note for the hills and cut them both out. Next I erased all of the lines so that you could barely see them and stamped the bear and the bunny image directly onto the Bristol Paper. Next, I mounted the mask of the characters and hills that I had cut out previously over top of the stamped images so that they would be protected while I coloured in the sky.

To do the sky I used a mixture of Tim Holtz inks listed below and PrismaColor pencils. Then I blended all of the colours together using Gamsol and a blending paper stump. I repeated the process with the PrismaColor pencils several times.

Once the sky was completed, I removed the stencil for the grass and proceeded to colour it in using the same technique that I had used for the sky.

Lastly, I removed the mask for the bear and bunny and coloured them in. I added in some small trees using a Black Prismacolor pencil.

I popped my finished image, back into my MISTI again and stamped the sentiment using VersaMark. I also stamped in the stars in the sky and embossed everything with Ranger Embossing Powder White – Extra Fine Detail. I also used a brush and tapped some of the white embossing powder all over the sky. Then heated it with my Marvy Uchida – Embossing Heat Tool. Lastly, I stamped and embossed the seagulls using VersaFine – Onyx Black and Ranger – Clear Super Fine Detail embossing powder. I coloured them in using Black PrismaColor pencil and then added in some highlights on the wings.

I popped up the coloured image and blue cardstock with 3M VHB – 2 sided tape.

Card Recipe:

Stamp and Sentiment: Mix and Match Clear Stamps (DC19095) (Dreamerland Crafts)

Inks: Versa Fine – Onyx Black, Versa Mark, (Sky Base): Tim Holtz Distress Ink – Blueprint Sketch, Tim Holtz Distress Ink – Chipped Sapphire, Tim Holtz Distress Ink – Black Soot

Embossing Powder: Ranger Embossing Powder White – Extra Fine Detail, Ranger – Clear Super Fine Detail embossing powder.

Paper: Inkadoo Stamping Mask Paper, Blue and Green – Recollections paper, Bristol Paper

Die Cuts:  My Creative Time -Stitched Squares Inside and Out

Tools: MISTI – Most Incredible Stamping Tool, Cuttlebug, Marvy Uchida – Embossing Heat Tool, 3M VHB – 2 sided tape

Image coloured with PrismaColor Pencils:

Sky:  Indigo Blue (PC901), Indanthrone Blue (PC208), Violet Blue (PC933), Denim Blue (PC1101), Black (PC935)

Grass: Dark Green (PC908), Peacock Green (PC907), Marine Green (PC988), Grass Green (909)

Bear: Dark Brown (PC946), Dark Umber (PC947), Chocolate (PC1082), Burnt Ochre (PC943), Sienna Brown (PC945)

Rabbit: 30% Warm Grey (PC1052), 20% Warm Grey (PC1051), 10% Warm Grey (PC1050)

Seagull Wings Highlight: White (PC938), Denim Blue (PC933)

All colours were blended with paper stump and Gamsol blending fluid.

Hope you like it and have a great week!

You can find more cards to inspire you at Dreamerland Crafts on the Facebook Fan page from the rest of our design team.

Our Friendship is Magic!


Welcome High Hopes Rubber Stamps Fans!

It’s Wednesday, and for my last High Hopes card for the year, I’m sharing a couple of good friends just relaxing and taking it easy! Sometimes it is nice to just chill out a bit! LOL! The stamp for the main image is called South Pole Pals R147 (High Hopes Rubber Stamps).

To make my card, I decided to keep it simple. I cut out the frame using Amy Design – Dies – Keep It Cool – Cool Square Frame and Copic Marker X-Press It Blending Card. Next, I stamped the image using my MISTI into the centre of the die cut. I coloured this in with the Copic markers listed below. For the outside of the die cut, I used Tim Holtz Distress Inks – Broken China and sponged on the ink using a dauber.

To create the background for the main image, I re-stamped the main image onto Inkadoo Stamping Mask Paper and fussy cut it out. Then I placed the mask over my coloured image. Next I used a mixture of Tim Holtz Distress Oxide inks, Faded Jeans, Wilted Violet and Festive Berries to create the sky. I have never tried this before, and just love the way it turned out.

For the snow, I stamped the bottom of the image with VersaMark ink and then added WOW! Embossing Glitter – White Puff Twinkle. I heated up the embossing powder with my heat gun and then added some Stickles – Diamond along the top of the snow.

Next I assembled the card onto 5.5″ x 5.5″ white AC Cardstock. I cut out a piece of 5.5″ x 5.5″ Hot Buy Craft Smart – Holiday Glitz Glitter Paper and mounted it with 2 sided tape onto the base. Then I added glue to the back of the frame and centre previously cut and coloured with Zig 2 Way Glue and mounted it onto top of the card.

Lastly, I added the sentiment Magic Friendship F234 (High Hopes Rubber Stamps) and popped it up with 3M VHB – 2 sided tape to finish up the card.

Card Recipe:

Stamp:  South Pole Pals R147 (High Hopes Rubber Stamps)

Sentiment: Magic Friendship F234 (High Hopes Rubber Stamps)

Inks: Memento – Tuxedo Black, Tim Holtz Distress Oxide Festive Berries, Tim Holtz Distress Oxide Faded Jeans, Tim Holtz Distress Oxide Wilted Violet, Tim Holtz Distress Inks – Broken China, Versamark

Paper: Copic Marker X-Press It Blending Card, Hot Buy Craft Smart – Holiday Glitz Glitter Paper 12″ x 12″

Die Cut: Amy Design – Dies – Keep It Cool – Cool Square Frame

Tools: MISTI – Most Incredible Stamping Tool, Cuttlebug, 3M VHB – 2 sided tape, Inkadoo Stamping Mask Paper

Embossing Powder: WOW! Embossing Glitter – White Puff Twinkle

Image coloured with Copic Markers:

Penguin: W9, W7, W5, E15, YR14, Y17, Y15, Y11, E45, E43, E41, Colorless Blender

Polar Bear: W9, W2, W1, W0, R30, R20, Colorless Blender

Hope you like it and have a fantastic week!

You can find lots of inspiration from the Design Team Divas at the High Hopes blog, and the High Hopes Rubber Stamps Facebook Fan page plus you can also follow us on
Instagram, Twitter and Pinterest.


Walking in a Winter Wonderland


Welcome Back Dreamerland Craft Fans!

Today, I’m sharing a card with you that I made using DCS19089 – Mix and Match Clear Stamp  (Dreamerland Crafts Clear Stamps) for the main image and sentiment and 2018 Christmas Trees & Houses – M18312 (Dreamerland Crafts Clear Stamps) for the trees in the background! I thought this little bear was just so adorable, so I thought I would make him pulling his little forest friend on a little walk through the forest!

I used the centre die cut from Creative Expressions by Sue Wilson – Festive Collection – Pointsettia Mini Background – CED3049 to cut out the area I wanted to stamp my image on. I used Copic Marker X-Press It Blending Card, Memento – Tuxedo Black ink and my MISTI to get a nice clean image. The first step was to stamp the bear, sled and bunny. Next I used Inkadoo Stamping Mask Paper and stamped the 3 images again. Next, I added the masked images over top of the images that were previously stamped on the base image.

The second step was to stamp in the trees. I wanted to give the impression that some trees were further back, so I inked the tree stamp with Memento – Bamboo Leaves and stamped once and then immediately again using the same stamp. I performed this several times across the background. Once all of the trees were in place, I removed the masking and was ready to colour in my images.

Before adding snow to the sky, I stamped on the sentiment using VersaMark ink and Ranger Embossing Powder White – Extra Fine Detail. Then I added in the snow flakes using Gelly Roll Sakura #8 Pen.

The colours used for each character and the trees are listed below. The final step for the main image was to add in some sparkle on the trees and snow on the ground. For the glitter on the trees I used Quickie Glue and DecoArt Glamour Dust. For the snow below the trees, sled and bear, I used VersaMark ink and WOW! Embossing Glitter – White Puff Twinkle and touches of Stickles – Diamond.

Lastly, I die cut the background frame using Recollections – Christmas Inkjet Printable Glitter Paper and Creative Expressions by Sue Wilson – Festive Collection – Pointsettia Mini Background. I added glue to the back of the die cut and mounted it on top of Crafts Sparkling Stickers – 02-3068629. Then I popped up the main image in the centre using 3M VHB – 2 sided tape.

Card Recipe:

Stamps: 2018 Christmas Trees & Houses – M18312 (Dreamerland Crafts Clear Stamps), DCS19089 – Mix and Match Clear Stamp (Dreamerland Crafts Clear Stamps)

Sentiments: DCS19089 – Mix and Match Clear Stamp (Dreamerland Crafts Clear Stamps)

Inks: Memento – Tuxedo Black, Memento – Bamboo Leaves, Memento – Rich Cocoa, VersaMark ink

Embossing Powder: Ranger Embossing Powder White – Extra Fine Detail, WOW! Embossing Glitter – White Puff Twinkle

Paper: Copic Marker X-Press It Blending Card, Crafts Sparkling Stickers – 02-3068629, Recollections – Christmas Inkjet Printable Glitter Paper – 8.5 x 11″

Die Cuts: Creative Expressions by Sue Wilson – Festive Collection – Pointsettia Mini Background – CED3049,

Tools: MISTI – Most Incredible Stamping Tool, Cuttlebug, 3M VHB – 2 sided tape, Inkadoo Stamping Mask Paper, Stickles – Diamond

Image coloured with Copic Markers:

Bear: E57, E55, E53, E39, E37, E35, E34, R59, R37, R35, Sakura Glaze – Black (Nose and Eyes), Gelly Roll Sakura #5 Pen

Bunny: E57, E55, E53, E51, R20, R00, Sakura Glaze – Black (Eyes), Gelly Roll Sakura #5 Pen

Sleigh: R59, R37, R35, C3, C2, C1, E39, E37, E35

Trees: BG96, YG67, YG17, G21, G20, G00, G0000

Background Sky: B99, B97, B95, B93, B91


Hope you like it and have a great week!

You can find more cards to inspire you at Dreamerland Crafts on the Facebook Fan page from the rest of our design team.