Tag Archive | Tim Holtz Distress Ink – Spun Sugar

Tea Time!!


Sharing a card I made today using KLM Digital Designs – Rose Teapot from the new June release for the image and sentiment. I have always loved tea and never liked coffee. I have a huge cupboard full of Herbal Teas and love how wonderful it tastes especially with a spoonful of natural unpasteurized honey. Spending time with my grandmother and having a cup of tea with her was always special and I still cherish those moments even though she left us for a better place a long time ago.

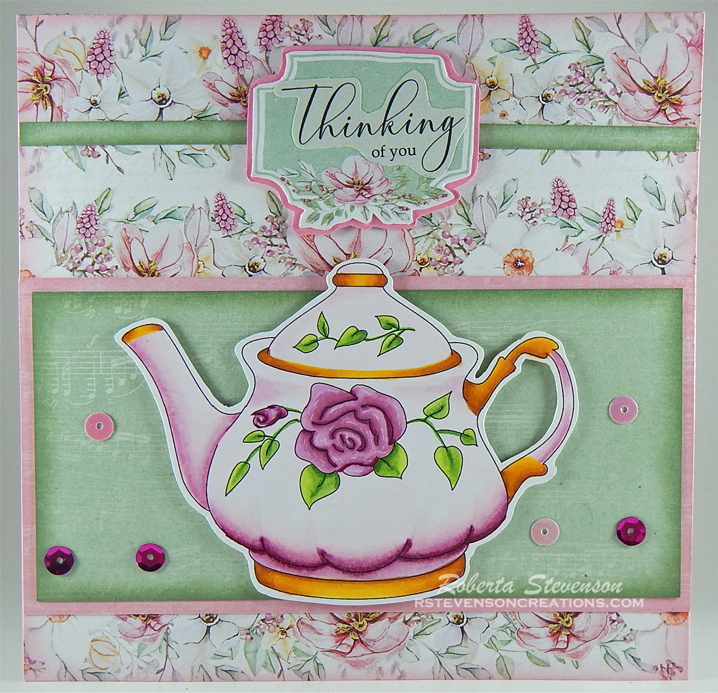
To make the card, I first imported the image and the sentiment into Microsoft Word. I created the green background behind the sentiment by creating a rectangle shape and moving it to the back behind it. Then I coloured the rectangle green using a custom colour of R233, G242 and B227 combined and printed out the image onto Copic Marker X-Press It Blending Card and the sentiment onto copy paper using my HP Printer. I coloured in the image with Copic markers and then fussy cut around it leaving a thin white border. I fussy cut around the sentiment as well and applied glue behind it and then attached it to the little sign. Then I attached the sign to some pink cardstock and fussy cut around the sign again. The background papers were all from P13 – The Four Seasons – Spring.

I cut the green patterned paper to the size of 5.75″ x 2.75″ and approximately 6″ x 3/16″ and inked around the edges with Tim Holtz Distress Ink – Bundled Sage. The pink solid patterned paper is 6″ x 3″ and the large patterned background is 6″ x 6″. The pinks were inked around the edges with Tim Holtz Distress Ink – Spun Sugar.

To assemble the card, I began with a base card of 6″ x 6″ using AC White Cardstock. Using double-side tape, I attached the large background directly to the base. Next I applied the larger pink rectangle to the main background using double-sided tape. The 2 green layers were also added using double-sided tape. For the sentiment and the image, 3M VHB – 2 sided tape was added to the backs of each and then attached to the card. To finish it off, I added some sequins using Craftin Desert Diva’s – Sherbert.

Card Recipe:

Stamp and Sentiment: Rose Teapot – KLM Digital Designs

Inks: HP Printer Grayscale, Tim Holtz Distress Ink – Bundled Sage, Tim Holtz Distress Ink – Spun Sugar

Paper: Copic Marker X-Press It Blending Card, P13 – The Four Seasons – Spring 6″ x 6″, P13 – The Four Seasons – Spring 12″ x 12″, Pink Cardstock

Miscellaneous: 3M VHB – 2 sided tape, Craftin Desert Diva’s – Sherbert Sequins

Image coloured with Copic Markers:

Teapot: RV66, RV63, RV55,RV52, RV00, RV000

Flower and Leaves: YG7, YG13, YG11, YG03, YG01, RV66, RV63, RV55, RV52

Hope you like it and have a great week!

You can find more cards to inspire you at KLM Designs, KLM Digital Design Team and KLM Digital Designs on the Facebook Fan page from the rest of our design team.

Miss You!!


Today, I’m sharing a slim-line card that I made using Dreamerland Crafts stamps called Meow Meow 04 – D20016 for the main image and for the sentiment Just A Note To Say – DCS17038Dreamerland Crafts. Love this new set and I as soon as I saw it, I knew I wanted to make a card to show how a lot of us are feeling right now during these Covid times missing family and friends.

To make this card I used a base card of 7″ x 8.25″ using Hammermill – Premium Colour 100 lb. cardstock. I scored it at 3.25″.  Next, using my Couture Creations – Go Power and Emboss and Whimsy Stamps – Slimline Marquee Die, I die cut Copic Marker X-Press It Blending Card.  Using my MISTI and Memento – Tuxedo Black ink, I stamped all of the images onto the shaped die cuts and coloured them in with Copic markers.

The frame die cut was coloured using Picket Fence Studio Blender Brush and Tim Holtz Distress Inks: Picked Raspberry, Spun Sugar and Worn Lipstick. The sentiments were stamped and embossed onto black cardstock using Versamark ink and Ranger Embossing Powder White – Extra Fine Detail. This was heat set using Marvy Uchida – Embossing Heat Tool. My cutter was used to cut the stamped sentiments into small strips. 3M VHB – 2 sided tape was applied to the back of each of the sentiments.

To assemble the card, I first turned the die cuts upside down and used a little bit of Scotch Tape on the back side to keep the inserts in place. Then, I applied double-sided tape across the entire back and attached it directly to the card base. I attached each of the sentiments and finished off the card with Crafts – Rhinestone Stickers.

Card Recipe:

Stamps: Meow Meow 04 – D20016 – Dreamerland Crafts

Sentiments: Just A Note To Say – DCS17038 – Dreamerland Crafts, Love and Cuddles – Penny Black

Inks: Memento – Tuxedo Black, Tim Holtz Distress Ink – Picked Raspberry, Tim Holtz Distress Ink – Spun Sugar, Tim Holtz Distress Ink -Worn Lipstick, Versamark

Paper: Copic Marker X-Press It Blending Card, Hammermill – Premium Colour 100 lb.

Die Cut: Whimsy Stamps – Slimline Marquee Die (WSD347)

Embossing Powder: Ranger Embossing Powder White – Extra Fine Detail

Tools: MISTI – Most Incredible Stamping Tool, Couture Creations – Go Power and Emboss, Picket Fence Studio Blender Brushes, Marvy Uchida – Embossing Heat Tool, Crafts – Rhinestone Stickers – 02-3048783

Image coloured with Copic Markers:

Cats: C7, C5, C3, R30, R22, R20, 100, YG23, YG17, G07 (Noses – Sakura Glaze – Black)

Bunny:  E35, E33, E31

Grass: YG17, YG13, YG03, YG01

Sky: B02, B01, B00, B000

Hope you like it and have a great week!

You can find more cards to inspire you at Dreamerland Crafts and Pointer Scrapbooking on the Facebook Fan pages from the rest of our design team.

Babies Are Sweet Beginnings!!!


It’s Wednesday, and this week I’m sharing a Baby Card featuring Sweet Beginnings – S169 from (High Hopes Rubber Stamps). I love this adorable stamp and I also have a few nieces that are pregnant right now. We are all looking forward to seeing pictures of the new little one’s when they are born. Once Covid19 is over, hopefully, we will be able to travel again and see them in person.

To create the card this week, I stamped the image onto Copic Marker X-Press It Blending Card using my MISTI and Memento – Tuxedo Black ink. I fussy cut around the image and then coloured it in with Copic Markers.

I created a card base made from Hammermill – Premium Colour 100 lb. paper, folded to 5.5″ x 4.25″. For the background paper, I cut a piece the same size as the base from Echo Park – Hello Baby – It’s a Girl. I attached this directly to the base with double-sided tape and then inked around the edges using Tim Holtz Distress Ink – Spun Sugar. I popped up the coloured image using 3M VHB – 2 sided tape. Lastly, I added some little embellishments from Forever In Time – Painted Wood Buttons – Patchwork Elephants to finish off the card.

Card Recipe:

Stamp: Sweet Beginnings – S169 (High Hopes Rubber Stamps)

Inks: Memento – Tuxedo Black, Tim Holtz Distress Ink – Spun Sugar

Paper: Copic Marker X-Press It Blending Card, Hammermill – Premium Colour 100 lb., Echo Park – Hello Baby – It’s a Girl (6″x6″)

Embellishments: Forever In Time – Painted Wood Buttons – Patchwork Elephants – SE083C

Tools and Miscellaneous: MISTI – Most Incredible Stamping Tool, Sakura Glaze – Black, 3M VHB – 2 sided tape

Image coloured with Copic Markers:

Banner: R85, RV13, RV11, RV10

Bear: E29, E25, E23, E21, R30, R02, Y35, Y18, Y13, Sakura Glaze – Black – Eyes and Mouth

Bunny: BV23, BV20, B60, R22, R20, BG49, BG23, BG15, BG10, BG11, YG41, G00, G000, Sakura Glaze – Black – Eyes

Kitten: N8, N5, N3, N1, V17, V15, V04, V01, Sakura Glaze – Black – Eyes and Nose

Hope you like it and have a fantastic week!

You can find lots of inspiration from the Design Team Divas at the High Hopes blog, and the High Hopes Rubber Stamps Facebook Fan page plus you can also follow us on
Instagram, Twitter and Pinterest.

May Your Day Be Filled With Love!!


It’s Wednesday, and I’m back this week to start off April with lots and lots of love from Elmer the Elephant using Elmer Elephant – Q043 (High Hopes Rubber Stamps) for the main image and Large Filled With Love – H004 (High Hopes Rubber Stamps) for the sentiment. With everything happening in the world right now, I think we could all use a little bit of love. When I was a child, Elmer was also called Elmer the Safety Elephant, so I hope that you and all of your loved ones are keeping safe right now too!

To make this card I first die cut some Copic Marker X-Press It Blending Card using Your Next Stamp – Stitched Rectangle Die Set (YNSD214) and my Cuttlebug. Next I used my MISTI and Memento – Tuxedo Black ink to stamp the image and the sentiment. I coloured in the image using Copic markers. Then I created my own background using a mixture of Tim Holtz Distress Inks – Festive Berries, Spun Sugar and Picked Raspbery and Kraftin’ Kimmie – Happy Hearts Stencil. I also did all around the edges with the Picked Raspberry. Lastly, added in the bottom border of hearts using Sizzix Framelets by Stephanie Barnard – 562676 – Hearts Dotted which I ran through my Cuttlebug twice with 2 different red cardstock. Then I inlayed the lighter colour into the darker hearts. I had also ran the cardstock through my Xyron Create a Sticker beforehand to make the die-cut work like a sticker and easy to inlay. I also used one of the small hearts for the “o” in “Love” and added some Spectrum Noir Sparkle Pen – Red Berry on top of it. Finally, I mounted the finished image onto a white base card 5.5″ x 4.25″.

Card Recipe:

Stamp: Elmer Elephant – Q043  (High Hopes Rubber Stamps)

Sentiment: Large Filled With Love – H004 (High Hopes Rubber Stamps)

Inks: Memento – Tuxedo Black, Tim Holtz – Festive Berries, Tim Holtz Distress Ink – Spun Sugar, Tim Holtz Distress Ink – Picked Raspberry

Paper: Copic Marker X-Press It Blending Card, Various scraps of red cardstock

Die-Cuts: Your Next Stamp – Stitched Rectangle Die Set (YNSD214), Sizzix Framelets by Stephanie Barnard – 562676 – Hearts Dotted

Tools: MISTI – Most Incredible Stamping Tool, Cuttlebug, Xyron Create a Sticker, Spectrum Noir Sparkle Pen – Red Berry

Image coloured with Copic Markers:

Elephant: C5, C3, C2, C1, C0, R22, R20, R11, RV32

Ground: E35, E34, E33, E31

Hope you like it and have a fantastic week!

You can find lots of inspiration from the Design Team Divas at the High Hopes blog, and the High Hopes Rubber Stamps Facebook Fan page plus you can also follow us on
Instagram, Twitter and Pinterest.

There is no better time to do a little shopping over at the High Hopes Stamps website store!! As there is a sale going on! click HERE to

SAVE 20% STORE WIDE

using coupon code LOVE