Archive | December 2023

Penguins Christmas!!!


Sharing another Christmas card I made using It’s Penguining To Look A Lot Like Christmas! by Kraftin’ Kimmie Stamps. Merry Christmas and A Happy New Year from our family to yours!

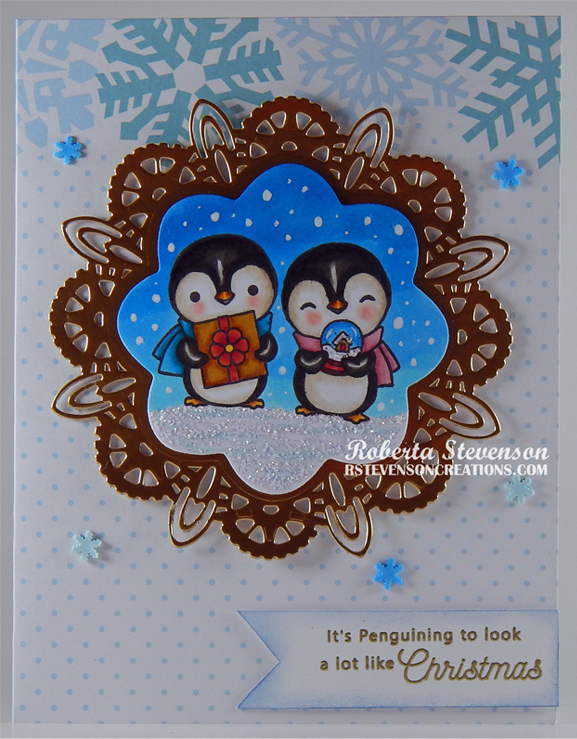
To make my card this week, I began with a Recollections – Winter 4.25″ x 5.5″ card base. I die cut Copic Marker X-Press It Blending Card and Recollections – Matte Gold Foil cardstock with my Cuttlebug and Creative Expressions – Industrial Chic – Gear Flower dies . With my MISTI and Memento – Tuxedo Black ink, I stamped the image onto the die cut. The sentiment was stamped using VersaMark ink and then embossed with Ranger Super Fine Gold Embossing powder. Marvy Uchida – Embossing Heat Tool was applied to the powder to heat emboss it. I cut some notches into the sentiment piece and then inked around the edges with some blue that I still had on a dauber.

The image was coloured in with Copic Markers listed below and then Stickles – Diamond was applied to the ground to add some extra sparkle. Wink of Stella – Clear was applied to the ribbon on the gift. U-Line double-sided foam tape was applied to the back of the die cuts and sentiment and they were all popped up onto the card. Lastly, I applied some small snowflakes from Recollections – Snowflake Specialty Polyester Glitter to complete the card.

Card Recipe:

Stamp and Sentiment: It’s Penguining To Look A Lot Like Christmas!Kraftin’ Kimmie Stamps

Inks: Memento – Tuxedo Black, VersaMark ink

Paper: Copic Marker X-Press It Blending Card, Recollections – Winter 4.25″ x 5.5″ (Assorted Box of Cards), Recollections – Matte Gold Foil cardstock

Die Cut: Creative Expressions – Industrial Chic – Gear Flower (CED3163)

Miscellaneous: MISTI – Most Incredible Stamping Tool, Gelly Roll Sakura #10 Pen, Wink of Stella – Clear, U-Line Double-Sided Foam Tape, Marvy Uchida – Embossing Heat Tool, Recollections – Snowflake Specialty Polyester Glitter

Image coloured with Copic Markers:

Penguins: W9, W7, W5, W3, W0, E15, YR14, Y17, Y11, RV00, E43, E42, E41, E40, R30, R22

Scarves: BG09, BG05, BG02, R85, R83, R81

Present: E15, YR27, YR24, YR13, Y04, R29, R27, R24, Wink of Stella – Clear

Globe: R39, R35, E35, Stickles – Diamond

Sky: B05, B04, B02, B01

Snow: B00, Stickles – Diamond, Gelly Roll Sakura #10 Pen

Hope you like it and have a fantastic week!

Mandala #3


Today, I’m sharing a Christmas card using KLM Digital DesignMandala #3 from the new December release. Being close to Christmas, I also made this to look like a Christmas ornament. Merry Christmas and A Happy New Year to everyone!

Hammermill – Premium Cardstock 110 lb. was used to create a 5.5″ x 5.5″ card base. DCWV – Holiday Cheer paper was cut to the same size and inked around the edges using a Sharpie – Gold Medium Point – Water Based Paint to create the gold border. This was applied directly to the base using double-sided tape.

The image was imported into Microsoft Word and printed out onto Copic Marker X-Press It Blending Card. I coloured in the image with Copic markers listed below and then traced around the entire image using a combination of Pental Slicci – Gold 8.0 pen for the thin lines and UNI Posca Pen – Gold for the thicker lines.

The Mandala was popped up onto the top part of the card using U-Line Double-Sided Foam Tape. With a Cuttlebug and Creative Expressions by Sue Wilson – Festive Collection – Ornate Holly Framed Noel die, I die cut the Noel out of Recollections – Matte Gold Foil 3 times. I layered the 3 pieces together with liquid glue and attached the sentiment to the card. Lastly, I added in some rhinestones to complete the card.

Card Recipe:

Stamp:  Mandala #3 – KLM Digital Designs

Inks: HP Printer Grayscale

Paper: Copic Marker X-Press It Blending Card, Hammermill – Premium Cardstock 110 lb., DCWV – Holiday Cheer (6″ x 6″), Recollections – Matte Gold Foil cardstock

Dies: Creative Expressions by Sue Wilson – Festive Collection – Ornate Holly Framed Noel – CED3073

Miscellaneous: U-Line Double-Sided Foam Tape, Pental Slicci – Gold 8.0 pen, UNI Posca Pen – Gold, Sharpie – Gold Medium Point – Water Based Paint

Image coloured with Copic Markers:

Mandala: BG09, BG07, BG05, B18, B16, G99, G16, YG67, YG63, YG61, YG25, YG23, YG21, R59, R37, R35, R29, R27, R24, R22

Hope you like it and have a great week!

You can find more cards to inspire you at KLM Designs, KLM Digital Design Team and KLM Digital Designs on the Facebook Fan page from the rest of our design team.

A Little Birdie Told Me…


Today, I’m sharing a masculine birthday card using KLM Digital DesignBirds Nest Gnome from the new December release. This image also comes with 2 more sentiments, “Spread your wings & fly” and “Just popping in to say hello“.  It looks like this little birdie told all of his friends too because they’re all ready to party with their hats on. LOL!

Hammermill – Premium Colour 100 lb. cardstock was used to create a 5.5″ x 4.25″ card base.  I cut the paper from Doodlebug Design Inc. – Party Time paper pack to the sizes of 5.5″ x .75″ and 5.5″ x 3.5″ and applied them directly to the base card. .5″ x 4.25″ was applied across the bottom and the thin stripe is 4-7/8″ x 1/8″.  The edges were inked around the card using  Tim Holtz Ranger Distress Ink – Chipped Sapphire.

The image and sentiment were imported into Microsoft Word and printed out onto Copic Marker X-Press It Blending Card. Using a Cuttlebug, I die cut the image using Lawn Fawn – Zig Zag Rectangle Stackables. The image was coloured in with Copic Markers listed below and then popped up onto the base using U-Line double-sided foam tape. The sentiment was fussy cut and then applied with glue to a scrap piece of navy blue cardstock. Once again, I fussy cut around it and then applied U-Line double-sided foam tape and popped it up onto the card. Lastly, I added some Stickles – Diamond to the pompoms on the hats.

Card Recipe:

Stamp and Sentiment:  KLM Digital DesignBirds Nest Gnome

Inks: HP Printer Grayscale, Tim Holtz Distress Ink – Chipped Sapphire

Paper: Copic Marker X-Press It Blending Card, Hammermill – Premium Colour 100 lb., Doodlebug Design Inc. – Party Time (6″ x 6″)

Dies: Lawn Fawn – Zig Zag Rectangle Stackables

Miscellaneous: U-Line double-sided foam tape, Cuttlebug, Stickles – Diamond

Image coloured with Copic Markers:

Skin: E21, E11, E04, E00, E000

Beard: E08, YR18, YR16, YR12

Shoes: E27, E25, E23, E21

Clothing: BG72, BG57, BG32, BG11, B93, B52, B45

Hat: R46, R14, R08

Bird: E35, E34, E31, R02, R00

Egg and Nest: B00, Y26, Y23, Y21, E23

Sky and Clouds: B60, B04, B02, B01, B00, C00

Grass: G16, YG25, YG23

Hope you like it and have a great week!

You can find more cards to inspire you at KLM Designs, KLM Digital Design Team and KLM Digital Designs on the Facebook Fan page from the rest of our design team.

Sweater Weather!!!


I went to an amazing Ugly Sweater crop this week at The Scrap Club and I thought it would be fun to make a Christmas card for a few of the ladies using New Sweater Weather and New Ugly Sweater Stencil by Kraftin’ Kimmie Stamps.

To make my cards this week, I began with a card base of Hammermill – Premium Colour 100 lb. cardstock, cut and scored to be 5.5″ x 4.25″. Hammermill – Premium Colour 100 lb. cardstock was also cut to the same size. Kraftin’ Kimmie StampsNew Ugly Sweater Stencil were applied to the paper using blending brushes and Krafty Kolours – Flirty Flamingo, Krafty Kolours – Ocean Opulence. I wanted to keep the background soft.

With my MISTI and Memento – Tuxedo Black ink, I stamped the images and the sentiment onto Copic Marker X-Press It Blending Card. Memento – Summer Sky ink was used to stamp the image of the pond. I coloured the images in with Copic markers and fussy cut all around them. I glued the stump and pond directly to the base. The mouse and bear were attached directly on top of the pond with glue. U-Line Double-Sided Foam Tape was attached to the bunny, penguin and sentiment and they were all popped up onto the card. Krafty Kolours – Ocean Opulence ink was applied around the sentiment before adding it to the card.

Cosmic Shimmer Fluffy Stuff was applied around the stump and the pond and then heat embossed with a Marvy Uchida – Embossing Heat Tool. Lastly, I added Stickles – Diamond for the snow on the top and side of the stump and to add some sparkle to the ice.

Card Recipe:

Stamp and Sentiment: New Sweater WeatherKraftin’ Kimmie Stamps

Inks: Memento – Tuxedo Black, Memento – Summer Sky, Krafty Kolours – Flirty Flamingo, Krafty Kolours – Ocean Opulence

Paper: Copic Marker X-Press It Blending Card, Hammermill – Premium Cardstock 110 lb., Hammermill – Premium Colour 100 lb.

Stencils: Kraftin’ Kimmie StampsNew Ugly Sweater Stencil

Miscellaneous: MISTI – Most Incredible Stamping Tool, Gelly Roll Sakura #10 Pen,  U-Line Double-Sided Foam Tape, Cosmic Shimmer Fluffy Stuff, Blending Brushes

Image coloured with Copic Markers:

Mouse: W7, W5, W3, R30, R22, R02

Penguin: W9, W7, W5, W3, W00, E15, YR14, Y17, E42, E41, E40, R30, R22, Colorless Blender

Bear and Rabbit: E55, E53, E51, E50, R30, R22, R02

Penguin and Rabbit Sweater, Mug, Earmuffs: BG32, BG11, BG10, B0000, R85, R81, RV00, E13, Gelly Roll Sakura #10 Pen

Bear and Mouse Sweater and Scarves: BG32, BG11, BG10, BG02, BG01, BG000

Ice: B0000, Stickles – Diamond

Stump: E27, E25, E23, E21

Snow: B000, Stickles – Diamond

Hope you like it and have a fantastic week!

Hula Hoop Gnome!


Today I’m sharing a card using KLM Digital DesignHula Gnome from the new December release. This image also comes with 2 more sentiments, “Your so much fun to be around” and “I like being around you”.  This hip gnome knows how to use a Hula Hoop! I did too in my younger days, now, not so much! LOL! For some strange reason, I just can’t seem to find the rhythm! How about you?

Hammermill – Premium Colour 100 lb. cardstock was used to create a 5.5″ x 4.25″ card base.  I inked around all of the edges with blender brushes and a mixture of Tim Holtz Ranger Distress Ink – Wilted Violet, Tim Holtz Distress Ink – Fossilized Amber and Tim Holtz Distress Ink – Prize Ribbon.

The image and sentiment were imported into Microsoft Word and printed out onto Copic Marker X-Press It Blending Card. Using a Cuttlebug, I die cut the image using My Creative Time – Rectangle Frame Die Layers. The image was coloured in with Copic Markers listed below and then popped up onto the base using U-Line double-sided foam tape. To finish off the card, I added in some Kraftin’ Kimmie dots.

Card Recipe:

Stamp and Sentiment:  KLM Digital DesignHula Gnome

Inks: HP Printer Grayscale, Tim Holtz Ranger Distress Ink – Wilted Violet, Tim Holtz Distress Ink – Fossilized Amber, Tim Holtz Distress Ink – Prize Ribbon

Paper: Copic Marker X-Press It Blending Card, Hammermill – Premium Colour 100 lb.

Dies: My Creative Time – Rectangle Frame Die Layers – MCT-D274

Miscellaneous: U-Line double-sided foam tape, Cuttlebug, Kraftin Kimmie Dots

Image coloured with Copic Markers:

Skin: E21, E11, E04, E00, E000

Beard: E08, YR18, YR16, YR12

Jeans: B26, B23, B21

Shoes: E33M E31, E30, E27, E25, E23

Shirt: BG72, BG57, BG32, BG11

Hat: R46, R14, R08

Hoola Hoop: V17, V15, V12, B69, B66, B63, Y17, Y15, Y11

Shadow: B00, Colorless Blender, C3, C2, C1

Hope you like it and have a great week!

You can find more cards to inspire you at KLM Designs, KLM Digital Design Team and KLM Digital Designs on the Facebook Fan page from the rest of our design team.

Owl Carol


Today, I’m sharing a Christmas card that I made using a retired image from Di’s Digistamps called Owl Carol.

For the base card, I used Hammermill – Premium Cardstock 110 lb. and cut it and scored it to be 5.5″ x 5.5″. For the background, I cut Hunkydory Adorable Scorable Pattern Packs – Let It Snow paper to the same size as the base card and inked around the edges and along the bottom with Tim Holtz Distress Ink – Prize Ribbon. I adhered this to the base card with double-sided tape. Washi Tape was then applied directly to the left side of the card base. Waffle Flower – Nesting Square dies and Cuttlebug were used to die cut a 4.25″ x 4.25″ piece of dark blue cardstock.  Precision Cutting Dies by Frantic Stamper Inc. “Falalalala” was used to die cut the sentiment 4 times. 3 times with the dark blue cardstock and 1 time using Recollections – Matte Gold Foil cardstock.

The image using HP High Quality Grayscale was printed onto Copic Marker X-Press It Blending Card and die cut using Cuttlebug and My Creative Time -Stitched Squares Inside and Out. The image was coloured in with Copic markers and Cosmic Shimmer Fluffy Stuff was added to the bottom of the image for the snow. Marvy Uchida – Embossing Heat Tool was applied to the snow to puff it up. Stickles – Diamond was applied to the puffy snow to add a little more sparkle and also to the top of the lantern and tree branch. Gelly Roll Sakura #10 Pen was applied in the sky to create a snowy background. Sakura Glaze – Black and Gelly Roll Sakura #5 Pen were added to the noses on the mouse and rabbit. The finished image was popped up onto the blue square cardstock using 3M – double-sided foam tape and then this was attached to the base card using U-Line Double-Sided Foam Tape. The “Falalalala” sentiments were attached together to give the illusion of being 3-D and applied to the card using liquid glue to finish it off.

Card Recipe:

Stamp: Di’s DigistampsOwl Carol

Inks: HP High Quality Grayscale, Tim Holtz Distress Ink – Prize Ribbon

Paper: Copic Marker X-Press It Blending Card, Hammermill – Premium Cardstock 110 lb., Hunkydory Adorable Scorable Pattern Packs – Let It Snow, Recollections – Matte Gold Foil cardstock

Die Cuts: Waffle Flower – Nesting Square dies, My Creative Time -Stitched Squares Inside and Out, Precision Cutting Dies by Frantic Stamper Inc. “Falalalala”, My Creative Time -Stitched Squares Inside and Out

Miscellaneous: U-Line Double-Sided Foam Tape, Stickles – Crystal, Gelly Roll Sakura #10 Pen, Gelly Roll Sakura #5 Pen, Sakura Glaze – Black, Cosmic Shimmer Fluffy Stuff, Marvy Uchida – Embossing Heat Tool, 3M – double-sided foam tape, Stickles – Diamond

Image coloured with Copic Markers:

Owl: C1, C0, E23, YR15, YR12

Mouse: W7, W5, W3, W2, R30, R24, R02, Sakura Glaze – Black, Gelly Roll Sakura #5 Pen

Mouse Scarf: BG72, BG57, BG32, BG11

Rabbit: E55, E53, E51, R30, R02, C0, C00, Sakura Glaze – Black, Gelly Roll Sakura #5 Pen

Rabbit Scarf: G16, YG25, YG21

Guitar: E55, E53, E51, E35, E33

Tree Branch: E29, E25, E23

Lantern and Candle: R46, R14, R08, YR16, Y08, Y00, C8, C6, C4

Sky: B99, B97, B95, B93

Snow: Cosmic Shimmer Fluffy Stuff, Stickles – Diamond

Hope you like it and have a great week!

Added into Challenge:

Challenge #81 – Anything Goes with a Featured Critter