Today I’m sharing a CAS card that I made using KLM Digital Designs – Floral Horseshoe – Pansy from the new September 2024 Release.
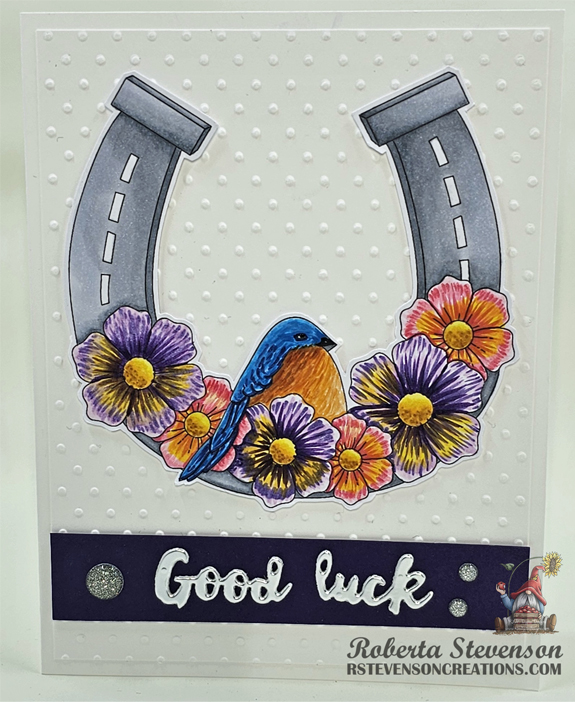
The base card was created to the size of 4.25″ x 5.5″ out of Hammermill – Premium 110 lb. cardstock. Cuttlebug Embossing Folder – Swiss dots and a Cuttlebug were used to create the background on Hammermill – Premium Colour 100 lb. cardstock, cut to the size of 4″ x 5.25″. This was popped up onto the base card using U-Line Double-Sided Foam Tape.
The image was printed out with my HP Printer onto Copic Marker X-Press It Blending Card using High Quality Grayscale and coloured in with Copic markers, then fussy cut. A Sakura Glaze – Black pen was used to apply the dot in the eye. Recollections – Purple Passions paper was cut to the size of 4″ x .75″. U-Line Double-Sided Foam Tape was applied to this and it was centred and popped up onto the Swiss Dots background. Crafter’s Companion Luxury Cardstock – Silver was die cut 3 times using a Cutttlebug and “Good Luck” die from PaperCrafter Today – 15 Die Cut Sentiment Set. I glued the die cuts together with liquid glue to give them an embossed look and then glued them to the sentiment strip. Lastly, Kraftin’ Kimmie – Dazzling Dots were applied around the sentiment to finish off the card.
Card Recipe:
Stamp and Sentiment: KLM Digital Designs – Floral Horseshoe – Pansy
Inks: HP Printer High Quality Grayscale
Paper: Copic Marker X-Press It Blending Card, Hammermill – Premium Cardstock 110 lb., Recollections – Purple Passions 8.5″ x 11″, Crafter’s Companion Luxury Cardstock – Silver – 8.5 x 11″
Embossing Folder: Cuttlebug Embossing Folder – Swiss dots
Die Cuts: PaperCrafter Today – 15 Die Cut Sentiment Set
Miscellaneous: Sakura Glaze – Black pen, U-Line Double-Sided Foam Tape, Kraftin’ Kimmie – Dazzling Dots
Image coloured with Copic Markers:
Horseshoe: C5, C3, C2, C1
Flowers: E15, Y17, Y15, Y11, Y08, V17, V12, V09, V000, RV14, RV13, RV11, RV000
Bird: E99, E97, YR20, YR16, YR15, YR12, Y32, B39, B14, B12, B06, B05, B000, BG01, C7
Hope you like it and have a great week!
You can find more cards to inspire you at KLM Designs, KLM Digital Design Team and KLM Digital Designs on the Facebook Fan page from the rest of our design team.