Tag Archive | Kraftin’ Kimmie – Starburst Stencil

Rain or Shine!


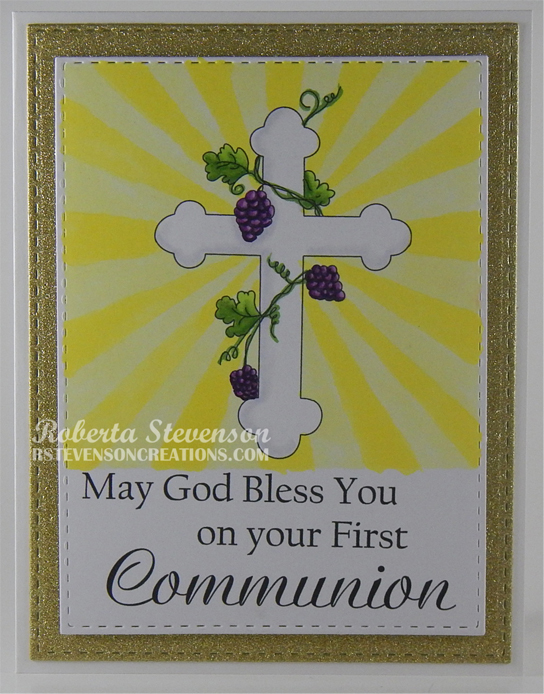
Sharing a card I made today using Penny Black Stamps – Rain or Shine. My husband and I always celebrate the first day that we started going out together and also our wedding anniversary each year. Yesterday, marked 36 wonderful years together. We had bears on the top of our wedding cake, so I thought it would be great to make him a card with bears to celebrate our special day.

To make my card, I started out with Hammermill – Premium Colour 100 lb. cardstock to create a card base of 5.5″ x 4.25″. Using My Creative Time – Rectangle Frame Dies and my Cuttlebug, I die cut a small rectangle into the front of the card. For the raindrops, I first applied some Post-It tape down the centre of the card and then applied Tim Holtz Distress Inks – Tumbled Glass with a Picket Fence – Blending Brush. I placed Kraftin’ Kimmie – Rainy Day Stencil over top of this blue section and this time I applied Tim Holtz Distress Ink – Salty Ocean. I removed the stencil and the Post-it Note tape and covered the centre where the blue colour ended. Using a Picket Fence – Blending Brush and Tim Holtz Distress Ink – Squeezed Lemonade, I applied yellow to the entire right side of the card. Lastly, I placed Kraftin’ Kimmie – Starburst Stencil over top and using the same brush, I applied Tim Holtz Distress Ink – Mustard Seed. I die cut the word “Happy” using My Creative Time – Happy Everything Stamp Set and Recollections – Black cardstock. Lastly, using a sentiment from the same stamp set, I stamped and heat embossed the word “Anniversary” using Versa Fine – Onyx Black and Ranger – Clear Super Fine Detail embossing powder.

Here is the inside of the card.

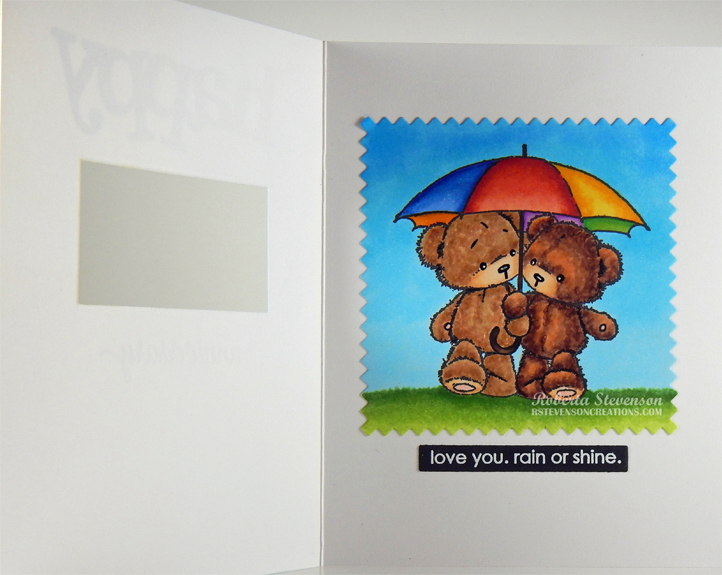
I stamped the image onto Copic Marker X-Press It Blending Card using my MISTI and Memento – Tuxedo Black ink. I die cut it using Lawn Fawn – Zig Zag Square Stackables and coloured in the image with Copic markers. Using my MISTI again, I heat embossed the sentiment onto Recollections – Black cardstock using VersaMark and Ranger Embossing Powder White – Extra Fine Detail. Gina K. Designs – Master Layouts – #9 was used to die cut the sentiment. I applied glue to the back of the image and sentiment and attached them both to the inside of the card.

Card Recipe:

Stamp and Sentiments: Rain or Shine (Penny Black Stamps) and Happy Everything Stamp Set (My Creative Time)

Inks: Memento – Tuxedo Black, Tim Holtz Distress Inks – Tumbled Glass, Tim Holtz Distress Ink – Salty Ocean, Tim Holtz Distress Ink – Squeezed Lemonade, Tim Holtz Distress Ink – Mustard Seed, Versa Fine – Onyx Black, VersaMark

Embossing Powder: Ranger Embossing Powder White – Extra Fine Detail, Ranger – Clear Super Fine Detail embossing powder

Paper: Copic Marker X-Press It Blending Card, Hammermill – Premium Colour 100 lb., Recollections – Black cardstock

Die Cuts: Lawn Fawn – Zig Zag Square Stackables, My Creative Time – Rectangle Frame Dies, My Creative Time – Happy Everything Stamp Set, Gina K. Designs – Master Layouts – #9

Stencils: Kraftin’ Kimmie – Rainy Day Stencil, Kraftin’ Kimmie – Starburst Stencil

Tools: MISTI – Most Incredible Stamping Tool, Cuttlebug, Picket Fence – Blending Brushes

Image coloured with Copic Markers:

Bears: E53, E51, E50, E35, E34, E33, E31, E27, E25, E23, E21 (Eyes: Sakura Glaze – Black and Gelly Roll Sakura #10 Pen)

Umbrella: R46, R14, R12, R08, B26, B24, B23, B21, Y19, Y17, Y13, Y11, YR16, YR15, YR14, YR12, YG09, YG07, YG06, YG03, V04, V01, E49, E47, E44

Grass: YG23, YG17, YG03, YG01

Sky: B02, B01, B00, B000

Hope you like it and have a great week!

1st Communion!!


Sharing a card I made today using KLM Digital Designs – Communion Cross from the new August release. This image comes with 3 sentiments. I’ve used 1 on my card, but you also have the choice of  “First Communion” and “On Your First Holy Communion”. This would be great image and sentiment to give to either your child or a friend’s child celebrating this blessed sacrament.

To make the card, I first imported the image and sentiment into Microsoft Word and printed it out onto Copic Marker X-Press It Blending Card. I die cut the image and frame using my Cuttlebug and My Creative Time – Rectangle Frame Layers dies. I coloured in the the image with Copic markers and then placed Kraftin’ Kimmie – Starburst stencil over top and taped off the area that I wanted to use. Using Copic Y04, I coloured in the darker rays using the stencil as a guide. The tape was carefully removed from the top and sides of the stencil. The tape was placed back down at the top before removing the tape from the bottom of the stencil. After removing the stencil completely, the tape was placed back down on the 2 sides and bottom where the darker rays ended. Using the darker rays as a guide, I coloured in the lighter rays using Copic Y00 marker. All of the tape was removed at this point which left a nice thin white border around it.

Using the same dies again, I die-cut Crafter’s Companion – Luxury Cardstock – Gold to use for my background.

The card was now ready to assemble. Hammermill – Premium Colour 100 lb. was used to create the card base of 5.5″ x 4.25″. The gold background was added directly to the base using double-sided tape. 3M VHB – 2 sided tape was added to the back of the image to pop it up and it was placed directly over the gold background.

Card Recipe:

Stamp and sentiment: Communion Cross – KLM Digital Designs

Inks: HP Printer Grayscale

Paper: Copic Marker X-Press It Blending Card, Hammermill – Premium Colour 100 lb., Crafter’s Companion – Luxury Cardstock – Gold

Die Cut: My Creative Time – Rectangle Frame Layers

Stencil: Kraftin’ Kimmie – Starburst

Miscellaneous:  3M VHB – 2 sided tape, Cuttlebug

Image coloured with Copic Markers:

Cross: B60, C1, C00, Colorless Blender

Grapes, Vines and Leaves: V09, V06, V04, V01, YG25, YG17, YG03, YG01

Starburst: Y04, Y00

Hope you like it and have a great week!

You can find more cards to inspire you at KLM Designs, KLM Digital Design Team and KLM Digital Designs on the Facebook Fan page from the rest of our design team.

Friends Together


Welcome Back Dreamerland Craft Fans!

Today, I’m sharing an inspirational card that I made using Mix and Match Clear Stamps – DCS 19096 to create the little scenes and also for the sentiment. I wanted to show a variety of scenes that you could make with this cute set and so for the first time for me ever, I created this little flip card.

Panel 1 – Bears hugging in the rain.

Panel 2: The rain has stopped and there is a beautiful rainbow for the little couple.

Panel 3 – The sun has come out and is now beaming.

Panel 4: I just love this adorable sentiment and it finishes off the little story of the 2 little bears hugging each other through all of the different types of weather.

Here is the flip card in action.


To make this card I used a base card of 4.25″ x 5.5″. DCWV – Pocket Blossom was cut to the same size and using double-sided tape was attached to the base card. Then, Tim Holtz Distress Ink – Salty Ocean was used to ink around all of the edges. I die cut X-Press It Blending Card using my Cuttlebug and dies from Lawn Fawn – Flippin’ Awesome. I used the largest square of the die set in order to have more room to create the scenes. The larger square was die cut using Recollection – White paper using My Creative Time – Rectangle Frame Dies. The die-cut for the mechanism of the Flip Card was also from Lawn Fawn – Flippin’ Awesome. So easy to use. I love this die set.

I created a mask of the bears so that I could add in the different elements on each panel. All of the images were coloured in with Copic Markers. For the rain, Memento – Bahama Blue ink was used. For the sunbeams, Kraftin’ Kimmie – Summer Sunshine, Kraftin’ Kimmie – Yummy Yellow and Kraftin’ Kimmie – Starburst Stencil were used.

Versa Fine – Onyx Black ink was used to stamp the sentiment and then Ranger – Clear Super Fine Detail embossing powder was applied. Marvy Uchida – Embossing Heat Tool was used to heat up the embossing powder.

Once all of the panels were completed, I die cut the sparkly blue paper using Lawn Fawn – Flippin’ Awesome – Add-On dies. The flipping mechanism was then attached to the sparkling blue paper. This was then attached directly to the base of the card.

Card Recipe:

Stamps and Sentiments:  Mix and Match Clear Stamps – DCS 19096 (Dreamerland Crafts)

Inks: Memento – Tuxedo Black, Versa Fine – Onyx Black, Kraftin’ Kimmie – Summer Sunshine, Kraftin’ Kimmie – Yummy Yellow, Memento – Bahama Blue, Tim Holtz Distress Ink – Salty Ocean

Paper: Copic Marker X-Press It Blending Card, DCWV – Pocket Blossom –  12″X12″ (30.5cmx30.5cm), Craft Thick Glitter Paper – 02-3022270

Die Cuts: My Creative Time – Rectangle Frame Dies, Lawn Fawn – Flippin’ Awesome, Lawn Fawn – Flippin’ Awesome – Add-On

Stencil: Kraftin’ Kimmie – Starburst Stencil

Tools: MISTI – Most Incredible Stamping Tool, Cuttlebug, Marvy Uchida – Embossing Heat Tool

Image coloured with Copic Markers:

Bears: E55, E53, E51, E35, E34, E33, E31, E29, E27, E25, E23, R20, R02, R00

Sky:  B01, B00, B000, B000

Hearts and Umbrella: R39, R37, R24, Pental Sunburst Metalic Med Gel Pen

Rainbow: V17, V15, V20, YR18, YR16, YR15, Y15, Y08, Y04

Clouds: B60, C0, Colorless Blender

Flowers: Y38, Y35, E15

Hope you like it and have a great week!

You can find more cards to inspire you at Dreamerland Crafts and Pointer Scrapbooking on the Facebook Fan pages from the rest of our design team.

Hang in There!


It’s Wednesday, and this week, I thought I’d make an inspirational card to share with you using Raggedy Ann-ouncement – R044 (High Hopes Rubber Stamps) for the main image and Hang In There – D278 (High Hopes Rubber Stamps) for the sentiment.

To make my card this week, I started off with a card base of 5.5″ x 4.25″.  I created the background on Hammermill – Premium Colour cardstock using various stencils, Picket Fence Studio Blender Brushes and Tim Holtz inks which I have listed below. I thought the sun rays reflected a ray of hope for everyone and I hope that we will all be seeing better days soon. Once the background was finished, I used 2 sided tape and mounted it onto the base card.

I stamped the image  and sentiment onto Copic Marker X-Press It Blending Card and coloured in the main image with Copic markers. I ran the coloured image through my Brother Scan and Cut to create a slim border around it and then went around the edges with Y06 – Yellow and YG25 – Celadon Green to make it blend into the background. Lastly, I popped up the image using 3M VHB – 2 sided tape and created a small shadow below Raggedy Ann.

Card Recipe:

Stamp:  Raggedy Ann-ouncement – R044  (High Hopes Rubber Stamps)

Sentiment: Hang In There – D278 (High Hopes Rubber Stamps)

Inks: Memento – Tuxedo Black, Tim Holtz Distress Ink – Squeezed Lemonade, Tim Holtz Distress Ink – Mustard Seed, Tim Holtz Distress Ink – Mowed Lawn, Tim Holtz Distress Ink – Crushed Olive, Tim Holtz Distress Inks – Peeled Paint

Paper: Copic Marker X-Press It Blending Card, Hammermill – Premium Colour 100 lb.

Stencil: Kraftin’ Kimmie – Starburst, Lawn Fawn – Lawn Cut dies (Made into Stencil), Kraftin’ Kimmie – Krafty Scenery 2

Tools: MISTI – Most Incredible Stamping Tool, 3M VHB – 2 sided tape, Picket Fence Studio Blender Brushes

Image coloured with Copic Markers:

Skin: E21, E11, E04, E00, E000, R22, R20

Hair: R35, R17, R14, R08

Dress: R59, R37, R35

Patch: B52, B41, B12

Apron and Socks: C-2, C-1, C-0

Shoes: C10, C8, C5, C3

Sign: E37, E35, E33, E31, E30

Shadow below feet: YG25, YG06, YG03

Hope you like it and have a fantastic week!

You can find lots of inspiration from the Design Team Divas at the High Hopes blog, and the High Hopes Rubber Stamps Facebook Fan page plus you can also follow us on
Instagram, Twitter and Pinterest.