Tag Archive | Sunshine

Sunshine and Seashells!!


Sharing a card I made today using KLM Digital Designs – Seascape Gnome from the May releases. This image also comes with 2 more sentiments, “Seas Every Opportunity” and “Be Shore of Yourself”! I don’t know about you, but I love walking along a beach to collect seashells. It’s always so much fun!

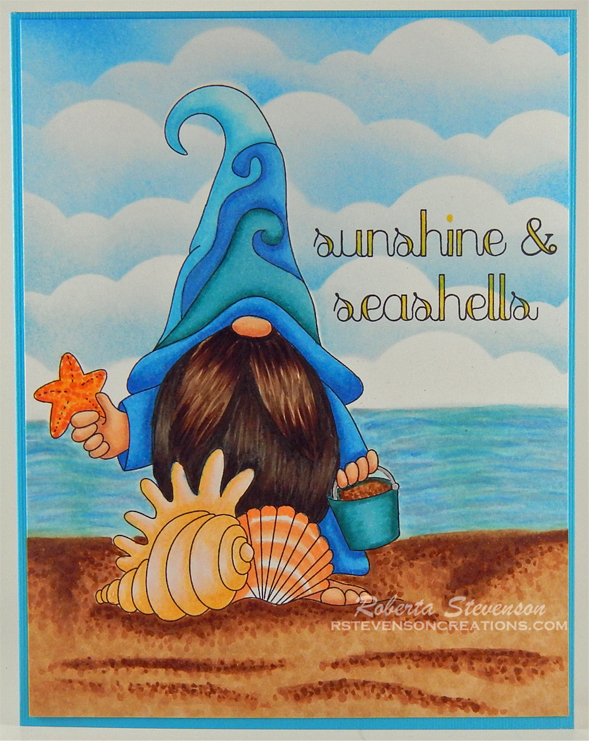
To make the card, I first imported the image into Microsoft Word and printed it out onto Copic Marker X-Press It Blending Card and a second copy onto regular copy paper using my HP Printer. Using my Brother Scan and Cut, I cut out the image from the copy paper. I used this as a mask to put over my main image. With the mask in place, I used Tim Holtz Distress Inks: Salty Ocean, Broken China and Tumbled Glass along with cloud stencils I had created using Avery Elle – Pierced Clouds Die (D-05-01) set.

Once this was completed, I removed the mask and began to colour in the water and sand. It was now time to colour my gnome. I unfortunately colured the first layer for the bottom of the beard blue, thinking it was part of the robe he was wearing. Uggggh! I didn’t want to start over, so I just finished colouring the mustache with my Copic markers and then tried to see if I could use the same colours to colour over the blue. It  didn’t quite work out a 100%, so I decided to use my PrismaColor Pencils to colour over top of the Copic markers. This seemed to fix it. I moved on to finish the rest of image.

After I was satisfied with the colouring of the image, I trimmed it down to 5.25″ x 4″. I applied double-sided tape to the back of the image and adhered it to a card base of 5.5″ x 4.25″ to complete my card.

Card Recipe:

Stamp: Seascape Gnome – KLM Digital Designs

Inks: HP Printer Grayscale, Tim Holtz Distress Inks: Salty Ocean, Broken China and Tumbled Glass

Paper: Copic Marker X-Press It Blending Card, Hot Buy – Cards and Envelopes (5.5″ x 4.25″)

Die Cut Stencils: Avery Elle – Pierced Clouds Die (D-05-01)

Image coloured with Copic Markers:

Skin: E21, E11, E00, E000

Beard: E49, E47, E44, E43, E40, PrismaColor Pencils – Gingeroot (PC1084), Dark Brown (PC946), Sandbar Brown (PC1094), Cream (PC914)

Clothing: B16, B04, B02, B01

Hat: B16, B04, B02, B01, BG53, BG49, BG45, BG02, BG01, BG000, Smooch – Pool

Sand: E37, E35, E33, E31

Water: BG70, B93, B91, B52, B41, B02, B01, B000, BG11, BG10

Starfish: YR31, YR09, YR04

Conch: YR31, YR21, YR20, R00, R000

Seashell: YR02, YR01, YR00, YR000

Pail: BG53, BG49, BG45, Pental Sunburst Metalic Med Gel Pen

Lettering: Atyou Spica – Lemon (05)

Hope you like it and have a great week!

You can find more cards to inspire you at KLM Designs, KLM Digital Design Team and KLM Digital Designs on the Facebook Fan page from the rest of our design team.

Create Sunshine!!!


It’s Wednesday, and this week, I made a card using Goat Your Back – TT137 by High Hopes Rubber Stamps for the main image and Somedays – GG024 (High Hopes Rubber Stamps) for the sentiment. This momma goat and her babes are out enjoying the warmer weather. Spring is finally here! We just planted our flowers this past weekend, or I should say, I helped pick them out and my husband actually did the planting. He has a green thumb. I definitely don’t. LOL!

To make my card this week, I started with a base of 6″ x 6″ using AC White Cardstock. I cut Bo Bunny – Sweet Moments Divine paper to be the same size as the base card and then inked around the edges with Tim Holtz Distress Ink – Crushed Olive. I attached this directly to the base using double-sided tape. Using Doodlebug Design Inc. – Spring Solid Assortment paper, I die cut the yellow rectangle, large green rectangle and small green rectangle using My Creative Time – Rectangle Frame Dies and My Creative Time – Rectangle Frame Layers. The edges were inked with Tim Holtz Distress Ink – Crushed Olive and Tim Holtz Distress Ink – Fossilized Amber. The same dies were also used to die cut Copic Marker X-Press It Blending Card for the main image. Gina Marie Designs – Nested Scalloped Stitched Rectangles were used to die cut Recollections – Petite Floral paper. The edges of this die cut were inked with Tim Holtz Distress Ink – Scattered Straw.

I stamped my image using my MISTI and Memento – Tuxedo Black ink onto the Copic Marker X-Press It Blending Card die cut. I coloured in the image and background using Copic markers. The sentiment was stamped onto white cardstock using my MISTI and Memento – Tuxedo Black ink. I used my small cutter to cut around the sentiment and inked it with Tim Holtz Distress Ink – Crushed Olive. I die cut the sun and clouds using Copic Marker X-Press It Blending cardstock and Nellie’s Choice – Nature Scene Dies – NSD002 – Sky. I coloured these with Copic markers. I added 3M VHB – 2 sided tape to the back of 1 cloud and the sun and attached them to the main image. The other cloud was attached using glue and tucked under the sun.

The card was now ready to assemble. I attached the large green rectangle to the patterned paper base with 3M VHB – 2 sided tape. The main image and yellow rectangle were attached to the large scalloped rectangle using glue. Then the scalloped rectangle was attached to the large green rectangle with 3M VHB – 2 sided tape. I attached the sentiment to the smaller green rectangle and popped it up using 3M VHB – 2 sided tape. To finish off the card I used a few pop dots and some yellow flowers.

Card Recipe:

Stamp: Goat Your Back – TT137 (High Hopes Rubber Stamps)

Sentiment: Somedays – GG024 (High Hopes Rubber Stamps)

Inks: Memento – Tuxedo Black, Tim Holtz Distress Inks: Scattered Straw, Crushed Olive, Fossilized Amber

Paper: Copic Marker X-Press It Blending Card, Recollections – Petite Floral – 12 x 12″ (30.4 x 30.4 cm), Doodlebug Design Inc. – Spring Solid Assortment (12″ x 12″), Bo Bunny – Sweet Moments Divine – 12 x 12 in., AC Cardstock – White

Die Cuts: Gina Marie Designs – Nested Scalloped Stitched Rectangles, My Creative Time – Rectangle Frame Dies, My Creative Time – Rectangle Frame Layers, Nellie’s Choice – Nature Scene Dies – NSD002 – Sky

Tools \ Miscellaneous: MISTI – Most Incredible Stamping Tool, 3M VHB – 2 sided tape, Dodz Small – Adhesive Dots, Flowers, Pop-dots

Image coloured with Copic Markers:

Goats: E53, E51, E50, E35, E34, E33, E31, E30, C5, C3, C1, C0, C00, R30, R27, R20, R14, Y38, Y35, Y17, Y08, Colorless Blender, (Eyes and Nose – Sakura Glaze – Black, Gelly Roll Sakura #5 Pen)

Grass: YG17, YG13, YG03, YG01

Sky: B02, B01, B00, B000, B0000

Clouds: B60, C00, Colorless Blender

Sun: Y19, Y18, Y17

Check out some other fun new stamps from High Hopes Rubber Stamps
Furry and Friends Release

Hope you like it and have a fantastic week!

You can find lots of inspiration from the Design Team Divas at the High Hopes blog, and the High Hopes Rubber Stamps Facebook Fan page plus you can also follow us on
Instagram, Twitter and Pinterest.

Polar Bear and Friend!!


Sharing this adorable image called Polar Bear and Friend from KLM Digital Designs today from the January release. This set comes with 3 sentiments, “You are Amazing”, “You’re My Sunshine on a Rainy Day” and “Best Friends Forever”, which I used on my card.

To make the card, I printed out the main image onto Copic Marker X-Press It Blending Card using my HP Printer. I used my Brother Scan and Cut to cut around the image and coloured it in with Copic markers. The sentiment was brought into Microsoft Word.  I imported the shape within Microsoft Word and used a weight of 3 for the solid line. Then, I brought the sentiment to the front and centred it in the middle of the shape. I printed this out on Recollections White cardstock and then just fussy cut around it.

I used AC White paper to create the base shape of the card 12″ x 6″. I scored the paper at 6″. I used Recollections – Blue Ombre Cardstock for the main background, cut to the same size as the base card. This was attached using double-sided tape.

Essentials by Tattered Lace Dies – Easel Slider dies and my Cuttlebug were used to die cut Hot Buy Craft Smart – Holiday Glitz Glitter Paper, Hammermill – Premium Colour 100 lb. and Stampin’ Up – Snowflake Splendor Designer Series Paper. Penny Black – Winter Roof die was used to die cut the icicles. The snow drifts on the bottom of the card were die cut using dies from Lawn Fawn – Stitched Hillside Borders. Once the icicles and snow drifts were die cut, I used the Tattered Lace die cut again so that everything would layer to the shape of the smaller rectangle. I used my Cuttlebug and Cuttlebug – Snow Dots stencil twice to create the texture to the larger rectangle. Gina K Designs – Glitz Glitter Gel was added to the icicles and front layer of snow. Stickles – Diamond was used to add texture to the back snow drift. Once everything was dry, I inked around all of the outside edges of the snow, rectangular shapes and main background with Tim Holtz Distress Ink – Blueprint Sketch.

To assemble the card, I used double-sided tape to attach the large rectangle shape directly to the base card. The smaller rectangle shape was assembled separately, then attached to the larger rectangular shape using 3M VHB – 2 sided tape. Tombo glue was used to add the icicles and layers of snow to the smaller rectangluar shape. The image and sentiment were popped up using 3M VHB – 2 sided tape. To complete the card, Stickles – Diamond was added below the bear to create a shadow and also some streaks along the snow.

Card Recipe:

Stamp and Sentiments: Polar Bear and Friend (KLM Digital Designs)

Inks: HP Printer Grayscale, Tim Holtz Distress Ink – Blueprint Sketch

Paper: Copic Marker X-Press It Blending Card, Hammermill – Premium Colour 100 lb., Stampin’ Up – Snowflake Splendor Designer Series Paper, Recollections – Blue Ombre Cardstock, Recollections – White Cardstock, AC White Cardstock, Hot Buy Craft Smart – Holiday Glitz Glitter Paper 12″ x 12″

Die Cut: Essentials by Tattered Lace Dies – Easel Slider, Penny Black – Winter Roof – 51-475, Lawn Fawn – Stitched Hillside Borders

Stencil: Cuttlebug – Snow Dots

Tools: 3M VHB – 2 sided tape, Cuttlebug, Gina K Designs – Glitz Glitter Gel

Image coloured with Copic Markers:

Penguin: W9, W7, W5, W3, E15, Y17, YR16, YR15, E43, E42, E41, E40, R11, RV00, Colorless Blender, White Prismacolor Premier Pencil

Polar Bear: W9, BV20, C1, C00, R24, R22, R11, RV00, E35, E33, E31, C1, Colorless Blender

Hope you like it and have a great week!

You can find more cards to inspire you at KLM Designs, KLM Digital Design Team and KLM Digital Designs on the Facebook Fan page from the rest of our design team.

Check out some special savings for a limited time at KLM!!

Friends Together


Welcome Back Dreamerland Craft Fans!

Today, I’m sharing an inspirational card that I made using Mix and Match Clear Stamps – DCS 19096 to create the little scenes and also for the sentiment. I wanted to show a variety of scenes that you could make with this cute set and so for the first time for me ever, I created this little flip card.

Panel 1 – Bears hugging in the rain.

Panel 2: The rain has stopped and there is a beautiful rainbow for the little couple.

Panel 3 – The sun has come out and is now beaming.

Panel 4: I just love this adorable sentiment and it finishes off the little story of the 2 little bears hugging each other through all of the different types of weather.

Here is the flip card in action.


To make this card I used a base card of 4.25″ x 5.5″. DCWV – Pocket Blossom was cut to the same size and using double-sided tape was attached to the base card. Then, Tim Holtz Distress Ink – Salty Ocean was used to ink around all of the edges. I die cut X-Press It Blending Card using my Cuttlebug and dies from Lawn Fawn – Flippin’ Awesome. I used the largest square of the die set in order to have more room to create the scenes. The larger square was die cut using Recollection – White paper using My Creative Time – Rectangle Frame Dies. The die-cut for the mechanism of the Flip Card was also from Lawn Fawn – Flippin’ Awesome. So easy to use. I love this die set.

I created a mask of the bears so that I could add in the different elements on each panel. All of the images were coloured in with Copic Markers. For the rain, Memento – Bahama Blue ink was used. For the sunbeams, Kraftin’ Kimmie – Summer Sunshine, Kraftin’ Kimmie – Yummy Yellow and Kraftin’ Kimmie – Starburst Stencil were used.

Versa Fine – Onyx Black ink was used to stamp the sentiment and then Ranger – Clear Super Fine Detail embossing powder was applied. Marvy Uchida – Embossing Heat Tool was used to heat up the embossing powder.

Once all of the panels were completed, I die cut the sparkly blue paper using Lawn Fawn – Flippin’ Awesome – Add-On dies. The flipping mechanism was then attached to the sparkling blue paper. This was then attached directly to the base of the card.

Card Recipe:

Stamps and Sentiments:  Mix and Match Clear Stamps – DCS 19096 (Dreamerland Crafts)

Inks: Memento – Tuxedo Black, Versa Fine – Onyx Black, Kraftin’ Kimmie – Summer Sunshine, Kraftin’ Kimmie – Yummy Yellow, Memento – Bahama Blue, Tim Holtz Distress Ink – Salty Ocean

Paper: Copic Marker X-Press It Blending Card, DCWV – Pocket Blossom –  12″X12″ (30.5cmx30.5cm), Craft Thick Glitter Paper – 02-3022270

Die Cuts: My Creative Time – Rectangle Frame Dies, Lawn Fawn – Flippin’ Awesome, Lawn Fawn – Flippin’ Awesome – Add-On

Stencil: Kraftin’ Kimmie – Starburst Stencil

Tools: MISTI – Most Incredible Stamping Tool, Cuttlebug, Marvy Uchida – Embossing Heat Tool

Image coloured with Copic Markers:

Bears: E55, E53, E51, E35, E34, E33, E31, E29, E27, E25, E23, R20, R02, R00

Sky:  B01, B00, B000, B000

Hearts and Umbrella: R39, R37, R24, Pental Sunburst Metalic Med Gel Pen

Rainbow: V17, V15, V20, YR18, YR16, YR15, Y15, Y08, Y04

Clouds: B60, C0, Colorless Blender

Flowers: Y38, Y35, E15

Hope you like it and have a great week!

You can find more cards to inspire you at Dreamerland Crafts and Pointer Scrapbooking on the Facebook Fan pages from the rest of our design team.