Tag Archive | Lawn Fawn – Lawn Cut dies

Happy Canada Day!!


Sharing a card I made for Canada Day today using KLM Digital Designs – Canadian Gnome. I paired this up with stickers from Photoplay – O Canada 2. So proud to be a Canadian and being able to celebrate it every July 1.

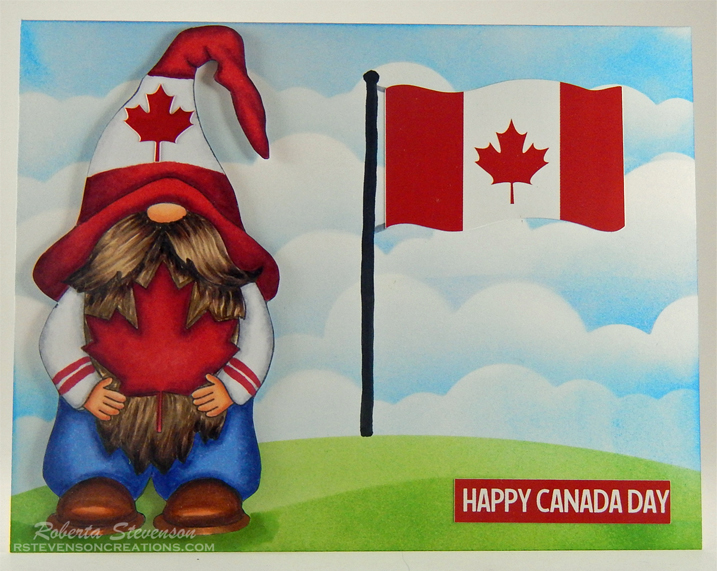
To make the card, I first imported the image into Microsoft Word and printed it out onto Copic Marker X-Press It Blending Card using my HP Printer. I coloured in the image with Copic markers and fussy cut around it. Using a black marker, I went around all of the edges.

For the base card, Hammermill – Premium Colour 100 lb. paper was used at the size of 5.5″ x 4.25″. I created the background using Tim Holtz Distress Ink – Salty Ocean and a mixture of cloud stencils I created using Avery Elle – PiercedCloudsDie and Whimsy Stamps – Grass and Cloud Edger Die Sets. The grass was made using Tim Holtz Distress Ink – Mowed Lawn and stencils I created using Lawn Fawn – Lawn Cut dies and Lawn Fawn – Stitched Hillside Borders.

To complete the card, I drew a flag pole with rope and attached the flag sticker. I added the small Maple Leaf sticker onto the hat and attached the image using 3M VHB – 2 sided tape. I applied some Copic Y17 and Y13 below the gnome. Lastly, I added the “Happy Canada Day” sticker.

Card Recipe:

Stamp: Canadian Gnome – KLM Digital Designs

Inks: HP Printer Grayscale, Tim Holtz Distress Ink – Mowed Lawn, Tim Holtz Distress Ink – Salty Ocean

Paper: Copic Marker X-Press It Blending Card, Hammermill – Premium Colour 100 lb., PhotoPlay – O Canada 2 by Becky Moore (Stickers)

Die Cuts \ Stencils: Avery Elle – Custom Steel Dies – Made in the USA – D-05-01 PiercedCloudsDie, Whimsy Stamps – Grass and Cloud Edger Die Set, Lawn Cuts – Simple Stitched Hillside Borders – Lawn Fawn, Lawn Fawn – Stitched Hillside Borders

Miscellaneous: 3M VHB – 2 sided tape

Image coloured with Copic Markers:

Skin: E21, E11, E00, E000

Beard: E49, E47, E44, E42

Shirt: C3, C1, C00, R37, Colorless Blender

Pants: B26, B23, B21

Hat and Maple Leaf: R39, R37, R35, C1, C00

Boots: E57, E55, E53, E27, E25, E23, E21

Hope you like it and have a great week!

You can find more cards to inspire you at KLM Designs, KLM Digital Design Team and KLM Digital Designs on the Facebook Fan page from the rest of our design team.

Hang in There!


It’s Wednesday, and this week, I thought I’d make an inspirational card to share with you using Raggedy Ann-ouncement – R044 (High Hopes Rubber Stamps) for the main image and Hang In There – D278 (High Hopes Rubber Stamps) for the sentiment.

To make my card this week, I started off with a card base of 5.5″ x 4.25″.  I created the background on Hammermill – Premium Colour cardstock using various stencils, Picket Fence Studio Blender Brushes and Tim Holtz inks which I have listed below. I thought the sun rays reflected a ray of hope for everyone and I hope that we will all be seeing better days soon. Once the background was finished, I used 2 sided tape and mounted it onto the base card.

I stamped the image  and sentiment onto Copic Marker X-Press It Blending Card and coloured in the main image with Copic markers. I ran the coloured image through my Brother Scan and Cut to create a slim border around it and then went around the edges with Y06 – Yellow and YG25 – Celadon Green to make it blend into the background. Lastly, I popped up the image using 3M VHB – 2 sided tape and created a small shadow below Raggedy Ann.

Card Recipe:

Stamp:  Raggedy Ann-ouncement – R044  (High Hopes Rubber Stamps)

Sentiment: Hang In There – D278 (High Hopes Rubber Stamps)

Inks: Memento – Tuxedo Black, Tim Holtz Distress Ink – Squeezed Lemonade, Tim Holtz Distress Ink – Mustard Seed, Tim Holtz Distress Ink – Mowed Lawn, Tim Holtz Distress Ink – Crushed Olive, Tim Holtz Distress Inks – Peeled Paint

Paper: Copic Marker X-Press It Blending Card, Hammermill – Premium Colour 100 lb.

Stencil: Kraftin’ Kimmie – Starburst, Lawn Fawn – Lawn Cut dies (Made into Stencil), Kraftin’ Kimmie – Krafty Scenery 2

Tools: MISTI – Most Incredible Stamping Tool, 3M VHB – 2 sided tape, Picket Fence Studio Blender Brushes

Image coloured with Copic Markers:

Skin: E21, E11, E04, E00, E000, R22, R20

Hair: R35, R17, R14, R08

Dress: R59, R37, R35

Patch: B52, B41, B12

Apron and Socks: C-2, C-1, C-0

Shoes: C10, C8, C5, C3

Sign: E37, E35, E33, E31, E30

Shadow below feet: YG25, YG06, YG03

Hope you like it and have a fantastic week!

You can find lots of inspiration from the Design Team Divas at the High Hopes blog, and the High Hopes Rubber Stamps Facebook Fan page plus you can also follow us on
Instagram, Twitter and Pinterest.


Santa and Rudolph


Welcome High Hopes Rubber Stamps Fans!

It’s Wednesday, and this month at High Hopes Rubber Stamps we are celebrating Christmas. YAY!!!  This week, I used Santa & Rudy – R047 (High Hopes Rubber Stamps) and for the sentiment Jingle All The Way – H040 (High Hopes Rubber Stamps).

Card Recipe:

Stamp: Santa & Rudy – R047  (High Hopes Rubber Stamps)

Sentiment: Jingle All The Way – H040 (High Hopes Rubber Stamps)

Inks: Memento – Tuxedo Black, Tim Holtz Distress Inks – Tumbled Glass

Paper: Copic Marker X-Press It Blending Card, Creative Memories – Glacier Paper Pack 12″ x 12″, Recollections – Fireside 6″ x 6″ (15.2 cm x 15.2 cm), Recollections – Christmas Inkjet Printable Glitter Paper – 8.5 x 11″, Red and Green cardstock

Die Cuts: My Creative Time – Sentiment Label Dies, Lawn Fawn – Lawn Cut dies, Your Next Stamp – Stitched Rectangle Die Set (YNSD214)

Tools: MISTI – Most Incredible Stamping Tool, Cuttlebug, Marvy – Liquid Applique, Stickles – Icicle, 3M VHB – 2 sided tape

Image coloured with Copic Markers:

Skin: E000, E00, E04, E11, E21, R22, R20

Jacket and Hat: R59, R37, R35

Boots and Buttons: C10, C8, C7

Mitts: G99, YG67, YG17

Deer: E35, E33, E31, E18, E15, R00, R000, W9, W7, W5, Colorless Blender and cloth for texture


Hope you like it and have a fantastic week!

You can find lots of inspiration from the Design Team Divas at the High Hopes blog, and the High Hopes Rubber Stamps Facebook Fan page plus you can also follow us on
Instagram, Twitter and Pinterest.


Merry Chris-moose!


Hi There!

Sharing a Christmas card that I made using Your Next Stamp Set – Merry Chris-Moose.

Included a close-up of moose and sentiment.


Stamped image using MISTI – Most Incredible Stamping Tool and Memento – Tuxedo Black ink to transfer image onto Copic Marker X-Press It Blending Card. Image was then coloured with Copic Markers. Background was done using Spectrum Noir Markers and then snow added with Gelly Roll Sakura #5, 8 and 10 Pens.

Sentiment was stamped using (MISTI), VersaMark ink and then heat embossed with Ranger Embossing Powder White – Extra Fine Detail.

Background Paper: Bo Bunny – Silver and Gold Collection Paper – 6 x 6 in pad

Die Cuts: Your Next Stamp – Stitched Rectangle Die Set (YNSD214). Used same die cut for sentiment. Just put die cut through twice using Cuttlebug to make it the depth that I required.

Lawn Fawn – Lawn Cut dies to create snowy hill.

Entered into Your Next Stamp Sketch and Color Challenge #90 – http://yournextstamp.com/blog/sketch-and-color-challenge-90-more-inspiration/ and also YNS Social Media challenge  – Challenge #90.

Hope you like it!

Miss Kate Cuttables – Guest Designer


Surprise!  I’m a guest designer for Miss Kate Cuttables again this year! Miss Kate Cuttables offers awesome freebie designs everyday and I always look forward to them. I also love their designs and their new paper is great too! I just had to have it as it goes so well with their designs!

I LOVE Christmas and make over 55 cards every year to give to family and friends. I thought why not start early this year and so I made a Christmas themed card for my guest spot.

Using my Cricut Explore and Cricut Design Space I uploaded Miss Kate Cuttables “boy-winter-deer-1016” (https://www.misskatecuttables.com/products/product/boy-winter-deer.php). I thought he was sooo cute! Added some Ranger Glossy Accents to his nose and eyes.  Wink of Stella – GL Green 040 was used on the ear muffs.

Here is a close-up of the little reindeer.


Also, uploaded one of my all time favourite trees from Miss Kate Cuttables – snowy-tree-10-07-15 (https://www.misskatecuttables.com/products/product/freebie-of-the-day-snowy-tree.php). I’ve used this tree on so many of my cards. Added some glitter with Spectrum Noir Clear Glitter Pen.

The background paper is from Miss Kate Cuttables – “mkd-winter-woodland-paper-collection” – winter woodland reindeer.jpg (https://www.misskatecuttables.com/products/product/winter-woodland-paper-collection.php). Printed out the digital image on my HP Printer and then sized it to 6″ x 6″ and edge around the sides with Tim Holtz Distress Inks – Peeled Paint.

Behind the reindeer the paper is from American Crafts – Holiday collection – 6 x 6″ (15.2 cm x 15.2 cm). Used My Creative Time -Stitched Squares Inside and Out to cut out the square and then edged around the sides of the small square with Tim Holtz Distress Inks – Peacock Feathers

The hills were made with Recollections – Christmas Inkjet Printable Glitter Paper – 8.5″ x 11″ and Lawn Fawn – Lawn Cut dies.  Then used  Tim Holtz Distress Inks – Tumbled Glass along the tops of the hills.

“Merry Christmas” ribbon is by Celebrate It!

Miss Kate Cuttables, thank you so much for inviting me to be a part of your guest design team again this year. It truly is a great honour and it made me so happy!