Tag Archive | My Creative Time – Tall Frame Layers

Woodland Gnome!!


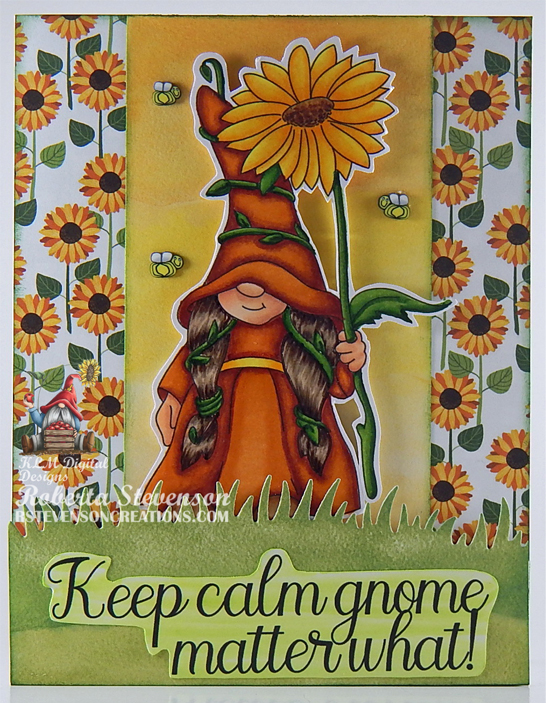
Sharing a card I made today using KLM Digital Designs – Woodland Gnome Girl from the new August release. This little gnome is keeping calm even with little bees flying around. I know if it was me, I’d be running for cover. LOL!


This image also comes with 2 other sentiments, “You gno-me too well” and “Just because”.

To make the card, I first imported the image and sentiment into Microsoft Word and printed them out onto Copic Marker X-Press It Blending Card. Using by Brother Scan and Cut, I cut around the image leaving a small white border. The image was coloured in with Copic markers. For the base card, I used Hammermill – Premium Colour 100 lb. and cut it to be 5.5″ x 4.25″. PhotoPlay – Gnome for the Holidays Thanksgiving paper was cut to the same size as the base and attached using double-sided tape. Lawn Fawn – Watercolor Wishes Rainbow paper was cut to the size of 5.5″ x 2.5″ and glued onto the sunflower paper in the centre. The image was popped up and placed onto the centre of the yellow background paper. Using my Cuttlebug, die cut from Lawn Fawn – Simple Grassy Hillsides and Lawn Fawn – Watercolor Wishes Rainbow paper, I cut the grass. I fussy cut around the printed sentiment and used Copic YGO1 to fill in the background and to go around the fussy cut. I ran this piece through my Xyron Create a Sticker because I wanted the sentiment to lay nice and flat on the grass background. The grass was then centred and popped up on the card. All of the background layers were inked with Tim Holtz Distress Ink – Rustic Wilderness before placing them onto the card. Lastly, to complete the card I added in a few bees from Sprinkletz Embellishments – Bubble Bees.

Card Recipe:

Stamp and sentiment: Woodland Gnome Girl – KLM Digital Designs

Inks: HP Printer Grayscale, Tim Holtz Distress Ink – Rustic Wilderness

Paper: Copic Marker X-Press It Blending Card, Hammermill – Premium Colour 100 lb., PhotoPlay – Gnome for the Holidays Thanksgiving, Lawn Fawn – Watercolor Wishes Rainbow – 6″ x 6″

Die Cut: Lawn Fawn – Simple Grassy Hillsides

Miscellaneous: Xyron Create a Sticker, Cuttlebug, Sprinkletz Embellishments – Bumble Bees (NK137), Brother Scan and Cut

Image coloured with Copic Markers:

Skin: E21, E11, E00, E000

Hair: E47, E45, E43, E42, E41

Dress and Hat: E08, YR18, YR14, YR12

Shoes: E39, E37, E35, E34, E33, E31, E30

Sunflower: YG67, YG23, YG17, Y17, Y15, Y02, E47, E37, E35, E31

Hope you like it and have a great week!

You can find more cards to inspire you at KLM Designs, KLM Digital Design Team and KLM Digital Designs on the Facebook Fan page from the rest of our design team.

Thank-you!!


Sharing a card I made today using KLM Digital Designs – Thank You Gnome from the new August release. I decided since Autumn and our Canadian Thanksgiving is almost upon us and some of the leaves have begun to change, that I would colour in the letters in the Fall colours.

To make the card, I first imported the image into Microsoft Word and printed it out onto Copic Marker X-Press It Blending Card. I die cut the image to the size of 7.25″ x 3.5″ using my Couture Creations – Go Power and Emboss and My Creative Time – Tall Frame Layers.  For the base card, I cut Hammermill – Premium Colour 100 lb. to the size of 7.25″ x 7″ and scored it at 3.5″. After colouring the image, I applied it to the base using double-sided tape.

Card Recipe:

Stamp and sentiment: Thank You Gnome – KLM Digital Designs

Inks: HP Printer Grayscale

Paper: Copic Marker X-Press It Blending Card, Hammermill – Premium Colour 100 lb.

Die Cut: My Creative Time – Tall Frame Layers

Miscellaneous: Couture Creations – Go Power and Emboss

Image coloured with Copic Markers:

Skin: E21, E11, E00, E000

Beard: E29, E27, E25, E23

Hat: E08, E97, E95

Coat: E89, E87, E84, E81

Pants: B26, B23, B21

Boots: E55, E53, E51, E29, E27, E25, E23

T: Y17, Y15, Y13

H: Y38, Y35, Y23

A: R46, R14, R08

N: YR18, YR16, YR15

K: YR27, YR24, YR21

Grass: YG17, YG13, YG11, YG03

Hope you like it and have a great week!

You can find more cards to inspire you at KLM Designs, KLM Digital Design Team and KLM Digital Designs on the Facebook Fan page from the rest of our design team.

Musical Penguin Parade


Hi There! Today I’d like to share a Christmas Card I made using Top Hat Penguin – RLF005 (High Hopes Rubber Stamps), Trumpet Penguin – RLF006 (High Hopes Rubber Stamps) and Flute Penguin – RLF002 (High Hopes Rubber Stamps). Musical Wishes – GLL014 (High Hopes Rubber Stamps) was chosen for the sentiment. I just love these adorable penguins and couldn’t resist putting them all together to create a musical penguin parade. LOL!

To make my card this week, I used Recollections – White cardstock for the base card which is 7.25″ x 7″. I scored the paper at 3.5″ to create the dimensions of 7.25″ x 3.5″. The red background was cut to the same size using Crafter’s Companion Luxury Cardstock – Red. The musical notes layer was cut from Craftsmart – Classic Village at 7″ x 3.25″. The snowy background was die cut to the same size in length using Recollections – Christmas Inkjet Printable Glitter Paper. I used My Creative Time – Tall Frame Dies, My Creative Time – Tall Frame Layers in order to achieve this. Once the snowy background paper was die cut, I tore along it in order to create the illusion of white snow drifts along the top of the snow. I adhered all of the layers with double-sided tape. Using my large Misti, I stamped the sentiment using Versa Fine – Onyx Black and embossed it with Ranger – Clear Super Fine Detail embossing powder. Marvy Uchida – Embossing Heat Tool was used to heat set the embossing powder.

I stamped all of the images onto Copic Marker X-Press It Blending Card using my Misti and Memento – Tuxedo Black ink. The images were then all coloured in with Copic markers and die cut using my Brother Scan and Cut machine. Then I ran all of the images through my Xyron Creative Station to make them all stickers. I placed them on the card and then used Stickles – Diamond to create some snow drifts. Clear – Wink of Stella was added to the Candy Cane to make it sparkle and also to all of the leaves and holly on the hats.

To complete the card, I edged all around the scene with Stickles – Sea Glass.

Card Recipe:

Stamp:  Top Hat Penguin – RLF005 (High Hopes Rubber Stamps), Trumpet Penguin – RLF006 (High Hopes Rubber Stamps), Flute Penguin – RLF002 (High Hopes Rubber Stamps)

Sentiment Background: Musical Wishes – GLL014 (High Hopes Rubber Stamps)

Inks: Memento – Tuxedo Black, Versa Fine – Onyx Black

Paper: Copic Marker X-Press It Blending Card, Recollections – Christmas Inkjet Printable Glitter Paper – 8.5 x 11″, Hot Buy Craftsmart – Classic Village – 12″ x 12″ paper, Crafter’s Companion Luxury Cardstock – Red – 8.5 x 11″

Die Cuts: My Creative Time – Tall Frame Dies, My Creative Time – Tall Frame Layers

Embossing Powder: Ranger – Clear Super Fine Detail embossing powder

Tools: MISTI – Most Incredible Stamping Tool, Cuttlebug,  Xyron Creative Station, Stickles – Sea Glass, Stickles – Diamond, Clear – Wink of Stella, Marvy Uchida – Embossing Heat Tool

Images coloured with Copic Markers:

Penguin Bodies: W9, W7, W5, W3, E15, Y17, YR16, YR15, E43, E42, E41, E40, R11, RV00, Colorless Blender, White Prismacolor Premier Pencil

Top Hats: C9, C8, C6, C3

Scarfs and Hat Bands: BG78, BG75, BG09, BG07, BG02

Vest and Mouse: R59, R39, R37, R24, C3, C1

Horn and Flute: E97, E23, Y17, Y15, Y11

Holly and Leaves: YG97, YG95, YG01, G21, R39, R24

Bird: Y19, Y15, Y11, YR15

Candy Cane: R37, R35, C1, C0, Colorless Blender, Clear – Wink of Stella

Hope you like it and have a fantastic week!

You can find lots of inspiration from the Design Team Divas at the High Hopes blog, and the High Hopes Rubber Stamps Facebook Fan page plus you can also follow us on
Instagram, Twitter and Pinterest.