Archives

Happy Pride Day!


Today, I’m sharing a Happy Pride Day card using Craft With SarahRainbow Gnomes from the free SVG April 21st – April 30th, 2023 Gnome Craft Countdown event. The Rainbow Gnomes were offered on day 6. The sentiment is a free sentiment that can be found on Cricut Design Space. My friend and his partner are celebrating this month along with many of their friends and I’m hoping this card puts an added smile on their faces.

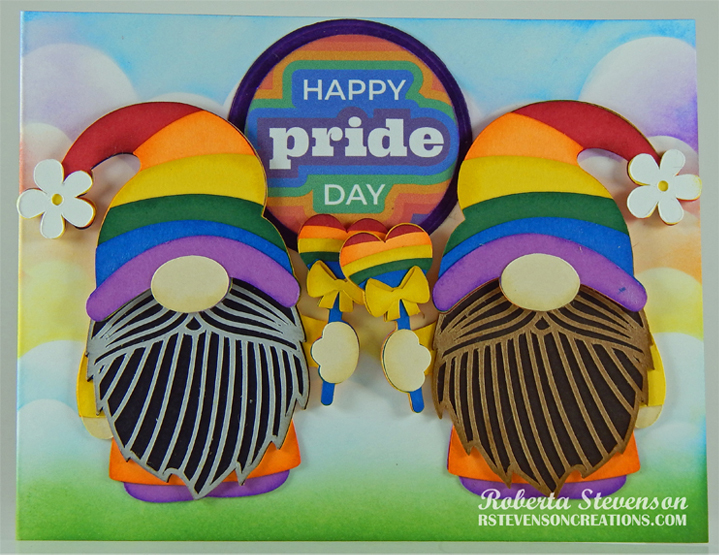
To create the card, I began with a card base of 4.25″ x 5.5″ using Hammermill – Premium Colour 100 lb. cardstock.  Using Lawn Fawn CutsCloudy Stencil, multiple blending brushes and multiple Tim Holtz Distress Inks, I created the clouds. With Tim Holtz Distress Ink – Mowed Lawn, I gently blended the grass into the base of the clouds.

I imported the .SVG file into Cricut Design Space and created a mirror image of the .svg so that I could have the gnomes facing in opposite directions. I cut out all of the different layers using various cardstock colours along with the sentiment with my Cricut Explore. Once the pieces were all cut out, I glued them all together as per the instructions from Craft With Sarah instructions associated with the .SVG file. These were then added to the front of the card to finish it off.

Card Recipe:

Cricut Explore, Cricut Design Space – WWW.CRAFTWITHSARAH.COM \ Gnomes – gcc-day-06-rainbow (W2.944 x H3.211, Happy Pride Day (#M278417D3) (1.755 x 1.755)

Inks: Grass: Tim Holtz Distress Ink – Mowed Lawn, Sky: Tim Holtz Distress Ink – Salty Ocean, Aged Mahagony, Squeezed Lemonade, Wilted Violet

Paper: Hammermill – Premium Colour 100 lb., miscellaneous card stock

Die Cuts: Lifestyle Crafts Cutting Dies – Nesting Circles – Size 2″

Stencil: Lawn Fawn Cuts Cloudy Stencil

Miscellaneous: Cricut Explore, Cuttlebug, Blending Brushes

Hope you like it and have a great week!

Father’s Day Fisherman!


Today, I’m sharing a Father’s Day card using HunkydoryMoonstone – What A Catch Card – MSTONE537 die that I made for our dads. Both of our dads love to fish and I thought this was the perfect die set when I saw it. Wishing everyone’s dad a very Happy Father’s Day today and everyday!

To create the card, I began with a card base of 6″ x 6″ using AC Cardstock – White. For the main background I attached Stampin’ UP! – Whale of a Time Designer Series Paper cut to the same size as the base with double-sided tape. Tim Holtz Distress Ink – Blueprint Sketch and a finger dauber were used to ink around all of the edges. Using a combination of my Cuttlebug, My Creative Time -Stitched Squares Inside and Out – 4.5″ x 4.5″ and Moonstone – What A Catch Card die, I die cut the image out of Recollections – Black cardstock.

Forever In Time – Glam Glitter Cardstock – Ombre Pastel was cut to be just slightly smaller than 4.5″ x 4.5″ and then U-Line double-sided pop-up tape was added to the back of the die-cut image. I removed the tape and then attached the Glitter cardstock on top. This allowed me to line up the 2 pieces easier. For the sentiment, I decided to use my Cricut Explore and Cricut Design Space to create the text and shadow, using some spare blue cardstock and Recollections – Black cardstock. Once the sentiment and shadow were die-cut, I ran the lettering through my Xyron Create a Sticker and attached the 2 pieces together.

U-Line double sided tape was attached to the back of the combined image and it was popped up onto the card. Scrapbook Adhesives – 3D Foam Strips – Permanent Black was added to the back of the sentiment pieces and they were popped up onto the card to finish it off.

Card Recipe:

Dies: My Creative Time -Stitched Squares Inside and Out, Moonstone – What A Catch Card – MSTONE537 (3.8″ x 3.8″), Cricut Explore

Inks: Memento – Tuxedo Black, Tim Holtz Distress Ink – Blueprint Sketch

Paper: Copic Marker X-Press It Blending Card, AC Cardstock – White, Stampin’ UP! – Whale of a Time Designer Series Paper (6″ x 6″), Forever In Time – Glam Glitter Cardstock – Ombre Pastel, Recollections – Black cardstock

Cricut Explore and Cricut Design Space: Lettering and Shadow

Miscellaneous: U-Line double-sided tape, Cricut Explore, Cuttlebug, Xyron Create a Sticker, Scrapbook Adhesives – 3D Foam Strips

Hope you like it and have a great week!

Belated Bithday Card


//

Hello There,

Like to share the tear bear I made using Teacup Panda from Kadoodle Bug Designs. (Cutie KaToodles – Teacup Panda).

Panda in cup 300 dpi0002

My second attempt at tear bears. Lots of work, but I’m loving it. Outlined paws with Spectrum Noir Marker.

Eyes with Pigma Micron 05 marker.

Patterned paper  – Kaitlin – Recollections Signature 12 x 12 Paper Pad.

Belated Birthday inside 300 dpi

For the inside, I cut out the snail from Cricut Cartridge Birthday Bash. Then I stamped the face with Peachy Keen Stamp Set – PK490 – Everyday Character Face Assortment. I added in some extra eyelashes and used my White Gel pen on the eye. Used chalk for cheeks, outline of snail and for shadow below snail. For the shell, I used some paper that I made using the Tim Holz Ranger Alcohol Inks.

Sentiment is from Craftin Desert Divas Stamp – Just because.

Web site for Panda .svg can be found here:

(Cutie KaToodles – Teacup Panda).

http://kadoodlebugdesigns.com/shop/index.php?main_page=product_info&cPath=55&products_id=756

Just Because stamps can be found here: http://www.craftindesertdivasshop.com.


Eagle Birthday Card


Hi There,

I’d like to share the card that I made

for my brother’s birthday with you.

Front of Card:

Billy's BD card front

Inside of Card:

Billy's BD card inside

Border – Peachy Keen Stamps PK-1425 Birch Frame Background A2.

Eagles and Sentiments – PK-1427 Smile Eagle .

Stamped with Memento – Tuxedo Black Ink.

Balloon, Face and Happy Birthday  – PKSC-33 September 2014

Used Cricut Explore for

Happy Birthday with Balloons – Birthday Cakes

Tree branch with leaves – Zooballoo

Cloud – Disney Mickey and Friends

Eagle Colouring – Front – Copics, Spectrum Noir and PrismaColor Premiere coloured pencils, Gelly Roll Sakura #8 pen

Leaves, balloons and branch – various coloured cardstock, Eyes on balloon – Gelly Roll Sakura #8 pen

Happy Birthday Elephant Card


Here is a card that I made from a freebie from Kadoodle Bug Designs from the Eggie Buddies collection called EggieBuddiesElephant.

Elephant BD card front

I used Quickutz Nesting Frame 7 from We R Memory Keeperts and my Cuttlebug to cut out the shaped background from Doodlebug Design Inc. 6×6 paper pad, Sugar Shoppe double-sided cardstock collection.

Then used a marker to go around the edging. Layered it onto blue and yellow cardstock.

Happy Birthday was cut out on my Cricut Explore and sentiment is from Inky Antics Clear Stamps Birthday Elephant.

Inside of card:

Elephant Inside4

Closer look at elephant.

Elephant Inside closeup

Inside is from Inky Antics Clear Stamps Birthday Elephant.

Balloon was made from Inky Antics Honeycomb Paper Assortment – Yellow.

Elephant and Sentiment was stamped with Memento – Tuxedo Black ink and then was coloured in using Copic Cool Grey for the base and then highlighted with PrismaColor Premier Pencils and Gamsol using pencil stumps.

Teddy Bear Xmas Card


Xmas Bear

To make this card, I used the bear from Cricut Teddy Bear Parade and my Gypsy to cut out the pieces using various cardstock (Red, gold, beige, tan, glitter white and glitter black).  Snow background is made with Glitter Paper from “The Paper Studio Christmas Cardstock Pack”. Then I used some ribbon for the sentiment.

Happy 30th Birthday


My nephew turned 30 this year, so I thought I’d make him a heartfelt card to tease him about getting a year older.

30 BD Front 30 BD Inside

To make the card, I used blue cardstock, green cardstock cut with Martha Stewart Icicle punch, black cardstock  for wording, DCWV Animal Prints, scraps of yellow, brown, flesh coloured cardstock, Spectrum Markers and PrismaColor Premier Pencils with Blending Solution. Rounded corner punch.

The boy and girl were both cut with my Cricut using Paper Doll Dressup. 3″ x 2.25″, accessories to match. Wording – Jasmine Font.

For the boys face I used Peachy Keen Stamp face from PK-1200 The Moodies Face Assortment 3/4″  Size

For the girls face I used Peachy Keen Stamp face from PK-1410 Christmas in July Face Assortment 3/4″ Size

I used pink chalk for their cheeks, blue and green marker for their eyes and Inkssentials for their eyes.

Bronze pearls for the girl’s necklace.

For the inside I stamped the little dog  and sentiment with Tuxedo Black Memento Ink using PK-1334 Howling Puppy stamps.

I then coloured it with Spectrum GB3 and then used Prisma Coloured Pencils PC943 and PC945 for shading.

Kerchief – Spectrum IBI, Prisma Coloured Pencils PC902, PC903, PC904 for shading.

Mouth – Copic R37, R39.

Rug – Spectrum GT2 ad GT3.

Lastly, I put a shadow around the whole puppy with Spectrum IG1.

Hope you like it!