Tag Archive | Lawn Fawn Cuts – Cloudy Stencil

Peace Dude!


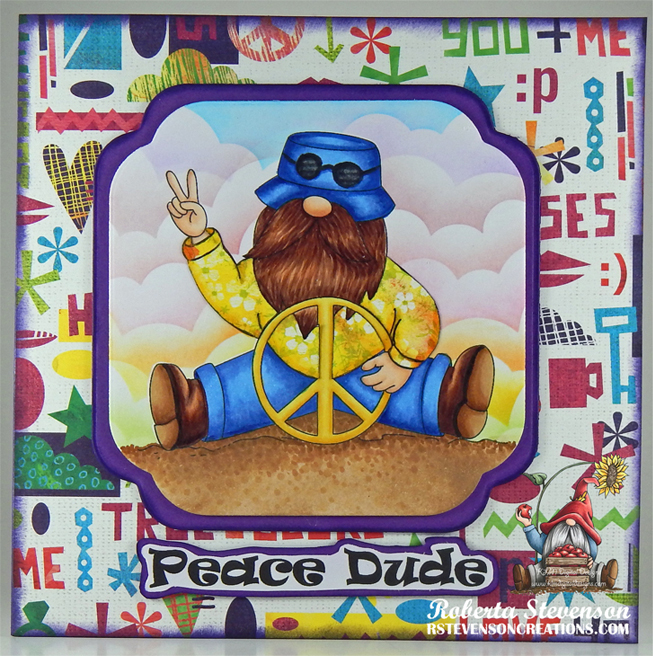
Today I’m sharing an inspirational \ birthday card using KLM Digital DesignPeace Gnome from the new March release. This image also comes with 2 more sentiments, “Peace begins with a smile” and “There is peace even in the storm”. Seeing this image made me feel nostalgic for my younger days in the 60’s and 70’s. I still remember how excited I was to get my very first pair of GWG bell bottom jeans and then LEVIS. LOL! Flower power was all the rage and there were flowers and peace signs everywhere. I was still young, but it was a really cool time to grow up.

AC Cardstock – White was used to create a 6″ x 6″ card base. BasicGrey – Lauderdale Patterned paper was cut to the same size as the base card and adhered with double-sided tape. Tim Holtz Distress Inks – Villainous Potion was used to ink around all of the edges.

The image and sentiment were imported into Microsoft Word and printed out onto Copic Marker X-Press It Blending Card and 2 extra copies of the image were printed onto plain copy paper to be used for masking later. With my Cuttlebug, I die cut the image and the purple background layer using Quickutz Nesting Frame 7 dies. I fussy cut around the sentiment and then inked it very lightly with some purple that I had left on my blending brush. I ran it through my Xyron Create a Sticker and attached it to a scrap piece of Recollections – Purple Passions paper. Once again, I fussy cut around the sentiment. The larger frame and sentiment edges were inked around the edges with the same ink as the base card.

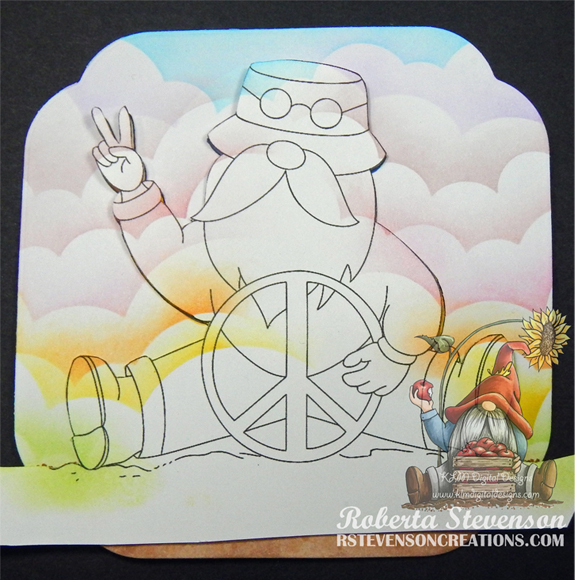
The image was coloured in with Copic Markers listed below. The top portion of the image was fussy cut and I applied some Washi Tape to the back of it to create a hinge and to mask the image. Using blender brushes and multiple Tim Holtz Distress Inks, I created the clouds in the sky with Lawn Fawn Cuts – Cloudy Stencil.

Once I completed the sky, I used second image that I had printed out onto the copy paper for 2 purposes. The first purpose was to use a stylus and tracing paper to transfer the image onto the patterned paper from BasicGrey – Lauderdale Paper Pad for paper piecing the gnome’s shirt. I loved the wild flower pattern and thought it was perfect for this hippie gnome. Once the pattern was transfered, I fussy cut it out. I used my Copic markers to create a small shadow on various parts of the shirt. With a Pigma Micron 03 black marker, I drew the lines in darker so that they would stand out on the shirt and then used a black marker to go around all of the pieces. Once completed, all of the pieces were put through a Xyron Create a Sticker to make it easier to stick to them to the coloured image and also so that they would lay flat. I then added the pieces to the main image.

The printed image was then fussy cut and the sand was added using a blender brush, Krafty Kolours – Sandy Shores for the base and a mixture of Copic markers listed below.

The remainder of the card was now ready to assemble. I added U-Line double-sided tape to the backs of the sentiment, large purple frame and image. They were all then popped up onto card.

Card Recipe:

Stamp and Sentiment:  Peace Gnome – KLM Digital Designs

Inks: HP Printer Grayscale, Tim Holtz Distress Inks – Salty Ocean, Wilted Violet, Aged Mahagony, Abandoned Coral, Kitsch Flamingo, Spiced Marmalade, Mustard Seed, Twisted Citron, Villainous Potion, Krafty Kolours – Sandy Shores

Paper: Copic Marker X-Press It Blending Card, AC Cardstock – White, BasicGrey – Lauderdale Paper Pad (6″ x 6″), Recollections – Purple Passions 8.5″ x 11″

Dies: Quickutz Nesting Frame 7

Stencils: Lawn Fawn Cuts – Cloudy Stencil

Miscellaneous: U-Line double-sided tape, Cuttlebug, Blending Brushes, Xyron Create a Sticker

Image coloured with Copic Markers:

Skin: E21, E11, E04, E00, E000

Beard: E29, E27, E25, E23, E21

Jeans and Hat: B26, B23, B21

Boots: E49, E35, E34, E31, E29, E27, E25, E23, E21

Shirt: Y17, Y11 (Lauderdale – Basic Grey Designer Paper)

Peace Sign: Y19, Y15, Y11

Sand: E37, E35, E34, E33, E31, E30 and Krafty Kolours – Sandy Shores for base

Glasses: N10, N9, N7, Colorless Blender

Hope you like it and have a great week!

You can find more cards to inspire you at KLM Designs, KLM Digital Design Team and KLM Digital Designs on the Facebook Fan page from the rest of our design team.

Do Not Stop!


Today I’m sharing an inspirational card using KLM Digital DesignSlow Ride Gnome from the new February release. This image also comes with 2 more sentiments, “Travel at your own pace” and “Life is a journey, not a race”.  It was hard for me to pick which sentiment to use as I loved them all. They are all so true to life.

Hammermill – Premium Colour 100 lb. cardstock was used to create a 5.5″ x 4.25″ card base. I had found Crafts Designer Paper – 02-3080678 at Dollarama and thought this paper was perfect for this card. It was cut to the same size as the base card and adhered with double-sided tape.

The image and sentiment were imported into Microsoft Word and printed out onto Copic Marker X-Press It Blending Card. With my Cuttlebug, I die cut the image using My Creative Time – Bunch of Fun Circle 3.25″ Dies. The larger circle was die cut using Recollections – Blue Ombre Cardstock and Lifestyle Crafts Cutting Dies – Nesting 3.5″ Circle. I trimmed down the sentiment to be 2.25″ x 1.5″. Using what was left on a blending brush that I used for blues, I lightly went over the paper to give it a light blue hue. Tim Holtz Distress Ink – Salvaged Patina was then inked around the 3 edges.

The image was coloured in with Copic Markers listed below. I printed out another copy of the image onto plain paper and fussy cut around the top portion. I applied some Washi Tape to the back of it to create a hinge and to mask the image. Using a blender brush, Tim Holtz Distress Ink – Salty Ocean and Lawn Fawn Cuts – Cloudy Stencil, I created the clouds in the sky.

For the assembly of the card, I added double-sided tape to the back of the sentiment and adhered it directly to the card. U-Line double-sided tape was added to the backs of the larger and smaller circle and both were popped up onto each other and the card. Lastly, to finish off everything, I added in some YNS Gumdrops – Tropical Paradise.

Card Recipe:

Stamp and Sentiment:  Slow Ride Gnome – KLM Digital Designs

Inks: HP Printer Grayscale, Tim Holtz Distress Ink – Salty Ocean, Tim Holtz Distress Ink – Salvaged Patina

Paper: Copic Marker X-Press It Blending Card, Hammermill – Premium Colour 100 lb., Crafts Designer Paper – 02-3080678, Recollections – Blue Ombre Cardstock

Dies: My Creative Time – Bunch of Fun Circle Dies, Lifestyle Crafts Cutting Dies – Nesting Circles

Stencils: Lawn Fawn Cuts – Cloudy Stencil

Miscellaneous: U-Line double-sided tape, Cuttlebug, Blending Brush, YNS Gumdrops – Tropical Paradise

Image coloured with Copic Markers:

Skin: E21, E11, E04, E00, E000

Beard: E08, YR18, YR16, YR12

Jeans: B26, B23, B21

Shoes: C9, C7, C5, C1

Shirt: B69, B63, C3, R46

Hat: BG09, BG05, BG02, BG01

Turtle: E47, E44, E43, E42, E40, BG99, BG96, BG93, BG90, G07, YG07, Y35, C1, C00, 100

Sand: E37, E35, E33, E31

Flower and Stem: G14, YG23, YG11, E33, Y38, Y35, Y32

Hope you like it and have a great week!

You can find more cards to inspire you at KLM Designs, KLM Digital Design Team and KLM Digital Designs on the Facebook Fan page from the rest of our design team.

Dance With Me!!


Today, I’m sharing a card that I made using Dreamerland Crafts stamps called Just Dance With Me – DCS17037. Sometimes just dancing with our partners or friends can bring such joy to us. No matter where you may be, just hear the music and dance no like no one is watching!

To create this card I began by making a base of 5.5″ x 4.25″ using Hammermill – Premium Colour 100 lb. cardstock. The sky was created using Lawn Fawn Cuts – Cloudy Stencil, a  blender brush and Tim Holtz Distress Inks – Salty Ocean and Broken China. To create the grass, I first cut 2 pieces of DCWV – Pocket Blossom designer paper to the sizes of 5.5″ x 2.5″ and 5.5″ x 1-5/8″.  Lawn Fawn – Grassy Hillside Borders die cuts and my Anna Griffin Empress Mini Cutting Machine were used to die cut the 2 pieces. Using a blender brush and Tim Holtz Distress Ink – Rustic Wilderness, I inked over top of the blades of grass and then around the other 3 edges.

The main image was stamped using my MISTI and Memento – Tuxedo Black ink onto Copic Marker X-Press It Blending Card. I coloured in the image and then fussy cut around it leaving a slim white border. U-Line double-sided tape was added to the back of the image. I then placed the image onto the card before removing the tape backing to see where to place the sentiment. Using my MISTI again and Versa Fine – Onyx Black ink, I applied the sentiment onto the base card. Ranger – Clear Super Fine Detail embossing powder was then applied to it and it was heat embossed with Marvy Uchida – Embossing Heat Tool.

The final pieces of the card were now ready to assemble. I peeled off the tape backings from the large die-cut and added some liquid glue to allow me to move it into the correct position over top of the grass I had placed down earlier onto the base card. After popping up the top grass cut, I then repeated the same process and popped up the image in between the blades of grass. Finally, I added in some butterflies from the same stamp set using Tim Holtz Distress Ink – Wilted Violet. I had made them lighter by first stamping off of the page and then onto the card.

Card Recipe:

Stamps: Just Dance With Me – DSC17037 – Dreamerland Crafts

Inks: Memento – Tuxedo Black, Tim Holtz Distress Ink – Rustic Wilderness, Wilted Violet, Salty Ocean and Broken China, Versa Fine – Onyx Black

Paper: Copic Marker X-Press It Blending Card, Hammermill – Premium Colour 100 lb., DCWV – Pocket Blossom – 12″X12″ (30.5cmx30.5cm)

Die Cuts: Lawn Fawn – Grassy Hillside Borders

Stencil: Lawn Fawn Cuts – Cloudy Stencil

Embossing Powder: Ranger – Clear Super Fine Detail embossing powder

Tools: MISTI – Most Incredible Stamping Tool, Marvy Uchida – Embossing Heat Tool, U-Line double-sided tape, Anna Griffin Empress Mini Machine, Gelly Roll Sakura #10 Pen

Image coloured with Copic Markers:

Skin: E21, E11, E04, E00, E000, R30, R30, R20

Hair: E47, E44, E43, E41

Dress: V06, V04, V01, V0000, Gelly Roll Sakura #10 Pen

Shirt: BG72, BG57, BG32, BG11

Jeans: B26, B23, B21

Hope you like it and have a great week!

You can find more cards to inspire you at Dreamerland Crafts and Pointer Scrapbooking on the Facebook Fan pages from the rest of our design team.

Better at the Beach!!!


Sharing a card I made today using KLM Digital Design –  Beach Gnome – Girl from the new June 2022 release. This image also comes with 2 more sentiments, “Good times & tan lines” and “Girls just wanna have sun”.

I imported the image and sentiment into Microsoft Word and printed them out onto Copic Marker X-Press It Blending Card and the image again onto regular copy paper. Using My Creative Time – Rectangle Frame Dies and my Cuttlebug, I die cut the image. The image was coloured in with Copic markers. I fussy cut around the image printed out of regular copy paper to create a mask and applied it over top of the coloured image using repositionable tape. Using several Picket Fence – Blending Brushes and multiple Tim Holtz Distress Inks and Krafty Kolours – Sandy Shores, I created the sand, water and clouds using Lawn Fawn – Ocean Waves Stencils, Lawn Fawn – Clippings – Slimline Hillside Stencils and Lawn Fawn Cuts – Cloudy Stencil.

I created a 5.5″ x 4.25″ card base using Hammermill – Premium Colour 100 lb. cardsstock. U-Line – 2 sided tape was added to the back of the image and it was popped up onto the base card. To finish the card off, I added in a few seashells using 2 layers of U-Line – 2 sided tape.

Card Recipe:

Stamp and Sentiment:  Beach Gnome – Girl – KLM Digital Designs

Inks: HP Printer Grayscale, Krafty Kolours – Sandy Shores, Tim Holtz Distress Ink – Salty Ocean, Mermaid Lagoon, Salvaged Patina, Peacock Feathers, Broken China

Paper: Copic Marker X-Press It Blending Card, Hammermill – Premium Colour 100 lb.

Die Cut: My Creative Time – Rectangle Frame Dies

Stencils: Lawn Fawn – Ocean Waves Stencils, Lawn Fawn – Clippings – Slimline Hillside Stencils and Lawn Fawn Cuts – Cloudy Stencil

Miscellaneous: U-Line – 2 sided tape, Picket Fence – Blending Brushes

Image coloured with Copic Markers:

Skin: E21, E11, E04, E00, E000

Hair: E47, E44, E43, E41

Clothing, Hat and Sandals: RV09, RV06, RV04, RV02, B79, B69, B66

Towel, Flower, Pail: V12, V09, V06, V04

Hope you like it and have a great week!

You can find more cards to inspire you at KLM Designs, KLM Digital Design Team and KLM Digital Designs on the Facebook Fan page from the rest of our design team.

Born to Be Wild!!


Sharing a card that I made today using KLM Digital Design –  Pre-Colored MotorCycle Gnome from the new May 2022 release.  I remember how refreshing it was when I was younger going for rides on a motorcycle during hot weather!

Using Hammermill – Premium Colour 100 lb. cardstock, I created a base card of 5.5″ x 4.25″. I cut a panel to be the same size out of the same cardstock. The mountains were created using Kraftin’ Kimmie – Krafty Scenery 2 and Tim Holtz Distress Ink – Vintage Photo, Picket Fence – Blending Brush and blocking off the base of the mountains with a long Post-It Note. Once the mountains were in place, I created the clouds using Lawn Fawn Cuts – Cloudy Stencil, Tim Holtz Distress Ink – Salty Ocean and a Picket Fence – Blending Brush. I die cut the road using my Anna Griffin Empress Mini Machine, My Favourite Things – Die-Namics – Open Road MFT-1138 out of Recollections – Black paper. I measured it to the line of the mountains and cut it. Using this as a guide, with Tim Holtz Distress Inks – Mowed Lawn and a Picket Fence – Blending Brush, I created the grass.

Using my Anna Griffin Empress Mini Machine and Stampin’ Cut & Emboss – Pine Wood Dies, I die cut all of the trees using Scrapbook.com – Jewels Smooth Cardstock and Lawn Fawn – Watercolor Wishes Rainbow. I coloured the trunks using Copic marker E27. I applied the bottom trees with glue and then popped up the front trees with Scrapbook Adhesives – 3D Foam Strips. I imported the image into Microsoft Word and printed it out onto Copic Marker X-Press It Blending Card. I fussy cut around the image and added 2 layers of U-Line double-sided tape to it and popped it up onto the road to complete the card.

Card Recipe:

Stamp:  Pre-Colored Motorcycle Gnome – KLM Digital Designs

Sentiment: Art Impressions – Born To Ride Set – 5044

Inks: HP Printer Grayscale, Tim Holtz Distress Ink – Salty Ocean, Tim Holtz Distress Ink – Rustic Wilderness, Tim Holtz Distress Ink – Vintage Photo

Paper: Copic Marker X-Press It Blending Card, Hammermill – Premium Colour 100 lb., Scrapbook.com – Jewels Smooth Cardstock (4.25″ x 5.5″), Scrapbook.com – Jewels Smooth Cardstock (4.25″ x 5.5″), Tim Holtz Distress Inks – Mowed Lawn, Recollections – Black, Lawn Fawn – Watercolor Wishes Rainbow – 6″ x 6″

Dies: Stampin’ Cut & Emboss – Pine Wood Dies, My Favourite Things – Die-Namics – Open Road MFT-1138

Stencil: Lawn Fawn Cuts – Cloudy Stencil, Kraftin’ Kimmie – Krafty Scenery 2

Miscellaneous: U-Line – 2 sided tape, Anna Griffin Empress Mini Machine, Picket Fence – Blending Brushes, Scrapbook Adhesives – 3D Foam Strips

Hope you like it and have a great week!

You can find more cards to inspire you at KLM Designs, KLM Digital Design Team and KLM Digital Designs on the Facebook Fan page from the rest of our design team.

Better Late Than Never!!


Sharing a birthday card I made today using KLM Digital Design –  Stanley The Snail from the new May 2022 release. This image also comes with 2 more sentiments, “You snailed it!” and “Thanks SLOW much!”  Love this sentiment “Better late than never!” as it could be used for so many different occasions.

Using Hammermill – Premium Colour 100 lb. cardstock, I created a base card of 5.5″ x 4.25″. Using Tim Holtz Distress Ink – Salty Ocean, I created the clouds with Lawn Fawn Cuts – Cloudy Stencil directly on the base card. With the dies from Lawn Fawn – Simple Grassy Hillsides and Lawn Fawn – Watercolor Wishes Rainbow paper, I die cut 3 lawn cuts using my Anna Griffin Empress Mini Machine.

I imported the image and sentiment into Microsoft Word and printed them out onto Copic Marker X-Press It Blending Card. The image was coloured in with Copic markers. Using scissors, I fussy cut around the coloured image and inked around the edges with a black marker. I cut the sentiment with my cutter and added U-Line double sided tape to it and popped it up onto the smallest lawn cut.

The card was now ready to assemble. I added U-Line double-sided tape to each layer of grass. I added a second layer of U-Line double sided tape to the middle layer. I used my fussy cut image to determine where the lawn cuts would be positioned and then popped up each layer onto the base. I applied some glue to the back of the image on the bottom only and adhered it to the card between the 2nd and 3rd layer of grass. I felt like the card still needed something, so I added 3 lady bugs from Forever In Time – Ladybug Gems and a butterfly from Doodlebug Design Inc. – Plum Butterflies Braddies to finish off my card.

Card Recipe:

Stamp and Sentiment:  Stanley the Snail – KLM Digital Designs

Inks: HP Printer Grayscale, Tim Holtz Distress Ink – Salty Ocean

Paper: Copic Marker X-Press It Blending Card, Hammermill – Premium Colour 100 lb., Lawn Fawn – Watercolor Wishes Rainbow – 6″ x 6″

Die: Lawn Fawn – Simple Grassy Hillsides

Stencil: Lawn Fawn Cuts – Cloudy Stencil

Miscellaneous: U-Line – 2 sided tape, Anna Griffin Empress Mini Machine, Doodlebug Design Inc. – Plum Butterflies Braddies, Forever In Time – Ladybug Gems

Image coloured with Copic Markers:

Snail: E84, E81, E44, E43, E42, E41, E39, E37, E35, E34, E33, E31, E30, E29, E27, E25, E23, E21, Y38

Hope you like it and have a great week!

You can find more cards to inspire you at KLM Designs, KLM Digital Design Team and KLM Digital Designs on the Facebook Fan page from the rest of our design team.

Keep On Swinging!!


Sharing a card I made today using KLM Digital Design –  Tire Swing Gnome from the new April 2022 release. This image also comes with 2 more sentiments, “May your toes touch the sky” and “Why can’t we just swing into Friday?” I think it would be good if we could just swing into Friday and have fun weekends all the time! Don’t you?

Here it is in action.


I used The Paper Studio – Primary Simply Solids (4.25″ x 5.5″) for my base card. I wanted to create an interactive swinging card and I found a video on You Tube from My Favourite Things called “Creating an Interactive Swing Card” by Stephanie on Mar 7, 2019. I didn’t have the dies, so I used the video for inspiration and decided to create my own mechanism and die cuts. Using my Cricut, I took a rectangle and added a bunch of circles and then welded them all together to create the tree. I also created the swing mechanism by joining a circle and thin long rectangle and then welding them together. The grass was also die cut on my Cricut Explore. I die cut the trees and swing mechanism using Copic Marker X-Press It Blending Card and the grass with Recollections – Green cardstock. I coloured in the trees with Copic markers. Using Hammermill – Premium Colour 100 lb. and Tim Holtz Distress Ink – Salty Ocean, I created the clouds with Lawn Fawn Cuts – Cloudy Stencil. Using the mechanism for placement, I die cut a circle into the cloud background.

I imported the image and sentiment into Microsoft Word and printed them out onto Copic Marker X-Press It Blending Card. The image was coloured in with Copic markers. Using scissors, I fussy cut around the coloured image and inked around the edges with a black marker. I cut the sentiment with my cutter and ran it through my Xyron Create a Sticker. I attached it to some Recollections – Black cardstock and cut around it again.

The card was now ready to assemble. I applied a small circle double-side pop-dot to the centre of the hole cut earlier on the cloud paper and attached it to a slightly larger circle at the back of the cloud paper. Using my EK Success Powder tool, I went around all of the sides of the pop-up to remove any stickiness. I applied the mechanism over top of the pop-dot and attached some extra two-sided tape. I applied another die cut circle over top of the raised pop-dot. This allowed the mechanism to now move freely back and forth on the page. Using double-sided tape on the back of the cloud paper, I applied the double-sided tape everywhere except around the mechanism and popped it onto the base card. I ran the grass die cut through my Xyron Create a Sticker and applied it directly to the cloud base. I took the 2 tree die cuts that I had created earlier and coloured and glued them both together. I attached the gnome image to the mechanism with double-sided tape and cut off the extra length not required. I added some double-sided tape behind the trees on both sides and only part way along the top on both sides leaving the area for the swinging mechanism free. This was then popped up onto the cloud background. I applied some U-Line double-sided tape and popped up the sentiment on top of the trees. Lastly, I added a penny to the back of the gnome to give it more momentum when swinging.

Card Recipe:

Stamp and Sentiment:  Tire Swing Gnome – KLM Digital Designs

Inks: HP Printer Grayscale, Tim Holtz Distress Ink – Salty Ocean

Paper: Copic Marker X-Press It Blending Card, The Paper Studio – Primary Simply Solids (4.25″ x 5.5″), Hammermill – Premium Colour 100 lb., Recollections – Green, Recollections – Black cardstock

Dies: Lawn Fawn Cuts – Cloudy Stencil

Miscellaneous: U-Line – 2 sided tape, EK Success Powder Tool, Cricut Explore, Xyron Create a Sticker, penny

Image coloured with Copic Markers:

Skin: E21, E11, E04, E00, E000

Beard: E47, E44, E43, E41

Shirt: BG09, BG05, BG02, BG01

Hat and Jeans: B26, B23, B21

Boots: E27, E25, E23, E21

Tire: T7, T5, T3, C2, C1, C0, Colorless Blender

Rope: Y21, E53, E52, E51

Hope you like it and have a great week!

You can find more cards to inspire you at KLM Designs, KLM Digital Design Team and KLM Digital Designs on the Facebook Fan page from the rest of our design team.

Snoozing Gnome!!


Sharing a card I made today using KLM Digital Designs new April Release called Snoozing Gnome. This little gnome is relaxing and enjoying the day. The image also comes with 2 other sayings, “pause and Reset” and “just Breathe”.

To make the card, I first imported the image into Microsoft Word and printed it out onto Copic Marker X-Press It Blending Card using my HP Printer. I coloured in the image with Copic markers.

For the base card, Hammermill – Premium Colour 100 lb. paper was used at the size of 5.5″ x 4.25″. I created the cloud background using Tim Holtz Distress Ink – Salty Ocean, Broken China and Tumbled Glass and Lawn Fawn Cuts – Cloudy Stencil.

Card Recipe:

Stamp: Snoozing Gnome – KLM Digital Designs

Inks: HP Printer Grayscale, Tim Holtz Distress Ink – Salty Ocean, Tim Holtz Distress Inks – Broken China, Tim Holtz Distress Inks – Tumbled Glass

Paper: Copic Marker X-Press It Blending Card, Hammermill – Premium Colour 100 lb.

Die Cuts Stencils: Lawn Fawn Cuts – Cloudy Stencil

Image coloured with Copic Markers:

Skin: E21, E11, E04, E00, E000

Beard: E49, E47, E44, E42

Shirt: BG72, BG57, BG32, BG11

Pants: B26, B23, B21

Hat: R59, R37, R35

Boots: E27, E25, E23, E21

Mushroom: R46, R14, R08, E43, E42, E40, C1, C00, Colorless Blender

Grass: YG17, YG13, YG03, YG01

Hope you like it and have a great week!

You can find more cards to inspire you at KLM Designs, KLM Digital Design Team and KLM Digital Designs on the Facebook Fan page from the rest of our design team.