Tag Archive | Tim Holtz Distress Ink – Wilted Violet

Birthday Ssschmirth-day!


Today, I’m sharing a fun birthday card using Whimsy StampsMe-Wow Cat Birthday that I made for my father-in-laws 80th Birthday. He’s wasn’t too keen on turning 80 so I thought I would make this fun card for him! He loved it and I hope that you do too!

To create the card, I began with a card base of 5.5″ x 5.5″ using Hammermill – Premium Colour 100 lb. cardstock. Echo Park Paper Co. – Happy Birthday Boy paper was cut to the same size as the base and adhered with double-sided tape. Using my Cuttlebug and My Creative Time – Stitched Squares Inside and Out, I die cut a 3.5″ x 3.5″ square out of Copic Marker X-Press It Blending Card and a 4″ x 4″ square out of Recollections – Black cardstock.

Using my MISTI and Memento – Tuxedo Black ink, I stamped the image from Whimsy StampsMe-Wow Cat Birthday. The image was coloured in with Copic markers and then I stamped the image again onto a Post-It note and fussy cut around the balloon and upper half of the kitty to use it as a mask. I placed it over top of the coloured image and created the party background using Tim Holtz Distress Ink – Salty Ocean, Tim Holtz Distress Ink – Squeezed Lemonade and Tim Holtz Distress Ink – Wilted Violet which I applied using Blending Brushes. After the first layers were added, I used the same colours,  but this time I used Hero Arts – Party Confetti Stencil (Crop & Create Exclusive) to create the streamers. I removed the mask and put the image into my MISTI once again and this time, I stamped the sentiment from the same stamp set using Versa Fine – Onyx Black ink and then heat embossed it using Ranger – Clear Super Fine Detail embossing powder and Marvy Uchida – Embossing Heat Tool. Lastly, U-Line double-sided tape was applied to the back of the image and the black square. These were then popped up onto the centre of the card.

Card Recipe:

Stamp: Whimsy StampsMe-Wow Cat Birthday – C1386

Inks: Memento – Tuxedo Black, Versa Fine – Onyx Black, Tim Holtz Distress Ink – Salty Ocean, Tim Holtz Distress Ink – Squeezed Lemonade and Tim Holtz Distress Ink – Wilted Violet

Paper: Copic Marker X-Press It Blending Card, Hammermill – Premium Colour 100 lb., Recollections – Black cardstock, Echo Park Paper Co. – Happy Birthday Boy 6″ x 6″

Dies: My Creative Time – Stitched Squares Inside and Out

Stencil: Hero Arts – Party Confetti Stencil (Crop & Create Exclusive)

Embossing Poweder: Ranger – Clear Super Fine Detail

Miscellaneous: U-Line double-sided tape, Marvy Uchida – Embossing Heat Tool, MISTI – Most Incredible Stamping Tool, Blending Brushes

Image coloured with Copic Markers:

Cat: C10, C8, C7, C6, C5, C4, R22, R02, 100, YG09, YG07, YG05

Hat: BG15, BG11, BG10, BG09, BG05, BG02, BG01

Balloon: BG09, BG05, BG02, BG01, BG0000

Lawn: YG25, YG23, YG21, YG03, YG01

Hope you like it and have a great week!

Happy Pride Day!


Today, I’m sharing a Happy Pride Day card using Craft With SarahRainbow Gnomes from the free SVG April 21st – April 30th, 2023 Gnome Craft Countdown event. The Rainbow Gnomes were offered on day 6. The sentiment is a free sentiment that can be found on Cricut Design Space. My friend and his partner are celebrating this month along with many of their friends and I’m hoping this card puts an added smile on their faces.

To create the card, I began with a card base of 4.25″ x 5.5″ using Hammermill – Premium Colour 100 lb. cardstock.  Using Lawn Fawn CutsCloudy Stencil, multiple blending brushes and multiple Tim Holtz Distress Inks, I created the clouds. With Tim Holtz Distress Ink – Mowed Lawn, I gently blended the grass into the base of the clouds.

I imported the .SVG file into Cricut Design Space and created a mirror image of the .svg so that I could have the gnomes facing in opposite directions. I cut out all of the different layers using various cardstock colours along with the sentiment with my Cricut Explore. Once the pieces were all cut out, I glued them all together as per the instructions from Craft With Sarah instructions associated with the .SVG file. These were then added to the front of the card to finish it off.

Card Recipe:

Cricut Explore, Cricut Design Space – WWW.CRAFTWITHSARAH.COM \ Gnomes – gcc-day-06-rainbow (W2.944 x H3.211, Happy Pride Day (#M278417D3) (1.755 x 1.755)

Inks: Grass: Tim Holtz Distress Ink – Mowed Lawn, Sky: Tim Holtz Distress Ink – Salty Ocean, Aged Mahagony, Squeezed Lemonade, Wilted Violet

Paper: Hammermill – Premium Colour 100 lb., miscellaneous card stock

Die Cuts: Lifestyle Crafts Cutting Dies – Nesting Circles – Size 2″

Stencil: Lawn Fawn Cuts Cloudy Stencil

Miscellaneous: Cricut Explore, Cuttlebug, Blending Brushes

Hope you like it and have a great week!

Peace Dude!


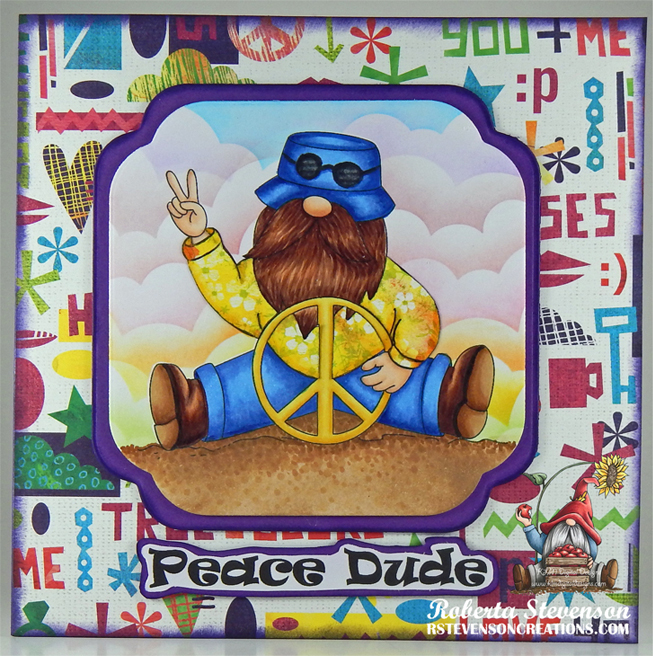
Today I’m sharing an inspirational \ birthday card using KLM Digital DesignPeace Gnome from the new March release. This image also comes with 2 more sentiments, “Peace begins with a smile” and “There is peace even in the storm”. Seeing this image made me feel nostalgic for my younger days in the 60’s and 70’s. I still remember how excited I was to get my very first pair of GWG bell bottom jeans and then LEVIS. LOL! Flower power was all the rage and there were flowers and peace signs everywhere. I was still young, but it was a really cool time to grow up.

AC Cardstock – White was used to create a 6″ x 6″ card base. BasicGrey – Lauderdale Patterned paper was cut to the same size as the base card and adhered with double-sided tape. Tim Holtz Distress Inks – Villainous Potion was used to ink around all of the edges.

The image and sentiment were imported into Microsoft Word and printed out onto Copic Marker X-Press It Blending Card and 2 extra copies of the image were printed onto plain copy paper to be used for masking later. With my Cuttlebug, I die cut the image and the purple background layer using Quickutz Nesting Frame 7 dies. I fussy cut around the sentiment and then inked it very lightly with some purple that I had left on my blending brush. I ran it through my Xyron Create a Sticker and attached it to a scrap piece of Recollections – Purple Passions paper. Once again, I fussy cut around the sentiment. The larger frame and sentiment edges were inked around the edges with the same ink as the base card.

The image was coloured in with Copic Markers listed below. The top portion of the image was fussy cut and I applied some Washi Tape to the back of it to create a hinge and to mask the image. Using blender brushes and multiple Tim Holtz Distress Inks, I created the clouds in the sky with Lawn Fawn Cuts – Cloudy Stencil.

Once I completed the sky, I used second image that I had printed out onto the copy paper for 2 purposes. The first purpose was to use a stylus and tracing paper to transfer the image onto the patterned paper from BasicGrey – Lauderdale Paper Pad for paper piecing the gnome’s shirt. I loved the wild flower pattern and thought it was perfect for this hippie gnome. Once the pattern was transfered, I fussy cut it out. I used my Copic markers to create a small shadow on various parts of the shirt. With a Pigma Micron 03 black marker, I drew the lines in darker so that they would stand out on the shirt and then used a black marker to go around all of the pieces. Once completed, all of the pieces were put through a Xyron Create a Sticker to make it easier to stick to them to the coloured image and also so that they would lay flat. I then added the pieces to the main image.

The printed image was then fussy cut and the sand was added using a blender brush, Krafty Kolours – Sandy Shores for the base and a mixture of Copic markers listed below.

The remainder of the card was now ready to assemble. I added U-Line double-sided tape to the backs of the sentiment, large purple frame and image. They were all then popped up onto card.

Card Recipe:

Stamp and Sentiment:  Peace Gnome – KLM Digital Designs

Inks: HP Printer Grayscale, Tim Holtz Distress Inks – Salty Ocean, Wilted Violet, Aged Mahagony, Abandoned Coral, Kitsch Flamingo, Spiced Marmalade, Mustard Seed, Twisted Citron, Villainous Potion, Krafty Kolours – Sandy Shores

Paper: Copic Marker X-Press It Blending Card, AC Cardstock – White, BasicGrey – Lauderdale Paper Pad (6″ x 6″), Recollections – Purple Passions 8.5″ x 11″

Dies: Quickutz Nesting Frame 7

Stencils: Lawn Fawn Cuts – Cloudy Stencil

Miscellaneous: U-Line double-sided tape, Cuttlebug, Blending Brushes, Xyron Create a Sticker

Image coloured with Copic Markers:

Skin: E21, E11, E04, E00, E000

Beard: E29, E27, E25, E23, E21

Jeans and Hat: B26, B23, B21

Boots: E49, E35, E34, E31, E29, E27, E25, E23, E21

Shirt: Y17, Y11 (Lauderdale – Basic Grey Designer Paper)

Peace Sign: Y19, Y15, Y11

Sand: E37, E35, E34, E33, E31, E30 and Krafty Kolours – Sandy Shores for base

Glasses: N10, N9, N7, Colorless Blender

Hope you like it and have a great week!

You can find more cards to inspire you at KLM Designs, KLM Digital Design Team and KLM Digital Designs on the Facebook Fan page from the rest of our design team.

Snowy Smiles!!!


It’s Wednesday, and this week, I made a Christmas card using High Hopes Rubber Stamps Snowy Smiles – RR003 for the main image. Winter is one of my favourite times of the year and the beauty of fresh snowfalls always make me happy as long as I don’t need to shovel. LOL!

To make my card this week, I began with a card base of 5.5″ x 4.25″ using Hammermill – Premium Colour 100 lb. cardstock. Crafts – Sparkling Stickers – 02-3068629 was applied to the base card. I cut out Heartfelt Creations – Celebrate the Season Collection paper and inked around the edges with Tim Holtz Distress Ink – Wilted Violet and a finger dauber. This was popped up onto the base card using U-Line double-sided tape.

The image was stamped using my MISTI and Memento – Tuxedo Black ink onto Copic Marker X-Press It Blending Card cardstock. I coloured in the image and then fussy cut around it. With a black marker, I inked around the outside of the image and then added U-Line double-sided tape and popped it up into the centre of the circle on the patterned paper. I applied the Crafts – Sparkling Stickers – 02-3068629 to a scrap piece of Hammermill – Premium Colour 100 lb. cardstock to match the background base paper.

With my Cuttelbug and Birch Press Designs – Big Joy dies, I die cut the sparkly scrap piece of paper and another scrap piece of Hammermill – Premium Colour 100 lb. cardstock. I coloured in the larger die cut with Copic markers and then attached the 2 pieces using liquid glue. U-Line double-sided tape was added to the combined piece and it was popped up onto the card under the snowlady.

I cut off the backs to 3 buttons from the Dress It Up – Holiday Collection – It’s Cold Outside and then applied Nuvo – Glacier Paste – Pixie Wings to them to give them a purple shimmer. Once the glacier paste was dry, I attached them to the card with liquid glue.

Card Recipe:

Stamp: Snowy Smiles – RR003 (High Hopes Rubber Stamps)

Inks: Memento – Tuxedo Black, Tim Holtz Distress Ink – Wilted Violet

Paper: Copic Marker X-Press It Blending Card, Hammermill – Premium Colour 100 lb., Heartfelt Creations – Celebrate the Season Collection (12″ x 12″), Crafts – Sparkling Stickers – 02-3068629

Die Cuts: Birch Press Designs – Big Joy (57164)

Tools and Embellishments: MISTI – Most Incredible Stamping Tool, U-Line double-sided tape, Nuvo – Glacier Paste – Pixie Wings, Dress It Up – Holiday Collection – It’s Cold Outside

Image coloured with Copic Markers:

Snowlady: BV20, B0000, YR68, YR31, YR18, Y38, R59, R35, R30, R21, Colorless Blender

Hat and Scarf: BG72, BG57, BG32, BG11, BG10, BG000, Colorless Blender

Circle Framing Snowlady: V17, V15, V12, BG000

Shadow Die Cut: V17, V15, V12

Hope you like it and have a fantastic week!

You can find lots of inspiration from the Design Team Divas at the High Hopes blog, and the High Hopes Rubber Stamps Facebook Fan page plus you can also follow us on
Instagram, Twitter and Pinterest.

Boo Pals!!


It’s Wednesday, and this week, I made a Hallowe’en card using High Hopes Rubber Stamps Boo Pals – SS007 for the image and Boo-tiful Day – E233 for the sentiment. Hallowe’en is now only a few months away! Wow! Where has this year gone? Time seems to be flying by so fast!

To make my card this week, I began with a card base of Hammermill – Premium Colour 100 lb. cardstock, cut and scored to be 5.5″ x 4.25″. I cut the background paper from Recollections – Black cardstock to be the same size as the base card and attached it using double-sided tape. Using My Creative Time – Rectangle Frame Layers and my Anna Griffin Empress Mini Machine, I die cut Doodlebug – Pumpkin Party cardstock. I just love these little ghosts. With a finger dauber and Tim Holtz Distress Ink – Villainous Potion, I inked around all of the edges of the die cut. U-Line double-side tape was applied to the back of this piece and I popped it up onto the base card. Using the same cutting machine, I die cut Copic Marker X-Press It Blending Card cardstock using Nestabilities Dies – Deckled Rectangles – Large.

I stamped the main image onto the Copic Marker X-Press It Blending Card die cut using my MISTI and Memento – Tuxedo Black ink and coloured it in. I created my own moon shape using a 2″ circle mask that I had created earlier with a Fiskars hand punch. The eyes and nose for the cat and ghost were added in using a Sakura Glaze – Black pen. I ran the coloured image through my Xyron Creative Station and attached it to Recollections – Black cardstock. I didn’t have a larger die of the same shape, so I put the piece that I had adhered together into my Brother Scan ‘N Cut and created a .08″ border around it. This created the small black border to make the image pop. The sentiment was stamped onto a scrap piece of Copic Marker X-Press It Blending Card cardstock using my MISTI and Memento – Tuxedo Black ink and then it was die cut using my cutting machine and Poppystamps – Christmas Quotes. Tim Holtz Distress Ink – Wilted Violet and a finger dauber were used to go around the die cut.

The card was now ready to assemble. I added U-Line double-sided tape to the back of the frame and sentiment and popped them both up onto the card to finish it off.

Card Recipe:

Stamps: Boo Pals – SS007 (High Hopes Rubber Stamps)

Sentiment: Boo-tiful Day – E233 (High Hopes Rubber Stamps)

Inks: Memento – Tuxedo Black, Tim Holtz Distress Ink – Wilted Violet, Tim Holtz Distress Ink – Villainous Potion

Paper: Copic Marker X-Press It Blending Card, Hammermill – Premium Colour 100 lb., Doodlebug – Pumpkin Party (12″ x 12″), Recollections – Black cardstock

Die Cuts: My Creative Time – Rectangle Frame Layers, Spellbinders Nestabilities Dies – Deckled Rectangles Large (S4-202), Poppystamps – Christmas Quotes

Tools: MISTI – Most Incredible Stamping Tool, U-Line double-sided tape, Anna Griffin Empress Mini Machine, Sakura Glaze – Black, Brother Scan ‘N Cut, Xyron Creative Station

Image coloured with Copic Markers:

Black Cat: C8, C6, C4, C3, R30, R22, (Eyes and Nose – Sakura Glaze – Black)

Ghost: BV20, C0, Colorless Blender, (Eyes and Nose – Sakura Glaze – Black)

Tombstone: W5, W3, W1, W0, 100

Grass: G99, G94, G21, YG97, YG17

Sky: BV29, BV25, BV23. BV20

Moon: BV23, BV20, C1, C0, C00, Y00, Colorless Blender

Hope you like it and have a spooktacular week!

You can find lots of inspiration from the Design Team Divas at the High Hopes blog, and the High Hopes Rubber Stamps Facebook Fan page plus you can also follow us on
Instagram, Twitter and Pinterest.

Ellie & Friends!!


It’s Wednesday, and this week, I made an Easter card using High Hopes Rubber Stamps Ellie & Friends – TDG025 for the image and Happy Easter! – F096 for the sentiment. We are celebrating our new “Spring Fever Release” this month and who couldn’t love this adorable image!

To make my card this week, I began with a card base of AC Cardstock – White, cut and scored to be 6″ x 6″. I cut the flower cardstock from Echo Park – Welcome Easter at 6″ x 1.75″ and Lawn Fawn – Watercolor Wishes Rainbow paper to 6″ x 4.5″. I applied double-side tape and adhered both pieces directly to the base. Tim Holtz Distress Ink – Wilted Violet ink was used to ink around all of the edges of the base card. Using My Creative Time -Stitched Squares Inside and Out and my Cuttlebug, I die cut Momenta – Cardstock and inked around the edges with Tim Holtz Distress Ink – Fossilized Amber. 3M double-sided tape was applied to the back of this and it was popped up onto the base card.

Using PinkFresh Studios – Essentials: Blanket Stitched Square Die Set and my Cuttlebug, I die cut Copic Marker X-Press It Blending Card. I stamped the main image onto this die cut and sentiment onto Copic Marker X-Press It Blending Card using my MISTI and Memento – Tuxedo Black. The image was coloured in with Copic Markers and then U-Line double-side tape was applied to the back of it. This was popped up over top of the yellow square.

I fussy cut around the sentiment and inked around the edges with Tim Holtz Distress Ink – Wilted Violet. I ran it through my Xyron Create a Sticker and applied it to the Momenta – Cardstock and fussy cut around it again. I applied Scrapbook Adhesives – 3D Foam Strips to the back of the sentiment layers and added it to the bottom right of the card. Lastly, I added in 3 DoodleBug Design Inc. – Sprinkles Spring Assortment to complete the card.

Card Recipe:

Stamps: Ellie & Friends – TDG025 (High Hopes Rubber Stamps)

Sentiment: Happy Easter! – F096 (High Hopes Rubber Stamps)

Inks: Memento – Tuxedo Black, Tim Holtz Distress Ink – Wilted Violet, Tim Holtz Distress Ink – Fossilized Amber

Paper: Copic Marker X-Press It Blending Card, Lawn Fawn – Watercolor Wishes Rainbow – 6″ x 6″, Echo Park – Welcome Easter (6″ x 6″), Momenta – Cardstock, AC Cardstock – White

Die Cuts: My Creative Time -Stitched Squares Inside and Out, PinkFresh Studios – Essentials: Blanket Stitched Square Die Set

Tools: MISTI – Most Incredible Stamping Tool, U-Line double-sided tape, 3M double-sided tape, Cuttlebug, Xyron Create a Sticker, DoodleBug Design Inc. – Sprinkles Spring Assortment, Scrapbook Adhesives – 3D Foam Strips

Image coloured with Copic Markers:

Elephant: C5, C3, C2, C1, R30, R20

Chicks: E53, E50, E15, YR31, YR18, YR14, Y21, Y08, Y14, Y08

Flowers, Stems and Leaves: V09, V06, V04, V01, Y17, Y13, G85, G43

Eggs: Y17, Y13, Y04. BG15, BG13, BG11, BG10, V17, V15, V12, B04, B02, B01, RV66, RV55, RV13, RV11, RV10

Sky: B60, B02, B01, B00, B000, C1, Colorless Blender

Grass: G14, YG23, YG11, YG03, YG01

Hope you like it and have a fantastic week!

Check out more adorable images in the new “Spring Fever Release” at High Hopes Rubber Stamps!

You can find lots of inspiration from the Design Team Divas at the High Hopes blog, and the High Hopes Rubber Stamps Facebook Fan page plus you can also follow us on
Instagram, Twitter and Pinterest.

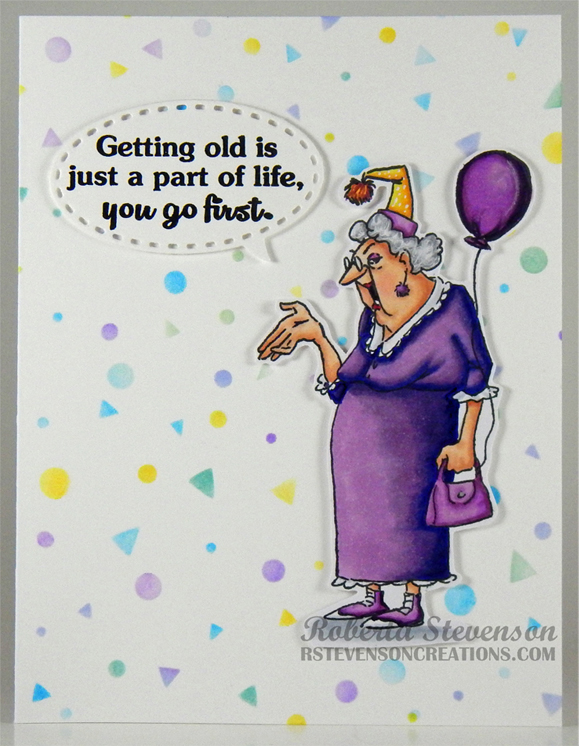
You Go First!!


Sharing a birthday card I made using Art Impressions Never Too Old – 5114  for the main image and sentiment. My friend and I tease each other about getting older. So, I thought this would be a fun card to make for her. LOL! I used another sentiment from this same set on the inside too, which reads, “Thanks for always being older than me”.

To make my card, I began with a card base of Hammermill – Premium Colour 100 lb. cardstock, cut and scored to be 5.5″ x 4.25″. For the background, I used multiple inks from Tim Holtz listed below, Picket Fence Studio Blender Brushes and Lawn Fawn – Confetti Stencils. Using my MISTI, Memento – Tuxedo Black ink, I stamped the image onto Copic Marker X-Press It Blending Card cardstock. The image was coloured in and fussy cut. Using my MISTI and Versa Fine – Onyx Black ink, I stamped the image onto Hammermill – Premium Colour 100 lb. cardstock. It was then embossed using my Marvy Uchida – Embossing Heat Tool and Ranger – Clear Super Fine Detail embossing powder. Spellbinders Die D-Lites – Conversation Bubble Three (S2-137) and my Cuttlebug were used to die cut the sentiment. U-Line double-sided tape was added to the backs of the sentiment and coloured image and they were both popped up onto the background to complete the front of the card. I repeated the process of inking and embossing for the inside sentiment to complete the card.

Card Recipe:

Stamp and Sentiment: Never Too Old – 5114 (Art Impressions)

Inks: Memento – Tuxedo Black, Versa Fine – Onyx Black, Tim Holtz Distress Ink – Salty Ocean, Shaded Lilac, Mustard Seed, Wilted Violet and Evergreen Bough

Paper: Copic Marker X-Press It Blending Card, Hammermill – Premium Colour 100 lb.

Dies: Spellbinders Die D-Lites – Conversation Bubble Three (S2-137)

Stencil: Lawn Fawn – Confetti Stencils (6″ x 6″)

Embossing Powder: Ranger – Clear Super Fine Detail embossing powder

Tools: MISTI – Most Incredible Stamping Tool, U-Line double-sided tape, Cuttlebug, Marvy Uchida – Embossing Heat Tool, Gelly Roll Sakura #8 Pen, Picket Fence Studio Blender Brushes

Image coloured with Copic Markers:

Skin: E21, E11, E00, E000, R46, R30, R20

Hair: N4, N3, N2, N0

Clothing, Purse, Shoes, Hat and Balloon: B69, V17, V15, V12, V09, V06, V05, V04, V01, E13, Y17, Y15, Y13, C2, C1, C00

Shadow: C3, C2, C1, C00

Hope you like it and have a great week!

Dancing Gnome!!


Sharing a card I made today using KLM Digital Designs –  Dancing Girl Gnome from the new November release. This image also comes with 2 more sayings: “Chin up princess or the crown slips” and “Happy Birthday”.

The base was created with Hammermill – Premium Colour 100 lb. cardstock cut and folded to the size of 5.5″ x 4.25″. I printed out Nana Vics Digitals – Ballerina #2 Digital Paper and cut it to size using My Creative Time – Rectangle Frame Dies. I inked around the edges with Tim Holtz Distress Ink – Wilted Violet and then adhered it to the base using double-sided tape and some glue. Stickles – Purple was added around all of the edges of the patterned paper background. I imported the image and sentiment into Microsoft Word and printed them out onto Copic Marker X-Press It Blending Card. My Creative Time – Stitched Zig Zag Ties and my Cuttlebug were used to die cut the sentiment and Tim Holtz Distress Ink – Wilted Violet was used to ink around all of the edges. The image was coloured in with Copic markers and then fussy cut with scissors and outlined around the edges with a black marker. I ran this through my Xyron Creative Station and applied it to Momenta – Cardstock. Once again, I fussy cut around the image and then ran it through my Xyron Creative Station. This time, the image was placed onto black cardstock. I fussy cut around it and then added U-Line double-sided tape to the back of the image and sentiment. Both the image and the sentiment were then popped up onto the card. I added in a few Kraftin Kimmie – Festive Dots to finish off the card.

Card Recipe:

Stamp and Sentiment:  Dancing Girl Gnome – KLM Digital Designs

Inks: HP Printer Grayscale, Tim Holtz Distress Ink – Wilted Violet

Paper: Copic Marker X-Press It Blending Card, Hammermill – Premium Colour 100 lb., Momenta – Cardstock, Nana Vics Digitals – Ballerina #2 Digital Paper

Die Cuts: My Creative Time – Rectangle Frame Dies, My Creative Time – Stitched Zig Zag Ties

Miscellaneous: U-Line – 2 sided tape, Stickles – Purple, Kraftin Kimmie – Festive Dots, Xyron Creative Station

Image coloured with Copic Markers:

Skin: E21, E11, E04, E00, E000, R30, R20

Hair: E18, E08, YR18, YR14

Dress, Hat and Shoes: B69, V17, V15, V12

Blouse: Y18, Y15, Y13, Y11

Shadow: C2, C1, C0

Hope you like it and have a great week!
You can find more cards to inspire you at KLM Designs, KLM Digital Design Team and KLM Digital Designs on the Facebook Fan page from the rest of our design team.

Have A Blessed Easter!


Today, I’m sharing an Easter card using Three Pane Easter – M043 by High Hopes Rubber Stamps for the main image and Blessed Easter Greetings – G151 (High Hopes Rubber Stamps) for the sentiment. Happy Easter to family, friends and everyone!

To make my card this week, I started with Craft Smart Card Paper pre-made to 5.5″ x 4.25″. I stamped the images and sentiment using MISTI and Memento – Tuxedo Black ink onto Copic Marker X-Press It Blending Card. Using my Brother Scan and Cut, I cut out each of the images. My Creative Time – Rectangle Frame Die Layers and my Cuttlebug were used to die cut the sentiment and Craft Sparkling Stickers – Purple (02-3068629) paper.

The main images were coloured in with Copic Markers. The background papers were all from Your Next Stamp – Happy Spring (6″x6″) paper pad. I cut each section at 4″ x 1.5″ and then inked around all of the edges with Tim Holtz Distress Ink – Wilted Violet. The sentiment was inked with Tim Holtz Distress Ink – Fossilized Amber.

To assemble the card, using glue, I attached the 3 background papers onto the base card. Crafts ribbon was attached using double-sided tape. The images, sentiment and sentiment background were attached to the background papers using 3M VHB – 2 sided tape. Lastly, to finish off the card, I cut 3 Easter eggs out of some watercolour paper that I had used various Cosmic Shimmer colours on previously. I inked around the edges with Tim Holtz Distress Ink – Wilted Violet and glued them directly to the background paper.

Card Recipe:

Stamp: Three Pane Easter – M043 (High Hopes Rubber Stamps)

Sentiment:  Blessed Easter Greetings – G151 (High Hopes Rubber Stamps)

Inks: Memento – Tuxedo Black, Tim Holtz Distress Ink – Wilted Violet, Tim Holtz Distress Ink – Fossilized Amber

Paper: Copic Marker X-Press It Blending Card, Craft Smart – Cards and Envelopes, Your Next Stamp – Happy Spring (6″x6″) 

Die Cuts: My Creative Time – Rectangle Frame Die Layers – MCT-D274

Tools: MISTI – Most Incredible Stamping Tool, Cuttlebug, 3M VHB – 2 sided tape, Cosmic Shimmer, Brother Scan and Cut

Image coloured with Copic Markers:

Bunny: E35, E34, E33, E31, E30, R30, R24, R20, Eyes (Sakura Glaze – Black)

Chick: Y17, Y08, Y04, YR18, YR16, YR12, Eyes (Sakura Glaze – Black)

Lamb: BV20, C3, C1, C00, Eyes (Sakura Glaze – Black)

Backgrounds for images: Y17, Y08, Y04, V17, V15, V12

Hope you like it and have a fantastic week!

You can find lots of inspiration from the Design Team Divas at the High Hopes blog, and the High Hopes Rubber Stamps Facebook Fan page plus you can also follow us on
Instagram, Twitter and Pinterest.

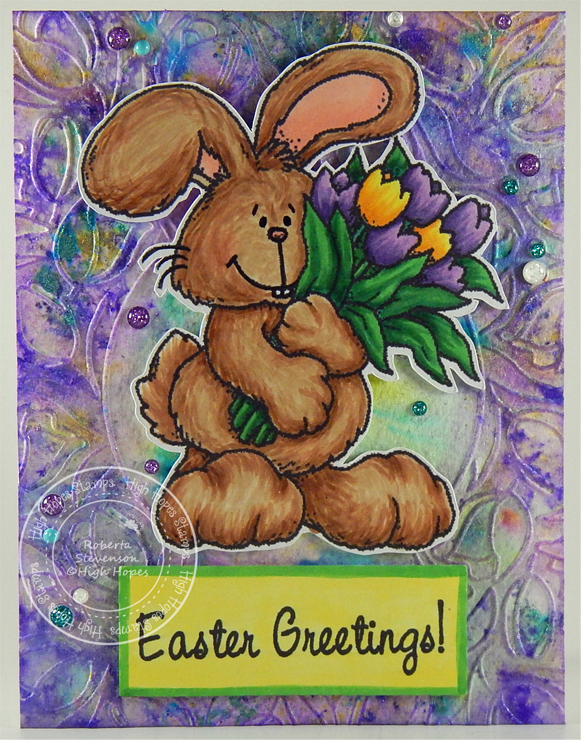
Bunny Blooms!


It’s Wednesday, and this week, I made an Easter card using Bunny Blooms – T063 by High Hopes Rubber Stamps for the main image and Script Easter Greetings – F093 (High Hopes Rubber Stamps) for the sentiment. Easter is almost here and this little bunny is about to brighten someone’s day!

To make my card this week, I started with Arches Watercolour Paper cut to 5.5″ x 4.25″. I ran this through my Cuttlebug using Tranquil Tulips Stencil from Simply Cards and PaperCraft. Next, I played with multiple Cosmic Shimmer products and spritzed some water to create this shimmery background. I let this dry overnight. I wanted the embossed tulips to show up more, so using a finger sponge, Tim Holtz Distress Ink – Wilted Violet was brushed over top of the raised edges. And of course, there is never enough shimmer so I added some Irridescent Glitter Dust spray as well. Then I glued this directly to the base card of Hammermill Premium 100 lb. Cardstock folded at 5.5″ x 4.25″. Lastly, I inked around the edges with the same ink.

The main image Bunny Blooms – T063 (High Hopes Rubber Stamps) and Script Easter Greetings – F093 (High Hopes Rubber Stamps) sentiment were stamped using my MISTI and Memento – Tuxedo Black ink onto Copic Marker X-Press It Blending Card. The main image and sentiment were coloured in with Copic Markers.

To assemble the remainder of my card, both the image and sentiment were attached to the background using 3M VHB – 2 sided tape. C.C. Designs – Dragon Dreams Enamel Dots were added to complete the card.

Card Recipe:

Stamp: Bunny Blooms – T063 (High Hopes Rubber Stamps)

Sentiment: Script Easter Greetings – F093 (High Hopes Rubber Stamps)

Inks: Memento – Tuxedo Black, Tim Holtz Distress Ink – Wilted Violet

Paper: Copic Marker X-Press It Blending Card, Arches Watercolour Paper, Hammermill Premium 100 lb. Cardstock

Stencil: Simply Cards and PaperCraft – Tranquil Tulips Stencil

Tools: MISTI – Most Incredible Stamping Tool, Cuttlebug, 3M VHB – 2 sided tape, Glitter Dust – Irridescent Spray, C.C. Designs – Dragon Dreams Enamel Dots

Image coloured with Copic Markers:

Bunny: E35, E34, E33, E31, E30, R30, R24, R20, Eyes (Sakura Glaze – Black)

Flowers and Leaves: V17, V15, V12, YR14, Y17, Y04, G17, G14, G07

Cosmic Shimmer: Pixi Powder: Purple Violet, Sun Yellow, Aubergine Dream, Purple Violet, Emerald Green, Pixie Sparkles: Groovy Grape, Pale Blush

Hope you like it and have a fantastic week!

You can find lots of inspiration from the Design Team Divas at the High Hopes blog, and the High Hopes Rubber Stamps Facebook Fan page plus you can also follow us on
Instagram, Twitter and Pinterest.

Easter Fun!


It’s Wednesday, and this week, I made an Easter card using Easter Fun – Q023 by High Hopes Rubber Stamps for the main image and Hoppy Easter – H245 (High Hopes Rubber Stamps) for the sentiment. This image reminds me so much of when I was younger. Every year, my mom would make boiled eggs and then we would all sit around the table and put them in the various dies to make some cool colourful eggs. It was always so much fun.

To make my card this week, I used AC White Paper for my base folded at 6″ x 6″. I combined 2 separate pieces of purple ribbon and some patterned ribbon eggs together using double sided tape. I attached this to Your Next Stamp Designer – Happy Spring paper. Then I attached this directly to the base using double-side tape. The sides were all inked with Tim Holtz Distress Ink – Wilted Violet. The egg embellishments were die cut using my Cuttlebug and Lawn Fawn – Mini Easter Eggs. The top layers were cut from Copic Marker X-Press It Blending Card and coloured with Copic B01 and BG32. The bottom layers were cut from Crafts – Sparkling Stickers  – 02-3068629. I added some glue to the top layer and attached them to the base egg. I attached these directly to the base.

The background for the bunny image was cut using Whimsy – Nested Frames Die Set. The background die was cut from Hot Buy – Recollections – Jewel Tones and them main image cut was from Copic Marker X-Press It Blending Card. The base frames were attached to the background using 3M VHB – 2 sided tape. The main image Easter Fun – Q023 (High Hopes Rubber Stamps) and Hoppy Easter – H245 sentiment were stamped using my MISTI and Memento – Tuxedo Black ink. The main image was coloured in with Copic Markers and the sentiment was coloured in using Zig Clean Color Real Brush Markers. Clear – Wink of Stella was brushed over top to make it sparkle.

To assemble the remainder of my card, I ran the coloured image and sentiment through my Xyron’s and then attached them to the base shapes on the card.

Card Recipe:

Stamp: Easter Fun – Q023 (High Hopes Rubber Stamps)

Sentiment: Script Easter Greetings – F093 (High Hopes Rubber Stamps)

Inks: Memento – Tuxedo Black, Tim Holtz Distress Ink – Wilted Violet

Paper: Copic Marker X-Press It Blending Card, AC White, Hot Buy – Recollections – Jewel Tones, YNS Designer Paper Pad – Happy Spring, Crafts – Sparkling Stickers  – 02-3068629

Die Cuts: Whimsy – Nested Frames Die Set, Lawn Fawn – Mini Easter Eggs

Tools: MISTI – Most Incredible Stamping Tool, Cuttlebug, 3M VHB – 2 sided tape, Clear – Wink of Stella, Xyron Create a Sticker, Xyron Creative Station

Image coloured with Copic Markers:

Bunnies: E35, E34, E33, E31, E30, R30, R20, C2, C1, C0, Eyes (Sakura Glaze – Black, Gelly Roll Sakura #8 Pen)

Shirts: BG72, BG57, BG32, BG11, V17, V15, V12

Eggs and Paint Tins: BG32, B04, B02, B01, Y17, Y13, C5, C3, C1, E53, E51, E50

Water and Egg Carton: E53, E51, E50, B000, B0000

Table and Shadow: W2, W1, W0

Background: Y02

Sentiment: Zig Clean Color Real Brush Markers – English Lavender (803), Lilac (083), Yellow (050), Orange (070), Turquoise Green (042), Green Shadow (049), Light Pink (026)

Hope you like it and have a fantastic week!

You can find lots of inspiration from the Design Team Divas at the High Hopes blog, and the High Hopes Rubber Stamps Facebook Fan page plus you can also follow us on
Instagram, Twitter and Pinterest.

Grad Gnome!!


My nephew graduated and I couldn’t resist sharing this adorable little Graduation Gnome With Diploma from KLM Digital Designs that I made for him. The image comes with 3 different sentiments, “Congrats Grad!”, which I’ve used on my card and also, “Congratulations” and “Today is your day!”.

To make the card, I printed out the main image onto Copic Marker X-Press It Blending Card using my HP Printer. I used my Brother Scan and Cut to cut around the image and coloured it in with Copic markers.

I used Hammermill paper to create the base shape of the card 8.5″ x 4.25″. I scored the paper at 4.25″. Then I used a mixture of Tim Holtz inks to create the background. Once I was satisfied with the look, I used Hammerill paper, my Cuttlebug and Your Next Stamp – Confetti Panel Die and popped this die cut up over the coloured background using 3M VHB – 2 sided tape. The sentiment was die cut using MFT – Die-namics Pierced Fishtail Flags, inked around the edges with Tim Holtz Distress Ink – Barn Door and then popped up with 3M VHB – 2 sided tape.

The sentiment was popped up the same way to complete the card.

Card Recipe:

Stamp and Sentiment: Graduation Gnome With Diploma (KLM Digital Designs)

Inks: HP Printer Grayscale, Tim Holtz Distress Ink – Barn Door, Carved Pumpkin, Salty Ocean, Blueprint Sketch, Wild Honey, Festive Berries, Wilted Violet and Lucky Clover

Paper: Copic Marker X-Press It Blending Card, Hammermill – Premium Colour 100 lb.

Die Cut: Your Next Stamp – Confetti Panel Die – YNSD770, MFT – Die-namics Pierced Fishtail Flags

Tools: 3M VHB – 2 sided tape, Cuttlebug

Image coloured with Copic Markers:

Skin: E000, E00, E04, E11, E21

Beard: E49, E47, E44, E42

Hat, Shoes and Gown: C10, C8, C6, T10, T8, Black (100)

Diploma: E41, E40

Tassel: R59, R39, R37, R35

Hope you like it and have a great week!

You can find more cards to inspire you at KLM Designs, KLM Digital Design Team and KLM Digital Designs on the Facebook Fan page from the rest of our design team.

Happy Birthday Gnome


It’s Wednesday, and this week, I used Balloon Gnome – SLF016 (High Hopes Rubber Stamps) for the main image and Mini Sentiment Set #1 – HLL001 (High Hopes Rubber Stamps) for the sentiment from the new release this month. The mini sentiment comes with 3 more sayings as well, which means you can use this little gnome to make a variety of different cards for multiple occasions. I chose to make a birthday card this time.

To make my card this week, I started out with a simple white card sized at 5.5″ x 4.25″. Then I used Doodlebug Design Inc. – Fairy Tales paper to create my background rectangles. To do this, I used my Cuttlebug and die cuts from My Creative Time – Rectangle Frame Dies and My Creative Time – Rectangle Frame Layers. Then I used Tim Holtz Distress Ink – Wilted Violet and Tim Holtz Distress Inks – Peacock Feathers to ink around the edges of the frames. I layered the first 2 layers directly onto the base and also glued the 2 smaller rectangles together. Then I popped up the smaller rectangles with 3M VHB – 2 sided tape.

I stamped the image and sentiment onto Copic Marker X-Press It Blending Cardstock and then coloured it in with Copic markers. Once completed, I used my Brother Scan and Cut to cut around the image. Then I popped up the image with the 3M VHB – 2 sided tape as well.

To finish the card off, I added some bling using Kraftin Kimmie – Summer Dots,  Kraftin Kimmie – Festive Dots and CC Designs – Dragon Dreams Enamel Dots.

Card Recipe:

Stamp: Balloon Gnome – SLF016 (High Hopes Rubber Stamps)

Sentiment: Mini Sentiment Set #1 – HLL001 (High Hopes Rubber Stamps)

Inks: Memento – Tuxedo Black, Tim Holtz Distress Ink – Wilted Violet, Tim Holtz Distress Inks – Peacock Feathers

Paper: Copic Marker X-Press It Blending Card, Doodlebug Design Inc. – Fairy Tales (6″ x 6″)

Die Cuts: My Creative Time – Rectangle Frame Dies, My Creative Time – Rectangle Frame Layers

Tools: MISTI – Most Incredible Stamping Tool, Cuttlebug, 3M VHB – 2 sided tape, Kraftin Kimmie – Summer Dots, Kraftin Kimmie – Festive Dots, CC Designs – Dragon Dreams Enamel Dots, Brother Scan and Cut

Image coloured with Copic Markers:

Skin: E21, E11, E04, E00, E000, R22, R20

Beard: W5, W4, W3, W2, W1, W0, W00

Hat and Outfit: BG45, BG18, BG15, V17. V5, V12, V09

Shoes: E27, E25, E23, E21

Balloon: Y08, Y06, Y02, Y000

Hope you like it and have a fantastic week!

You can find lots of inspiration from the Design Team Divas at the High Hopes blog, and the High Hopes Rubber Stamps Facebook Fan page plus you can also follow us on
Instagram, Twitter and Pinterest.


Buddy’s Surprize!!


It’s Wednesday, and this week, I made a birthday card using Buddy Bear’s Surprise – S193 (High Hopes Rubber Stamps) for the main image and Shhh Party! – H038 (High Hopes Rubber Stamps) for the sentiment. Buddy is not very good at keeping secrets though or spelling! LOL! He is however, ready to bring you presents and party on!

To make my card this week, I started off with a card base of 5.5″ x 4.25″.  I love this background party paper by Echo Park called “It’s Your Birthday”. I cut it the same size as the base card and then used 2-sided tape to attach it to the base. Then I inked around the entire outside edges of the card with Tim Holtz Distress Ink – Wilted Violet.

I used My Creative Time – Stitched Squares Inside and Out to cut some Copic Marker X-Press It Blending Card. Then I used my MISTI and Memento – Tuxedo Black Ink to stamp the image. I coloured in the main image with Copic markers. I stamped the sentiment onto some yellow cardstock with Memento – Tuxedo Black ink and then used Your Next Stamp – Stitched Rectangle Die Set to die cut it out. Next, I ran both my image and sentiment through the Xyron Creative Station to turn them both into stickers. I applied both of these to some Violet cardstock and trimmed a small border. Lastly, I popped up both the image and the sentiment using 3M VHB – 2 sided tape.

Card Recipe:

Stamp:  Buddy Bear’s Surprise – S193  (High Hopes Rubber Stamps)

Sentiment: Shhh Party! – H038 (High Hopes Rubber Stamps)

Inks: Memento – Tuxedo Black, Tim Holtz Distress Ink – Wilted Violet

Paper: Copic Marker X-Press It Blending Card, Echo Park – It’s Your Birthday (6″x6″ Double-Sided)

Die Cuts: My Creative Time – Stitched Squares Inside and Out, Your Next Stamp – Stitched Rectangle Die Set (YNSD214)

Tools: MISTI – Most Incredible Stamping Tool, 3M VHB – 2 sided tape, Xyron Creative Station

Image coloured with Copic Markers:

Bear: E29, E27, E25, E23, R22, R20, R00, R14

Banner and Bow: BG18, BG13, BG11, Y00

Hat: V09, V06, V04, Y19, Y11

Present: BV04, BV02, BV00, Y38, Y19, Y11, YR16, YR15

Flowers and Leaves: G07, YG13, RV22, RV23, RV21,

Grass: YG17, YG13, YG03, YG01

Sky: B01, B00, B000, B0000

Hope you like it and have a fantastic week!

You can find lots of inspiration from the Design Team Divas at the High Hopes blog, and the High Hopes Rubber Stamps Facebook Fan page plus you can also follow us on
Instagram, Twitter and Pinterest.


Birthday Banner Gnome


Today I’m sharing Banner Gnome (KLM Digital Designs) from KLM Digital Designs new release. I thought it would be fun to put the new banner stamp inside a banner. This was such an awesome stamp to play with and it comes with 3 different sentiments, “Happy Birthday” as shown here, “Your Awesome” and “Congratulations”.

When I first started colouring this card, I had something totally different in mind for how I was going to colour the scroll. But, once I created the background, I decided to colour it using bluish green tones for the top and bottom of the large scroll.

I printed out the main image twice onto Copic Marker X-Press It Blending Card using my HP Printer. I always print using Grayscale because the image won’t smudge when you go to colour. I found that printing out in black sometimes did. I used my brother Scan N’ Cut to cut around 1 of the images. Then fussy cut it where I still needed to. As I mentioned, once before, I’m still learning how to use my new machine.

For the other image, I die cut around it using Penny Black – Paper Scroll and my Cuttlebug. I coloured in the main image with copics. Then I placed the other image that I had cut around earlier over top of it to use it as a mask. I also used some Post-It Note paper to mask off the top and bottom of the main scroll. I used a Picket Fence Studio’s brush and went over the entire background inside the scroll with Tim Holtz Distress Inks – Tumbled Glass. Then, I placed Kraftin’ Kimmie – Confetti Stencil over top of everything. I have a large magnetic mat, so I just used some strong magnets to hold everything in place. Then, using the various sized Picket Fence Studio brushes which I labelled in various colours, I used a mixture of Tim Holtz inks to create the background. All of the colours are listed below.

I removed all of the masked pieces and then completed the colouring of the large scroll.

Lastly, I attached the entire image to some Recollections Purple Passions cardstock cut at 5.5″ x 4.25″ and added some small balloons which I had die cut previously using Your Next Stamp – Mini Balloon Trio Set.

Card Recipe:

Stamp and Sentiment: Banner Gnome (KLM Digital Designs)

Inks: HP Printer Greyscale, Tim Holtz Distress Inks – Tumbled Glass, Tim Holtz Distress Inks – Peacock Feathers, Tim Holtz Distress Ink – Wilted Violet, Tim Holtz Distress Ink – Mermaid Lagoon, Tim Holtz Distress Ink – Evergreen Bough, Tim Holtz Distress Ink – Cracked Pistachio

Paper: Copic Marker X-Press It Blending Card, Recollections – Purple Passions 8.5″ x 11″

Die Cuts: Penny Black – Paper Scroll 51-458, Your Next Stamp – Mini Balloon Trio Die Set (YNSD241)

Stencil: Kraftin’ Kimmie – Confetti

Tools: Cuttlebug

Image coloured with Copic Markers:

Skin: E000, E00, E04, E11, E21

Beard: W5, W4, W3, W2, W1, W0, W00

Hat: BG49, BG15, BG13, BG11

Boots: E29, E27, E25, E23

Pants: B26, B23, B21

Shirt: G43, G24, G21, G20

Pencil: YR31, YR21, YR20, YR14, Y19, Black

Paintbrush: B69, B18, B16, C3, C2, C1, Y15, Y11, BG02, BG01, BG00

Banners: BG05, BG02, BG01, BG00, BG000

Hope you like it and have a great week!

You can find more cards to inspire you at KLM Designs, KLM Digital Design Team and KLM Digital Designs on the Facebook Fan page from the rest of our design team.

Happy Mother’s Day Gnomes


Welcome Back KLM Digital Designs Fans!

KLM Digital Designs has just released some brand new stamps this month, and today I’m sharing Mom and Kids Gnomes (KLM Digital Designs)!  This new stamp contains adorable images of a mom, her children and 3 loving sentiments for your mother. A perfect new release for Mother’s Day!

For this card, I decided to create my own family. The digital stamps allow you to resize them to your preference, so I made one boy larger than the other to represent my older and younger brother.

To put the card together, I printed out the main image onto Copic Marker X-Press It Blending Card and the sentiment onto Recollections – Purple Passions 8.5″ x 11″ paper. I coloured in the main image with copics and then mounted it onto purple Recollection’s paper.

I cut a piece of Recollections – Petite Floral – Double Sided paper to 6″ x 6″ and mounted it onto my 6″ x 6″ card base. I went around all of the edges with Tim Holtz Distress Ink – Wilted Violet. Then I cut the previously printed out sentiment to 6″ x 1.25″ and taped it onto the base card. Lastly, I mounted the coloured image with the purple frame onto the base card.

Card Recipe:

Stamp and Sentiment: Mom and Kids Gnomes (KLM Digital Designs)

Inks: HP Printer Greyscale, Tim Holtz Distress Ink – Wilted Violet

Paper: Copic Marker X-Press It Blending Card, Recollections – Petite Floral – Double Sided 12 x 12 in (30.4 x 30.4 cm), Recollections – Purple Passions 8.5″ x 11″

Image coloured with Copic Markers:

Skin: E000, E00, E04, E11, E21, R22, R20

Hair: E47, E44, E43, N8, N6, N4

Pants: B26, B23, B21, C3

Shirts: YG67, YG63, YG61

Dresses: V17, V15, V12

Blouses: Y17, Y08, Y04

Hats: BV04, B02, BV00, R37, R35, R17

Shoes: N8, N6, N4, E29, E25, E23

Boots: E27, E25, E23

Purse: E35, E33, E31

Sky: B60, B01, B00, B000, B0000, C1, C0, Colorless Blender

Grass: YG17, YG13, YG03, YG01

Hope you like it and have a great week!

You can find more cards to inspire you at KLM Designs, KLM Digital Design Team and KLM Digital Designs on the Facebook Fan page from the rest of our design team.

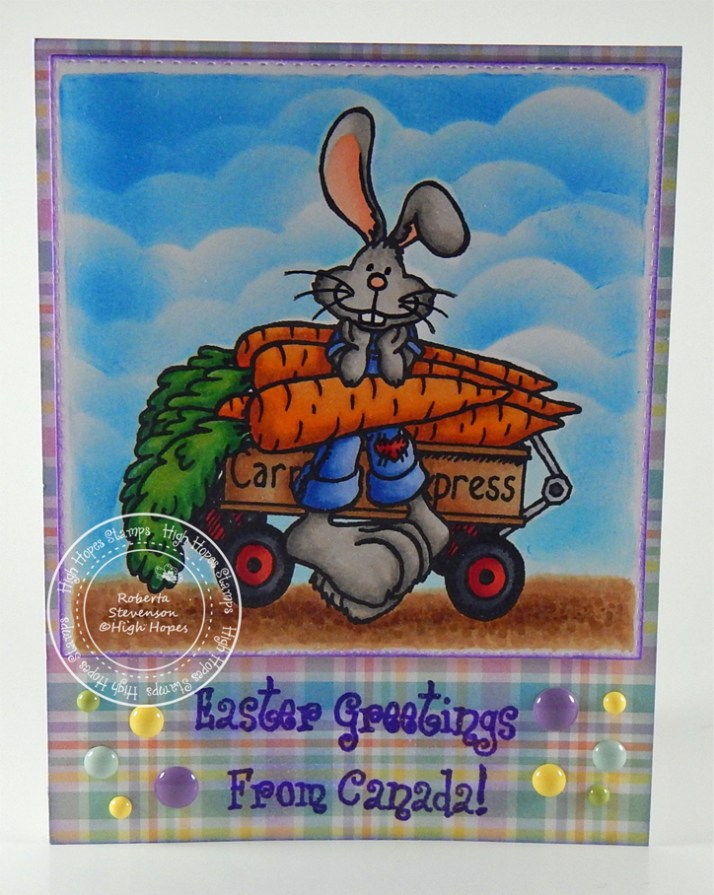
Carrot Express!!!


It’s Wednesday, and Easter is quickly approaching. So for this week, I used Carrot Express – S055 (High Hopes Rubber Stamps) for the main image and Canadian Easter Greetings – H139 (High Hopes Rubber Stamps) for the sentiment.

To put this card together, I first die-cut some Copic Marker X-Press It Blending Card using my Cuttlebug and My Creative Time -Stitched Squares Inside and Out. Next, I stamped the image with Memento – Tuxedo Black ink using my MISTI to get a nice clean image. I put the die-cut back over the image again and used it for a template to get a nice clean white border. I created a mask out of the image and used the die-cut from Avery Elle – Custom Steel Dies – Made in the USA – D-05-01 PiercedCloudsDie and Tim Holtz Distress Ink – Salty Ocean to create the sky background.

I mounted the plaid paper from Recollections – Easter Paper onto a white card base of 5.5″ x 4.25″and then edged around the image and card with Tim Holtz Distress Inks and embossed the sentiment using Tim Holtz Distress Ink – Wilted Violet and VersaMark.

Lastly, I popped up the image onto the card using 3M – VHB 2-sided tape and added in some Kraftin’ Kimmie Pastel Krafty Dots.

Card Recipe:

Stamp: Carrot Express – S055 (High Hopes Rubber Stamps)

Sentiment: Canadian Easter Greetings – H139 (High Hopes Rubber Stamps)

Inks: Memento – Tuxedo Black, Tim Holtz Distress Ink – Wilted Violet, Tim Holtz Distress Inks – Shaded Lilac, VersaMark

Paper: Copic Marker X-Press It Blending Card, Recollections – Easter Paper

Embossing: Ranger – Clear Super Fine Detail embossing powder

Die Cuts: Avery Elle – Custom Steel Dies – Made in the USA – D-05-01 PiercedCloudsDie, My Creative Time -Stitched Squares Inside and Out

Tools: MISTI – Most Incredible Stamping Tool, Cuttlebug, 3M VHB – 2 sided tape, Kraftin’ Kimmie Pastel Krafty Dots

Image coloured with Copic Markers:

Rabbit: W5, W3, W1, R30, R02

Overalls: B26, B23, B21, R29, R27, R24

Carrots and Leaves: YR27, YR12, YR09, YR04, G14, G07, YG25, YG21

Wagon: E35, E33, E31, R29, R27, R24, W9, W7, W5, C2, C1, C0

Dirt: E37, E35, E33, E31

Hope you like it and have a fantastic week!

You can find lots of inspiration from the Design Team Divas at the High Hopes blog, and the High Hopes Rubber Stamps Facebook Fan page plus you can also follow us on
Instagram, Twitter and Pinterest.


Easter Masterpiece!


It’s Wednesday, and this week I used High Hopes Rubber Stamps Bunny Masterpiece – S063 for the main image and Egg-Stra Special -G243 for the sentiment. These little bunnies are getting prepared for Easter. I remember making painted eggs every year in the kitchen with my mom and brothers as a child. Do you have an Easter tradition of painting eggs too?

To create the card I coloured in the image and then popped it up using 3M VHB – 2 sided tape. I also popped up the sentiment. I found some old cardstock and cut out some of the little eggs and then edged around each of them with various Tim Holtz colours listed below. The card is 6″ x 6″.

Card Recipe:

Stamp:  Bunny Masterpiece – S063 (High Hopes Rubber Stamps)

Sentiment: Egg-Stra Special -G243 (High Hopes Rubber Stamps)

Inks: Memento – Tuxedo Black, Tim Holtz Distress Inks – Dusty Concord, Spun Sugar, Wilted Violet, Evergreen Bough, Shaded Lilac and Fossilized Amber

Paper: Copic Marker X-Press It Blending Card, Recollections – Blue Ombre Cardstock, Recollections – Purple Ombre Cardstock, Recollections – Easter Printed Cardstock

Die Cuts: My Creative Time -Stitched Squares Inside and Out

Tools: MISTI – Most Incredible Stamping Tool, Cuttlebug, 3M VHB – 2 sided tape

Image coloured with Copic Markers:

Bunnies: C3, C2, C1, C0, R30, R02, RV04

Overalls: B26, B23, B21, V09, V06, V04, BV04, BV02, BV01, BV000

Egg: Y08, Y06, Y02, BG13, BG11, BG10, RV04, RV02, RV00, G02, G00, G000, B41, B34, B32

Paintbrushes: N4, N0, E27, E23, BG13, BG11, BG10, B34, B41

Grass: G17, G14, G07

Sky: B02, B01, B00, B000

Hope you like it and have a fantastic week!

You can find lots of inspiration from the Design Team Divas at the High Hopes blog, and the High Hopes Rubber Stamps Facebook Fan page plus you can also follow us on
Instagram, Twitter and Pinterest.


Sending Smiles!


Spring is just around the corner!

It’s Wednesday, and for today’s card I used Andreas Kitties – R202 (High Hopes Rubber Stamps) for the main image and Sending Smiles – G276 (High Hopes Rubber Stamps) for the sentiment. This cheery little girl is hoping to bring smiles to everyone she knows and hopefully put a smile on your face too. She’s already for Spring! Are you??? I know I am. LOL!

To make this card, I started out with a 6″ x 6″ card base and then mounted the background onto the card. I cut the ovals and scalloped oval using my Cuttlebug and die cut from My Creative Time – Scalloped Stitched Oval Dies. The sentiment was cut out using My Creative Time – Ribbon End Dies.

For the main image, I used Copic markers to colour it all in. I fussy cut around the image and then traced around all of the edges using my black Copic marker. I edged around all of the borders of the die cuts with various Tim Holtz distress inks. I assembled the card using 3M VHB – 2 sided tape.

To add the last finishing touch to the card, I added in some flowers along the side and a pearl in the centre for all of the yellow flowers.

Card Recipe:

Stamp:  Andreas Kitties – R202 (High Hopes Rubber Stamps)

Sentiment: Sending Smiles – G276 (High Hopes Rubber Stamps)

Inks: Memento – Tuxedo Black, Tim Holtz Distress Ink – Fossilized Amber, Tim Holtz Distress Ink – Wilted Violet, Tim Holtz Distress Ink – Twisted Citron

Paper: Copic Marker X-Press It Blending Card, American Crafts – Dear Lizzy – Day Dreamer 6″x6″ (15.2×15.2cm), Forever in Time – Dandelion Wish SP344-23, Purple Cardstock, Stamperia – Lilac Flowers

Die Cuts: My Creative Time – Ribbon End Dies, My Creative Time – Scalloped Stitched Oval Dies

Tools: MISTI – Most Incredible Stamping Tool, Cuttlebug, Prima Flowers – Ameruse Pastel Mix, Recollections – Handmade Flowers

Image coloured with Copic Markers:

Skin: E21, E11, E04, E00, E000, R22, R20

Hair: E47, E44, E43

Blouse and Socks: Y08, Y04, Y00

Dress: V09, V06, V04, V01

Shoes: W9, W7, W6, W5, W3, W1

Cats: C7, C5, C3, W5, W3, W1, E27, E25, E23, R20

Straw Basket: E34, YR23, Y23, Y21

Hope you like it and have a fantastic week!

You can find lots of inspiration from the Design Team Divas at the High Hopes blog, and the High Hopes Rubber Stamps Facebook Fan page plus you can also follow us on
Instagram, Twitter and Pinterest.


Just A Note!


Welcome KLM Digital Design Fans!

Today, I’m sharing a new stamp set from KLM Digital Designs called Mailbox Greetings. These little country birds decided to make their home in someone’s mailbox and are enjoying the nice sunny weather. A lot of snow here still where I live, so it will be a while before we get to see some flowers blooming and some nice clear skies. LOL!

This stamp set would make a wonderful addition to your collection if you would just like to send a little thank-you to someone or just to write them a short note.

Card Recipe:

Stamp and Sentiment: Mailbox Greetings (KLM Digital Designs)

Inks: HP Printer Gray Scale, Tim Holtz Distress Ink – Wilted Violet, Tim Holtz Distress Inks – Dusty Concord

Paper: Copic Marker X-Press It Blending Card, Recollections – Petite Floral – Double Sided 12 x 12 in (30.4 x 30.4 cm), Recollections – Purple Passions 8.5″ x 11″

Die Cuts: Your Next Stamp – Stitched Rectangle Die Set (YNSD214), Craftin Desert Diva’s Fancy Frames

Coloured with Copic Markers:

Birds: E27, E25, E23, YR12, Sakura Glaze – Black

Sky: B91, B34, B28, B26, B24, B23, B12, B01, B00, BG70, Colorless Blender, Prismacolor Premier Pencil – White

Post: E47, E43, E35

Mailbox and Handle: C6, C4, C2, R39, R29, R27, R24

Nest Under Bird: Y23, Y11, E33, E30, E84

Grass and Leaves: G14, G09, G07, YG17, YG13, YG07

Flowers: V12, V09, V06, V04

Thank you and have a great week!