Tag Archive | Clouds

Kit and Clowder – Scrapbooking Fun Summit June2026


Today I’m sharing a card that I made following a video from the Kit and ClowderScrapbooking Fun Summit June 2026 colouring class by Alyce Keegan. She taught us how to colour this beautiful background within the circle and this adorable little bird in this amazing class.


The base card for the 1st image was created to the size of 4.25″ x 5.5″ out of Hammermill – Premium 110 lb. Cardstock. Momenta – Cardstock was cut to the size of 4″ x 5.25″ and attached to the base using liquid glue. The sentiment was applied to the Momenta Cardstock using a MISTI, Versa Fine – Onyx Black ink and Your Next Stamp – Party Pets (CYNS586). Ranger – Clear Super Fine Detail embossing powder was applied over the sentiment and then it was heat embossed with a Marvy Uchida – Embossing Heat Tool.

The image provided by Alyce was printed out with my HP Printer onto Copic Marker X-Press It Blending Card using High Quality Greyscale and coloured in with Copic markers as per the class instructions. The finished image was then fussy cut and glued onto Recollections – Black cardstock.  U-Line Double-Sided foam tape was attached to the back of the black cardstock and it was popped up onto the base card above the sentiment. Kraftin’ Kimmie pop dots were added to finish the card off.


For the 2nd card. I decided to print out the image again and colour it once more utilizing the lessons that I had learned from Alyce’s class. Once the image was coloured, I fussy cut around it and applied U-Line Double-Sided Foam Tape to the back of it.

This time, I made a Thank You card using AC Cardstock – White cardstock for my base to the size of 6″ x 6″. Pinkfresh Studios – Happy Heart paper was cut to the size of 5.5″ x 5.5″ and then with a Sharpie – Gold Medium Point – Water Based Paint, I inked around all of the edges. Spellbinders – Thanks Enclosed Sentiments – Etched Dies from the Four Petal Collection were used to die cut white cardstock and Spellbinders Gold carstock. These were then glued together with liquid glue. U-Line Double-Sided Foam Tape was applied to the backs of the sentiments and coloured cardstock. All pieces were then popped up onto the base and some pop dots were added to complete the card. I also used some of the Gold ink from the pen to create a gold ink spatter on the background.

It amazed me how different the 2 cards turned out, simply by changing the backgrounds.

Card Recipe:

Stamp Image: Kit and Clowder – Alyce Keegan_Sky

Sentiment Card 1: Your Next Stamp – Party Pets (CYNS586) (Retired)

Paper: Copic Marker X-Press It Blending Card, Hammermill – Premium Cardstock 110 lb., Recollections – Black cardstock, Momenta – Cardstock, Pinkfresh Studios – Happy Heart (6″ x 6″), Spellbinders Gold Cardstock, White Cardstock

Ink: HP Printer High Quality GreyScale, Versa Fine – Onyx Black

Dies: Spellbinders – Thanks Enclosed Sentiments – Etched Dies from the Four Petal Collection (S6-208)

Miscellaneous: U-Line Double-Sided Foam Tape, Sharpie – Gold Medium Point – Water Based Paint, Ranger – Clear Super Fine Detail embossing powder, Marvy Uchida – Embossing Heat Tool


Hope you like it and have a great week!

Dreams Take Flight!!


Today, I’m featuring a card I made using Embrace Your Dream – D19039  from Dreamerland Crafts. My dad always dreamed of flying and he would build all kinds of model airplanes. Then one day he decided to build a real plane with the assistance of his brother and a friend. It took them a long time, but in the end it was a beautiful plane and the best part was that we were all taken for rides in it. It’s an experience we will never forget. So just as my dad followed his dreams, he taught us all to follow our dreams as well. If you dream about something long enough, eventually it will become a reality for you. So never be afraid to follow your dreams.


To make this card I used a white base card of 4.25″ x 5.5″. The background was die cut using My Creative Time – Rectangle Frame Die Layers – MCT-D274 and my Cuttlebug. The paper is from Doodlebug Design Inc. – I Love Travel. Once die cut, the edges were inked around using Tim Holtz Distress Ink – Salty Ocean. I also used this colour to do the clouds in the sky on the image. I adhered the background to the base using glue so that I could move it around to fit better.

The sentiment was stamped using my MISTI, VersaMark ink and Ranger Embossing Powder White – Extra Fine Detail and the stamp from Kraftin’ Kimmie – Sky’s The Limit. The powder was then heat embossed with Marvy Uchida – Embossing Heat Tool. It was die cut using My Creative Time – Sentiment Label Dies.

The image was die cut using My Creative Time – Bunch of Fun Circle Dies from Copic Marker X-Press It Blending Card. The circle behind the main image was die cut with My Creative Time – More Stitched Circles MCT-D136 from black cardstock. I coloured in the entire image with Copic markers and then created a mask. I added in the clouds and used a small piece of old rag and some rubbing alcohol to create some texture in the grass.

To assemble the card, I ran the main image through Xyron Creative Station to make like a sticker and so that it would lay completely flat on the black circle. 3M VHB – 2 sided tape was used to pop up the main image and sentiment to complete the card.

Card Recipe:

Stamp:  Embrace Your Dream – D19039 (Dreamerland Crafts)

Sentiment: Kraftin’ Kimmie – Sky’s The Limit

Inks: Memento – Tuxedo Black, Tim Holtz Distress Ink – Salty Ocean, VersMark

Paper: Copic Marker X-Press It Blending Card, Doodlebug Design Inc. – I Love Travel (6 x 6), Black cardstock White cardstock

Die Cuts: My Creative Time – Bunch of Fun Circle Die, Avery Elle – Custom Steel Dies – Made in the USA – D-05-01 PiercedCloudsDie, My Creative Time – Rectangle Frame Die Layers – MCT-D274, My Creative Time – Sentiment Label Dies – MCT-D139, My Creative Time – More Stitched Circles MCT-D136

Embossing Powder: Ranger Embossing Powder White – Extra Fine Detail

Tools: MISTI – Most Incredible Stamping Tool, Cuttlebug, Marvy Uchida – Embossing Heat Tool, Xyron Creative Station, 3M VHB – 2 sided tape

Image coloured with Copic Markers:

Face: E21, E11, E04, E00, E000

Hair: E47, E44, E43

Jacket:  E37, E35, E34, E33

Pants: E87, E84, E81

Boots: N8, N6, N4, E53, E51, E50

Goggles: E37, E35, E33

Scarf and Helmet: E33, E31, E30

Gloves: E79, E77, E74

Airplane: C5, C3, C1, C0, Y08, Y04

Grass: YG17, YG13, YG03, YG01

Sky: Tim Holtz Distress Ink – Salty Ocean, Avery Elle – Custom Steel Dies – Made in the USA – D-05-01 PiercedCloudsDie

Hope you like it and have a great week!

You can find more cards to inspire you at Dreamerland Crafts and Pointer Scrapbooking on the Facebook Fan pages from the rest of our design team.

Saying Hi!


Welcome Back Dreamerland Craft Fans!

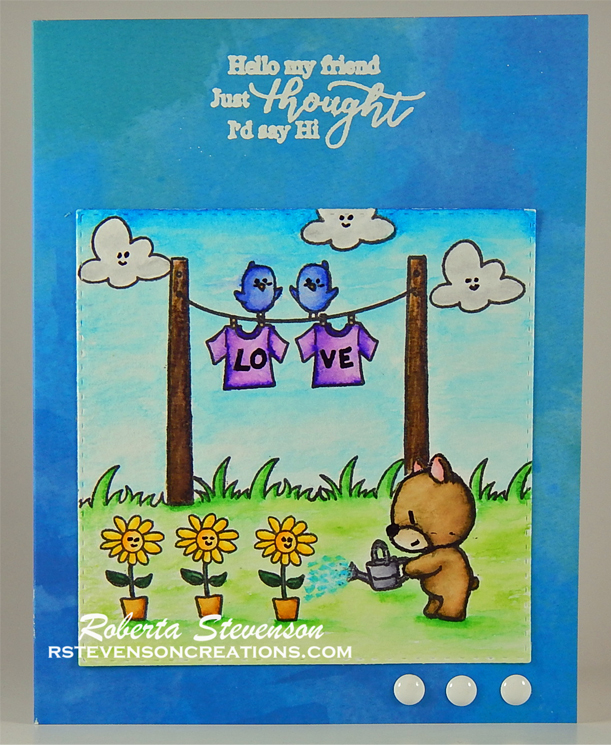
Today, I’m sharing Mix and Match Clear Stamps – DCS 19093 (Dreamerland Crafts) for the images and sentiment that I used to create this little scene. I just love how you can used these little stamps to create a variety of scenes. To colour my card this week, I thought I would try using Zig Clean Color Real Brush Markers. I normally colour with Copic markers, so this was a bit of a challenge for me.

To make this card I used a base card of 4.25″ x 5.5″ by Hot Buy – Recollections – Watercolour Solids. The sentiment was stamped directly onto the background paper using my MISTI, VersaMark ink and Ranger Embossing Powder White – Extra Fine Detail. The powder was then heat embossed with Marvy Uchida – Embossing Heat Tool.

Strathmore – Watercolor Paper – 140 lb. was die cut using my Cuttlebug and dies from My Creative Time -Stitched Squares Inside and Out. For the images, I used my MISTI and Kraftin’ Kimmie – Wicked Black Ink.  I created a mask of the bear’s head using some Post-it Note paper and set it aside. To create the scene it was done in stages. First the bear and the little flower pots were stamped. Then the mask created earlier was put overtop of the little bear as show below. The poles, clothesline and grass were then stamped next.

Lastly, the T-Shirts, birds and clouds were stamped. Once this was completed, the mask for the bear was removed. The images were coloured in with the colour recipe listed below and Sakura Glaze – Black was used for all of the little eyes. Once the colouring was all completed, the finished scene was mounted directly to the base with 2-sided tape. Kraftin’ Kimmie – Lovely Dots were added to put a finishing touch on the card.

Card Recipe:

Stamps and Sentiments:  Mix and Match Clear Stamps – DCS 19093 (Dreamerland Crafts)

Inks: Kraftin’ Kimmie – Wicked Black Ink, VersaMark, Sakura Glaze – Black

Paper: Strathmore – Watercolor Paper – 140 lb., Hot Buy – Recollections – Watercolour Solids

Die Cuts: My Creative Time -Stitched Squares Inside and Out

Embossing Powder: Ranger Embossing Powder White – Extra Fine Detail

Tools: MISTI – Most Incredible Stamping Tool, Cuttlebug, Marvy Uchida – Embossing Heat Tool, Kraftin’ Kimmie – Lovely Dots

Image coloured with Zig Clean Color Real Brush Markers:

Bear: No. 64 – Oatmeal, No. 61 – Light Brown, No. 201 – Pink Haze, No. 26 – Light Pink

Sky:  No. 31 – Cobalt Blue, No. 36 – Light Blue

Clouds: No. 99 – Cool Gray 1, No. 90 – Gray

Grass: No. 47 – May Green, No. 41 – Light Green

Poles: No. 58 – Deep Brown, No. 62 – Dark Brown, No. 66 – Dark Oatmeal

Flowers: No. 61 – Light Brown, No. 52 – Bright Yellow, No. 55 – Pale Yellow,

Watering Can: No. 090 – Gray

Birds: No. 32 – Persian Blue, No. 30 – Blue

T-Shirts: No. 84 – Deep Violet, No. 83 – Lilac

Hope you like it and have a great week!

You can find more cards to inspire you at Dreamerland Crafts and Pointer Scrapbooking on the Facebook Fan pages from the rest of our design team.