Today I’m sharing a card using KLM Digital Design – Coffee Gnome from the new November release. This image also comes with 2 more sentiments, “Your a special blend” and “You are the cream to my …”. I’m personally not a coffee lover, but I do believe this is the perfect image and sentiment to send a little note to a friend.
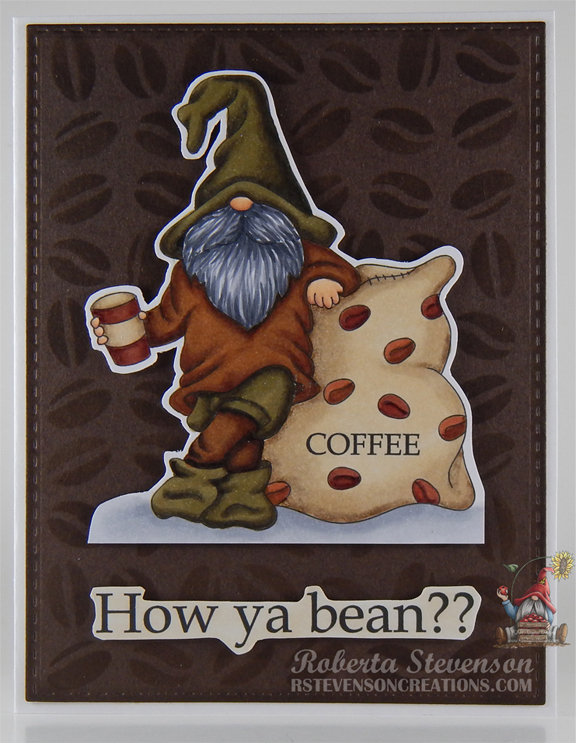
Hammermill – Premium Cardstock 110 lb. was used to create a 5.5″ x 4.25″ card base. Creative Memories – Hot Fudge paper was die cut to the size of 5.25″ x 4″. Using Tim Holtz Distress Inks – Ground Espresso and a blending brush, I created my own background using the stencil from Coffee Break – Practical Publishing 2017. With a sponge dauber, the edges were also inked all around. The finished background was then applied directly to the card using double-sided tape.
The image and sentiment were imported into Microsoft Word and printed out onto Copic Marker X-Press It Blending Card and coloured in with Copic markers. Both the sentiment and image were then fussy cut all around leaving a small border surrounding them. U-Line Double-Sided Foam tape was applied to both and they were popped up onto the card.
Card Recipe:
Stamp and Sentiment: Coffee Gnome – KLM Digital Designs
Inks: HP Printer Grayscale, Tim Holtz Distress Inks – Ground Espresso
Paper: Copic Marker X-Press It Blending Card, Hammermill – Premium Cardstock 110 lb.
Dies: My Creative Time – Rectangle Frame Die Layers – MCT-D274
Stencils: Coffee Break – Practical Publishing 2017
Miscellaneous: U-Line Double-Sided Foam Tape, Cuttlebug, Blending Brush, Dauber
Image coloured with Copic Markers:
Skin: E21, E11, E04, E00, E000
Beard: C7, C6, C5, C3
Pants, Hat and Shoes: E89, E87, E84
Shirt and Socks: E49, E39, E37, E35
Coffee Sack: E43, E42, E41, E37, E19, E18, E17, E15, E13
Coffee Cup: E43, E42, E41, E19, E18, E17
Shadow: C3, C2, C1, C0
Sentiment: E40
Hope you like it and have a great week!
You can find more cards to inspire you at KLM Designs, KLM Digital Design Team and KLM Digital Designs on the Facebook Fan page from the rest of our design team.