Tag Archive | Snowman

Snowmen – Winter Fun!!


It’s Wednesday, and this week, I made a Christmas card using High Hopes Rubber Stamps Snowman Dash – TT054 for the main image and Winter Fun! – F109, for the sentiment. Growing up in the North, we couldn’t wait to get home from school to go sledding down the hills across the street or behind our house. There was so much snow that the snowbanks the plows created were just the perfect height for us to have loads of fun! On the weekends, we would go to the much larger hills!

To make my card this week, I began with a card base of 5.5″ x 4.25″ using Hammermill – Premium Colour 100 lb. cardstock. I inked around the edges with a blender brush and blue ink that I still had on it from a previous project. I don’t clean off my brushes because I have dedicated brushes for each colour group.

The image was stamped onto the inner die cut using my MISTI and Memento – Tuxedo Black ink, which I had die cut using my Cuttlebug and paper from Copic Marker X-Press It Blending Card cardstock with MFT – Stitched Rec Scallop Frame dies. I coloured in the image and then added the sentiment using a MISTI, VersaMark ink and Ranger Embossing Powder White – Extra Fine Detail. This was heat embossed using a Marvy Uchida – Embossing Heat Tool. The snow in the sky was created using a Gelly Roll Sakura #10 Pen and UNIPosca PC-3M White marker. Stickles – Star Dust was added to the snow on the hill and Cosmic Shimmer Fluffy Stuff and DecoArt Glamour Dust were added to give some texture to the snow where the sled had been. A Marvy Uchida – Embossing Heat Tool was used to fluff up the Cosmic Shimmer Fluffy Stuff. Once the Stickles was all dry, I pieced the 2 die cuts back together using Scotch tape on the back. U-Line double-sided tape was added to the combined piece and it was popped up onto the card.

Card Recipe:

Stamps: Snowman Dash – TT054 (High Hopes Rubber Stamps)

Sentiment: Winter Fun – F109 (High Hopes Rubber Stamps)

Inks: Memento – Tuxedo Black, VersaMark

Paper: Copic Marker X-Press It Blending Card, Hammermill – Premium Colour 100 lb.

Embossing Powder: Ranger Embossing Powder White – Extra Fine Detail

Die Cuts: Die-namics – Exclusive Designs for “My Favourite Things” – Stitched Rec Scallop Frame – MFT-860

Tools and Embellishments: MISTI – Most Incredible Stamping Tool, U-Line double-sided tape, Stickles – Star Dust, Cuttlebug, DecoArt Glamour Dust, Cosmic Shimmer Fluffy Stuff, UNIPosca PC-3M White marker, Marvy Uchida – Embossing Heat Tool, Blending Brush

Image coloured with Copic Markers:

Snowmen: BV20, B0000, YR68, YR31, Y38, R59, R235, 100, W9, W7, W5, Colorless Blender

Snowman1 Mittens and Scarf: BV08, BV13, BV02, BV01, BV00

Snowman2 Mittens and Scarf: BG75, BG57, BG49, BG13, BG11, BG10

Snowman3 Hat and Mittens: R59, R46, R37, R35, R14, R08

Sled: E49, E47, E39, E37, E35, E34

Sky: B06, B05, B04, B02

Hope you like it and have a fantastic week!

You can find lots of inspiration from the Design Team Divas at the High Hopes blog, and the High Hopes Rubber Stamps Facebook Fan page plus you can also follow us on
Instagram, Twitter and Pinterest.

Noel!!


It’s Wednesday, and this week, I made a CAS Christmas card using High Hopes Rubber Stamps Woodland Stocking – TDG011. We always had stockings under the tree filled with goodies and our names on each of the stockings. Even our dogs had their own stockings growing up. LOL!

To make my card this week, I began with a card base of 6″ x 6″ using AC Cardstock – White. I adhered Recollections – Christmas Cottage 6 in. x 6 in. cardstock to the base front using double-sided tape. Using my Cuttlebug and paper from Copic Marker X-Press It Blending Card, I die cut the frame with Waffle Flower – Nesting Square dies. The image was stamped onto the die cut using my MISTI and Memento – Tuxedo Black ink. I coloured in the image and then inked around the edges with a NUVO Glitter Marker – Golden Honey. I added some U-Line double-sided tape to the back of the coloured image and popped it up into the centre of the diamond. To finish off the card, I added 4 pop dots from YNS – Happy Harvest Gumdrops.

Card Recipe:

Stamps: Woodland Stocking – TDG011 (High Hopes Rubber Stamps)

Inks: Memento – Tuxedo Black, Tim Holtz Distress Ink – Pine Needles

Paper: Copic Marker X-Press It Blending Card, AC Cardstock – White, Recollections – Christmas Cottage (12″ x 12″)

Die Cuts: Waffle Flower – Nesting Square dies

Tools: MISTI – Most Incredible Stamping Tool, U-Line double-sided tape, NUVO Glitter Marker – Golden Honey, Cuttlebug, YNS – Happy Harvest Gumdrops

Image coloured with Copic Markers:

Cheeks: RV00, RV000

Eyes and Noses: Sakura Glaze – Black, Gelly Roll Sakura #5 Pen

Snowman: BV20, B0000, Y38, YR31, C9, C7, C5, B04, B02, B01, Colorless Blender

Owl: E55, E53, E51, W0, W00, Y38, YR31

Fox: E99, E97, E08, N1, N0, R02, R01

Penguin: C9, C7, C5, C3, E42, E41, YR31, Y38

Reindeer: E51, E50, E33, E31, E30, E29, E27, E25, E23, E21, R02, R01

Noel and Ribbon: YR27, YR23, Y15, Y11, Y00

Tree Branch and Pines: E29, E25, E23, G49

Holly, Leaves and Pine Needles: G99, G29, G21, YG67, YG17, R89, R27, R24

Sock: B04, B02, B01, B00, R59, R37, R35, C1, G29

Ribbon: R59, R37, R35

Hope you like it and have a fantastic week!

You can find lots of inspiration from the Design Team Divas at the High Hopes blog, and the High Hopes Rubber Stamps Facebook Fan page plus you can also follow us on
Instagram, Twitter and Pinterest.

Winter Friends!!


It’s Wednesday, and this week, I made a Christmas card using High Hopes Rubber Stamps Winter Friends – TT048 for the main image and Jingle All the Way – H040, for the sentiment. Snowmen are one of my favourite images to colour and how adorable is this happy snowman singing to his little friend?

To make my card this week, I began with a card base of 6″ x 6″ using AC Cardstock – White. I adhered American Crafts – “Kringle and Co” 6 x 6 in. cardstock to the base front. Red and green cardstock were cut to the sizes of 6″ x 1.25″ and 6″ x 1-1/8″ from some spare paper I had. I adhered the green to the red using double-sided tape and some glue to allow me to centre it. The combined strip was put through a Xyron Create a Sticker to keep it flat. I added this combined strip to the card approximately a .25″ up from the bottom. Tim Holtz Distress Ink – Rustic Wilderness was used to ink around all of the edges of the card and it was set aside to dry.

Using my Cuttlebug and paper from Copic Marker X-Press It Blending Card, I die cut the frame with Gina Marie Designs – Loopy Oval die cuts. The image was stamped onto the die cut using my MISTI and Memento – Tuxedo Black ink. I coloured in the image and then added the snow in the sky using a Gelly Roll Sakura #10 Pen. Stickles – Crystal was added to the snow on the ground and along the branches to give it some sparkle.  I set the image to the side to allow the Stickles time to dry.

I cut a piece of Recollections Christmas Ink Jet Printable Glitter Paper to the size of 4″ x 1″. Using my MISTI once again, I stamped the sentiment onto it using Memento – Tuxedo Black ink and then cut a fish tail on each end. U-Line double sided tape was added to the back of the sentiment and then it was popped up and centred in between the red and green stripe. U-Line double-sided tape was added to the back of the image and it was popped up onto the card above the sentiment once the Stickles had dried. Lastly, I die cut 2 pinecones and some pine leaves using my Cuttlebug and dies from Stampin’ UP! – Pretty Pines Thinlets die set. Liquid glue was used to pieced them altogether. I adhered these to the 2 upper corners of the card and then applied some Stickles – Crystal to the leaves to finish off the card.

Card Recipe:

Stamps: Winter Friends – TT048 (High Hopes Rubber Stamps)

Sentiment: Jingle All the Way – H040 (High Hopes Rubber Stamps)

Inks: Memento – Tuxedo Black, Tim Holtz Distress Ink – Rustic Wilderness

Paper: Copic Marker X-Press It Blending Card, AC Cardstock – White, American Crafts – “Kringle and Co” 6 x 6 in. (15.2 cm x 15.2 cm), Recollections Christmas Ink Jet Printable Glitter Paper

Die Cuts: Gina Marie Designs – Loopy Oval, Stampin’ UP! – Pretty Pines Thinlets (141851)

Tools: MISTI – Most Incredible Stamping Tool, U-Line double-sided tape, Stickles – Crystal, Cuttlebug, Xyron Create a Sticker

Image coloured with Copic Markers:

Snowman: BV20, B0000, YR68, Y38, Y18, R29, R24, RV00, Colorless Blender

Snowman Hat, Mittens and Scarf: G99, GY67, YG63, YG61, R59, R37, R35

Snowman Boots and Buttons: C9, C7, C5, C3

Bird: R46, R14, R08, Y17

Bird Hat and Scarf: G99, YG67, YG63, R59, R37, R35

Bells: YR27, YR23, Y15, Y11, Y00

Tree Branch and Pines: E29, E25, E23, G49

Snow: BV20, B0000, Colorless Blender, Gelly Roll Sakura #10 Pen, Stickles – Crystal

Sky: B04, B02, B01, B00

Hope you like it and have a fantastic week!

You can find lots of inspiration from the Design Team Divas at the High Hopes blog, and the High Hopes Rubber Stamps Facebook Fan page plus you can also follow us on
Instagram, Twitter and Pinterest.

You Got This!!


It’s Wednesday, and this week, I made a card using High Hopes Rubber Stamps Lasso Some Snow – TDG021  for the main image and Don’t Worry – FDG021 for the sentiment. We all need a little bit of encouragement every now and then and this little snowman is here to give us some.

To make my card this week, I began with a card base of Hammermill – Premium Colour 100 lb. cardstock, cut and scored to be 5.5″ x 4.25″.  I used Echo Park Paper Co. – My Favorite Winter cardstock cut to the same size as the base card for the background. I attached this to the base using double-sided tape. Using my Cuttlebug, a mixture of square dies from My Creative Time -Stitched Squares Inside and Out and Waffle Flower – Nesting Square dies, I die cut cardstock from Scrapbook.com Neutrals Smooth Cardstock and also Copic Marker X-Press It Blending Card. I applied double-sided tape to the back of the tan square and applied it directly to the background. U-Line double-sided tape was added to the back of the dark brown square and popped up onto the centre of the tan square.

With my MISTI and Memento – Tuxedo Black ink, I stamped the image onto the Copic Marker X-Press It Blending Card cardstock square and coloured it in with Copic markers. Gelly Roll Sakura #10 Pen was used to create the snow in the sky. Sakura Glaze – Black and Gelly Roll Sakura #5 Pen were used on the eyes of the snowman. I applied U-line douhble-sided tape to the back of the completed image and popped it up onto the centre of the dark brown square.

With my MISTI and Memento – Tuxedo Black ink, I stamped the sentiment onto Recollections – White cardstock and then die cut it out using my Cuttlebug and My Creative Time – Ribbon End Dies. I inked around the edges using Copic – E59 marker to give it a dark brown border. I used my knife to remove the double border from the piece left behind and then traced the shape of the ribbon onto the remaining piece of Scrapbook.com Neutrals Smooth Cardstock. I cut this out with my cutter and scissors. U-Line double-sided tape was applied to both pieces and the completed sentiment was popped up onto the card below the main image to complete the card.

Card Recipe:

Stamp: Lasso Some Snow – TDG021 (High Hopes Rubber Stamps)

Sentiment: Don’t Worry – FDG021 (High Hopes Rubber Stamps)

Inks: Memento – Tuxedo Black

Paper: Copic Marker X-Press It Blending Card, Hammermill – Premium Colour 100 lb., Echo Park Paper Co. – My Favorite Winter (6″ x 6″), Scrapbook.com – Neutrals Smooth Cardstock (5.5″ x 4.25″), Recollections – White cardstock

Die Cuts: My Creative Time -Stitched Squares Inside and Out, Waffle Flower – Nesting Square dies, My Creative Time – Ribbon End Dies

Tools: MISTI – Most Incredible Stamping Tool, U-Line double-sided tape, Gelly Roll Sakura #10 Pen, Gelly Roll Sakura #5 Pen, Sakura Glaze – Black, Cuttlebug

Image coloured with Copic Markers:

Snowman: B60, C9, C7, C5, C00, E49, YR18, YR16, YR12, Colorless Blender (Eyes – Sakura Glaze – Black, Gelly Roll Sakura #5 Pen)

Hats, Mitts and Scarf: B99, B977, B95

Coat: E51, E50, E37, E35, E34, E33, E31

Birds: E59, E37, E35

Fence: E29, E27, E25, E23, E21

Wheel and Rope: E77, E74, E47, E44, E43, Y35, YR31

Sky: B04, B02, B01, B00

Snow: B000, B60, C00, Colorless Blender, Stickles – Diamond

Hope you like it and have a fantastic week!

You can find lots of inspiration from the Design Team Divas at the High Hopes blog, and the High Hopes Rubber Stamps Facebook Fan page plus you can also follow us on
Instagram, Twitter and Pinterest.

Card of the Month Challenge Round 2 – Brrr!!!


Hey friends! Thank you for everyone that voted for me in Round 1. I have a card using High Hopes Stamps featured in this month’s Card of the Month contest Card of The Month – JUST FOR FUN! with Creative Scrapbooker magazine! Such an honor because all the creations are outstanding! Was wondering if you would all do me a favour and vote for me in Round 2, https://creativescrapbooker.ca/card-of-the-month-nov-2021/?fbclid=IwAR0TdRXPRGcVdkfuxB5BdXNFi2yCfNNW_XZnFzmSXNN4awMuHc3SXrG7i9Y#/bracket/3616656/

I made a Christmas card using Havin’ A Ball Snowman – S147 by High Hopes Rubber Stamps for the main image and Brr… – FDG004 (High Hopes Rubber Stamps) for the sentiment. Brr…. – Winter is coming soon!

Card of the Month Challenge – Brrr!!!


Hey friends! I have a card using High Hopes Stamps featured in this month’s Card of the Month contest Card of The Month – JUST FOR FUN! with Creative Scrapbooker magazine!
Such an honor because all the creations are outstanding! Was wondering if you would all do me a favour and vote for me.
https://creativescrapbooker.ca/card-of-the-month-nov-2021/?fbclid=IwAR0TdRXPRGcVdkfuxB5BdXNFi2yCfNNW_XZnFzmSXNN4awMuHc3SXrG7i9Y#/bracket/3616656/

I made a Christmas card using Havin’ A Ball Snowman – S147 by High Hopes Rubber Stamps for the main image and Brr… – FDG004 (High Hopes Rubber Stamps) for the sentiment. Brr…. – Winter is coming soon!

Christmas Cheer!!


Today we are having a sponsor day over at the Passionate Paper Creations & Friends FB group and I’m sharing a snowman card I made using this digital image from Whimsy Stamps – Snowman’s New Hope and clear stamp for the sentiment Dragon Christmas Cheer.

For the base card, I used AC Cardstock – White and cut it and scored it to be 6″ x 6″. The image was printed out using HP High Quality Grayscale onto Copic Marker X-Press It Blending Card. The background paper was cut to the size of 6″ x 6″ using Hot Buy – Recollections – Jewel Tones paper. This was applied directly to the base using double-sided tape. I die cut Doodlebug Design Inc. – Winter Wonderland paper using my Couture Creations – Go Power and Emboss and Creative Expression Craft Dies by Sue Wilson – Noble Dies – Double Pierced Squares – Set B. This was inked around the edges with Lawn Fawn – Peacock Ink and applied directly over top of the bottom layer using double-sided tape. The circles were cut with my Cuttlebug, various colours from Hot Buy – Recollections – Jewel Tones paper and Copic Marker X-Press It Blending Card using Lifestyle Crafts Cutting Dies – Nesting Circles. I applied the 1st 2 circles with double-sided tape over top of the snowman background.

The image was coloured in with Copic markers. I popped up the image and applied it to to the card using 3M double sided tape. I added snow to the bottom of the snowman using Stickles – Diamond to add texture. The snowy background was created with a Ranger – Emboss It Pen Clear and the sentiment was stamped with Versamark ink. Ranger Embossing Powder White – Extra Fine Detail was applied and heat embossed using Marvy Uchida – Embossing Heat Tool. I fussy cut around the sentiment and it was popped up using 3M double-sided tape onto the card to finish it off.

Card Recipe:

Stamp: Snowman’s New Hope – Whimsy Digital Stamps

Sentiment: Dragon Christmas Cheer Whimsy Clear Stamps

Inks: HP High Quality Grayscale, Lawn Fawn – Peacock Ink, Versamark, Ranger – Emboss It Pen Clear

Paper: Copic Marker X-Press It Blending Card, AC Cardstock – White, Hot Buy – Recollections – Jewel Tones, Doodlebug Design Inc. – Winter Wonderland (6″ x 6″)

Die Cuts: Creative Expression Craft Dies by Sue Wilson – Noble Dies – Double Pierced Squares – Set B, Lifestyle Crafts Cutting Dies – Nesting Circles

Embossing Powder: Ranger Embossing Powder White – Extra Fine Detail

Miscellaneous: Couture Creations – Go Power and Emboss, 3M double-sided tape, Stickles – Diamond, Marvy Uchida – Embossing Heat Tool

Image coloured with Copic Markers:

Snowman: YR18, YR15, YR12, R30, R20, B60, C0, C00, Colorless Blender

Hat and Scarf: B37, B26, B23, B21, B14, B12, BG72, BG57, BG34, BG11

Sky: BG10, BG000, BG0000

Hope you like it and have a great week!

Come and check us out on Passionate Paper Creations & Friends FB group
as we are currently sponsoring Whimsy Stamps until Sunday, October 31, 2021.

If you are a member of Passionate Paper Creations & Friends FB group
you can go to the top of the page and get a shopping discount.


If you are not a member just click join. We are a fun loving group with a lot of inspiration.

Believe!!!


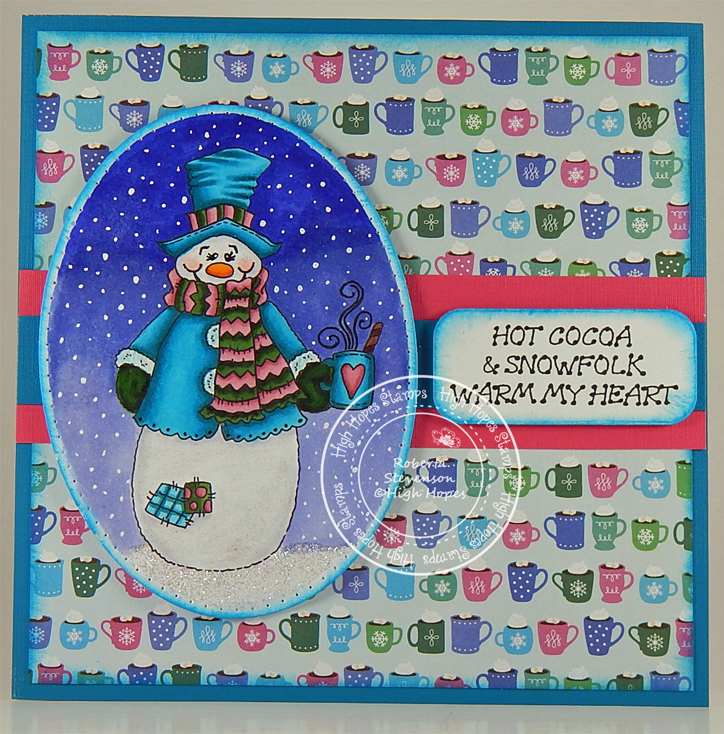
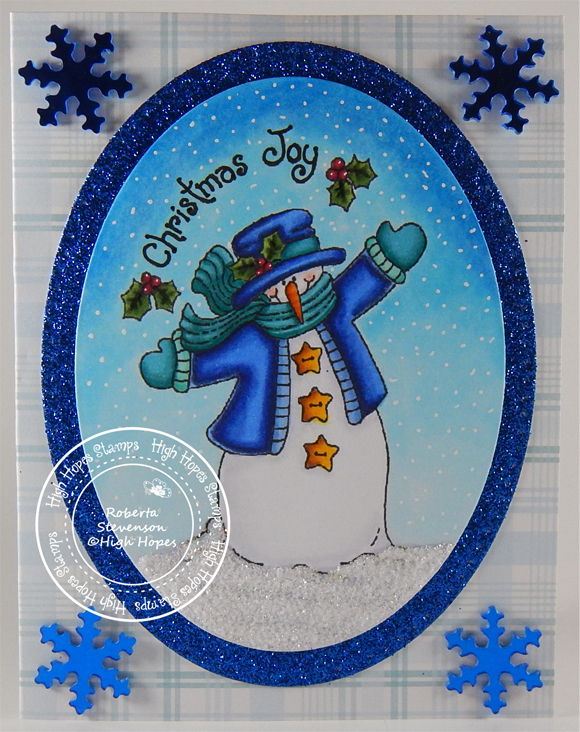
It’s Wednesday, and this week, I made a Christmas card using Believe Snowman – TFL006 and Snow Globe – ULF002 by High Hopes Rubber Stamps for the main image and North Pole Greetings – GLL005 (High Hopes Rubber Stamps) for the sentiment. It’s time to start believing the magic of Christmas and the joy that it brings to everyone!

To make my card this week, I began with a card base using AC Cardstock – White cut and folded to 6″ x 6″. The snowflake background is from Lawn Fawn – Let It Shine Snowflakes (6″ x 6″) paper pad. I applied this directly to the base using double-sided tape.

Using Lifestyle Crafts Cutting Dies – Nesting Circles and my Cuttlebug, I die cut a 3.75″ circle from Copic Marker X-Press It Blending Card paper. With my MISTI and Memento – Tuxedo Black ink, I stamped the snowman scene image onto it. I coloured in the image with Copic markers and then added some snow to the sky and snowman’s arms using a Gelly Roll Sakura #8 Pen. Sakura Glaze – Black was added to the eyes of the snowman and birds and the snowman’s mouth. With a Ranger – Emboss It Pen Clear, I added some ink to the top of the Snowman’s hat, sign, icicles, tops of the birdhouses and snow drifts and then heat embossed everything with WOW! Sparkling Snow Embossing Glitter and a Marvy Uchida – Embossing Heat Tool. Stickles – Diamond was added as an extra layer to the snow and Wink of Stella – Clear was applied over all the snowman. This was then set aside to dry.

With my MISTI and Memento – Summer Sky ink I stamped the top part of the globe onto Copic Marker X-Press It Blending Card paper. I cleaned off the stamp and this time, I used some Post-it Notes to hide the background inside the globe and inked the braided border for both the top and bottom of the base with Versamark ink. I applied Ranger Super Fine Detail Gold Embossing powder and heat embossed it using a Marvy Uchida – Embossing Heat Tool. With my globe image still in place on my MISTI, I removed the snowglobe stamp and added the sentiment turning up both ends of the stamp slightly to give the words some curvature. The sentiment was stamped using Versamark ink and then Ranger Super Fine Detail Gold Embossing powder was applied to it and then heat embossed using a Marvy Uchida – Embossing Heat Tool. The base was then coloured in using my Copic markers and a Gelly Roll Stardust – Clear pen was used to colour in the white areas to give it some glitter. I also added some of this pen to the tops of the snowman’s arms. With my scissors, I fussy cut around the entire snow globe.

The card was now ready to assemble. I attached 3M double-side tape to pop up the snow globe onto the main background and then added 3M double-sided tape to the back of the circle and centred it on the top part of the globe. Lastly, to finish off the card, I applied some Nuvo Crystal Drops – Caribbean Ocean, Violet Galaxy and Nuvo Glitter Drops – Sherbert Shimmer to some of the snowflakes on the base card.

Card Recipe:

Stamp: Believe Snowman – TFL006 (High Hopes Rubber Stamps), Snow Globe – ULF002 (High Hopes Rubber Stamps)

Sentiment: North Pole Greetings – GL005 (High Hopes Rubber Stamps)

Inks: Memento – Tuxedo Black, Memento – Summer Sky ink, Versamark

Paper: Copic Marker X-Press It Blending Card, AC Cardstock – White, Lawn Fawn – Let It Shine Snowflakes (6″ x 6″)

Die Cut: Lifestyle Crafts Cutting Dies – Nesting Circles

Stickles: Diamond

Nuvo: Crystal Drops – Caribbean Ocean, Violet Galaxy and Glitter Drops – Sherbert Shimmer

Embossing Powder:Ranger Super Fine Detail Gold Embossing powder, WOW! Sparkling Snow Embossing Glitter

Tools: MISTI – Most Incredible Stamping Tool, Marvy Uchida – Embossing Heat Tool, Cuttlebug, Gelly Roll Sakura #8 Pen, Ranger – Emboss It Pen Clear, Sakura Glaze – Black pen, Gelly Roll Stardust – Clear pen

Image coloured with Copic Markers:

Snowman: B60, C1, C00, Colorless Blender

Hat and Buttons: C10, C8, C6, C4

Arms and Sign: E27, E25, E23, E21

Scarves, Patches, Hat Band: RV66, RV63, RV55, BG09, BG07, BG02, BG01

Bird Houses: RV66, RV63, RV55, BG09, BG07, BG02, BG01, E27, E25, E23, E21

Birds: R46, R14, R08

Sky: B99, B97, B95, B93, B91

Snow: B60, C1, C00, B0000, BG0000, Colorless Blender

Snow Globe: R46, R14, R08

Hope you like it and have a fantastic week!

You can find lots of inspiration from the Design Team Divas at the High Hopes blog, and the High Hopes Rubber Stamps Facebook Fan page plus you can also follow us on
Instagram, Twitter and Pinterest.

Brrr!!!


It’s Wednesday, and this week, I made a Christmas card using Havin’ A Ball Snowman – S147 by High Hopes Rubber Stamps for the main image and Brr… – FDG004 (High Hopes Rubber Stamps) for the sentiment. Brr…. – Winter is coming soon!

To make my card this week, I began with a card base using Hammermill – Premium Colour 100 lb. cut to 4.25″ x 5.5″. I cut out the background from Heartfelt Creations – Merry and Bright Collection and sized it to 4″ x 5.25″. Adding double-sided tape, I adhered this to some yellow cardstock. I cut around the yellow cardstock and left a very thin border. Lastly, I applied some double-sided tape and glue and attached it to the base.

With my MISTI and Memento – Tuxedo Black ink, I stamped the image and sentiment onto Copic Marker X-Press It Blending Card. I coloured in the image and sentiment with Copic markers. I ran the sentiment through my Xyron Create a Sticker and then I fussy cut around the image and the sentiment. Using a black pen, I outlined all of the edges for the image and sentiment, except in the snowy area. I peeled off the backing to the sentiment pieces and adhered them to the card front. I glued the snowman image in place at the bottom of the cut out background. I applied Stickles – Sea Glass to the Sweater cuffs and trim and a little bit in the snow at the bottom of the snowman. Stickles – HIbiscus was applied to the hat trim and pom pom. Stickles – Diamond was added to the snowballs and Stickles Crystal, Diamond and Stardust were all added to the snow to finish off the card.

Card Recipe:

Stamp: Havin’ A Ball Snowman – S147 (High Hopes Rubber Stamps)

Sentiment: Brr… – FDG004 (High Hopes Rubber Stamps)

Inks: Memento – Tuxedo Black

Paper: Copic Marker X-Press It Blending Card, Hammermill – Premium Colour 100 lb. cardstock, Heartfelt Creations – Merry and Bright Collection, Yellow Cardstock

Stickles: Sea Glass, Hibiscus, Crystal, Diamond, Stardust

Tools: MISTI – Most Incredible Stamping Tool, Xyron Create a Sticker

Image coloured with Copic Markers:

Snowman and Snowballs: B60, C1, C00, R30, R20, YR18, YR15, YR14, E27, E25, E23

Hat and Scarf: RV66, RV63, RV55, Y17, Y15, Y13

Sweater: B04, B02, B01, B00

Boots: RV66, RV63, RV55, B04, B02, B01, B00, C7, C5, C3, C1

Sentiment: RV66, RV63, RV55, Y17, Y15, Y13, B04, B02, B01, B00

Hope you like it and have a fantastic week!

You can find lots of inspiration from the Design Team Divas at the High Hopes blog, and the High Hopes Rubber Stamps Facebook Fan page plus you can also follow us on
Instagram, Twitter and Pinterest.

Hot Cocoa and Snowfolk!!!


It’s Wednesday, and this week, I made a card using Snowman Cup Of Love – S149 by High Hopes Rubber Stamps for the main image and Dot Warm Heart – G117 (High Hopes Rubber Stamps) for the sentiment. Hot chocolate is one of my favourite drinks during cold winter days. It looks like it is for this snowman too!

To make my card this week, I began with a card base of AC Cardstock – White cut and scored to be 6″ x 6″. I cut the background paper from Hot Buy – Recollections – Jewel Tones cardstock to the same size as the base and used double-side tape to apply it directly to it. Pebbles – Winter Wonderland paper was cut to the size of 5.75″ x 5.75″ and inked around the edges using Tim Holtz Distress Ink – Mermaid Lagoon. I applied this directly to the main background using double-sided tape. I cut 2 more strips from the Hot Buy – Recollections – Jewel Tones paper at 6″ x 1.5″ and 6″ x .75″ and applied them midway across the card using double-sided tape.

The image and sentiment were stamped using my MISTI and Memento – Tuxedo Black ink. I die-cut the sentiment using my Cuttlebug and Hero Arts – Infinity Dies – Rounded Rectangle and inked around the edges with Tim Holtz Distress Ink – Mermaid Lagoon. This was popped up on the card using 3M double-sided tape. The image was die cut with Creative Expression Craft Dies by Sue Wilson – Noble Dies – Double Pierced Ovals and inked around the edges with Tim Holtz Distress Ink – Mermaid Lagoon. I coloured in the image in with Copic markers and popped it up on the card using 3M double-sided tape. Lastly, I added some Clear Glitter Glue to the bottom of the snowman to create some snow. You can’t see it in this picture, but I also added Wink of Stella – Clear to make the snowman sparkle too!

Card Recipe:

Stamp: Snowman Cup Of Love – S149 (High Hopes Rubber Stamps)

Sentiment: Dot Warm Heart – G117 (High Hopes Rubber Stamps)

Inks: Memento – Tuxedo Black, Tim Holtz Distress Ink – Mermaid Lagoon

Paper: Copic Marker X-Press It Blending Card, AC Cardstock – White, Hot Buy – Recollections – Jewel Tones, Pebbles – Winter Wonderland 6″ x 6″

Die Cuts: Hero Arts – Infinity Dies – Rounded Rectangle (DI465), Creative Expression Craft Dies by Sue Wilson – Noble Dies – Double Pierced Ovals

Tools: MISTI – Most Incredible Stamping Tool, 3M – 2 sided tape, Sakura Glaze – Black Pen, Gelly Roll Sakura #8 Pen, Cuttlebug, Wink of Stella – Clear

Image coloured with Copic Markers:

Eyes: Sakura Glaze – Black Pen, Gelly Roll Sakura #8 Pen

Snowman: YR18, YR16, YR12, B60, C1, C0, C00, Colorless Blender

Hat, Scarf, Mitts, Coat, Patches and Cup: BG09, BG05, BG02, BG01, G99, YG67, YG17, R85, R83, R81

Cinnamon Stick: E27, E23

Background: G43, G40, G12

Snow: Clear Glitter Glue

Hope you like it and have a fantastic week!

You can find lots of inspiration from the Design Team Divas at the High Hopes blog, and the High Hopes Rubber Stamps Facebook Fan page plus you can also follow us on
Instagram, Twitter and Pinterest.

Baking Snowman!!


Sharing a card I made today using KLM Digital Designs – Baking Snowman from the July release. This image comes with 3 sentiments. I’ve used 1 on my card, but you also have the choice of  “Lovin’ from the oven” and “Wishing you a delicious Holiday”. Christmas at our house always had so many wonderful aromas from my mom baking all kinds of Christmas goodies for everyone!

To make the card, I first imported the image and sentiment into Microsoft Word and printed it out onto Copic Marker X-Press It Blending Card. I die the image and frame using my Cuttlebug and Creative Expression Craft Dies by Sue Wilson – Paper Cuts Collection – Christmas Feast dies. I coloured the image in with Copic markers and then added in the snowflakes for the sky with Gelly Roll Sakura #10 Pen. Black PrismaColor Premier Pencil was used to outline parts of the image. Gina K Designs – Glitz Glitter Gel – Iridescent was added below the snowman to create the sparkling snow and the image was set aside to dry.

The frame for the sentiment die was cut twice using Gina Marie Designs – Nested Scalloped Stitched Rectangles. A cutter was used to remove the frame from the one that contained the sentiment. The edges were then inked with Tim Holtz Distress Ink – Barn Door. Viva Decor – Inka-Gold – Yellowgold was applied to the other 2 frames and then once it was dry, a paper towel was used to buff them up and give the gold some shine. The sentiment was then applied directly to the small frame using double-sided tape.

The card was now ready to assemble. Hammermill – Premium Colour 100 lb. was used to create the card base. It was sized at 8-5/8″ x 7¼” and then scored at 3-5/8″. I used my Couture Creations – Go Power and Emboss to die cut Hot Buy Craft Smart – Holiday Glitz Glitter Paper using PinkFresh Studio Essentials – Slim Stitched Rectangle Dies. The dimensions were the same as the base card. Using glue, I applied the large rectangle die-cut directly to the base card. Next, I used the outside frame for the snowman as a guide to where to place the coloured image. I removed the image and applied glue to the back of it and set it back inside the frame. Once the image was glued down to the base, I added glue to the back of the frame and moved it into place around the coloured image to complete the puzzle. 3M VHB – 2 sided tape was added to the back of the frame for the sentiment and it was added directly to the glitter paper. Lastly, to finish off my card, I removed the button parts from the backs of the buttons from Dress It Up – Holiday Collection – Christmas Cookies using my Tim Holtz scissors and pliers.  Mini Glue Dots were applied to the backs of each of the buttons and they were applied directly to the glitter paper.

Card Recipe:

Stamp and sentiment: Baking Snowman – KLM Digital Designs

Inks: HP Printer Grayscale, Tim Holtz Distress Ink – Barn Door

Paper: Copic Marker X-Press It Blending Card, Hammermill – Premium Colour 100 lb., Hot Buy Craft Smart – Holiday Glitz Glitter Paper 12″ x 12″

Die Cut: Creative Expression Craft Dies by Sue Wilson – Paper Cuts Collection – Christmas Feast, Gina Marie Designs – Nested Scalloped Stitched Rectangles, PinkFresh Studio Essentials – Slim Stitched Rectangle Dies

Miscellaneous: Viva Decor – Inka-Gold – Yellowgold, Gina K Designs – Glitz Glitter Gel – Iridescent, Dress It Up – Holiday Collection – Christmas Cookies, Gelly Roll Sakura #10 Pen, 3M VHB – 2 sided tape, Min Glue Dots – 3/16″, Cuttlebug, Couture Creations – Go Power and Emboss

Image coloured with Copic Markers:

Snowman: B60, C1, C00

Apron: G99, G21, YG67, YG17

Hat: BV20, C0, C00

Gingerbread: E35, E33, E31, R35, YG17, Gelly Roll Sakura #10 Pen

Rolling Pin: E43, E42, E40

Sky: B37, B14, B12

Snow: Gina K Designs – Glitz Glitter Gel – Iridescent

Hope you like it and have a great week!

You can find more cards to inspire you at KLM Designs, KLM Digital Design Team and KLM Digital Designs on the Facebook Fan page from the rest of our design team.

Think Snow!!!


It’s Wednesday, and this week, I made a card using Snowman Stumble – TT014 by High Hopes Rubber Stamps for the main image and Think Snow 2 – FF047 (High Hopes Rubber Stamps) for the sentiment. I grew up skating at the outdoor rink directly across the street from my house. We couldn’t wait to get home from school and throw on our skates. The rinks were always full of children from the neighbourhood. We would either play rink games or hockey. I think there was a rink every couple of blocks. As soon as we’d finish eating, we were back on the ice again. Our parents were always yelling at us to come inside at the end of the day. How times have changed. LOL!

To make my card this week, I began with a card base made from Hammermill – Premium Colour 100 lb. cut and scored to be 5.5″ x 4.25″. My Cuttlebug and My Creative Time – Rectangle Frame Dies were used to die cut Hot Buy Craft Smart – Holiday Glitz Glitter Paper to be the same size as the base card. With a Picket Fence – Blending Brush and a mixture of Tim Holtz Distress Ink – Blueprint Sketch and Tim Holtz Distress Ink – Salty Ocean, I created the background sky. I applied this directly to the glitter background paper. Once this was done, I applied this directly to the base using double-sided tape. Next, Nellie’s Choice – Nature Scene Dies – NSD001 – Mountains were used to die cut the tree scenery using Momenta – Cardstock and using a small dauber I added in some darker touches of green using Tim Holtz Distress Inks – Peeled Paint. The pond was die cut using Whimsy Stamps – Wavy Nested Frame Dies Set and Copic Marker X-Press It Blending Card. I inked the image and sentiment using my MISTI and Memento – Tuxedo Black. Lastly, I die cut the sentiment using Joy Crafts – Labels and Tags and inked around the edges with my Picket Fence – Blending Brush and the ink that was still on it from doing the sky.

I coloured in the image with Copic markers and added in some highlights on the skate blades with Pental Sunburst Metalic Med Gel Pen. I inked the image a second time onto the Hot Buy Craft Smart – Holiday Glitz Glitter Paper for the snowman body and fussy cut around it. Once it was coloured in with Copics, I ran it through my Xyron Create a Sticker and attached it to the base stamped image.

The card was now ready to assemble. Part of the pond was cut off at the top before it was attached it to the sparkly background using glue and double-sided tape. Next, I added some 3M VHB – 2 sided tape to the back of the trees and applied it over top of where the sky ended and the pond met. To create the snow around the pond and in between the trees, pond and snow, I used Cosmic Shimmer Fluffy Stuff and added some DecoArt Glamour Dust while it was still wet. Marvy Uchida – Embossing Heat Tool was used to heat the liquid and make it puff up to look like fluffy snow. I added some Stickles – Diamond to the pompom. Using a Gelly Roll Sakura #10 Pen and Sharpie Water Based Paint – White – Extra Fine Point pen, I created the snow in the sky. Lastly, to finish off the card, I added 3M VHB – 2 sided tape to the sentiment and applied it to the card.

Card Recipe:

Stamp: Snowman Stumble – TT014 (High Hopes Rubber Stamps)

Sentiment: Think Snow 2 – FF047 (High Hopes Rubber Stamps)

Inks: Memento – Tuxedo Black, Tim Holtz Distress Ink – Blueprint Sketch, Tim Holtz Distress Ink – Salty Ocean, Tim Holtz Distress Inks – Peeled Paint

Paper: Copic Marker X-Press It Blending Card, Hammermill – Premium Colour 100 lb., Momenta – Cardstock, Hot Buy Craft Smart – Holiday Glitz Glitter Paper 12″ x 12″

Die Cuts: My Creative Time – Rectangle Frame Dies, Nellie’s Choice – Nature Scene Dies – NSD001 – Mountains, Whimsy Stamps – Wavy Nested Frame Dies Set (WSD382), Joy Crafts – Labels and Tags

Stickles: Diamond

Tools: MISTI – Most Incredible Stamping Tool, 3M VHB – 2 sided tape, Gelly Roll Sakura #10 Pen, Sharpie Water Based Paint – White – Extra Fine Point, DecoArt Glamour Dust, Cosmic Shimmer Fluffy Stuff, Marvy Uchida – Embossing Heat Tool, Cuttlebug, Picket Fence – Blending Brush, Pental Sunburst Metalic Med Gel Pen, Xyron Create a Sticker

Image coloured with Copic Markers:

Snowman: B60, R30, R20, YR21, YR16, YR15, Colorless Blender

Hat: BG72, BG57, BG32, BG11, Gelly Roll Sakura #10 Pen

Mitts and Skates: C3, C2, C1, C00, BG09, BG05, BG02, BG01

Ice: B00, B000, B000

Hope you like it and have a fantastic week!

You can find lots of inspiration from the Design Team Divas at the High Hopes blog, and the High Hopes Rubber Stamps Facebook Fan page plus you can also follow us on
Instagram, Twitter and Pinterest.

Little Cup of Cocoa


Coffee Loving Cardmakers is currently hosting the 2020 Fall / Winter Coffee Lovers Blog Hop! For my Fourth entry into this hop, I chose this loveable snowman in a hot tub of Cocoa called Snow Yummy – S182  by High Hopes Rubber Stamps. For the sentiments I used High Hopes Rubber Stamps, Cup of Cocoa – M009 and Holiday All Year – H200.

The image was stamped with Memento – Tuxedo Black ink onto Copic Marker X-Press It Blending Card using my MISTI to give me a nice clean image. The image was coloured with copic markers and then I fussy cut around it. I used a black marker to go around all of the edges where I had cut out the image.

I cut Hammermill – Premium Colour 100 lb. paper to be 4.25″ x 11″. Then I scored the paper at 5.5″ and again at 8.25″. (2.75″ from the original score line). I cut another piece of the cardstock at 4.25″ x 5.5″ to be the front panel. I then cut Stampin’ Up – Snowflake Splendor Designer Series Paper to be 4.25″ x 5″ and used double-side tape to place it directly to the front panel piece. Hot Buy Craft Smart – Holiday Glitz Glitter Paper was used to create the snow. I cut it 4.25″ wide and then just tore a piece across the width to create the shape. I used double-sided tape to adhere this directly to the bottom of the front panel.

The sentiments were then added with Versa Fine – Onyx Black and embossed with Ranger – Clear Super Fine Detail embossing powder. This was then heat set with Marvy Uchida – Embossing Heat Tool. To create the rectangles, I used  My Creative Time – Rectangle Frame Layers  for the patterned paper and My Creative Time – Rectangle Frame Dies for the background rectangle using Hot Buy – Recollections – Jewel Tones. Next, I ran the small sentiment and the coloured image through my Xyron Creative Station to create stickers out of them. This made it easer to adhere the larger image to the background and the smaller sentiment to the larger rectangle.

The card was now ready to assemble. I applied double-sided tape to only the lower half of the scored card and then placed the finished scene panel onto it. I cut another piece of patterned paper at 4-1/8″ x 3″ and adhered it the lower half of the inside card. Then I popped up the sentiment using 3M VHB – 2 sided tape. I added some Wink of Stella – Clear  to the snowman to make him sparkle and Gelly Roll Stardust – Clear and the Wink of Stella – Clear to the large snowflake on the mug. Lastly, I added some Stickles – Diamond to add some texture to the snow.

Card Recipe:

Stamp: Snow Yummy – S182 (High Hopes Rubber Stamps)

Sentiments: Cup of Cocoa – M009 (High Hopes Rubber Stamps)Holiday All Year – H200 (High Hopes Rubber Stamps)

Inks: Memento – Tuxedo Black, Versa Fine – Onyx Black

Embossing Powder: Ranger – Clear Super Fine Detail embossing powder

Paper: Copic Marker X-Press It Blending Card, Hammermill – Premium Colour 100 lb., Stampin’ Up – Snowflake Splendor Designer Series Paper, Hot Buy Craft Smart – Holiday Glitz Glitter Paper 12″ x 12″

Die Cuts: My Creative Time – Rectangle Frame Layers, My Creative Time – Rectangle Frame Dies

Tools: MISTI – Most Incredible Stamping Tool, Cuttlebug, 3M VHB – 2 sided tape, Xyron Creative Station, Wink of Stella – Clear, Stickles – Diamond

Image coloured with Copic Markers:

Snowman: B60, BG000, YR18, YR14, Y08, C9, N8, N5, R30, R27, R24, R22, R20, Colorless Blender, Wink of Stella – Clear

Mug and Hot Cocoa: E23, E25, E27, B37, B14, B12, Wink of Stella – Clear and Gelly Roll Stardust – Clear

Hat and Scarf: C9, C7, C5, R59, R39, R37, R35

Hope you like it and have a great week!

Christmas Joy!


It’s Wednesday, and this week I’m sharing a Christmas card featuring Christmas Joy Snowy – S228 from (High Hopes Rubber Stamps). I love snowmen, winter and Christmas! Growing up in a northern community, we had a lot of snow. It was always so much fun and seeing the snow fall on Christmas day was always wonderful. Where we live now, we don’t get as much and it’s always disappointing when we don’t see snow on the ground for Christmas. It’s ok for the other days, but Christmas is extra special. Hopefully, Christmas Joy Snowy will bring some snow for us this year on our special day. LOL!

To create the card this week, I first used my Cuttlebug and Creative Expressions by Sue Wilson – Festive Collection Peeking Snowflake to create a die cut out of Copic Marker X-Press It Blending Card paper. I stamped the image and then coloured it in with Copic Markers. Once it was all coloured in, I added added some snowflakes to the sky using Gelly Roll Sakura #10 Pen. Clear – Wink of Stella was applied to all of the leaves. Stickles – Diamond was added to create the ground snow effect and I sprinkled some Martha Stewart Crafts – Crystal Fine Glitter on top of the Stickles while it was still wet. The coloured image was set aside to let it dry.

I die cut the larger oval using the same dies out of Crafts – Thick Glitter Craft Paper. I love this paper, but in order to prevent the glitter from getting everywhere, I first sprayed it with some hairspray.

The card was now ready to assemble. I used Recollections – Winter 4.25″ x 5.5″ card for my base. The large oval was adhered directly onto the base using 2-sided tape. The main image was added using 3M VHB – 2 sided tape and some snowflake embellishments were added to complete the card.

Card Recipe:

Stamp: Christmas Joy Snowy – S228 (High Hopes Rubber Stamps)

Inks: Memento – Tuxedo Black

Paper: Copic Marker X-Press It Blending Card, Crafts – Thick Glitter Craft Paper 02-302270, Recollections – Winter 4.25″ x 5.5 (Assorted Box of Cards)

Die Cut: Creative Expressions by Sue Wilson – Festive Collection Peeking Snowflake

Stickles: Diamond

Tools and Miscellaneous: MISTI – Most Incredible Stamping Tool, Marvy Uchida – Embossing Heat Tool, Cuttlebug, Clear – Wink of Stella, 3M VHB – 2 sided tape

Image coloured with Copic Markers:

Snowman: B60, B0, B00, R22, R20, Colorless Blender

Jacket and Hat: B39, B32, B28, B24, B23, B21

Buttons: E15, YR24, Y35, Y08

Mitts and Scarf: BG57, BG53, BG49, BG13, BG11, BG10

Holly and Leaves: G99, YG67, YG17, YG01, G21, R39, R37, Gelly Roll Sakura #5 Pen

Nose: E08, YR18, YR16, YR12

Background: B60, B04, B02, B00, B000, BV20, Stickles – Diamond, Gelly Roll Sakura #10 Pen, Martha Stewart Crafts – Crystal Fine Glitter

Hope you like it and have a fantastic week!

You can find lots of inspiration from the Design Team Divas at the High Hopes blog, and the High Hopes Rubber Stamps Facebook Fan page plus you can also follow us on
Instagram, Twitter and Pinterest.