Tag Archive | Snowflake

Pre-Colored Snowflake Gnome!


Today I’m sharing a Christmas CAS card that I made using KLM Digital DesignsPre-Colored Snowflake Gnome from the new December 2024 Release. This pre-coloured image makes it very easy to create lots of last minute Christmas cards.

The base card was created to the size of 4.25″ x 5.5″ out of Hammermill – Premium 110 lb. cardstock. Whimsy Stamps – Blurry Flurries paper was cut to the same size and applied to the base card using double-sided tape.

The image was printed out onto Copic Marker X-Press It Blending Card and fussy cut. Joy Crafts – Merry Christmas Cutting Stencil was die cut using a Cuttlebug and Lawn Fawn – Sparkle Cardstock in “Pixie Dust” paper. This was applied along the top of the card using liquid glue. With a spatula, DecoArt Snow-Tex was applied along the bottom of the card and then some glitter was sprinkled onto it while it was still wet. Gentle pressure was used to push the glitter into the DecoArt Snow-Tex. U-Line Double-Sided Foam Tape was applied to the upper part of the image and it was popped up onto the card. Lastly, Stickles – Diamond was applied along the bottom of the feet.

Card Recipe:

Stamp: KLM Digital DesignsPre-Colored Snowflake Gnome

Sentiment Die: Joy Crafts – Merry Christmas Cutting Stencil (6002/0683)

Inks: HP Printer

Paper: Copic Marker X-Press It Blending Card, Hammermill – Premium Cardstock 110 lb., Whimsy Stamps – Blurry Flurries WSDP25 (6″ x 6″), Lawn Fawn – Sparkle Cardstock in “Pixie Dust” (8.5″ x 11″)

Miscellaneous: U-Line Double-Sided Foam Tape, DecoArt Snow-Tex, Stickles – Diamond

Hope you like it and have a great week!

You can find more cards to inspire you at KLM Designs, KLM Digital Design Team and KLM Digital Designs on the Facebook Fan page from the rest of our design team.

NOTE: KLM Designs will be closing as of January 1st, 2025. All physical stamps are now $2.50!
Stock up while supplies last!


Penguin Candy Cane !


Today I’m sharing another Christmas card that I made using Whimsy StampsPenguin Candy Cane.

The image was printed out with my HP Printer onto Copic Marker X-Press It Blending Card using High Quality Grayscale and coloured in with Copic markers. Once I finished colouring the image, I fussy cut around it.

The base card was created to the size of 4.25″ x 5.5″ out of Hammermill – Premium 110 lb. cardstock. Creative Expressions – Christmas Wishes paper was cut to be the same size as the base and was applied directly to the card using double-sided tape. A finger dauber was used to apply Tim Holtz Distress Inks – Candied Apple around all of the edges of the card. Using a Cuttlebug, I die cut the larger snowflake with Creative Expressions – Festive Collection – Lace Snowflake Frame and the smaller snowflakes with Poppy – Simple Snowflakes out of Lawn Fawn – Sparkle Cardstock in “Pixie Dust” paper. The holly and leaves were die cut using dies from Spellbinders – Dancin’ Figgy Pudding and some scraps of Recollections – Green cardstock and Crafter’s Companion Luxury Cardstock – Red. I used a Copic marker G99 to make the veins darker in the leaves and a White Gelly Roll Sakura #10 Pen to add a highlight on the berries and then used liquid glue to assemble them.

The whole card was now ready to assemble. U-Line Double-Sided Foam Tape was applied to the completed image and it was popped up onto the centre of the large snowflake. U-Line Double-Sided Foam Tape was then applied to the large snowflake and it was popped up onto the centre of the card. Liquid glue was applied to the holly and berries and smaller snowflakes which were adhered directly to the card base. Lastly, I applied U-Line Double-Sided Foam Tape to the sentiment from Hunkydory Essential Book of Christmas Sentiments 2023 and popped it up onto the corner of the card to finish it off.

Card Recipe:

Stamp: Whimsy StampsPenguin Candy Cane

Inks: HP Printer High Quality Grayscale, Tim Holtz Distress Inks – Candied Apple

Paper: Copic Marker X-Press It Blending Card, Hammermill – Premium Cardstock 110 lb., Creative Expressions – Christmas Wishes (8″ x 8″), Crafter’s Companion Luxury Cardstock – Red – 8.5 x 11″, Lawn Fawn – Sparkle Cardstock in “Pixie Dust” (8.5″ x 11″), Hunkydory Essential Book of Christmas Sentiments 2023, Recollections – Green cardstock

Die Cuts: Spellbinders – Dancin’ Figgy Pudding – S4-1315, Creative Expressions – Festive Collection – Lace Snowflake Frame (CED3123), Poppy – Simple Snowflakes (Style 1931)

Miscellaneous: U-Line Double-Sided Foam Tape, White Gelly Roll Sakura #10 Pen

Image coloured with Copic Markers:

Penguin: W9, W7, W5, W3, W00, E15, YR14, Y17, Y11, RV00, E43, E42, E41, E40, Colorless Blender

Hat: R46, R14, R08, C01, C0

Candy Cane: G16, YG25, YG23, R46, R14, R08, C1, C0

Hope you like it and have a great week!

Wish You A Merry Christmas


Today, I’m featuring a Christmas card from Dreamerland Crafts new Christmas release called We Wish You A Merry Christmas – D20012. This card features a little kitten helping his friend celebrate the joy of Christmas giving.

To create this card, I first die-cut some Copic Marker X-Press It Blending Card using my Cuttlebug and Creative Expressions – Festive Frames – Snowball. I separated the 2 pieces of the die-cut and using my MISTI and Memento – Tuxedo Black, I stamped the image onto the paper and  coloured it in with Copic markers. I stamped the sentiment using VersaMark ink. The sentiment was then embossed with Ranger Embossing Powder White – Extra Fine Detail and Marvy Uchida – Embossing Heat Tool was used to heat set the embossing powder. Once this was done, I added all of the snowflakes in the sky using a Gelly Roll Sakura #10 Pen and also Gelly Roll Sakura #8 Pen. For the snow on the ground, I used a mixture of Nuvo Glitter Accents – Fresh Snowfall and Stickles – Crystal. This was then set aside for a few hours to dry.

For the frame, I used Cosmic Shimmer Opal Polish – Summer Sky. It was my first time using this polish and I just love how it turned out. Once the snow on the image was dry, I flipped the 2 die-cuts over and attached them back together using some clear tape on the back.

The card was now ready to assemble. For the card base I used The Paper Studio – Primary Base Colours 4.25″ x 5.5″. I added some double-sided tape and some glue to the backing of the finished frame and image and attached it directly to the card base.

Card Recipe:

Stamp and Sentiment:  We Wish You A Merry Christmas – D20012 (Dreamerland Crafts)

Inks: Memento – Tuxedo Black, VersaMark

Paper: Copic Marker X-Press It Blending Card, The Paper Studio – Primary Base Colours 4.25″ x 5.5″

Opal Polish: Cosmic Shimmer – Summer Sky

Glitter \ Snow: Nuvo Glitter Accents – Fresh Snowfall, Stickles – Crystal

Die Cuts: Creative Expressions – Festive Frames – Snowball – CED3146

Tools: MISTI – Most Incredible Stamping Tool, Marvy Uchida – Embossing Heat Tool, Gelly Roll Sakura #8 Pen, 3M VHB – 2 sided tape, Cuttlebug, Gelly Roll Sakura #10 Pen

Image coloured with Copic Markers:

Face: E21, E11, E04, E00, E000, R22, R20, Eyes – Sakura Glaze – Black, Gelly Roll Sakura #5 Pen

Hair: E15, Y38, Y21, YR23

Hat, Cape and Coat:  G29, YG17, YG05, YG03, BV20, C1, C0

Pants: B26, B23, B21

Boots: E53, E51, E50, E29, E27, E25, E23

Present: R14, R13, R11

Bow and Girl’s Scarf: R59, R39, R37, R35

Kitten and Scarf: N10, N8, N6, N4, N3, G29, YG17, YG05, YG03, R32, R20, Eyes – Sakura Glaze – Black, Gelly Roll Sakura #5 Pen

Present: Y17, Y15, Y08, Y04, Y17, Y15, Y13

Stars: Y17, Y15, Y13

Sky: B99, B97, B79, B69, B39, B37, B34, Gelly Roll Sakura #10 Pen, Gelly Roll Sakura #8 Pen

Hope you like it and have a great week!

You can find more cards to inspire you at Dreamerland Crafts and Pointer Scrapbooking on the Facebook Fan pages from the rest of our design team.

Sending You Tidings


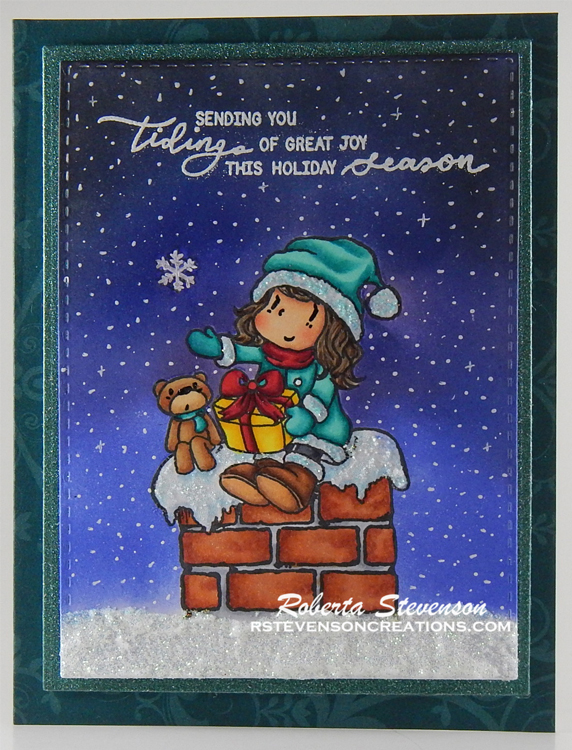
Today, I’m featuring a Christmas card by Dreamerland Crafts using their stamp set called Sending You Tidings – D19072. Growing up in the North, we used to get a lot of snow. I always love looking out the window and seeing the snow fall and how beautiful it looks on the houses and trees. Driving in it, not so much, but everything else about winter, I love. LOL!

To make this card, I cut some Copic Marker X-Press It Blending Card to the size of 4.75″ x 3.5″ using my Cuttlebug and My Creative Time – Rectangle Frame Layers Dies. Then using my MISTI and Memento – Tuxedo Black, I stamped the image first onto the paper and then again on to Post-It Note to create a mask. I fussy cut around the mask and placed it to the side to use a little later. I then proceeded to colour in my image with Copic markers.

Once the colouring of the image was complete, I was ready to create the sky. To accomplish this, the mask that I had set aside earlier was placed over top of the coloured image. A mixture of Tim Holtz Distress Inks were then used: Black Soot, Chipped Sapphire, Blueprint Sketch and Dusty Concord inks. Once, the background was completed, I stamped the sentiment from the same stamp set using my MISTI and VersaMark ink. The sentiment was then embossed with Ranger Embossing Powder White – Extra Fine Detail and Marvy Uchida – Embossing Heat Tool was used to heat set the embossing powder.

I was now ready to add the final finishing touches. To do this, I added in the snowflakes and stars using Gelly Roll Sakura #10, #8 and #5 Pens. Stickles – Cool Mint was added to the little lady’s hat, pom-pom and coat cuffs. Gina K Designs – Glitz Glitter Gel was applied with a spatula along the bottom of the card to create some sparkling snow and also to the top of the chimney with a Q-Tip. I also coloured in the little snowflake in the sky with Gelly Roll Sakura #10 pen and then Gelly Roll Stardust – Clear to make it sparkle. I set the card aside to let the glitter dry for a few hours.

For the card base I used Recollections – Winter 4.25″ x 5.5 and edged around all of the sides with Tim Holtz Distress Ink – Iced Spruce. I die cut Hot Buy Craft Smart – Holiday Glitz Glitter Paper to the size 3.75″ x 5″ using My Creative Time – Rectangle Frame Dies and Cuttlebug. This was adhered directly onto the base using 3M VHB – 2 sided tape. Once the glitter was completely dry, I layered the completed image on top of the second layer using 3M VHB – 2 sided tape.

Card Recipe:

Stamp and Sentiment:  Sending You Tidings – D19072 (Dreamerland Crafts)

Inks: Memento – Tuxedo Black, VersaMark, Tim Holtz Distress Ink – Black Soot, Tim Holtz Distress Ink – Chipped Sapphire, Tim Holtz Distress Ink – Blueprint Sketch, Tim Holtz Distress Inks – Dusty Concord, Tim Holtz Distress Ink – Iced Spruce

Paper: Copic Marker X-Press It Blending Card, Hammermill – Premium Colour 100 lb., Hot Buy Craft Smart – Holiday Glitz Glitter Paper 12″ x 12″, Recollections – Winter 4.25″ x 5.5″ (Assorted Box of Cards)

Embossing Powder: Ranger Embossing Powder White – Extra Fine Detail

Die Cuts: My Creative Time – Rectangle Frame Die Layers – MCT-D274, My Creative Time – Rectangle Frame Dies

Tools: MISTI – Most Incredible Stamping Tool, Marvy Uchida – Embossing Heat Tool, Stickles – Cool Mint, Gelly Roll Sakura #8 Pen, 3M VHB – 2 sided tape, Cuttlebug

Image coloured with Copic Markers:

Face: E21, E11, E04, E00, E000, R22, R20, Eyes – Sakura Glaze – Black

Hair: E47, E44, E43

Hat, Jacket, Mitts, Bear’s Scarf:  BG49, BG15, BG13, BG11, Stickles – Cool Mint

Leggings: C7, C5

Boots: E27, E25, E23, E21

Bear: E35, E34, E33, E31, E30, R22, R20, Eyes and Noses – Sakura Glaze – Black

Bow and Girl’s Scarf: R59, R39, R37, R35

Present: Y17, Y15, Y08, Y04

Chimney: E99, E97, E08, E07, E13, C4, C2

Snow: Gina K Designs – Glitz Glitter Gel, Gelly Roll Sakura #8 Pen, Gelly Roll Sakura #5 Pen

Hope you like it and have a great week!

You can find more cards to inspire you at Dreamerland Crafts and Pointer Scrapbooking on the Facebook Fan pages from the rest of our design team.