Tag Archive | Your Next Stamp – Stitched Rectangle Die Set (YNSD214)

Anniversary Gnomes!!


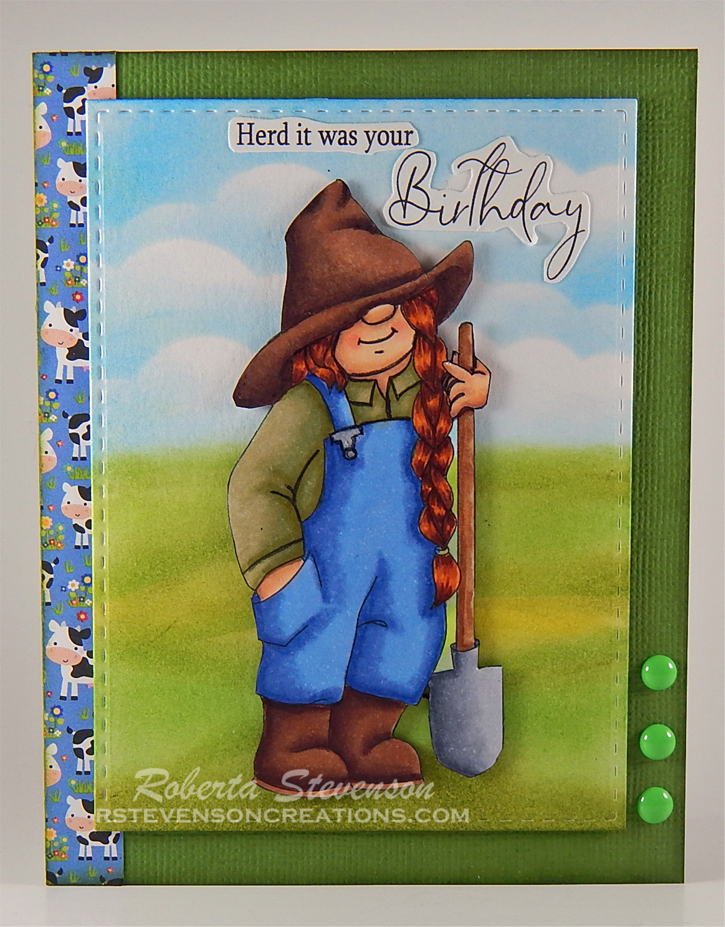
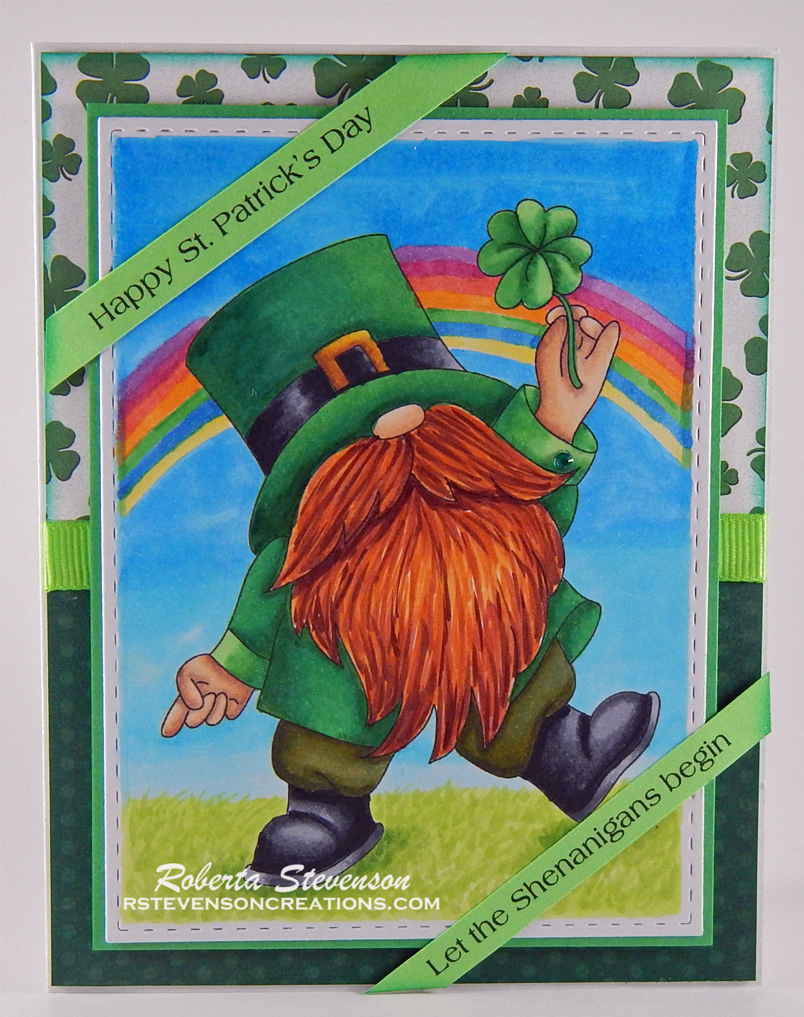
Sharing a card I made today combining the image from KLM Digital Designs April Release called Bride Gnome and image and sentiment from Groom Gnome. These images could be used separately or together and come with multiple sentiments.

To make the card, I first imported the image into Microsoft Word and printed it out onto Copic Marker X-Press It Blending Card using my HP Printer. I coloured in the image with Copic markers. Then I printed them out again on regular copy paper and used my Brother Scan and Cut  to cut around them. I used these as masks over top of the coloured images. Using multiple Tim Holtz inks listed below, I created the sky with a stencil I had created from Avery Elle – Pierced Clouds Die and grass stencil I created from Lawn Fawn – Grassy Hillside Borders.

For the base card, Recollections – Christmas Cards and envelopes paper was used at the size of 5.5″ x 4.25″. I die cut the finished coloured image with Your Next Stamp – Stitched Rectangle Die Set (YNSD214) and glued it to the base.

Card Recipe:

Stamp: Bride Gnome – KLM Digital Designs, Groom Gnome – KLM Digital Designs

Sentiment: Groom Gnome – KLM Digital Designs

Inks: HP Printer Grayscale, Tim Holtz Distress Ink: Peeled Paint, Mowed Lawn, Crushed Olive, Salty Ocean, Broken China, Tumbled Glass

Paper: Copic Marker X-Press It Blending Card, Recollections – Christmas Cards and Envelopes – 5″ x 6.5″

Die Cuts: Avery Elle – Pierced Clouds Die (D-05-01), Lawn Fawn – Grassy Hillside Borders, Your Next Stamp – Stitched Rectangle Die Set (YNSD214)

Image coloured with Copic Markers:

Skin: E21, E11, E04, E00, E000, R30, R20

Beard: E49, E47, E44, E42

Hat and Tuxedo: C9, C7, C5, C3, C2

Shirt Sleeves: C00, Colorless Blender

Shoes: 100, C10, C8, C6, C5

Hair: E18, E08, YR18, YR14

Dress and Shoes : B60, C00, Colorless Blender

Flowers, Leaves, Vest and Ribbon: BV04, BV02, BV01, BV00, Y17, Y04, YG17, YG13, YG03, Gelly Roll Sakura #10 Pen

Hope you like it and have a great week!

Take advantage of this special at KLM Digital Designs!

MOTHER’S DAY SALE 20% OFF EVERYTHING UNTIL MAY 10TH
CODE:MOTHERSDAY21

You can find more cards to inspire you at KLM Designs, KLM Digital Design Team and KLM Digital Designs on the Facebook Fan page from the rest of our design team.

Birthday Girl!!


Sharing image and sentiment from KLM Digital Designs today from the new February release called Karah’s Cupcake. This stamp set comes with 3 sentiments. This image brings back memories of when I was little and my mom used to bake us fancy cakes and cupcakes for our birthdays every year.

To make the card, I first imported the image and sentiment into Microsoft Word. I sized both the image and sentiment to fit 5″ x 3.6″ and printed everything out onto Copic Marker X-Press It Blending Card using my HP Printer. The image was coloured in with Copic markers. I had a few issues with her hair using my markers, so I used PrismaColor pencils to try and fix it. For the shadow behind the girl, I just used the same 2 markers several times on the background wall. I die cut some pink cardstock using Your Next Stamp – Stitched Rectangle Die Set and then inked around the edges using Tim Holtz Distress Ink – Picked Raspberry.

I used Hot Buy Recollections Card base of 5.25″ x 4.25″ for the base and attached the die cut directly to the base using double-sided tape. The completed image was popped up using 3M VHB – 2 sided tape to finish off the card.

Card Recipe:

Stamp and Sentiments: Karah’s Cupcake (KLM Digital Designs)

Inks: HP Printer Grayscale, Tim Holtz Distress Ink – Picked Raspberry

Die Cuts: Your Next Stamp – Stitched Rectangle Die Set (YNSD214)

Paper: Copic Marker X-Press It Blending Card, Hot Buy Recollections

Image coloured with Copic Markers:

Skin: E21, E11, E04, E00, E000

Hair: E47, E44, E43, PrismaColor Pencils – Eggshell PC140, Ginger Root PC1084, Chocolate PC1082, Light Umber PC941

Eyes: E43, C0, G07, G03, G00, Sakura Glaze – Black, Gelly Roll Sakura #10 Pen, Gelly Roll Sakura #8 Pen

Blouse Headband, Bow, Lips, Cupcake Wrapper: R85, R81, RV00, RV000

Cupcake and Dish: RV09, RV04, RV02, BV23, BV20, BV000, Atayou Spica – Pink 02, Atayou Spica – Blossom 14, Wink of Stella – Clear

Cherry and Stem: R37, R35, R24, G99

Table Top: E47, E39, E37, E35, E33, E31

Wall: BG32, BG10

Hope you like it and have a great week!

You can find more cards to inspire you at KLM Designs, KLM Digital Design Team and KLM Digital Designs on the Facebook Fan page from the rest of our design team.


C’mon Baby Light My Fire!


It’s Wednesday, and this week, I used Walker Walter – TLF013 (High Hopes Rubber Stamps) and Walker Winnie – TLF012 (High Hopes Rubber Stamps) for the main images and Light My Fire – F154 (High Hopes Rubber Stamps) for the sentiment. I thought I would create a Senior’s Valentine’s card with these fun images. This could also be used for an Anniversary card too. After all, you’re never too old to be in love!!!

To make my card this week, I used Hammermill – Premium Colour 100 lb. for my base at 4.25″ x 5.5″. I taped down the card onto a glass mat and then used the stencils Flames – Honey Bee Stamps to create the background using various Tim Holtz Distress inks which I have listed below.

I stamped both the images and sentiment using my Misti and Memento – Tuxedo Black ink onto Copic Marker X-Press It Blending Card. I coloured in the images using Copic Markers. Then I fussy cut around both images and in between the walkers. The sentiment was also fussy cut and I cut into 2 pieces to fit my design better. I added 2-sided tape to the back of my sentiments and then attached them to a small piece of Martha Stewart Crafts – Enchanted Woodland paper. Ran this through my Xyron Create a Sticker and then fussy cut around the sentiment again. I found the white too bright when I added it to the card, so I used Copic Y11 to give it some colour.

For the main images, once coloured, I ran both of them through my Xyron Creative Station and adhered them directly to the base. I used my Cuttlebug to cut some hearts out of Martha Stewart Crafts – Enchanted Woodland paper using Sizzix Framelets – Hearts Dotted die. Then I ran them through my Xyron Create a Sticker to change them into stickers and placed them directly onto the base. For the few spots on the images that I didn’t fussy cut, I used Copic markers YR23, YR16 and YR15 to fill in the white spaces.

Card Recipe:

Stamp:  Walker Walter – TLF013 (High Hopes Rubber Stamps), Walker Winnie – TLF012 (High Hopes Rubber Stamps)

Sentiment Background: Light My Fire – F154 (High Hopes Rubber Stamps)

Inks: Memento – Tuxedo Black, Tim Holtz Distress Ink – Fossilized Amber, Tim Holtz Distress Ink – Barn Door, Tim Holtz Distress Ink – Fired Brick, Tim Holtz Distress Ink – Wild Honey, Tim Holtz Distress Ink – Carved Pumpkin

Paper: Copic Marker X-Press It Blending Card, Martha Stewart Crafts – Enchanted Woodland 12″ x 12″, Hammermill – Premium Colour 100 lb.

Die Cuts: Sizzix Framelets by Stephanie Barnard – 562676 – Hearts Dotted

Stencil: Flames – Honey Bee Stamps

Tools: MISTI – Most Incredible Stamping Tool, Cuttlebug, 3M VHB – 2 sided tape, Xyron Creative Station, Xyron Create a Sticker

Images coloured with Copic Markers:

Skin: E21, E11, E04, E00, E000, R22, R20

Hair: C5, C3, C1, Gelly Roll Sakura #8 Pen

Shirt, Dress, Earring, Lady’s Shoes, Horn: BG72, BG57, BG32, BG11, C3, C1

Pants: B26, B24, B21

Man’s Shoes: E27, E25, E23, E21, C3, C1

Blouse, Flowers and Socks: RV19, RV17, RV14, RV11, RV10, G09, G07, Y17, Y08

Tennis Balls: YG05, YG03, YG01

Walkers, Horns, Wheels and Grips: C9, C7, C5, C3, C1

Hope you like it and have a fantastic week!

You can find lots of inspiration from the Design Team Divas at the High Hopes blog, and the High Hopes Rubber Stamps Facebook Fan page plus you can also follow us on
Instagram, Twitter and Pinterest.

Speedy Recovery!


It’s Wednesday, and this week, I used Walker Walter – TLF013 (High Hopes Rubber Stamps) from the new release for the main image and Speedy Recovery Background – U004 (High Hopes Rubber Stamps) for the sentiment. I have an older friend in the hospital right now waiting to have an operation and I thought this little card would definitely cheer him up.

To make my card this week, I used Recollections – Cape Cod cardstock for the base card which is 4.25″ x 5.5″. I stamped both the large background image and Walter using my Misti and Memento – Tuxedo Black ink.

Then I ran the background image through my Cuttlebug using Your Next Stamp – Stitched Rectangle Die Set to die cut it.

Both images were coloured using Copic Markers. I edged around the background image and card base with Tim Holtz Distress Ink – Blueprint Sketch. I used my Brother Scan and Cut to cut around “Walker Walter” and then outlined the image with Copic Markers C3 and C1. Next, I ran the image through my Xyron Creative Station and adhered it to some Black cardstock. I again used the Scan and Cut to cut around the image. I thought the border was too large, so I just manually fussy cut around the image leaving a smaller black border around it.

To complete the card, I bumped up both the background and the main image with 3M VHB – 2 sided tape.

Card Recipe:

Stamp:  Walker Walter – TLF013 (High Hopes Rubber Stamps)

Sentiment \ Background: Speedy Recovery Background – U004 (High Hopes Rubber Stamps)

Inks: Memento – Tuxedo Black, Tim Holtz Distress Ink – Blueprint Sketch

Paper: Copic Marker X-Press It Blending Card, Recollections – Cape Cod cardstock, Recollections – Black cardstock

Die Cuts: Your Next Stamp – Stitched Rectangle Die Set (YNSD214)

Tools: MISTI – Most Incredible Stamping Tool, Cuttlebug, 3M VHB – 2 sided tape, Xyron Creative Station

Images coloured with Copic Markers:

Skin: E21, E11, E04, E00, E000, R22, R20

Hair: C5, C3, C1, Gelly Roll Sakura #8 Pen

Shirt: YG67, YG45, YG41, G07

Pants: B26, B24, B21

Shoes: E27, E25, E23, E21

Tennis Ball: YG67, YG45, YG41

Walker: R59, R39, R37, R29, R27, R24, C9, C7, C5, C3, C2, C1, C0,

Bandages: E21, E00, E000

Syringes: C2, C1, C0, Y08, C9, Colorless Blender

Pills: B00, B000, B000, C1, C0, R24, Colorless Blender

Scissors: R29, R24, C2

Spool: E53, E51, E50

Stethoscope: C9, C2, C1, C0

Outline around image: C3, C1

Hope you like it and have a fantastic week!

You can find lots of inspiration from the Design Team Divas at the High Hopes blog, and the High Hopes Rubber Stamps Facebook Fan page plus you can also follow us on
Instagram, Twitter and Pinterest.


Have A Purr-fect Day!


Happy Canada Day to all of my fellow Canadians!!!

It’s Wednesday, and this week, I used Kitty’s Perch – TLF021 from High Hopes Rubber Stamps new release for the main image and Pawsitively – G307 (High Hopes Rubber Stamps) for the sentiment. This happy little kitty is having a great day exploring and has taken some time out to wish you a “Pawsitively Purr-fect Day”!! Hopefully, he puts a little smile on your face!

For my card this week, I began with a white base card of 5.5″ x 4.25″. I cut some Recollections – Green cardstock the same size and adhered it directly on the front of the base. Then I used my Cuttlebug and Your Next Stamp – Stitched Rectangle Die Set using the various dies to create the layers using both the base green cardstock and also Recollections – Petite Floral. I adhered the next to layers directly to the base. Then popped up the last 2 layers with 3M VHB – 2 sided tape. The image was coloured with Copic markers and was stamped using my MISTI and Memento – Tuxedo Black onto Copic Marker X-Press It Blending Card.

I used my MISTI and Memento – Tuxedo Black ink for the sentiment as well, then I cut it to size and ran it through my Xyron Create a Sticker and placed it directly over the 2nd layer. Lastly, to finish off the card, I added some Craft- Rhinestone Stickers over the flowered background.

Card Recipe:

Stamp:  Kitty’s Perch – TLF021  (High Hopes Rubber Stamps)

Sentiment: Pawsitively – G307 (High Hopes Rubber Stamps)

Inks: Memento – Tuxedo Black

Paper: Copic Marker X-Press It Blending Card, Recollections – Petite Floral – Double Sided 12 x 12 in (30.4 x 30.4 cm), Recollections – Green

Die Cuts: Your Next Stamp – Stitched Rectangle Die Set (YNSD214)

Tools: MISTI – Most Incredible Stamping Tool, Cuttlebug, 3M VHB – 2 sided tape, Craft – Rhinestone Stickers, Xyron Create a Sticker

Image coloured with Copic Markers:

Kitty’s Fur: E95, R22, C7, C5, C3, C1, C0, Prismacolor Premier Pencils – PC935 – Black and PC1056 – 70% Warm Grey

Collar: R59, R39, R37

Garbage Can: C3, G28, G19, G07, G05, YG67, YG09

Grass: YG17, YG13, YG03, YG01

Sky: B01, B00, B000, B0000

Clouds: Stampin’ Up – Whisper White ink and Q-Tip

Hope you like it and have a fantastic week!

You can find lots of inspiration from the Design Team Divas at the High Hopes blog, and the High Hopes Rubber Stamps Facebook Fan page plus you can also follow us on
Instagram, Twitter and Pinterest.


Birthday Wishes!!


Welcome Back Dreamerland Craft Fans!

Today, I’m sharing a birthday card that I made using Dreamerland Crafts stamp Together for the Holidays – DS19048 for my main image and Birthday 08 – DS17059 (Dreamerland Crafts) for the sentiment.


To make this card I used a base card of 4.25″ x 5.5″. I die cut X-Press It Blending Card using my Cuttlebug and die cut from Papercraft Inspirations. Then I stamped the image using Memento – Tuxedo Black ink and my MISTI. The original stamp also has snowflakes. I removed them for this card. I coloured in the image with Copic markers and then I used the same die cut to make the frame using Crafts – Sparkling Stickers – 02-3068629. I also used the same paper for my base background colour.

I used Your Next Stamp – Stitched Rectangle Die Set to die cut Echo Park Paper Co. – Happy Birthday Girl paper and then inked around the edges using Tim Holtz Distress Ink – Fossilized Amber. Next, I stamped the sentiment using Versa Fine – Onyx Black ink and my MISTI. I used Ranger – Clear Super Fine Detail embossing powder and then heat embossed the powder with Marvy Uchida – Embossing Heat Tool. Then I adhered this to the base of the card. Lastly, I used 3M VHB – 2 sided tape to pop up the image and added a few pop dots from Kraftin’ Kimmie to complete the card.

Card Recipe:

Stamp:  Together For the Holidays – DS19048 (Dreamerland Crafts)

Sentiment: Birthday 08 – DS17059 (Dreamerland Crafts)

Inks: Memento – Tuxedo Black, Versa Fine – Onyx Black, Tim Holtz Distress Ink – Fossilized Amber

Embossing Powder: Ranger – Clear Super Fine Detail embossing powder

Paper: Copic Marker X-Press It Blending Card, Echo Park Paper Co. – Happy Birthday Girl 6″ x 6″, Crafts – Sparkling Stickers – 02-3068629

Die Cuts: Your Next Stamp – Stitched Rectangle Die Set (YNSD214), Papercraft Inspirations

Tools: MISTI – Most Incredible Stamping Tool, Cuttlebug, Marvy Uchida – Embossing Heat Tool, 3M VHB – 2 sided tape, Kraftin’ Kimmie – Under Water Dots

Image coloured with Copic Markers:

Skin: E000, E00, E04, E11, E21, R22, R20

Hair:  E47, E44, E43, E41

Dress: BG18, BG15, BG13, BG11, BG10

Bear: E35, E33, E31, E29, E27, E25, E23, Sakura Glaze – Black Pen

Present: BG15, BG13, BG11, Y08, Y04, Y00

Swing: E35, E33, E31, E17, E15

Hope you like it and have a great week!

You can find more cards to inspire you at Dreamerland Crafts and Pointer Scrapbooking on the Facebook Fan pages from the rest of our design team.

Buddy’s Surprize!!


It’s Wednesday, and this week, I made a birthday card using Buddy Bear’s Surprise – S193 (High Hopes Rubber Stamps) for the main image and Shhh Party! – H038 (High Hopes Rubber Stamps) for the sentiment. Buddy is not very good at keeping secrets though or spelling! LOL! He is however, ready to bring you presents and party on!

To make my card this week, I started off with a card base of 5.5″ x 4.25″.  I love this background party paper by Echo Park called “It’s Your Birthday”. I cut it the same size as the base card and then used 2-sided tape to attach it to the base. Then I inked around the entire outside edges of the card with Tim Holtz Distress Ink – Wilted Violet.

I used My Creative Time – Stitched Squares Inside and Out to cut some Copic Marker X-Press It Blending Card. Then I used my MISTI and Memento – Tuxedo Black Ink to stamp the image. I coloured in the main image with Copic markers. I stamped the sentiment onto some yellow cardstock with Memento – Tuxedo Black ink and then used Your Next Stamp – Stitched Rectangle Die Set to die cut it out. Next, I ran both my image and sentiment through the Xyron Creative Station to turn them both into stickers. I applied both of these to some Violet cardstock and trimmed a small border. Lastly, I popped up both the image and the sentiment using 3M VHB – 2 sided tape.

Card Recipe:

Stamp:  Buddy Bear’s Surprise – S193  (High Hopes Rubber Stamps)

Sentiment: Shhh Party! – H038 (High Hopes Rubber Stamps)

Inks: Memento – Tuxedo Black, Tim Holtz Distress Ink – Wilted Violet

Paper: Copic Marker X-Press It Blending Card, Echo Park – It’s Your Birthday (6″x6″ Double-Sided)

Die Cuts: My Creative Time – Stitched Squares Inside and Out, Your Next Stamp – Stitched Rectangle Die Set (YNSD214)

Tools: MISTI – Most Incredible Stamping Tool, 3M VHB – 2 sided tape, Xyron Creative Station

Image coloured with Copic Markers:

Bear: E29, E27, E25, E23, R22, R20, R00, R14

Banner and Bow: BG18, BG13, BG11, Y00

Hat: V09, V06, V04, Y19, Y11

Present: BV04, BV02, BV00, Y38, Y19, Y11, YR16, YR15

Flowers and Leaves: G07, YG13, RV22, RV23, RV21,

Grass: YG17, YG13, YG03, YG01

Sky: B01, B00, B000, B0000

Hope you like it and have a fantastic week!

You can find lots of inspiration from the Design Team Divas at the High Hopes blog, and the High Hopes Rubber Stamps Facebook Fan page plus you can also follow us on
Instagram, Twitter and Pinterest.


BBQ King


Sharing a birthday card I made using Good In The Woods Accessories and Good in the Woods (Kraftin’ Kimmie Stamps) for the images. A friend of mine is a BBQ King and has won multiple awards for his prowess at BBQing. I thought these stamps matched him perfectly.

To make the card I started with a base of 5.5″ x 4.25″ white cardstock. Next, I cut the background paper from Your Next Stamp Designer Paper Pad – For the Boys at the same size. I adhered it to the base with double-side tape and then edged around the entire card with Kraftin’ Kimmie – Stormy Sky ink.

I die-cut Copic Marker X-Press It Blending Card using my Cuttlebug and Your Next Stamp – Stitched Rectangle Die Set. I stamped the images onto the die cut using my MISTI and Memento – Tuxedo Black Ink. Next I coloured in the image with Copic Markers and then ran it through my Xyron Creative Station. I adhered this to some red cardstock and created a thin border around it. Lastly, I popped up the image using 3M VHB – 2 sided tape and applied it on top of the background paper.

Card Recipe:

Stamps:  Good in the Woods Accessories (Kraftin’ Kimmie Stamps), Good in the Woods (Kraftin’ Kimmie Stamps)

Inks: Memento – Tuxedo Black, Kraftin’ Kimmie – Stormy Sky

Paper: Copic Marker X-Press It Blending Card, Your Next Stamp Designer Paper Pad – For the Boys – 6″ x 6″

Die Cuts: Your Next Stamp – Stitched Rectangle Die Set (YNSD214)

Stencil: Kraftin’ Kimmie – Wonderful Waves

Tools: MISTI – Most Incredible Stamping Tool, Cuttlebug, 3M VHB – 2 sided tape, Xyron Creative Station

Image coloured with Copic Markers:

Skin: E21, E11, E04, E00, E000

Hair: E29, E25, E21

Apron and Shoes: E37, E35, E33

Shirt: YG95, YG991, E52, E51, E50

Socks: C1, C0, Colorless Blender

BBQ and Meat: Y08, R24, YR16, E99, E97, E35, E19, E18, E17, E15, E09, E08, R39, R37, R24, C10, C7, C4

Spatula: C5, C3, C1, E55, E53, E51

Sky: B02, B01, B00, B000, Colorless Blender

Lawn: YG17, YG13, YG03, YG01

Hope you like it and have a great week!

Enjoy Your Special Day!


Welcome Back Dreamerland Craft Fans!

Today, I’m sharing a birthday card that I made using Dreamerland Crafts stamps called A Restful Afternoon – D19014 for the main image. For the sentiments I used a combination of Birthday 07 – DS17058 and Birthday 08 – DS17059. These 2 friends are sharing a nice peaceful afternoon in the sun just relaxing. What a wonderful way to spend a gorgeous day in the sun.


To make this card I used a base card of 4.25″ x 5.5″. I die cut the rectangle using Copic Marker X-Press It Blending Card using my Cuttlebug and Your Next Stamp – Stitched Rectangle Die Set. Then I stamped the image using Memento – Tuxedo Black ink and my MISTI. The grass border was stamped with Memento – New Sprout. I coloured in the image and background with Copic markers.

For the background paper, I used Recollections – Petite Floral and green cardstock. I stamped the sentiments using Versa Fine – Onyx Black ink and my MISTI. I used Ranger – Clear Super Fine Detail embossing powder and then heat embossed the powder with Marvy Uchida – Embossing Heat Tool. Next, I edged around all of the background pieces with Tim Holtz Distress Ink – Mowed Lawn. I layered the image directly onto the green cardstock. Then, I popped up the image with 3M VHB – 2 sided tape and added a few Kraftin’ Kimmie – Springy Dots.

Card Recipe:

Stamp and Sentiment:  A Restful Afternoon – D19014 (Dreamerland Crafts), Birthday 08 – DS17059 (Dreamerland Sentiments Clear Stamps), Birthday 07 – DS17058 (Dreamerland Sentiments Clear Stamps)

Inks: Memento – Tuxedo Black, Versa Fine – Onyx Black, Memento – New Sprout, Tim Holtz Distress Ink – Mowed Lawn

Embossing Powder: Ranger – Clear Super Fine Detail embossing powder

Paper: Copic Marker X-Press It Blending Card, Recollections – Petite Floral (12 x 12 in – 30.4 x 30.4 cm), Green Cardstock

Die Cuts: Your Next Stamp – Stitched Rectangle Die Set (YNSD214)

Tools: MISTI – Most Incredible Stamping Tool, Cuttlebug, Marvy Uchida – Embossing Heat Tool, 3M VHB – 2 sided tape, Kraftin’ Kimmie – Springy Dots

Image coloured with Copic Markers:

Bear: E53, E51, E50, E29, E27, E25, E23, R22, R20

Pig:  E93, E44, E43, R22, R20, R00, R000

Lounge Chairs: BG18 BG15, BG13, BG11

Books: B05, B04, B02, V06, V04, V01, C1

Drinks and Table: YR09, YR07, YR04, Y08, Y06, Y02, B05, C3, C1, C0, Colorless Blender

Sky: B01, B00, B000

Grass: YG17, YG13, YG05, YG03

Hope you like it and have a great week!

You can find more cards to inspire you at Dreamerland Crafts and Pointer Scrapbooking on the Facebook Fan pages from the rest of our design team.

Birthday Gnome Farmer


KLM Digital Designs released some brand new stamps this month, and today I’m sharing Farmer Gnome (KLM Digital Designs)!  He’s taking a break from his busy farm chores just to wish you an extra special birthday!

To put the card together, I printed out the main image onto Copic Marker X-Press It Blending Card and the sentiment onto some white cardstock.

I die cut another piece using the Copic paper with Your Next Stamp – Stitched Rectangle Die Set and my Cuttlebug. I coloured in the main image with copics and then tested out my new Brother Scan’ Cut machine for the first time to cut around the image. I think I need a little more practice, as I still had to fussy cut a bit when it was done. LOL! But, it was still pretty cool to see the cutter in motion. I designed my own background and coloured in the haystack, sky and grass. Then, I popped up the coloured image with 3M VHB – 2 sided tape and placed it onto the background.

For the sentiment, I used Microsoft  Word to layer “Herd it was your” on top of each other, as the original was too long for my card. After printing it out, I fussy cut around it and then ran it through my Xyron Create a Sticker and attached it to some black cardstock. I fussy cut a small border around that piece and then ran it also through the Xyron. I attached this to my coloured image.

Lastly, I attached the entire background to some blue cardstock cut at 5.5″ x 4.25″.

Card Recipe:

Stamp and Sentiment: Farmer Gnome (KLM Digital Designs)

Inks: HP Printer Greyscale

Paper: Copic Marker X-Press It Blending Card, Blue and Black Cardstock

Die Cuts: Your Next Stamp – Stitched Rectangle Die Set (YNSD214)

Tools: 3M VHB – 2 sided tape, Cuttlebug, Xyron Create a Sticker

Image coloured with Copic Markers:

Skin: E000, E00, E04, E11, E21

Beard: W5, W4, W3, W1, W0, W00

Hat: E89, E87, E84

Boots: E29, E27, E25, E23

Rake: E29, E25, E23, C5, C3, C1

Overalls: B26, B23, B21, C7, C5, C3

Shirt: G24, G21, G20

Hay: E15, YR21, YR23, YR24, Y38, Y21, Y08, Y000

Grass: YG17, YG13, YG05, YG03

Sky: B01, B00, B000, B0000, Colorless Blender Re-Inker and a Q-Tip to blend

Hope you like it and have a great week!

You can find more cards to inspire you at KLM Designs, KLM Digital Design Team and KLM Digital Designs on the Facebook Fan page from the rest of our design team.

Wade Goes To The Beach!


It’s Wednesday, and this week, I used Wade – 132 (High Hopes Rubber Stamps) for the main image and Summer’s Day Saying – L031 (High Hopes Rubber Stamps) for the sentiment. Wade couldn’t wait to go the beach. He’s enjoying the waves and the beautiful beach and sunshine. It will be wonderful when we can all join him with our friends and families too!

To make my card this week, I started off with a white card base of 6″ x 6″. I cut out another piece of paper using Hammermill – Premium Colour 100 lb. cardstock the same size as the base card. Then I ran it through my Cuttlebug using Stampin’ Up – Sizzix Big Shot – Seaside. I loved the wavy pattern it created. Next, I used multiple Tim Holtz shades of blue to create the water effect. All colours are listed below.

I used my Cuttlebug and Your Next Stamp – Stitched Rectangle Die Set to die cut Copic Marker X-Press It Blending Card and white cardstock for my image and sentiment. I stamped the sentiment and image onto the die cuts and then coloured in the main image with Copic markers. The background was coloured in using a variety of Copic Refill inks, Colorless Blender and a Q-Tip. For the water, I wisped several colours back and forth and then added some Copic Colorless Blender and wisped the colours one last time. Once everything was completed, ran the image through my Xyron Creative Station so that it would lay completely flat on the blue cardstock I mounted it onto. I cut a thin border all away around the image and inked around the edges of the sentiment with Tim Holtz Distress Ink – Brushed Corduroy.  Then popped the image and the sentiment using 3M VHB – 2 sided tape onto the base card. I added in a some sea shells from Dress It Up – Beach Collection and Craftin’ Desert Divas – Seashells Sequence. I just removed the button portion and then used glue dots to attach to the card.

Card Recipe:

Stamp:  Wade – S132  (High Hopes Rubber Stamps)

Sentiment: Summer’s Day Saying – L031 (High Hopes Rubber Stamps)

Inks: Memento – Tuxedo Black, Tim Holtz Distress Ink – Salty Ocean, Tumbled Glass, Mermaid Lagoon, Broken China, Evergreen Bough and Brushed Corduroy

Paper: Copic Marker X-Press It Blending Card, Hammermill – Premium Colour 100 lb., Blue carstock

Die Cuts: Your Next Stamp – Stitched Rectangle Die Set (YNSD214)

Embossing Folder: Stampin’ Up – Sizzix Big Shot – Seaside

Tools: MISTI – Most Incredible Stamping Tool, Cuttlebug, 3M VHB – 2 sided tape, Xyron Creative Station, Dress It Up – Beach Collection – #452, Craftin’ Desert Divas – Seashells Sequence

Image coloured with Copic Markers:

Dragon: G85, G82, G21, G20, YR15, YR12, YR02, V17, V15, V12

Swim Trunks: C10, C8, C1, Y15, Y08, Y06, R39, R37, R35

Floaties and Fins: B29, B26, B16

Rubber Ducky Tube: Y38, Y19, Y08, YR18, YR15, YR12, BG18, BG13, BG11, BG07, BG05, BG02

Water: BG72, BG70, BG13, BG10, B93, B91, B52, B41, B000, , B0000, C3

Used Copic Refills and Q-Tip to Create Background:

Sand: E30, E31, Colorless Blender

Sky: B0000, B000, Colorless Blender

Hope you like it and have a fantastic week!

You can find lots of inspiration from the Design Team Divas at the High Hopes blog, and the High Hopes Rubber Stamps Facebook Fan page plus you can also follow us on
Instagram, Twitter and Pinterest.

Check out the High Hopes Website for something else to give you a big smile!

Over on the High Hopes Website there is a Store Wide sale, save 20% off right now when you use the coupon Code Love at the checkout!


Happy Father’s Day Gnomes


KLM Digital Designs released some brand new stamps this month, and today I’m sharing Dad and Kid Gnomes (KLM Digital Designs)!  This new stamp contains adorable images of a dad, his children and 3 loving sentiments for your father. This stamp allows you to create your card to represent all of your siblings with your dad or just 1 if it is a special card.

For this card, I decided to create a card from a son to his dad.

To put the card together, I printed out the main image onto Copic Marker X-Press It Blending Card and the sentiment onto Hammermill Premium Colour paper.

I die cut the Hammermill paper with Your Next Stamp – Stitched Rectangle Die Set. Then using stencils that I made with Avery Elle – PiercedCloudsDie, I created the sky using Tim Holtz Distress Ink – Salty Ocean. For the grassy hillsides, I created stencils using Lawn Fawn – Stitched Hillside Borders and Lawn Fawn – Simple Stitched Hillside Borders – Lawn Cuts. Then I used Tim Holtz Distress Inks – Bundled Sage, Mowed Lawn, Crushed Olive and Peeled Paint to create the colour variations of the hills.

I coloured in the main image with copics and then fussy cut around them. Then I used a black marker to go around all of the edges. I attached the background to some AC White cardstock cut at 5.5″ x 4.25″. Then to finish off the card, I popped up the 2 coloured images with 3M VHB – 2 sided tape and placed them onto the background.

Card Recipe:

Stamp and Sentiment: Dad and Kid Gnomes (KLM Digital Designs)

Inks: HP Printer Greyscale

Paper: Copic Marker X-Press It Blending Card, Hammermill – Premium Colour 100 lb., AC White Cardstock

Die Cuts: Your Next Stamp – Stitched Rectangle Die Set (YNSD214), Avery Elle – Custom Steel Dies – Made in the USA – D-05-01 PiercedCloudsDie, Lawn Fawn – Stitched Hillside Borders, Lawn Fawn – Simple Stitched Hillside Borders – Lawn Cuts

Background Inks:

Sky:Tim Holtz Distress Ink – Salty Ocean

Grass: Tim Holtz Distress Ink – Bundled Sage, Tim Holtz Distress Ink – Mowed Lawn, Tim Holtz Distress Ink – Crushed Olive, Tim Holtz Distress Inks – Peeled Paint

Tools: 3M VHB – 2 sided tape, Cuttlebug

Image coloured with Copic Markers:

Skin: E000, E00, E04, E11, E21, R22, R20

Hair: E47, E44, E43

Beard: W5, W4, W3, W1, W0, W00

Pants and Hat – Dad: E89, E87, E84

Coat – Dad: YG95, YG93, YG91

Boots: C10, C8, C5, C3

Cane: E29, E25, E23

Overalls – Boy: B26, B23, B21. E15, Y28, Y26, Y19

Shirt – Boy: YG95, YG93, YG91

Hat and Socks – Boy: E89, E87, E84

Hope you like it and have a great week!

You can find more cards to inspire you at KLM Designs, KLM Digital Design Team and KLM Digital Designs on the Facebook Fan page from the rest of our design team.

Have You Herd The News???


It’s Wednesday, and this week, I couldn’t wait to colour up this super adorable image called Funny Farm – T065 by High Hopes Rubber Stamps.  I also thought that the sentiment – Have You Herd The News – G080 (High Hopes Rubber Stamps) was perfect for these little characters. Their facial expressions, just make you wonder what it is that is so secret that they can’t wait to tell you!! Hmmmm! Could it be a birthday surprise, or maybe a new baby is coming? or someone is retiring??? or someone just graduated???? This combo could be use for so many possibilities and that is why it was so much fun to play with.

Above is the card from the front angle and below is the card from the top angle.

To make my card this week, I started off with a green cardstock base of 5.5″ x 11″. Then I scored it at 5.5″ and 2.75″ on one side from the edge to make it a pop-up card. I also cut another piece of cardstock at about 4-1/8″ x 5.25″. I added some patterned paper from DCWV – Fashion District to this piece and to the inside bottom of the card, cut to the same size. Next, used My Mind’s Eye – Lost & Found paper cut at 3.75″ x 5″ which I popped up with 3M VHB – 2 sided tape. Before attaching the background papers, I edged around them with Tim Holtz Distress Ink – Shabby Shutters.

I die-cut the main image out of Copic Marker X-Press It Blending Card using my Cricut and Your Next Stamp – Stitched Rectangle Die Set. Then I stamped the image using my MISTI and Memento – Tuxedo Black ink. After that, I coloured in the image using Copic markers. For the background, I used a new technique that I learned. First I used a Q-Tip to moisten the background with some Copic Colorless Blender and then I used a mixture of Copic Re-inkers listed below with a Q-Tip to create the sky and grass. Love this technique, as it is quick and easy. After colouring the image, I inked around the edges with the same Tim Holtz ink and then popped up the image using some 3M VHD – 2 sided tape.

I die cut the sentiment using the same die set that I used for the main image and then stamped the sentiment with Memento – Tuxedo Black Ink. I mounted it with 3M VHB – 2 sided tape onto Joy Crafts – Artist Trading Card Wood Texture cardstock. Then, I popped up the entire base background and sentiment with Forever in Time – Pop-Dot Adhesives onto the inside base of the card.

I attached the finished image that was mounted onto the background papers onto the lower half of the card that had been scored at 2.75″ earlier, leaving the top half empty.

Card Recipe:

Stamp:  Funny Farm – T065  (High Hopes Rubber Stamps)

Sentiment: Have You Herd The News – G080 (High Hopes Rubber Stamps)

Inks: Memento – Tuxedo Black, Tim Holtz Distress Ink – Shabby Shutters

Paper: Copic Marker X-Press It Blending Card, DCWV – Fashion District (6×6″, 15.2×15.2cm), Joy Crafts – Artist Trading Card – Wood Texture (2-3/8×3-3/8″ – 85mm x 60mm), My Mind’s Eye – Lost & Found (6×6″)

Die Cuts: Your Next Stamp – Stitched Rectangle Die Set (YNSD214)

Tools: MISTI – Most Incredible Stamping Tool, Cuttlebug, 3M VHB – 2 sided tape, Forever in Time – Pop-Dot Adhesives

Image coloured with Copic Markers:

Pig: E93, E44, E43, E40, R20, R000, R00

Sheep: C5, C3, C1, C0, B60

Cow: R20, R02, R00, R000, E93, C10, C9, C8, C6, C5, C3, C2, C1, Y17, Y15, Y13, Colorless Blender

Rooster: E99, E97, E23, E09, R24, BG53, BG78, BG75, BG72, Y06, YR21

Sky: B000, B00, Colorless Blender

Grass: YG17, YG13, YG11, Colorless Blender

Hope you like it and have a fantastic week!

You can find lots of inspiration from the Design Team Divas at the High Hopes blog, and the High Hopes Rubber Stamps Facebook Fan page plus you can also follow us on
Instagram, Twitter and Pinterest.

Check out the High Hopes Website for something else to give you a big smile!

Over on the High Hopes Website there is a Store Wide sale, save 20% off right now when you use the coupon Code Love at the checkout!


Father’s Day – Come Sail Away!


Today I’m sharing a Father’s Day card that I made using  Come Sail Away (KLM Digital Designs).  It comes with multiple sentiments, but I decided to choose the sentiment from Father Gnome and Kids & Sentiments (KLM Digital Designs). You could also use this image to make a Special birthday card, Bon Voyage or Inspirational card too!

For this card, I printed out the image with my HP Printer onto Copic Marker X-Press It Blending Card using Grayscale. I used Copic markers to colour in the image. For the water, I used a variety of markers and created the movement of the water by just wisping them over the paper very gently. Then I added in some white caps using Sharpie Water Based Paint – White – Extra Fine Point. I did this by just dabbing the paper with tight dots of ink.

For the sand and sky, I used a special technique that I saw on-line, using a Q-Tip and Colorless blender Re-Inker to wet my background and then adding in the colours also using a Q-Tip and Copic Re-inkers. This was the first time I ever tried this and I just love how it turned out.

After the image was coloured in, I went around the edges of both the card and the image with Sharpie – Gold Medium Point – Water Based Paint. Then I mounted the image on top of the background on a 5.5″ x 4.25″ card base using some 3M VHB – 2 sided tape.

Card Recipe:

Stamp: Come Sail Away (KLM Digital Designs)

Sentiment: Father Gnome and Kids & Sentiments (KLM Digital Designs)

Inks: HP Printer Grayscale, Sharpie – Gold Medium Point – Water Based Paint, Sharpie Water Based Paint – White – Extra Fine Point

Paper: Copic Marker X-Press It Blending Card, KaiserCraft – High Tide – 6.5″ Paper Pad

Die Cuts:  Your Next Stamp – Stitched Rectangle Die Set (YNSD214)

Tools: 3M VHB – 2 sided tape, Cuttlebug

Image coloured with Copic Markers:

Water: BG72, BG70, B93, B91, B52, B41, B000, C1, Y000, Colorless Blender, Sharpie Water Based Paint – White – Extra Fine Point

Rocks: N4, N2, N1, N0, E30

Sky: B0000, B000, Colorless Blender

Sand: E30, E31, Colorless Blender

Cloud: BG70, C0, Colorless Blender

Sailboat: B39, B37, C1, C0, E23, Colorless Blender

Hope you like it and have a great week!

You can find more cards to inspire you at KLM Designs, KLM Digital Design Team and KLM Digital Designs on the Facebook Fan page from the rest of our design team.

Herd It Was Your Birthday!!!


KLM Digital Designs has just released some brand new stamps this month, and today I’m sharing Woman Farmer Gnome (KLM Digital Designs)! She’s taking some time out from her chores on this beautiful sunny day to wish you a Happy Birthday.

For this card, I printed out the image with my HP Printer onto Copic Marker X-Press It Blending Card using Greyscale. Then I coloured it in with Copic markers and fussy cut around it. I used a  black marker to go around all of the image to hide the white paper from where I fussy cut it. I couldn’t cut out the portion between the girl and the shovel, so I used my copics to match the background that I created with the Tim Holtz inks.

For the background, I used Your Next Stamp – Stitched Rectangle Die Set die and my Cuttlebug to cut Strathmore Bristol Paper (100 lb. – 270 g/m2). Next I created some stencils from Avery Elle – Pierced Clouds Die and Lawn Fawn – Stitched Hillside Borders. I used these stencils to create the cloudy background and the fields behind the farm girl using Tim Holtz Distress Inks.

I had a small scrap strip of patterned paper from Doodle Bug Designs Inc. – Down on the Farm and thought it would go perfectly with this card. I applied this to a 5.5″ x 4.25″ card base from AC Cardstock – Autumn collection. I printed out the sentiment and fussy cut it to split it up and attached it on top of the base background. I then popped up the colored image using 3M VHB – 2 sided tape onto the background that I created earlier. Then I popped up the entire background onto the base card. I added in a few Party Time dots from Kraftin’ Kimmie Dots and inked around the entire card with Tim Holtz Distress Inks – Peeled Paint to finish it off.

Card Recipe:

Stamp and Sentiment: Woman Farmer Gnome (KLM Digital Designs)

Inks: HP Printer Greyscale, Tim Holtz Distress Ink – Salty Ocean, Tim Holtz Distress Ink – Crushed Olive, Tim Holtz Distress Ink – Mowed Lawn, Tim Holtz Distress Inks – Peeled Paint

Paper: Copic Marker X-Press It Blending Card, Doodle Bug Designs Inc. – Down on the Farm – 6″ x 6″ paper pad, AC Cardstock – Autumn, Strathmore Bristol Paper (100 lb. – 270 g/m2)

Die Cuts: Your Next Stamp – Stitched Rectangle Die Set (YNSD214), Avery Elle – Custom Steel Dies – Made in the USA – D-05-01 Pierced Clouds Die, Lawn Fawn – Stitched Hillside Borders

Tools and Miscellaneous: Cuttlebug, 3M VHB – 2 sided tape, Kraftin’ Kimmie Party Time Dots, Xyron Create a Sticker

Image coloured with Copic Markers:

Skin: E000, E00, E04, E11, E21, R22, R20

Hair: E18, E08, YR18, YR14

Pants: B26, B23, B21

Shirt: YG95, YG93, YG91

Hoe: C5, C3, C1, E39, E35, E31

Boots and Hat: E29, E27, E25, E23

Background: YG61, YG03, YG01, B000, Tim Holtz Distress Ink – Salty Ocean, Tim Holtz Distress Ink – Crushed Olive, Tim Holtz Distress Ink – Mowed Lawn, Tim Holtz Distress Inks – Peeled Paint

Hope you like it and have a great week!

You can find more cards to inspire you at KLM Designs, KLM Digital Design Team and KLM Digital Designs on the Facebook Fan page from the rest of our design team.

Wine Birthday Divas!!!


Sharing a birthday card today that I made for my aunt using Wine Divas – SC0677 (AI Art Impressions) for both the images and sentiments. My aunt is into crafts and cardmaking too and sometimes when I stay over at her house, we like to share a bottle of wine together, talk and laugh. That is why when I saw this stamp set, I knew I had to make this special card for her birthday. LOL!

To make this card, I used my MISTI to get a nice clean stamped image using Memento – Tuxedo Black and Copic Marker X-Press It Blending Card. Next I die-cut out the stamped image using my Cuttlebug and Your Next Stamp – Stitched Rectangle Die Set (YNSD214). I cut the background paper from Doodle Bug Designs Inc. – Sugar Shoppe at 5.5″ x 4.25″ and mounted it onto top of a white card base 5.5″ x 4.25″. I then inked around all of the edges using Tim Holtz Distress Ink – Picked Raspberry. Before, popping up the base image onto the background with 3M VHB – 2 sided tape, I used my MISTI, Versa Fine – Onyx Black and Ranger – Clear Super Fine Detail embossing powder to add in the sentiment. I heat set the embossing powder with my Marvy Uchida – Embossing Heat Tool.

For the inside of the card, I mounted the background paper from Doodle Bug Designs Inc. – Sugar Shoppe – 6″ x 6″ paper pad onto a card base of 5.5″ x 4.25″. Then, I fussy cut around the image and attached it to the card base using 2 sided tape. I embossed the sentiment to finish off the inside.

Card Recipe:

Stamp and Sentiment: Wine Divas – SC0677 (AI Art Impressions)

Inks: Memento – Tuxedo Black, VersaFIne – Onyx Black, Tim Holtz Distress Ink – Picked Raspberry

Embossing Powder: Ranger – Clear Super Fine Detail embossing powder

Paper: Copic Marker X-Press It Blending Card, Doodle Bug Designs Inc. – Sugar Shoppe – 6″ x 6″ paper pad

Die Cuts:  Your Next Stamp – Stitched Rectangle Die Set (YNSD214)

Tools: MISTI – Most Incredible Stamping Tool, Cuttlebug, 3M VHB – 2 sided tape, Marvy Uchida – Embossing Heat Tool

Image coloured with Copic Markers:

Skin: E000, E00, E04, E11, E21, R29, R24, R22, R20

Hair Combos: E47, E44, E43, E18, E08, YR18, YR14, E29, E25, E21, E15, YR23, Y21

Blouses, Dress, Earrings and Shoes: BG15, BG11, BG10, BV04, BV02, BV01, BV00, E35, E34, E33, Colorless Blender

Pants: B26, B23, B21

Table and Chairs:  W3, W2, W1, W0

Big Chair: E37, E35, E34, E33

Wine: R29, R17, R14

Wine Bottle: R29, R17, R14, E15, Y38, Y17, Y08

Purse: E15, Y38, Y17, Y08, YR27

Background: R85, R83, R81, Y08, Y04, Y02

My Aunt loved her card and I hope that you do too! Hope you like it and have a great week!

I Detect A Birthday!


Sharing a card that I made for my brother this week! For the main image and sentiment, I used It’s A Mystery (Kraftin Kimmie Stamps). My little brother retired from the OPP last year, so I thought this would be a fun card to make for him for his birthday this year.

To make the background for the card, I die cut multiple rectangles using Your Next Stamp – Stitched Rectangle Die Set (YNSD214) in various brown cardstocks and some white Copic Marker X-Press It Blending Cardstock.

For the brick background, I used Darice – Brick Wall Embossing Folder and then various Tim Holtz inks listed below to give the different colours for the texture.

I coloured in the main images with Copic markers and then fussy cut around them leaving a thin white border. I stamped the lamp post using My Creative Time – Wishing You Were Here and then used the co-ordinating die cut to cut it out.

I used Sentiment Label Dies (My Creative Time) to die cut the ribbon and then stamped the sentiment using VersaMark and Ranger Embossing Powder White – Extra Fine Detail. Which I heat set with Marvy Uchida – Embossing Heat Tool. Then I used the YNS die cut to trim off the edge so that it matched the rest of the card.

I layered all of the pieces together using 3M VHB – 2 sided tape to pop them up and then 2-sided tape to mount the final rectangles onto the 5.5″ x 4.25″ card base.

Card Recipe:

Stamp and Sentiment: It’s A Mystery  (Kraftin Kimmie Stamps)

Inks: Memento – Tuxedo Black, Tim Holtz Distress Ink – Brushed Corduroy, Tim Holtz Distress Ink – Rusty Hinge, Tim Holtz Distress Ink – Vintage Photo, Tim Holtz Distress Ink – Walnut Stain

Paper: Copic Marker X-Press It Blending Card, Park Lane 50 pk 8.5”x11” Value Papers-Browns, AC Cardstock – Autumn

Die Cuts: Your Next Stamp – Stitched Rectangle Die Set (YNSD214), My Creative Time – Wishing You Were Here, Sentiment Label Dies (My Creative Time)

Embossing Folder: Darice – Brick Wall

Tools: MISTI – Most Incredible Stamping Tool, Cuttlebug, Marvy Uchida – Embossing Heat Tool

Image coloured with Copic Markers:

Skin: E000, E00, E04, E11, E21

Detective: E39, E37, E35, E34, E33, E31, E89, E87, E84

Magnifying Glass: C1

Shadow and Sidewalk: C5, C3, C2, C1

My brother loved his card. I hope you like it too and have a fantastic week!


May Your Day Be Filled With Love!!


It’s Wednesday, and I’m back this week to start off April with lots and lots of love from Elmer the Elephant using Elmer Elephant – Q043 (High Hopes Rubber Stamps) for the main image and Large Filled With Love – H004 (High Hopes Rubber Stamps) for the sentiment. With everything happening in the world right now, I think we could all use a little bit of love. When I was a child, Elmer was also called Elmer the Safety Elephant, so I hope that you and all of your loved ones are keeping safe right now too!

To make this card I first die cut some Copic Marker X-Press It Blending Card using Your Next Stamp – Stitched Rectangle Die Set (YNSD214) and my Cuttlebug. Next I used my MISTI and Memento – Tuxedo Black ink to stamp the image and the sentiment. I coloured in the image using Copic markers. Then I created my own background using a mixture of Tim Holtz Distress Inks – Festive Berries, Spun Sugar and Picked Raspbery and Kraftin’ Kimmie – Happy Hearts Stencil. I also did all around the edges with the Picked Raspberry. Lastly, added in the bottom border of hearts using Sizzix Framelets by Stephanie Barnard – 562676 – Hearts Dotted which I ran through my Cuttlebug twice with 2 different red cardstock. Then I inlayed the lighter colour into the darker hearts. I had also ran the cardstock through my Xyron Create a Sticker beforehand to make the die-cut work like a sticker and easy to inlay. I also used one of the small hearts for the “o” in “Love” and added some Spectrum Noir Sparkle Pen – Red Berry on top of it. Finally, I mounted the finished image onto a white base card 5.5″ x 4.25″.

Card Recipe:

Stamp: Elmer Elephant – Q043  (High Hopes Rubber Stamps)

Sentiment: Large Filled With Love – H004 (High Hopes Rubber Stamps)

Inks: Memento – Tuxedo Black, Tim Holtz – Festive Berries, Tim Holtz Distress Ink – Spun Sugar, Tim Holtz Distress Ink – Picked Raspberry

Paper: Copic Marker X-Press It Blending Card, Various scraps of red cardstock

Die-Cuts: Your Next Stamp – Stitched Rectangle Die Set (YNSD214), Sizzix Framelets by Stephanie Barnard – 562676 – Hearts Dotted

Tools: MISTI – Most Incredible Stamping Tool, Cuttlebug, Xyron Create a Sticker, Spectrum Noir Sparkle Pen – Red Berry

Image coloured with Copic Markers:

Elephant: C5, C3, C2, C1, C0, R22, R20, R11, RV32

Ground: E35, E34, E33, E31

Hope you like it and have a fantastic week!

You can find lots of inspiration from the Design Team Divas at the High Hopes blog, and the High Hopes Rubber Stamps Facebook Fan page plus you can also follow us on
Instagram, Twitter and Pinterest.

There is no better time to do a little shopping over at the High Hopes Stamps website store!! As there is a sale going on! click HERE to

SAVE 20% STORE WIDE

using coupon code LOVE


Happy St. Patrick’s Day!!


Let the Shenanigans Begin

Today, I’m sharing this fun Shamrock Gnome (KLM Digital Designs) who is enjoying his lucky 4-leaf clover!  My mom’s family is part Irish and so St. Patty’s Day is always celebrated in our home. Let’s hope this little Gnome spreads some luck for everyone.

I printed out the image with my HP Printer onto Copic Marker X-Press It Blending Card using Grayscale. Then I die cut the image with Your Next Stamp – Stitched Rectangle Die Set. I coloured in the image with Copic markers and then attached the die cut back over top of the image. This allowed me to create the background and leave a white border all around the image.

Next, I printed out both sentiments using Black ink only. I glued the background paper and ribbon onto a base of 4″ x 5.25″. I inked around the edges with Tim Holtz Distress Inks – Lucky Clover and then pasted everything onto a 4.25″ x 5.5″ card base. Lastly, I popped up the coloured image and sentiments with 3M VHB – 2 sided tape.

Card Recipe:

Stamp and Sentiments: Shamrock Gnome (KLM Digital Designs)

Inks: HP Printer Black and Grayscale, Tim Holtz Distress Inks – Lucky Clover

Paper: Copic Marker X-Press It Blending Card, Little Scraps of Heaven – Clover Paper

Die Cuts:  Your Next Stamp – Stitched Rectangle Die Set (YNSD214)

Tools: Cuttlebug, 3M VHB – 2 sided tape, Forever in Time- Color-Match Gems

Image coloured with Copic Markers:

Skin: E000, E00, E04, E11, E21, R22, R20

Hair and Beard: E18, E08, YR18, YR14

Hat: G17, G09, G07, YG09, C9, C7, C5, C2, E15, Y35, Y28, Y06

Jacket: G17, G14, G09, G07, G05, YG11, YG09

Pants: YG99, YG97, YG95, G94

Boots:  C9, C7, C5, C2

Clover:  G14, G07, G05, YG11

Sky and Rainbow: V15, RV17, R14, YR14, Y13, G14, B14, B04, B02, B01, B00, B000

Grass: YG17, YG13, YG03, YG01

Hope you like it and have a great week!

You can find more cards to inspire you at KLM Designs and KLM Digital Designs on the Facebook Fan page from the rest of our design team.

Gone Fishing!


It’s Wednesday, and this week I used Anthony James – R022 (High Hopes Rubber Stamps) for the main image and Gone Fishing Sign – G103 (High Hopes Rubber Stamps) for the sentiment.

I come from a family that LOVES fishing. My dad has always loved fishing and now my older brother has fallen into his foot steps of loving to fish too. I remember going fishing with my dad and I thought I had a really, really big fish. We were all so excited until I pulled up a big chunk of grass reeds. LOL! The fish were jumping all around us, but we couldn’t seem to catch any that 1 day.

As soon as we were back on shore, you could see the huge fish playing all over the lake. I think they were just laughing at us. But I’m not a 100% sure. LOL!

To make the card, I first used Your Next Stamp – Stitched Rectangle Die Set (YNSD214) to cut out the main image from Copic Marker X-Press It Blending Card and My Creative Time – Stitched Squares Inside and Out to die cut the square out of some white cardstock. Then I used my MISTI and Memento – Tuxedo Black Ink to get a nice crisp image. I used various Copic markers listed below to colour in the image.

I decided to colour in the fish with PrismaColor pencils on the sentiment.

Next I ran both the coloured image and the sentiment through my Xyron Creative Station and placed both cuts over top of some green cardstock. Then I popped both up using 3M VHB – 2 sided tape.

The base of the card is 5.5″ x 5.5″. I edged around the card and sentiment with Tim Holtz Distress Ink – Bundled Sage. For a final touch, I added a little fish under the sentiment.

Card Recipe:

Stamp:  Anthony James – R022 (High Hopes Rubber Stamps)

Sentiment: Gone Fishing Sign – G103 (High Hopes Rubber Stamps)

Inks: Memento – Tuxedo Black, Tim Holtz Distress Ink – Bundled Sage

Paper: Copic Marker X-Press It Blending Card, ModaScrap – Under The Sea (6″ x 6″), Green cardstock

Die Cuts: Your Next Stamp – Stitched Rectangle Die Set (YNSD214), My Creative Time -Stitched Squares Inside and Out

Tools: MISTI – Most Incredible Stamping Tool, Cuttlebug, Xyron Creative Station, 3M VHB – 2 sided tape

Image coloured with Copic Markers:

Skin:  E21, E11, E04, E00, E000

Hair: E59, E57, E55

Overalls:  B26, B23, B21, E15, Y35, Y08

Shirt:  R27, R24, R22, G46, G43, G40, G24

Ball Cap: G82, G46, G43, G40, G28, G24, G21

Shoes: E39, E37, E35, E33, E31

Fishing Rod and Reel: R27, R24, R22, E39, E35, E31, G46, G40, G28, C3, C1

Fish:  RV21, R22, G46, G43, G40, G20

Ground: E37, E35, E33, E31

Sky: B02, B01, B00, B000

Sign: PrismaColor Pencils – Blush Pink (PC928), Sap Green Light (PC 120), Charteuse (PC989), Apple Green (PC912), Olive Green (PC911)

Hope you like it and have a fantastic week!

You can find lots of inspiration from the Design Team Divas at the High Hopes blog, and the High Hopes Rubber Stamps Facebook Fan page plus you can also follow us on
Instagram, Twitter and Pinterest.