Tag Archive | Craftin Desert Diva’s – Flag Banner Dies

The Happy Couple!!


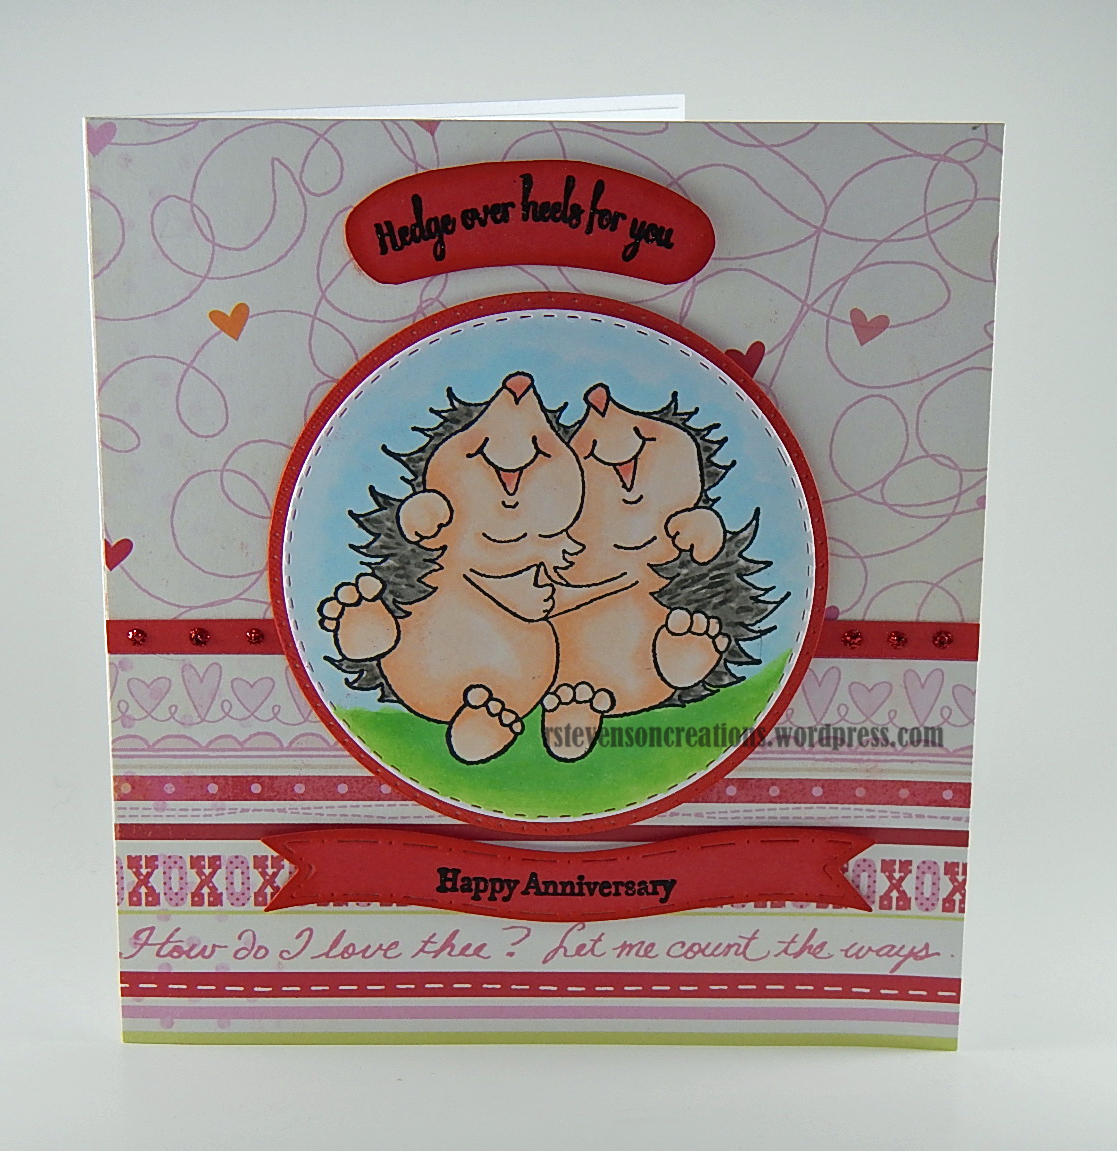
Today, I’m sharing a card that I made using the image from The Paper Shelter called The Happy Couple. I made this card for a colleague who was married recently. Here’s wishing the happy couple a very long and happy marriage!


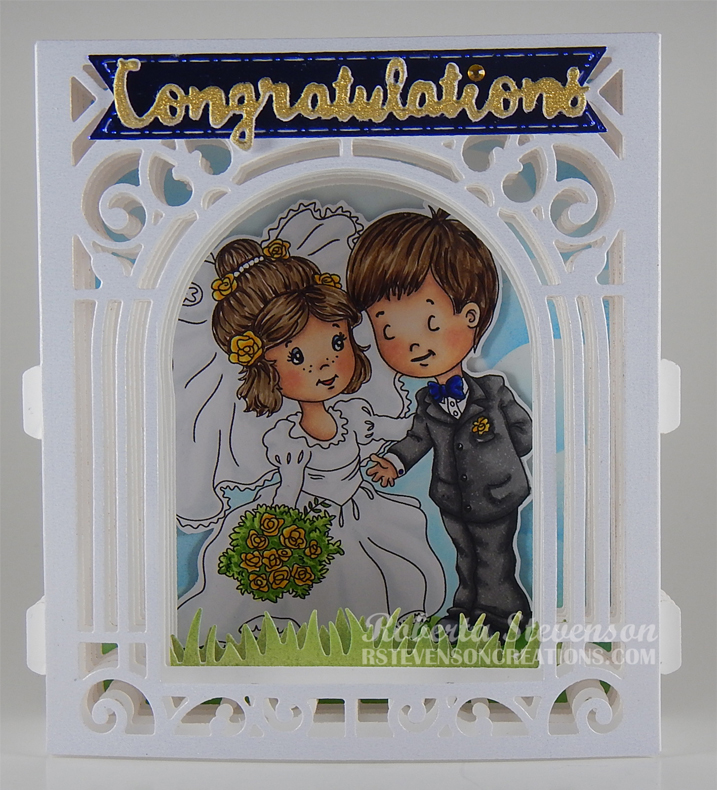
To make the card, I first imported the image into Microsoft Word and then printed it out on my HP Printer using High Quality Grayscale. The image was printed onto Copic Marker X-Press It Blending Card. I coloured in the image using Copic markers and then fussy cut around it.

Using my Cuttlebug, Spellbinders – S6-138 dies, and I die cut Hammermill – Premium Colour 100 lb. 5 times for the layers and twice for the sides. For the front of the card, I die cut Crafts Pearl Papers – 02-3081416 with the same dies. For the grass, I die-cut Lawn Fawn – Shadow Box Card Park Add-On and Lawn Fawn – Simple Grassy Hillsides using Momenta – Cardstock. Lastly, I die-cut the flag banner using Crafter’s Companion – Luxury Cardstock – Navy Blue and Craftin Desert Diva’s – Flag Banner Dies and the sentiment was die cut 5 times with Hammermill – Premium Colour 100 lb. cardstock and once with Hot Buy Craft Smart – Holiday Glitz Glitter Paper using PaperCrafter Today – 15 Die Cut Sentiment Set.

For the back panel using stencils I had made previously out of Avery Elle – Pierced Clouds Dies, I coloured in the sky using Tim Holtz Distress Ink – Salty Ocean and Tim Holtz Distress Inks – Broken China. Tim Holtz Distress Ink – Mowed Lawn was used to colour in the grass. The card was now ready to put together. I started with the coloured background and added the coloured image to it using 3M VHB – 2 sided tape.

This was adhered to the side panels using double-side tape on both sides.  Working from back to front, I added on the next layer and applied the grass die cut to front of the layer. This was put through the tabs on the side. I added in the next layers in the same manner. A layer with more grass was added to the 4th layer. I added in the next layer and then for the very front I once again cut off the tabs on both sides and then attached it to the sides using double-sided tape. The banner was then added using glue. The paper for the sentiment had been put through my Xyron Creative Station prior to cutting it. This made it easy to peel of the back of the stickers for each layer and assembling them on top of each other. I used the white layers for the bottom of the sentiment and for the final piece, I used the gold. A small jewel dot was used to finish off the dotted “i”.

Card Recipe:

Stamp: The Happy Couple (The Paper Shelter)

Inks: HP Printer Grayscale, Tim Holtz Distress Ink – Salty Ocean, Tim Holtz Distress Inks – Broken China, Tim Holtz Distress Ink – Mowed Lawn

Paper: Copic Marker X-Press It Blending Card, Hammermill – Premium Colour 100 lb., Crafter’s Companion – Luxury Cardstock – Navy Blue, Crafts Pearl Papers – 02-3081416, Momenta – Cardstock, Hot Buy Craft Smart – Holiday Glitz Glitter Paper 12″ x 12″

Die Cuts: Lawn Fawn – Shadow Box Card Park Add-On, Lawn Fawn – Simple Grassy Hillsides, Spellbinders – S6-138, Craftin Desert Diva’s – Flag Banner Dies, PaperCrafter Today – 15 Die Cut Sentiment Set, Avery Elle – Pierced Clouds Die (D-05-01)

Miscellaneous: 3M VHB – 2 sided tape, Xyron Creative Station

Image coloured with Copic Markers:

Skin: E21, E11, E00, E000, R22, R20, B23, B21, Eyes (Gelly Roll Sakura #8 Pen, Sakura Glaze – Black)

Hair: E47, E44, E43, E41

Dress: BG70, C00, Colorless Blender

Suit and Tie: T7, T5, T3, B69, B39, B24

Flowers and Greenery: YG17, YG11, YG03, YG01. Y35, Y08, Y02, Y00

Shoes: C8, C7, C5, C3

Hope you like it and have a great week!

Gnome – Merry Christmas!


It’s Wednesday, and this week I’m featuring a Christmas card I made using the image Flying Gnome – TLF008 and sentiment Sm Christmas Script – F051 from (High Hopes Rubber Stamps).  I just love colouring these adorable little gnomes. Also, it’s always good to make Christmas cards a little at a time throughout the year so that you are not rushing to get them all done in December. LOL! Have you started making your Christmas cards yet this year?

To create the card this week, I first used the die cut from Creative Expressions by Sue Wilson – Festive Collection – Pointsettia Mini Background – CED3049 to cut some Copic Marker X-Press It Blending Card using my Cuttlebug. I stamped the main image and then coloured it with Copic Markers. I started off doing the sky first as I didn’t want any of the Reds smearing into it. (This happens sometimes if you are not careful.) Once the image was all coloured in, I used Sakura Glaze – Black and Gelly Roll Sakura #8 Pen to increase the intensity of the eye on the bird. I outlined the entire image with Pigma Micron 03 black marker to make it stand out more against the sky. Lastly, I used a mixture of Gelly Roll Sakura #8 Pen and Gelly Roll Sakura #10 Pen to create the snow and stars in the sky.

For the base of the card, I began with a standard white card base of 4.25″ x 5.5″. I cut another piece of white cardstock the same size and applied the red shimmer topping on it using Crafts – Sparkling Stickers – 02-3068629. I used the same die cut listed above to cut out the intricate design using my Cuttlebug and the gold paper from Hot Buy Craft Smart – Holiday Glitz Glitter Paper. I had put the gold paper through my Xyron Creative Station before I die cut it. This made it easier to just peel and stick onto the base.

For the sentiment, I die cut some spare red cardstock using Craftin Desert Diva’s – Flag Banner Dies. Using my MISTI and VersaMark ink, I stamped the sentiment onto the die cut and embossed it using Ranger Super Fine Gold Embossing powder. This was heated with my Marvy Uchida – Embossing Heat Tool. The image and the sentiment were both popped up with 3M VHB – 2 sided tape to complete the card.

Card Recipe:

Stamp: Flying Gnome – TLF008 (High Hopes Rubber Stamps)

Sentiment: Sm Christmas Script – F051 (High Hopes Rubber Stamps)

Inks: Memento – Tuxedo Black, VersaMark

Paper: Copic Marker X-Press It Blending Card, Hot Buy Craft Smart – Holiday Glitz Glitter Paper 12″ x 12″, Crafts – Sparkling Stickers – 02-3068629

Die Cut: Creative Expressions by Sue Wilson – Festive Collection – Pointsettia Mini Background – CED3049, Craftin Desert Diva’s – Flag Banner Dies (Retired)

Embossing Powder: Ranger Super Fine Gold

Tools and Miscellaneous: MISTI – Most Incredible Stamping Tool, Cuttlebug, Pigma Micron 03 black marker, Xyron Creative Station, Marvy Uchida – Embossing Heat Tool

Image coloured with Copic Markers:

Skin: E21, E11, E04, E00, E000

Beard: W5, W4, W3, W2, W1, W0, W00

Hat and Outfit: R59, R39, R37, R35, YG97, YG95, YG93, G43

Cardinal Bird: R37, R35, R24, R22, R17, R14, R08, R05, R02, R000, YR15, YR12, C3, N10, N8, Gelly Roll Sakura #8 Pen, Sakura Glaze – Black

Leaves and Holly: R59, R37, R24, YG97, YG95, YG93, YG05, G43

Shoe: E34, E33, E31

Sky: B99, B97, B95, B93, Gelly Roll Sakura #8 Pen, Gelly Roll Sakura #10 Pen

Hope you like it and have a fantastic week!

You can find lots of inspiration from the Design Team Divas at the High Hopes blog, and the High Hopes Rubber Stamps Facebook Fan page plus you can also follow us on
Instagram, Twitter and Pinterest.


Witchy Poo’s Happy Hallowe’en!!!


It’s Wednesday, and Sitting Witchy Poo from (High Hopes Rubber Stamps) is back again to celebrate a Happy Hallowe’en and wondering what to do with all her candy.  My husband and I just LOVE Hallowe’en! We try to decorate our yard every year for the little ghosts and goblins who come to visit and we give out lots and lots of candy. Our front lawn gets turned into a grave yard for a day with spooky black cats, crows, skeletons, and more. On the porch we put out all of the animated little toys and of course the talking skeletons playing poker at the Bistro table. LOL! The children just love it and so do the parents! LOL!

To create the card this week, I stamped the main image and then coloured it with Copic Markers listed below. I fussy cut around Witchy Poo leaving just a little bit of white around the top of her body, but going directly to the line for the bottom of her. Flag Banner Dies from Craftin’ Desert Diva’s (restired) were used for the die cut and then the sentiment was stamped onto it. Tim Holtz Distress Ink – Carved Pumpkin was applied around the edges to create a frame around the orange cardstock.

To create the background, Pebbles – Boo! paper was used. I wanted to add something a little extra so I pulled out my Kraftin’ Kimmie – Bats and Moons Stencil and applied Nuvo Glimmer Paste – Amethyst Purple! I just love the way it turned out. The bottom piece of cardstock was cut at 1″ x 5.5″. Tim Holtz Distress Ink – Black Soot was used to go around all of the edges of the top and bottom piece.

Once everything was dry my card was ready to be assembled. I began with a standard white card base of 4.25″ x 5.5″. I mounted the coloured circles and bats cut at the same size directly on top of the base with 2-sided tape. I did the same with the candy on the very bottom. The image and the sentiment were both popped up with 3M VHB – 2 sided tape. Finally, to cover some of my paste boo-boos, I added in some candy corn from Dress My Craft – Dessert Mix.

Card Recipe:

Stamp: Sitting Witchy Poo – S151 (High Hopes Rubber Stamps)

Sentiment: Happy Halloween – H232 (High Hopes Rubber Stamps)

Inks: Memento – Tuxedo Black, Tim Holtz Distress Ink – Carved Pumpkin, Tim Holtz Distress Ink – Black Soot

Paper: Copic Marker X-Press It Blending Card, Pebbles – Boo! (6×6 in / 15.2×15.2 cm), Orange cardstock, White Cardstock

Die Cut: Craftin Desert Diva’s – Flag Banner Dies (Retired)

Stencil: Kraftin’ Kimmie – Bats and Moons

Tools and Miscellaneous: MISTI – Most Incredible Stamping Tool, Cuttlebug, Nuvo Glimmer Paste – Amethyst Purple, Dress My Craft – Dessert Mix

Image coloured with Copic Markers:

Skin: BG96, BG93, BG90, YG23, G40

Hair: E18, E08, YR18, YR14

Hat, Blouse, Pantaloons: V17, V09, V06, V04

Vest, Dress and Hat Band: YR68, YR65, YR18, YR15, YR12, YR00

Socks: YR18, YR15, YR12, YG09, YG07

Shoes: V17, V09, V06, V04, N6, N4, N2, E15, Y38, Y35, Y15

Star: E15, Y38, Y35, Y15

Hope you like it and have a spooktacular week!

You can find lots of inspiration from the Design Team Divas at the High Hopes blog, and the High Hopes Rubber Stamps Facebook Fan page plus you can also follow us on
Instagram, Twitter and Pinterest.


Sweets for my Sooeet!!!


Valentine’s Day Is Almost Here!!! Who Wants Chocolate???

It’s Wednesday, and since Valentine’s Day is almost here, I thought I’d share this adorable little piggy called  Sow Soo-Eet Piggy (S091) from High Hopes Rubber Stamps! He sure does love his chocolate and so do I. LOL! I’m a choc-o-holic and so is my husband! I can give up many things, but not my chocolate. No way! LOL! And the sentiment Sweets for my Sooeet (G197) by High Hopes Rubber Stamps is the perfect fit for this card.

I decided to keep the card simple this week. I started off with a base of 5.5″ x 5.5″. I used double side tape and added the pretty heart ribbon to both the top and bottom of the card.

The die cuts for the main image are both from Craftin Desert Diva’s – Fancy Frames. I edged around the large die cut with Tim Holtz Distress Ink – Aged Mahagony to deepen the red. It was then attached to the card using 2 sided tape.

The main image was stamped onto Copic Marker X-Press It Blending Card and then coloured in with Copic Markers. I left the die cut metal frame on while I coloured the image. Once, the coloured image was done, I was ready to add some clouds. To do this, I stamped the image again onto some Post-It paper and then cut it out to create a masked image. I layered this on top of the pig and Valentine’s boxes and then created the clouds in the background using various blues from Tim Holtz Ranger Distress Ink and a stencil that I created using Avery Elle – D-05-01 PiercedCloudsDie.

Lastly, I stamped the sentiment onto white card stock. I die cut the frame for the sentiment with Craftin Desert Diva’s – Flag Banner Dies out of red cardstock. Then I used the same red cardstock, which I had just cut the banner out of to use as a stencil to trace around my sentiment.  I then used the trace marks as a guide to cut the sentiment out, moving just slightly inwards from my tracing to create the inner banner. This allowed me to have a nice red frame around the sentiment.

To finish the card I popped up the coloured image and sentiment with 3M VHB – 2 sided tape and added a couple of hearts.

Card Recipe:

Stamp: Sow Soo-Eet Piggy (S091) (High Hopes Rubber Stamps)

Sentiment: Sweets for my Sooeet (G197) (High Hopes Rubber Stamps)

Inks: Memento – Tuxedo Black, Tim Holtz Distress Ink – Salty Ocean, Tim Holtz Ranger Distress Ink – Broken China, Tim Holtz Distress Inks – Tumbled Glass, Tim Holtz Distress Ink – Aged Mahagony

Paper: Copic Marker X-Press It Blending Card, Red and White Cardstock

Die Cuts: Avery Elle – Custom Steel Dies – Made in the USA – D-05-01 PiercedCloudsDie, Craftin Desert Diva’s Fancy Frames, Craftin Desert Diva’s – Flag Banner Dies

Tools: MISTI – Most Incredible Stamping Tool, Cuttlebug

Miscellaneous: Kraftin Kimmie – Heart Krafty Dots, American Crafts Premium Ribbon

Image coloured with Copic Markers:

Pig: R22, R20, R000, R00, E93, E44, E43, E41, E04, E37, E35, E34

Shirt: B18, B16, B14, B12, R29, R27, R24

Valentine boxes: R29, R27, R24, R22, R17, R14, C1, C0

Chocolate Wrappers: E37, E34, E29, E25, E23

Ground: E99, E97, E33, E31, E30

Hope you like it and have a fantastic week!

You can find lots of inspiration from the Design Team Divas at the High Hopes blog, and the High Hopes Rubber Stamps Facebook Fan page plus you can also follow us on
Instagram, Twitter and Pinterest.


Christmas Joy!


Welcome High Hopes Rubber Stamps Fans!

It’s Wednesday, and this month at High Hopes Rubber Stamps we are celebrating Christmas. This week, I used Seasonal Wreath M018 (High Hopes Rubber Stamps) and Christmas Joy G115  (High Hopes Rubber Stamps).


Card Recipe:

Stamp: Seasonal Wreath M018  (High Hopes Rubber Stamps)

Sentiment: Christmas Joy G115 (High Hopes Rubber Stamps)

Inks: Memento – Tuxedo Black

Paper: Copic Marker X-Press It Blending Card, Recollections – Christmas Inkjet Printable Glitter Paper – 8.5 x 11″, Crafter’s Companion Luxury Cardstock – Red – 8.5 x 11″

Tools: MISTI – Most Incredible Stamping Tool, Cuttlebug

Die Cut: Craftin Desert Diva’s – Flag Banner Dies (Retired)

Embellishments: Crafts Stickers – 02-3010502, Crafts – Ribbon

Image coloured with Copic Markers:

Wreath: G99, YG67, YG17, G21

Bow: E15, Y28, YR24, Y17, Y08

Ribbon: R59, R37, R35, R27, R24

Candy: BG45, BG10, R59, B26, B23, B21, Gelly Roll Sparkle Pen, Wink of Stella – Clear

Berries: Crafts – Self Adhesive Pearls 02-3006207

Hope you like it and have a fantastic week!

You can find lots of inspiration from the Design Team Divas at the High Hopes blog, and the High Hopes Rubber Stamps Facebook Fan page plus you can also follow us on
Instagram, Twitter and Pinterest.


Have a Purrrfect Day!


Welcome OCS Fans!

Today is Wednesday and I’m sharing another Spring card with you today. This little kitty is chillaxing in the grass and enjoying the beautiful butterflies fluttering around it. The stamp I used to create this scene is called Kitty’s Flutter Friends by High Hopes Rubber Stamps.


Card Recipe:

Stamp: Kitty’s Flutter Friends  (High Hopes Rubber Stamps)

Paper: Copic Marker X-Press It Blending Card, AITOH Origami – Print Chiyogami – Butterflies, Blue cardstock

Inks: Memento – Tuxedo Black, TIm Holtz Distress Ink – Salty Ocean, Tim Holtz Distress Ink – Picked Raspberry

Die Cuts: Your Next Stamp – Stitched Rectangle Die Set (YNSD214), Craftin Desert Diva’s – Flag Banner Dies

Miscellaneous: Butterfly Stickers, Echo Park Paper Co. – Imagine That Enamel Dots

Tools: MISTI – Most Incredible Stamping Tool, Cuttlebug

Coloured with Copic, Spectrum Noir and PrismaColor Premier Pencils

Cat: Spectrum Noir: BG10, BG8, BG6, BG4, R22, R20, R02, 90% Warm Gray (PC1058),70% Warm Gray (PC1056), 50% Warm Gray (PC1054), Black (PC935), Sakura Glaze – Black

Bow: RV10, RV04, RV02

Heart: R29, R27, R24

Butterflies: BG07, BG05, BG02, YG13, YR02, R05, Sakura Glaze – Black

Grass: G17, G14, G07 (Texture: old face cloth and Rubbing Alcohol)

Sky and Clouds: B04, B02, BG02, BG01, BG000, BG70, C1, C0

You can find lots of inspiration from the Design Team Divas at the One Crazy Stamper blog, and the One Crazy Stamper Facebook Fan page plus you can also follow us on Instagram, Twitter and Pinterest.

Happy 28th Anniversary


Hi There,

Sharing a card that I made for my wonderful husband of 28 years a few years back, but never got around to posting. He’s been my best friend always and continues to be even more so as we get older together. Even after 28 years of marriage, we still never run out of things to talk about. I LOVE IT and him too! LOL!

Here is a close-up:

For the inside of the card, I wrote something special for him.

Here is a close-up of the image:

Used my MISTI and stamped images onto Copic Marker X-Press It Blending Card using Memento – Tuxedo Black ink. Coloured in images with Copic markers.

Stamp on Front: High Hopes Rubber Stamps – Dancing Hedgehogs S512.

Sentiments: Craftin Desert Divas – Lovies and Stampin Up: Teeny Tiny Wishes

Background Paper: K&Company – KP Valentine

Die Cuts: My Creative Time – Bunch of Fun Circle Dies, My Creative Time – More Stitched Circles, Craftin Desert Diva’s – Flag Banner Dies


Happy Retirement


Sharing a card that I made for a lady that I worked with. Today was her last day and I wanted to make her a special card. I am so jealous that she gets to retire at such a young age. LOL! I hope she enjoys each and every day of her retirement and wish her all the best of luck in the future! I made her drink green, I hope she likes a nice Tom Collins. LOL!

Here is the card that I made her using Art Impressions – SC0653 – Beach Babes.


Here is a close-up of the image from the front of the card.

Here is the inside of the card. I made up some small saying to go with each letter of “Retired”.

She loved her card and I hope you do too!


Die Cuts:

Craftin Desert Diva’s – Flag Banner Dies

Your Next Stamp – Stitched Rectangle Die Set (YNSD214)

Papers:

Copic Marker X-Press It Blending Card (for image)

Fancy Pants Designs – Nautical by Nancie Rowe Janitz (6″ x 6″ Paper Pad)

Bo Bunny – Down by the Sea Collection (6″ x 6″ Paper Pad)

Ink:

Coloured image with Copic markers.

Memento – Tuxedo Black

Tim Holtz Distress Ink – Twisted Citron

Tim Holtz Distress Ink – Crushed Olive

Sentiments:

Both inside and out sentiments were created in a Microsoft Word document and then printed out on my printer.

Reindeer and Duck Christmas Cards


Hi There,

Sharing a couple of cards made from Too Cute By Jessica – Christmas Animals SVG Cuts designed by Jesssica Owens 2014.

Using my Cricut Explore and Cricut Design Space, I uploaded the images and then cut the pieces out for the little animals.

Reindeer

Here is a close-up of the image:

Reindeer-CU

For the eyes on both cards, I used Gelly Roll Sakura #8 Pen and General’s Charcoal White 558 Pencil, black chalk for the shadow and Pigma Micron 01 black marker for the eyelashes.

For the background snow, I used White Permanent Chalk Marker on blue cardstock.

The background papers are from Pebbles – Home for Christmas paper pad – 36 papers- 6 x 6 in (15.2 x 15.2 cm).

My Creative Time – Scalloped Stitched Oval Dies were used for framing the deer.

For the mound of snow I used Recollections – Christmas Inkjet Printable Glitter Paper – 8.5 x 11″ and Lawn Cuts – Simple Stitched Hillside Borders – Lawn Fawn.

Ribbon banner is from Craftin Desert Diva’s –  “Flag Banner Dies”

Sentiment – My Creative Time – Prehistoric Holidays Stamp Set.

Using the same die cut set, I also made this cute little duck card.

Xmasduck

Here is a close up:

Xmasduck-CU

For the music background paper, I stamped the musical notes with Recollections – Capturing Special Memories wooden stamp, Versa Fine – Onyx Black and Ranger – Clear Super Fine Detail embossing powder. Then I inked up the paper with Tim Holtz Distress Ink – Vintage Photo.

The patterned paper behind the duck is from American Crafts – “Holiday” 6″ x 6″ (15.2 x 15.2 cm).

The patterned paper above the musical notes is from Heidi Swapp – HS01073 – 6″ x 6″ (15.2 x 15.2 cm).

Sentiment – Craftin Desert Divas’s – Holly Day Punnies – VersaMark ink and Ranger Embossing Powder White – Extra Fine Detail.

Die Cuts used – Craftin Desert Diva’s – Fancy Stitched Label Dies.

Hope you like them!


Coffee Time Kitty


Hi There,

Back to share another card with you. It is a freebie from Craftin Desert Diva’s called Coffee Time Kitty. I was hoping to share it in the Coffee Blog Hop too, but I was a little late! LOL!

Kitty-PerkUUp

Here is a close up:

Kitty-PerkUUpCU

To make this card, I printed out the image in grayscale and then coloured the image in using PrismaColor Premier pencils and Gamsol. I cut out the image using My Creative Time -Stitched Squares Inside and Out and then went around the edges with Tim Holtz Distress Inks – Dusty Concord.

For the fancy border, I used Spellbinders Lacy Squares – S4295.

The sentiment is from Craftin Desert Diva’s – Got Coffee stamps. Created flag by using die cut from Craftin Desert Diva’s – Flag Banner Dies.

Added in some ribbon on the side made by American Crafts.

Hope you like it!

Entered into Craftin Desert Diva’s Digi June Challenge which can be found here: https://www.facebook.com/groups/1428163220758119/. (Craftin Desert Diva’s Gallery).

Coffee Blog Hop – JessicaLynnOriginal


Hi There,

Sharing my card that I made for the JessicaLynnOriginal Coffee Blog Hop.

The digital stamp was a freebie for this contest located on JessicaLynn’s site.

JessicaBlogHop

Here is a close-up:

JessicaBlogHop-CU

Coloured the image with Spectrum Noir markers and then added in highlights \ shading with PrismaColor Premier pencils.

Created background behind owl with Craftin Desert Diva’s – Got Coffee stamps and VersaMark Ink.

Sentiment is also from the same set.

Other background paper is from: Teresa Collins – Summer Stories Designer Cardstock Paper – 6 x 6″ Designer Pad.

Die cuts are from: My Creative Time -Stitched Squares Inside and Out, My Creative Time – More Stitched Edges and

Craftin Desert Diva’s – Flag Banner Dies

Entered into contest for JessicaLynnOriginal Coffee Blog Hop.

Hope you like it!

Winter Polar Bear


Hi There,

Thought I’d share another Christmas card that I just finished for this year. Only about 45 more to go!!!!

PolarBear-TCBJ

To make this card I used the .svg cut from Too Cute By Jessica called Winter Polar Bear – Designer Jessica Owens 2015 and cut it out on my Cricut Explore after I finished uploading the image in Cricut Design Space. Used Sharpie Water Based Paint – White – Extra Fine Point, General’s Charcoal white for the eyes and Pigma Micron 03 black marker for the eyelashes.

Added some Clear – Wink of Stella on the red portion of the candy cane and  Wink of Stella – Glitter White on the white pieces.

Ranger Stickles Yellow Glitter Glue for the centre of the pointsettia.

Here is a close-up of the bear.

PolarBearCUp-TCBJ

All patterened papers are from Pebbles – Home for Christmas paper pad – 36 papers- 6 x 6 in (15.2 x 15.2 cm).

Inked around the edges with Tim Holtz Distress Ink – Pine Needles and Memento Dew Drop – Lady Bug ink.

Sentiment is from Popcorn the Bear – Christmas Collection. Also used Craftin Desert Diva’s – Flag Banner Dies. Stamped sentiment with Versamark and then used Ranger Embossing Powder White – Extra Fine Detail.

My Creative Time – Scalloped Stitched Oval Dies were used for framing the bear.

Hope you like it!


Beary Merry Christmas Bears


Hi There,

Just getting an early start on this years Christmas cards. I make over 40 cards every year!

All cards are made using Too Cute By Jessica – Little Lovelies A Beary Merry Christmas. .svg design is by Jessica Owens.

I uploaded the patterns for the bears into Cricut Design Space and cut using my Cricut Explore.

Inked all of the edges for the bears and accessories and then ran the pieces through my Xyron’s for easy assembly. Highlighted the eyes with Gelly Roll Sakura #8 Pen.

For the first bear, sentiment was stamped using Versa Fine – Onyx Black and Ranger – Clear Super Fine Detail embossing powder. Sentiment is from Jaded Blossom – Season’s Tweetings.

Used Craftin Desert Diva’s – Flag Banner Dies. I ran the die half way through my Big Shot and then turned it around to get the ribbon edge on both sides.

Patterned Paper – American Crafts – Merry and Bright 6 x 6″ pad and American Crafts – Holiday 6 x 6″ pad. The top patterned paper was cut out using Craftin Desert Diva’s Fancy Frames. I also used the same die for the foam used to make this a shaker card. Filled the shaker card with Creatology Glitter.

BearyMerry1

Here is a close up:

BearyMerry1_CUP

For my second card, I used American Crafts – Peppermint Express 6 x 6″ paper pad and May Arts Ribbon.

Highlighted ribbon on bear and present with Wink of Stella – GL Green 040.

Edged  around large present with Tim Holtz Distress Ink – Mowed Lawn.

Sentiment is from the same .svg file.

BearyMerry2_CUP2

Here are a couple of close ups:

BearyMerry2_CUP2     BearyMerry2-CU

For the last bear, I used the paper from American Crafts – Peppermint Express 6 x 6″ paper pad as well. I inked around the edges with Tim Holtz Distress Ink – Mowed Lawn.

Put the green paper from Craft Smith Green through Cutttlebug using Snow Dots Embossing Folder.

Squares cut out with My Creative Time -Stitched Squares Inside and Out.

Sentiment from Craftin Desert Diva’s – Holly Day Punnies.

Bow – May Arts Ribbon.

BearyMerry3

Here is a close up:

Beary-Merry-CUP-3

Hope you like them!