Tag Archive | #Roberta

Lil Fireman


Hi There,

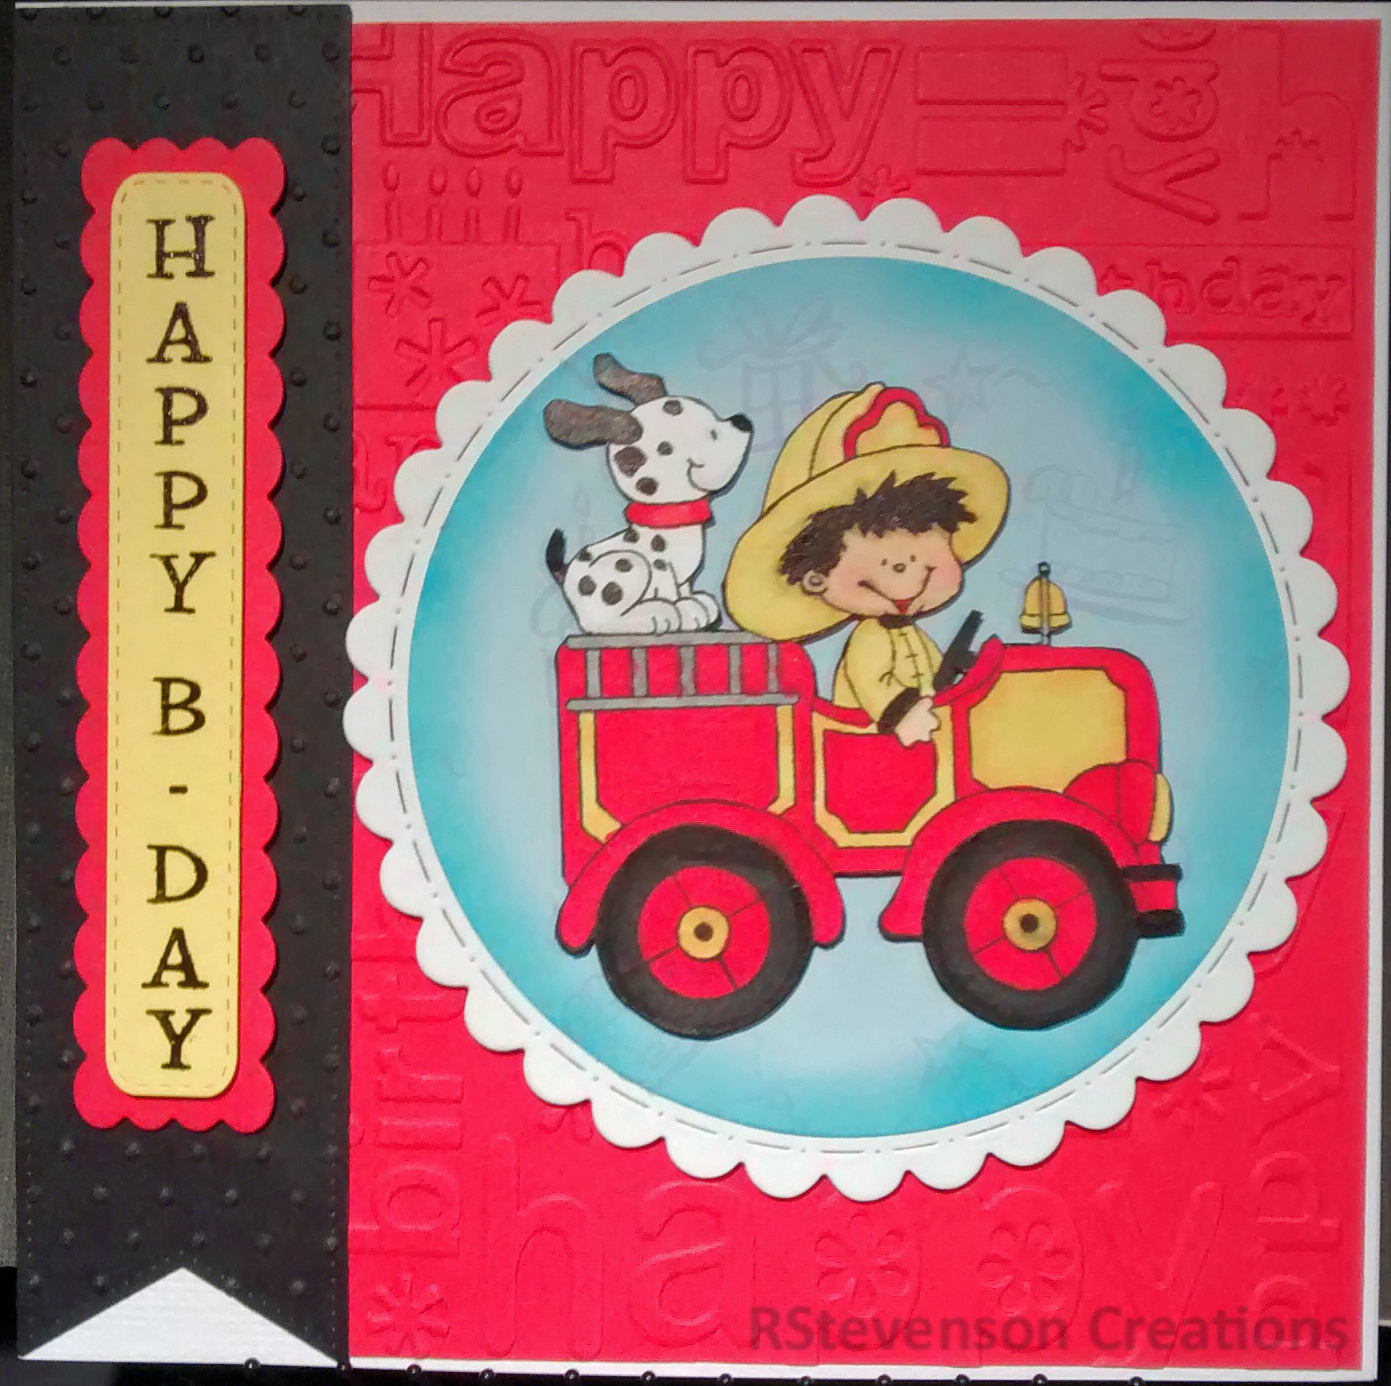
Back to share a birthday card I made for my older brother today who happens to be a fireman.

To make the card, I used the stamp from High Hopes Rubber Stamps called “Lil Fireman” – S274. Artwork by Annie Long. As soon I saw this stamp, I knew I had to make it for him. I stamped the image using Memento Tuxedo Black and then fussy cut the image out when I was done.

RayBD2016

Here is a close up.

RayBDClosup

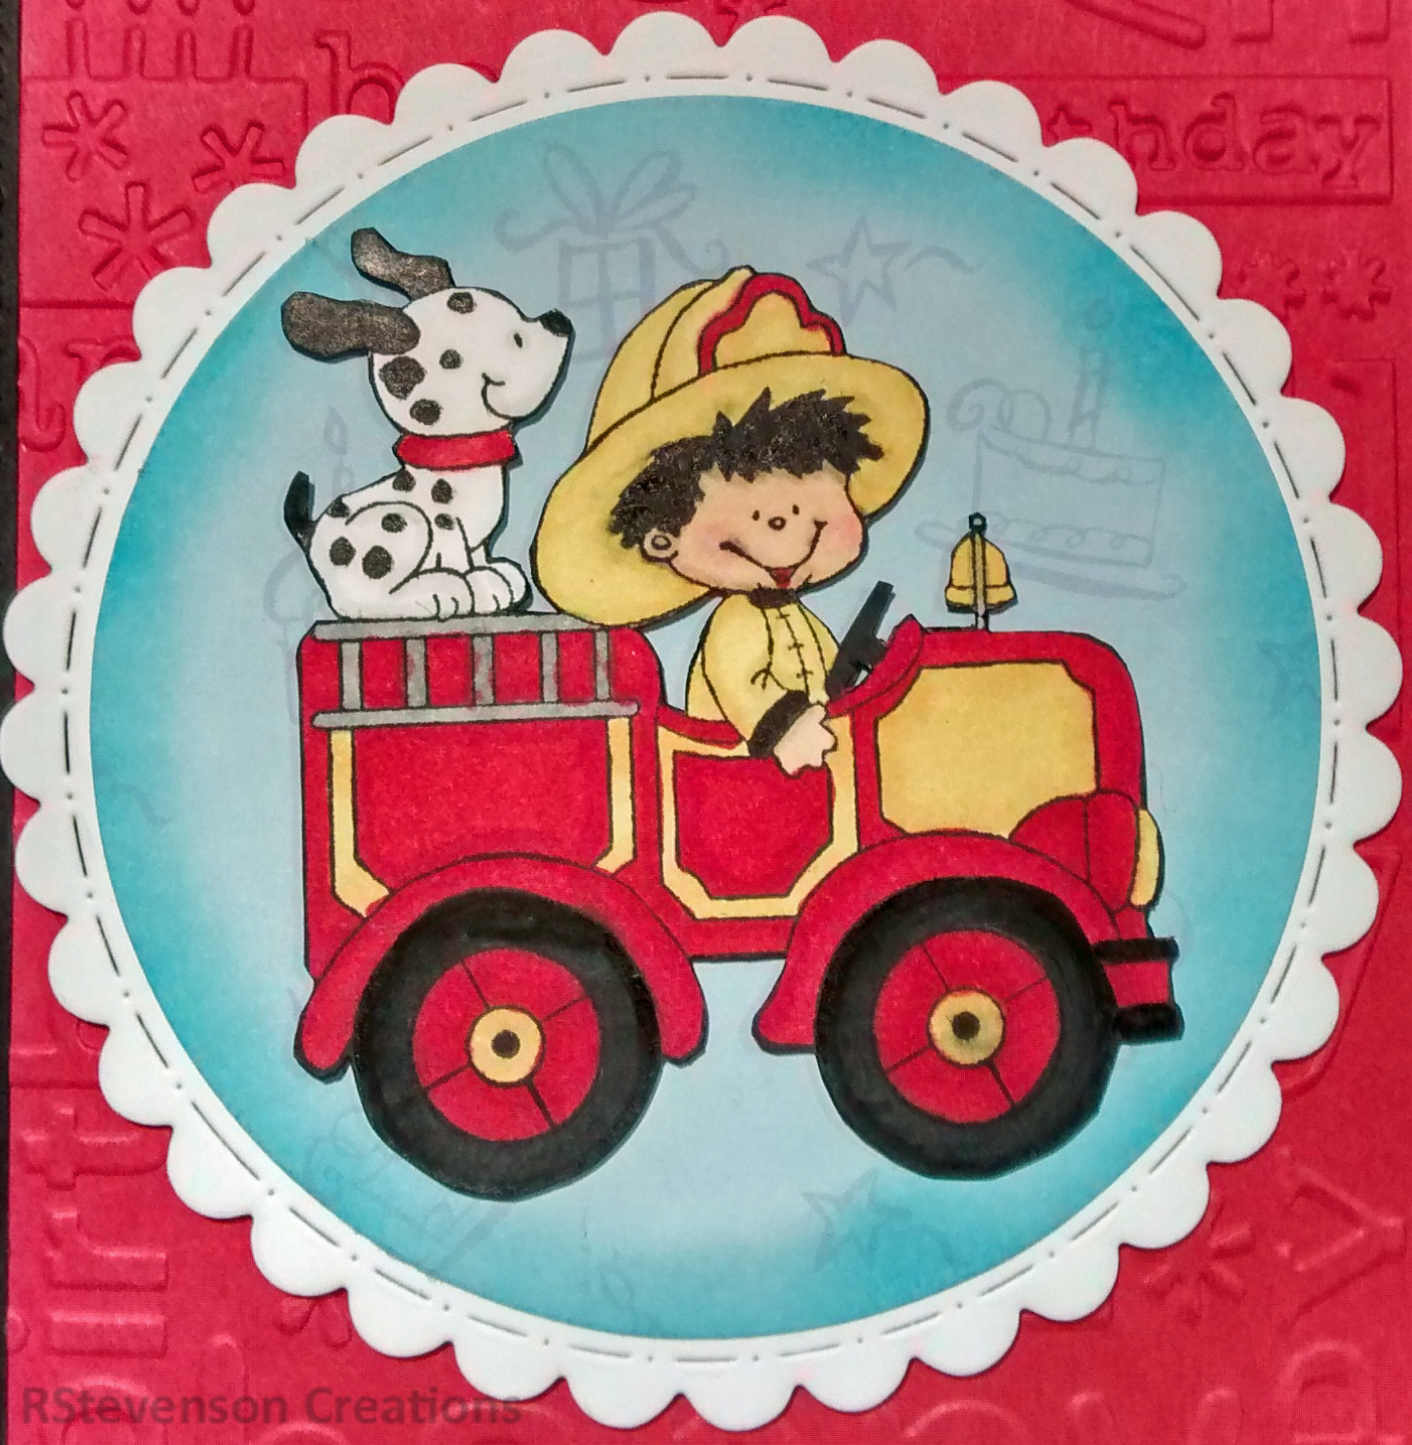
I used my Spectrum Noir markers to colour the image.

Face: EB2, FS2, FS4 and PP1.

Hair: True Black, IG5, IG7

Dog and tires: True Black

Fireman clothing and Yellow on truck: CT2, CT4

Red on truck, dog and hat: DR2, DR4, DR6

Ladder: IG3

Embossed card with: Cuddle Bug A2 Happy Birthday Embossing folder

Tag: Dies cuts and Stamp for “Happy B-Day” – My Creative Time: Fun Vertical Greetings

Circle border: Crafting Desert Diva’s – Stitched in Circle Dies

Inner Circle: Lifestyle Crafts – Nesting Circles

Hope you like it!

Entered into: http://www.onecrazystampercom.blogspot.ca/2016/03/march-challenge-anything-goes.html

Birthday Card – Cupcake Bears


Hi There,

Back again to share a Birthday card that I made for my wonderful mom! She loves bears and baking so I thought this would be a great card to make for her.

The bear pattern is from Too Cute By Jessica – Cupcake Bears. Original Artwork from Marjorie Ann Designs.

Cupcake-Bears-RSwatermark


Here is a closer look.

Bears-Close-Up-watermark


I love the balloon pattern paper. Not sure who it is by as I picked it up at our local dollar store.

I used the stitched dies from “My Creative Time – Stitched Rectangular Frame Dies and More” to cut out the main background and purple patterned background.

Used “Craftin Desert Diva’s – Fancy Frames” for the darker fancy border.

For the sentiment I used from the Cricut Cartridge – Birthday Cakes- Happy Birthday
I used Dove Blender pen and pink chalk to create the lines on the cupcake wrapper.
Went around bears with Dew Drop Memento – Rich Cocoa to give the bears some dimension.
For the eyes, cheeks and bow, I used Gelly Roll Sakura #8 Pen.
Hope you like it!

Bears – SG Hugs and Kisses Bear


Hi There,

Like to share a special card I made for my dear sweet husband. I’ve been very sick over the past couple of weeks and he has been taking great care of me. Love him so much!

When we were married our theme was bears. So I thought this card was perfect.

I’ve included 2 images. The first image is before I put the shaker card together. The second image is the completed card.

BearyMuchFrt_300 dpi  BearyMuchFrt4_300 dpi

The bears are from Too Cute by Jessica – SG Hugs and Kisses Bear by Saskatoon Graphics.

I uploaded the bear into Cricut Design Space and then copied it and made a mirror image. For the girl bear I added a little bow. Cut the designs out with my Cricut Explore.

For the sentiment and lips and hearts on the background, I used Peachy Keen Stamps – PKS-13 January 2013.

I stamped the sentiment first with VersaMark and then embossed with Ranger – Super Fine Detail Clear.

Sequence is from Craftin Desert Diva’s – Heart Breaker.

Heart patterned paper is from K&C Company – KP Valentine.  Kelly Panacci.

Highlights on the eyes were done using Gelly Roll Sakura #8 Pen.

Craft foam was also used to make the shaker card.

Used Cricut Design Space and my Cricut Explore to create the window and frame border for the shaker card.

I am also happy to announce that I am now a Designer for Too Cute By Jessica. YAY!

It’s still not too late to join the current challenge. http://toocutebyjessicadt.blogspot.ca/2016/02/valentines-day-challenge.html


Chinese New Year 2016


Back to share my cards for Chinese New Year 2016.

I know I’m running a little late. I’m glad it goes for a whole month. LOL!

Chinese2016Frnt_300 dpi Chinese2016Frnt2_300 dpi Chinese2016inside_300 dpi

Used 2 types of paper for the fronts. The mirrored gold paper, unfortunately shows everything. But I still liked it.

Using Cricut Design space, I uploaded Marjorie Ann Designs \ Kristi w. Designs – Gone Bananas. All of the monkeys are from this pattern.

I created the type with Cricut Font – 3 Birds – Life’s a Party Cartridge.

I thought the little monkey face would go great in place of the “o” and the other little monkey replacing the “0” in 2016.

For the eyes, I used Gelly Roll Sakura #8 Pen.

For the inside, I brought the wording into Microsoft Word and then pasted it 10 times on the paper before printing it out.

Then I used the cutting die from My Creative Time – Stitched Rectangular Frame Dies and More to frame the sentiment.

Lastly, I went around each frame with Sharpie – Medium Point Gold Water based paint.

I make 8 cards in total. There were a lot of little pieces and it took a long time, but I’m very happy on how they turned out.

Hope you are too!

Panda Birthday Card


Hi There,

Back to share a card that I made for a dear friend of mine that loves Pandas.

PandaBDFrnt PandaBD-In

The pandas are from “Too Cute By Jessica – Cuddly Pandas”. As soon as I saw them, I knew I had to use them for her card.

I uploaded the svg’s to Cricut Design Space and cut the images with my Cricut Explore. Added some white chalk around the edges where it was black on black. For the white’s on the pupils, I used Gelly Roll Sakura #8 Pen.

I made the sky on the front with Craftin Desert Diva’s – Stitched Scallop Dies and using Stampin Up Baja Breeze and Pacific Point mini ink pads on watercolour paper.

The ground is made using Craftin Desert Diva’s – Outdoor Landscape Dies. I think this is one of my all time favourite dies.

The sentiments are from: Stampendous Clear Stamps – Birthday Wish

Bamboo stamp in background is from All Night Media.

The balloons are cut from birthday paper filled with balloons. I cut 3 out and layered them. Then I added a little bit of twine.

The hat is from Cricut – Sweet Treats Cartridge.

Hope you like it!


Valentine’s Day Card for my Hubby


Hi There,
Back again to share a Valentine’s card that I made for my wonderful husband of 25 years.
Love Bug Front   Card open

To make the shape of the card, I used Cricut Design Space and then cut the card layout and all of the images using my Cricut Explore.
I made the card 6″ x 6″ and cut 2″ off either side of the panels so that they would come together to make the front of the card.
I adhered the 2 (4″ x 3″ panels rectangles on both sides). I also used Cricut Design Space to cut the hearts directly in half so I knew they would match up on the front.
I duplicated the large hearts while they were still together and used them on the inside. The large hearts are both part of the Cricut Craft Room Basics.
The “Happy Valentine’s Day” is from Cricut – “Phrases” cartridge.

Love Bugs are all from Miss Kate Cuttables.
Valentine LadyBug Boy, Valentine Ladybug and Love Bug Title.

Here’s a closer look.

Girl Bug Mail Bug

Inside Bug

Paper background is from K@Company 12 x 12″ Designer Paper.
Wording is from Cricut – “Baby Steps Font”.

For the final touch, I added a some Clear “Wink of Stella” on the Lady and some of the hearts.
Hope you like it!

Entered this card into “Miss Kate Cuttables Galleria – January Challenge.”

Also entered into “https://www.facebook.com/groups/CricutLoversGuide/permalink/865475223573693/” – Cricut Lovers Guide to Design Space.

And: http://www.craftindesertdivasblog.com/2016/01/craftin-desert-divas-shaped-card-linky.html


Best Friends Furever


Hi There,

Back to share a card I’m calling “Best Friends Furever” after the sentiment from Craftin Desert Diva’s.

IMG_20160117_011944

The background was done with watercolour paper and Tim Holtz Distress Inks.

Black Soot, Peacock Feathers, Tumbled Glass, Shaded Lilac, Dusty Concord and Broken China.

Snow falling is made from Craftin Desert Diva’s – Across the Border stamp, VersaMark and Ranger Embossing Powder White – Extra Fine Detail. I REALLY love this stamp for snow. One of my personal favourites.

Snow on ground is cut using Craftin Desert Diva’s – Stitched Scallop Dies and Recollections Christmas Ink Jet Printable Glitter Paper.

Stamps used are all from Craftin Desert Diva’s and were stamped with Memento – Tuxedo Black ink.

“Chilly” – Polar Bear, Hat, Wolf, Bunny, Iceberg

Sentiment – “Polar Pals”

Here is a closer look at the characters.

Used Sakura Gelly Roll 06 and Sakura Gelly Roll 08 for the eyes and noses. Stampendous – Cotton Ball White FL400 Fun Flock for the pom-poms on hat.

Used Spectrum Noir Markers to colour and PrismaPremier Coloured Pencils with Gamsol.


IMG_20160117_011957      IMG_20160117_012007

Hope you like it!

Entering this into Winter Snow Challenge . It’s a challenge on Craftin Desert Diva’s Linky Party Blog.

YAY! I made top 3 for the Winter Snow Challenge. Yippee! I’m so excited. My first time.

Craftin Desert Divas


Xmas Card for Hubby


Hi There again,

Thought I’d share the XMas card that I made for my husband this year. He thought he was getting a really romantic card when he saw the front of it!!!! He was wrong, but he really laughed when he saw the inside.Todd XmasF - Copy

To make the card I used Recollections – Winter 4.25 in x 5.5 in (10.7 cm x 13.9 cm) card for the base.

The deer are from Miss Kate Cuttables – Birch Trees with Deer. I used Cricut Design Space and the Cricut Explore to cut it out.

Glitter Paper is – Recollections Christmas Ink Jet Printable Glitter Paper.

I stamped Merry Christmas with Memento Ink.

Todd Xmas In

For the inside – Used stamp from Hampton Art – Art Impressions – SCO715 – Christmas Reindeer Games.

Stamped image with Memento – Tuxedo Black ink. Coloured with a mixture of Copics and Spectrum Noir Alcohol  Markers. Then used Wink of Stella – Clear on the Christmas tree balls and earrings.

Cut frame out with Craftin Desert Diva’s – Fancy Frames.

Used Sharpie Gold – Medium Point for going around frames on both the front and inside of card.

Hope you like it!


Friends Xmas


Back again to share a card that I made using High Hopes Rubber Stamps Polar Hug SS001 by Dina Gerner.

PolarBear Xmas


Loved this stamp the moment I saw it. Stamped the image with Memento – Tuxedo Black ink and then cut it out.

For the background I used watercolour paper and used various colours to try and create the Northern Lights.

I then used Tim Holtz Distress Inks – Black Soot, Peacock Feathers, Tumbled Glass, Shaded Lilac, Dusty Concord and Broken China.

To colour in the image I used Copics – BG05, B05, BG15 and B24 on the hat and scarf.

Penguin – Spectrum Noir – IG3, IG5, IG7 and Copic 100. Feet and beak, YR07. Pompom, Liquid Applique. Wink of Stella – Clear on scarf and hat brim.

Polar Bear, Blue shadow – PC904 – PrismaColor Premier and Gamsol. Tongue – Copic R37. Nose – Sakura Gelly Roll 06.

Sentiment – Craftin Desert Diva’s – Polar Pals. Embossed with VersaMark and Ranger Embossing Powder White – Extra Fine Detail.

I cut using my die cut from Craftin Desert Diva’s – Outdoor Landscape Dies. Snow on ground is Recollections Christmas Ink Jet Printable Glitter Paper.

Square cuts are from My Creative Time – Stitched Squares Inside and Out.

Background paper is – American Crafts – “Holiday” – 6 x 6 in. (15.2 x 5.2 cm)

Snow falling is made from Craftin Desert Diva’s – Across the Border stamp,  VersaMark and Ranger Embossing Powder White – Extra Fine Detail.

Silver Edging around outside of card – Pilot Silver Marker – Medium Point.

Entered this card into:

“http://onecrazystampercom.blogspot.ca/2015/12/december-challenge-christmaswinter.html”

https://www.facebook.com/High-Hopes-Rubber-Stamps-1041614605853195/ (Christmas / Winter Challenge)


Xmas Card for Vet 2015


Back to share this year’s card for our vet Dr. Aziz and his wonderful staff from “Boo” our cat.

VetXmas2015F_300 dpi VetXmas2015IN_300 dpi


The stamp on the front page is from High Hopes Rubber Stamps – “Wasn’t Me! TT013” by Dina Gerner.

The sentiment was typed out on my computer in Word. I saw this sentiment at “One Crazy Stamper” on another card created by Sheri Burry and loved it!

The image was coloured with my Spectrum Noir markers.

For the cat I used – IG2, IG4, IG6 and IG8. CR4 for cheeks and ears. Bow – DR6, DR8. Nose and Eyes – Sakura Glaze – Black

Tree: LG2, J3, GT2. EB2, EB4, EB6 and DR6.

Christmas Balls – DR6, DR8. PL2, PL3, PL4. CT2, CT4. BT4, BT8. Wink of Stella – Clear.

Mouse – TN2, TN3, TN4.

Ribbon – American Crafts

Background Paper – American Crafts – “Holiday” 6″ x 6″ (15.2 x 15.2 cm)

Frames – My Creative Time – Stitched Squares Inside and Out

Gold border around frames – Sharpie  – Medium Gold

Inside of card:

Image: Penny Black – Holly Day Critters

For the cat I used – IG2, IG4, IG6 and IG8. CR4 for cheeks and ears

Tree Boughs – Tree: LG2, J3, GT2.

Christmas Balls – DR6, DR8 and BT4, BT8. Wink of Stella – Clear.

IG1 was used for shadow on both images.

Sentiment: Just Rite Cling – Sparky and Friends

Hope you like it.

Also entered into “http://onecrazystampercom.blogspot.ca/2015/12/december-challenge-christmaswinter.html”

Entered into https://www.facebook.com/High-Hopes-Rubber-Stamps-1041614605853195/ (Christmas / Winter Challenge)


OCS_WonChallengeButton


Cricut Snowman and Reindeer


Hi there again,

Cricut Snowman and Reindeer3


Made this card to enter into Kadoodle Bug Challenge.

To make my card, I used Cricut Design Space and Cricut Explore.

The .svg files for CK Cricut Snowman and CK Cute Little Deer are from Kadoodle Bug Designs.

Trees are from Miss Kate Cuttables.

Made the snow on ground with Craftin Desert Diva’s – Outdoor Landscape Dies and Recollections Christmas Ink Jet Printable Glitter Paper. Aleene’s Glitter Snow below snowman and reindeer.

Falling snow – Craftin Desert Diva’s – Across the Borders stamp and Ranger White Embossing Powder – Super Find Detail.

Background – Watercolour paper, Tim Holtz Distress Inks – Tumbled Glass, Peacock Feathers, Broken China and Shaded Lilac.

Background paper – American Crafts – Wish List Paper pad, 6×6 in. (15.2 x 15.2 cm)

Sentiment – Craftin Desert Diva’s – Polar Pals.

My Creative Time – Stitched Squares – Inside and Out.

Hope you like it.

Entered into contest – KBD Challenge.


Christmas Penguins – Let’s Chill


Here to share another card that I made.

The adorable penguin and sentiment is from Craftin Desert Diva’s “Chill Out” stamp set.


Merry Christmas Penguins- Chill Out2Let's Chill

Included both pics as one shows the sparkle better than the other one.

I stamped the little penguin with Memento Black Tuxedo ink and then coloured it in with a mixture of Copics and Spectrum Noir markers.

Used some DecoArt Glamour Dust on the hat and top of the stocking.

To make the eyes shiny, I used Glossy Accents.

The die cut frame was done with my Cuttlebug and the die from Craftin Desert Divas “Banner Dies”.

I used Sizzix Tim Holtz Alterations Snowflakes for the snowflake patter and AC Cardstock. After embossing, I used some light sandpaper to make the snowflakes stand out more. Then I added some blue gem stones. To make the snow, I used Gelly Roll Sakura #8 pen.

The design behind the penguin is from My Creative Time – “Stitched Belly Band Deies”.

The patterned paper background is from “Home For Christmas” Paper pad 6″ x 6″ pad.

The card base is white card stock.

Hope you like it!


Christmas Penguins – Igloo card


Hi There,

Back to share a Christmas card that I made this past weekend.


Christmas Penguins - Igloo            Christmas Penguins - Igloo - Close Up

The adorable penguins are from Craftin Desert Diva’s “Chill Out” stamp set. I just fell in love with these little characters.

The sentiment is also from the same set.

I stamped the little penguins with Memento Black Tuxedo ink and then coloured them in with a mixture of Copics and Spectrum Noir markers.

To make the eyes shiny, I used Glossy Accents. Also, first coloured in the little tree balls and then added some coloured “Stickles”.

To make the igloo from “Go Canada”, I used Cricut Design Space and my Cricut Explore, black, gray cardstock and Glittered Christmas Cardstock for the white.

The tree to the right of the igloo is from Miss Kate Cuttables. I really love this little tree and with being an .svg file, I can make them all different sizes. Added some Wink of Stella – Glitter White to the snow on the tree. Unfortunately, it does show up that great in this pic.

Added some “Sookwang Be Creative” double sided tape over heavy weight white cardstock by AC Cardstock to make the snow using my Cuttlebug, embossing folder  “D’vine Swirl”. Next, I die cut the snow with Craftin Desert Diva’s “Outdoor Landscape” dies. After that, I peeled off the top layer of the tape and sprinkled DecoArt Glamour Dust onto the embossed image. I felt this gave the snow more sparkle.

The die cut border was done with my Cuttlebug and the dies from Craftin Desert Diva’s “Fancy Frame Dies”. The patterned paper is from “Home For Christmas” Paper pad 6″ x 6″ pad.

I also used this die cut on the Swirly snow base as well.

The card base is from Recollections “Frost” Card and Envelope set.

Hope you like it!

Minion Birthday Card


Hi There,

Made this birthday card for my Super husband.

He means the world to me and I’m not to sure what I’d do without him.

My husband loves the minions, so I thought this would be a really cute card for him.

Super Man Minion HB in 300 dpi

The Superman minion .svg file was from the SVG Cuts “Super Hero” Blog Hop!” on April 24, 2015.

Background cupcake pattern is from DCWV – Everyday Stack 6″ x 6″ paper pad.

Other background paper was found at the dollar store, so not sure who makes it. I thought it looks great for a birthday background though.

I used my Cuttlebug and Quickutz Nesting Frame 7 dies from We R memory keepers to cut out the shapes.

Super woman Minion HB in 300 dpi


This is the inside of the card. I realized that I spelled “Your” wrong and fixed it to “You’re” with a marker later. Oops!

The Wonder woman minion .svg file was from the SVG Cuts “One in a “Minion” Blog Hop!” on June 12, 2015. The file was only available at the time of the hop.

To make this card, I imported the .svg files into Cricut Design Space and then used the Cricut Explore to cut out the pieces.

LOVE  my Cricut Explore!!!

For the sentiments, I used the Magneto font in Microsoft Word and then just printed it out on my printer and cut around the wording.

Hope you like it! My husband thought it was pretty funny.

Pink Bear Birthday Card


Hi There,

I’m back to share a birthday card that I made for my niece’s birthday.


Pink Bear HB in 200 dpi

I used the .svg freebie that I had received from KaDoodle Bugs Designs – Cuddly Pink Bear. I thought this bear was just so adorable.

I imported the file into Cricut Design Space and then used the Cricut Explore to cut all of the pieces.

For the bear, I used the embossing tool because I didn’t want to cut the Mulberry Paper  (Nicole Handmade Mulberry Paper). Instead, I just required the outlines so that I could wet around the images and then tear them a part.

Used my Cuttlebug to do the following:

The circle was cut with Lifestyle Crafts Cutting Dies – Nesting Circles. – 3rd largest die and Doodlebug Design Inc. –

Sugar Shoppe 6 x 6 paper pad.

Inked around the edges with Dew Drop Memento – Rose Bud.

The scallop was cut with WeR Memory Keepers – Quickutz Nesting Scallops – largest die.

Doily was cut from My Creative Time – Bunch of Stitched Doily Dies.

Used Inkssentials Glossy Accents for the nose and Wink of Stella Gl. White 000 for the hat.

Some stickles for the ice cream sprinkles.

Peel Offs – Happy Birthday Assortment for the sentiment.

Gelly Roll Sakura #8 Pen was used on the eyes for highlights and stitching around the scallops.

Pigma Micron #5 – Black was used for the eyelashes.


Super Mario Minion Birthday Card


Hi There,

Sharing a Super Mario Birthday card that I made for my nephew.

Super Mario Minion HB in 300 dpi

The .svg file was from the SVG Cuts “One in a “Minion” Blog Hop!” on June 12, 2015. The file was only available at the time of the hop.

To make this card, I imported the .svg file into Cricut Design Space and then used the Cricut Explore to cut out the pieces.

LOVE  my Cricut Explore!!!

I needed to find some brick to put the characters up on, so I went shopping looking for an embossing folder or die cut. Couldn’t find any and then it dawned on me.

I have Cricut Design Space and my Cricut Explore. I could just make my own wall!!!!

I used the round corner rectangle and made various sizes, cut them out and placed them onto a solid colour. Voila! I had my brick wall.

For the background I used #Summer Paper Pad 6 x 6 in (15.2 x 15.2 cm) from American Crafts.

The sentiment is from Craftin Desert Divas – Little Super Star.

Balloons are from Frances Meyer – Stickers – (FST 955 Balloons).

White stitching around the pocket is made with

Gelly Roll Sakura #8 Pen.

Snowman Globe


SnowGlobe Snowman1 SnowGlobe Snowman HB in 300 dpi

It’s Christmas in July!

Here is a snowman shaker card that I made.

This is a close-up.

Snoman - Closeup

To make the card, I used my Cricut Explore to cut out the snow globe from “Cricut Cartridge – Joys of the Season – #M3EAF0″.

To make the window, I merged together the large circle and a small rectangle in Cricut Design Space.

Next, I put the smaller globe on top of the merged piece and then used the slice tool.

This enabled me to cut the cardboard pieces out. I cut out 4 pieces of thin cardboard and then glued the cellophane across the top.

I had received some flowers and kept the cellophane that they used to wrap the flowers up with.

Works great for shaker cards and it cuts easily.

The snowman is from Peachy Keen Stamps –

“PK-1346 Picture Snow Day”

Sentiment is from Craftin Desert Diva’s “Chill Out”

Used my Cuttlebug to cut the Snow using Craftin Desert Diva’s – “Landscape Dies” then embossed with “D’Vine Swirl”

Background paper behind snowman is from Recollections Signature – Blue Christmas 6 in x 6 in paper pad.

Snowmwan’s jacket was paperpierced from DCWV Premium Paper Pack – Assorted papers.

Card base is Recollections – Frost.

I used Spectrum Noir Pens LV1, LV2, CR4, BT1 and Blender pen to colour.

Memento – Tuxedo Black was used for sentiment and for stamping the snowman.


StarWars Birthday Card


Hi There,

I like to share a StarWars birthday card that I made.

Yoda and Jabba are from the SVG Cutting Files Blog Hop on May 4, 2015.

Used Cricut Design Studio and my Cricut Explore to cut the images.

StarWars Yoda HB in 300 dpi

Cricut Cartridge – Plantin Schoolbook Roly Poly was used

for sentiment on front of card.

Ground beneath Yoda is cut using my Cuttlebug and

new Craftin Desert Diva’s – Outdoor Landscape Dies.

I then chalked the tops of the mounds with brown chalk to make them stand out more.

Background paper on front of card is from

Heidi Swapp 6 x 6 paper pad – September Skies.

StarWars Jabba HB in 300 dpi0002

Stamp sentiment on inside is from

Peachy Keen PK-1428 Sentiments for September 2014 Release.

Stamp sentiment for “Happy Birthday to You” –

Peachy Keen PKSC30 – June 2014

Ink Used – Memento – Tuxedo Black

Background paper on inside of card is from

Doodlebug Design Inc. 6 x 6 paper pad – Sugar Shoppe

Thank You Card


Hi There,

Like to share a Thank You card I made for my neighbour for coming to my rescue the other day. Needed to go in for some minor day surgery and my husband just started a new job and therefore couldn’t take me. My neighbour was so good, she took me to the hospital and stayed the whole time with me. 7 hours in total if you include the drive time. I’ll be eternally grateful. It’s so nice to have great neighbours that you can depend on.

Here is the shaker card that I made for her.

Super Star ThankYou fr1 300 dpi

Here is the little girl before I put her

behind the shaker for a closer look.

Super Star fr1 300 dpi

This is the inside of the card.

Super Star ThankYou in 300 dpi

I put my neighbours initials on the belt for both images.

Stamps and Sentiments are from:

Craftin Desert Divas – Little Super Star, Starstruck Sequins for shaker.

Used Memento Ink – Tuxedo Black for images.

Used StazOn Ink – Jet Black for sentiments.

Spectrum Noir Alcohol Markers were used for colouring images.

Markers used:

Hair: GB2, GB6, GB7, GB10
Skin: FS2, FS5, TN2, CR3
Dress, Bow, Hair Ribbon: DR1, DR3, DR5, DR7
Cape: CR6, CR8, CR10, Blender
Boots: TB4, TB5, TB6
Belt Buckle, Stars: Atayou Spica – Lemon 05, CT4
Cape: Atayou Spica – Red 03

Eyes Highlights: GellyRoll 08 Sakura

Cricut Explore used to cut –

Scallopped Square – Accent Essentials – Cricut – #M45624

Circle Card Seal Base – #M468A9 – Picturesque – Cricut

Stars – Recollections


Get Well Soon


Hi There,

Created this card for the Craftin Desert Divas June Anything Project.

Sweet Pea - Get well soon - FR 300 dpi

Sweet Pea - Get well soon - in 300 dpi

For this project, I used the stamps from Garden Cuties and the sentiment on the inside from Craftin Desert Diva’s Tissue Time.

All stamping was done with Memento Tuxedo black ink.

I cut out the frame for the inside of the card using Craftin Desert Divas Tag Essential Dies and my Cuttlebug.

Used my Cricut Explore to cut out the Pea pod design from sweetpeajoanneb, which was a free .svg file.

The background papers are from Ki-Doilies Paper Pad by Hamtpon Art.

Coloured in the stamps with my Spectrum Noir alcohol markers and then used Gamsol and PrismaColor Premier coloured pencils to do the highlights.

Hope you like it!