Tag Archive | Tim Holtz Distress Inks – Broken China

Flying By!!


Today, I’m sharing a card using Dreamerland Crafts stamps called Off To A Flying Start – D16003. We have had a lot of pilots in our family in the past and still do. I’ve had the precious opportunity of flying in a small 2 seater plane that my dad and uncle had built years ago and also being allowed into the cockpit of an Air Canada plane on our honeymoon flight in both directions over 30 years ago when it was still possible to this. On the flight home there was an electrical storm. This was so awesome to see. These are experiences that I will never forget as I loved every moment.

To make this card I used a base of 5.5″ x 4.25″ using Hammermill – Premium Colour 100 lb. cardstock. Copic Marker X-Press It Blending Card was cut to the same size as the base and Dreamerland image Off To A Flying Start – D16003 was stamped using my MISTI and Memento – Tuxedo Black ink. The image was stamped a second time onto some plain paper and then fussy cut to create a mask. I coloured in the image using Copic markers. The mask created earlier was then put over top of the coloured image and I applied some Post-It tape along the bottom to hold it into place. Using some stencils that I had previously created using Avery Elle – Pierced Clouds Die, multiple blue Tim Holtz Distress inks listed below and a Picket Fence – Blending Brush, I created the cloudy background. Then, I applied the grass using Copic markers. The coloured image was then put back into my MISTI and using Versa Fine – Onyx Black to stamp the sentiment Sky’s The Limit by Kraftin’ Kimmie. Ranger Embossing Powder White – Extra Fine Detail was applied and heated with Marvy Uchida – Embossing Heat Tool. I applied double-side tape and attached it to the base card to finish it off.

Card Recipe:

Stamps: Off To A Flying Start – D16003 – Dreamerland Crafts

Sentiment: Sky’s The Limit – Kraftin’ Kimmie

Inks: Memento – Tuxedo Black, Versa Fine – Onyx Black, Tim Holtz Distress Ink – Salty Ocean, Tim Holtz Distress Inks – Broken China, Tim Holtz Distress Inks – Tumbled Glass

Paper: Copic Marker X-Press It Blending Card, Hammermill – Premium Colour 100 lb.

Die Cuts \ Stencils: Avery Elle – Pierced Clouds Die (D-05-01) (Created stencils from dies)

Embossing Powder: Ranger Embossing Powder White – Extra Fine Detail

Tools: MISTI – Most Incredible Stamping Tool, Picket Fence – Blending Brush, Marvy Uchida – Embossing Heat Tool

Image coloured with Copic Markers:

Skin: E21, E11, E04, E00, E000, R30, R24, R22, R20

Hair: E47

Jacket and Hat: E89, E87, E84

Pants: E47, E44, E43

Boots and Mitts: E27, E25, E23, E21

Scarf: E50, E40, E31, E30

Goggles: W6, W3, B00

Wings: E33, E31, E30

Grass: YG17, YG13, YG03, YG01

Hope you like it and have a great week!

You can find more cards to inspire you at Dreamerland Crafts and Pointer Scrapbooking on the Facebook Fan pages from the rest of our design team.

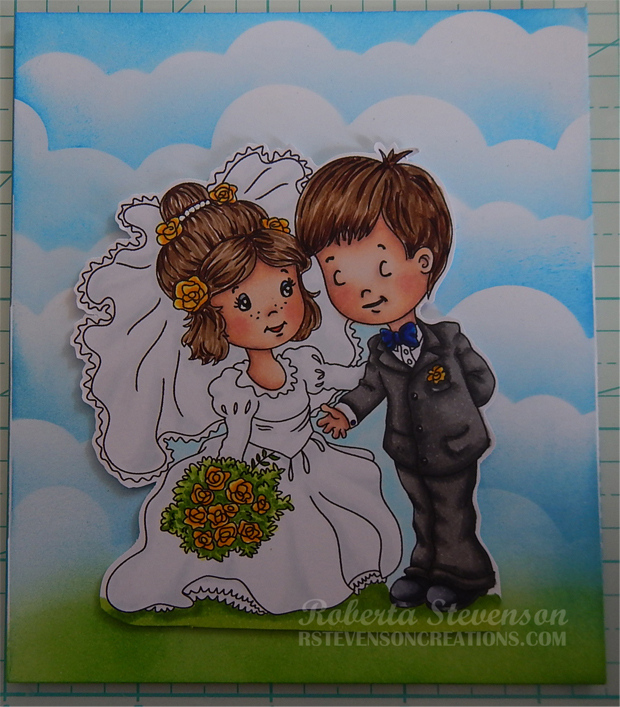
The Happy Couple!!


Today, I’m sharing a card that I made using the image from The Paper Shelter called The Happy Couple. I made this card for a colleague who was married recently. Here’s wishing the happy couple a very long and happy marriage!


To make the card, I first imported the image into Microsoft Word and then printed it out on my HP Printer using High Quality Grayscale. The image was printed onto Copic Marker X-Press It Blending Card. I coloured in the image using Copic markers and then fussy cut around it.

Using my Cuttlebug, Spellbinders – S6-138 dies, and I die cut Hammermill – Premium Colour 100 lb. 5 times for the layers and twice for the sides. For the front of the card, I die cut Crafts Pearl Papers – 02-3081416 with the same dies. For the grass, I die-cut Lawn Fawn – Shadow Box Card Park Add-On and Lawn Fawn – Simple Grassy Hillsides using Momenta – Cardstock. Lastly, I die-cut the flag banner using Crafter’s Companion – Luxury Cardstock – Navy Blue and Craftin Desert Diva’s – Flag Banner Dies and the sentiment was die cut 5 times with Hammermill – Premium Colour 100 lb. cardstock and once with Hot Buy Craft Smart – Holiday Glitz Glitter Paper using PaperCrafter Today – 15 Die Cut Sentiment Set.

For the back panel using stencils I had made previously out of Avery Elle – Pierced Clouds Dies, I coloured in the sky using Tim Holtz Distress Ink – Salty Ocean and Tim Holtz Distress Inks – Broken China. Tim Holtz Distress Ink – Mowed Lawn was used to colour in the grass. The card was now ready to put together. I started with the coloured background and added the coloured image to it using 3M VHB – 2 sided tape.

This was adhered to the side panels using double-side tape on both sides.  Working from back to front, I added on the next layer and applied the grass die cut to front of the layer. This was put through the tabs on the side. I added in the next layers in the same manner. A layer with more grass was added to the 4th layer. I added in the next layer and then for the very front I once again cut off the tabs on both sides and then attached it to the sides using double-sided tape. The banner was then added using glue. The paper for the sentiment had been put through my Xyron Creative Station prior to cutting it. This made it easy to peel of the back of the stickers for each layer and assembling them on top of each other. I used the white layers for the bottom of the sentiment and for the final piece, I used the gold. A small jewel dot was used to finish off the dotted “i”.

Card Recipe:

Stamp: The Happy Couple (The Paper Shelter)

Inks: HP Printer Grayscale, Tim Holtz Distress Ink – Salty Ocean, Tim Holtz Distress Inks – Broken China, Tim Holtz Distress Ink – Mowed Lawn

Paper: Copic Marker X-Press It Blending Card, Hammermill – Premium Colour 100 lb., Crafter’s Companion – Luxury Cardstock – Navy Blue, Crafts Pearl Papers – 02-3081416, Momenta – Cardstock, Hot Buy Craft Smart – Holiday Glitz Glitter Paper 12″ x 12″

Die Cuts: Lawn Fawn – Shadow Box Card Park Add-On, Lawn Fawn – Simple Grassy Hillsides, Spellbinders – S6-138, Craftin Desert Diva’s – Flag Banner Dies, PaperCrafter Today – 15 Die Cut Sentiment Set, Avery Elle – Pierced Clouds Die (D-05-01)

Miscellaneous: 3M VHB – 2 sided tape, Xyron Creative Station

Image coloured with Copic Markers:

Skin: E21, E11, E00, E000, R22, R20, B23, B21, Eyes (Gelly Roll Sakura #8 Pen, Sakura Glaze – Black)

Hair: E47, E44, E43, E41

Dress: BG70, C00, Colorless Blender

Suit and Tie: T7, T5, T3, B69, B39, B24

Flowers and Greenery: YG17, YG11, YG03, YG01. Y35, Y08, Y02, Y00

Shoes: C8, C7, C5, C3

Hope you like it and have a great week!

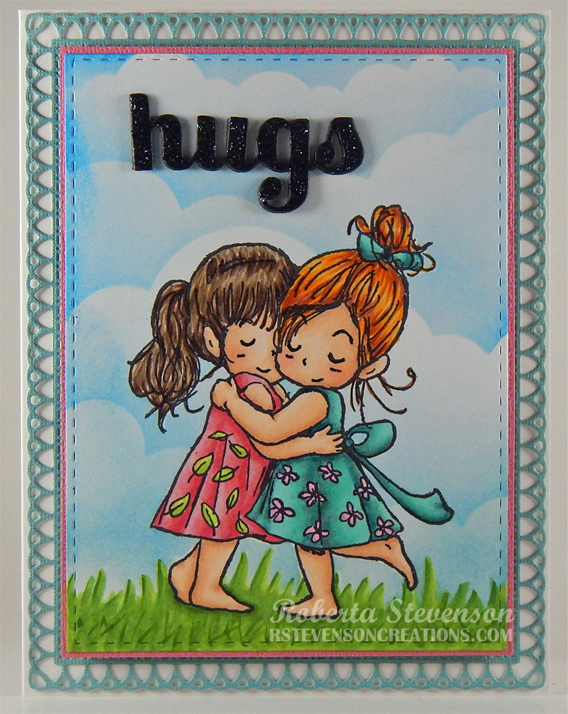
Hugs!!


Today, I’m sharing a card that I made using Dreamerland Crafts stamps called True Friendship – D18020 for the main image and sentiment. It’s always great to see our friends and give them a big hug. Now, it’s wonderful that more and more of my family and friends are getting their 2nd Covid shots, so we will all be able to hug each other again when we see each other. Have you given someone a hug today?

To make this card I used a base card of 5.5″ x 4.25″ using Hammermill – Premium Colour 100 lb. cardstock. I die cut the aqua and pink layers using my Couture Creations – Go Power and Emboss and Gina Marie Designs – Loopy Rectangle Die Set. I trimmed off the loops and line pattern to create a slim border out of the pink cardstock. I applied liquid glue on the the back of the aqua design and adhered it directly to the base card. Next, I applied some double-sided foam tape to the back of the pink rectangle and placed it on  top of the aqua die cut.

For the main image, I first die cut Copic Marker X-Press It Blending Cardstock using my Cuttlebug and My Creative Time – Rectangle Frame Layers. Next, using my MISTI and Memento – Tuxedo Black ink, I stamped the main image onto this and coloured it in with Copic markers. I stamped a second image onto regular copy paper and fussy cut around the image by hand to create a mask. This I placed over top of the coloured image of the 2 little girls. I was able to create the cloudy sky using the stencil from Heffy Doodle – Cloudy Skies, a combination of Tim Holtz Distress Ink – Salty Ocean and Tim Holtz Distress Inks – Broken China and a Picket Fence Studio Blender Brush. The grass base was created with Tim Holtz Distress Ink – Mowed Lawn, Lawn Fawn – Slimline Grassy Hillside Stencils and a Picket Fence Studio Blender Brush. Then, I removed the mask and added in a little more texture to the grass using the Copics listed below.

To create the “Hugs” sentiment, I first ran some black cardstock through my Xyron Create a Sticker. Then using the die-cut from Sugar Script – Hugs, I cut it out 4 times to create a raised image. Since, I had already made stickers out of them, it was easy to peel off the backing and layer them on top of each other. I layered the first 3 and then on the last layer, I first applied Stickles – Black Diamond to it and set it aside to dry. Once, it was dry, I added it as the top layer. I just loved how it had that added sparkle. LOL!

To complete my card, I applied some liquid glue to the back of the coloured image and then adhered it directly to the pink layer. I peeled the backing off of my bottom layer of “Hugs” and applied it directly to the coloured image.

Card Recipe:

Stamp: True Friendship – D18020 – Dreamerland Crafts

Inks: Memento – Tuxedo Black, Tim Holtz Distress Ink – Salty Ocean, Tim Holtz Distress Inks – Broken China, Tim Holtz Distress Ink – Mowed Lawn

Paper: Copic Marker X-Press It Blending Card, Hammermill – Premium Colour 100 lb., Doodebug – Spring Solid Assortment (12″ x 12″)

Die Cuts: My Creative Time – Rectangle Frame Layers, Gina Marie Designs – Loopy Rectangle Die Set, Sugar Script – Hugs

Stencil: Heffy Doodle – Cloudy Skies, Lawn Fawn – Slimline Grassy Hillside Stencils

Embossing Powder: Ranger – Clear Super Fine Detail

Tools: MISTI – Most Incredible Stamping Tool, Cuttlebug, Picket Fence Studio Blender Brushes, Xyron Create a Sticker, Couture Creations – Go Power

Image coloured with Copic Markers:

Skin: E21, E11, E00, E000, R30, R20

Hair: E47, E44, E43, E40, E15, Y38, Y21

Dress1: YG03, YG01, R14, R13, R11

Dress2:  RV02, BG72, BG57, BG13, BG11

Grass: YG17, YG13, YG03, YG01

Hope you like it and have a great week!

You can find more cards to inspire you at Dreamerland Crafts and Pointer Scrapbooking on the Facebook Fan pages from the rest of our design team.

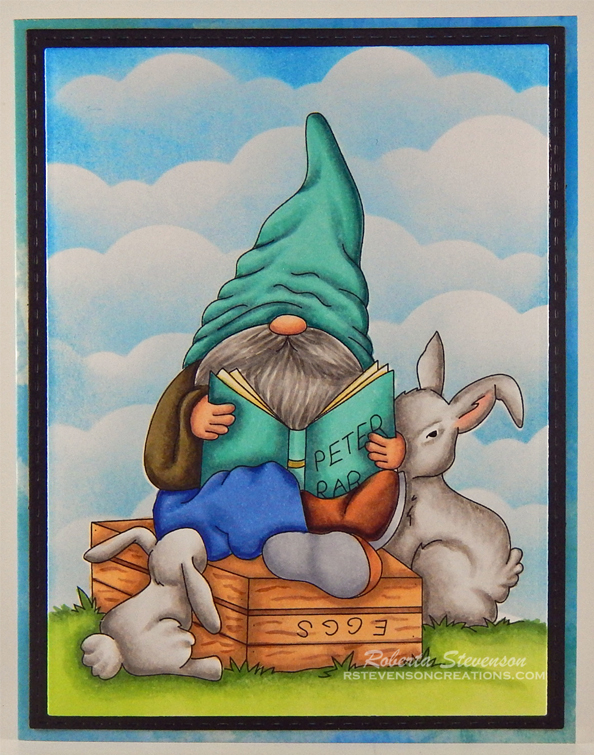
Rabbits Story Time!!


Sharing a card I made today using KLM Digital Designs – Reading Gnome with Rabbits from the new June release. I think this image is such a peaceful scene. These little rabbits are really interested in the story about their cousin Peter Rabbit. We have a little family of wild rabbits that have adopted our backyard yard. I wonder if they’d sit close to me while I read to them. LOL!

To make the card, I first imported the image into Microsoft Word and printed it out onto Copic Marker X-Press It Blending Card and copy paper using my HP Printer. Using my Cuttlebug, My Creative Time – Rectangle Frame Dies and My Creative Time – Rectangle Frame Layers, I die cut black cardstock and the image. I coloured in the image with Copic markers and I created the cloud background using Tim Holtz Distress Ink: Salty Ocean, Broken China, Tumbled Glass with a mixture of cloud stencils I created using Avery Elle – PiercedCloudsDie. I had used my Brother Scan and Cut to create the mask to put over the image while I created the clouds.

To assemble the card, I used Hot Buy – Cards and Envelopes cardstock (5.5″ x 4.25″) for the base. Using double-sided tape, I attached the coloured image and black layer to the base card.

Card Recipe:

Stamp: Reading Gnome with Rabbits – KLM Digital Designs

Inks: HP Printer Grayscale, Tim Holtz Distress Ink – Salty Ocean, Tim Holtz Distress Inks – Broken China, Tim Holtz Distress Inks – Tumbled Glass

Paper: Copic Marker X-Press It Blending Card, Hot Buy – Cards and Envelopes (5.5″ x 4.25″), Black cardstock

Die Cuts Stencils: Avery Elle – Pierced Clouds Die (D-05-01), My Creative Time – Rectangle Frame Dies, My Creative Time – Rectangle Frame Layers

Miscellaneous: Picket Fence – Blending Brush

Image coloured with Copic Markers:

Skin: E21, E11, E04, E00, E000

Beard: W5, W4, W3, W2, W1, W00

Shirt: E89, E87, E84

Jeans: B26, B23, B21

Boots: E27, E25, E23, E21, C3, C2, C1, C0

Book and Hat: BG72, BG57, BG32, BG11, YR30, Y000

Rabbits: W3, W2, W1, W0, W00, R30, R20

Egg Box: E57, E55, E53, E51

Grass: YG17, YG13, YG03, YG01

Hope you like it and have a great week!

You can find more cards to inspire you at KLM Designs, KLM Digital Design Team and KLM Digital Designs on the Facebook Fan page from the rest of our design team.

Seas The Day!!


Sharing a card I made today using KLM Digital Designs – Boating Gnome from the new June release. This stamp comes with 2 other sentiments, “It’s a boat time” and “You float my boat”. There’s nothing like getting up early in the morning and rowing a boat along a shore seeing the wildlife when you go camping. It’s so peaceful and serene.

To make the card, I first imported the image into Microsoft Word and printed it out onto Copic Marker X-Press It Blending Card and copy paper using my HP Printer. Using my Cuttlebug, My Creative Time – Rectangle Frame Dies and My Creative Time – Rectangle Frame Layers, I die cut red, blue cardstock and the image. I coloured in the image with Copic markers and I created the cloud background using Tim Holtz Distress Ink: Salty Ocean, Broken China, Tumbled Glass with a mixture of cloud stencils I created using Avery Elle – PiercedCloudsDie. I had used my Brother Scan and Cut to create the mask to put over the image while I created the clouds.

To assemble the card, I used Hot Buy – Cards and Envelopes cardstock (5.5″ x 4.25″) for the base. I attached the coloured image to the blue layer using double-sided tape. 3M VHB – 2 sided tape was applied to backs of the red and blue rectangles and attached directly to the base.

Card Recipe:

Stamp: Boating Gnome – KLM Digital Designs

Inks: HP Printer Grayscale, Tim Holtz Distress Ink – Salty Ocean, Tim Holtz Distress Inks – Broken China, Tim Holtz Distress Inks – Tumbled Glass

Paper: Copic Marker X-Press It Blending Card, Hot Buy – Cards and Envelopes (5.5″ x 4.25″), Red cardstock, Blue cardstock

Die Cuts Stencils: Avery Elle – Pierced Clouds Die (D-05-01), My Creative Time – Rectangle Frame Dies, My Creative Time – Rectangle Frame Layers

Miscellaneous: 3M VHB – 2 sided tape, Cuttlebug, Brother Scan and Cut, Picket Fence – Blending Brush

Image coloured with Copic Markers:

Skin: E21, E11, E00, E000

Beard: E47, E44, E43, E42

Hat and Glasses: R29, R27, R24, R22, C5

Bathing Suit: B79, B69, B66

Boat and Oar: E39, E37, E35, E34, E33, E31, E30, E29, E27, E25, E23, E21, WR27, R24, R17

Water: BG70, B93, B91, B52, B41, B06, B02, B01, B000

Hope you like it and have a great week!

You can find more cards to inspire you at KLM Designs, KLM Digital Design Team and KLM Digital Designs on the Facebook Fan page from the rest of our design team.

Feel Good!!


Today, I’m sharing a card that I made using Dreamerland Crafts stamps called Having You Around – D19078 for the main image and sentiment. There’s nothing like the love between a boy and his faithful companion. They become best friends as they both grow older together!!!

To make this card I used a base card of 5.5″ x 4.25″ using Hammermill – Premium Colour 100 lb. cardstock. I also cut a panel the same size out of Copic Marker X-Press It Blending Card. I used this to create my background using stencils I created to make clouds by Avery Elle – Pierced Clouds Die (D-05-01) and inks listed below by Tim Holtz. Copic markers were used to colour in the water and I used My Favourite Things – Slimline Grassy Edges Stencil as a guide for the grass on the bottom of the card. Using my MISTI and Versa Fine – Onyx Black ink, I stamped the sentiment and then embossed the ink with Ranger – Clear Super Fine Detail embossing powder. This was heat set with Marvy Uchida – Embossing Heat Tool. I used double-sided tape and attached my background panel to the base card.

Using my Cuttlebug and dies from Studio Light – Wonderful Autumn, I cut the trees and landscape out of Copic Marker X-Press It Blending Card. Using my Copic markers, I coloured these in as well. Then I layered them on top of each other and used glue to adhere them to the coloured background.

Next, using my MISTI and Memento – Tuxedo Black ink, I stamped the main image onto Copic Marker X-Press It Blending Cardstock and coloured it in with Copic markers. I fussy cut around the image by hand and used a black marker to go around all of the edges. 3M VHB – 2 sided tape was applied to the back of the image and it was placed on top of the background to finish off the card.

Card Recipe:

Stamp and Sentiment: Having You Around – D19078 – Dreamerland Crafts

Inks: Memento – Tuxedo Black, Tim Holtz Distress Ink – Salty Ocean, Tim Holtz Distress Inks – Broken China, Versa Fine – Onyx Black

Paper: Copic Marker X-Press It Blending Card, Hammermill – Premium Colour 100 lb.

Die Cuts: Studio Light – Wonderful Autumn – StencilWA311, Avery Elle – Pierced Clouds Die (D-05-01)

Stencil: My Favourite Things – Slimline Grassy Edges Stencil (ST-151)

Embossing Powder: Ranger – Clear Super Fine Detail

Tools: MISTI – Most Incredible Stamping Tool, Cuttlebug, Picket Fence Studio Blender Brushes, Marvy Uchida – Embossing Heat Tool

Image coloured with Copic Markers:

Skin: E21, E11, E00, E000, R22, R20

Hair: E47, E44, E43, E40

Shirt and Hat: E89, E87, E84, R24

Jeans:  B26, B23, B21

Dog: E55, E53, E51

Boat: E49, E27, E25, E23, E21

Trees: E25, E23, G99, G94, G82

Grass: YG17, YG13, YG03, YG01

Water: B93, B91, B52, B41, B06, B04, B02, B01, B000

Hope you like it and have a great week!

You can find more cards to inspire you at Dreamerland Crafts and Pointer Scrapbooking on the Facebook Fan pages from the rest of our design team.

Sunshine and Seashells!!


Sharing a card I made today using KLM Digital Designs – Seascape Gnome from the May releases. This image also comes with 2 more sentiments, “Seas Every Opportunity” and “Be Shore of Yourself”! I don’t know about you, but I love walking along a beach to collect seashells. It’s always so much fun!

To make the card, I first imported the image into Microsoft Word and printed it out onto Copic Marker X-Press It Blending Card and a second copy onto regular copy paper using my HP Printer. Using my Brother Scan and Cut, I cut out the image from the copy paper. I used this as a mask to put over my main image. With the mask in place, I used Tim Holtz Distress Inks: Salty Ocean, Broken China and Tumbled Glass along with cloud stencils I had created using Avery Elle – Pierced Clouds Die (D-05-01) set.

Once this was completed, I removed the mask and began to colour in the water and sand. It was now time to colour my gnome. I unfortunately colured the first layer for the bottom of the beard blue, thinking it was part of the robe he was wearing. Uggggh! I didn’t want to start over, so I just finished colouring the mustache with my Copic markers and then tried to see if I could use the same colours to colour over the blue. It  didn’t quite work out a 100%, so I decided to use my PrismaColor Pencils to colour over top of the Copic markers. This seemed to fix it. I moved on to finish the rest of image.

After I was satisfied with the colouring of the image, I trimmed it down to 5.25″ x 4″. I applied double-sided tape to the back of the image and adhered it to a card base of 5.5″ x 4.25″ to complete my card.

Card Recipe:

Stamp: Seascape Gnome – KLM Digital Designs

Inks: HP Printer Grayscale, Tim Holtz Distress Inks: Salty Ocean, Broken China and Tumbled Glass

Paper: Copic Marker X-Press It Blending Card, Hot Buy – Cards and Envelopes (5.5″ x 4.25″)

Die Cut Stencils: Avery Elle – Pierced Clouds Die (D-05-01)

Image coloured with Copic Markers:

Skin: E21, E11, E00, E000

Beard: E49, E47, E44, E43, E40, PrismaColor Pencils – Gingeroot (PC1084), Dark Brown (PC946), Sandbar Brown (PC1094), Cream (PC914)

Clothing: B16, B04, B02, B01

Hat: B16, B04, B02, B01, BG53, BG49, BG45, BG02, BG01, BG000, Smooch – Pool

Sand: E37, E35, E33, E31

Water: BG70, B93, B91, B52, B41, B02, B01, B000, BG11, BG10

Starfish: YR31, YR09, YR04

Conch: YR31, YR21, YR20, R00, R000

Seashell: YR02, YR01, YR00, YR000

Pail: BG53, BG49, BG45, Pental Sunburst Metalic Med Gel Pen

Lettering: Atyou Spica – Lemon (05)

Hope you like it and have a great week!

You can find more cards to inspire you at KLM Designs, KLM Digital Design Team and KLM Digital Designs on the Facebook Fan page from the rest of our design team.
Soccer For You!!


Sharing a card I made today using KLM Digital Designs – Soccer Gnome from the new May release. This image also comes with 3 more sentiments, “I Bet You Play Soccer”, “Because Your A Keeper” and “I Get A Kick Out of You!”.

To make the card, I first imported the image into Microsoft Word and printed it out onto Copic Marker X-Press It Blending Card and then again on to plain paper using my HP Printer. Using my Brother Scan and Cut, I cut the image out of the plain paper to use as a mask. I put this over top of my main image character and added in the clouds using Tim Holtz Distress Ink – Salty Ocean, Broken China and Tumbled Glass and a mixture of cloud stencils I created using Avery Elle – Pierced Clouds Dies. Then I removed the mask. I coloured in the remainder of the image with Copic markers and then trimmed it off to be 5.25″ x 4″.

For the base, The Paper Studio – Christmas Box of Cards 2012 pre-made cards was used at the size of 5.5″ x 4.25″. I attached the coloured image directly to the base card using double-sided tape.

Card Recipe:

Stamp and Sentiment: Soccer Gnome – KLM Digital Designs

Inks: HP Printer Grayscale, Tim Holtz Distress Inks – Salty Ocean, Broken China and Tumbled Glass

Paper: Copic Marker X-Press It Blending Card, The Paper Studio – Christmas Box of Cards 2012

Die Cuts Stencils: Avery Elle – Custom Steel Dies – Made in the USA – D-05-01 PiercedCloudsDie

Image coloured with Copic Markers:

Skin: E21, E11, E04, E00, E000

Beard: E49, E47, E44, E43, E42

Shirt, Hat and Shoes: R59, R39, R37, R35

Pants and Shoes: C1, C00, Colorless Blender

Soccer Ball: C1, C00, Colorless Blender

Grass: YG17, YG13, YG11, YG03, YG01

Hope you like it and have a great week!

You can find more cards to inspire you at KLM Designs, KLM Digital Design Team and KLM Digital Designs on the Facebook Fan page from the rest of our design team.
Anniversary Gnomes!!


Sharing a card I made today combining the image from KLM Digital Designs April Release called Bride Gnome and image and sentiment from Groom Gnome. These images could be used separately or together and come with multiple sentiments.

To make the card, I first imported the image into Microsoft Word and printed it out onto Copic Marker X-Press It Blending Card using my HP Printer. I coloured in the image with Copic markers. Then I printed them out again on regular copy paper and used my Brother Scan and Cut  to cut around them. I used these as masks over top of the coloured images. Using multiple Tim Holtz inks listed below, I created the sky with a stencil I had created from Avery Elle – Pierced Clouds Die and grass stencil I created from Lawn Fawn – Grassy Hillside Borders.

For the base card, Recollections – Christmas Cards and envelopes paper was used at the size of 5.5″ x 4.25″. I die cut the finished coloured image with Your Next Stamp – Stitched Rectangle Die Set (YNSD214) and glued it to the base.

Card Recipe:

Stamp: Bride Gnome – KLM Digital Designs, Groom Gnome – KLM Digital Designs

Sentiment: Groom Gnome – KLM Digital Designs

Inks: HP Printer Grayscale, Tim Holtz Distress Ink: Peeled Paint, Mowed Lawn, Crushed Olive, Salty Ocean, Broken China, Tumbled Glass

Paper: Copic Marker X-Press It Blending Card, Recollections – Christmas Cards and Envelopes – 5″ x 6.5″

Die Cuts: Avery Elle – Pierced Clouds Die (D-05-01), Lawn Fawn – Grassy Hillside Borders, Your Next Stamp – Stitched Rectangle Die Set (YNSD214)

Image coloured with Copic Markers:

Skin: E21, E11, E04, E00, E000, R30, R20

Beard: E49, E47, E44, E42

Hat and Tuxedo: C9, C7, C5, C3, C2

Shirt Sleeves: C00, Colorless Blender

Shoes: 100, C10, C8, C6, C5

Hair: E18, E08, YR18, YR14

Dress and Shoes : B60, C00, Colorless Blender

Flowers, Leaves, Vest and Ribbon: BV04, BV02, BV01, BV00, Y17, Y04, YG17, YG13, YG03, Gelly Roll Sakura #10 Pen

Hope you like it and have a great week!

Take advantage of this special at KLM Digital Designs!

MOTHER’S DAY SALE 20% OFF EVERYTHING UNTIL MAY 10TH
CODE:MOTHERSDAY21

You can find more cards to inspire you at KLM Designs, KLM Digital Design Team and KLM Digital Designs on the Facebook Fan page from the rest of our design team.

Snoozing Gnome!!


Sharing a card I made today using KLM Digital Designs new April Release called Snoozing Gnome. This little gnome is relaxing and enjoying the day. The image also comes with 2 other sayings, “pause and Reset” and “just Breathe”.

To make the card, I first imported the image into Microsoft Word and printed it out onto Copic Marker X-Press It Blending Card using my HP Printer. I coloured in the image with Copic markers.

For the base card, Hammermill – Premium Colour 100 lb. paper was used at the size of 5.5″ x 4.25″. I created the cloud background using Tim Holtz Distress Ink – Salty Ocean, Broken China and Tumbled Glass and Lawn Fawn Cuts – Cloudy Stencil.

Card Recipe:

Stamp: Snoozing Gnome – KLM Digital Designs

Inks: HP Printer Grayscale, Tim Holtz Distress Ink – Salty Ocean, Tim Holtz Distress Inks – Broken China, Tim Holtz Distress Inks – Tumbled Glass

Paper: Copic Marker X-Press It Blending Card, Hammermill – Premium Colour 100 lb.

Die Cuts Stencils: Lawn Fawn Cuts – Cloudy Stencil

Image coloured with Copic Markers:

Skin: E21, E11, E04, E00, E000

Beard: E49, E47, E44, E42

Shirt: BG72, BG57, BG32, BG11

Pants: B26, B23, B21

Hat: R59, R37, R35

Boots: E27, E25, E23, E21

Mushroom: R46, R14, R08, E43, E42, E40, C1, C00, Colorless Blender

Grass: YG17, YG13, YG03, YG01

Hope you like it and have a great week!

You can find more cards to inspire you at KLM Designs, KLM Digital Design Team and KLM Digital Designs on the Facebook Fan page from the rest of our design team.

Meowy Christmas!


Hi Everyone! I’m participating in the 2020 Cat Lovers Blog Hop (#2020CatLoversHop) this year.

This is my third year joining the fun event. For six years, Her Peaceful Garden has been sponsoring The Cat Lover’s Blog Hop and it is a lot of fun.


Here is a second Christmas card that I have created for the hop using Deck The Halls – GSD438 (Gerda Steiner Designs) for the main image and sentiment. I have always had black cats, so that is why I mainly colour all cat images in shades of black. LOL!

To make my card, I started with a base of 5.5″ x 4.25″. I cut some Copic Marker X-Press It Blending Card the same sized and stamped on the main image. Copic markers were used to colour the image in. Then I used some Clear – Wink of Stella to add a little bit of sparkle to both of the baubles. For the background, I started with Copic colours BG01 and BG000. Then I blended in Tim Holtz Distress Inks with a sponge dauber working from the inside to the outside. Once this was done, I stamped the sentiment using Versa Fine – Onyx Black and applied Ranger – Clear Super Fine Detail embossing powder which I heat set with Marvy Uchida – Embossing Heat Tool.

The frame was die cut using my Cuttlebug, Crafter’s Companion Luxury Cardstock – Red cardstock and die cut called Hero Arts – Fancy Dies – Christmas Lights Border Fancy. I added some liquid glue onto the back and placed it on top of my finished image. To complete the card, I attached the main image to the base card.

Card Recipe:

Stamp and Sentiment:  Deck The Halls – GSD438 (Gerda Steiner Designs)

Inks: Memento – Tuxedo Black, Versa Fine – Onyx Black, Tim Holtz Distress Inks – Tumbled Glass, Tim Holtz Distress Inks – Broken China, Tim Holtz Distress Ink – Salty Ocean

Paper: Copic Marker X-Press It Blending Card, Crafter’s Companion Luxury Cardstock – Red – 8.5 x 11″

Die Cuts: Hero Arts – Fancy Dies – Christmas Lights Border Fancy – DI786

Embossing Powder: Ranger – Clear Super Fine Detail embossing powder

Tools: MISTI – Most Incredible Stamping Tool, Cuttlebug, 3M VHB – 2 sided tape, Diamond Stickles, Marvy Uchida – Embossing Heat Tool

Images coloured with Copic Markers:

Kitten: N8, N6, N4, R30, R22, Sakura Glaze – Black for nose and eyes

Lights: B69, B16, B12, BG01, Y35, Y15, Y11, Y08, R37, R35, R30, R22, YG09, YG05, YG01, G09, 100, Colorless Blender

Bobbles: BG09, BG07, BG05, R59, R39, R37, R35, Pental Sunburst Metalic Med Gel Pen, Clear – Wink of Stella

Background: BG01, BG000, Tim Holtz Distress Inks – Tumbled Glass, Tim Holtz Distress Inks – Broken China, Tim Holtz Distress Ink – Salty Ocean

Hope you like it and have a fantastic week!

Wade Goes To The Beach!


It’s Wednesday, and this week, I used Wade – 132 (High Hopes Rubber Stamps) for the main image and Summer’s Day Saying – L031 (High Hopes Rubber Stamps) for the sentiment. Wade couldn’t wait to go the beach. He’s enjoying the waves and the beautiful beach and sunshine. It will be wonderful when we can all join him with our friends and families too!

To make my card this week, I started off with a white card base of 6″ x 6″. I cut out another piece of paper using Hammermill – Premium Colour 100 lb. cardstock the same size as the base card. Then I ran it through my Cuttlebug using Stampin’ Up – Sizzix Big Shot – Seaside. I loved the wavy pattern it created. Next, I used multiple Tim Holtz shades of blue to create the water effect. All colours are listed below.

I used my Cuttlebug and Your Next Stamp – Stitched Rectangle Die Set to die cut Copic Marker X-Press It Blending Card and white cardstock for my image and sentiment. I stamped the sentiment and image onto the die cuts and then coloured in the main image with Copic markers. The background was coloured in using a variety of Copic Refill inks, Colorless Blender and a Q-Tip. For the water, I wisped several colours back and forth and then added some Copic Colorless Blender and wisped the colours one last time. Once everything was completed, ran the image through my Xyron Creative Station so that it would lay completely flat on the blue cardstock I mounted it onto. I cut a thin border all away around the image and inked around the edges of the sentiment with Tim Holtz Distress Ink – Brushed Corduroy.  Then popped the image and the sentiment using 3M VHB – 2 sided tape onto the base card. I added in a some sea shells from Dress It Up – Beach Collection and Craftin’ Desert Divas – Seashells Sequence. I just removed the button portion and then used glue dots to attach to the card.

Card Recipe:

Stamp:  Wade – S132  (High Hopes Rubber Stamps)

Sentiment: Summer’s Day Saying – L031 (High Hopes Rubber Stamps)

Inks: Memento – Tuxedo Black, Tim Holtz Distress Ink – Salty Ocean, Tumbled Glass, Mermaid Lagoon, Broken China, Evergreen Bough and Brushed Corduroy

Paper: Copic Marker X-Press It Blending Card, Hammermill – Premium Colour 100 lb., Blue carstock

Die Cuts: Your Next Stamp – Stitched Rectangle Die Set (YNSD214)

Embossing Folder: Stampin’ Up – Sizzix Big Shot – Seaside

Tools: MISTI – Most Incredible Stamping Tool, Cuttlebug, 3M VHB – 2 sided tape, Xyron Creative Station, Dress It Up – Beach Collection – #452, Craftin’ Desert Divas – Seashells Sequence

Image coloured with Copic Markers:

Dragon: G85, G82, G21, G20, YR15, YR12, YR02, V17, V15, V12

Swim Trunks: C10, C8, C1, Y15, Y08, Y06, R39, R37, R35

Floaties and Fins: B29, B26, B16

Rubber Ducky Tube: Y38, Y19, Y08, YR18, YR15, YR12, BG18, BG13, BG11, BG07, BG05, BG02

Water: BG72, BG70, BG13, BG10, B93, B91, B52, B41, B000, , B0000, C3

Used Copic Refills and Q-Tip to Create Background:

Sand: E30, E31, Colorless Blender

Sky: B0000, B000, Colorless Blender

Hope you like it and have a fantastic week!

You can find lots of inspiration from the Design Team Divas at the High Hopes blog, and the High Hopes Rubber Stamps Facebook Fan page plus you can also follow us on
Instagram, Twitter and Pinterest.

Check out the High Hopes Website for something else to give you a big smile!

Over on the High Hopes Website there is a Store Wide sale, save 20% off right now when you use the coupon Code Love at the checkout!


Wishing You the Sweetest Things!


Welcome Back Dreamerland Craft Fans!

Today, I’m sharing Dreamerland Craft Stamps Coordinating Die & Clear Stamp Package (D172906) for Character Stamp D172006 Love The Music From My Guitar and Love The Music From My Guitar – D172006! This little boy loves his guitar and all of the animals love his music.

To make his card, I stamped all of the images using my MISTI, Memento – Tuxedo Black ink and Copic Marker X-Press It Blending Card. I coloured in all of the images using Copic markers and then used my Cuttlebug and all of the die cuts from Coordinating Die & Clear Stamp Package (D172906) for Character Stamp D172006 Love The Music From My Guitar (Dreamerland Crafts Clear Stamps). I also die cut the sentiment at the same time and stamped it with Versa Fine – Onyx Black and then heat embossed it using Marvy Uchida – Embossing Heat Tool and Ranger – Clear Super Fine Detail embossing powder..

I was now ready to do the background. To achieve this I cut several die cuts using Monte Mart A4 Watercolour Book paper, Lawn Cuts – Simple Stitched Hillside Borders – Lawn Fawn and Your Next Stamp – Stitched Rectangle Die Set (YNSD214).

For the sky I used several Tim Holtz Blue inks in various shades listed below using a stencil that I had created from Avery Elle – Custom Steel Dies – Made in the USA – D-05-01 PiercedCloudsDie. For the grass I used various shades of Tim Holtz green inks – (see below).

I ran all of the die cuts and the back 2 layers of grass through Xyron Creative Station. Then I set them all aside.

I was now ready to assemble my card. I layered the first 2 die cuts onto the main die cut and then popped up the bottom grass cut with 3M VHB – 2 sided tape. I then added on the characters that I made stickers out of for easy assembly. I popped up the upper half of the little dog with 3M VHB – 2 sided tape. Once the scene was completed I mounted it onto 5.25″ x 4.25″ white cardstock.

Card Recipe:

Stamps and Sentiment: Coordinating Die & Clear Stamp Package (D172906) for Character Stamp D172006 Love The Music From My Guitar (Dreamerland Crafts Clear Stamps), Love The Music From My Guitar – D172006 (Dreamerland Crafts)

Inks: Memento – Tuxedo Black, Versa Fine – Onyx Black

Clouds: Tim Holtz Distress Ink – Blueprint Sketch, Tim Holtz Distress Ink – Salty Ocean, Tim Holtz Distress Inks – Broken China

Grass: Tim Holtz Distress Ink – Mowed Lawn, Tim Holtz Distress Ink – Bundled Sage, Tim Holtz Distress Ink – Twisted Citron, Tim Holtz Distress Inks – Peeled Paint

Embossing Powder: Ranger – Clear Super Fine Detail embossing powder

Paper: Copic Marker X-Press It Blending Card, Mont Mart A4 Watercolour Book paper – Acid Free – 190 GSM, Recollections – White Cardstock

Die Cuts:  Your Next Stamp – Stitched Rectangle Die Set (YNSD214), Coordinating Die & Clear Stamp Package (D172906) for Character Stamp D172006 Love The Music From My Guitar (Dreamerland Crafts Clear Stamps), Avery Elle – Custom Steel Dies – Made in the USA – D-05-01 PiercedCloudsDie

Tools: MISTI – Most Incredible Stamping Tool, Cuttlebug, 3M VHB – 2 sided tape, Marvy Uchida – Embossing Heat Tool

Image coloured with Copic Markers:

Skin: E000, E00, E04, E11, E21, R22, R20

Hair: E47, E44, E43

Shirt: BG49, BG45, BG34

Pants: B26, B23, B21

Guitar: E99, E97, E93, E51, E35, E33, E31, YR27

Bird: B04, B02, B00, Y38

Dog: E35, E34, E33, E31

Rabbit: C7, C5, C3, R30, R02

Cat: W9, W7, W5

Pig: E93,E04, R20, R00, R000, E44, E04

Background: B04, B02, B00

Hope you like it and have a great week!

You can find more cards to inspire you at Dreamerland Crafts on the Facebook Fan page from the rest of our design team.

Our Friendship is Magic!


Welcome High Hopes Rubber Stamps Fans!

It’s Wednesday, and for my last High Hopes card for the year, I’m sharing a couple of good friends just relaxing and taking it easy! Sometimes it is nice to just chill out a bit! LOL! The stamp for the main image is called South Pole Pals R147 (High Hopes Rubber Stamps).

To make my card, I decided to keep it simple. I cut out the frame using Amy Design – Dies – Keep It Cool – Cool Square Frame and Copic Marker X-Press It Blending Card. Next, I stamped the image using my MISTI into the centre of the die cut. I coloured this in with the Copic markers listed below. For the outside of the die cut, I used Tim Holtz Distress Inks – Broken China and sponged on the ink using a dauber.

To create the background for the main image, I re-stamped the main image onto Inkadoo Stamping Mask Paper and fussy cut it out. Then I placed the mask over my coloured image. Next I used a mixture of Tim Holtz Distress Oxide inks, Faded Jeans, Wilted Violet and Festive Berries to create the sky. I have never tried this before, and just love the way it turned out.

For the snow, I stamped the bottom of the image with VersaMark ink and then added WOW! Embossing Glitter – White Puff Twinkle. I heated up the embossing powder with my heat gun and then added some Stickles – Diamond along the top of the snow.

Next I assembled the card onto 5.5″ x 5.5″ white AC Cardstock. I cut out a piece of 5.5″ x 5.5″ Hot Buy Craft Smart – Holiday Glitz Glitter Paper and mounted it with 2 sided tape onto the base. Then I added glue to the back of the frame and centre previously cut and coloured with Zig 2 Way Glue and mounted it onto top of the card.

Lastly, I added the sentiment Magic Friendship F234 (High Hopes Rubber Stamps) and popped it up with 3M VHB – 2 sided tape to finish up the card.

Card Recipe:

Stamp:  South Pole Pals R147 (High Hopes Rubber Stamps)

Sentiment: Magic Friendship F234 (High Hopes Rubber Stamps)

Inks: Memento – Tuxedo Black, Tim Holtz Distress Oxide Festive Berries, Tim Holtz Distress Oxide Faded Jeans, Tim Holtz Distress Oxide Wilted Violet, Tim Holtz Distress Inks – Broken China, Versamark

Paper: Copic Marker X-Press It Blending Card, Hot Buy Craft Smart – Holiday Glitz Glitter Paper 12″ x 12″

Die Cut: Amy Design – Dies – Keep It Cool – Cool Square Frame

Tools: MISTI – Most Incredible Stamping Tool, Cuttlebug, 3M VHB – 2 sided tape, Inkadoo Stamping Mask Paper

Embossing Powder: WOW! Embossing Glitter – White Puff Twinkle

Image coloured with Copic Markers:

Penguin: W9, W7, W5, E15, YR14, Y17, Y15, Y11, E45, E43, E41, Colorless Blender

Polar Bear: W9, W2, W1, W0, R30, R20, Colorless Blender

Hope you like it and have a fantastic week!

You can find lots of inspiration from the Design Team Divas at the High Hopes blog, and the High Hopes Rubber Stamps Facebook Fan page plus you can also follow us on
Instagram, Twitter and Pinterest.


Somebunny Loves You


Hi Dreamerland Fans!

Today I’m sharing a card that I made using a new release stamp from Dreamerland Crafts called I Believe in Love.  I decided to make this an inspirational card because I loved the way the little girl was hugging her bunny with such affection.

I stamped the image onto Copic Marker X-Press It Blending Card using my MISTI – Most Incredible Stamping Tool and Memento – Tuxedo Black. Then the image was coloured in with Copic markers. For the background I used Canson Watercolour Paper and first layered the grass area with multiple Tim Holtz green shades of ink listed below and then the sky with Tim Holtz blue shades of ink. Lastly, to finish the grass, I used a Rake brush and a mixture of Tim Holtz Distress Ink – Mowed Lawn and Tim Holtz Distress Ink – Pine Needles and some water. For the clouds in the sky, I used a cotton ball, cotton swab and some water. Lastly I stamped the sentiment using VersaMark and embossed it with Ranger Embossing Powder White – Extra Fine Detail.

Card Recipe

Stamp: I Believe in Love (Dreamerland Crafts)

Sentiment: Make Special Cards – February 2019 – Issue 16

Paper: Canson Watercolour Paper, Copic Marker X-Press It Blending Card

Ink: Memento – Tuxedo Black, VersaMark

Embossing Powder: Ranger Embossing Powder White – Extra Fine Detail

Image coloured in Copic Markers:

Skin: E000, E00, E04, E11, E21, R22, R20

Hair: E15, Y38, Y21, YR23

Sweater \ Bow in Hair: V09, V06, V04, V01

Sweater Pattern \ Tights: BG57, BG49, BG45

Pants: E29, E27, E25, E23, E21

Boots: E55, E53, E51, E50, E25, E42, E41, E40

Bunny: R02, R20, C-3, C-2, C-1, Colourless Blender

Grass: Tim Holtz Distress Ink – Mowed Lawn, Tim Holtz Distress Ink – Pine Needles, Tim Holtz Distress Inks – Lucky Clover, Tim Holtz Distress Ink – Bundled Sage, 1/2 Loew-Cornell 7120 Rake Brush

Sky: Tim Holtz Distress Inks – Broken China, Tim Holtz Distress Ink – Salty Ocean, Tim Holtz Distress Inks – Tumbled Glass

Stencil: Memory Box Designer Stecil – Frame Love, Tim Holtz Distress Ink – Black Soot

Miscellaneous: MISTI – Most Incredible Stamping Tool, Ranger Embossing Powder White – Extra Fine Detail

Thanks for dropping by and hope to see you back soon!

Capture the Good Times!


Hi Dreamerland Crafts Fans!

Today I’d like to share a card that I made using Dreamerland Crafts Photographer stamp from their new release this year. I decided to colour the outfit blue to match the cameras in the background. To create the scene, I also used several of the Dreamland Mix and Match background stamps.


I used some Canson Watercolour paper and wet it down. Then I stamped on my clouds using Clouds – Dreamerland Crafts Mix & Match Collection stamp and a mixture of Tim Holtz Blue inks which you can find in the list below. For the background blue, I used Tim Holtz Distress Inks – Tumbled Glass, some water and a watercolour brush.

For the greenery Flower Beds – Dreamerland Crafts Mix & Match Collection stamp was used and stamped with a mixture of Tim Holtz greens and Tim Holtz Distress Ink – Gathered Twigs. Then I used the watercolour brush and Tim Holtz Distress Ink – Wilted Violet for the flowers and to add in a little more colour below the shrubbery.

I popped up the little girl and bird with some 3M VHB – 2 sided tape after stamping the images with Memento – Tuxedo Black ink and then colouring the images in with Copic markers.

Background paper and sentiment are from Creative Memories – Shutter Bug collection which I thought was perfect to complete this card.

Note: Using my MISTI – Most Incredible Stamping Tool allowed me to do the placement of the Mix and Match images with ease.

I hope you like my little photographer! Are you ready to go out and take some pictures now too???

Card Recipe:

Stamps: Photographer – Dreamerland Crafts Clear Stamps (D19012), Clouds – Dreamerland Crafts Mix & Match Collection (M18305), Flower Beds – Dreamerland Crafts Mix & Match Collection (M18307)

Paper: Creative Memories – Shutter Bug Designer Paper Pack – 12 x 12 in. double sided paper, Canson – Watercolor cold press 90 lb. (185 g), Copic Marker X-Press It Blending Card, Dark blue cardstock

Ink: Tim Holtz Distress Ink – Blueprint Sketch, Tim Holtz Distress Inks – Broken China, Tim Holtz Distress Inks – Tumbled Glass, Tim Holtz Distress Ink – Bundled Sage, Tim Holtz Distress Ink – Mowed Lawn, Tim Holtz Distress Ink – Shabby Shutters, Tim Holtz Distress Ink – Gathered Twigs, Tim Holtz Distress Ink – Wilted Violet, Memento – Tuxedo Black

Die Cuts: Your Next Stamp – Stitched Rectangle Die Set (YNSD214)

Tools: MISTI – Most Incredible Stamping Tool, Cuttlebug, 3M VHB – 2 sided tape, Watercolour brush

Copic Markers for Colouring:

Skin: E000, E00, E04, E11, E21, R22, R20

Hair: E49, E47, E44, W4

Bow, Socks and Blouse: B04, B02, B00

Skirt and Shoes: B23, B21, B18, Black

Camera: N8, N6, N4, N0

Bird: E17, E15, E13, R02, R01, E49

Panda – Masculine BD Card


Hi There,

Here to share a card that I made for my friend who loves bears. I decided to make him a Panda card using the digi stamp from The Paper Shelter – Most Adorable Panda.

Coloured in the image with a mixture of Spectrum Noir Markers and Copics. I love the way that the Spectrum Noir markers blended so great on the eyes. Hope you do too!

Here is a close-up of the Panda.

For the background papers I used Bo Bunny – Felicity (12 in. x 12 in.) double sided paper.

Die cuts – My Creative Time – More Stitched Circles

Edging – Tim Holtz Distress Inks – Ground Espresso

Sentiment – Stampin Up – Vintage Labels, Tim Holtz Distress Inks – Broken China and Tim Holtz Distress Inks – Peacock Feathers.

Entered into The Paper Shelter Challenge – Challenge 294 – Stitching Faux or Real

Easter Card – Lamb


Hi There,

Back to share the first of some new Easter Cards that I made using Too Cute By Jessica – JS Spring Animals by JessicaSawyerDesign.


EasterLamb1

To create this card I uploaded the .svg files into Cricut Design Space and the used Cricut Explore to cut each of the images.

Here is a close up:

LambCUp

Easter Basket – Treasure Box Gems

Basket Weave – Lifestyle Crafts – Embossing Folder

Here is a close up:

TBG-Basket

Grass: Background Cricut Cartridge – Grass #M44E6A – Disney® – Mickey and Friends

Grass: Foreground – Cricut Cartridge – Border #M34848 – Paper Dolls for Everyday

Clouds – Avery Elle – Custom Steel Dies – Made in the USA – D-05-01 PiercedCloudsDie – Cut out clouds using the die and then used that as a stencil for the clouds.

Sky- Tim Holtz Ranger Distress Ink – Broken China

White on eyes and across noses – Sharpie Water Based Paint – White – Extra Fine Point

Texture for lamb’s wool – Cuttlebug and D’Vine Swirl

Sentiment – Cricut Cartridge – Ashlyn’s Alphabet Block; Patterned Paper – #Summer Paper Pad by American Crafts 6 x 6″ (15.2 x 15.2 cm) for the colourful lettering.

Various ink pads for highlighting characters.

Hope you like it and Happy Easter everyone!


Easter Chicken Card


Hi There,

Back to share the first of some new Easter Cards that I made using Too Cute By Jessica – JS Spring Animals by JessicaSawyerDesign

EasterChick1


To create this card I uploaded the .svg files into Cricut Design Space and the used Cricut Explore to cut each of the images.
Here is a close up.

EasterChickCUP

Egg – Cricut Cartridge – Create A Critter – Shell – #M44F2A

Grass: Background Cricut Cartridge – Grass #M44E6A – Disney® – Mickey and Friends

Grass: Foreground – Cricut Cartridge – Border #M34848 – Paper Dolls for Everyday

Clouds – Avery Elle – Custom Steel Dies – Made in the USA – D-05-01 PiercedCloudsDie – Cut out clouds using the die and then used that as a stencil for the clouds.

Sky- Tim Holtz Ranger Distress Ink – Broken China

White on eyes and across noses – Sharpie Water Based Paint – White – Extra Fine Point.

Flower – Crafts – Fabric Flower Embellishment Kit 02-3001702 from Dollarama.

Sentiment – Cricut Cartridge – Ashlyn’s Alphabet Block; Patterned Paper – #Summer Paper Pad by American Crafts 6 x 6″ (15.2 x 15.2 cm) for the colourful lettering.

Various inks to ink around characters.

Hope you like it and Happy Easter everybody!


Best Friends Furever


Hi There,

Back to share a card I’m calling “Best Friends Furever” after the sentiment from Craftin Desert Diva’s.

IMG_20160117_011944

The background was done with watercolour paper and Tim Holtz Distress Inks.

Black Soot, Peacock Feathers, Tumbled Glass, Shaded Lilac, Dusty Concord and Broken China.

Snow falling is made from Craftin Desert Diva’s – Across the Border stamp, VersaMark and Ranger Embossing Powder White – Extra Fine Detail. I REALLY love this stamp for snow. One of my personal favourites.

Snow on ground is cut using Craftin Desert Diva’s – Stitched Scallop Dies and Recollections Christmas Ink Jet Printable Glitter Paper.

Stamps used are all from Craftin Desert Diva’s and were stamped with Memento – Tuxedo Black ink.

“Chilly” – Polar Bear, Hat, Wolf, Bunny, Iceberg

Sentiment – “Polar Pals”

Here is a closer look at the characters.

Used Sakura Gelly Roll 06 and Sakura Gelly Roll 08 for the eyes and noses. Stampendous – Cotton Ball White FL400 Fun Flock for the pom-poms on hat.

Used Spectrum Noir Markers to colour and PrismaPremier Coloured Pencils with Gamsol.


IMG_20160117_011957      IMG_20160117_012007

Hope you like it!

Entering this into Winter Snow Challenge . It’s a challenge on Craftin Desert Diva’s Linky Party Blog.

YAY! I made top 3 for the Winter Snow Challenge. Yippee! I’m so excited. My first time.

Craftin Desert Divas