Tag Archive | Beach

Better at the Beach!!!


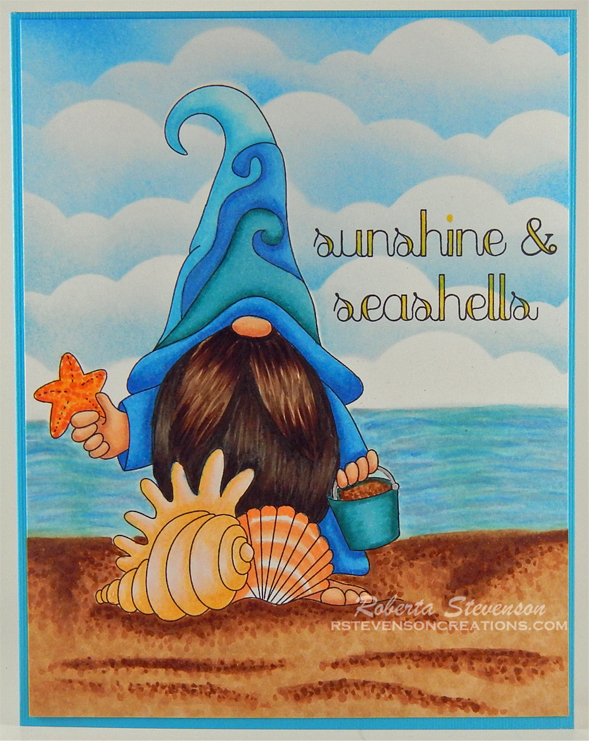
Sharing a card I made today using KLM Digital Design –  Beach Gnome – Girl from the new June 2022 release. This image also comes with 2 more sentiments, “Good times & tan lines” and “Girls just wanna have sun”.

I imported the image and sentiment into Microsoft Word and printed them out onto Copic Marker X-Press It Blending Card and the image again onto regular copy paper. Using My Creative Time – Rectangle Frame Dies and my Cuttlebug, I die cut the image. The image was coloured in with Copic markers. I fussy cut around the image printed out of regular copy paper to create a mask and applied it over top of the coloured image using repositionable tape. Using several Picket Fence – Blending Brushes and multiple Tim Holtz Distress Inks and Krafty Kolours – Sandy Shores, I created the sand, water and clouds using Lawn Fawn – Ocean Waves Stencils, Lawn Fawn – Clippings – Slimline Hillside Stencils and Lawn Fawn Cuts – Cloudy Stencil.

I created a 5.5″ x 4.25″ card base using Hammermill – Premium Colour 100 lb. cardsstock. U-Line – 2 sided tape was added to the back of the image and it was popped up onto the base card. To finish the card off, I added in a few seashells using 2 layers of U-Line – 2 sided tape.

Card Recipe:

Stamp and Sentiment:  Beach Gnome – Girl – KLM Digital Designs

Inks: HP Printer Grayscale, Krafty Kolours – Sandy Shores, Tim Holtz Distress Ink – Salty Ocean, Mermaid Lagoon, Salvaged Patina, Peacock Feathers, Broken China

Paper: Copic Marker X-Press It Blending Card, Hammermill – Premium Colour 100 lb.

Die Cut: My Creative Time – Rectangle Frame Dies

Stencils: Lawn Fawn – Ocean Waves Stencils, Lawn Fawn – Clippings – Slimline Hillside Stencils and Lawn Fawn Cuts – Cloudy Stencil

Miscellaneous: U-Line – 2 sided tape, Picket Fence – Blending Brushes

Image coloured with Copic Markers:

Skin: E21, E11, E04, E00, E000

Hair: E47, E44, E43, E41

Clothing, Hat and Sandals: RV09, RV06, RV04, RV02, B79, B69, B66

Towel, Flower, Pail: V12, V09, V06, V04

Hope you like it and have a great week!

You can find more cards to inspire you at KLM Designs, KLM Digital Design Team and KLM Digital Designs on the Facebook Fan page from the rest of our design team.

High Tides


Sharing a card I made today using KLM Digital Design –  Beach Gnome from the new May 2022 release. This image also comes with 2 more sentiments, “Life is better at the beach” and “Enjoy the little things”.

I imported the image and sentiment into Microsoft Word and printed them out onto Copic Marker X-Press It Blending Card. The image was coloured in with Copic markers. I created the pattern on his shirt to make it look a little wild. Using scissors, I fussy cut around the coloured image. I also fussy cut around the sentiment, splitting it into 2 parts. I ran them through a Xyron Create a Sticker and adhered them directly to Recollections – Black cardstock. Once again, I fussy cut around the sentiments. I added U-Line double-sided tape to the backs of the sentiment and image and set them aside.

I created a 5.5″ x 4.25″ card base using Hammermill – Premium Colour 100 lb. cardsstock. I cut another panel to be the same size as the card base. Using Tim Holtz Distress Ink – Squeezed Lemonade ink, a Picket Fence – Blending Brush and Kraftin’ Kimmie – Sunburst stencil, I created the sunny background. I did this by first laying down the yellow background and then putting the stencil over top to make the sun rays a little brighter. Using Krafty Kolours – Sandy Shores ink, I created the sandy shore. For the waves, I thought the paper from Bo Bunny – Down by the Sea Collection was perfect. Using the coloured image as a guide for placement, I cut along the wavy lines with the piece measuring approximately 1.75″ x 4.25″. Using a finger dauber and Tim Holtz Distress Ink – Evergreen Bough, I inked along the top and bottom of the waves to remove the white. Using Tim Holtz Distress Inks – Tumbled Glass and a Picket Fence – Blending Brush, I added a bit of tint to the patterned paper. Using glue, I attached it to the background panel. I added in a small shadow under the sandals with Copic markers.

The card was now ready to assemble. I attached the panel to the base card using double-sided tape. I removed the tape backing from the image and sentiment and popped them both up onto the card. Using a button shank remover, I removed the backs to the Dress It Up Buttons. I applied some glue to the backs of each of them and placed them onto the card to finish it off.

Card Recipe:

Stamp and Sentiment:  Beach Gnome – KLM Digital Designs

Inks: HP Printer Grayscale, Tim Holtz Distress Ink – Squeezed Lemonade, Krafty Kolours – Sandy Shores, Tim Holtz Distress Inks – Tumbled Glass, Tim Holtz Distress Ink – Evergreen Bough

Paper: Copic Marker X-Press It Blending Card, Hammermill – Premium Colour 100 lb., Bo Bunny – Down by the Sea Collection (6″ x 6″ Paper Pad), Recollections – Black

Stencil: Kraftin’ Kimmie – Sunburst

Embellishments: Dress It Up – Ocean View, Dress It Up – Seashells At The Seashore

Miscellaneous: U-Line – 2 sided tape, Gelly Roll Sakura #10 Pen, Gelly Roll Sakura #5 Pen, Xyron Create a Sticker, Picket Fence – Blending Brushes

Image coloured with Copic Markers:

Skin: E21, E11, E04, E00, E000

Beard: E47, E44, E43, E41

Hat and Sandals: B26, B23, B21

Shirt: Y38, Y35, Y15, YR16, Gelly Roll Sakura #10 Pen

Bathing Suit: BG09, BG05, BG02, BG01

Sunglasses: BG09, BG05, BG00, Gelly Roll Sakura #5 Pen

Shadow Under Sandals: E35, E34, E33

Hope you like it and have a great week!

You can find more cards to inspire you at KLM Designs, KLM Digital Design Team and KLM Digital Designs on the Facebook Fan page from the rest of our design team.

Surfin’ Dudley!


It’s Wednesday, and this week, I used High Hopes Stamps’ image Surf Scene Dudley – S244. I’ve seen surfers in action while travelling the world, but have never gone on one myself. Who knows, maybe someday???? Dudley, sure looks happy sporting his vacation pose. LOL!

Using my MISTI and Memento – Tuxedo Black ink, I stamped the image onto Copic Marker X-Press It Blending Card. I coloured in the image with Copic markers and used Copic – Opaque White to create the splash on the waves. My Creative Time – Rectangle Frame Dies and My Creative Time – Rectangle Frame Layers were both used to die cut the coloured image and background papers. The edges were inked around with Tim Holtz Distress Ink – Evergreen Bough. The image was then attached to the Aqua background using double-sided tape.

To assemble the card, I began with a base card of Hot Buy – Cards and Envelopes (5.5″ x 4.25″). I popped up the 2 backgrounds with 3M VHB – 2 sided tape and attached them both to the base card. Lastly, I added some pop-dots from CC Designs – Dragon Dreams Enamel to finish it off.

Card Recipe:

Stamp: Surf Scene Dudley – S244 (High Hopes Rubber Stamps)

Inks: Memento – Tuxedo Black, Tim Holtz Distress Ink – Evergreen Bough

Paper: Copic Marker X-Press It Blending Card, DCWV – Coastal – 12″ x 12″, Hot Buy – Recollections – Jewel Tones, Hot Buy – Cards and Envelopes (5.5″ x 4.25″)

Die Cuts: My Creative Time – Rectangle Frame Dies, My Creative Time – Rectangle Frame Layers

Tools: MISTI – Most Incredible Stamping Tool, Cuttlebug, 3M VHB – 2 sided tape, CC Designs – Dragon Dreams Enamel Dots

Images coloured with Copic Markers:

Dragon: G94, G82, G46, YG07, YG03, YG00, BV04, BV02, BV01 (Eyes – Sakura Glaze – Black)

Bathing Suit: YR18, YR16, Y08

Surf Board: BG72, BG57, BG32, BG11, YR16, YR14, Y08, Y04

Water: BG70, BG32, BG11, B93, B91, B52, B41, B06, B04, B02, B01, (Copic – Opaque White)

Sky: B02, B01, B00, B000

Sand: E37, E35, E33, E31

Clouds: BG70, C1, C00, Colorless Blender

Hope you like it and have a fantastic week!

You can find lots of inspiration from the Design Team Divas at the High Hopes blog, and the High Hopes Rubber Stamps Facebook Fan page plus you can also follow us on
Instagram, Twitter and Pinterest.

Sunshine and Seashells!!


Sharing a card I made today using KLM Digital Designs – Seascape Gnome from the May releases. This image also comes with 2 more sentiments, “Seas Every Opportunity” and “Be Shore of Yourself”! I don’t know about you, but I love walking along a beach to collect seashells. It’s always so much fun!

To make the card, I first imported the image into Microsoft Word and printed it out onto Copic Marker X-Press It Blending Card and a second copy onto regular copy paper using my HP Printer. Using my Brother Scan and Cut, I cut out the image from the copy paper. I used this as a mask to put over my main image. With the mask in place, I used Tim Holtz Distress Inks: Salty Ocean, Broken China and Tumbled Glass along with cloud stencils I had created using Avery Elle – Pierced Clouds Die (D-05-01) set.

Once this was completed, I removed the mask and began to colour in the water and sand. It was now time to colour my gnome. I unfortunately colured the first layer for the bottom of the beard blue, thinking it was part of the robe he was wearing. Uggggh! I didn’t want to start over, so I just finished colouring the mustache with my Copic markers and then tried to see if I could use the same colours to colour over the blue. It  didn’t quite work out a 100%, so I decided to use my PrismaColor Pencils to colour over top of the Copic markers. This seemed to fix it. I moved on to finish the rest of image.

After I was satisfied with the colouring of the image, I trimmed it down to 5.25″ x 4″. I applied double-sided tape to the back of the image and adhered it to a card base of 5.5″ x 4.25″ to complete my card.

Card Recipe:

Stamp: Seascape Gnome – KLM Digital Designs

Inks: HP Printer Grayscale, Tim Holtz Distress Inks: Salty Ocean, Broken China and Tumbled Glass

Paper: Copic Marker X-Press It Blending Card, Hot Buy – Cards and Envelopes (5.5″ x 4.25″)

Die Cut Stencils: Avery Elle – Pierced Clouds Die (D-05-01)

Image coloured with Copic Markers:

Skin: E21, E11, E00, E000

Beard: E49, E47, E44, E43, E40, PrismaColor Pencils – Gingeroot (PC1084), Dark Brown (PC946), Sandbar Brown (PC1094), Cream (PC914)

Clothing: B16, B04, B02, B01

Hat: B16, B04, B02, B01, BG53, BG49, BG45, BG02, BG01, BG000, Smooch – Pool

Sand: E37, E35, E33, E31

Water: BG70, B93, B91, B52, B41, B02, B01, B000, BG11, BG10

Starfish: YR31, YR09, YR04

Conch: YR31, YR21, YR20, R00, R000

Seashell: YR02, YR01, YR00, YR000

Pail: BG53, BG49, BG45, Pental Sunburst Metalic Med Gel Pen

Lettering: Atyou Spica – Lemon (05)

Hope you like it and have a great week!

You can find more cards to inspire you at KLM Designs, KLM Digital Design Team and KLM Digital Designs on the Facebook Fan page from the rest of our design team.

Happy Bird Day!


It’s Wednesday, and this week, I used Party Girl Florence – S098 (High Hopes Rubber Stamps) for the main image and Happy Bird Day – F098 (High Hopes Rubber Stamps) for the sentiment. Florence is all dolled up and ready for a Bird Day party! She’s the centre of attention with all of her bling, balloons, party hat and musical whistle. She’s also has some fancy moves in store for the Flamingo party dance! LOL!

To make my card this week, I started off with a white card base of 6″ x 6″. For the background paper, I used Forever in Time – Flamingo – Perfect Prints. I coloured the little party hats onto the Flamingos using PrismaColor Premier Pencils. Then I added some white pearls around their necks with Sharpie Water Based Paint – White – Extra Fine Point. Lastly, I edged around the paper with Tim Holtz Distress Ink – Cracked Pistachio.

I used my Cuttlebug and My Creative Time – More Stitched Circles MCT-D136 to die cut Copic Marker X-Press It Blending Card Stock and then my MISTI and Memento – Tuxedo Black ink to stamp the image. I coloured in the image with Copic markers and then used Lifestyle Crafts Cutting Dies – Nesting Circles to cut out the pink and aqua circles. I ran the coloured image through a Xyron Creative Station to make it into a sticker and then mounted it onto the pink cardstock. Then I popped up this piece and the aqua circle with 3M VHB – 2 sided tape. I went around the edge of the pink circle with Hibiscus – Stickles and used Crystal – Stickles for the necklace around Florence’s neck.

I stamped the sentiment onto Yellow cardstock and the ran it through my Xyron Create a Sticker. I mounted that onto some pink cardstock and then popped up this piece and the aqua cardstock with 3M VHB – 2 sided tape. I went around the pink cardstock with Hibiscus Stickles. To finish off the card, I added some Crafts – pop dots.

Card Recipe:

Stamp:  Party Girl Florence – S098  (High Hopes Rubber Stamps)

Sentiment: Happy Bird Day – F098 (High Hopes Rubber Stamps)

Inks: Memento – Tuxedo Black, Tim Holtz Distress Ink – Cracked Pistachio

Paper: Copic Marker X-Press It Blending Card, Forever in Time – Flamingo – Perfect Prints (6″x6″\15cmx15cm)

Die Cuts: Lifestyle Crafts Cutting Dies – Nesting Circles, My Creative Time – More Stitched Circles

Tools: MISTI – Most Incredible Stamping Tool, Cuttlebug, 3M VHB – 2 sided tape, Xyron Creative Station, Xyron Create a Sticker, Sharpie Water Based Paint – White – Extra Fine Point, Hibiscus – Stickles, Crystal – Stickles, Crafts – Pop Dots

Image coloured with Copic Markers:

Flamingo: RV09, RV06, RV04, RV00, RV000, C5, C8, PrismaColor Premier White Pencil

Balloons: RV19, RV17, RV09, RV000, Y15, Y08, Y04, Y00, PrismaColor Premier White Pencil

Hat: B29, B26, B16

Hats on Background Paper: PrismaColor Premier Pencils – PC905 (Aquamarine), PC1006 (Parrot Green), PC1002 (Yellowed Orange), PC994 (Process Red)

Water and Sky: BG13, BG11, BG10, BG01, B01, B00, B000, B0000

Hope you like it and have a fantastic week!

You can find lots of inspiration from the Design Team Divas at the High Hopes blog, and the High Hopes Rubber Stamps Facebook Fan page plus you can also follow us on
Instagram, Twitter and Pinterest.


Wade Goes To The Beach!


It’s Wednesday, and this week, I used Wade – 132 (High Hopes Rubber Stamps) for the main image and Summer’s Day Saying – L031 (High Hopes Rubber Stamps) for the sentiment. Wade couldn’t wait to go the beach. He’s enjoying the waves and the beautiful beach and sunshine. It will be wonderful when we can all join him with our friends and families too!

To make my card this week, I started off with a white card base of 6″ x 6″. I cut out another piece of paper using Hammermill – Premium Colour 100 lb. cardstock the same size as the base card. Then I ran it through my Cuttlebug using Stampin’ Up – Sizzix Big Shot – Seaside. I loved the wavy pattern it created. Next, I used multiple Tim Holtz shades of blue to create the water effect. All colours are listed below.

I used my Cuttlebug and Your Next Stamp – Stitched Rectangle Die Set to die cut Copic Marker X-Press It Blending Card and white cardstock for my image and sentiment. I stamped the sentiment and image onto the die cuts and then coloured in the main image with Copic markers. The background was coloured in using a variety of Copic Refill inks, Colorless Blender and a Q-Tip. For the water, I wisped several colours back and forth and then added some Copic Colorless Blender and wisped the colours one last time. Once everything was completed, ran the image through my Xyron Creative Station so that it would lay completely flat on the blue cardstock I mounted it onto. I cut a thin border all away around the image and inked around the edges of the sentiment with Tim Holtz Distress Ink – Brushed Corduroy.  Then popped the image and the sentiment using 3M VHB – 2 sided tape onto the base card. I added in a some sea shells from Dress It Up – Beach Collection and Craftin’ Desert Divas – Seashells Sequence. I just removed the button portion and then used glue dots to attach to the card.

Card Recipe:

Stamp:  Wade – S132  (High Hopes Rubber Stamps)

Sentiment: Summer’s Day Saying – L031 (High Hopes Rubber Stamps)

Inks: Memento – Tuxedo Black, Tim Holtz Distress Ink – Salty Ocean, Tumbled Glass, Mermaid Lagoon, Broken China, Evergreen Bough and Brushed Corduroy

Paper: Copic Marker X-Press It Blending Card, Hammermill – Premium Colour 100 lb., Blue carstock

Die Cuts: Your Next Stamp – Stitched Rectangle Die Set (YNSD214)

Embossing Folder: Stampin’ Up – Sizzix Big Shot – Seaside

Tools: MISTI – Most Incredible Stamping Tool, Cuttlebug, 3M VHB – 2 sided tape, Xyron Creative Station, Dress It Up – Beach Collection – #452, Craftin’ Desert Divas – Seashells Sequence

Image coloured with Copic Markers:

Dragon: G85, G82, G21, G20, YR15, YR12, YR02, V17, V15, V12

Swim Trunks: C10, C8, C1, Y15, Y08, Y06, R39, R37, R35

Floaties and Fins: B29, B26, B16

Rubber Ducky Tube: Y38, Y19, Y08, YR18, YR15, YR12, BG18, BG13, BG11, BG07, BG05, BG02

Water: BG72, BG70, BG13, BG10, B93, B91, B52, B41, B000, , B0000, C3

Used Copic Refills and Q-Tip to Create Background:

Sand: E30, E31, Colorless Blender

Sky: B0000, B000, Colorless Blender

Hope you like it and have a fantastic week!

You can find lots of inspiration from the Design Team Divas at the High Hopes blog, and the High Hopes Rubber Stamps Facebook Fan page plus you can also follow us on
Instagram, Twitter and Pinterest.

Check out the High Hopes Website for something else to give you a big smile!

Over on the High Hopes Website there is a Store Wide sale, save 20% off right now when you use the coupon Code Love at the checkout!