Tag Archive | AC – Green Cardstock

Santa Candy Cane


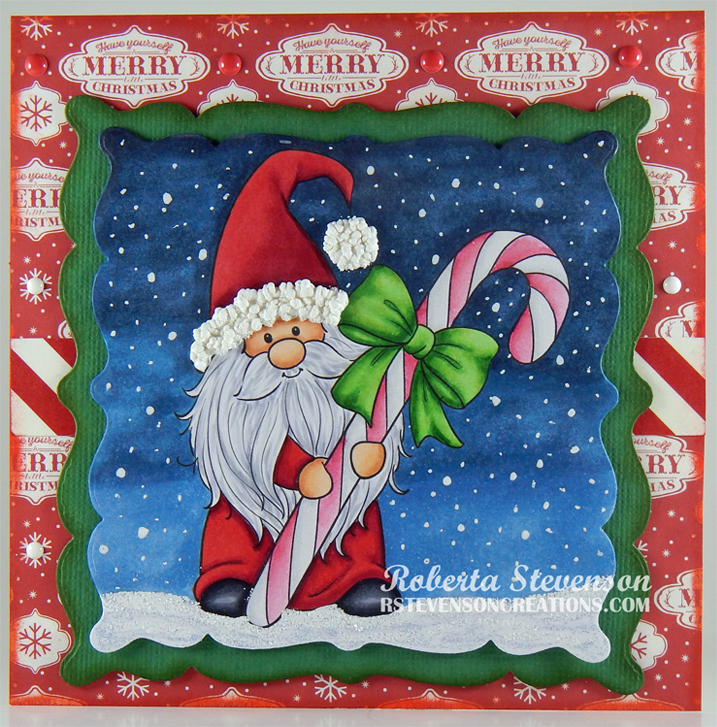
Today, I’m featuring this adorable Santa image from Conie Fong Art called Holiday Gnomes Bundle By Conie Fong.

For the base card, I used Hammermill – Premium Colour 100 lb. cardstock and cut it and scored it to be 5.5″ x 5.5″. For the background, I cut Craft Smith – Peppermint Twist paper to the same size as the base card and inked around the edges with Tim Holtz Distress Inks – Candied Apple. I adhered this to the base card with double-sided tape. AC – Green cardstock was die cut with my Cuttlebug and Essentials by Tattered Lace Dies – Easel Slider dies. Tim Holtz Distress Inks – Peeled Paint was used to ink around all of the edges and it was popped up onto the base card using U-Line double-sided tape.

The image using HP High Quality Grayscale was printed onto Copic Marker X-Press It Blending Card and die cut using my Cuttlebug and Essentials by Tattered Lace Dies – Easel Slider dies. The image was coloured in with Copic markers and Cosmic Shimmer Fluffy Stuff and WOW! Sparkling Snow Embossing Glitter were added to the brim of the hat and pompom. Ranger – Emboss It Pen Clear was added in parts at the bottom for snow and WOW! Sparkling Snow Embossing Glitter was applied. The hat, pompom and snow were all then heat embossed using my Marvy Uchida – Embossing Heat Tool. Stickles – Crystal was also added to the snow to add a little more sparkle. Lastly, using a Gelly Roll Sakura #10 Pen, I added snow to the background sky. The finished image was popped up onto the green cardstock using U-Line double-sided tape and Kraftin’ Kimmie – Christmas Dots were added to complete the card.

Card Recipe:

Stamp: Holiday Gnomes Bundle by Conie Fong

Inks: HP High Quality Grayscale, Tim Holtz Distress Inks – Candied Apple, Tim Holtz Distress Inks – Peeled Paint

Paper: Copic Marker X-Press It Blending Card, Hammermill – Premium Colour 100 lb., Craft Smith – Peppermint Twist 6×6 in., American Crafts – Green Cardstock

Die Cuts: Essentials by Tattered Lace Dies – Easel Slider

Miscellaneous: U-Line double-sided tape, Stickles – Crystal, Gelly Roll Sakura #10 Pen, Cosmic Shimmer Fluffy Stuff, Marvy Uchida – Embossing Heat Tool

Image coloured with Copic Markers:

Skin: E21, E11, E00, E000, R30, R20

Beard: C2, C1, C0, BV20

Hat and Clothing: R59, R37, R35, WOW! Embossing Glitter – White Puff Twinkle, Cosmic Shimmer Fluffy Stuff, Ranger – Emboss It Pen Clear

Shoes: C9, C7, C5, C3

Candy Cane: C1, C0, C00, Colorless Blender, Spectrum Noir Sparkles – Red Berry, Spectrum Noir Sparkles – Clear

Bow: G14, G07, YG23, YG11

Sky: C7, B99, B97, B95

Snow: B60, C1, Stickles – Diamond, Cosmic Shimmer Fluffy Stuff, WOW! Sparkling Snow Embossing Glitter, Ranger – Emboss It Pen Clear

Hope you like it and have a great week!


Toadly Awesome!!


Sharing a card I made today using KLM Digital Designs –  Ryan The Frog Catcher from the new October release. This image also comes with 2 more sayings: “You’re unfrogetable” and “Don’t worry, be hoppy”.

To make the card, I first imported the image and sentiment into Microsoft Word and printed them out onto Copic Marker X-Press It Blending Card.  The image was coloured in with Copic markers and then fussy cut and inked around the edges with a black marker. I fussy cut around the sentiment and ran it through my Xyron Create a Sticker. I applied this to some green cardstock and then repeated the process to add it to some more green cardstock. Once again, I fussy cut around it and then added 3M VHB – 2 sided tape to the back of it to pop-it up onto the card later.

For the base card, I used Hammermill – Premium Colour 100 lb. cardstock and cut it and scored it to be 5.5″ x 4.25″. I cut AC – Green Cardstock to the same size as the base and attached it using double-sided tape. For the inside background, I cut Reminisce – The Menagerie – Happy Frogs paper to the size of 5.25″ x 4″, 1 lime green panel – 5.25″ x 2″, 1 darker green panel, 1 medium green panel and 1 lighter green panel to the size of 5.25″ x .5″. I applied some Tim Holtz Distress Ink – Rustic Wilderness using a Picket Fence Studio Blender Brush to the 2″ panel on both of the long sides. Using my Cuttlebug and various scraps of greens and browns, I die cut the grass and cattails using Lawn Fawn – Shadow Box Card Park Add-On, Lawn Fawn – Bayou Backdrop and Lawn Fawn – Meadow Backdrop: Landscape.

The card was now ready to assemble. I attached the smaller patch of grass on the right side of the frog background with glue. Next, I added the 2″ panel on the left size. Using glue, I attached each of the remaining .5″ panels, centering them in between the 2″ green panel. The 2nd layer of grass was attached with glue along the lower edge of the card and then I used scissors to cut off the pieces that were over the edges of the main background piece. I made sure that no glue was added to the tops of the grasses. I pieced the 2 cattails together using glue and then popped up the tops of them with 3M VHB – 2 sided tape. I added some glue and inserted the 1st cattail under the top blades of grass. 3M VHB – 2 sided tape was added to the back of the boy and the net, except for the area behind the shoes and he was inserted under the top blade of grass and in front of the cattail. The other cattail was then applied to the card using 3M VHB – 2 sided tape for the top part of the cattail and glue was added to the remainder of the piece and added to the card. The other 2 darker blades of grass were added with some glue. Lastly, to finish off the card, the popped up sentiment was added.

Card Recipe:

Stamp and sentiment:  Ryan The Frog Catcher – KLM Digital Designs

Inks: HP Printer Grayscale, Tim Holtz Distress Ink – Rustic Wilderness

Paper: Copic Marker X-Press It Blending Card, Hammermill – Premium Colour 100 lb., Reminisce – The Menagerie – Happy Frogs (12″ x 12″), AC – Green Cardstock, Various green cardstocks

Die Cuts: Lawn Fawn – Shadow Box Card Park Add-On, Lawn Fawn – Bayou Backdrop, Lawn Fawn – Meadow Backdrop: Landscape

Miscellaneous: 3M VHB – 2 sided tape, Picket Fence Studio Blender Brush, Gelly Roll Sakura #5 Pen, Xyron Create a Sticker

Image coloured with Copic Markers:

Skin and Mouth: E21, E11, E00, E000, R30, R20

Hair: E47, E45, E43, E41

Overalls: B26, B23, B21

Shirt : YR18, YR16, YR14, Y17, Y15, Y13

Shoes: C8, C6, C4, C2, C1, C00

Toad: G46, G28, Gelly Roll Sakura #5 Pen

Net: G07, G05, YG06, C8, C6, C4

Hope you like it and have a great week!

You can find more cards to inspire you at KLM Designs, KLM Digital Design Team and KLM Digital Designs on the Facebook Fan page from the rest of our design team.

Winter Fun!!!


It’s Wednesday, and this week, I made a card using Bearly Swooshin’ – T202 by High Hopes Rubber Stamps for the main image and Roundin’ Up – G190 (High Hopes Rubber Stamps) for the sentiment. Winter was always a fun time for me growing up. We had so many outdoor rinks and played so many winter sports. I tried X-Country skiing, but in no way would ever attempt downhill skiing, I was dangerous enough on X-Cross Country skis. I wonder it that’s why everyone I ever went skiing with would only go once with me. LOL!

To make my card this week, I began with a card base of AC Cardstock – White cut and scored to be 6″ x 6″. I cut the background paper from Recollections – Burgundy cardstock to the same size as the base and used double-side tape to apply it directly to it. Photo-Play – O Canada 2 – Ice Rink paper was cut to the size of 5.75″ x 5.75″ and inked around the edges using Tim Holtz Distress Ink – Rustic Wilderness. I applied this directly to burgundy background using double-sided tape. Using Hero Arts – Infinity Dies – Rounded Rectangle dies and my Cuttlebug, I die cut the following: Copic Marker X-Press It Blending Card, Recollections – Burgundy cardstock, AC – Green Cardstock and Recollections – White cardstock.

The image and sentiment were stamped using my MISTI and Memento – Tuxedo Black ink. I coloured in the image with Copic markers and used a Gelly Roll Sakura #8 Pen to create the snow in the sky and whites of the bear’s eyes. Sakura Glaze – Black Pen was used for the eyes and nose. Just love the embossed look those 2 pens give to an image. Lastly, I added some Stickles – Diamond and some Clear Glitter glue for the snow. Once the glitter was all dry, I attached the finished image to the burgundy rounded rectangle with 3M VHB double-sided tape to pop it up. Then, I applied 3M double-sided tape onto the back of the larger rectangle to pop it up on the pictured background. The sentiment was inked with Tim Holtz Distress Ink – Rustic Wilderness and I ran it through my Xyron Create a Sticker and placed it on top of the small green rectangle. I added 3 layers of the 3M VHB – 2 sided tape to the one side to pop it up and some glue and placed it on top of the popped-up coloured image. Lastly, to complete the card, I added some YNS Gumdrops.

Card Recipe:

Stamp: Bearly Swooshin’ – T202 (High Hopes Rubber Stamps)

Sentiment: Roundin’ Up – G190 (High Hopes Rubber Stamps)

Inks: Memento – Tuxedo Black, Tim Holtz Distress Ink – Rustic Wilderness

Paper: Copic Marker X-Press It Blending Card, AC Cardstock – White, Photo-Play – O Canada 2 – Ice Rink (12″ x 12″), Recollections – Burgundy, AC – Green Cardstock and Recollections – White Cardstock

Die Cuts: Hero Arts – Infinity Dies – Rounded Rectangle (DI465)

Tools: MISTI – Most Incredible Stamping Tool, 3M – 2 sided tape, Sakura Glaze – Black Pen, Gelly Roll Sakura #8 Pen, Xyron Create a Sticker, 3M VHB – 2 sided tape, YNS Gumdrops, Cuttlebug

Image coloured with Copic Markers:

Eyes: Sakura Glaze – Black Pen, Gelly Roll Sakura #8 Pen

Bear: E47, E44, E43

Hat, Scarf, Mitts and Bindings: R59, R37, R35, C1, C0, C00, Colorless Blender

Skis, Goggles and Poles: B99, B95, B93, B91, B00, 100, T6

Background: G43, G40, G12

Snow: Stickles – Diamond, Clear Glitter Glue

Hope you like it and have a fantastic week!

You can find lots of inspiration from the Design Team Divas at the High Hopes blog, and the High Hopes Rubber Stamps Facebook Fan page plus you can also follow us on
Instagram, Twitter and Pinterest.