Tag Archive | WOW! Sparkling Snow Embossing Glitter

Beautiful Day!!


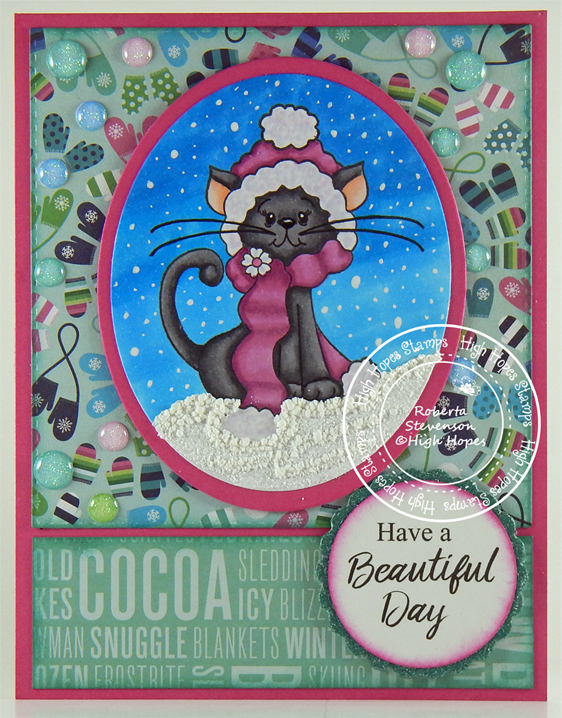
It’s Wednesday, and this week, I made a card using High Hopes Rubber Stamps Winter Kitty – SDG006  for the main image and Beautiful Day – FDG013 for the sentiment. We just had a major snowfall over the last few days and this little kitty is all bundled up and ready to play!

Growing up we had a lot of snow during the winter and couldn’t wait to put on our mitts and snow boots and go out to play. We had huge snow banks in the schoolyard across the street and would toboggan down them or just slide down in our snow suits! LOL! It was sooooo much fun! Sometimes we even made big snow forts in the backyard with tables and chairs made out of ice and snow. We hardly spent anytime indoors and didn’t usually go back into the house until we had to or we were turning blue because it was so cold out, but even then we still wanted to continue playing outdoors. LOL!

To make my card this week, I began with a card base of Hammermill – Premium Colour 100 lb. cardstock, cut and scored to be 5.5″ x 4.25″.  I used Scrapbook.com – Rainbow Smooth Cardstock for the main background paper. It was already the same size as the base, so no cutting had to be done. To get more use out of the same paper, I had cut the oval frame using my Cuttlebug and Hero Arts – Infinity Die Ovals first. Then, I placed the Rainbow cardstock onto the card base using double-sized tape. I die cut the square background using My Creative Time -Stitched Squares Inside and Out and Pebbles – Winter Wonderland paper and the rectangle to the size of 4″ x 4″. The rectangle was cut from from the same paper pack to the size of 1.25″ x 4″. I inked around the edges of both shapes with a sponge dauber and Tim Holtz Distress Ink – Evergreen Bough. Using double-sided tape, I placed both shapes over the pink background and hid where I cut the oval with the square. I cut out a smaller oval using the same Hero Arts – Infinity Die Ovals and Copic Marker X-Press It Blending Card. I also cut out a 1.5″ circle using a circle punch. Lastly, I die cut the scalloped circle using WeR Memory Keepers – Quickutz Nesting Scallops dies and Hot Buy Craft Smart – Holiday Glitz Glitter Paper.

With my MISTI and Memento – Tuxedo Black ink, I stamped the image onto the Copic Marker X-Press It Blending Card cardstock oval and the sentiment onto the circle. I coloured in the image with Copic markers and then added some Ranger – Emboss It Pen Clear to the bottom of the oval and applied WOW! Sparkling Snow Embossing Glitter. I heat embossed this and added more embossing powder several times to create a thicker layer with my Marvy Uchida – Embossing Heat Tool. Then I added some Cosmic Shimmer Fluffy Stuff and heat embossed it as well to puff it up. Gelly Roll Sakura #10 Pen was used to create the snow in the sky. Sakura Glaze – Black and Gelly Roll Sakura #5 Pen were used on the eyes and nose of the cat.

I inked around the edges of the large pink oval and the circle with Tim Holtz Distress Ink – Picked Raspberry. I applied the coloured image directly to the pink oval and the sentiment circle to the scalloped circle using some liquid glue. Both shapes were then popped up onto the card using U-Line double-sided tape. To completed the card and add in some extra sparkle, I applied some YNS Gumdrops – Winter Wonderland to the background patterned paper.

Card Recipe:

Stamp: Winter Kitty – SDG006 (High Hopes Rubber Stamps)

Sentiment: Beautiful Day – FDG013 (High Hopes Rubber Stamps)

Inks: Memento – Tuxedo Black, Tim Holtz Distress Ink – Evergreen Bough, Tim Holtz Distress Ink – Picked Raspberry, Ranger – Emboss It Pen Clear

Paper: Copic Marker X-Press It Blending Card, Hammermill – Premium Colour 100 lb., Scrapbook.com – Rainbow Smooth Cardstock (4.25″ x 5.5″), Pebbles Winter Wonderland 6″ x 6″, Hot Buy Craft Smart – Holiday Glitz Glitter Paper 12″ x 12″

Die Cuts: My Creative Time -Stitched Squares Inside and Out, Hero Arts – Infinity Die Ovals, WeR Memory Keepers – Quickutz Nesting Scallops, 1.5″ Circle Punch

Tools: MISTI – Most Incredible Stamping Tool, U-Line double-sided tape, Gelly Roll Sakura #10 Pen, Gelly Roll Sakura #5 Pen, Sakura Glaze – Black, Cuttlebug, YNS Gumdrops – Winter Wonderland

Image coloured with Copic Markers:

Kitty: N7, N5, N3, R02, R00, RV66, RV63, RV55 (Eyes – Sakura Glaze – Black, Gelly Roll Sakura #5 Pen)

Sky: B05, B04, B02, Gelly Roll Sakura #10 Pen

Snow: WOW! Sparkling Snow Embossing Glitter, Cosmic Shimmer Fluffy Stuff, Marvy Uchida – Embossing Heat Tool

Hope you like it and have a fantastic week!

You can find lots of inspiration from the Design Team Divas at the High Hopes blog, and the High Hopes Rubber Stamps Facebook Fan page plus you can also follow us on
Instagram, Twitter and Pinterest.

Santa Candy Cane


Today, I’m featuring this adorable Santa image from Conie Fong Art called Holiday Gnomes Bundle By Conie Fong.

For the base card, I used Hammermill – Premium Colour 100 lb. cardstock and cut it and scored it to be 5.5″ x 5.5″. For the background, I cut Craft Smith – Peppermint Twist paper to the same size as the base card and inked around the edges with Tim Holtz Distress Inks – Candied Apple. I adhered this to the base card with double-sided tape. AC – Green cardstock was die cut with my Cuttlebug and Essentials by Tattered Lace Dies – Easel Slider dies. Tim Holtz Distress Inks – Peeled Paint was used to ink around all of the edges and it was popped up onto the base card using U-Line double-sided tape.

The image using HP High Quality Grayscale was printed onto Copic Marker X-Press It Blending Card and die cut using my Cuttlebug and Essentials by Tattered Lace Dies – Easel Slider dies. The image was coloured in with Copic markers and Cosmic Shimmer Fluffy Stuff and WOW! Sparkling Snow Embossing Glitter were added to the brim of the hat and pompom. Ranger – Emboss It Pen Clear was added in parts at the bottom for snow and WOW! Sparkling Snow Embossing Glitter was applied. The hat, pompom and snow were all then heat embossed using my Marvy Uchida – Embossing Heat Tool. Stickles – Crystal was also added to the snow to add a little more sparkle. Lastly, using a Gelly Roll Sakura #10 Pen, I added snow to the background sky. The finished image was popped up onto the green cardstock using U-Line double-sided tape and Kraftin’ Kimmie – Christmas Dots were added to complete the card.

Card Recipe:

Stamp: Holiday Gnomes Bundle by Conie Fong

Inks: HP High Quality Grayscale, Tim Holtz Distress Inks – Candied Apple, Tim Holtz Distress Inks – Peeled Paint

Paper: Copic Marker X-Press It Blending Card, Hammermill – Premium Colour 100 lb., Craft Smith – Peppermint Twist 6×6 in., American Crafts – Green Cardstock

Die Cuts: Essentials by Tattered Lace Dies – Easel Slider

Miscellaneous: U-Line double-sided tape, Stickles – Crystal, Gelly Roll Sakura #10 Pen, Cosmic Shimmer Fluffy Stuff, Marvy Uchida – Embossing Heat Tool

Image coloured with Copic Markers:

Skin: E21, E11, E00, E000, R30, R20

Beard: C2, C1, C0, BV20

Hat and Clothing: R59, R37, R35, WOW! Embossing Glitter – White Puff Twinkle, Cosmic Shimmer Fluffy Stuff, Ranger – Emboss It Pen Clear

Shoes: C9, C7, C5, C3

Candy Cane: C1, C0, C00, Colorless Blender, Spectrum Noir Sparkles – Red Berry, Spectrum Noir Sparkles – Clear

Bow: G14, G07, YG23, YG11

Sky: C7, B99, B97, B95

Snow: B60, C1, Stickles – Diamond, Cosmic Shimmer Fluffy Stuff, WOW! Sparkling Snow Embossing Glitter, Ranger – Emboss It Pen Clear

Hope you like it and have a great week!


Dress Up The Christmas Tree!!


Today, I’m sharing a card using Dreamerland Crafts stamps called Mix and Match Clear Stamps – DCS19090.  These little woodland creatures are enjoying their new tree on a snowy evening. Do you have an outdoor Christmas tree?

To make this card I used a base of 5.5″ x 4.25″ using Hammermill – Premium Colour 100 lb. cardstock. Using my Cuttlebug and My Creative Time – Rectangle Frame Dies, I die-cut Crafter’s Companion – Luxury Cardstock – Gold to the size of 5.5″ x 4.25″ and adhered it to the base using double-sided tape. Your Next Die – Stiched Frame Snowfall Hill was used to die cut Creative Memories – Glacier Designer Paper Pack for the snow frame and glued to the base background. With My Creative Time – Rectangle Frame Dies, I also die cut Copic Marker X-Press It Blending Card cardstock to the size of 4.5″ x 3.25″.

I stamped the image using my MISTI and Memento – Tuxedo Black ink onto the Copic Marker X-Press It Blending Card cardstock. I coloured in the image with Copic Markers. The sentiment was added using Versamark and Ranger Embossing Powder White – Extra Fine Detail. This was heated up with a Marvy Uchida – Embossing Heat Tool. The background snow was applied with a Gelly Roll Sakura #10 Pen. Crayola – Yellow Glitter Glue was applied to the glow around the star of the tree and Cosmic Shimmer Fluffy Stuff combined with WOW! Sparkling Snow Embossing Glitter was used to create the snow on the bottom. Stickles – Diamond was applied between the snow drifts to create a little more glitter. Nuvo Crystal Drops – Dandelion Yellow, Red Berry and Caribbean Ocean were applied to the tree for decorations. Once everything was dry, I applied U-Line double-sided tap to the back of the coloured image and applied it to the base to complete the card.

Card Recipe:

Stamp: Mix and Match Clear Stamps – DCS19090 – Dreamerland Crafts

Inks: Memento – Tuxedo Black, Versamark

Paper: Copic Marker X-Press It Blending Card, Hammermill – Premium Colour 100 lb., Crafter’s Companion – Luxury Cardstock – Gold, Creative Memories – Glacier Designer Paper Pack 12 x 12″

Die Cuts: My Creative Time – Rectangle Frame Dies, Your Next Die – Stiched Frame Snowfall Hill

Embossing Powder: Ranger Embossing Powder White – Extra Fine Detail, WOW! Sparkling Snow Embossing Glitter

Nuvo Crystal Drops: Dandelion Yellow, Red Berry, Caribbean Ocean

Tools: MISTI – Most Incredible Stamping Tool, Marvy Uchida – Embossing Heat Tool, Gelly Roll Sakura #10 Pen, Crayola – Yellow Glitter Glue, Cosmic Shimmer Fluffy Stuff, Stickles – Diamond

Image coloured with Copic Markers:

Bear and Scarf: E53, E51, E50, E37, E35, E34, E33, E31, E30, R59, R37, R35, R02, R00

Rabbit and Scarf: R59, R37, R35, R02, R00, BV23, BV20, Colorless Blender

Tree, Star and Base of Tree: G99, YG67, YG17, G21, Y17, Y15, Y13. Y04

Sky: B99, B97, B95, B93

Hope you like it and have a great week!

You can find more cards to inspire you at Dreamerland Crafts and Pointer Scrapbooking on the Facebook Fan pages from the rest of our design team.

Sparkle All The Way!!!


It’s Wednesday, and this week, I made a Christmas card using Snowbear Friends – TDG009 by High Hopes Rubber Stamps for the main image and Sparkle – FDG011 (High Hopes Rubber Stamps) for the sentiment. This month we are celebrating our new Woodland Winter Release at High Hopes Stamps.

To make my card this week, I began with a card base of Hammermill – Premium Colour 100 lb. cardstock, cut and scored to be 5.5″ x 4.25″. I die cut Copic Marker X-Press It Blending Card with my Cuttlebug and My Creative Time – Rectangle Frame Layers. With my MISTI and Memento – Tuxedo Black ink, I stamped the image onto the die cut and the sentiment onto Copic Marker X-Press It Blending Card. I coloured the image in with Copic markers and added in the snow in the sky with Gelly Roll Sakura #10 Pen. I added in the tree decorations using a combination of Nuvo Crystal Drops: Red Berry, Dandelion Yellow and Carribean Dream. Pental Sunburst Metalic Med Gel Pen – Silver and Pental Sunburst Metalic Med Gel Pen – Gold were used to create stripes and colour in circles on the presents. Cosmic Shimmer Fluffy Stuff was applied to the brim of their hats and pom-poms and heat embossed with my Marvy Uchida – Embossing Heat Tool. A little bit of Stickles – Diamond was added onto top of the brims and pompoms to make them sparkly.  I added in the snow on the bottom using a spatula and Nuvo Glimmer Paste – Moonstone and let it dry. Once it was dry, I added in some Cosmic Shimmer Fluffy Stuff to give the snow a little more texture. This too, was heat embossed with my Marvy Uchida – Embossing Heat Tool. I adhered the image to the base card using double-sided tape and Stickles – Diamond was added to the top and side of the sign to complete the card.

Card Recipe:

Stamp: Snowbear Friends – TDG009 (High Hopes Rubber Stamps)

Sentiment: Sparkle – FDG011 (High Hopes Rubber Stamps)

Inks: Memento – Tuxedo Black

Paper: Copic Marker X-Press It Blending Card, Hammermill – Premium Colour 100 lb.

Die Cut: My Creative Time – Rectangle Frame Layers

Nuvo Crystal Drops: Red Berry, Dandelion Yellow, Carribean Dream

Tools: MISTI – Most Incredible Stamping Tool, Marvy Uchida – Embossing Heat Tool, Gelly Roll Sakura #10 Pen, Cosmic Shimmer Fluffy Stuff, Stickles Diamond, Nuvo Glimmer Paste – Moonstone

Image coloured with Copic Markers:

Polar Bears: BV23, BV20, B60, R02, R00, RV00, C9, C7, C5

Hats and Scarves: R59, R46, R37, R35, R14, R08, BG72, BG57, BG32, BG11, BG09, BG05, BG02, BG01, Cosmic Shimmer Fluffy Stuff

Tree: G99, G21, YG67, YG17

Sign: R59, R37, R35, C2, C1, C00

Gifts and Bows: BG72, BG57, BG32, BG11, BG09, BG05, BG02, BG01, R46, R14, R08, E15, Y28, Y26, Y17, Pental Sunburst Metalic Med Gel Pen – Silver, Pental Sunburst Metalic Med Gel Pen – Gold

Sky: B06, B05, B04, B03, B02, B01

Snow: C3, C00, BV20, B000, Nuvo Glimmer Paste – Moonstone, Stickles – Diamond

Hope you like it and have a fantastic week!

You can find lots of inspiration from the Design Team Divas at the High Hopes blog, and the High Hopes Rubber Stamps Facebook Fan page plus you can also follow us on
Instagram, Twitter and Pinterest.

Christmas Penguins!!!


It’s Wednesday, and this week, I made a Christmas card using Christmas Penguins – TDG004 by High Hopes Rubber Stamps for the main image and Happy Holidays – FDG006 (High Hopes Rubber Stamps) for the sentiment. This is just a sneak peek to all of the wonderful images coming soon on Monday, December 6, 2022 as we celebrate our Woodland Winter Release for the month of December at High Hopes Stamps.


To make my card this week, I began with a card base of Hammermill – Premium Colour 100 lb. cardstock, cut and scored to be 5.5″ x 4.25″. I die cut Copic Marker X-Press It Blending Card with my Cuttlebug and My Creative Time – Rectangle Frame Layers. With my MISTI and Memento – Tuxedo Black ink, I stamped the image onto the die cut and the sentiment onto Copic Marker X-Press It Blending Card. I coloured the image in with Copic markers and added in the snow in the sky with Gelly Roll Sakura #10 Pen. I combined Cosmic Shimmer Fluffy Stuff and WOW! Embossing Glitter – White Puff Twinkle for their hats and pom-poms and heat embossed them with my Marvy Uchida – Embossing Heat Tool. I added in the snow on the bottom with Cosmic Shimmer Fluffy Stuff and Sprinkled some WOW! Sparkling Snow Embossing Glitter on as well after using a Ranger – Emboss It Pen Clear in spots. This too, was heat embossed with my Marvy Uchida – Embossing Heat Tool. Lastly, I added in some Stickles – Diamond for snow as well. I love sparkle. LOL! Using double-sided tape, I adhered the finished scene to the base card. I rounded the sentiment with a 1/4″ rounder on the top and cut the 2 bottoms at a diagonal. Copic Marker R37 was used to go around the edges. I popped this onto the finished image using U-Line double-sided tape to complete the card.

Card Recipe:

Stamp: Christmas Penguins – TDG004 (High Hopes Rubber Stamps)

Sentiment: Happy Holidays – FDG006 (High Hopes Rubber Stamps)

Inks: Memento – Tuxedo Black

Paper: Copic Marker X-Press It Blending Card, Hammermill – Premium Colour 100 lb.

Die Cut: My Creative Time – Rectangle Frame Layers

Tools: MISTI – Most Incredible Stamping Tool, U-Line double-sided tape, Marvy Uchida – Embossing Heat Tool, Gelly Roll Sakura #10 Pen, Ranger – Emboss It Pen Clear

Image coloured with Copic Markers:

Penguins: W9, W7, W5, W3, W00, E15, YR14, Y17, Y11, RV00, E43, E42, E41, E40

Hats and Bow for Penguin: R59, R37, R35

Holly and Bow: G14, G07, YG23, YG11

Large Gift and Small Gift: BG72, BG57, BG32, BG11, Y17, Y15, Y13

Medium Gift: V17, V15, V12

Long Gift: RV66, RV63, RV55

Ribbons: Y38, Y35, Y32, RV66, RV63, RV55

Sky: B05, B04, B03, B02

Snow: BV06, Cosmic Shimmer Fluffy Stuff, WOW! Sparkling Snow Embossing Glitter, WOW! Embossing Glitter – White Puff Twinkle, Stickles – Diamond

Hope you like it and have a fantastic week!

You can find lots of inspiration from the Design Team Divas at the High Hopes blog, and the High Hopes Rubber Stamps Facebook Fan page plus you can also follow us on
Instagram, Twitter and Pinterest.

Christmas Cheer!!


Today we are having a sponsor day over at the Passionate Paper Creations & Friends FB group and I’m sharing a snowman card I made using this digital image from Whimsy Stamps – Snowman’s New Hope and clear stamp for the sentiment Dragon Christmas Cheer.

For the base card, I used AC Cardstock – White and cut it and scored it to be 6″ x 6″. The image was printed out using HP High Quality Grayscale onto Copic Marker X-Press It Blending Card. The background paper was cut to the size of 6″ x 6″ using Hot Buy – Recollections – Jewel Tones paper. This was applied directly to the base using double-sided tape. I die cut Doodlebug Design Inc. – Winter Wonderland paper using my Couture Creations – Go Power and Emboss and Creative Expression Craft Dies by Sue Wilson – Noble Dies – Double Pierced Squares – Set B. This was inked around the edges with Lawn Fawn – Peacock Ink and applied directly over top of the bottom layer using double-sided tape. The circles were cut with my Cuttlebug, various colours from Hot Buy – Recollections – Jewel Tones paper and Copic Marker X-Press It Blending Card using Lifestyle Crafts Cutting Dies – Nesting Circles. I applied the 1st 2 circles with double-sided tape over top of the snowman background.

The image was coloured in with Copic markers. I popped up the image and applied it to to the card using 3M double sided tape. I added snow to the bottom of the snowman using Stickles – Diamond to add texture. The snowy background was created with a Ranger – Emboss It Pen Clear and the sentiment was stamped with Versamark ink. Ranger Embossing Powder White – Extra Fine Detail was applied and heat embossed using Marvy Uchida – Embossing Heat Tool. I fussy cut around the sentiment and it was popped up using 3M double-sided tape onto the card to finish it off.

Card Recipe:

Stamp: Snowman’s New Hope – Whimsy Digital Stamps

Sentiment: Dragon Christmas Cheer Whimsy Clear Stamps

Inks: HP High Quality Grayscale, Lawn Fawn – Peacock Ink, Versamark, Ranger – Emboss It Pen Clear

Paper: Copic Marker X-Press It Blending Card, AC Cardstock – White, Hot Buy – Recollections – Jewel Tones, Doodlebug Design Inc. – Winter Wonderland (6″ x 6″)

Die Cuts: Creative Expression Craft Dies by Sue Wilson – Noble Dies – Double Pierced Squares – Set B, Lifestyle Crafts Cutting Dies – Nesting Circles

Embossing Powder: Ranger Embossing Powder White – Extra Fine Detail

Miscellaneous: Couture Creations – Go Power and Emboss, 3M double-sided tape, Stickles – Diamond, Marvy Uchida – Embossing Heat Tool

Image coloured with Copic Markers:

Snowman: YR18, YR15, YR12, R30, R20, B60, C0, C00, Colorless Blender

Hat and Scarf: B37, B26, B23, B21, B14, B12, BG72, BG57, BG34, BG11

Sky: BG10, BG000, BG0000

Hope you like it and have a great week!

Come and check us out on Passionate Paper Creations & Friends FB group
as we are currently sponsoring Whimsy Stamps until Sunday, October 31, 2021.

If you are a member of Passionate Paper Creations & Friends FB group
you can go to the top of the page and get a shopping discount.


If you are not a member just click join. We are a fun loving group with a lot of inspiration.

Believe!!!


It’s Wednesday, and this week, I made a Christmas card using Believe Snowman – TFL006 and Snow Globe – ULF002 by High Hopes Rubber Stamps for the main image and North Pole Greetings – GLL005 (High Hopes Rubber Stamps) for the sentiment. It’s time to start believing the magic of Christmas and the joy that it brings to everyone!

To make my card this week, I began with a card base using AC Cardstock – White cut and folded to 6″ x 6″. The snowflake background is from Lawn Fawn – Let It Shine Snowflakes (6″ x 6″) paper pad. I applied this directly to the base using double-sided tape.

Using Lifestyle Crafts Cutting Dies – Nesting Circles and my Cuttlebug, I die cut a 3.75″ circle from Copic Marker X-Press It Blending Card paper. With my MISTI and Memento – Tuxedo Black ink, I stamped the snowman scene image onto it. I coloured in the image with Copic markers and then added some snow to the sky and snowman’s arms using a Gelly Roll Sakura #8 Pen. Sakura Glaze – Black was added to the eyes of the snowman and birds and the snowman’s mouth. With a Ranger – Emboss It Pen Clear, I added some ink to the top of the Snowman’s hat, sign, icicles, tops of the birdhouses and snow drifts and then heat embossed everything with WOW! Sparkling Snow Embossing Glitter and a Marvy Uchida – Embossing Heat Tool. Stickles – Diamond was added as an extra layer to the snow and Wink of Stella – Clear was applied over all the snowman. This was then set aside to dry.

With my MISTI and Memento – Summer Sky ink I stamped the top part of the globe onto Copic Marker X-Press It Blending Card paper. I cleaned off the stamp and this time, I used some Post-it Notes to hide the background inside the globe and inked the braided border for both the top and bottom of the base with Versamark ink. I applied Ranger Super Fine Detail Gold Embossing powder and heat embossed it using a Marvy Uchida – Embossing Heat Tool. With my globe image still in place on my MISTI, I removed the snowglobe stamp and added the sentiment turning up both ends of the stamp slightly to give the words some curvature. The sentiment was stamped using Versamark ink and then Ranger Super Fine Detail Gold Embossing powder was applied to it and then heat embossed using a Marvy Uchida – Embossing Heat Tool. The base was then coloured in using my Copic markers and a Gelly Roll Stardust – Clear pen was used to colour in the white areas to give it some glitter. I also added some of this pen to the tops of the snowman’s arms. With my scissors, I fussy cut around the entire snow globe.

The card was now ready to assemble. I attached 3M double-side tape to pop up the snow globe onto the main background and then added 3M double-sided tape to the back of the circle and centred it on the top part of the globe. Lastly, to finish off the card, I applied some Nuvo Crystal Drops – Caribbean Ocean, Violet Galaxy and Nuvo Glitter Drops – Sherbert Shimmer to some of the snowflakes on the base card.

Card Recipe:

Stamp: Believe Snowman – TFL006 (High Hopes Rubber Stamps), Snow Globe – ULF002 (High Hopes Rubber Stamps)

Sentiment: North Pole Greetings – GL005 (High Hopes Rubber Stamps)

Inks: Memento – Tuxedo Black, Memento – Summer Sky ink, Versamark

Paper: Copic Marker X-Press It Blending Card, AC Cardstock – White, Lawn Fawn – Let It Shine Snowflakes (6″ x 6″)

Die Cut: Lifestyle Crafts Cutting Dies – Nesting Circles

Stickles: Diamond

Nuvo: Crystal Drops – Caribbean Ocean, Violet Galaxy and Glitter Drops – Sherbert Shimmer

Embossing Powder:Ranger Super Fine Detail Gold Embossing powder, WOW! Sparkling Snow Embossing Glitter

Tools: MISTI – Most Incredible Stamping Tool, Marvy Uchida – Embossing Heat Tool, Cuttlebug, Gelly Roll Sakura #8 Pen, Ranger – Emboss It Pen Clear, Sakura Glaze – Black pen, Gelly Roll Stardust – Clear pen

Image coloured with Copic Markers:

Snowman: B60, C1, C00, Colorless Blender

Hat and Buttons: C10, C8, C6, C4

Arms and Sign: E27, E25, E23, E21

Scarves, Patches, Hat Band: RV66, RV63, RV55, BG09, BG07, BG02, BG01

Bird Houses: RV66, RV63, RV55, BG09, BG07, BG02, BG01, E27, E25, E23, E21

Birds: R46, R14, R08

Sky: B99, B97, B95, B93, B91

Snow: B60, C1, C00, B0000, BG0000, Colorless Blender

Snow Globe: R46, R14, R08

Hope you like it and have a fantastic week!

You can find lots of inspiration from the Design Team Divas at the High Hopes blog, and the High Hopes Rubber Stamps Facebook Fan page plus you can also follow us on
Instagram, Twitter and Pinterest.

Moo-rry Christmas!!!


It’s Wednesday, and this week, I made a Christmas card using Chillin’ Charlie – TT049 by High Hopes Rubber Stamps for the main image and Moo-rry Christmas – FDG002 (High Hopes Rubber Stamps) for the sentiment. It’s beginning to look a lot like Christmas release is being celebrated this month at High Hopes Rubber Stamps.

To make my card this week, I began with a card base from Recollections – Winter 4.25″ x 5.5 (Assorted Box of Cards). I cut Crafter’s Companion – Luxury Cardstock – Navy Blue paper to the size of 3-5/8″ x 4-5/8″. The 3.5″ x 4.5″ background was cut from Heartfelt Creations – Festive Winterscapes Collection. I inked around the edges of the base card and background image with Tim Holtz Distress Ink – Faded Jeans. The sentiment was added to the base card using Versa Fine – Onyx Black ink and my MISTI. The ink was embossed using my Marvy Uchida – Embossing Heat Tool and Ranger – Clear Super Fine Detail embossing powder. I applied the 2 cut pieces together using double-sided tape and then popped them onto the base using 3M  double-sided tape. I had some branches pre-punch from earlier from various green cardstock using my Martha Stuart – Branch punch. I applied liquid glue to the backs of each of the branches and applied them to the popped up background.

With my MISTI and Memento – Tuxedo Black ink, I stamped the image onto Copic Marker X-Press It Blending Card. I coloured in the image with Copic markers and then I fussy cut around it. For the hat trim and pop-pom, I used Ranger – Emboss It Pen Clear and sprinkled on some WOW! Sparkling Snow Embossing Glitter. I heated this with my Marvy Uchida – Embossing Heat Tool and then repeated the process to give it more texture. The image was popped up onto the background using 3M double-sided tape and a few small Ranger Snowflakes were added. Lastly, I added some Stickles – Diamond to the snowflakes on the background and in the centres of the smaller snowflakes to complete my card.

Card Recipe:

Stamp: Chillin’ Charlie – TT049 (High Hopes Rubber Stamps)

Sentiment: Moo-rry Christmas – FDG002 (High Hopes Rubber Stamps)

Inks: Memento – Tuxedo Black, Tim Holtz Distress Ink – Faded Jeans, Versa Fine – Onyx Black

Paper: Copic Marker X-Press It Blending Card, Recollections – Winter 4.25″ x 5.5 (Assorted Box of Cards), Crafter’s Companion – Luxury Cardstock – Navy Blue, Heartfelt Creations – Festive Winterscapes Collection

Die Cut: Martha Stuart – Branch punch

Embossing Powder: WOW! Sparkling Snow Embossing Glitter

Tools: MISTI – Most Incredible Stamping Tool, 3M – 2 sided tape, Marvy Uchida – Embossing Heat Tool, Sakura Glaze – Black Pen, Gelly Roll Sakura #5 Pen, Ranger – Emboss It Pen Clear, Ranger Snowflake Glitter

Image coloured with Copic Markers:

Eyes: Sakura Glaze – Black Pen, Gelly Roll Sakura #5 Pen

Cow: C8, C6, C4, C3, C1, C00, B60, R30, R20, R00, R000, E95, E93, E53, E51, E50

Santa Hat: R59, R37, R35, WOW! Sparkling Snow Embossing Glitter, Cosmic Shimmer Fluffy Stuff

Collar, Holly and Bell: G43, G29, G28, H 14, YG23, YG03, E15, YR24, Y35, Y08

Hope you like it and have a fantastic week!

You can find lots of inspiration from the Design Team Divas at the High Hopes blog, and the High Hopes Rubber Stamps Facebook Fan page plus you can also follow us on
Instagram, Twitter and Pinterest.

Time to Celebrate!!


Today, I’m sharing a Christmas card using Dreamerland Crafts stamps called Let’s Celebrate – D19074 for the main image and Christmas Snow Scene – M18313 for the background. For the sentiment, I used Holiday Sentiments Set 001 – D163001


To make this card I used a base of 5.5″ x 4.25″ using Hammermill – Premium Colour 100 lb. cardstock. My Cuttlebug and My Creative Time – Rectangle Frame Layers Die were used to die-cut Copic Marker X-Press It Blending Cardstock. Using the background stamps, I stamped the background using my MISTI and Memento – Summer Sky ink. I coloured in the sky, trees and house with Copic markers and then added some snow using Gelly Roll Sakura #8 Pen. Once this was done, I added Gina K Designs – Glitz Glitter Gel – Iridescent to the remainder of the die cut for the sparkling snow. I added a little bit more where the boys feet would land and set it aside to dry. Once again, I used my MISTI and Memento – Tuxedo Black ink and stamped the main images. I coloured them in with Copic markers and then applied Ranger – Emboss It Pen Clear to the fur trims for the hats and clothing. I applied WOW! Sparkling Snow Embossing Glitter to the inked areas and then heat embossed everything with my Marvy Heat Embossing Tool. For the pompoms, I applied Cosmic Shimmer Fluffy Stuff and then heat embossed the liquid for it to puff up. For the present, I added some gold swirls using a Pental Sunburst Metalic Med Gel Pen. Then I fussy cut around the images leaving a thin white border. I stamped the sentiment using my MISTI and Lawn Fawn – Peacock Ink on to the base card. Then I stamped it again, this time using Versamark ink and then added Ranger – Clear Super Fine Detail embossing powder and heat embossed it.

The card was now ready to assemble. Using double-sided tape, I attached the background to the scalloped border. I added 3M double-sided tape to the back of the scalloped border and popped it up onto the base card. Using 3M double-sided tape, I popped up the main image and present onto the background. A little more of the Stickles – Diamond was added to snow where his feet are to complete the card.

Card Recipe:

Stamps: Let’s Celebrate – D19074 – Dreamerland Crafts, Christmas Snow Scene – M18313 – Dreamerland Crafts

Sentiment: Holiday Sentiments Set 001 – DS163001 – Dreamerland Crafts

Inks: Memento – Tuxedo Black, Versamark, Lawn Fawn – Peacock Ink, Memento – Summer Sky ink

Paper: Copic Marker X-Press It Blending Card, Hammermill – Premium Colour 100 lb., Hot Buy – Recollections – Jewel Tones

Die Cuts: My Creative Time – Rectangle Frame Layers, Gina Marie Designs – Nested Scalloped Stitched Rectangles

Stickles: Diamond

Embossing Powder: WOW! Sparkling Snow Embossing Glitter, Cosmic Shimmer Fluffy Stuff, Ranger – Clear Super Fine Detail embossing powder

Tools: MISTI – Most Incredible Stamping Tool, Cuttlebug,  Marvy Heat Embossing Tool, Sakura Glaze – Black, Gelly Roll Sakura #8 Pen, Gelly Roll Sakura #5 Pen, 3M VHB – 2 sided tape and Pental Sunburst Metalic Med Gel Pen

Image coloured with Copic Markers:

All Eyes and Small Noses:  Sakura Glaze – Black pen, Gelly Roll Sakura #5 Pen

Skin: E21, E11, E00, E000, R30, R22, R20

Hair: E47, E44, E43

Clothing and Hat: B37, B14, B12

Mitts: YG67, YG63, YG61

Boots: C8, C6, C4, C2, C1

Bear: E57, E55, E53, E51

Pig: E95, E93, R00, R000

Rabbit: C2, C1, C00, R30, R20

Present and Bow: BG09, BG05, BG02, BG01, E15, Y38, Y15, Y08

House: E40, E41, E30, E18, E15, Y04

Trees: G99, G21, YG67, YG17

Sky: B04, B02, B01, B00

Hope you like it and have a great week!

You can find more cards to inspire you at Dreamerland Crafts and Pointer Scrapbooking on the Facebook Fan pages from the rest of our design team.

Santa’s New Ride!!!


It’s Wednesday, and this week, I made a Christmas card using Flyin’ High Santa – T093 by High Hopes Rubber Stamps for the main image and Here Comes Santa Claus – G272 (High Hopes Rubber Stamps) for the sentiment. Santa’s giving his reindeer a rest this year as he checks out his new ride. LOL!

To make my card this week, I began with a card base of Hammermill – Premium Colour 100 lb. cardstock, cut and scored to be 5.5″ x 4.25″. I cut the background paper from Creative Memories – Glacier Paper Pack to be the same size and applied this directly to the base card using double-sided tape. I took a small scrap of Recollections – Black cardstock and ran it through my Xyron Create a Sticker so that it would become a sticker. With my Cuttlebug and Joy Crafts – Lin & Len Design 1201/0027, I die cut the silhouette out of the black paper and then peeled off the backing and placed it directly to the bottom of the card. Stampendous – Snowflakes – Chunky White was sprinkled over top of the card and melted from the bottom of the card using my Marvy Uchida – Embossing Heat Tool.

With my MISTI and Memento – Tuxedo Black ink, I stamped both the image and the sentiment onto Copic Marker X-Press It Blending Card. I cut the sentiment in half using my cutter and ran it through the Xyron Create a Sticker. I placed the sticker on top of some Recollections – Black cardstock and cut it again using my small cutting tool. I coloured in the image with Copic markers and then I fussy cut around it. With a Gelly Roll Sakura #8 Pen, I coloured in the candy cane swirls on the airplane and small circles. Once it was dry, I used Gelly Roll Stardust – Clear to go over the big yellow gumdrop, the swirls on the propeller, the candy cane swirls, small circles on the plane and the star on the tree to add some glitter. For Santa’s cuffs, coat trim and hat, I used Ranger – Emboss It Pen Clear and sprinkled on some WOW! Sparkling Snow Embossing Glitter. I heated this with my Marvy Uchida – Embossing Heat Tool and then repeated the process to give it more texture. For Santa’s pop pom, I applied a little bit of Cosmic Shimmer Fluffy Stuff and then heat embossed it with my Marvy Uchida – Embossing Heat Tool.

The Santa image and sentiment were both popped up onto the background using 3M double-sided tape to complete the card.

Card Recipe:

Stamp: Flyin’ High Santa – T093 (High Hopes Rubber Stamps)

Sentiment: Here Comes Santa Claus – G272 (High Hopes Rubber Stamps)

Inks: Memento – Tuxedo Black

Paper: Copic Marker X-Press It Blending Card, Hammermill – Premium Colour 100 lb., Creative Memories – Glacier Paper Pack (12″ x 12″), Recollections – Black cardstock

Die Cut: Joy Crafts – Lin & Len Design 1201/0027

Embossing Powder: WOW! Sparkling Snow Embossing Glitter, Stampendous – Snowflakes – Chunky White

Tools: MISTI – Most Incredible Stamping Tool, 3M – 2 sided tape, Gelly Roll Stardust – Clear, Xyron Create a Sticker, Cosmic Shimmer Fluffy Stuff, Cuttlebug, Marvy Uchida – Embossing Heat Tool, Gelly Roll Sakura #8 Pen, Sakura Glaze – Black Pen, Gelly Roll Sakura #5 Pen, Ranger – Emboss It Pen Clear

Image coloured with Copic Markers:

Eyes: Sakura Glaze – Black Pen, Gelly Roll Sakura #5 Pen

Skin: E21, E11, E00, E000, R30, R20

Beard: C1, C0, C00, Colorless Blender

Santa Hat, Clothing, Mitts: R59, R37, R35, YG67, YG63, YG61, WOW! Sparkling Snow Embossing Glitter, Cosmic Shimmer Fluffy Stuff

Airplane: R29, R27, R22, R17, G14, YG23, YG01, BG0000, C5, C3, C2, C1, C0, C00, Colorless Blender, Gelly Roll Stardust – Clear

Star and Present Bow: Y17, Y13, Y04, BG07, BG05, BG02, BG01, Gelly Roll Stardust – Clear

Christmas Tree, Propeller and Leaves: G14, YG23, YG01, Y17, Y13, Y04, Gelly Roll Stardust – Clear

Hope you like it and have a fantastic week!

You can find lots of inspiration from the Design Team Divas at the High Hopes blog, and the High Hopes Rubber Stamps Facebook Fan page plus you can also follow us on
Instagram, Twitter and Pinterest.