Tag Archive | Winter

Everything is Magical!


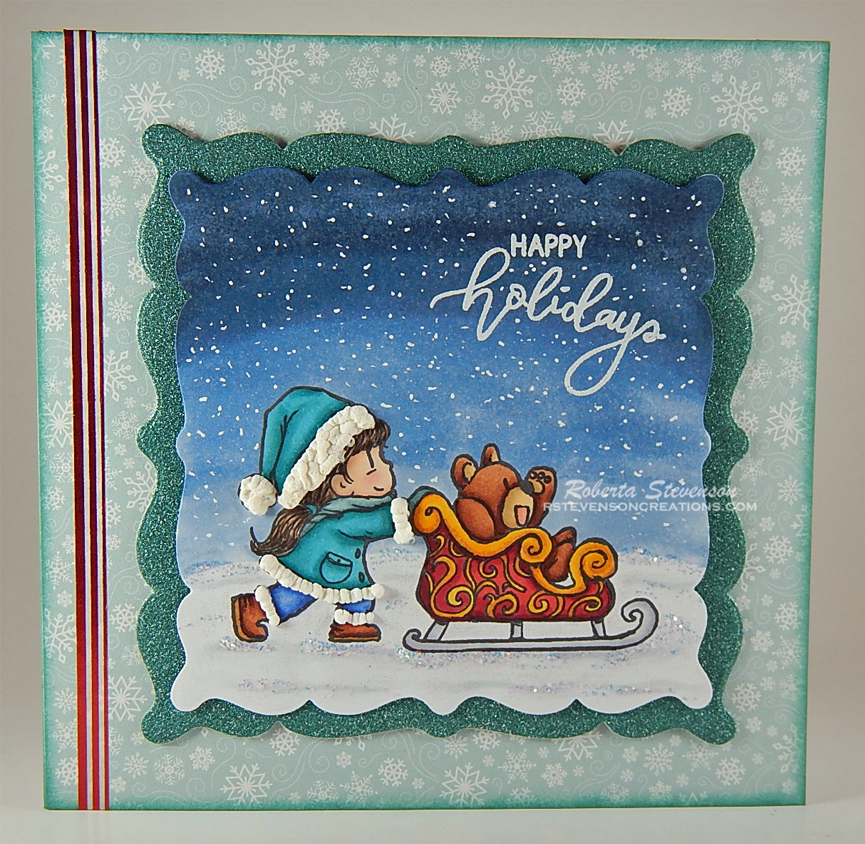
Sharing a Christmas card that I made today using KLM Digital DesignSledding Gnome from the new December 2022 release. This image also comes with 2 more sentiments, “Some people are worth melting for” and “Walking in a Winter WONDERLAND”.

Hammermill – Premium Colour 100 lb. cardstock was used to create a 5.5″ x 4.25″ card base. I cut Lawn Fawn – Let It Shine Snowflakes designer paper to be the same size and adhered it to the base using double-sided tape. The image and sentiment were imported into Microsoft Word and printed out onto Copic Marker X-Press It Blending Card. The printed image was die cut using my Cuttlebug and Die-namics – MFT – Stitched Rec Scallop Frame dies. It was coloured in and then I applied Cosmic Shimmer Fluffy Stuff. DecoArt Glamour Dust was sprinkled over top while it was still wet and then it was heat set with a Marvy Uchida – Embossing Heat Tool to puff up the snow. I applied the snow flakes in the sky using a UNIPosca PC-3M White marker and snow on the ground with Stickles – Diamond in between and on top of the fluffy snow. U-Line double-sided tape was applied to the image after the Stickles was dry and it was popped up onto the base.

Card Recipe:

Stamp and Sentiment:  Sledding Gnome – KLM Digital Designs

Inks: HP Printer Grayscale

Paper: Copic Marker X-Press It Blending Card, Hammermill – Premium Colour 100 lb., Lawn Fawn – Let It Shine Snowflakes (6″ x 6″)

Dies: Die-namics – Exclusive Designs for “My Favourite Things” – Stitched Rec Scallop Frame – MFT-860

Miscellaneous: U-Line double-sided tape, Stickles – Diamond, Cosmic Shimmer Fluffy Stuff, DecoArt Glamour Dust, Marvy Uchida – Embossing Heat Tool, UNIPosca PC-3M White marker

Image coloured with Copic Markers:

Skin: E21, E11, E00, E000

Beard: E47, E44, E43, E41

Hat and Mittens: BG72, BG57, BG32, BG11

Jeans: B26, B23, B21

Shoes: C9, C7, C5

Shirt: R46, R14, R08

Sled: E39, E37, E35, E34, E31, E30,  C5, C3, C1

Holly: BG99, YG17, YG03, R46

Sky: B02, B01, B00, B000

Snow: BV20, B000

Hope you like it and have a great week!

You can find more cards to inspire you at KLM Designs, KLM Digital Design Team and KLM Digital Designs on the Facebook Fan page from the rest of our design team.

Winter Wonderland


Sharing a CAS card that I made today using KLM Digital DesignSkier Gnome for the main image and Sledding Gnome for the sentiment from the new December 2022 release. I tried Cross-Country skiing a few times. I was so bad at it, that once was enough for any of my friends. They said I was too dangerous on them. LOL! I even skied down into a tree to avoid knocking over 3 people once going down a small hill. My friend was laughing so hard it took him a little while before he could help me back up away from the tree. But, by the time we got back he was freezing and I was hot from all of the hard work I was doing trying to keep up to him. He was a professional skier. That was the last time he ever went with me. Then there was the time that there were about 6 of us. They made the mistake of asking me to go first side-stepping up the hill. I almost made it to the top when my foot slipped and yes, I knocked everyone over like a bunch of bowling pins. LOL! Guess what??? They never went with me again either. Oh well! Some things are just not meant to be!!! As you may have guessed by now. Downhill is definitely out of the question for me.

To make my card this week, I started with a 5.5″ x 4.25″ card base using Hammermill – Premium Colour 100 lb. cardstock. Recollections – Christmas Plaids paper was cut to the same size and adhered directly to the base using double-sided tape! The image and sentiment were imported into Microsoft Word and printed out onto Copic Marker X-Press It Blending Card. With my Cuttlebug and My Creative Time – Rectangle Frame Dies, I die cut the printed image and sentiment.

I coloured in the image and then added in the snow in the sky using a combination of a Gelly Roll Sakura #10 Pen and UNIPosca PC-3M White marker. The snow at the bottom was created using a combination of Cosmic Shimmer Fluffy Stuff and DecoArt Glamour Dust. To puff up the snow, heat was applied using Marvy Uchida – Embossing Heat Tool. I added a little more glitter along the very top of the snow with Stickles – Star Dust. The completed image was then popped up onto the card using U-Line double-sided tape.

Card Recipe:

Stamp:  Skier Gnome – KLM Digital Designs

Sentiment: Sledding Gnome – KLM Digital Designs

Inks: HP Printer Grayscale

Paper: Copic Marker X-Press It Blending Card, Hammermill – Premium Colour 100 lb., Recollections – Christmas Plaids

Die Cuts: My Creative Time – Rectangle Frame Dies

Miscellaneous: U-Line double-sided tape, Cuttlebug, Gelly Roll Sakura #10 Pen, UNIPosca PC-3M White marker, DecoArt Glamour Dust, Cosmic Shimmer Fluffy Stuff, Stickles – Star Dust, Marvy Uchida – Embossing Heat Tool

Image coloured with Copic Markers:

Skin: E21, E11, E04, E00, E000

Beard: E08, YR18, YR16, YR12

Antlers: E33, E31, E30

Ears: R25, R23, R02, R01

Shirt and Hat: G46, G29, G24, G21, R39, R34

Jeans: B26, B23, B21

Boots: E34, E33, E31, E29, E27, E25, E23

Poles: E39, E37, E35, C8, C6, C5, C4, C3, C1

Sky: B99, B97, B95, B93

Hope you like it and have a great week!

You can find more cards to inspire you at KLM Designs, KLM Digital Design Team and KLM Digital Designs on the Facebook Fan page from the rest of our design team.

You Got This!!


It’s Wednesday, and this week, I made a card using High Hopes Rubber Stamps Lasso Some Snow – TDG021  for the main image and Don’t Worry – FDG021 for the sentiment. We all need a little bit of encouragement every now and then and this little snowman is here to give us some.

To make my card this week, I began with a card base of Hammermill – Premium Colour 100 lb. cardstock, cut and scored to be 5.5″ x 4.25″.  I used Echo Park Paper Co. – My Favorite Winter cardstock cut to the same size as the base card for the background. I attached this to the base using double-sided tape. Using my Cuttlebug, a mixture of square dies from My Creative Time -Stitched Squares Inside and Out and Waffle Flower – Nesting Square dies, I die cut cardstock from Scrapbook.com Neutrals Smooth Cardstock and also Copic Marker X-Press It Blending Card. I applied double-sided tape to the back of the tan square and applied it directly to the background. U-Line double-sided tape was added to the back of the dark brown square and popped up onto the centre of the tan square.

With my MISTI and Memento – Tuxedo Black ink, I stamped the image onto the Copic Marker X-Press It Blending Card cardstock square and coloured it in with Copic markers. Gelly Roll Sakura #10 Pen was used to create the snow in the sky. Sakura Glaze – Black and Gelly Roll Sakura #5 Pen were used on the eyes of the snowman. I applied U-line douhble-sided tape to the back of the completed image and popped it up onto the centre of the dark brown square.

With my MISTI and Memento – Tuxedo Black ink, I stamped the sentiment onto Recollections – White cardstock and then die cut it out using my Cuttlebug and My Creative Time – Ribbon End Dies. I inked around the edges using Copic – E59 marker to give it a dark brown border. I used my knife to remove the double border from the piece left behind and then traced the shape of the ribbon onto the remaining piece of Scrapbook.com Neutrals Smooth Cardstock. I cut this out with my cutter and scissors. U-Line double-sided tape was applied to both pieces and the completed sentiment was popped up onto the card below the main image to complete the card.

Card Recipe:

Stamp: Lasso Some Snow – TDG021 (High Hopes Rubber Stamps)

Sentiment: Don’t Worry – FDG021 (High Hopes Rubber Stamps)

Inks: Memento – Tuxedo Black

Paper: Copic Marker X-Press It Blending Card, Hammermill – Premium Colour 100 lb., Echo Park Paper Co. – My Favorite Winter (6″ x 6″), Scrapbook.com – Neutrals Smooth Cardstock (5.5″ x 4.25″), Recollections – White cardstock

Die Cuts: My Creative Time -Stitched Squares Inside and Out, Waffle Flower – Nesting Square dies, My Creative Time – Ribbon End Dies

Tools: MISTI – Most Incredible Stamping Tool, U-Line double-sided tape, Gelly Roll Sakura #10 Pen, Gelly Roll Sakura #5 Pen, Sakura Glaze – Black, Cuttlebug

Image coloured with Copic Markers:

Snowman: B60, C9, C7, C5, C00, E49, YR18, YR16, YR12, Colorless Blender (Eyes – Sakura Glaze – Black, Gelly Roll Sakura #5 Pen)

Hats, Mitts and Scarf: B99, B977, B95

Coat: E51, E50, E37, E35, E34, E33, E31

Birds: E59, E37, E35

Fence: E29, E27, E25, E23, E21

Wheel and Rope: E77, E74, E47, E44, E43, Y35, YR31

Sky: B04, B02, B01, B00

Snow: B000, B60, C00, Colorless Blender, Stickles – Diamond

Hope you like it and have a fantastic week!

You can find lots of inspiration from the Design Team Divas at the High Hopes blog, and the High Hopes Rubber Stamps Facebook Fan page plus you can also follow us on
Instagram, Twitter and Pinterest.

Beautiful Day!!


It’s Wednesday, and this week, I made a card using High Hopes Rubber Stamps Winter Kitty – SDG006  for the main image and Beautiful Day – FDG013 for the sentiment. We just had a major snowfall over the last few days and this little kitty is all bundled up and ready to play!

Growing up we had a lot of snow during the winter and couldn’t wait to put on our mitts and snow boots and go out to play. We had huge snow banks in the schoolyard across the street and would toboggan down them or just slide down in our snow suits! LOL! It was sooooo much fun! Sometimes we even made big snow forts in the backyard with tables and chairs made out of ice and snow. We hardly spent anytime indoors and didn’t usually go back into the house until we had to or we were turning blue because it was so cold out, but even then we still wanted to continue playing outdoors. LOL!

To make my card this week, I began with a card base of Hammermill – Premium Colour 100 lb. cardstock, cut and scored to be 5.5″ x 4.25″.  I used Scrapbook.com – Rainbow Smooth Cardstock for the main background paper. It was already the same size as the base, so no cutting had to be done. To get more use out of the same paper, I had cut the oval frame using my Cuttlebug and Hero Arts – Infinity Die Ovals first. Then, I placed the Rainbow cardstock onto the card base using double-sized tape. I die cut the square background using My Creative Time -Stitched Squares Inside and Out and Pebbles – Winter Wonderland paper and the rectangle to the size of 4″ x 4″. The rectangle was cut from from the same paper pack to the size of 1.25″ x 4″. I inked around the edges of both shapes with a sponge dauber and Tim Holtz Distress Ink – Evergreen Bough. Using double-sided tape, I placed both shapes over the pink background and hid where I cut the oval with the square. I cut out a smaller oval using the same Hero Arts – Infinity Die Ovals and Copic Marker X-Press It Blending Card. I also cut out a 1.5″ circle using a circle punch. Lastly, I die cut the scalloped circle using WeR Memory Keepers – Quickutz Nesting Scallops dies and Hot Buy Craft Smart – Holiday Glitz Glitter Paper.

With my MISTI and Memento – Tuxedo Black ink, I stamped the image onto the Copic Marker X-Press It Blending Card cardstock oval and the sentiment onto the circle. I coloured in the image with Copic markers and then added some Ranger – Emboss It Pen Clear to the bottom of the oval and applied WOW! Sparkling Snow Embossing Glitter. I heat embossed this and added more embossing powder several times to create a thicker layer with my Marvy Uchida – Embossing Heat Tool. Then I added some Cosmic Shimmer Fluffy Stuff and heat embossed it as well to puff it up. Gelly Roll Sakura #10 Pen was used to create the snow in the sky. Sakura Glaze – Black and Gelly Roll Sakura #5 Pen were used on the eyes and nose of the cat.

I inked around the edges of the large pink oval and the circle with Tim Holtz Distress Ink – Picked Raspberry. I applied the coloured image directly to the pink oval and the sentiment circle to the scalloped circle using some liquid glue. Both shapes were then popped up onto the card using U-Line double-sided tape. To completed the card and add in some extra sparkle, I applied some YNS Gumdrops – Winter Wonderland to the background patterned paper.

Card Recipe:

Stamp: Winter Kitty – SDG006 (High Hopes Rubber Stamps)

Sentiment: Beautiful Day – FDG013 (High Hopes Rubber Stamps)

Inks: Memento – Tuxedo Black, Tim Holtz Distress Ink – Evergreen Bough, Tim Holtz Distress Ink – Picked Raspberry, Ranger – Emboss It Pen Clear

Paper: Copic Marker X-Press It Blending Card, Hammermill – Premium Colour 100 lb., Scrapbook.com – Rainbow Smooth Cardstock (4.25″ x 5.5″), Pebbles Winter Wonderland 6″ x 6″, Hot Buy Craft Smart – Holiday Glitz Glitter Paper 12″ x 12″

Die Cuts: My Creative Time -Stitched Squares Inside and Out, Hero Arts – Infinity Die Ovals, WeR Memory Keepers – Quickutz Nesting Scallops, 1.5″ Circle Punch

Tools: MISTI – Most Incredible Stamping Tool, U-Line double-sided tape, Gelly Roll Sakura #10 Pen, Gelly Roll Sakura #5 Pen, Sakura Glaze – Black, Cuttlebug, YNS Gumdrops – Winter Wonderland

Image coloured with Copic Markers:

Kitty: N7, N5, N3, R02, R00, RV66, RV63, RV55 (Eyes – Sakura Glaze – Black, Gelly Roll Sakura #5 Pen)

Sky: B05, B04, B02, Gelly Roll Sakura #10 Pen

Snow: WOW! Sparkling Snow Embossing Glitter, Cosmic Shimmer Fluffy Stuff, Marvy Uchida – Embossing Heat Tool

Hope you like it and have a fantastic week!

You can find lots of inspiration from the Design Team Divas at the High Hopes blog, and the High Hopes Rubber Stamps Facebook Fan page plus you can also follow us on
Instagram, Twitter and Pinterest.

Good Times!!


It’s Wednesday, and this week, I made a card using High Hopes Rubber Stamps Bird Song – TDG016  for the main image and Good Times – FDG014 for the sentiment. These little birdie friends know how to whistle a tune. Unfortunately, I myself never mastered how to whistle! I’ve tried over the years, but just can’t seem to do it. LOL!

To make my card this week, I began with a card base of Hammermill – Premium Colour 100 lb. cardstock, cut and scored to be 5.5″ x 4.25″.  I used Scrapbook.com – Brights Smooth Cardstock for the background paper. This paper is great because it’s already cut to size which makes it so easy. I applied it to the base using double-sided tape. Using my Cuttlebug and Your Next Die – Stitched Frame Snowfall Hill die set, I die cut the centre piece from Copic Marker X-Press It Blending Card and the frame from Crafter’s Companion – Luxury Cardstock – Gold.

With my MISTI and Memento – Tuxedo Black ink, I stamped the image onto the Copic Marker X-Press It Blending Card cardstock and the sentiment onto Recollections – White cardstock. I coloured in the image with Copic markers and then added some Stickles – Diamond and Stickles – Waterfall to the parts of the snow to make it sparkly. Gelly Roll Sakura #10 Pen was used to create the snow in the sky. To make the eyes stand out a little more, I used Sakura Glaze – Black and then added a white dot using Gelly Roll Sakura #5 Pen. Once the stickles were dry, I turned the coloured image and frame over and taped them together on the back with some Scotch tape to keep the 2 pieces together. U-line double-sided tape was then applied and I turned it over again and popped it up onto the card. The sentiment was die cut using my Cuttlebug and Essentials by Tattered Lace Dies – Easel Slider. I inked around the edges with Sharpie – Gold Medium Point – Water Based Paint pen, added U-Line double-sided tape to the top half of the sentiment and added it on top of the image. Lastly I added some YNS Gumdrops – White Sugar and Sparkle to complete the card.

Card Recipe:

Stamp: Bird Song – TDG016 (High Hopes Rubber Stamps)

Sentiment: Good Times – FDG014 (High Hopes Rubber Stamps)

Inks: Memento – Tuxedo Black

Paper: Copic Marker X-Press It Blending Card, Hammermill – Premium Colour 100 lb., Scrapbook.com – Brights Smooth Cardstock (4.25″ x 5.5″), Recollections – White, Crafter’s Companion – Luxury Cardstock – Gold

Die Cuts: Your Next Die – Stitched Frame Snowfall Hill, Essentials by Tattered Lace Dies – Easel Slider

Tools: MISTI – Most Incredible Stamping Tool, U-Line double-sided tape, Gelly Roll Sakura #10 Pen, Gelly Roll Sakura #5 Pen, Sakura Glaze – Black, Stickles – Diamond, Stickles – Waterfall, Cuttlebug, YNS Gumdrops – White Sugar and Sparkle

Image coloured with Copic Markers:

Bird1 and Scarf: R59, R39, R37, R35, R29, R27, BG09, BG09, BG05, BG02, BG01, BG000 (Eyes – Sakura Glaze – Black, Gelly Roll Sakura #5 Pen)

Bird2 and Scarf: Y17, Y15, Y13, Y11, Y02, Y00, BG72, BG57, BG49, BG32, BG11, Gelly Roll Sakura #5 Pen

Bird3 and Scarf: R56, R46, R37, R24, R22, C9, C7, C5, G16, G14, YG23, YG03

Beaks and Claws: YR18, YR14, YR12, Y19, Y08

Pine Needles: G29

Sky: B05, B04, B02, B01, Gelly Roll Sakura #10 Pen

Snow: C1, Stickles – Diamond, Stickles – Waterfall

Hope you like it and have a fantastic week!

You can find lots of inspiration from the Design Team Divas at the High Hopes blog, and the High Hopes Rubber Stamps Facebook Fan page plus you can also follow us on
Instagram, Twitter and Pinterest.

Friendship Warms The Heart!!


It’s Wednesday, and this week, I made a card using Friends Snooze – TDG013 by High Hopes Rubber Stamps for the main image and Friendship – FDG023 (High Hopes Rubber Stamps) for the sentiment. Pop on over to High Hopes Rubber Stamps and see all of the wonderful new images as we celebrate our Winter Friends Release!

To make my card this week, I began with a card base of Hammermill – Premium Colour 100 lb. cardstock, cut and scored to be 5.5″ x 4.25″.  I cut the background paper from American Crafts – Jack Frost to be the same size and attached it directly to the base using double-sided tape. Tim Holtz Distress Ink – Chipped Sapphire was used to ink around the outside of the card. Using my Cuttlebug, My Creative Time – Rectangle Frame Layers, My Creative Time – Rectangle Frame Dies, Gina Marie Designs – Nested Scalloped Stitched Rectangles, I die cut the Copic Marker X-Press It Blending Card, Scrapbook.com – Peppermint Smooth Cardstock and Crafter’s Companion – Luxury Cardstock – Ice Blue Pack. Using U-line double-sided tape, I popped up each of the layers onto the card base.

Using my MISTI and Memento – Tuxedo Black ink, I stamped the image onto Copic Marker X-Press It Blending Card cardstock and the sentiment onto Recollections – White cardstock. I coloured in the image with Copic markers and then added some Stickles – Diamond to the parts of the snow to make it sparkly. Gelly Roll Sakura #5 Pen was used to create a starry night sky. I added U-line double-sided tape to the completed image and popped it up onto the card. The sentiment was die cut using my Cuttlebug and Poppystamps – Christmas Quotes. I inked around the edges with Tim Holtz Distress Ink – Chipped Sapphire and glued it onto the top of the image at an angle to complete the card.

Card Recipe:

Stamp: Friends Snooze – TDG013 (High Hopes Rubber Stamps)

Sentiment: Friendship – FDG023 (High Hopes Rubber Stamps)

Inks: Memento – Tuxedo Black, Tim Holtz Distress Ink – Chipped Sapphire

Paper: Copic Marker X-Press It Blending Card, Hammermill – Premium Colour 100 lb., American Crafts – Jack Frost 6 x 6 in., Crafter’s Companion – Luxury Cardstock – Ice Blue Pack, Scrapbook.com – Peppermint Smooth Cardstock – 4.25″ x 5.5″, Recollections – White

Die Cuts: My Creative Time – Rectangle Frame Layers, My Creative Time – Rectangle Frame Dies, Poppystamps – Christmas Quotes, Gina Marie Designs – Nested Scalloped Stitched Rectangles

Tools: MISTI – Most Incredible Stamping Tool, U-Line double-sided tape, Gelly Roll Sakura #10 Pen, Gelly Roll Sakura #5 Pen, Sakura Glaze – Black, Stickles – Diamond, Cuttlebug

Image coloured with Copic Markers:

Bear and Scarf: C9, C7, C5, C4, C3, E27, E25, E23, BG09, BG05, BG02, BG01 (Eyes and Nose – Sakura Glaze – Black)

Bird, Scarf and Hat: R46, R22, R14, R08, YR18, YR15, BG72, BG57, BG32, BG11, Gelly Roll Sakura #5 Pen

Pine Needles: G29

Sky: B99, B97, B95, B93, Gelly Roll Sakura #5 Pen

Snow: B60, B0000, BV20, BG0000, Colorless Blender, Stickles – Diamond

Hope you like it and have a fantastic week!

You can find lots of inspiration from the Design Team Divas at the High Hopes blog, and the High Hopes Rubber Stamps Facebook Fan page plus you can also follow us on
Instagram, Twitter and Pinterest.

Hello Winter!!!


It’s Wednesday, and this week, I made a Christmas CAS card using Penguin Tag – SDG003 by High Hopes Rubber Stamps for the main image and Hello Winter – FDG007 (High Hopes Rubber Stamps) for the sentiment. Winter is now here and these little penguins couldn’t wait to start enjoying it.

I’d like to take this time to also wish everyone a Very Merry Christmas and A Happy New Year!

To make my card this week, I began with a card base of Hammermill – Premium Colour 100 lb. cardstock, cut and scored to be 5.5″ x 4.25″.  I cut the background paper from Craft Consortium – Polar Playtime to be the same and attached it directly to the base. Tim Holtz Distress Ink – Picked Raspberry was used to ink around the outside of the card. Using my MISTI and Memento – Tuxedo Black ink, I stamped the image and sentiment onto Copic Marker X-Press It Blending Card cardstock. I coloured in the image with Copic markers and the little berries with a Pental Sunburst Metalic Med Gel Pen – Gold. I used Sakura Glaze – Black and Gelly Roll Sakura #10 Pen was used for the eyes and little dots on the hat.) Clear – Wink of Stella was applied over top of the candy canes and candy cane border. Once this was all complete, I fussy cut around the image and then coloured in around it with Copic B01. I ran the image through my Xyron Creative Station and attached it to some Hot Pink cardstock. Once again, I fussy cut around the image and then popped it up on to the card using U-Line double-sided tape. Lastly, Gelly Roll Sparkle Pen was applied to the little blue snowflakes and dots on the background paper to finish off the card.

Card Recipe:

Stamp: Penguin Tag – SDG003 (High Hopes Rubber Stamps)

Sentiment: Hello Winter – FDG007 (High Hopes Rubber Stamps)

Inks: Memento – Tuxedo Black, Tim Holtz Distress Ink – Picked Raspberry

Paper: Copic Marker X-Press It Blending Card, Hammermill – Premium Colour 100 lb., Craft Consortium – Polar Playtime (6″ x 6″), Hot Pink cardstock

Tools: MISTI – Most Incredible Stamping Tool, U-Line double-sided tape, Gelly Roll Sakura #10 Pen, Pental Sunburst Metalic Med Gel Pen – Gold, Sakura Glaze – Black, Gelly Roll Sparkle Pen, Clear – Wink of Stella, Xyron Creative Station

Image coloured with Copic Markers:

Penguin: W9, W7, W5, W3, W0, E15, YR14, Y17, Y11, R30, E42, E41, E40 (Eyes – Sakura Glaze – Black, Gelly Roll Sakura #10 Pen)

Hat, Pom Pom and Bow Tie: RV14, RV13, RV11, RV10, G14, YG23, YG11, Gelly Roll Sakura #10 Pen

Holly and Leaves: G14, YG23, YG11, R59, R37, R35

Candy Cane and Border: C1, C0, R59, R37, R35, Colorless Blender, Clear – Wink of Stella

Berries: Pental Sunburst Metalic Med Gel Pen – Gold

Hope you like it and have a fantastic week!

You can find lots of inspiration from the Design Team Divas at the High Hopes blog, and the High Hopes Rubber Stamps Facebook Fan page plus you can also follow us on
Instagram, Twitter and Pinterest.

Hot Cocoa and Snowfolk!!!


It’s Wednesday, and this week, I made a card using Snowman Cup Of Love – S149 by High Hopes Rubber Stamps for the main image and Dot Warm Heart – G117 (High Hopes Rubber Stamps) for the sentiment. Hot chocolate is one of my favourite drinks during cold winter days. It looks like it is for this snowman too!

To make my card this week, I began with a card base of AC Cardstock – White cut and scored to be 6″ x 6″. I cut the background paper from Hot Buy – Recollections – Jewel Tones cardstock to the same size as the base and used double-side tape to apply it directly to it. Pebbles – Winter Wonderland paper was cut to the size of 5.75″ x 5.75″ and inked around the edges using Tim Holtz Distress Ink – Mermaid Lagoon. I applied this directly to the main background using double-sided tape. I cut 2 more strips from the Hot Buy – Recollections – Jewel Tones paper at 6″ x 1.5″ and 6″ x .75″ and applied them midway across the card using double-sided tape.

The image and sentiment were stamped using my MISTI and Memento – Tuxedo Black ink. I die-cut the sentiment using my Cuttlebug and Hero Arts – Infinity Dies – Rounded Rectangle and inked around the edges with Tim Holtz Distress Ink – Mermaid Lagoon. This was popped up on the card using 3M double-sided tape. The image was die cut with Creative Expression Craft Dies by Sue Wilson – Noble Dies – Double Pierced Ovals and inked around the edges with Tim Holtz Distress Ink – Mermaid Lagoon. I coloured in the image in with Copic markers and popped it up on the card using 3M double-sided tape. Lastly, I added some Clear Glitter Glue to the bottom of the snowman to create some snow. You can’t see it in this picture, but I also added Wink of Stella – Clear to make the snowman sparkle too!

Card Recipe:

Stamp: Snowman Cup Of Love – S149 (High Hopes Rubber Stamps)

Sentiment: Dot Warm Heart – G117 (High Hopes Rubber Stamps)

Inks: Memento – Tuxedo Black, Tim Holtz Distress Ink – Mermaid Lagoon

Paper: Copic Marker X-Press It Blending Card, AC Cardstock – White, Hot Buy – Recollections – Jewel Tones, Pebbles – Winter Wonderland 6″ x 6″

Die Cuts: Hero Arts – Infinity Dies – Rounded Rectangle (DI465), Creative Expression Craft Dies by Sue Wilson – Noble Dies – Double Pierced Ovals

Tools: MISTI – Most Incredible Stamping Tool, 3M – 2 sided tape, Sakura Glaze – Black Pen, Gelly Roll Sakura #8 Pen, Cuttlebug, Wink of Stella – Clear

Image coloured with Copic Markers:

Eyes: Sakura Glaze – Black Pen, Gelly Roll Sakura #8 Pen

Snowman: YR18, YR16, YR12, B60, C1, C0, C00, Colorless Blender

Hat, Scarf, Mitts, Coat, Patches and Cup: BG09, BG05, BG02, BG01, G99, YG67, YG17, R85, R83, R81

Cinnamon Stick: E27, E23

Background: G43, G40, G12

Snow: Clear Glitter Glue

Hope you like it and have a fantastic week!

You can find lots of inspiration from the Design Team Divas at the High Hopes blog, and the High Hopes Rubber Stamps Facebook Fan page plus you can also follow us on
Instagram, Twitter and Pinterest.

Winter Fun!!!


It’s Wednesday, and this week, I made a card using Bearly Swooshin’ – T202 by High Hopes Rubber Stamps for the main image and Roundin’ Up – G190 (High Hopes Rubber Stamps) for the sentiment. Winter was always a fun time for me growing up. We had so many outdoor rinks and played so many winter sports. I tried X-Country skiing, but in no way would ever attempt downhill skiing, I was dangerous enough on X-Cross Country skis. I wonder it that’s why everyone I ever went skiing with would only go once with me. LOL!

To make my card this week, I began with a card base of AC Cardstock – White cut and scored to be 6″ x 6″. I cut the background paper from Recollections – Burgundy cardstock to the same size as the base and used double-side tape to apply it directly to it. Photo-Play – O Canada 2 – Ice Rink paper was cut to the size of 5.75″ x 5.75″ and inked around the edges using Tim Holtz Distress Ink – Rustic Wilderness. I applied this directly to burgundy background using double-sided tape. Using Hero Arts – Infinity Dies – Rounded Rectangle dies and my Cuttlebug, I die cut the following: Copic Marker X-Press It Blending Card, Recollections – Burgundy cardstock, AC – Green Cardstock and Recollections – White cardstock.

The image and sentiment were stamped using my MISTI and Memento – Tuxedo Black ink. I coloured in the image with Copic markers and used a Gelly Roll Sakura #8 Pen to create the snow in the sky and whites of the bear’s eyes. Sakura Glaze – Black Pen was used for the eyes and nose. Just love the embossed look those 2 pens give to an image. Lastly, I added some Stickles – Diamond and some Clear Glitter glue for the snow. Once the glitter was all dry, I attached the finished image to the burgundy rounded rectangle with 3M VHB double-sided tape to pop it up. Then, I applied 3M double-sided tape onto the back of the larger rectangle to pop it up on the pictured background. The sentiment was inked with Tim Holtz Distress Ink – Rustic Wilderness and I ran it through my Xyron Create a Sticker and placed it on top of the small green rectangle. I added 3 layers of the 3M VHB – 2 sided tape to the one side to pop it up and some glue and placed it on top of the popped-up coloured image. Lastly, to complete the card, I added some YNS Gumdrops.

Card Recipe:

Stamp: Bearly Swooshin’ – T202 (High Hopes Rubber Stamps)

Sentiment: Roundin’ Up – G190 (High Hopes Rubber Stamps)

Inks: Memento – Tuxedo Black, Tim Holtz Distress Ink – Rustic Wilderness

Paper: Copic Marker X-Press It Blending Card, AC Cardstock – White, Photo-Play – O Canada 2 – Ice Rink (12″ x 12″), Recollections – Burgundy, AC – Green Cardstock and Recollections – White Cardstock

Die Cuts: Hero Arts – Infinity Dies – Rounded Rectangle (DI465)

Tools: MISTI – Most Incredible Stamping Tool, 3M – 2 sided tape, Sakura Glaze – Black Pen, Gelly Roll Sakura #8 Pen, Xyron Create a Sticker, 3M VHB – 2 sided tape, YNS Gumdrops, Cuttlebug

Image coloured with Copic Markers:

Eyes: Sakura Glaze – Black Pen, Gelly Roll Sakura #8 Pen

Bear: E47, E44, E43

Hat, Scarf, Mitts and Bindings: R59, R37, R35, C1, C0, C00, Colorless Blender

Skis, Goggles and Poles: B99, B95, B93, B91, B00, 100, T6

Background: G43, G40, G12

Snow: Stickles – Diamond, Clear Glitter Glue

Hope you like it and have a fantastic week!

You can find lots of inspiration from the Design Team Divas at the High Hopes blog, and the High Hopes Rubber Stamps Facebook Fan page plus you can also follow us on
Instagram, Twitter and Pinterest.

Think Snow!!!


It’s Wednesday, and this week, I made a card using Snowman Stumble – TT014 by High Hopes Rubber Stamps for the main image and Think Snow 2 – FF047 (High Hopes Rubber Stamps) for the sentiment. I grew up skating at the outdoor rink directly across the street from my house. We couldn’t wait to get home from school and throw on our skates. The rinks were always full of children from the neighbourhood. We would either play rink games or hockey. I think there was a rink every couple of blocks. As soon as we’d finish eating, we were back on the ice again. Our parents were always yelling at us to come inside at the end of the day. How times have changed. LOL!

To make my card this week, I began with a card base made from Hammermill – Premium Colour 100 lb. cut and scored to be 5.5″ x 4.25″. My Cuttlebug and My Creative Time – Rectangle Frame Dies were used to die cut Hot Buy Craft Smart – Holiday Glitz Glitter Paper to be the same size as the base card. With a Picket Fence – Blending Brush and a mixture of Tim Holtz Distress Ink – Blueprint Sketch and Tim Holtz Distress Ink – Salty Ocean, I created the background sky. I applied this directly to the glitter background paper. Once this was done, I applied this directly to the base using double-sided tape. Next, Nellie’s Choice – Nature Scene Dies – NSD001 – Mountains were used to die cut the tree scenery using Momenta – Cardstock and using a small dauber I added in some darker touches of green using Tim Holtz Distress Inks – Peeled Paint. The pond was die cut using Whimsy Stamps – Wavy Nested Frame Dies Set and Copic Marker X-Press It Blending Card. I inked the image and sentiment using my MISTI and Memento – Tuxedo Black. Lastly, I die cut the sentiment using Joy Crafts – Labels and Tags and inked around the edges with my Picket Fence – Blending Brush and the ink that was still on it from doing the sky.

I coloured in the image with Copic markers and added in some highlights on the skate blades with Pental Sunburst Metalic Med Gel Pen. I inked the image a second time onto the Hot Buy Craft Smart – Holiday Glitz Glitter Paper for the snowman body and fussy cut around it. Once it was coloured in with Copics, I ran it through my Xyron Create a Sticker and attached it to the base stamped image.

The card was now ready to assemble. Part of the pond was cut off at the top before it was attached it to the sparkly background using glue and double-sided tape. Next, I added some 3M VHB – 2 sided tape to the back of the trees and applied it over top of where the sky ended and the pond met. To create the snow around the pond and in between the trees, pond and snow, I used Cosmic Shimmer Fluffy Stuff and added some DecoArt Glamour Dust while it was still wet. Marvy Uchida – Embossing Heat Tool was used to heat the liquid and make it puff up to look like fluffy snow. I added some Stickles – Diamond to the pompom. Using a Gelly Roll Sakura #10 Pen and Sharpie Water Based Paint – White – Extra Fine Point pen, I created the snow in the sky. Lastly, to finish off the card, I added 3M VHB – 2 sided tape to the sentiment and applied it to the card.

Card Recipe:

Stamp: Snowman Stumble – TT014 (High Hopes Rubber Stamps)

Sentiment: Think Snow 2 – FF047 (High Hopes Rubber Stamps)

Inks: Memento – Tuxedo Black, Tim Holtz Distress Ink – Blueprint Sketch, Tim Holtz Distress Ink – Salty Ocean, Tim Holtz Distress Inks – Peeled Paint

Paper: Copic Marker X-Press It Blending Card, Hammermill – Premium Colour 100 lb., Momenta – Cardstock, Hot Buy Craft Smart – Holiday Glitz Glitter Paper 12″ x 12″

Die Cuts: My Creative Time – Rectangle Frame Dies, Nellie’s Choice – Nature Scene Dies – NSD001 – Mountains, Whimsy Stamps – Wavy Nested Frame Dies Set (WSD382), Joy Crafts – Labels and Tags

Stickles: Diamond

Tools: MISTI – Most Incredible Stamping Tool, 3M VHB – 2 sided tape, Gelly Roll Sakura #10 Pen, Sharpie Water Based Paint – White – Extra Fine Point, DecoArt Glamour Dust, Cosmic Shimmer Fluffy Stuff, Marvy Uchida – Embossing Heat Tool, Cuttlebug, Picket Fence – Blending Brush, Pental Sunburst Metalic Med Gel Pen, Xyron Create a Sticker

Image coloured with Copic Markers:

Snowman: B60, R30, R20, YR21, YR16, YR15, Colorless Blender

Hat: BG72, BG57, BG32, BG11, Gelly Roll Sakura #10 Pen

Mitts and Skates: C3, C2, C1, C00, BG09, BG05, BG02, BG01

Ice: B00, B000, B000

Hope you like it and have a fantastic week!

You can find lots of inspiration from the Design Team Divas at the High Hopes blog, and the High Hopes Rubber Stamps Facebook Fan page plus you can also follow us on
Instagram, Twitter and Pinterest.

Winter Wonderland


Sharing a card I made from the Kit and Clowder October 2020 Markers Class called “Winter Wonderland”. I really love snow and nature and this class combined both of those loves for me. The class challenged me in a lot of ways, but I am so happy with the final results. I decided to turn this finished image into a Christmas card.

Alyce is such a wonderful instructor as she takes you through chapter by chapter breaking down everything and she is very easy to follow. I am sure that I will be doing this class a few more times. One for more practice and two because I LOVE this image so much! LOL!

To complete the card, I ran the image through my Xyron Creative Station to change it into a sticker as I wanted it lay completely flat on the black cardstock that I was adhering it to. I stamped out the sentiment using the stamp from Rosewood Frog’s Whiskers Ink called May Your Christmas – G1089 with VersaMark ink and then used Ranger Embossing Powder White – Extra Fine Detail. This was then heated with my Marvy Uchida – Embossing Heat Tool. I just thought this sentiment went so well with the image.

I cut some AC White Cardstock and scored it to be 6″ x 6″. Then I added some glue to the back panel of my image and mounted it directly to the base. I used 3M VHB – 2 sided tape to pop up the sentiment and then added some embellishments to complete the card.

Card Recipe:

Stamp: Deer Scene – Kit and Clowder Class (LeeHollandArt)

Sentiments: May Your Christmas – G1089 (Rosewood Frog’s Whiskers Ink)

Class Videos: Kit and Clowder October 2020 Markers Class called “Winter Wonderland”

Hope you like it and have a great week!

Happy Holidays!


Welcome Back Dreamerland Craft Fans!

Dreamerland has just released some brand new stamps for their 2019 Christmas release and today, I’m sharing Happy Holidays (Dreamerland Crafts Clear Stamps)!  The image was coloured with copic markers.

Card Recipe:

Stamp and Sentiment: Happy Holidays (Dreamerland Crafts Clear Stamps)

Inks: Memento – Tuxedo Black, VersaMark ink, Tim Holtz Distress Ink – Evergreen Bough

Embossing Powder: Ranger Embossing Powder White – Extra Fine Detail

Paper: Copic Marker X-Press It Blending Card, Pebbles Winter Wonderland 6″ x 6″, Hot Buy Craft Smart – Holiday Glitz Glitter Paper 12″ x 12″

Die Cuts:  Essentials by Tattered Lace Dies – Easel Slider

Tools: MISTI – Most Incredible Stamping Tool, Cuttlebug, 3M VHB – 2 sided tape, Washi Tape

Image coloured with Copic Markers:

Skin: E000, E00, E04, E11, E21, R22, R20

Hair: E49, E47, E43

Hat and Coat: BG57, BG53, BG49

Scarf and Mitts: BG78, BG72, BG70

Pants: B26, B23, B21

Boots: E18, E17, E15, E13

Bear: E18, E17, E15, E13, E55, E53, E51, R22, R20

Sled: E15, Y38, Y35, Y15, R59, R37, R35, C3, C1, C0

Sky: B99, B97, B95, B93, B91, Gelly Roll Sakura #10 Pen, Gelly Roll Sakura #8 Pen

Snow: BV20, C1, Colorless Blender, Spectrum Noir – Sparkles – Crystal Clear, Stickles – Icicle


Hope you like it and have a great week!

You can find more cards to inspire you at Dreamerland Crafts on the Facebook Fan page from the rest of our design team.