Tag Archive | Delta Ceramcoat – White

Merry Christmas Bears!


Sharing a Christmas card that I made for my husband this year using Penny BlackNose to Nose – 30-521 and Gina K. DesignsPeaceful Christmas for the trees. Bears have a special place in our hearts, so this was the perfect image to celebrate our Christmas with.

Hammermill – Premium Colour 100 lb. cardstock was used to create a 5.5″ x 4.25″ card base. I cut American Crafts Vicki Boutin Mixed Media Foundations Paper to be the same as as the base. I went out of my comfort zone and attempted to create Northern Lights in the sky by applying a combination of Tim Holtz Distress Oxide Inks – Prize Ribbon, Twisted Citron, Villainous Potion and Black Soot with blending brushes after watching several YouTube videos. Once I was satisfied with the colours, I spritzed the paper with water and allowed it to dry. Once again, I did some ink blending with the same colours. I used some water and a small paint brush and applied Cosmic Shimmer – Opal Glaze Polish – Gilded Avocado over the entire sky. I set this aside to dry. Wasn’t quite what I expected it to be, but I still liked it and hope that you do too!

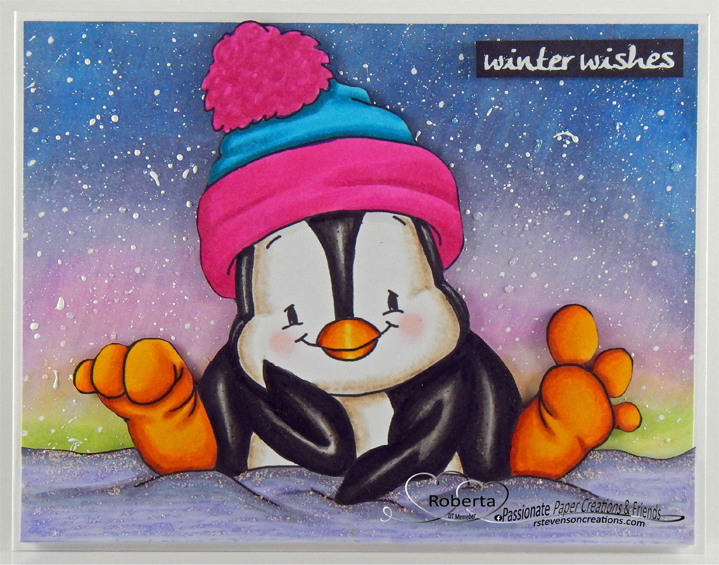
Using my MISTI and Memento – Tuxedo Black ink, I stamped the image onto Copic Marker X-Press It Blending Card. I coloured in the image and then fussy cut it out. By now the background was dry. I put the background back into my MISTI and this time, using Color Hue – Remarkable Ink Pad Eclipse Black, I stamped the trees. I mixed together a combination of FolkArt – Extreme Glitter Acrylic Paint and Delta Ceramcoat – White. With a small paint brush and some water, I applied this to the bottom below the trees and onto the small heart. I love the way some of the blue and purples came through onto the snow giving it some natural shadows. I also added in some stars by putting some of the mixture onto the brush once again and then tapping it to create a small splatter in the sky. This dried fairly quickly. I attached the finished background to my base card using double-sided tape. U-Line double-sided tape was applied to the image and heart and then they were both popped up onto card. Stickles – Diamond was applied to create the snow on the ground to give a cast shadow below the bears. Lastly, I cut the sentiment out of Recollection – Christmas Vellum. This was put through my Xyron Create a Sticker to make it lay flat and not show any glue marks.

Card Recipe:

Stamps:  Nose to Nose – 30521 – Penny Black, Peaceful Christmas – Gina K. Designs

Inks: Memento – Tuxedo Black, Color Hue – Remarkable Ink Pad Eclipse Black, Tim Holtz Distress Oxide Inks – Prize Ribbon, Twisted Citron, Villainous Potion and Black Soot

Paper: Copic Marker X-Press It Blending Card, Hammermill – Premium Colour 100 lb., American Crafts Vicki Boutin Mixed Media Foundations Paper 12″X12

Paint: Delta Ceramcoat – White, FolkArt – Extreme Glitter Acrylic Paint

Miscellaneous: U-Line double-sided tape, Stickles – Diamond, MISTI – Most Incredible Stamping Tool, Cosmic Shimmer – Opal Glaze Polish – Gilded Avocado, Xyron Create a Sticker, Blending brushes

Image coloured with Copic Markers:

Bears: BV23, BV20, E51, E50, R30, R02, R00, Colorless Blender

Scarf: R59, R37, R35, R22

Heart: BV20, B000, Colorless Blender

Hope you like it!

Merry Christmas and A Happy New Year to everyone!

North Pole Greetings!!


It’s Wednesday, and this week, I made a Christmas card using High Hopes Rubber Stamps North Pole Penguin – TDG008 for the main image and Seasons Greetings – F300A, for the sentiment. Christmas is getting nearer and this little penguin is helping Santa deliver some of your presents this year!

To make my card this week, I began with a card base from Crate Paper – Boxed Cards – Mittens & Mistletoe (5.5″ x 4.25″). Tim Holtz Distress Ink – Rustic Wilderness and a finger dauber were used to ink around all of the edges. With my Cuttlebug and dies from My Favourite Things – Die-namics – Elegant Rectangle Stax, I die cut a large rectangle out of Forever In Time – Texture Rouge paper and a smaller one out of Copic Marker X-Press It Blending Card cardstock. U-Line double-sided tape was added to the large rectangle and it was popped up onto the base card.

The image was stamped onto the smaller rectangle using my MISTI – Most Incredible Stamping Tool and Memento – Tuxedo Black ink. I coloured in the image and then with a paint brush and a small mixture of DecoArt Glamour Dust, FolkArt – Extreme Glitter Acrylic Paint and Delta Ceramcoat – White, I added in the first layer of snow. A little more DecoArt Glamour Dust was added to it while it was still wet. This dried pretty quickly and Cosmic Shimmer Fluffy Stuff and more glitter were added to give the snow some texture. I also added this to the hat, pompom and sign. Lastly, I added some Crystal – Stickles because you can never have enough glitter. LOL! Wink of Stella – Clear was added to the bows, side of the ball on the pole and down the entire pole. Pental Sunburst Metalic Med Gel Pen – Gold and Wink of Stella – Clear were added to the pink present dots. Once everything was dry, I stamped the sentiment using my MISTI and VersaMark ink. Ranger Embossing Powder White – Extra Fine Detail was applied over top of the ink and then heat embossed with Marvy Uchida – Embossing Heat Tool. The snow in the sky was created using a Gelly Roll Sakura #10 Pen. I applied U-Line double-sided tape to the back of the image and popped it up on top of the larger rectangle. To complete my card, I added in 4 YNS – Holly Jolly Sparkly Gumdrops in the corners.

Card Recipe:

Stamps: North Pole Penguin – TDG008 (High Hopes Rubber Stamps)

Sentiment: Seasons Greetings – F300A (High Hopes Rubber Stamps)

Inks: Memento – Tuxedo Black, Tim Holtz Distress Ink – Rustic Wilderness, VersaMark

Paper: Copic Marker X-Press It Blending Card, Crate Paper – Boxed Cards – Mittens & Mistletoe (5.5″ x 4.25″), Forever In Time – Texture Rouge

Die Cuts: My Favourite Things – Die-namics – Elegant Rectangle Stax – MFT-1268

Embossing Powder: Ranger Embossing Powder White – Extra Fine Detail

Tools: MISTI – Most Incredible Stamping Tool, U-Line double-sided tape, Cosmic Shimmer Fluffy Stuff, Crystal – Stickles, Pental Sunburst Metalic Med Gel Pen – Gold, DecoArt Glamour Dust, FolkArt – Extreme Glitter Acrylic Paint, Delta Ceramcoat – White, Cuttlebug, Wink of Stella – Clear, Marvy Uchida – Embossing Heat Tool, YNS – Holly Jolly Sparkly Gumdrops

Image coloured with Copic Markers:

Penguin: W9, W7, W5, W3, W00, E15, YR14, Y17, Y11, RV00, EE42, E41, E40, Colorless Blender (Eyes: Gelly Roll Sakura #10 Pen, Sakura Glaze – Black)

Hat, Scarf, Sign and Ribbon: R59, R37, R35

Presents: BG72, BG57, BG32, BG11, YR24, YR23, YR21, YR08, YG07, YG05, YG03, RV14, RV13, RV10

Pole: R46, R14, R08, C1, C00, Colorless Blender

Sky: B99, B97, B95, B93

Hope you like it and have a fantastic week!

You can find lots of inspiration from the Design Team Divas at the High Hopes blog, and the High Hopes Rubber Stamps Facebook Fan page plus you can also follow us on
Instagram, Twitter and Pinterest.

Making Beautiful Music!!


Today, I’m sharing a Christmas card that I made using Dreamerland Crafts stamps called Making Beautiful Music – D152002. This little angel is so sweet and is spreading Christmas cheer to everyone early this year.

To create this card I began by making a base of 5.5″ x 5.5″ using AC Cardstock – White. AC – Christmas Cardstock – Green was cut to be the same size as the base and then adhered to the card using double-sided tape. The frame was created using Couture Creations – Go Power and Emboss die-cutting machine, Creative Expressions by Sue Wilson – Festive Collection – Ornate Holly Framed Noel die and Lawn Fawn – Sparkle Cardstock in “Pixie Dust” paper. I applied liquid glue to the back of this piece and then adhered it to the card.

With my Cuttlebug, I die cut a 3.5″ x 3.5″ square using My Creative Time -Stitched Squares Inside and Out and Copic Marker X-Press It Blending Card cardstock. The main image was stamped using my MISTI and Memento – Tuxedo Black ink onto Copic Marker X-Press It Blending Card. I cleaned off the angel and then stamped in place again using VersaMark ink for the snowflakes. Ranger Embossing Powder White – Extra Fine Detail was applied to the image and then heat embossed with a Marvy Uchida – Embossing Heat Tool. I coloured in the image and then added some sparkles onto the dress using a Gelly Roll Sakura #8 Pen. Sparkle was added to wings with Clear – Wink of Stella. To make the snowflakes a little brighter and to add some smaller snowflakes in the sky, I used a white Gelly Roll Sakura #10 Pen. I created a small mixture of FolkArt – Extreme Glitter Acrylic Paint, DecoArt Glamour Dust, Delta Ceramcoat – White onto an acrylic block and with a paint brush added in the snowy background along the bottom of the square. Using a small Stylus, I added in a few more sparkly snowflakes and sprinkled DecoArt Glamour Dust over them while they were still wet. This was then put aside to dry.

Using my Cuttlebug, I die cut 6 petals and 7 leaves out of scraps of paper using Spellbinders – Holiday Flower & Greenery dies. Liquid glue was used to attach the petals together and the I added U-Line double-sided tape and some liquid glue to the bottoms of them to attach them to the card. I trimmed the leaves and with a small amount of liquid glue applied to the tips of the leaves, I adhered them to the card under the flowers. PinkFresh Studio – Essentials Jewel Mix yellow jewels were glued to the centre of each flower. Using my Cuttlebug once again, I die cut 2 sentiments using Creative Expressions by Sue Wilson – Festive Collection – Ornate Holly Framed Noel die with some scrap gold paper. The oval was die cut using Creative Expressions – Frames and Tags – Charlotte dies and a scrap piece of AC – Christmas Cardstock – Burgundy. I glued the 2 sentiments on top of each other to give it some dimension and then attached the sentiment to the oval. U-Line double-sided tape was added to the back of the finished image and it was popped up onto the centre of the card. U-Line double-sided tape was applied to the oval and it was popped up onto the top of the card to finish it off.

Card Recipe:

Stamps: Making Beautiful Music – D152002 – Dreamerland Crafts

Inks: Memento – Tuxedo Black, VersaMark

Paper: Copic Marker X-Press It Blending Card, AC – Christmas Cardstock, Lawn Fawn – Sparkle Cardstock in “Pixie Dust” (8.5″ x 11″)

Die Cuts: Creative Expressions – Frames and Tags – Charlotte (CED4319), Creative Expressions by Sue Wilson – Festive Collection – Ornate Holly Framed Noel – CED3073, Spellbinders – Holiday Flower & Greenery (S1-099), My Creative Time -Stitched Squares Inside and Out

Embossing Powder: Ranger Embossing Powder White – Extra Fine Detail

Tools: MISTI – Most Incredible Stamping Tool, Marvy Uchida – Embossing Heat Tool, U-Line double-sided tape, PinkFresh Studio – Essentials Jewel Mix, Gelly Roll Sakura #10 Pen, Gelly Roll Sakura #8 Pen, Cuttlebug, Clear – Wink of Stella

Image coloured with Copic Markers:

Skin: E21, E11, E04, E00, E000, R30, R22, R20

Hair: E47, E44, E43, E41

Dress: R59, R37, R35, R21, C1, Gelly Roll Sakura #10 Pen

Wing: BG0000, BG000, B0000, Y000, RV0000, Clear – Wink of Stella

Flower: R59, R37, R35, R21, Y35

Horn: E15, YR24, Y35, Y08

Background Sky: B02, B01, B00, B000

Snow: FolkArt – Extreme Glitter Acrylic Paint, DecoArt Glamour Dust, Delta Ceramcoat – White

Hope you like it and have a great week!

You can find more cards to inspire you at Dreamerland Crafts and Pointer Scrapbooking on the Facebook Fan pages from the rest of our design team.

Penguin – Thinking of You!!


Hi everyone…today we are having a sponsor day over at the Passionate Paper Creations & Friends FB group site with Whimsy stamps!! Sharing a card I made today using this adorable image from Whimsy Stamps – Penguin Thinking of You and for the sentiment Penguins Winter Adventure.

For the base card, I used Hammermill – Premium Colour 100 lb. and cut it and scored it to be 5.5″ x 4.25″. I printed out the image using HP High Quality Grayscale onto Copic Marker X-Press It Blending Card. The image was coloured in with Copic markers and then fussy cut around the image and snow. I coloured in the background separately and then splattered some FolkArt – Extreme Glitter Acrylic Paint and Delta Ceramcoat – White onto the background. The background was cut down to 5.25″ x 4″ and was popped up onto the base using U-line double-sided tape. The image was then popped up onto the background using U-line double-sided tape and the sentiment was stamped with VersaMark ink and embossed with Ranger Embossing Powder White – Extra Fine Detail and my Marvy Uchida – Embossing Heat Tool. This was popped up using 3M double-sided tape and applied to the card to finish it off.

Card Recipe:

Stamps and sentiment: Penguin Thinking of You – Whimsy Stamps

Sentiment: Penguins Winter Adventure – Whimsy Stamps

Inks: HP High Quality Grayscale, Versamark

Paper: Copic Marker X-Press It Blending Card, Hammermill – Premium Colour 100 lb.

Embossing Powder: Ranger Embossing Powder White – Extra Fine Detail

Miscellaneous: 3M double-sided tape, Stickles – Diamond, FolkArt – Extreme Glitter Acrylic Paint, Delta Ceramcoat – White, Marvy Uchida – Embossing Heat Tool, U-Line double-sided tape

Image coloured with Copic Markers:

Penguin: W9, W7, W5, W3, W00, E15, YR14, Y17, Y11, R11, RV00, E43, E42, E41, E40

Hat: RV09, RV06, RV04, BG09, BG05, BG02, BG01

Sky and Snow: BV23, BV20, BV00, B97, B95, B63, B60, B45, B41, YG17, YG11, YG03, YG00, RV02, RV00, RV000

Hope you like it and have a great week!

Come and check us out on Passionate Paper Creations & Friends FB group
as we are currently sponsoring Whimsy Stamps until Saturday, October 31, 2021.

If you are a member of Passionate Paper Creations & Friends FB group
you can go to the top of the page and get a shopping discount.

If you are not a member just click join. We are a fun loving group with a lot of inspiration.

Surfing Gabriel!!


It’s Wednesday, and this week, I made a masculine card using Surfing Gabriel – TT516 by High Hopes Rubber Stamps for the main image and No Waves – FR011 (High Hopes Rubber Stamps) for the sentiment. Gabriel is enjoying the waves and the bright skies. I can’t wait for the weather to warm up here so that I can start swimming again too!

To make my card this week, I die cut a square from Copic Marker X-Press It Blending Card using My Creative Time -Stitched Squares Inside and Out. A larger square was cut using Waffle Flower – Nesting Square dies and spare blue cardstock. The image and sentiment were both stamped using my MISTI and Memento – Tuxedo Black ink. I coloured in the image with Copic markers. Then, I created a mask and put it over top of the coloured image and added in my clouds using various Tim Holtz inks listed below and Avery Elle – Pierced Clouds Die (Used to create stencils). To create the spray on the waves, I mixed a little bit of FolkArt – Extreme Glitter Acrylic Paint and Delta Ceramcoat – White paint and applied it to the coloured image using a 1/4″ H.J. Domed Dry Stipple brush. For a little extra sparkle, I added some DecoArt Glamour Dust while the paint was still wet.

Brother Scan and Cut was used to die-cut around the sentiment. Edges were inked with Tim Holtz Distress Ink – Blueprint Sketch. A second circle was die cut using Lifestyle Crafts Cutting Dies – Nesting Circles out of aqua cardstock and inked with Tim Holtz Distress Inks – Peacock Feathers.

To assemble the card, I used Recollections – Winter 4.25″ x 5.5 for the base. Tim Holtz Distress Ink – Salty Ocean was used to ink around the edges of the card. The coloured image was glued to the larger square and the sentiment was glued to the larger circle. 3M VHB – 2 sided tape was attached to the backs of the larger circle and square and attached to the base card. To finish it off, YNS Gumdrops were added.

Card Recipe:

Stamp: Surfing Gabriel – TT516 (High Hopes Rubber Stamps)

Sentiment: No Waves – FR011 (High Hopes Rubber Stamps)

Inks: Memento – Tuxedo Black, Tim Holtz Distress Ink – Salty Ocean, Tim Holtz Distress Inks – Tumbled Glass, Tim Holtz Ranger Distress Ink – Broken China, Tim Holtz Distress Ink – Blueprint Sketch, Tim Holtz Distress Inks – Peacock Feathers

Paper: Copic Marker X-Press It Blending Card, Recollections – Winter 4.25″ x 5.5 (Assorted Box of Cards), Aqua cardstock, Blue cardstock

Die Cuts: My Creative Time -Stitched Squares Inside and Out, Waffle Flower – Nesting Square dies, Lifestyle Crafts Cutting Dies – Nesting Circles

Stencil: Avery Elle – Custom Steel Dies – Made in the USA – D-05-01 PiercedCloudsDie (Used to create stencils)

Tools: MISTI – Most Incredible Stamping Tool, Picket Fence – Blending Brush, 1/4″ H.J. Domed Dry Stipple, YNS Gumdrops, 3M VHB – 2 sided tape

Image coloured with Copic Markers:

Skin: E21, E11, E04, E00, E000, R30, R20 (Eyes: Sakura Glaze – Black, Gelly Roll Sakura #8 Pen)

Hair: E47, E44, E43, E40

Swim Trunks: B79, B69, B66, YG03, YG01

Surf Board: Y38, Y17, Y15, YR18, YR16, BG57, BG32, BG11

Water: BG70, B93, B91, B52, B41, B06, B02, B01, B000

Water Droplets: B06, B02, B00

Sentiment: B000

Foamy Water: FolkArt – Extreme Glitter Acrylic Paint, Delta Ceramcoat – White, DecoArt Glamour Dust

Check out some other fun new stamps from the vault for Boys and Men here:
THE VAULT IS OPEN! MEN & BOYS RELEASE Archives – High Hopes Rubber Stamps (highhopesstamps.com)

Hope you like it and have a fantastic week!

You can find lots of inspiration from the Design Team Divas at the High Hopes blog, and the High Hopes Rubber Stamps Facebook Fan page plus you can also follow us on
Instagram, Twitter and Pinterest.

Surfer Bob!!


It’s Wednesday, and this week, I made a masculine card using Surfer Bob – TT519 by High Hopes Rubber Stamps for the main image and Surf’s Up – FR009 (High Hopes Rubber Stamps) for the sentiment. Wild and crazy Bob has awesome balance on his surf board. We had the opportunity to see surfers in Hawaii riding the waves on one of our trips. It was amazing!!! I’ve never tried surfing before, but I would sure love to. It’s definitely on my bucket list. LOL!

To make my card this week, I used Hammermill – Premium Colour 100 lb. paper folded to 4.25″ x 5.5″ for the base. I cut Copic Marker X-Press It Blending Card to the same size as the base and stamped the image and sentiment using my MISTI and Memento – Tuxedo Black ink. I coloured in the image with Copic markers and created my own background.

To create the background, I first created a mask of Surfer Bob using Post-It Note paper and fussy cut around the image. Then I put it over top of the coloured image. Using a Picket Fence – Blending Brush and Lawn Fawn – Cloudy Stencil, I began the top of the sky with Tim Holtz Distress Ink – Salty Ocean. I did this for 2 rows and then switched to Tim Holtz Distress Inks – Tumbled Glass, followed by Tim Holtz Ranger Distress Ink – Broken China. The mask was removed and the water was created by just adding a mixture of strokes with the Copic colours listed below.

I added double-sided tape to the coloured image and attached it to the base. Then, I mixed a little bit of FolkArt – Extreme Glitter Acrylic Paint and Delta Ceramcoat – White paint. Using a 1/4″ H.J. Domed Dry Stipple brush, I created the water spray for the waves. For a little extra sparkle, I added some DecoArt Glamour Dust while the paint was still wet.

Card Recipe:

Stamp: Surfer Bob – TT519 (High Hopes Rubber Stamps)

Sentiment: Surf’s Up – FR009 (High Hopes Rubber Stamps)

Inks: Memento – Tuxedo Black, Tim Holtz Distress Ink – Salty Ocean, Tim Holtz Distress Inks – Tumbled Glass, Tim Holtz Ranger Distress Ink – Broken China

Paper: Copic Marker X-Press It Blending Card, Hammermill – Premium Colour 100 lb.

Stencil: Lawn Fawn – Cloudy Stencil

Tools: MISTI – Most Incredible Stamping Tool, Picket Fence – Blending Brush, 1/4″ H.J. Domed Dry Stipple

Image coloured with Copic Markers:

Skin: E21, E11, E04, E00, E000, R30, R20

Hair: E47, E44, E43, E40

Swim Trunks: B69, B52, Y17, C01 for shading

Surf Board: Y17, Y15, YR18, YR16, YR14

Water: BG72, BG70, B93, B91, B52, B41, B06, B02, B01, B000, C0

Foamy Water: FolkArt – Extreme Glitter Acrylic Paint, Delta Ceramcoat – White, DecoArt Glamour Dust

Check out some other fun new stamps from the vault for Boys and Men here:
THE VAULT IS OPEN! MEN & BOYS RELEASE Archives – High Hopes Rubber Stamps (highhopesstamps.com)

Hope you like it and have a fantastic week!

You can find lots of inspiration from the Design Team Divas at the High Hopes blog, and the High Hopes Rubber Stamps Facebook Fan page plus you can also follow us on
Instagram, Twitter and Pinterest.