Tag Archive | Tim Holtz Distress Inks – Lucky Clover

Happy St. Patrick’s Day!!!


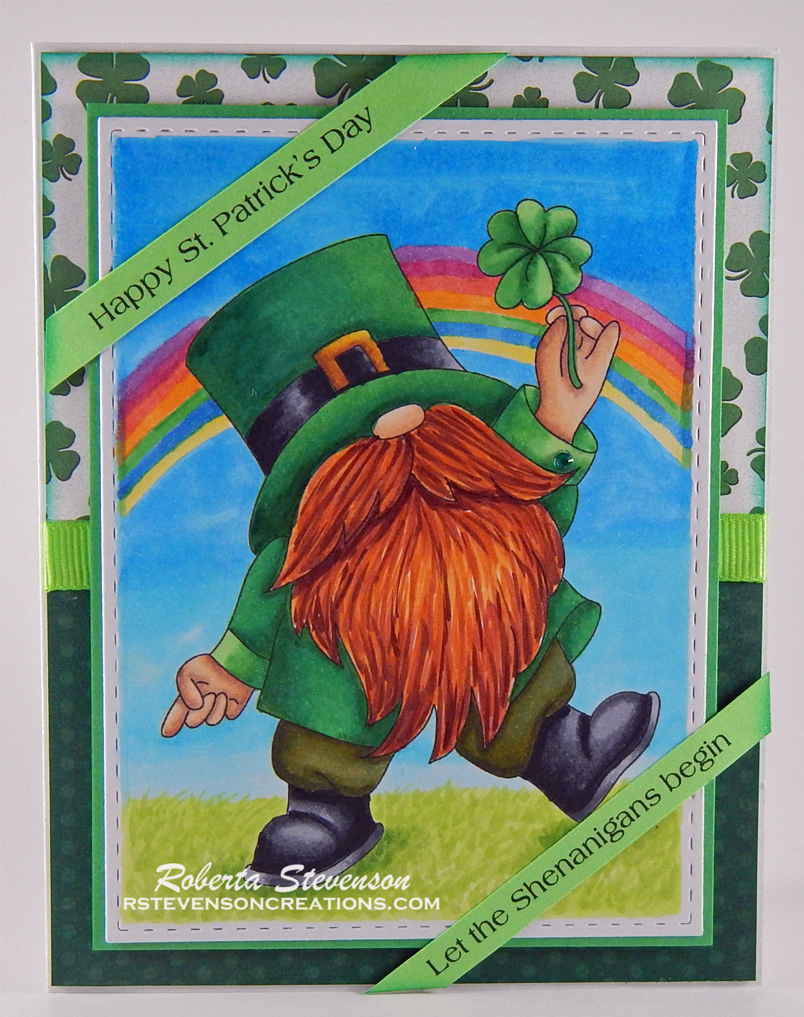
Today I am sharing a Happy St. Patrick’s Day card I made using Gerda Steiner StampsSt. Patrick’s Day Cat and Hat Digital Stamp stamp for the image and Lawn Fawn – Celebration Scripty Sentiments for the sentiment. Lawn Fawn – Clover Background Stencils were used to create the background.


To make my cards this week, I began with a card base of Hammermill – Premium Cardstock 110 lb. cardstock, cut and scored to be 5.5″ x 4.25″. I created the background using Lawn Fawn – Clover Background Stencils, and applying Tim Holtz Distress Inks – Lucky Clover for the first layer and then Tim Holtz Distress Ink – Pine Needles for the second layer along with the Lucky Clover ink in spots using an ink blending brush. Tim Holtz Distress Ink – Pine Needles was then applied all around the edges of the card using a finger dauber.

The image was imported into Microsoft Word and then printed out onto Copic Marker X-Press It Blending Card paper using HP Printer Grayscale. With my Cuttlebug, I die cut the image using dies from My Creative Time – Rectangle Frame Die Layers. The image was coloured in with Copic Markers and then Tim Holtz Distress Inks – Mowed Lawn was applied around the edges of the die cut.

The sentiment was stamped directly onto the base card using Versa Fine – Onyx Black ink and MISTI for placement. I embossed the sentiment with Ranger – Clear Super Fine Detail embossing powder and then heat embossed it with a Marvy Uchida – Embossing Heat Tool. U-Line Double-Sided Foam Tape was applied to back of the coloured image and it was popped up onto the centre of the card. Lastly, I added in a few sparkly Gumdrops from Your Next Stamp.

Card Recipe:

Stamp: Gerda Steiner StampsSt. Patrick’s Day Cat and Hat Digital Stamp

Sentiment: Lawn Fawn – Celebration Scripty Sentiments

Inks: HP Printer Grayscale, Versa Fine – Onyx Black, Tim Holtz Distress Inks – Lucky Clover, Tim Holtz Distress Ink – Pine Needles, Tim Holtz Distress Inks – Mowed Lawn

Paper: Copic Marker X-Press It Blending Card, Hammermill – Premium Cardstock 110 lb.

Die Cuts: My Creative TimeRectangle Frame Die Layers – MCT-D274

Stencils: Lawn Fawn – Clover Background Stencils

Embossing Powder: Ranger – Clear Super Fine Detail embossing powder

Miscellaneous: MISTI – Most Incredible Stamping Tool, U-Line Double-Sided Foam Tape, Marvy Uchida – Embossing Heat Tool, Blending Brush, Your Next Stamp – Gumdrops

Image coloured with Copic Markers:

Kitten: R02, R00, C9, C7, C5, C3, Sakura Glaze – Black (Eyes and Nose), PrismaColor Premier Pencil Black (PC935)

Shamrocks: G99, G21, YG67, YG17

Hat: G29, YG25, YG17, YG07, YG03, YG01, C9, C7, C5, C3, E27, Y26, Y15, Y11


Hope you like it and have a fantastic week!

Grad Gnome!!


My nephew graduated and I couldn’t resist sharing this adorable little Graduation Gnome With Diploma from KLM Digital Designs that I made for him. The image comes with 3 different sentiments, “Congrats Grad!”, which I’ve used on my card and also, “Congratulations” and “Today is your day!”.

To make the card, I printed out the main image onto Copic Marker X-Press It Blending Card using my HP Printer. I used my Brother Scan and Cut to cut around the image and coloured it in with Copic markers.

I used Hammermill paper to create the base shape of the card 8.5″ x 4.25″. I scored the paper at 4.25″. Then I used a mixture of Tim Holtz inks to create the background. Once I was satisfied with the look, I used Hammerill paper, my Cuttlebug and Your Next Stamp – Confetti Panel Die and popped this die cut up over the coloured background using 3M VHB – 2 sided tape. The sentiment was die cut using MFT – Die-namics Pierced Fishtail Flags, inked around the edges with Tim Holtz Distress Ink – Barn Door and then popped up with 3M VHB – 2 sided tape.

The sentiment was popped up the same way to complete the card.

Card Recipe:

Stamp and Sentiment: Graduation Gnome With Diploma (KLM Digital Designs)

Inks: HP Printer Grayscale, Tim Holtz Distress Ink – Barn Door, Carved Pumpkin, Salty Ocean, Blueprint Sketch, Wild Honey, Festive Berries, Wilted Violet and Lucky Clover

Paper: Copic Marker X-Press It Blending Card, Hammermill – Premium Colour 100 lb.

Die Cut: Your Next Stamp – Confetti Panel Die – YNSD770, MFT – Die-namics Pierced Fishtail Flags

Tools: 3M VHB – 2 sided tape, Cuttlebug

Image coloured with Copic Markers:

Skin: E000, E00, E04, E11, E21

Beard: E49, E47, E44, E42

Hat, Shoes and Gown: C10, C8, C6, T10, T8, Black (100)

Diploma: E41, E40

Tassel: R59, R39, R37, R35

Hope you like it and have a great week!

You can find more cards to inspire you at KLM Designs, KLM Digital Design Team and KLM Digital Designs on the Facebook Fan page from the rest of our design team.

Happy St. Patrick’s Day!!


Let the Shenanigans Begin

Today, I’m sharing this fun Shamrock Gnome (KLM Digital Designs) who is enjoying his lucky 4-leaf clover!  My mom’s family is part Irish and so St. Patty’s Day is always celebrated in our home. Let’s hope this little Gnome spreads some luck for everyone.

I printed out the image with my HP Printer onto Copic Marker X-Press It Blending Card using Grayscale. Then I die cut the image with Your Next Stamp – Stitched Rectangle Die Set. I coloured in the image with Copic markers and then attached the die cut back over top of the image. This allowed me to create the background and leave a white border all around the image.

Next, I printed out both sentiments using Black ink only. I glued the background paper and ribbon onto a base of 4″ x 5.25″. I inked around the edges with Tim Holtz Distress Inks – Lucky Clover and then pasted everything onto a 4.25″ x 5.5″ card base. Lastly, I popped up the coloured image and sentiments with 3M VHB – 2 sided tape.

Card Recipe:

Stamp and Sentiments: Shamrock Gnome (KLM Digital Designs)

Inks: HP Printer Black and Grayscale, Tim Holtz Distress Inks – Lucky Clover

Paper: Copic Marker X-Press It Blending Card, Little Scraps of Heaven – Clover Paper

Die Cuts:  Your Next Stamp – Stitched Rectangle Die Set (YNSD214)

Tools: Cuttlebug, 3M VHB – 2 sided tape, Forever in Time- Color-Match Gems

Image coloured with Copic Markers:

Skin: E000, E00, E04, E11, E21, R22, R20

Hair and Beard: E18, E08, YR18, YR14

Hat: G17, G09, G07, YG09, C9, C7, C5, C2, E15, Y35, Y28, Y06

Jacket: G17, G14, G09, G07, G05, YG11, YG09

Pants: YG99, YG97, YG95, G94

Boots:  C9, C7, C5, C2

Clover:  G14, G07, G05, YG11

Sky and Rainbow: V15, RV17, R14, YR14, Y13, G14, B14, B04, B02, B01, B00, B000

Grass: YG17, YG13, YG03, YG01

Hope you like it and have a great week!

You can find more cards to inspire you at KLM Designs and KLM Digital Designs on the Facebook Fan page from the rest of our design team.

Somebunny Loves You


Hi Dreamerland Fans!

Today I’m sharing a card that I made using a new release stamp from Dreamerland Crafts called I Believe in Love.  I decided to make this an inspirational card because I loved the way the little girl was hugging her bunny with such affection.

I stamped the image onto Copic Marker X-Press It Blending Card using my MISTI – Most Incredible Stamping Tool and Memento – Tuxedo Black. Then the image was coloured in with Copic markers. For the background I used Canson Watercolour Paper and first layered the grass area with multiple Tim Holtz green shades of ink listed below and then the sky with Tim Holtz blue shades of ink. Lastly, to finish the grass, I used a Rake brush and a mixture of Tim Holtz Distress Ink – Mowed Lawn and Tim Holtz Distress Ink – Pine Needles and some water. For the clouds in the sky, I used a cotton ball, cotton swab and some water. Lastly I stamped the sentiment using VersaMark and embossed it with Ranger Embossing Powder White – Extra Fine Detail.

Card Recipe

Stamp: I Believe in Love (Dreamerland Crafts)

Sentiment: Make Special Cards – February 2019 – Issue 16

Paper: Canson Watercolour Paper, Copic Marker X-Press It Blending Card

Ink: Memento – Tuxedo Black, VersaMark

Embossing Powder: Ranger Embossing Powder White – Extra Fine Detail

Image coloured in Copic Markers:

Skin: E000, E00, E04, E11, E21, R22, R20

Hair: E15, Y38, Y21, YR23

Sweater \ Bow in Hair: V09, V06, V04, V01

Sweater Pattern \ Tights: BG57, BG49, BG45

Pants: E29, E27, E25, E23, E21

Boots: E55, E53, E51, E50, E25, E42, E41, E40

Bunny: R02, R20, C-3, C-2, C-1, Colourless Blender

Grass: Tim Holtz Distress Ink – Mowed Lawn, Tim Holtz Distress Ink – Pine Needles, Tim Holtz Distress Inks – Lucky Clover, Tim Holtz Distress Ink – Bundled Sage, 1/2 Loew-Cornell 7120 Rake Brush

Sky: Tim Holtz Distress Inks – Broken China, Tim Holtz Distress Ink – Salty Ocean, Tim Holtz Distress Inks – Tumbled Glass

Stencil: Memory Box Designer Stecil – Frame Love, Tim Holtz Distress Ink – Black Soot

Miscellaneous: MISTI – Most Incredible Stamping Tool, Ranger Embossing Powder White – Extra Fine Detail

Thanks for dropping by and hope to see you back soon!

Father’s Day – Golfing!


Welcome One Crazy Stamper Fans!

It’s Wednesday, and I’m back to share a Father’s Day card that I made for my Father-In-Law using Bob Loves Golf  (High Hopes Rubber Stamps).


Card Recipe:

Stamp:  Bob Loves Golf (High Hopes Rubber Stamps)

Paper: Recollections – Bright and Basic – 6 x 6 in. (15.2 x 15.2 cm), Copic Marker X-Press It Blending Card

Miscellaneous Tools: Cricut Explore, Cuttlebug, MISTI – Most Incredible Stamping Tool

Die Cuts: My Creative Time -Stitched Squares Inside and Out

Inks: Tim Holtz Distress Inks – Lucky Clover, Memento – Tuxedo Black

Image coloured with Copic Markers:

Skin: E000, E00, E11, R22, R20

Hair: C6, C4, N0

On the Green: YG17, YG13, YG03, YG01

Shoes: E29, E25, E23, E53, E51, E50

Tam and Shorts, Socks: B04, B02, B00

Shirt: Y02, Y00, Y000

Glasses: N4, B000

Golf Club: N4, N2, N0, C6

Golf Bag: B29, B26, B23, YG07, YG05, YG03, N4, N2, N0

Golf Club Covers: YG07, YG05, B00

Golf Ball: C2, C0

Tee: B29, B23

Hope you like it and have a fantastic week!

You can find lots of inspiration from the Design Team Divas at the One Crazy Stamper blog, and the One Crazy Stamper Facebook Fan page plus you can also follow us on Instagram, Twitter and Pinterest.

Mother’s Day Card


Hi Everyone,

Thought I’d share the card that I made for my mom for Mother’s Day.

The stamp is from High Hopes Rubber Stamps – Snuggles and Cuddles T503.

MomCard2016

I stamped the image twice. Once as a mask so that I could do my background first and then again with Memento – Tuxedo Black ink. Coloured it in with Spectrum Noir markers.

Here is a close-up.

MomCard2016-Cup

For the sky I used Tim Holtz Distress Ink – Salty Ocean and Avery Elle – Custom Steel Dies – Made in the USA – D-05-01 PiercedCloudsDie.

For the grass I used a mixture of Tim Holtz Distress Inks – Mowed Lawn, Tim Holtz Distress Inks – Lucky Clover and Tim Holtz Distress Inks – Peeled Paint. Used a little grass stamp that I have to add some texture.

Sentiment is from me created in Microsoft Word and the printed out on white cardstock. “Mom” is from My Creative Time – Mom Stamp and Die set.

Background paper is from Kaitlin – Recollections Signature 12 x12 Paper Pad.

Used Craftin Desert Diva’s Fancy Frames for the stitched rectangle and scalloped edge frame.

Hope you like it!