Tag Archive | Believe

Believe in Santa!!


Hi everyone…today we are having a sponsor day over at the Passionate Paper Creations & Friends FB group site with Joy Clair Designs!! Today I’m using this adorable Santa image and sentiment from Joy Clair Designs called Love Santa Digital Stamps. Thank you Joy Clair Designs for sponsoring us.

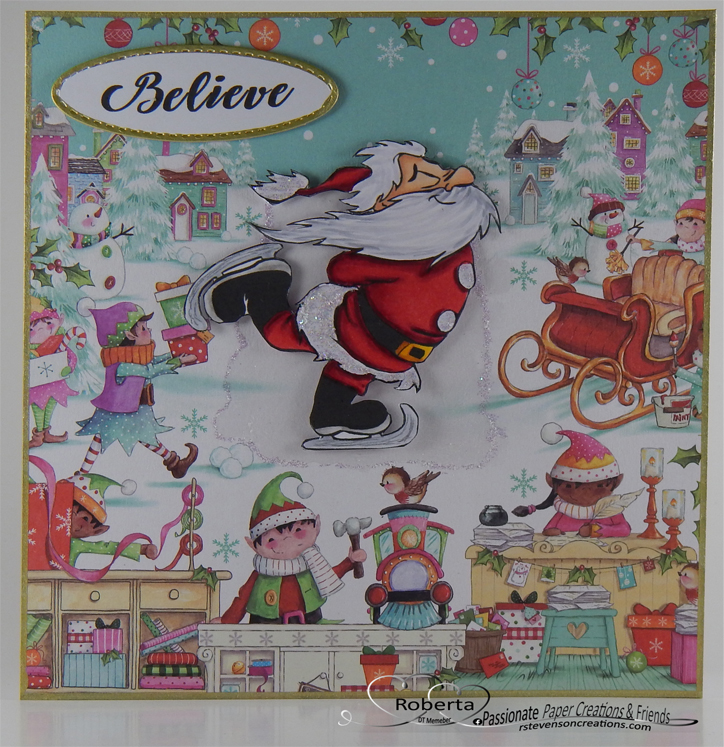
I printed out the image and sentiment using HP High Quality Grayscale onto Copic Marker X-Press It Blending Card. The image was coloured in with Copic markers and then fussy cut. The sentiment was die cut with my Cuttlebug and Whimsy Stamps – Quick Strips Die Set – WSD330.

For the base card, I used AC Cardstock – White and cut it and scored it to be 6″ x 6″. For the background, I applied Craft Consortium – Made By Elves (6″ x 6″) to the base using double-sided tape. A Sharpie – Gold Medium Point – Water Based Paint was used to go around the edges of the card and also around the sentiment. I applied some Ranger Inkssentials – Glossy Accents on top of the snow to make it look like an icy pond and applied some Stickles – Crystal around the edges. Once it was dried, I popped up the image and sentiment onto the background using U-line double sided tape to complete the card.

Card Recipe:

Stamp and Sentiment: Love Santa Digital Stamps – Joy Clair Designs

Inks: HP High Quality Grayscale

Paper: Copic Marker X-Press It Blending Card, AC Cardstock – White, Craft Consortium – Made By Elves (6″ x 6″), Hammermill – Premium Colour 100 lb.

Die Cuts: Whimsy Stamps – Quick Strips Die Set – WSD330

Miscellaneous: U-Line double-sided tape, Ranger Inkssentials – Glossy Accents, Sharpie – Gold Medium Point – Water Based Paint, Stickles – Crystal, Stickles – Star Dust

Image coloured with Copic Markers:

Skin: E21, E11, E01, E00, R30, R20

Beard and Hair: C3, C2, C1, C0, Colorless Blender

Hat and Clothing: R59, R37, R35, B60, C1, C0, E15, Y35, YR24, Y08, Stickles – Star Dust

Skates: C2, C1, C0, W3, W2, W1, Pental Sunburst Metalic Med Gel Pen – Silver

Hope you like it and have a great week!

Come and check us out on Passionate Paper Creations & Friends FB group
as we are currently sponsoring Joy Clair DesignsJoy Clair Designs Facebook Group.

Oh you don’t want to miss this big sale! Jump over to Passionate Paper Creations & Friends. Not a Member? Come Join! https://bit.ly/2VwG9iz.

If you are a member of Passionate Paper Creations & Friends FB group
you can go to the top of the page and get a shopping discount.

If you are not a member just click join. We are a fun loving group with a lot of inspiration.

Believe!!!


It’s Wednesday, and this week, I made a Christmas card using Believe Snowman – TFL006 and Snow Globe – ULF002 by High Hopes Rubber Stamps for the main image and North Pole Greetings – GLL005 (High Hopes Rubber Stamps) for the sentiment. It’s time to start believing the magic of Christmas and the joy that it brings to everyone!

To make my card this week, I began with a card base using AC Cardstock – White cut and folded to 6″ x 6″. The snowflake background is from Lawn Fawn – Let It Shine Snowflakes (6″ x 6″) paper pad. I applied this directly to the base using double-sided tape.

Using Lifestyle Crafts Cutting Dies – Nesting Circles and my Cuttlebug, I die cut a 3.75″ circle from Copic Marker X-Press It Blending Card paper. With my MISTI and Memento – Tuxedo Black ink, I stamped the snowman scene image onto it. I coloured in the image with Copic markers and then added some snow to the sky and snowman’s arms using a Gelly Roll Sakura #8 Pen. Sakura Glaze – Black was added to the eyes of the snowman and birds and the snowman’s mouth. With a Ranger – Emboss It Pen Clear, I added some ink to the top of the Snowman’s hat, sign, icicles, tops of the birdhouses and snow drifts and then heat embossed everything with WOW! Sparkling Snow Embossing Glitter and a Marvy Uchida – Embossing Heat Tool. Stickles – Diamond was added as an extra layer to the snow and Wink of Stella – Clear was applied over all the snowman. This was then set aside to dry.

With my MISTI and Memento – Summer Sky ink I stamped the top part of the globe onto Copic Marker X-Press It Blending Card paper. I cleaned off the stamp and this time, I used some Post-it Notes to hide the background inside the globe and inked the braided border for both the top and bottom of the base with Versamark ink. I applied Ranger Super Fine Detail Gold Embossing powder and heat embossed it using a Marvy Uchida – Embossing Heat Tool. With my globe image still in place on my MISTI, I removed the snowglobe stamp and added the sentiment turning up both ends of the stamp slightly to give the words some curvature. The sentiment was stamped using Versamark ink and then Ranger Super Fine Detail Gold Embossing powder was applied to it and then heat embossed using a Marvy Uchida – Embossing Heat Tool. The base was then coloured in using my Copic markers and a Gelly Roll Stardust – Clear pen was used to colour in the white areas to give it some glitter. I also added some of this pen to the tops of the snowman’s arms. With my scissors, I fussy cut around the entire snow globe.

The card was now ready to assemble. I attached 3M double-side tape to pop up the snow globe onto the main background and then added 3M double-sided tape to the back of the circle and centred it on the top part of the globe. Lastly, to finish off the card, I applied some Nuvo Crystal Drops – Caribbean Ocean, Violet Galaxy and Nuvo Glitter Drops – Sherbert Shimmer to some of the snowflakes on the base card.

Card Recipe:

Stamp: Believe Snowman – TFL006 (High Hopes Rubber Stamps), Snow Globe – ULF002 (High Hopes Rubber Stamps)

Sentiment: North Pole Greetings – GL005 (High Hopes Rubber Stamps)

Inks: Memento – Tuxedo Black, Memento – Summer Sky ink, Versamark

Paper: Copic Marker X-Press It Blending Card, AC Cardstock – White, Lawn Fawn – Let It Shine Snowflakes (6″ x 6″)

Die Cut: Lifestyle Crafts Cutting Dies – Nesting Circles

Stickles: Diamond

Nuvo: Crystal Drops – Caribbean Ocean, Violet Galaxy and Glitter Drops – Sherbert Shimmer

Embossing Powder:Ranger Super Fine Detail Gold Embossing powder, WOW! Sparkling Snow Embossing Glitter

Tools: MISTI – Most Incredible Stamping Tool, Marvy Uchida – Embossing Heat Tool, Cuttlebug, Gelly Roll Sakura #8 Pen, Ranger – Emboss It Pen Clear, Sakura Glaze – Black pen, Gelly Roll Stardust – Clear pen

Image coloured with Copic Markers:

Snowman: B60, C1, C00, Colorless Blender

Hat and Buttons: C10, C8, C6, C4

Arms and Sign: E27, E25, E23, E21

Scarves, Patches, Hat Band: RV66, RV63, RV55, BG09, BG07, BG02, BG01

Bird Houses: RV66, RV63, RV55, BG09, BG07, BG02, BG01, E27, E25, E23, E21

Birds: R46, R14, R08

Sky: B99, B97, B95, B93, B91

Snow: B60, C1, C00, B0000, BG0000, Colorless Blender

Snow Globe: R46, R14, R08

Hope you like it and have a fantastic week!

You can find lots of inspiration from the Design Team Divas at the High Hopes blog, and the High Hopes Rubber Stamps Facebook Fan page plus you can also follow us on
Instagram, Twitter and Pinterest.

When You Believe!


Today, I’m sharing an inspirational card that I made using Dreamerland Crafts stamps called When You Believe – D20007. I’ve been told that to become a ballet dancer it takes a lot of hard work and practice. This can also be said for many other professions as well. The overwhelming feeling of success and joy when one achieves their goals is always worth the hard work.

To make this card I used a base card of 5.5″ x 4.25″ using Hammermill – Premium Colour 100 lb. cardstock. I printed out the background using my HP Printer and pattern from Nana Vics Digitals – Ballerina #1 Digital Paper. I cut it the same size as the base card and used double-sided tape to attached it on top. Tim Holtz Distress Ink – Picked Raspberry was used to ink around all of the edges.

I stamped the image using Memento – Tuxedo Black ink and my MISTI onto Copic Marker X-Press It Blending Card. I coloured in the image with Copic markers. My Creative Time – Rectangle Frame Dies and my Cuttlebug were used to die cut the image. I stamped the sentiment using my MISTI and Tim Holtz Distress Ink – Picked Raspberry onto Hammermill – Premium Colour 100 lb. cardstock. Then, I cleaned off the stamp and stamped the sentiment again, this time using VersMark ink. I added Ranger – Clear Super Fine Detail embossing powder and then heat embossed the powder with Marvy Uchida – Embossing Heat Tool. I fussy cut around the sentiment and used Tim Holtz Distress Ink – Picked Raspberry ink to ink around the edges. The image was then centred over the fancy rectangle I die cut using DIY Scrapbooking Artist – Nested Stitched Scallop Rectangle Dies using glue.

To assemble the card, I added 3M VHB – 2 sided tape to the backs of the large triangle and sentiment. These were both attached directly to the patterned background. Lastly, to complete the card, I used some Craftin’ Desert Divas – Sherbet Sequins for embellishments.

Card Recipe:

Stamp and Sentiment:  When You  Believe – D20007 (Dreamerland Crafts)

Inks: Memento – Tuxedo Black, Tim Holtz Distress Ink – Picked Raspberry, VersaMark, HP Printer – Colour

Embossing Powder: Ranger – Clear Super Fine Detail embossing powder

Paper: Copic Marker X-Press It Blending Card, Hammermill – Premium Colour 100 lb., Nana Vics Digitals – Ballerina #1 Digital Paper

Die Cut: My Creative Time – Rectangle Frame Dies, DIY Scrapbooking Artist – Nested Stitched Scallop Rectangle Dies

Tools: MISTI – Most Incredible Stamping Tool, Cuttlebug, Marvy Uchida – Embossing Heat Tool, 3M VHB – 2 sided tape, Craftin’ Desert Divas – Sherbert Sequins

Image coloured with Copic Markers:

Skin: E000, E00, E04, E11, E21, R22, R20

Hair:  E15, Y21, YR23

Dress, Bun Band and Shoes: RV09, R83, R81, RV00, RV000

Background: RV09

Hope you like it and have a great week!

You can find more cards to inspire you at Dreamerland Crafts and Pointer Scrapbooking on the Facebook Fan pages from the rest of our design team.

Mistletoe Santa Gnome!!


Today, I’m sharing another super adorable gnome from KLM Digital Designs November release called Mistletoe Santa Gnome. The image comes with 3 different sentiments, “Merry Christmas”, which I’ve used on my card and also, “Believe” and “ho-ho-ho”. This Santa gnome is out taking a stroll and enjoying the magic of Christmas and winter.

I decided to colour this Santa in non-traditional colours. To make the card, I printed out the main image onto Copic Marker X-Press It Blending Card using my HP Printer. I used my Brother Scan and Cut to cut around the image and coloured it in with Copic markers. Then I applied Nuvo Glitter Accents – Fresh Snowfall to the all of the trimming and set it aside to dry.

I used AC White paper to create the base shape of the card 6″ x 6″. Then I applied Stampin’ Up – Snowflake Splendor Designer Series Paper cut to the same size directly to the base. I had a spare cut-out from American Crafts – “Holiday” paper in which I had used My Creative Time -Stitched Squares Inside and Out to die cut the centre. I trimmed it a little bit on all sides to create a border. I took a small scrap of Recollections – Christmas Inkjet Printable Glitter Paper and tore it across the top to imitate snow caps. This I adhered to the back of the die-cut panel. Then, I glued the entire piece down on to the background. I also made sure that I didn’t use any glue towards the tops of the snow.

The sentiment was brought into Microsoft Word and I adjusted the width to be .95″. This allowed me to use the 1″ die from Lifestyle Crafts Cutting Dies – Nesting Circles to die cut the sentiment after it was printed out. I inked around the edges of the sentiment with Tim Holtz Distress Inks – Peacock Feathers and applied Clear – Wink of Stella over top of it to make it sparkle. The snowflakes were all die cut from Signature Collection by Sara Davies – Winter Wonderland Snowflake Quartet.

The remainder of the card was now ready to put together. I glued the Gnome directly to the background paper and moved it slightly under the snow. I added glue to each of the snowflakes and placed them directly onto the backgrounds. Lastly, I popped up the sentiment with 3M VHB – 2 sided tape.

Card Recipe:

Stamp and Sentiment: Mistletoe Santa Gnome (KLM Digital Designs)

Inks: HP Printer Grayscale, Tim Holtz Distress Inks – Peacock Feathers

Paper: Copic Marker X-Press It Blending Card, Stampin’ Up – Snowflake Splendor Designer Series Paper, Recollections – Christmas Inkjet Printable Glitter Paper – 8.5 x 11″, American Crafts – “Holiday” 6 x 6 in. (15.2 cm x 15.2 cm)

Die Cut: My Creative Time -Stitched Squares Inside and Out, Lifestyle Crafts Cutting Dies – Nesting Circles, Signature Collection by Sara Davies – Winter Wonderland Snowflake Quartet

Tools: 3M VHB – 2 sided tape, Clear – Wink of Stella, Nuvo Glitter Accents – Fresh Snowfall, Gelly Roll Sakura #8 Pen, Cuttlebug

Image coloured with Copic Markers:

Skin: E000, E00, E04, E11, E21

Beard: W4, W3, W2, W1, W0, W00

Hat and Coat: BG49, BG18, BG15, BG13, BG11, Gelly Roll Sakura #8 Pen

Mitts: BG78, BG75, BG72

Holly, Pine Needles and Berries: R59, R35, G46, G43, G29, YG01, Gelly Roll Sakura #8 Pen

Hope you like it and have a great week!

Check out KLM Designs for some great savings this month.

Offer good until 12/07/20
25% OFF ALL PHOTOPOLYMER STAMPS
USE COUPON CODE: BLACKFRIDAY

You can find more cards to inspire you at KLM Designs, KLM Digital Design Team and KLM Digital Designs on the Facebook Fan page from the rest of our design team.