Tag Archive | Stickles – Star Dust

Winter Wonderland


Sharing a CAS card that I made today using KLM Digital DesignSkier Gnome for the main image and Sledding Gnome for the sentiment from the new December 2022 release. I tried Cross-Country skiing a few times. I was so bad at it, that once was enough for any of my friends. They said I was too dangerous on them. LOL! I even skied down into a tree to avoid knocking over 3 people once going down a small hill. My friend was laughing so hard it took him a little while before he could help me back up away from the tree. But, by the time we got back he was freezing and I was hot from all of the hard work I was doing trying to keep up to him. He was a professional skier. That was the last time he ever went with me. Then there was the time that there were about 6 of us. They made the mistake of asking me to go first side-stepping up the hill. I almost made it to the top when my foot slipped and yes, I knocked everyone over like a bunch of bowling pins. LOL! Guess what??? They never went with me again either. Oh well! Some things are just not meant to be!!! As you may have guessed by now. Downhill is definitely out of the question for me.

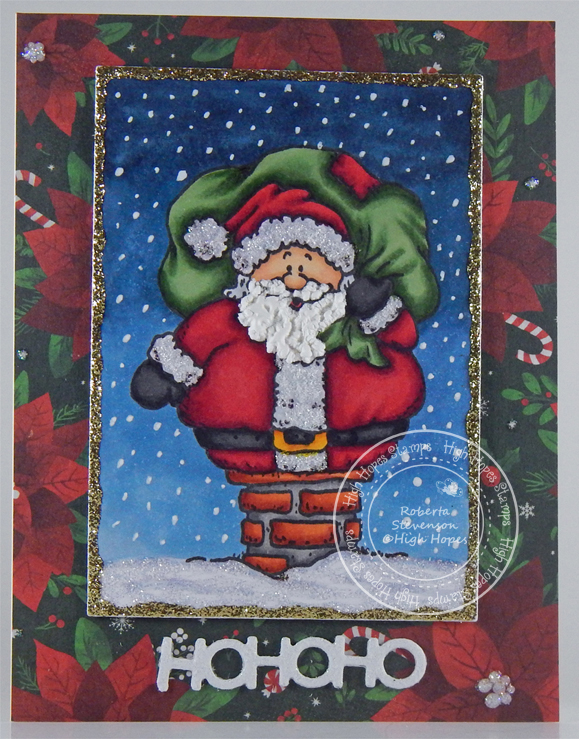
To make my card this week, I started with a 5.5″ x 4.25″ card base using Hammermill – Premium Colour 100 lb. cardstock. Recollections – Christmas Plaids paper was cut to the same size and adhered directly to the base using double-sided tape! The image and sentiment were imported into Microsoft Word and printed out onto Copic Marker X-Press It Blending Card. With my Cuttlebug and My Creative Time – Rectangle Frame Dies, I die cut the printed image and sentiment.

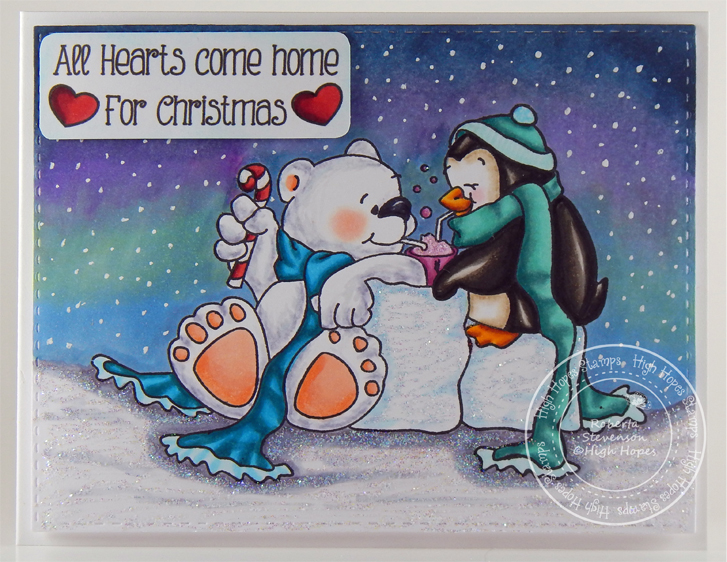
I coloured in the image and then added in the snow in the sky using a combination of a Gelly Roll Sakura #10 Pen and UNIPosca PC-3M White marker. The snow at the bottom was created using a combination of Cosmic Shimmer Fluffy Stuff and DecoArt Glamour Dust. To puff up the snow, heat was applied using Marvy Uchida – Embossing Heat Tool. I added a little more glitter along the very top of the snow with Stickles – Star Dust. The completed image was then popped up onto the card using U-Line double-sided tape.

Card Recipe:

Stamp:  Skier Gnome – KLM Digital Designs

Sentiment: Sledding Gnome – KLM Digital Designs

Inks: HP Printer Grayscale

Paper: Copic Marker X-Press It Blending Card, Hammermill – Premium Colour 100 lb., Recollections – Christmas Plaids

Die Cuts: My Creative Time – Rectangle Frame Dies

Miscellaneous: U-Line double-sided tape, Cuttlebug, Gelly Roll Sakura #10 Pen, UNIPosca PC-3M White marker, DecoArt Glamour Dust, Cosmic Shimmer Fluffy Stuff, Stickles – Star Dust, Marvy Uchida – Embossing Heat Tool

Image coloured with Copic Markers:

Skin: E21, E11, E04, E00, E000

Beard: E08, YR18, YR16, YR12

Antlers: E33, E31, E30

Ears: R25, R23, R02, R01

Shirt and Hat: G46, G29, G24, G21, R39, R34

Jeans: B26, B23, B21

Boots: E34, E33, E31, E29, E27, E25, E23

Poles: E39, E37, E35, C8, C6, C5, C4, C3, C1

Sky: B99, B97, B95, B93

Hope you like it and have a great week!

You can find more cards to inspire you at KLM Designs, KLM Digital Design Team and KLM Digital Designs on the Facebook Fan page from the rest of our design team.

Snowmen – Winter Fun!!


It’s Wednesday, and this week, I made a Christmas card using High Hopes Rubber Stamps Snowman Dash – TT054 for the main image and Winter Fun! – F109, for the sentiment. Growing up in the North, we couldn’t wait to get home from school to go sledding down the hills across the street or behind our house. There was so much snow that the snowbanks the plows created were just the perfect height for us to have loads of fun! On the weekends, we would go to the much larger hills!

To make my card this week, I began with a card base of 5.5″ x 4.25″ using Hammermill – Premium Colour 100 lb. cardstock. I inked around the edges with a blender brush and blue ink that I still had on it from a previous project. I don’t clean off my brushes because I have dedicated brushes for each colour group.

The image was stamped onto the inner die cut using my MISTI and Memento – Tuxedo Black ink, which I had die cut using my Cuttlebug and paper from Copic Marker X-Press It Blending Card cardstock with MFT – Stitched Rec Scallop Frame dies. I coloured in the image and then added the sentiment using a MISTI, VersaMark ink and Ranger Embossing Powder White – Extra Fine Detail. This was heat embossed using a Marvy Uchida – Embossing Heat Tool. The snow in the sky was created using a Gelly Roll Sakura #10 Pen and UNIPosca PC-3M White marker. Stickles – Star Dust was added to the snow on the hill and Cosmic Shimmer Fluffy Stuff and DecoArt Glamour Dust were added to give some texture to the snow where the sled had been. A Marvy Uchida – Embossing Heat Tool was used to fluff up the Cosmic Shimmer Fluffy Stuff. Once the Stickles was all dry, I pieced the 2 die cuts back together using Scotch tape on the back. U-Line double-sided tape was added to the combined piece and it was popped up onto the card.

Card Recipe:

Stamps: Snowman Dash – TT054 (High Hopes Rubber Stamps)

Sentiment: Winter Fun – F109 (High Hopes Rubber Stamps)

Inks: Memento – Tuxedo Black, VersaMark

Paper: Copic Marker X-Press It Blending Card, Hammermill – Premium Colour 100 lb.

Embossing Powder: Ranger Embossing Powder White – Extra Fine Detail

Die Cuts: Die-namics – Exclusive Designs for “My Favourite Things” – Stitched Rec Scallop Frame – MFT-860

Tools and Embellishments: MISTI – Most Incredible Stamping Tool, U-Line double-sided tape, Stickles – Star Dust, Cuttlebug, DecoArt Glamour Dust, Cosmic Shimmer Fluffy Stuff, UNIPosca PC-3M White marker, Marvy Uchida – Embossing Heat Tool, Blending Brush

Image coloured with Copic Markers:

Snowmen: BV20, B0000, YR68, YR31, Y38, R59, R235, 100, W9, W7, W5, Colorless Blender

Snowman1 Mittens and Scarf: BV08, BV13, BV02, BV01, BV00

Snowman2 Mittens and Scarf: BG75, BG57, BG49, BG13, BG11, BG10

Snowman3 Hat and Mittens: R59, R46, R37, R35, R14, R08

Sled: E49, E47, E39, E37, E35, E34

Sky: B06, B05, B04, B02

Hope you like it and have a fantastic week!

You can find lots of inspiration from the Design Team Divas at the High Hopes blog, and the High Hopes Rubber Stamps Facebook Fan page plus you can also follow us on
Instagram, Twitter and Pinterest.

Ho Ho Ho!!


It’s Wednesday, and this week, I made a Christmas card using High Hopes Rubber Stamps Santa In Chimney – S202 for the image. Christmas is only a few months away, so I’m busy making more Christmas cards for this year to give away! How about you?

To make my card this week, I began with a card base of Hammermill – Premium Colour 100 lb. cardstock, cut and scored to be 5.5″ x 4.25″. DCWV – Holiday Cheer was cut to the same size and applied to the base using double-sided tape. The image was die-cut using Anna Griffin Empress Mini Cutting Machine, My Creative Time – Rectangle Frame Dies and Copic Marker X-Press It Blending Card. The image was stamped onto the Copic Marker X-Press It Blending Card using my MISTI – Most Incredible Stamping Tool and Memento – Tuxedo Black ink. Once it was coloured in, I applied some Cosmic Shimmer Fluffy Stuff to his beard and then heat set it with a Marvy Uchida – Embossing Heat Tool to make it puff up. Stickles – Diamond was applied to the Coat trim and hat, as well as the roof. Stickles – Gold was applied all around the die-cut to create some extra sparkle. Stickles – Star Dust was applied to the insides of the background flowers and some snowflakes.  Once everything was dry, I added some U-Line double-sided tape and popped up the main coloured image onto the base card. For the sentiment, I die cut Recollections Christmas Ink Jet Printable Glitter Paper with the Anna Griffin Empress Mini Cutting Machine using Jolly Quickutz – Deck the Halls limited edition gift set. I applied Scrapbook Adhesives – 3D Foam Strips to the Sentiment and popped it up onto the card to finish it off.

Card Recipe:

Stamp: Santa In Chimney – S202 (High Hopes Rubber Stamps)

Sentiment: Jolly Quickutz – Deck the Halls limited edition gift set

Inks: Memento – Tuxedo Black

Paper: Copic Marker X-Press It Blending Card, Hammermill – Premium Colour 100 lb., DCWV – Holiday Cheer (6″ x 6″), Recollections Christmas Ink Jet Printable Glitter Paper

Die Cuts: Jolly Quickutz – Deck the Halls limited edition gift set, My Creative Time – Rectangle Frame Dies

Stickles: Diamond, Gold, Star Dust

Tools: MISTI – Most Incredible Stamping Tool, U-Line double-sided tape, Anna Griffin Empress Mini Machine, Stickles – Diamond, Cosmic Shimmer Fluffy Stuff, Marvy Uchida – Embossing Heat Tool, Scrapbook Adhesives – 3D Foam Strips

Image coloured with Copic Markers:

Skin: E21, E11, E00, E000, R30, R20, Eyes (Sakura Glaze – Black)

Hair: C2, C1, C00

Coat and Hat Trim: C2, C1, C00, Stickles – Diamond

Clothing: R59, R37, R35

Belt and Mitts: 100, T9, T7, T5, E15, Y38, Y35, Y15

Sack: G99, YG67, YG63, YG61, R59, Y37, R35

Chimney: E97, E19, E08, T5, T3, T1

Roof: BV20, B60, C1, C00, Stickles – Diamond

Sky: B99, B97, B95, B93

Hope you like it and have a fantastic week!

You can find lots of inspiration from the Design Team Divas at the High Hopes blog, and the High Hopes Rubber Stamps Facebook Fan page plus you can also follow us on
Instagram, Twitter and Pinterest.

Cat & Mouse Party!!


It’s Wednesday, and this week, I made a birthday card using High Hopes Rubber Stamps Cat & Mouse Party – TDG036 for the image and Dot Happy Birthday To You! – F065 for the sentiment. These animals are ready to party, are you?

To make my card this week, I began with a card base of AC Cardstock – White paper cut and scored to be 6″ x 6″. Using my Cuttlebug and My Creative Time -Stitched Squares Inside and Out, I die cut 3 squares out of Doodlebug Design Inc. – Fairy Tales, Recollections – Spring Inks paper and Copic Marker X-Press It Blending Card. I also used Doodlebug Design Inc. – Fairy Tales 6″ x 6″ paper for my main background. I applied this directly to the base card using double-sided tape. Tim Holtz Distress Ink – Evergreen Bough and Tim Holtz Distress Ink – Picked Raspberry were both used to go around the edges of the die-cut paper. I applied U-Line double-sided tape to the backs of the aqua coloured square and patterned paper and popped them both up onto the background.

The image and sentiment were both stamped onto Copic Marker X-Press It Blending Card using my MISTI – Most Incredible Stamping Tool and Memento – Tuxedo Black ink. The image was coloured in with Copic Markers. I die cut the sentiment using my Anna Griffin Empress Mini Machine and My Creative Time – Stitched Zig Zag Ties. Copic marker RV06 was used to go around the edges. I attached the coloured image to Recollections – Spring Inks paper using double-sided tape and then cut a slim border around the image. I applied U-Line double-sided tape to the back of this piece and popped it up into the centre of the patterned square. 4 layers of U-Line double-sided tape were attached to the back of the sentiment on the bottom portion and liquid glue was applied to the top. I popped this up onto the card at the bottom. Lastly, to finish the card off, I applied Creative Impressions – Metallic Balloon Brads by adding 2 layers of U-Line double-sided tape. I popped them onto the sentiment and the card and drew in some string for the balloons. Stickles – Star Dust was added to the cake and confetti.

Card Recipe:

Stamps: Cat & Mouse Party – TDG036 (High Hopes Rubber Stamps)

Sentiment: Dot Happy Birthday To You! – F065 (High Hopes Rubber Stamps)

Inks: Memento – Tuxedo Black, Tim Holtz Distress Ink – Evergreen Bough, Tim Holtz Distress Ink – Picked Raspberry

Paper: Copic Marker X-Press It Blending Card, AC Cardstock – White, Doodlebug Design Inc. – Fairy Tales (6″ x 6″), Recollections – Spring Inks (12″ x 12″)

Die Cuts: My Creative Time -Stitched Squares Inside and Out, My Creative Time – Stitched Zig Zag Ties

Tools: MISTI – Most Incredible Stamping Tool, U-Line double-sided tape, Cuttlebug, Anna Griffin Empress Mini Machine, Creative Impressions – Metallic Balloon Brads – Item 90613, Stickles – Star Dust

Image coloured with Copic Markers:

Cat: N9, N7, N6, N5, N4, R46, R30, R20

Mouse: E35, E34, E33, E31, E30, R46, R30, R20, R02, R01, R00

Cake, Hat and Confetti: BG57, BG32, RV06, RV04, RV02, RV00, Y17, Y15, Y11, YR15, YR14, YR12, V04, YG07, YG05, YG03

Balloons: BG72, BG57, BG32, BG11, BG000, YR18, YR16, YR12, YR00

Candles: BG32, R46, YR14, Y08, Y04

Plate: BV25, BV23, BV20, BV0000

Background: Y04, Y02, Y00

Hope you like it and have a fantastic week!

You can find lots of inspiration from the Design Team Divas at the High Hopes blog, and the High Hopes Rubber Stamps Facebook Fan page plus you can also follow us on
Instagram, Twitter and Pinterest.

Eat Cake!!


It’s Wednesday, and this week, I made a birthday card using High Hopes Rubber Stamps Cupcake Hedgie – TDG035 for the image and Eat Cake – FDG026 for the sentiment. I think the expression on this little hedgie says it all! Birthdays should always be an excuse to eat some cake! LOL!

To make my card this week, I began with a card base of Hammermill – Premium Colour 100 lb. cardstock, cut and scored to be 5.5″ x 4.25″. I adhered Scrapbook.com – Brights Smooth Cardstock which was the same size as the base to the card using double-sided tape. Using my Anna Griffin Empress Mini Machine die cutting machine, I die cut the cake background paper with Your Next Stamp Designer Pad – Birthday Boy and My Creative Time – Rectangle Frame Layers. Tim Holtz Distress Ink – Blueprint Sketch was then inked around all of the edges. I add some U-Line double-sided tape and popped it up onto the base card. Again, using my Empress die cutter, I die cut some golden yellow cardstock using My Creative Time -Stitched Squares Inside and Out. I added some U-Line double sided tape and added it to the patterned background. Waffle Flower – Nesting Square dies were used to die cut the smaller square out of Copic Marker X-Press It Blending Card and My Creative Time – Bunch of Fun Circle Die was used to die cut the circle from some Red cardstock.

The image and sentiment were stamped onto the Copic Marker X-Press It Blending Card. I coloured in the image with Copic Markers. I added Stickles – Star Dust to the cupcake to make the layers sparkle. A 1.5″ Circle punch was used to cut out the sentiment. U-Line double sided tape was added to the backs of the image and sentiment. I popped up the image onto the smaller square and the sentiment onto the red circle. I added another layer of U-Line double sided tape to the right side of the red circle and a little bit of glue to the left side and popped it up over top of the main image. To finish off the card, I added on some YNS Gumdrops – Firefly Magic Sparkly Gumdrops and YNS Gumdrops – Sugar Rush Sparkly Gumdrops.

Card Recipe:

Stamp: Cupcake Hedgie – TDG035 (High Hopes Rubber Stamps)

Sentiment: Eat Cake – FDG026 (High Hopes Rubber Stamps)

Inks: Memento – Tuxedo Black, Tim Holtz Distress Ink – Blueprint Sketch

Paper: Copic Marker X-Press It Blending Card, Hammermill – Premium Colour 100 lb., Your Next Stamp Designer Pad – Birthday Boy (6″ x 6″), Scrapbook.com – Brights Smooth Cardstock (4.25″ x 5.5″)

Die Cuts: My Creative Time -Stitched Squares Inside and Out, My Creative Time – Rectangle Frame Layers, My Creative Time – Bunch of Fun Circle Dies, Waffle Flower – Nesting Square dies

Tools: MISTI – Most Incredible Stamping Tool, U-Line double-sided tape, Anna Griffin Empress Mini Machine, Stickles – Star Dust, YNS Gumdrops – Firefly Magic Sparkly Gumdrops, YNS Gumdrops – Sugar Rush Sparkly Gumdrops

Image coloured with Copic Markers:

Hedgehog: E53, E51, E50, E49, E44, E43, E42, E41, W4, R30, R20, R08, W4

Cupcake Wrapper: B29, B26, B24, B21

Cupcake: Y17, Y15, Y11, R46, R14, R08, G14, YG23, YG11, B26, B24, B21

Cherry: R89, R59, R39, R21

Ground: E34, E33, E3

Check out our new re-release of some fun images for our “Let’s Celebrate Release”!

Hope you like it and have a fantastic week!

You can find lots of inspiration from the Design Team Divas at the High Hopes blog, and the High Hopes Rubber Stamps Facebook Fan page plus you can also follow us on
Instagram, Twitter and Pinterest.

Believe in Santa!!


Hi everyone…today we are having a sponsor day over at the Passionate Paper Creations & Friends FB group site with Joy Clair Designs!! Today I’m using this adorable Santa image and sentiment from Joy Clair Designs called Love Santa Digital Stamps. Thank you Joy Clair Designs for sponsoring us.

I printed out the image and sentiment using HP High Quality Grayscale onto Copic Marker X-Press It Blending Card. The image was coloured in with Copic markers and then fussy cut. The sentiment was die cut with my Cuttlebug and Whimsy Stamps – Quick Strips Die Set – WSD330.

For the base card, I used AC Cardstock – White and cut it and scored it to be 6″ x 6″. For the background, I applied Craft Consortium – Made By Elves (6″ x 6″) to the base using double-sided tape. A Sharpie – Gold Medium Point – Water Based Paint was used to go around the edges of the card and also around the sentiment. I applied some Ranger Inkssentials – Glossy Accents on top of the snow to make it look like an icy pond and applied some Stickles – Crystal around the edges. Once it was dried, I popped up the image and sentiment onto the background using U-line double sided tape to complete the card.

Card Recipe:

Stamp and Sentiment: Love Santa Digital Stamps – Joy Clair Designs

Inks: HP High Quality Grayscale

Paper: Copic Marker X-Press It Blending Card, AC Cardstock – White, Craft Consortium – Made By Elves (6″ x 6″), Hammermill – Premium Colour 100 lb.

Die Cuts: Whimsy Stamps – Quick Strips Die Set – WSD330

Miscellaneous: U-Line double-sided tape, Ranger Inkssentials – Glossy Accents, Sharpie – Gold Medium Point – Water Based Paint, Stickles – Crystal, Stickles – Star Dust

Image coloured with Copic Markers:

Skin: E21, E11, E01, E00, R30, R20

Beard and Hair: C3, C2, C1, C0, Colorless Blender

Hat and Clothing: R59, R37, R35, B60, C1, C0, E15, Y35, YR24, Y08, Stickles – Star Dust

Skates: C2, C1, C0, W3, W2, W1, Pental Sunburst Metalic Med Gel Pen – Silver

Hope you like it and have a great week!

Come and check us out on Passionate Paper Creations & Friends FB group
as we are currently sponsoring Joy Clair DesignsJoy Clair Designs Facebook Group.

Oh you don’t want to miss this big sale! Jump over to Passionate Paper Creations & Friends. Not a Member? Come Join! https://bit.ly/2VwG9iz.

If you are a member of Passionate Paper Creations & Friends FB group
you can go to the top of the page and get a shopping discount.

If you are not a member just click join. We are a fun loving group with a lot of inspiration.

Card of the Month Challenge Round 2 – Brrr!!!


Hey friends! Thank you for everyone that voted for me in Round 1. I have a card using High Hopes Stamps featured in this month’s Card of the Month contest Card of The Month – JUST FOR FUN! with Creative Scrapbooker magazine! Such an honor because all the creations are outstanding! Was wondering if you would all do me a favour and vote for me in Round 2, https://creativescrapbooker.ca/card-of-the-month-nov-2021/?fbclid=IwAR0TdRXPRGcVdkfuxB5BdXNFi2yCfNNW_XZnFzmSXNN4awMuHc3SXrG7i9Y#/bracket/3616656/

I made a Christmas card using Havin’ A Ball Snowman – S147 by High Hopes Rubber Stamps for the main image and Brr… – FDG004 (High Hopes Rubber Stamps) for the sentiment. Brr…. – Winter is coming soon!

Card of the Month Challenge – Brrr!!!


Hey friends! I have a card using High Hopes Stamps featured in this month’s Card of the Month contest Card of The Month – JUST FOR FUN! with Creative Scrapbooker magazine!
Such an honor because all the creations are outstanding! Was wondering if you would all do me a favour and vote for me.
https://creativescrapbooker.ca/card-of-the-month-nov-2021/?fbclid=IwAR0TdRXPRGcVdkfuxB5BdXNFi2yCfNNW_XZnFzmSXNN4awMuHc3SXrG7i9Y#/bracket/3616656/

I made a Christmas card using Havin’ A Ball Snowman – S147 by High Hopes Rubber Stamps for the main image and Brr… – FDG004 (High Hopes Rubber Stamps) for the sentiment. Brr…. – Winter is coming soon!

Polar Friends!!!


It’s Wednesday, and this week, I made a Christmas card using Polar Friends – TT058 by High Hopes Rubber Stamps for the main image and All Hearts – HDG004 (High Hopes Rubber Stamps) for the sentiment. Sharing Christmas with loved ones is always something to look forward to.

Using My Creative Time – Rectangle Frame Dies and my Cuttlebug, I die cut a 5.25″ x 4″ rectangle from Copic Marker X-Press It Blending Card paper. With my MISTI and Memento – Tuxedo Black ink, I stamped the image onto it. I coloured in the image with Copic markers and then added some snow to the sky using a Gelly Roll Sakura #8 Pen and Sharpie Water Based Paint – White – Extra Fine Point. Stickles – Diamond was added to the ice cubes and Wink of Stella – Clear was applied to the candy cane. Stickles – Star Dust was added to all of the snow. This was then set aside to dry.

Once everything was dry, I popped up the image onto Hammermill – Premium Colour 100 lb. paper cut and folded to 5.5″ x 4.25″ with U-Line double-sided tape. I stamped out the sentiment onto Copic Marker X-Press It Blending Card and coloured in the hearts with Copics and tinted the white paper with Lawn Fawn – Peacock ink. To finish off the card, I popped this up with 3M VHB – 2 sided tape.

Card Recipe:

Stamp: Polar Friends – TT058 (High Hopes Rubber Stamps)

Sentiment: All Hearts – HDG004 (High Hopes Rubber Stamps)

Inks: Memento – Tuxedo Black, Lawn Fawn – Peacock Ink

Paper: Copic Marker X-Press It Blending Card, Hammermill – Premium Colour 100 lb.

Die Cut: My Creative Time – Rectangle Frame Dies

Stickles: Star Dust, Diamond

Tools: MISTI – Most Incredible Stamping Tool, Cuttlebug, Gelly Roll Sakura #8 Pen, Sharpie Water Based Paint – White – Extra Fine Point, Wink of Stella – Clear, U-Line double-sided tape, 3M VHB – 2 sided tape

Image coloured with Copic Markers:

Polar Bear: B60, BV23, BV20, C1, C00, R30, R20, R02, Colorless Blender

Penguin: W9, W7, W5, W3, W00, E15, YR14, Y17, Y11, R11, RV00, E43, E42, E41, E40

Penguin Scarf and Hat: BG72, BG57, BG05, BG11, BG10, BG000, BG0000

Bear Scarf: RV66, RV63, RV55, BG09, BG07, BG02, BG01, B00, B000, B0000

Ice: B60, B000, B0000

Sky: B99, B97, B95, B93, B45, B41, BG45, BG11, BG10, BV25, BV23, BV20, BV04, V04, V01, YG11, RV04, RV63

Snow: BV23, BV20, Colorless Blender, Stickles – Star Dust

Soda: RV66, RV63, RV55, RV52

Candy Cane and Hearts: R59, R37, R35

Hope you like it and have a fantastic week!

You can find lots of inspiration from the Design Team Divas at the High Hopes blog, and the High Hopes Rubber Stamps Facebook Fan page plus you can also follow us on
Instagram, Twitter and Pinterest.

Brrr!!!


It’s Wednesday, and this week, I made a Christmas card using Havin’ A Ball Snowman – S147 by High Hopes Rubber Stamps for the main image and Brr… – FDG004 (High Hopes Rubber Stamps) for the sentiment. Brr…. – Winter is coming soon!

To make my card this week, I began with a card base using Hammermill – Premium Colour 100 lb. cut to 4.25″ x 5.5″. I cut out the background from Heartfelt Creations – Merry and Bright Collection and sized it to 4″ x 5.25″. Adding double-sided tape, I adhered this to some yellow cardstock. I cut around the yellow cardstock and left a very thin border. Lastly, I applied some double-sided tape and glue and attached it to the base.

With my MISTI and Memento – Tuxedo Black ink, I stamped the image and sentiment onto Copic Marker X-Press It Blending Card. I coloured in the image and sentiment with Copic markers. I ran the sentiment through my Xyron Create a Sticker and then I fussy cut around the image and the sentiment. Using a black pen, I outlined all of the edges for the image and sentiment, except in the snowy area. I peeled off the backing to the sentiment pieces and adhered them to the card front. I glued the snowman image in place at the bottom of the cut out background. I applied Stickles – Sea Glass to the Sweater cuffs and trim and a little bit in the snow at the bottom of the snowman. Stickles – HIbiscus was applied to the hat trim and pom pom. Stickles – Diamond was added to the snowballs and Stickles Crystal, Diamond and Stardust were all added to the snow to finish off the card.

Card Recipe:

Stamp: Havin’ A Ball Snowman – S147 (High Hopes Rubber Stamps)

Sentiment: Brr… – FDG004 (High Hopes Rubber Stamps)

Inks: Memento – Tuxedo Black

Paper: Copic Marker X-Press It Blending Card, Hammermill – Premium Colour 100 lb. cardstock, Heartfelt Creations – Merry and Bright Collection, Yellow Cardstock

Stickles: Sea Glass, Hibiscus, Crystal, Diamond, Stardust

Tools: MISTI – Most Incredible Stamping Tool, Xyron Create a Sticker

Image coloured with Copic Markers:

Snowman and Snowballs: B60, C1, C00, R30, R20, YR18, YR15, YR14, E27, E25, E23

Hat and Scarf: RV66, RV63, RV55, Y17, Y15, Y13

Sweater: B04, B02, B01, B00

Boots: RV66, RV63, RV55, B04, B02, B01, B00, C7, C5, C3, C1

Sentiment: RV66, RV63, RV55, Y17, Y15, Y13, B04, B02, B01, B00

Hope you like it and have a fantastic week!

You can find lots of inspiration from the Design Team Divas at the High Hopes blog, and the High Hopes Rubber Stamps Facebook Fan page plus you can also follow us on
Instagram, Twitter and Pinterest.

Warm Winter Wishes


Welcome High Hopes Rubber Stamps Fans!

It’s Wednesday, and this month at High Hopes Rubber Stamps we are celebrating Christmas. This week, I used Winter Wishes Snowy (R136) (High Hopes Rubber Stamps).

Card Recipe:

Stamp: Winter Wishes Snowy (R136) (High Hopes Rubber Stamps)

Inks: Memento – Tuxedo Black, Tim Holtz Distress Inks – Peacock Feathers

Paper: Copic Marker X-Press It Blending Card, Recollections – Northern Lights (6″ x 6″, 15.2 cm x 15.2 cm), Hot Buy Craft Smart – Holiday Glitz Glitter Paper 12″ x 12″

Die Cuts: My Creative Time – Bunch of Fun Circle Dies, Martha Stuart – Branch punch, Jolly Quickutz – Deck the Halls limited edition gift set

Tools: MISTI – Most Incredible Stamping Tool, Cuttlebug, Echo Park Paper Co. Enamel Dots – Imagine That

Image coloured with Copic Markers:

Hat and Mitts: RV66, RV19, RV06, Stickles – Star Dust

Scarf, Vest, Button: RV66, RV19, RV17, RV06, BG18, BG15, BG11

Sign: B26, B23, B21, B12, B00

Frame: RV66, RV19, RV17, RV06, BG18, BG15, BG11, B26, B23, B21, B12, B00

Inside Frame: BG000, BG00, BG01

Cardinals: R59, R37, R35, R08

Cardinal Scarf: B26, B23, B21

Snowman: BV20, B000, C1, Colorless Blender, R30, R20

Snowman Nose: C7, C5, C3

Snowman Arms: E37, E35, E33

Heart: RV66, RV19, RV06

Stars: E15, Y35, Y08

Hope you like it and have a fantastic week!

You can find lots of inspiration from the Design Team Divas at the High Hopes blog, and the High Hopes Rubber Stamps Facebook Fan page plus you can also follow us on
Instagram, Twitter and Pinterest.


Merry Christmas Eh!


Welcome One Crazy Stamper Fans!

It’s Wednesday, and today is the last day of the month for One Crazy Stamper celebrating Christmas in July with High Hopes Rubber Stamps.  This week, I decided to combine Canadian Christmas Greeting (High Hopes Rubber Stamps) with the background papers and perfect Canadian sentiment from PhotoPlay, “Oh What Fun, EH?” LOL!

Card Recipe:

Stamp:  Canadian Christmas Greeting (High Hopes Rubber Stamps)

Sentiment and Background Papers: Photo Play – O Canada Christmas by Becky Fleck, Crafts Glitter Cardstock – 02-3068425

Paper: Copic Marker X-Press It Blending Card

Snowy Ground: WOW! White Puff Embossing Powder

Die Cuts: My Creative Time – More Stitched Circles

Inks: (Image) Memento – Tuxedo Black, (Edging) Tim Holtz Distress Ink – Salty Ocean, VersaMarker, VersaMark

Tools: Cuttlebug, MISTI – Most Incredible Stamping Tool, Marvy Heat Embossing Tool

Coloured with Copic Markers:

Moose: E29, E27, E25, E23, Sakura Glaze – Black

Wreath and Holly: G28, G14, G07

Beaver: E39, E37, E35, E33, Sakura Glaze – Black

Beard: C2, Colourless Blender

Belt: Black, C10, C9, C7, C3, C2

Baubles: B29, B28, B24, B21, Wink of Stella – Clear

Bow, Hat, Tambourine: C3, R39, R29, R27, R24

Candy Cane: C3, R39, R29, R27, R24, Wink of Stella – Clear

Bells: C3, C2, Wink of Stella – Clear

Sky: B04, B02, B00, Gelly Roll Sakura #10 Pen, Gelly Roll Sakura #8 Pen

Hat Trim: Stickles – Star Dust

Hope you like it and have a fantastic week!

You can find lots of inspiration from the Design Team Divas at the One Crazy Stamper blog, and the One Crazy Stamper Facebook Fan page plus you can also follow us on Instagram, Twitter and Pinterest.


Sitting Santa


Welcome One Crazy Stamper Fans!

It’s Wednesday, and this month at One Crazy Stamper we are celebrating Christmas in July with High Hopes Rubber Stamps.  This week, I used Sitting Santa (High Hopes Rubber Stamps). Looks like Santa is in the North Pole getting all of your presents ready for you! Have you started your Christmas shopping yet for this year?

Card Recipe:

Stamp:  Sitting Santa (High Hopes Rubber Stamps)

Sentiment: Merry Christmas (High Hopes Rubber Stamps)

Paper: Copic Marker X-Press It Blending Card, Patterned paper

Ink: Memento – Tuxedo Black, VersaMark, Tim Holtz Distress Ink – Forest Moss

Embossing Powder: Stampendous Stamp-n Stuff – Green Tinsel, Recollections – Sparkle, Recollections – Snow

Die Cut: Lea’bilities Frame Circle Ribbons

Image and Die Cut Coloured in Copic Markers:

Skin: E000, E00, E21, E11, E04, R22, R20

Hat, Suit and Wreath: C3, R39, R29, R27, R24, Stickles – Star Dust

Shoes and Mitts: W10, W8, W6, Sakura Glaze – Black

Present: G43, G40, YG13, YG11

Bows: G28, YG63, G21, Wink of Stella – Clear


Hope you like it and have a fantastic week!

You can find lots of inspiration from the Design Team Divas at the One Crazy Stamper blog, and the One Crazy Stamper Facebook Fan page plus you can also follow us on Instagram, Twitter and Pinterest.


Bearing Gifts!


Welcome One Crazy Stamper Fans!

It’s Wednesday, and this month at One Crazy Stamper we are celebrating Christmas in July with High Hopes Rubber Stamps.  I used Teddy Gift (High Hopes Rubber Stamps) for my second card this month. He comes bearing gifts for you!!!

Card Recipe:

Stamp: Teddy Gift (High Hopes Rubber Stamps)

Die Cut: Creative Expressions by Sue Wilson – Festive Collection – Ornate Holly Framed Noel

Paper: Copic Marker X-Press It Blending Card, Crafts – Sparkling Stickers – 02-3068629, Crafts – Glitter Cardstock – 02-3068425, Aqua cardstock

Ribbon: Celebrate It – Holiday Ribbon Bow-Tique – 118164

Embellishments: Crafts – Rhinestones – Crafts – 02-3030386, Stickles – Star Dust, Nuvo Glitter Accents – Fresh Snowfall, Spectrum Noir  Sparkles – Crystal Clear

Tools: MISTI – Most Incredible Stamping Tool, Cuttlebug

Coloured with Copic Markers:

Bear: E29, E27, E25, E23, E55, E53, E51, Sakura Glaze – Black, Gelly Roll Sakura #5 Pen

Hat: R59, R39, R29, R27, R24

Holly and Leaves: YG99, YG93, R39

Vest: YG99, YG93, G14, YG09, R59, R39, R29, R27, R24

Gift: BG18, BG15, BG13, BG11

Ribbon: E15, YR38, YR24, YR23


Hope you like it and have a fantastic week!

You can find lots of inspiration from the Design Team Divas at the One Crazy Stamper blog, and the One Crazy Stamper Facebook Fan page plus you can also follow us on Instagram, Twitter and Pinterest.