Tag Archive | Cow

Udderly Fabulous Christmas!!!


It’s Wednesday, and this week, I made a CAS Christmas card using High Hopes Rubber Stamps Decorating With Charlie – TT060 for the main image and Udderly Fabulous – HDG007 for the sentiment. These little farm friends have started to decorate their tree. Have you started to decorate yours?

To make my card this week, I began with a card base of 4.25″ x 5.5″ Hammermill – Premium Colour 100 lb. cardstock. I cut Copic Marker X-Press It Blending Card cardstock to be the same size as the base card and then with my MISTI and Memento – Tuxedo Black ink, I stamped the image onto it. I coloured in the image and then placed it back into my MISTI to stamp the sentiment onto it. I applied VersaMark ink and then embossed it with Ranger Embossing Powder White – Extra Fine Detail. I heated this with my Marvy Uchida – Embossing Heat Tool. Snow was added to the sky using a UNIPosca PC-3M White marker. For the snow at the bottom of the card, Brutus Monroe – Snow Paste was applied with a small spatula and DecoArt Glamour Dust was sprinkled over top while it was still wet to give it even more sparkle. Once the snow was dry, I applied double-sided tape and liquid glue to adhere the image directly to the base card.

Card Recipe:

Stamp: Decorating With Charlie – TT060 (High Hopes Rubber Stamps)

Sentiment: Udderly Fabulous – HDG007 (High Hopes Rubber Stamps)

Inks: Memento – Tuxedo Black, VersaMark

Paper: Copic Marker X-Press It Blending Card, Hammermill – Premium Colour 100 lb.

Embossing Powder: Ranger Embossing Powder White – Extra Fine Detail

Tools: MISTI – Most Incredible Stamping Tool, Marvy Uchida – Embossing Heat Tool, DecoArt Glamour Dust, Brutus Monroe – Snow Paste, UNIPosca PC-3M White marker

Image coloured with Copic Markers:

Cow: C8, C6, C4, C3, C1, C00, B60, R30, R20, R00, R000, E95, E93, E53, E51, E50

Mouse: R30, R20, R02, R01, W5, W3, W1, W0, W00

Sky: B05, B04, B02, B01, B00

Tree and Pines: E49, E27, E23, G29

Bauble, Scarf and Collar: R59, R37, R35

Holly and Bell: G43, G29, YG63, YR24, Y35, Y08, E15

Grass: YG67, YG63

Hope you like it and have a fantastic week!

You can find lots of inspiration from the Design Team Divas at the High Hopes blog, and the High Hopes Rubber Stamps Facebook Fan page plus you can also follow us on
Instagram, Twitter and Pinterest.

Love One An-udder!!


It’s Wednesday, and this week, I made an Anniversary card using High Hopes Rubber Stamps Cow Hugs – TT136 for the image and Love An Udder – F205 for the sentiment. Love this adorable combination and thought it would be great for an Inspirational card or an Anniversary card!

To make my card this week, I began with a card base of Hammermill – Premium Colour 100 lb. cardstock, cut and scored to be 5.5″ x 4.25″. Doodle Bug Designs Inc. – Down on the Farm cardstock background paper was cut to the size of 5.5″ x 4.25″ and adhered directly to the base using double-sided tape. Tim Holtz Distress Ink – Black Soot and a finger dauber were used to ink around all of the edgs of the card. Using my Anna Griffin Empress Mini Machine and dies from Whimsy Stamps – Wavy Nested Frame Dies Set, I die cut one pattern out of Recollections – Black cardstock and a smaller cut from Copic Marker X-Press It Blending Card. Using PinkFresh Studio – Slim Stripes dies and my Anna Griffin Empress Mini Machine, I die cut some black stripes using the half-inch die from Recollections – Black cardstock. I added some U-Line double-sided tape to the backs of the 2 black pieces and popped them up onto the patterned background. Using scisssors, I cut off the excess from the black stripe after it was adhered to the base.

I stamped the main image and sentiment onto the Copic Marker X-Press It Blending Card using my MISTI and Memento – Tuxedo Black. The image was coloured in with Copic Markers. I used a Sakura Glaze – Black pen, and Gelly Roll Sakura #8 Pen to create the eyes. After the image was coloured in, I added some U-Line double-sided tape to it and popped it up onto the black die cut. Using my machine again, I die cut the sentiment using Gina K Designs – Sentiment Strips. This was popped up with Scrapbook Adhesives – Black 3D Foam Strips onto the black stripe. To finish off my card, I added 2 little button cows on either side of the sentiment from Dress It Up – In the Barnyard and Dress It Up – Mooove It.

Card Recipe:

Stamps: Cow Hugs – TT136 (High Hopes Rubber Stamps)

Sentiment: Love An Udder – F205 (High Hopes Rubber Stamps)

Inks: Memento – Tuxedo Black, Tim Holtz Distress Ink – Black Soot

Paper: Copic Marker X-Press It Blending Card, Hammermill – Premium Colour 100 lb., Doodle Bug Designs Inc. – Down on the Farm – 6″ x 6″ paper pad, Recollections – Black

Die Cuts: PinkFresh Studio – Slim Stripes, Whimsy Stamps – Wavy Nested Frame Dies Set (WSD382), Gina K Designs – Sentiment Strips

Tools: MISTI – Most Incredible Stamping Tool, U-Line double-sided tape, Anna Griffin Empress Mini Machine, Sakura Glaze – Black Pen, Gelly Roll Sakura #8 Pen, Dress It Up – In the Barnyard and Dress It Up – Mooove It

Image coloured with Copic Markers:

Cows: N9, N7, N5, N0, E42, E41, E40, R30, R02, R01, R00, R000 (Eyes – Sakura Glaze – Black, Gelly Roll Sakura #8 Pen)

Leaves and Grass: G99, YG67, YG17, G21, G07, G05

Flowers: B29, B26, B24, B21, YR16, YR12, E15, Y35, Y11, Y08, Y06, Y04, R46, R14, R08

Bow and Cow Bell: R46, R14, R08, Y38, Y35, Y17, Y15

Sky and Clouds: B60, B01, B00, B000, B0000

Hope you like it and have a fantastic week!

You can find lots of inspiration from the Design Team Divas at the High Hopes blog, and the High Hopes Rubber Stamps Facebook Fan page plus you can also follow us on
Instagram, Twitter and Pinterest.

Moo-rry Christmas!!!


It’s Wednesday, and this week, I made a Christmas card using Chillin’ Charlie – TT049 by High Hopes Rubber Stamps for the main image and Moo-rry Christmas – FDG002 (High Hopes Rubber Stamps) for the sentiment. It’s beginning to look a lot like Christmas release is being celebrated this month at High Hopes Rubber Stamps.

To make my card this week, I began with a card base from Recollections – Winter 4.25″ x 5.5 (Assorted Box of Cards). I cut Crafter’s Companion – Luxury Cardstock – Navy Blue paper to the size of 3-5/8″ x 4-5/8″. The 3.5″ x 4.5″ background was cut from Heartfelt Creations – Festive Winterscapes Collection. I inked around the edges of the base card and background image with Tim Holtz Distress Ink – Faded Jeans. The sentiment was added to the base card using Versa Fine – Onyx Black ink and my MISTI. The ink was embossed using my Marvy Uchida – Embossing Heat Tool and Ranger – Clear Super Fine Detail embossing powder. I applied the 2 cut pieces together using double-sided tape and then popped them onto the base using 3M  double-sided tape. I had some branches pre-punch from earlier from various green cardstock using my Martha Stuart – Branch punch. I applied liquid glue to the backs of each of the branches and applied them to the popped up background.

With my MISTI and Memento – Tuxedo Black ink, I stamped the image onto Copic Marker X-Press It Blending Card. I coloured in the image with Copic markers and then I fussy cut around it. For the hat trim and pop-pom, I used Ranger – Emboss It Pen Clear and sprinkled on some WOW! Sparkling Snow Embossing Glitter. I heated this with my Marvy Uchida – Embossing Heat Tool and then repeated the process to give it more texture. The image was popped up onto the background using 3M double-sided tape and a few small Ranger Snowflakes were added. Lastly, I added some Stickles – Diamond to the snowflakes on the background and in the centres of the smaller snowflakes to complete my card.

Card Recipe:

Stamp: Chillin’ Charlie – TT049 (High Hopes Rubber Stamps)

Sentiment: Moo-rry Christmas – FDG002 (High Hopes Rubber Stamps)

Inks: Memento – Tuxedo Black, Tim Holtz Distress Ink – Faded Jeans, Versa Fine – Onyx Black

Paper: Copic Marker X-Press It Blending Card, Recollections – Winter 4.25″ x 5.5 (Assorted Box of Cards), Crafter’s Companion – Luxury Cardstock – Navy Blue, Heartfelt Creations – Festive Winterscapes Collection

Die Cut: Martha Stuart – Branch punch

Embossing Powder: WOW! Sparkling Snow Embossing Glitter

Tools: MISTI – Most Incredible Stamping Tool, 3M – 2 sided tape, Marvy Uchida – Embossing Heat Tool, Sakura Glaze – Black Pen, Gelly Roll Sakura #5 Pen, Ranger – Emboss It Pen Clear, Ranger Snowflake Glitter

Image coloured with Copic Markers:

Eyes: Sakura Glaze – Black Pen, Gelly Roll Sakura #5 Pen

Cow: C8, C6, C4, C3, C1, C00, B60, R30, R20, R00, R000, E95, E93, E53, E51, E50

Santa Hat: R59, R37, R35, WOW! Sparkling Snow Embossing Glitter, Cosmic Shimmer Fluffy Stuff

Collar, Holly and Bell: G43, G29, G28, H 14, YG23, YG03, E15, YR24, Y35, Y08

Hope you like it and have a fantastic week!

You can find lots of inspiration from the Design Team Divas at the High Hopes blog, and the High Hopes Rubber Stamps Facebook Fan page plus you can also follow us on
Instagram, Twitter and Pinterest.

Moo-Chas Grass-ius!!


Sharing a card I made today using KLM Digital Designs –  Udderly Fun from the new September release. This stamp also comes with 2 other fun sayings, “Have a moo-tiful day” and “Your Moo-velous!”

To make the card, I first imported the image and sentiment into Microsoft Word and printed them out onto Copic Marker X-Press It Blending Card. Using my Cuttlebug and My Creative Time – Rectangle Frame Die Layers, I die cut the image and then coloured it in with Copic markers leaving a thin white border from the dotted line. Using My Creative Time – Rectangle Frame Dies, I die cut black cardstock to create a border for the image and put them together using double-sided tape. The larger dies from this same set were used to die cut the background from Doodle Bug Designs Inc. – Down on the Farm paper.

I die-cut the sentiment using Whimsy Stamps – Quick Strips Die Set. Then, I traced around the outer edge of the die with a coloured pencil onto black cardstock so that I could see the lines. I used my cutter and scissors to create a smaller outer border for the sentiment.

For the base card, I used Hammermill – Premium Colour 100 lb. cardstock and cut it and scored it to be 5.5″ x 4.25″. Using double-sided tape, I adhered the patterned paper directly to the base and inked around the edges using Tim Holtz Distress Ink – Black Soot. The sentiment was added to the black cardstock die cut using double-sided tape. I added some 3M – 2 sided tape to the backs of the image and sentiment and they were both popped up on top of the base to complete the card.

Card Recipe:

Stamp and sentiment:  Udderly Fun – KLM Digital Designs

Inks: HP Printer Grayscale, Tim Holtz Distress Ink – Black Soot

Paper: Copic Marker X-Press It Blending Card, Hammermill – Premium Colour 100 lb., Doodle Bug Designs Inc. – Down on the Farm – 6″ x 6″ paper pad

Die Cuts: Whimsy Stamps – Quick Strips Die Set – WSD330, My Creative Time – Rectangle Frame Die Layers, My Creative Time – Rectangle Frame Dies

Miscellaneous: 3M – 2 sided tape

Image coloured with Copic Markers:

Cow: E95, E93, E42, E41, E40, E34, E33, E31, R02, R00, C8, C6, C4, C1, C0, C00

Bonnet: V17, V15, V12

Flowers and Leaves: YG17, YG03, Y38, Y19, Y17, Y15, Y13, E18, E15

Grass: G14, YG23, YG11

Sky and Clouds: B60, B01, B00, B000, B0000, C0, C00, Colorless Blender

Hope you like it and have a great week!

You can find more cards to inspire you at KLM Designs, KLM Digital Design Team and KLM Digital Designs on the Facebook Fan page from the rest of our design team.

Drummer Boy!!!


It’s Wednesday, and this week, I made a card using Drummer & Friends – RDG005 by High Hopes Rubber Stamps for the main image and Pa Rum Pa Pum Pum – H090 (High Hopes Rubber Stamps) for the sentiment. This is the start of a new month and we’re celebrating the Christmas Cheer release for the month of September at High Hopes.

To make my card this week, I began with a card base of AC Cardstock – White cut and scored to be 6″ x 6″. I cut the background paper from Heartfelt Creations – Festive Winterscapes Collection – Sheet 9A paper to be the same size as the base and inked around the edges using Tim Holtz Distress Ink – Chipped Sapphire. I applied this directly to the base card using double-sided tape. The sentiment was then stamped onto the background paper using Versamark Ink and heat embossed using my Marvy Uchida – Embossing Heat Tool and Ranger Embossing Powder White – Extra Fine Detail.

The image was stamped using my MISTI and Memento – Tuxedo Black ink. I coloured in the image with Copic markers.  I fussy cut around it and then inked the edges with a black marker. I popped it up onto the background using 3M double-sided tape. I inked under the image with C2 copic marker to create a shadow and finish off the card.

Card Recipe:

Stamp: Drummer & Friends – RDG005 (High Hopes Rubber Stamps)

Sentiment: Pa Rum Pa Pum Pum – H090 (High Hopes Rubber Stamps)

Inks: Memento – Tuxedo Black, Tim Holtz Distress Ink – Chipped Sapphire, Versamark

Paper: Copic Marker X-Press It Blending Card, AC Cardstock – White, Heartfelt Creations – Festive Winterscapes Collection – Sheet 9A

Embossing Powder: Ranger Embossing Powder White – Extra Fine Detail

Tools: MISTI – Most Incredible Stamping Tool, 3M – 2 sided tape, Sakura Glaze – Black, Pen Gelly Roll Sakura #5 Pen, Marvy Uchida – Embossing Heat Tool

Image coloured with Copic Markers:

Eyes and Small Noses for all: Sakura Glaze – Black Pen, Gelly Roll Sakura #5 Pen

Skin: E21, E11, E00, E000, R30, R20

Hair: E47, E44, E43

Robe and Hat: E55, E53, E51, B95, B93, B91, YG67, YG63, YG61

Lamb: B60, C3, C2, C1, C00

Camel: E44, E43, E42, E41

Horse: E29, E27, E25, E23, E21

Cow: C7, C5, C3, C1, C00, R59, R37, R35, R30, R22, R02, R00, E53, E51, E50, E31, E30, E15, Y38, Y17, Y08, Colorless Blender

Drum, Drumsticks and Rope: E53, E51, E50, E15, Y38, Y23, Y21, Y19, Y17, Y15, Y08, Y02, R59, R37, R35

Hope you like it and have a fantastic week!

You can find lots of inspiration from the Design Team Divas at the High Hopes blog, and the High Hopes Rubber Stamps Facebook Fan page plus you can also follow us on
Instagram, Twitter and Pinterest.

Have You Herd The News???


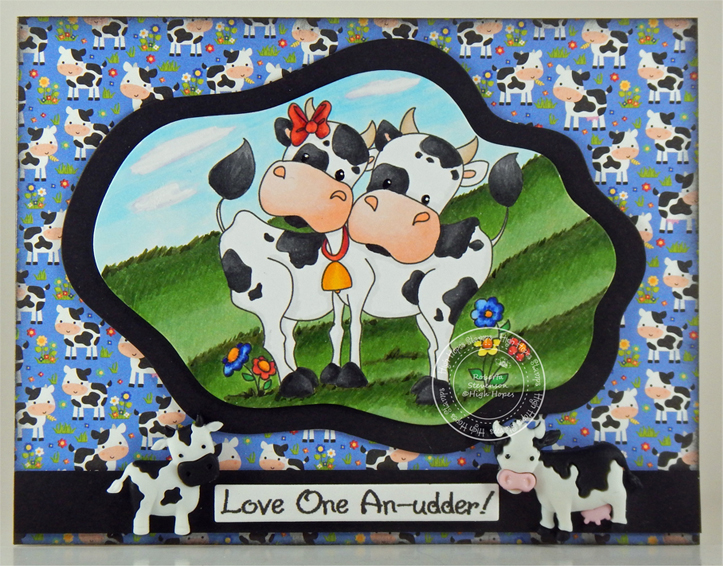
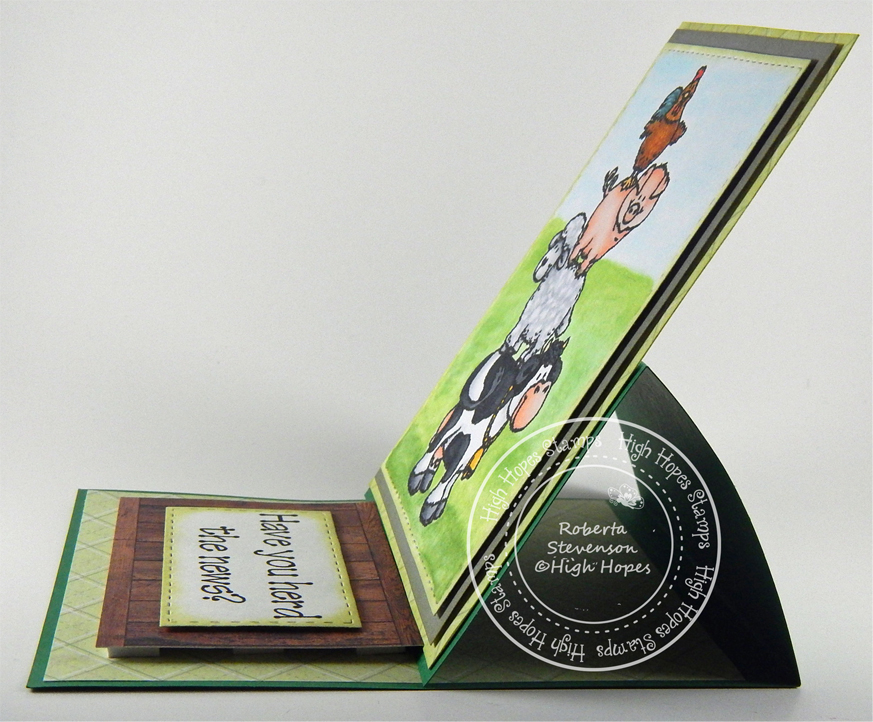
It’s Wednesday, and this week, I couldn’t wait to colour up this super adorable image called Funny Farm – T065 by High Hopes Rubber Stamps.  I also thought that the sentiment – Have You Herd The News – G080 (High Hopes Rubber Stamps) was perfect for these little characters. Their facial expressions, just make you wonder what it is that is so secret that they can’t wait to tell you!! Hmmmm! Could it be a birthday surprise, or maybe a new baby is coming? or someone is retiring??? or someone just graduated???? This combo could be use for so many possibilities and that is why it was so much fun to play with.

Above is the card from the front angle and below is the card from the top angle.

To make my card this week, I started off with a green cardstock base of 5.5″ x 11″. Then I scored it at 5.5″ and 2.75″ on one side from the edge to make it a pop-up card. I also cut another piece of cardstock at about 4-1/8″ x 5.25″. I added some patterned paper from DCWV – Fashion District to this piece and to the inside bottom of the card, cut to the same size. Next, used My Mind’s Eye – Lost & Found paper cut at 3.75″ x 5″ which I popped up with 3M VHB – 2 sided tape. Before attaching the background papers, I edged around them with Tim Holtz Distress Ink – Shabby Shutters.

I die-cut the main image out of Copic Marker X-Press It Blending Card using my Cricut and Your Next Stamp – Stitched Rectangle Die Set. Then I stamped the image using my MISTI and Memento – Tuxedo Black ink. After that, I coloured in the image using Copic markers. For the background, I used a new technique that I learned. First I used a Q-Tip to moisten the background with some Copic Colorless Blender and then I used a mixture of Copic Re-inkers listed below with a Q-Tip to create the sky and grass. Love this technique, as it is quick and easy. After colouring the image, I inked around the edges with the same Tim Holtz ink and then popped up the image using some 3M VHD – 2 sided tape.

I die cut the sentiment using the same die set that I used for the main image and then stamped the sentiment with Memento – Tuxedo Black Ink. I mounted it with 3M VHB – 2 sided tape onto Joy Crafts – Artist Trading Card Wood Texture cardstock. Then, I popped up the entire base background and sentiment with Forever in Time – Pop-Dot Adhesives onto the inside base of the card.

I attached the finished image that was mounted onto the background papers onto the lower half of the card that had been scored at 2.75″ earlier, leaving the top half empty.

Card Recipe:

Stamp:  Funny Farm – T065  (High Hopes Rubber Stamps)

Sentiment: Have You Herd The News – G080 (High Hopes Rubber Stamps)

Inks: Memento – Tuxedo Black, Tim Holtz Distress Ink – Shabby Shutters

Paper: Copic Marker X-Press It Blending Card, DCWV – Fashion District (6×6″, 15.2×15.2cm), Joy Crafts – Artist Trading Card – Wood Texture (2-3/8×3-3/8″ – 85mm x 60mm), My Mind’s Eye – Lost & Found (6×6″)

Die Cuts: Your Next Stamp – Stitched Rectangle Die Set (YNSD214)

Tools: MISTI – Most Incredible Stamping Tool, Cuttlebug, 3M VHB – 2 sided tape, Forever in Time – Pop-Dot Adhesives

Image coloured with Copic Markers:

Pig: E93, E44, E43, E40, R20, R000, R00

Sheep: C5, C3, C1, C0, B60

Cow: R20, R02, R00, R000, E93, C10, C9, C8, C6, C5, C3, C2, C1, Y17, Y15, Y13, Colorless Blender

Rooster: E99, E97, E23, E09, R24, BG53, BG78, BG75, BG72, Y06, YR21

Sky: B000, B00, Colorless Blender

Grass: YG17, YG13, YG11, Colorless Blender

Hope you like it and have a fantastic week!

You can find lots of inspiration from the Design Team Divas at the High Hopes blog, and the High Hopes Rubber Stamps Facebook Fan page plus you can also follow us on
Instagram, Twitter and Pinterest.

Check out the High Hopes Website for something else to give you a big smile!

Over on the High Hopes Website there is a Store Wide sale, save 20% off right now when you use the coupon Code Love at the checkout!


Oh Sheep! I Forgot Your Birthday!


Welcome One Crazy Stamper Fans!

It’s Wednesday, and I’m back to share another belated birthday card that I made using She-Baa Sheep (High Hopes Rubber Stamps) and Dunno Ducky (High Hopes Rubber Stamps). I had a lot of fun pairing these two stamps together.

On the inside of the card, I thought it would be funny to use the Dunno Ducky stamp. I just think he’s so adorable and his body language says it all!

All of the sentiments were typed in Microsoft Word and then printed out on my printer. Fonts and sizes are listed below. I fussy cut around the phrases for the front of the card and then popped them up.

I love High Hopes Rubber Stamps, because they have so many stamps that you can play with to create combos like this one.

Card Recipe:

Stamps:  She-Baa Sheep (High Hopes Rubber Stamps), Dunno Ducky (High Hopes Rubber Stamps)

Paper: Doodle Bug Designs Inc. – Down on the Farm – 6″ x 6″ paper pad, Copic Marker X-Press It Blending Card

Inks: Memento – Tuxedo Black, Tim Holtz Distress Ink – Fossilized Amber, Tim Holtz Distress Ink – Cracked Pistachio

Duck: Y17, Y13, Y11

Duck Feet and Beak: E15, Y38, Y35, Y19

Straw: E34, YR23, Y23, Y21

Sheep: C5, C3, C1, C0, Colourless Blender, R22, R20

Bow: BG13, BG11, BG10

Bell: E15, Y38, Y35, Y19

Sentiments: Microsoft Word Font – Cooper Black, Point Sizes 28 and 36

Hope you like it and have a fantastic week!

You can find lots of inspiration from the Design Team Divas at the One Crazy Stamper blog, and the One Crazy Stamper Facebook Fan page plus you can also follow us on Instagram, Twitter and Pinterest.