Tag Archive | Doodle Bug Designs Inc. – Down on the Farm – 6″ x 6″ paper pad

A Little Behind!!


It’s Wednesday, and this week, I made belated birthday card using High Hopes Rubber Stamps Henriettas Backside – Q035 for the image and Sorry I’m – FLL031 for the sentiment. Like Henrietta, I get so busy sometimes, that I forget to send out my birthday cards on time.  This little chickie has now given me an excuse for being late. LOL!

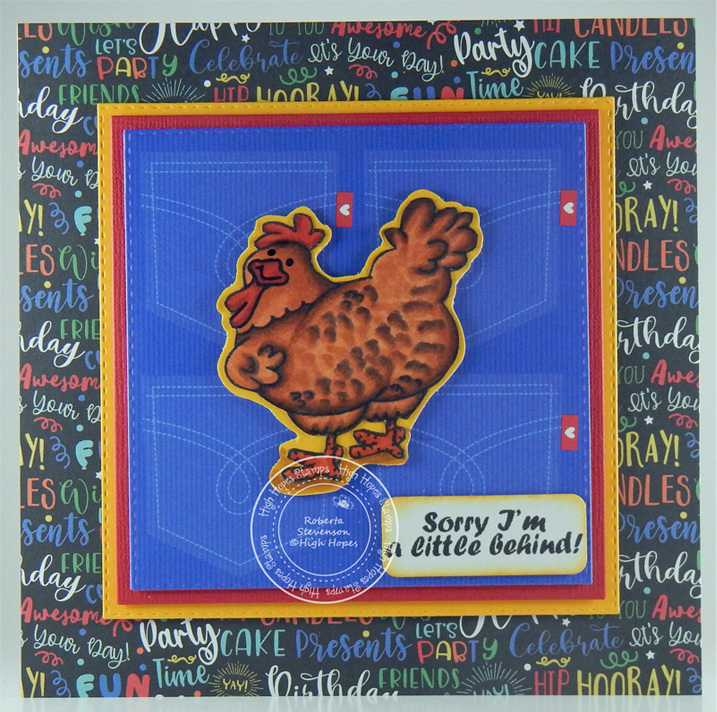
To make my card this week, I began with a card base of AC Cardstock – White cut and scored to be 6″ x 6″. I cut Echo Park Paper Co. – It’s Your Birthday – 6″ x 6″ paper to be the same size as the base and adhered it with double-sided tape. Using my Cuttlebug, I die cut some golden yellow cardstock using My Creative Time -Stitched Squares Inside and Out. I added U-Line double-sided tape to the square and popped it up onto the centre of the card. Using my Cuttlebug again, I die cut Forever In Time – Texture Rouge cardstock with Waffle Flower – Nesting Square dies. I added some U-Line double-sided tape and popped this up into the centre of the last square. Lastly, using my Anna Griffin Empress Mini Machine, I die cut the patterned paper using My Creative Time -Stitched Squares Inside and Out. Once again, I added U-Line double-sided tape and popped up the square into the centre of the previous one.

The image and sentiment were both stamped onto Copic Marker X-Press It Blending Card and the image was coloured in with Copic Markers. I fussy cut around the image and ran it through my Xyron Creative Station to create a sticker. I attached this to Scrapbook.com – Playful Smooth Cardstock and then fussy cut around again leaving a small border. Using my Copic markers E25 ad E23, I added some colour under the feet. With my Empress machine again and Poppystamps – Christmas Quotes die, I die cut the sentiment. Tim Holtz Distress Inks – Wild Honey was used to ink around the edges. I added some U-Line double-sided tape to the back of the image and sentiment and popped them up onto the Jean patterned paper to complete the card.

Card Recipe:

Stamps: Henriettas Backside – Q035 (High Hopes Rubber Stamps)

Sentiment: Sorry I’m – FLL031 (High Hopes Rubber Stamps)

Inks: Memento – Tuxedo Black, Tim Holtz Distress Inks – Wild Honey

Paper: Copic Marker X-Press It Blending Card, AC Cardstock – White, Doodle Bug Designs Inc. – Down on the Farm – 6″ x 6″ paper pad, Echo Park Paper Co. – It’s Your Birthday – 6″ x 6″ paper pad, Forever In Time – Texture Rouge, Scrapbook.com – Playful Smooth Cardstock (4.25″ x 5.5″), Yellow Cardstock

Die Cuts: My Creative Time -Stitched Squares Inside and Out, Waffle Flower – Nesting Square dies, Poppystamps – Christmas Quotes, Xyron Creative Station

Tools: MISTI – Most Incredible Stamping Tool, U-Line double-sided tape, Anna Griffin Empress Mini Machine, Cuttlebug

Image coloured with Copic Markers:

Hen: E97, E47, E37, E09, YR27, YR23, R08

Hope you like it and have a fantastic week!

You can find lots of inspiration from the Design Team Divas at the High Hopes blog, and the High Hopes Rubber Stamps Facebook Fan page plus you can also follow us on
Instagram, Twitter and Pinterest.

Also entered into #Farmquest Challenge Blog #4.  “https://farmquestchallenge.blogspot.com/2022/05/fqcb-theme-4-poultry-and-wire-or-metal.html”.

Love One An-udder!!


It’s Wednesday, and this week, I made an Anniversary card using High Hopes Rubber Stamps Cow Hugs – TT136 for the image and Love An Udder – F205 for the sentiment. Love this adorable combination and thought it would be great for an Inspirational card or an Anniversary card!

To make my card this week, I began with a card base of Hammermill – Premium Colour 100 lb. cardstock, cut and scored to be 5.5″ x 4.25″. Doodle Bug Designs Inc. – Down on the Farm cardstock background paper was cut to the size of 5.5″ x 4.25″ and adhered directly to the base using double-sided tape. Tim Holtz Distress Ink – Black Soot and a finger dauber were used to ink around all of the edgs of the card. Using my Anna Griffin Empress Mini Machine and dies from Whimsy Stamps – Wavy Nested Frame Dies Set, I die cut one pattern out of Recollections – Black cardstock and a smaller cut from Copic Marker X-Press It Blending Card. Using PinkFresh Studio – Slim Stripes dies and my Anna Griffin Empress Mini Machine, I die cut some black stripes using the half-inch die from Recollections – Black cardstock. I added some U-Line double-sided tape to the backs of the 2 black pieces and popped them up onto the patterned background. Using scisssors, I cut off the excess from the black stripe after it was adhered to the base.

I stamped the main image and sentiment onto the Copic Marker X-Press It Blending Card using my MISTI and Memento – Tuxedo Black. The image was coloured in with Copic Markers. I used a Sakura Glaze – Black pen, and Gelly Roll Sakura #8 Pen to create the eyes. After the image was coloured in, I added some U-Line double-sided tape to it and popped it up onto the black die cut. Using my machine again, I die cut the sentiment using Gina K Designs – Sentiment Strips. This was popped up with Scrapbook Adhesives – Black 3D Foam Strips onto the black stripe. To finish off my card, I added 2 little button cows on either side of the sentiment from Dress It Up – In the Barnyard and Dress It Up – Mooove It.

Card Recipe:

Stamps: Cow Hugs – TT136 (High Hopes Rubber Stamps)

Sentiment: Love An Udder – F205 (High Hopes Rubber Stamps)

Inks: Memento – Tuxedo Black, Tim Holtz Distress Ink – Black Soot

Paper: Copic Marker X-Press It Blending Card, Hammermill – Premium Colour 100 lb., Doodle Bug Designs Inc. – Down on the Farm – 6″ x 6″ paper pad, Recollections – Black

Die Cuts: PinkFresh Studio – Slim Stripes, Whimsy Stamps – Wavy Nested Frame Dies Set (WSD382), Gina K Designs – Sentiment Strips

Tools: MISTI – Most Incredible Stamping Tool, U-Line double-sided tape, Anna Griffin Empress Mini Machine, Sakura Glaze – Black Pen, Gelly Roll Sakura #8 Pen, Dress It Up – In the Barnyard and Dress It Up – Mooove It

Image coloured with Copic Markers:

Cows: N9, N7, N5, N0, E42, E41, E40, R30, R02, R01, R00, R000 (Eyes – Sakura Glaze – Black, Gelly Roll Sakura #8 Pen)

Leaves and Grass: G99, YG67, YG17, G21, G07, G05

Flowers: B29, B26, B24, B21, YR16, YR12, E15, Y35, Y11, Y08, Y06, Y04, R46, R14, R08

Bow and Cow Bell: R46, R14, R08, Y38, Y35, Y17, Y15

Sky and Clouds: B60, B01, B00, B000, B0000

Hope you like it and have a fantastic week!

You can find lots of inspiration from the Design Team Divas at the High Hopes blog, and the High Hopes Rubber Stamps Facebook Fan page plus you can also follow us on
Instagram, Twitter and Pinterest.

Moo-Chas Grass-ius!!


Sharing a card I made today using KLM Digital Designs –  Udderly Fun from the new September release. This stamp also comes with 2 other fun sayings, “Have a moo-tiful day” and “Your Moo-velous!”

To make the card, I first imported the image and sentiment into Microsoft Word and printed them out onto Copic Marker X-Press It Blending Card. Using my Cuttlebug and My Creative Time – Rectangle Frame Die Layers, I die cut the image and then coloured it in with Copic markers leaving a thin white border from the dotted line. Using My Creative Time – Rectangle Frame Dies, I die cut black cardstock to create a border for the image and put them together using double-sided tape. The larger dies from this same set were used to die cut the background from Doodle Bug Designs Inc. – Down on the Farm paper.

I die-cut the sentiment using Whimsy Stamps – Quick Strips Die Set. Then, I traced around the outer edge of the die with a coloured pencil onto black cardstock so that I could see the lines. I used my cutter and scissors to create a smaller outer border for the sentiment.

For the base card, I used Hammermill – Premium Colour 100 lb. cardstock and cut it and scored it to be 5.5″ x 4.25″. Using double-sided tape, I adhered the patterned paper directly to the base and inked around the edges using Tim Holtz Distress Ink – Black Soot. The sentiment was added to the black cardstock die cut using double-sided tape. I added some 3M – 2 sided tape to the backs of the image and sentiment and they were both popped up on top of the base to complete the card.

Card Recipe:

Stamp and sentiment:  Udderly Fun – KLM Digital Designs

Inks: HP Printer Grayscale, Tim Holtz Distress Ink – Black Soot

Paper: Copic Marker X-Press It Blending Card, Hammermill – Premium Colour 100 lb., Doodle Bug Designs Inc. – Down on the Farm – 6″ x 6″ paper pad

Die Cuts: Whimsy Stamps – Quick Strips Die Set – WSD330, My Creative Time – Rectangle Frame Die Layers, My Creative Time – Rectangle Frame Dies

Miscellaneous: 3M – 2 sided tape

Image coloured with Copic Markers:

Cow: E95, E93, E42, E41, E40, E34, E33, E31, R02, R00, C8, C6, C4, C1, C0, C00

Bonnet: V17, V15, V12

Flowers and Leaves: YG17, YG03, Y38, Y19, Y17, Y15, Y13, E18, E15

Grass: G14, YG23, YG11

Sky and Clouds: B60, B01, B00, B000, B0000, C0, C00, Colorless Blender

Hope you like it and have a great week!

You can find more cards to inspire you at KLM Designs, KLM Digital Design Team and KLM Digital Designs on the Facebook Fan page from the rest of our design team.

Be-Lated Birthday Chicks!!


Sharing a belated birthday card I made for my sister-in-law using Art Impressions – Spring Chicken Set – AiCS40. I really had fun with these cool Chicks! LOL!

Inside of the card.

To make the card, I began with the base of 5.5″ x 4.25″ Hammermill – Premium Colour cardstock. My Creative Time – Rectangle Frame Dies and my Cuttlebug were used to die cut Echo Park Paper Co. – My Favorite Winter paper. I just loved this paper and thought it had the look of barn board for the chicken coop. Double-sided tape was applied to the back of the background paper and it was applied directly to the base card. Tim Holtz Distress Ink – Aged Mahagony was used to ink around all of the edges of the card. Using Lifestyle Crafts Cutting Dies – Nesting Circles dies, I die cut 1 large circle from black cardstock and 1 smaller circle from Doodle Bug Designs Inc. – Down on the Farm paper. I inked around the smaller circle with the same Tim Holtz ink. I applied the 2 circles together using double-sided tape and then added 3M VHB – 2 sided tape to the back of the larger circle and attached it to the background. The speech bubble was die cut with Spellbinders Die D-Lites – Conversation Bubble 4 and my Cuttlebug.

Using my MISTI and Memento – Tuxedo Black ink, the images were stamped onto Copic Marker X-Press It Blending Cardstock and coloured in with Copic Markers. Once everything was coloured, I fussy cut around both images. I popped up the image on the front with 3M VHB – 2 sided tape and ran the second image through my Xyron Creative Station to make a sticker out of it and placed it on the inside of the card. All of the sentiments were stamped with Versa Fine – Onyx Black ink and then embossed with Ranger – Clear Super Fine Detail Embossing Powder. Marvy Uchida – Embossing Heat Too heated the powder. The sentiment bubble was popped up onto the front of the card with 3M VHB – 2 sided tape.

Card Recipe:

Stamp and Sentiments: Spring Chicken Set – AiCS40 – Art Impressions

Inks: Memento – Tuxedo Black, Versa Fine – Onyx Black, Tim Holtz Distress Ink – Aged Mahagony

Paper: Copic Marker X-Press It Blending Card, Hammermill – Premium Colour 100 lb., Doodle Bug Designs Inc. – Down on the Farm – 6″ x 6″ paper pad, Echo Park Paper Co. – My Favorite Winter (6″ x 6″)

Die Cuts: My Creative Time – Rectangle Frame Dies, Spellbinders Die D-Lites – Conversation Bubble 4 (SP-S2138)

Embossing Powder: Ranger – Clear Super Fine Detail

Miscellaneous: 3M VHB – 2 sided tape, Xyron Creative Station, Marvy Uchida – Embossing Heat Tool

Image coloured with Copic Markers:

Chickens: E99, E97, E55, E53, E51, E43, E42, E40, E15, E13, R46, R17, R14, R08, B60, C1, C0, Colorless Blender

Eye Shadow and Glasses: YG17, YG11, B00

Balloon, Cup and Cupcake Wrapper: RV09, RV06, RV04, RV02, RV00

Hat, Flower and Leaves: RV09, RV06, RV02, YG17, YG11, YR30, YR23, Y21, Y17

Cupcake Topping and Candle: Y02, Y00, Y000, RV06, RV04, RV00, Y08, YR12

Dirt: E37, E35, E33, E31

Hope you like it and have a great week!

Birthday Sentiments For Ewe


Today I’m sharing  Sheep and Sentiments (KLM Digital Designs) image from KLM Digital Designs new September Release. These little “Ewes” are so fun to colour up and I just love their adorable expressions. This stamp comes with 3 sentiments, 2 of which I have used in the cards below and also “Wooly Hope Ewe Feeling Better”! I wooly love this stamp set and I’m sure you will too! LOL!


I printed out the main images onto Copic Marker X-Press It Blending Card using my HP Printer. The image was then die cut with my Cuttlebug and My Creative Time -Stitched Squares Inside and Out. Both of the images were then coloured in with Copic Markers. For both cards, Hot Buy – Recollections – Watercolour Solids Cards & Envelopes – 5.5″ x 4.25″, Doodle Bug Designs Inc. – Down on the Farm – 6″ x 6″ paper pad were used to create the backgrounds. I edged around the printed backgrounds with Tim Holtz Distress Ink – Evergreen Bough ink.

My Creative Time – Rectangle Frame Dies Layers were used to die-cut the background paper for the 2nd card. The sentiments were both printed out onto Recollections – White card stock and then fussy cut. They were then placed onto some Dark Yellow Cardstock and fussy cut around again. All of the layers were now ready to be assembled. The image, background layer and sentiments were all popped up with 3M VHB – 2 sided tape. Some Kraftin’ Kimmie Dots – Neon Rainbow were added to the 1st card.

Card Recipe:

Stamp: Sheep and Sentiments (KLM Digital Designs)

Inks: HP Printer Grayscale, Tim Holtz Distress Ink – Evergreen Bough

Paper: Copic Marker X-Press It Blending Card, Hot Buy – Recollections – Watercolour Solids Cards & Envelopes, Doodle Bug Designs Inc. – Down on the Farm – 6″ x 6″ paper pad

Die Cuts: My Creative Time – Rectangle Frame Layers, My Creative Time -Stitched Squares Inside and Out

Tools: 3M VHB – 2 sided tape, Kraftin Kimmie Dots – Neon Rainbow

Image coloured with Copic Markers:

Sheep: B60, C5, C3, C1, R21, R02, R01, YG09, YG07, Colorless Blender

Grass: YG17, YG13, YG03, YG01

Sky and Clouds: B60, B02, B01, B00, B000, B000, C0, Colorless Blender

Hope you like it and have a great week!

You can find more cards to inspire you at KLM Designs, KLM Digital Design Team and KLM Digital Designs on the Facebook Fan page from the rest of our design team.

Friends for Heifer!


It’s Wednesday, and this week, I used Clarabelle and Riley – Q032 (High Hopes Rubber Stamps) for the main image and Friends for Heifer – G183 (High Hopes Rubber Stamps) for the sentiment. Riley thought Clarabelle could use a big hug. It will be so nice when we can get back together again with friends and family and give them a big hug too!

To make my card this week, I thought I would keep it simple. I thought the cow print from Doodle Bug Designs Inc. – Down on the Farm went with this card beautifully. I stamped the image onto Copic Marker X-Press It Blending Card and then coloured the image in with Copic Markers. Once I coloured the image in, I carefully placed it behind the patterned paper and then placed it onto my card base sized 5.5″ x 5.5″. I inked around the edges of the card with Tim Holtz Distress Ink – Black Soot and added a little black bow to finish it off.

Card Recipe:

Stamp:  Clarabelle and Riley – Q032  (High Hopes Rubber Stamps)

Sentiment: Friends for Heifer – G183 (High Hopes Rubber Stamps)

Inks: Memento – Tuxedo Black, Tim Holtz Distress Ink – Black Soot

Paper: Copic Marker X-Press It Blending Card, Doodle Bug Designs Inc. – Down on the Farm – 6″ x 6″ paper pad

Die Cuts: My Creative Time – Bunch of Fun Circle Dies

Tools: MISTI – Most Incredible Stamping Tool, Cuttlebug

Image coloured with Copic Markers:

Skin: E21, E11, E04, E00, E000, R22, R20

Hair: E47, E44, E43

Shirt: YG67, YG63, YG61, R29, R27, R24

Pants: B26, B23, B21

Hat and Boots: E29, E27, E25, E23

Scarf: B26, B23, B21, R29

Cow: C10, C8, C6, C1, C0, R11, R02, R01, E53, E51, E50

Hope you like it and have a fantastic week!

You can find lots of inspiration from the Design Team Divas at the High Hopes blog, and the High Hopes Rubber Stamps Facebook Fan page plus you can also follow us on
Instagram, Twitter and Pinterest.

Check out the High Hopes Website for something else to brighten your day!

Over on the High Hopes Website there is a Store Wide sale, save 20% off right now when you use the coupon Code Love at the checkout!


Herd It Was Your Birthday!!!


KLM Digital Designs has just released some brand new stamps this month, and today I’m sharing Woman Farmer Gnome (KLM Digital Designs)! She’s taking some time out from her chores on this beautiful sunny day to wish you a Happy Birthday.

For this card, I printed out the image with my HP Printer onto Copic Marker X-Press It Blending Card using Greyscale. Then I coloured it in with Copic markers and fussy cut around it. I used a  black marker to go around all of the image to hide the white paper from where I fussy cut it. I couldn’t cut out the portion between the girl and the shovel, so I used my copics to match the background that I created with the Tim Holtz inks.

For the background, I used Your Next Stamp – Stitched Rectangle Die Set die and my Cuttlebug to cut Strathmore Bristol Paper (100 lb. – 270 g/m2). Next I created some stencils from Avery Elle – Pierced Clouds Die and Lawn Fawn – Stitched Hillside Borders. I used these stencils to create the cloudy background and the fields behind the farm girl using Tim Holtz Distress Inks.

I had a small scrap strip of patterned paper from Doodle Bug Designs Inc. – Down on the Farm and thought it would go perfectly with this card. I applied this to a 5.5″ x 4.25″ card base from AC Cardstock – Autumn collection. I printed out the sentiment and fussy cut it to split it up and attached it on top of the base background. I then popped up the colored image using 3M VHB – 2 sided tape onto the background that I created earlier. Then I popped up the entire background onto the base card. I added in a few Party Time dots from Kraftin’ Kimmie Dots and inked around the entire card with Tim Holtz Distress Inks – Peeled Paint to finish it off.

Card Recipe:

Stamp and Sentiment: Woman Farmer Gnome (KLM Digital Designs)

Inks: HP Printer Greyscale, Tim Holtz Distress Ink – Salty Ocean, Tim Holtz Distress Ink – Crushed Olive, Tim Holtz Distress Ink – Mowed Lawn, Tim Holtz Distress Inks – Peeled Paint

Paper: Copic Marker X-Press It Blending Card, Doodle Bug Designs Inc. – Down on the Farm – 6″ x 6″ paper pad, AC Cardstock – Autumn, Strathmore Bristol Paper (100 lb. – 270 g/m2)

Die Cuts: Your Next Stamp – Stitched Rectangle Die Set (YNSD214), Avery Elle – Custom Steel Dies – Made in the USA – D-05-01 Pierced Clouds Die, Lawn Fawn – Stitched Hillside Borders

Tools and Miscellaneous: Cuttlebug, 3M VHB – 2 sided tape, Kraftin’ Kimmie Party Time Dots, Xyron Create a Sticker

Image coloured with Copic Markers:

Skin: E000, E00, E04, E11, E21, R22, R20

Hair: E18, E08, YR18, YR14

Pants: B26, B23, B21

Shirt: YG95, YG93, YG91

Hoe: C5, C3, C1, E39, E35, E31

Boots and Hat: E29, E27, E25, E23

Background: YG61, YG03, YG01, B000, Tim Holtz Distress Ink – Salty Ocean, Tim Holtz Distress Ink – Crushed Olive, Tim Holtz Distress Ink – Mowed Lawn, Tim Holtz Distress Inks – Peeled Paint

Hope you like it and have a great week!

You can find more cards to inspire you at KLM Designs, KLM Digital Design Team and KLM Digital Designs on the Facebook Fan page from the rest of our design team.

Oh Sheep! I Forgot Your Birthday!


Welcome One Crazy Stamper Fans!

It’s Wednesday, and I’m back to share another belated birthday card that I made using She-Baa Sheep (High Hopes Rubber Stamps) and Dunno Ducky (High Hopes Rubber Stamps). I had a lot of fun pairing these two stamps together.

On the inside of the card, I thought it would be funny to use the Dunno Ducky stamp. I just think he’s so adorable and his body language says it all!

All of the sentiments were typed in Microsoft Word and then printed out on my printer. Fonts and sizes are listed below. I fussy cut around the phrases for the front of the card and then popped them up.

I love High Hopes Rubber Stamps, because they have so many stamps that you can play with to create combos like this one.

Card Recipe:

Stamps:  She-Baa Sheep (High Hopes Rubber Stamps), Dunno Ducky (High Hopes Rubber Stamps)

Paper: Doodle Bug Designs Inc. – Down on the Farm – 6″ x 6″ paper pad, Copic Marker X-Press It Blending Card

Inks: Memento – Tuxedo Black, Tim Holtz Distress Ink – Fossilized Amber, Tim Holtz Distress Ink – Cracked Pistachio

Duck: Y17, Y13, Y11

Duck Feet and Beak: E15, Y38, Y35, Y19

Straw: E34, YR23, Y23, Y21

Sheep: C5, C3, C1, C0, Colourless Blender, R22, R20

Bow: BG13, BG11, BG10

Bell: E15, Y38, Y35, Y19

Sentiments: Microsoft Word Font – Cooper Black, Point Sizes 28 and 36

Hope you like it and have a fantastic week!

You can find lots of inspiration from the Design Team Divas at the One Crazy Stamper blog, and the One Crazy Stamper Facebook Fan page plus you can also follow us on Instagram, Twitter and Pinterest.


It’s Pasture Birthday!


Welcome One Crazy Stamper Fans!

It’s Wednesday, and I’m back to share a card that I made using Farmer Clem (High Hopes Rubber Stamps) on the front of the card and Charlie Party Cow (High Hopes Rubber Stamps) on the inside. A friend asked me to create her a belated birthday card for her farmer friend and I thought this made the perfect combination to do it.

I coloured in Farmer Clem (High Hopes Rubber Stamps) and then fussy cut around him and popped him up on the front of the card. All of the sentiments were created in Microsoft Word and then printed out on my printer. Details are below.


For the inside of my card, I stamped the Charlie Party Cow (High Hopes Rubber Stamps) twice and then fussy cut around both of the cows to make it look like they had a party going on. I popped up the one cow image to give the scene a little bit of depth.

Card Recipe:

Stamps: Farmer Clem (High Hopes Rubber Stamps),  Charlie Party Cow (High Hopes Rubber Stamps)

Paper: Doodle Bug Designs Inc. – Down on the Farm – 6″ x 6″ paper pad, Momenta – Cardstock, Copic Marker X-Press It Blending Card, Blue Cardstock

Die Cuts: My Creative Time – Bunch of Fun Circle Dies, Creative Expression Craft Dies by Sue Wilson – Noble Dies – Double Pierced Squares – Set B

Inks: Tim Holtz Distress Ink – Barn Door, Tim Holtz Distress Ink – Blueprint Sketch, Tim Holtz Distress Inks – Peeled Paint, Memento – Tuxedo Black

Miscellaneous: Cuttlebug, MISTI – Most Incredible Stamping Tool

Skin: E000, E00, E21, E04, E11, R22, R20

Hair, Eyebrows and Mustache: C5, C3, C0

Overalls: B37, B24, B23, E15, Y38, Y34, Y17

Shirt: R17, R24, R39, R27, R29, G07, YG17

Scarf: R29, R27, R24, R17, R14

Hat: E15, Y38, Y35, Y17, R229, R27, R24, R17

Boots: E42, E33, E25, E79, E77, E74

Pitchfork: C5, C3, C1, E79, E77, E15

Cows: C10, C8, C6, C3, C1, C0, Colourless Blender, R02, R01, R20, R32, R30, E43, E42, E41

Hat, Confetti: R17, R14, G17, G14, V06, V05, B24, Y19

Balloons:

Yellow: Y09, Y06, Y04, Y02, Y00

Purple: V06, V05, V04, V02, V000

Green: G17, G14, YG41, G00

Background – Spectrum Noir TB3

Sentiments: Microsoft Word – Font Cooper Black, Point Size 20 and 28

Hope you like it and have a fantastic week!

You can find lots of inspiration from the Design Team Divas at the One Crazy Stamper blog, and the One Crazy Stamper Facebook Fan page plus you can also follow us on Instagram, Twitter and Pinterest.