Tag Archive | Nellie’s Choice – Nature Scene Dies – NSD002 – Sky

Hearts Warm!!!


It’s Wednesday, and this week, I made a card using Toasting Marshmallows – T026 by High Hopes Rubber Stamps for the main image and Hearts Warm – G063 (High Hopes Rubber Stamps) for the sentiment. This image brings back so many memories of going camping and sitting around the campfire roasting marshmallows. I gave my image coloured marshmallows, because growing up they were always my favourite! LOL!

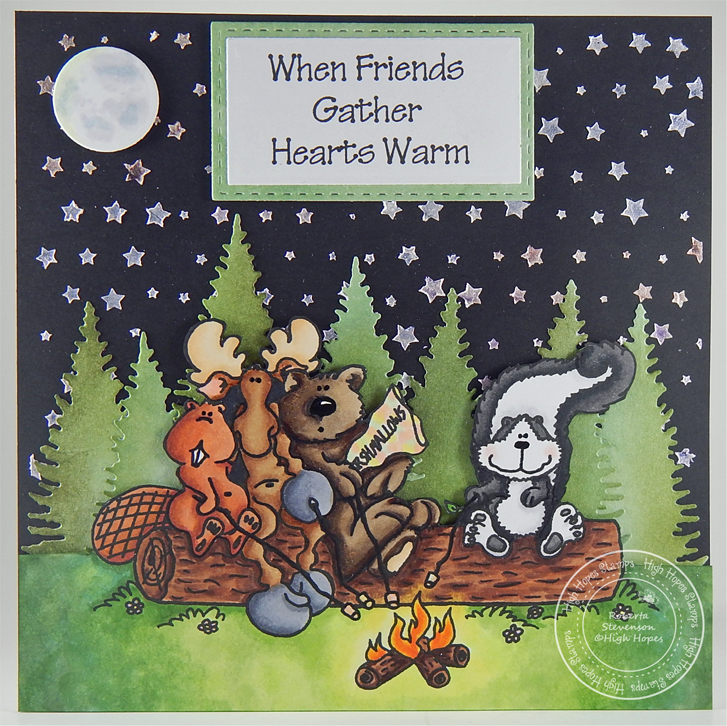
To make my card this week, I started with a base of 6″ x 6″ using Recollections – Black cardstock. I taped Echo Park – Star Stencil on top of the cardstock and applied several Cosmic Shimmer – Opal Blaze Polishes using a spatula to create the nice starry background. I wanted my scene to look like the friends were in the woods, so I die cut some trees of various sizes using Nellie’s Choice – Nature Scene Dies – NSD001 – Mountains and Momenta – Cardstock. Once I die cut the trees, I added some Tim Holtz Distress Ink – Forest Moss and Tim Holtz Distress Inks – Peeled Paint to add some more colour to them. Then, I ran the trees through my Xyron Create a Sticker to make it easier to apply them later. I felt the scene also needed a moon, so I die cut one using Nellie’s Choice – Nature Scene Dies – NSD002 – Sky and then coloured it in and added 3M VHB – 2 sided tape to the back of it and set everything aside.

I stamped my image and sentiment using my MISTI and Memento – Tuxedo Black ink onto Copic Marker X-Press It Blending Cardstock. I fussy cut around the top part of the image and then used a ruler to know where to cut the remainder of the bottom piece with my cutter. I coloured in the image using Copic markers and then used a black marker to go around all of the fussy cut part of the image and Copic marker – YG67 was used to go around the edges of the grassy area. For the sentiment, I used My Creative Time – Rectangle Frame Dies and My Creative Time – Rectangle Frame Layers to cut out the sentiment and background layer. I ran the sentiment through my Xyron Create a Sticker and applied it directly to the outer frame.

My card was now ready to assemble. I first adhered my starry background to a card base of AC – White cardstock sized at 6″ x 6″ using double-sided tape. Then, I used my coloured image to help me with the placement of where the trees would go. Since, I had already made stickers out of my trees, this was a fairly easy process. Once I was satisfied with their positioning, I applied 3M VHB – 2 sided tape, to the back of the coloured image and sentiment frame and attached them directly to the base card. Lastly, I attached the moon to complete the scene.

Card Recipe:

Stamp: Toasting Marshmallows – T026 (High Hopes Rubber Stamps)

Sentiment: Hearts Warm – G063 (High Hopes Rubber Stamps)

Inks: Memento – Tuxedo Black, Tim Holtz Distress Inks – Peeled Paint, Tim Holtz Distress Ink – Forest Moss

Paper: Copic Marker X-Press It Blending Card, Recollections – Black Cardstock, AC Cardstock – White, Momenta – Cardstock

Die Cuts: Nellie’s Choice – Nature Scene Dies – NSD001 – Mountains, Nellie’s Choice – Nature Scene Dies – NSD002 – Sky, My Creative Time – Rectangle Frame Dies, My Creative Time – Rectangle Frame Layers

Stencil: Echo Park – Star Stencil (6″ x 6″)

Cosmic Shimmer: Opal Blaze Polish – Sapphire Grape, Sunset Orange, Pink Blueberry, Turquoise Peach

Tools Miscellaneous: MISTI – Most Incredible Stamping Tool, Xyron Create a Sticker, Cuttlebug, Spatula

Image coloured with Copic Markers:

Beaver: E99, E97, E11, E07, (Eyes – Sakura Glaze – Black)

Moose: E53, E51, E50, E35, E34, E33, E31, R30, R20, Colorless Blender, (Eyes – Sakura Glaze – Black)

Bear: E53, E51, E50, E47, E44, E43, E42, (Eyes and Nose – Sakura Glaze – Black)

Skunk: C10, T6, T4, C1, C00, R30, R20, Colorless Blender, (Eyes and Nose – Sakura Glaze – Black)

Logs: E29, E27, E25, E23, E21

Marshmallows: YR00, R30, G20, Y11

Fire and Glow: YR09, YR04, Y08, Y02, Y00

Grass: YG67, YG63, YG45, YG17, YG13, YG03, YG01

Moon: BV20, C1, C00, Y000, Colorless Blender

Hope you like it and have a fantastic week!

You can find lots of inspiration from the Design Team Divas at the High Hopes blog, and the High Hopes Rubber Stamps Facebook Fan page plus you can also follow us on
Instagram, Twitter and Pinterest.

Create Sunshine!!!


It’s Wednesday, and this week, I made a card using Goat Your Back – TT137 by High Hopes Rubber Stamps for the main image and Somedays – GG024 (High Hopes Rubber Stamps) for the sentiment. This momma goat and her babes are out enjoying the warmer weather. Spring is finally here! We just planted our flowers this past weekend, or I should say, I helped pick them out and my husband actually did the planting. He has a green thumb. I definitely don’t. LOL!

To make my card this week, I started with a base of 6″ x 6″ using AC White Cardstock. I cut Bo Bunny – Sweet Moments Divine paper to be the same size as the base card and then inked around the edges with Tim Holtz Distress Ink – Crushed Olive. I attached this directly to the base using double-sided tape. Using Doodlebug Design Inc. – Spring Solid Assortment paper, I die cut the yellow rectangle, large green rectangle and small green rectangle using My Creative Time – Rectangle Frame Dies and My Creative Time – Rectangle Frame Layers. The edges were inked with Tim Holtz Distress Ink – Crushed Olive and Tim Holtz Distress Ink – Fossilized Amber. The same dies were also used to die cut Copic Marker X-Press It Blending Card for the main image. Gina Marie Designs – Nested Scalloped Stitched Rectangles were used to die cut Recollections – Petite Floral paper. The edges of this die cut were inked with Tim Holtz Distress Ink – Scattered Straw.

I stamped my image using my MISTI and Memento – Tuxedo Black ink onto the Copic Marker X-Press It Blending Card die cut. I coloured in the image and background using Copic markers. The sentiment was stamped onto white cardstock using my MISTI and Memento – Tuxedo Black ink. I used my small cutter to cut around the sentiment and inked it with Tim Holtz Distress Ink – Crushed Olive. I die cut the sun and clouds using Copic Marker X-Press It Blending cardstock and Nellie’s Choice – Nature Scene Dies – NSD002 – Sky. I coloured these with Copic markers. I added 3M VHB – 2 sided tape to the back of 1 cloud and the sun and attached them to the main image. The other cloud was attached using glue and tucked under the sun.

The card was now ready to assemble. I attached the large green rectangle to the patterned paper base with 3M VHB – 2 sided tape. The main image and yellow rectangle were attached to the large scalloped rectangle using glue. Then the scalloped rectangle was attached to the large green rectangle with 3M VHB – 2 sided tape. I attached the sentiment to the smaller green rectangle and popped it up using 3M VHB – 2 sided tape. To finish off the card I used a few pop dots and some yellow flowers.

Card Recipe:

Stamp: Goat Your Back – TT137 (High Hopes Rubber Stamps)

Sentiment: Somedays – GG024 (High Hopes Rubber Stamps)

Inks: Memento – Tuxedo Black, Tim Holtz Distress Inks: Scattered Straw, Crushed Olive, Fossilized Amber

Paper: Copic Marker X-Press It Blending Card, Recollections – Petite Floral – 12 x 12″ (30.4 x 30.4 cm), Doodlebug Design Inc. – Spring Solid Assortment (12″ x 12″), Bo Bunny – Sweet Moments Divine – 12 x 12 in., AC Cardstock – White

Die Cuts: Gina Marie Designs – Nested Scalloped Stitched Rectangles, My Creative Time – Rectangle Frame Dies, My Creative Time – Rectangle Frame Layers, Nellie’s Choice – Nature Scene Dies – NSD002 – Sky

Tools \ Miscellaneous: MISTI – Most Incredible Stamping Tool, 3M VHB – 2 sided tape, Dodz Small – Adhesive Dots, Flowers, Pop-dots

Image coloured with Copic Markers:

Goats: E53, E51, E50, E35, E34, E33, E31, E30, C5, C3, C1, C0, C00, R30, R27, R20, R14, Y38, Y35, Y17, Y08, Colorless Blender, (Eyes and Nose – Sakura Glaze – Black, Gelly Roll Sakura #5 Pen)

Grass: YG17, YG13, YG03, YG01

Sky: B02, B01, B00, B000, B0000

Clouds: B60, C00, Colorless Blender

Sun: Y19, Y18, Y17

Check out some other fun new stamps from High Hopes Rubber Stamps
Furry and Friends Release

Hope you like it and have a fantastic week!

You can find lots of inspiration from the Design Team Divas at the High Hopes blog, and the High Hopes Rubber Stamps Facebook Fan page plus you can also follow us on
Instagram, Twitter and Pinterest.

Love Lifts Me Up!!


Today, I’m sharing an inspirational slider card that I made using Dreamerland Crafts stamps called Your Love Lifts Me Up – D20001. Love this stamp and image for lifting someone’s spirit up.

To make this card I used a base card of 5.5 x 4.25″ using Hammermill – Premium Colour 100 lb. cardstock. I cut the background to be the same size using Asuka Studio – Sparkly Sky. I really love this paper. Using my MISTI and Memento – Tuxedo Black ink, I stamped the image onto Copic Marker X-Press It Blending Card and coloured them in with Copic markers. Then, I fussy cut around it leaving a small white border.

I stamped the sentiment using Versa Fine – Onyx Black and embossed it with Ranger – Clear Super Fine Detail embossing powder. The little cloud was die cut with my Cuttlebug and Nellie’s Choice – Nature Scene Dies – NSD002 – Sky. Then I used a Picket Fence – Blending Brush that still had some blue ink on it from my last project to give it some colour. I cut a small strip just over a .5″ wide and about 4″ long to be a pull tab. I die cut a circle out of the top background paper with Lifestyle Crafts Cutting Dies – Nesting Circles and then glued the piece that I cut onto the pull tab. Using 2 layers of 3M VHB – 2 sided tape, I created the path on the back of the background and added some tape where I wanted the tab to stop. I glued 2 small magnets to the back of the cloud and also to the pull tab. (4 in total). Then I used an embossing pillow against the taped sides and over the magnets so that it would glide easier. I added some more double-sided tape to the remainder of the back of the background and then attached it to the card.

Card Recipe:

Stamps: Your Love Lifts Me Up – D20001 (Dreamerland Crafts)

Inks: Memento – Tuxedo Black, Versa Fine – Onyx Black

Paper: Copic Marker X-Press It Blending Card, Hammermill – Premium Colour 100 lb., Asuka Studio – Sparkly Sky (6″x6″)

Die Cut: Lifestyle Crafts Cutting Dies – Nesting Circles, Nellie’s Choice – Nature Scene Dies – NSD002 – Sky

Tools: MISTI – Most Incredible Stamping Tool, Cuttlebug, Ranger – Clear Super Fine Detail embossing powder, Marvy Uchida – Embossing Heat Tool, Picket Fence – Blending Brush

Image coloured with Copic Markers:

Skin: E21, E11, E4, E00, E000, R30, R20

Hair:  E47, E44, E43 (Eye – Sakura Glaze – Black, Gelly Roll Sakura #8 Pen)

Flowers and Leaves: Y17, Y08, YG05, YG01

Dress: B06, B04, B01, B000

Shadow: B00, B000

Hope you like it and have a great week!

You can find more cards to inspire you at Dreamerland Crafts and Pointer Scrapbooking on the Facebook Fan pages from the rest of our design team.

Over The Hill Dinosaur!!


Sharing the first image and sentiment from KLM Digital Designs today from the new February release called Dinosaur Collection. Love this collection and the images are great for masculine cards too! Over the next few days, more images and sentiments from this set will be posted. Watch for them! LOL!

To make the card, I printed out the main image onto Copic Marker X-Press It Blending Card using my HP Printer and coloured it in with Copic markers. Microsoft Word was used to import the shape and line weight of 3 was used for the thickness. I imported the sentiment and sized it to fit inside the shape. This was printed out on Recollections – White cardstock and then I used my cutter to keep the lines straight.

To add some dimension to the card, I die cut some small clouds using Nellie’s Choice – Nature Scene Dies – NSD002 – Sky using Hammermill – Premium Colour 100 lb. paper. Copic markers were used to add some colour to them. My Creative Time – Stitched Squares Inside and Out die was used to cut out the main image and Creative Expression Craft Dies by Sue Wilson – Noble Dies – Double Pierced Squares – Set B were used to die cut the larger square using Recollections – Black cardstock.

To assemble the card, the 2 squares were attached using double-sided tape. The clouds and sentiment were popped up using 3M VHB – 2 sided tape. Larger cloud was attached with Tombow glue.

Card Recipe:

Stamp and Sentiments: Dinosaur Collection (KLM Digital Designs)

Inks: HP Printer Grayscale

Paper: Copic Marker X-Press It Blending Card, Hammermill – Premium Colour 100 lb., Recollections – White, Recollections – Black

Die Cut: Nellie’s Choice – Nature Scene Dies – NSD002 – Sky, Creative Expression Craft Dies by Sue Wilson – Noble Dies – Double Pierced Squares – Set B

Tools: 3M VHB – 2 sided tape, Cuttlebug

Image coloured with Copic Markers:

Dinosaur: E89, E87, E84, E81

Mountain: E89, E59, E53, E49, E35, E33, E27, E23, Colorless Blender

Sky: R32, R11, R00, B91, B01, B00, B000, BG70,

Clouds: B60, C1, C0, Colorless Blender

Hope you like it and have a great week!

You can find more cards to inspire you at KLM Designs, KLM Digital Design Team and KLM Digital Designs on the Facebook Fan page from the rest of our design team.