Tag Archive | Recollections – Blue Ombre Cardstock

Do Not Stop!


Today I’m sharing an inspirational card using KLM Digital DesignSlow Ride Gnome from the new February release. This image also comes with 2 more sentiments, “Travel at your own pace” and “Life is a journey, not a race”.  It was hard for me to pick which sentiment to use as I loved them all. They are all so true to life.

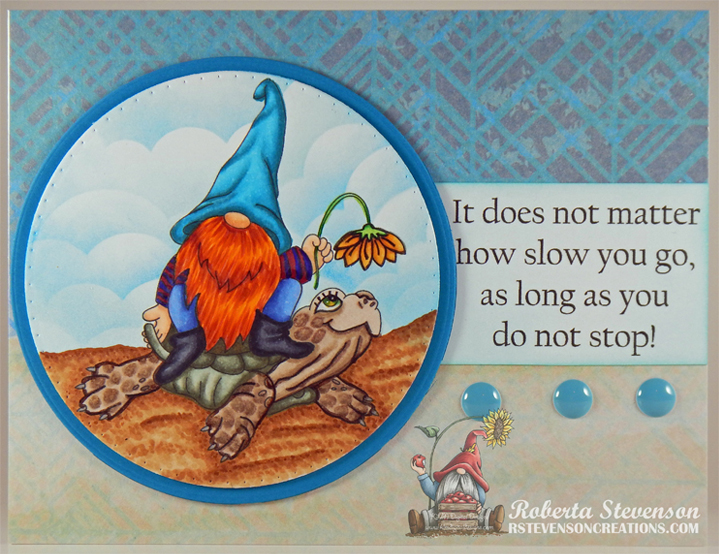
Hammermill – Premium Colour 100 lb. cardstock was used to create a 5.5″ x 4.25″ card base. I had found Crafts Designer Paper – 02-3080678 at Dollarama and thought this paper was perfect for this card. It was cut to the same size as the base card and adhered with double-sided tape.

The image and sentiment were imported into Microsoft Word and printed out onto Copic Marker X-Press It Blending Card. With my Cuttlebug, I die cut the image using My Creative Time – Bunch of Fun Circle 3.25″ Dies. The larger circle was die cut using Recollections – Blue Ombre Cardstock and Lifestyle Crafts Cutting Dies – Nesting 3.5″ Circle. I trimmed down the sentiment to be 2.25″ x 1.5″. Using what was left on a blending brush that I used for blues, I lightly went over the paper to give it a light blue hue. Tim Holtz Distress Ink – Salvaged Patina was then inked around the 3 edges.

The image was coloured in with Copic Markers listed below. I printed out another copy of the image onto plain paper and fussy cut around the top portion. I applied some Washi Tape to the back of it to create a hinge and to mask the image. Using a blender brush, Tim Holtz Distress Ink – Salty Ocean and Lawn Fawn Cuts – Cloudy Stencil, I created the clouds in the sky.

For the assembly of the card, I added double-sided tape to the back of the sentiment and adhered it directly to the card. U-Line double-sided tape was added to the backs of the larger and smaller circle and both were popped up onto each other and the card. Lastly, to finish off everything, I added in some YNS Gumdrops – Tropical Paradise.

Card Recipe:

Stamp and Sentiment:  Slow Ride Gnome – KLM Digital Designs

Inks: HP Printer Grayscale, Tim Holtz Distress Ink – Salty Ocean, Tim Holtz Distress Ink – Salvaged Patina

Paper: Copic Marker X-Press It Blending Card, Hammermill – Premium Colour 100 lb., Crafts Designer Paper – 02-3080678, Recollections – Blue Ombre Cardstock

Dies: My Creative Time – Bunch of Fun Circle Dies, Lifestyle Crafts Cutting Dies – Nesting Circles

Stencils: Lawn Fawn Cuts – Cloudy Stencil

Miscellaneous: U-Line double-sided tape, Cuttlebug, Blending Brush, YNS Gumdrops – Tropical Paradise

Image coloured with Copic Markers:

Skin: E21, E11, E04, E00, E000

Beard: E08, YR18, YR16, YR12

Jeans: B26, B23, B21

Shoes: C9, C7, C5, C1

Shirt: B69, B63, C3, R46

Hat: BG09, BG05, BG02, BG01

Turtle: E47, E44, E43, E42, E40, BG99, BG96, BG93, BG90, G07, YG07, Y35, C1, C00, 100

Sand: E37, E35, E33, E31

Flower and Stem: G14, YG23, YG11, E33, Y38, Y35, Y32

Hope you like it and have a great week!

You can find more cards to inspire you at KLM Designs, KLM Digital Design Team and KLM Digital Designs on the Facebook Fan page from the rest of our design team.

Polar Bear and Friend!!


Sharing this adorable image called Polar Bear and Friend from KLM Digital Designs today from the January release. This set comes with 3 sentiments, “You are Amazing”, “You’re My Sunshine on a Rainy Day” and “Best Friends Forever”, which I used on my card.

To make the card, I printed out the main image onto Copic Marker X-Press It Blending Card using my HP Printer. I used my Brother Scan and Cut to cut around the image and coloured it in with Copic markers. The sentiment was brought into Microsoft Word.  I imported the shape within Microsoft Word and used a weight of 3 for the solid line. Then, I brought the sentiment to the front and centred it in the middle of the shape. I printed this out on Recollections White cardstock and then just fussy cut around it.

I used AC White paper to create the base shape of the card 12″ x 6″. I scored the paper at 6″. I used Recollections – Blue Ombre Cardstock for the main background, cut to the same size as the base card. This was attached using double-sided tape.

Essentials by Tattered Lace Dies – Easel Slider dies and my Cuttlebug were used to die cut Hot Buy Craft Smart – Holiday Glitz Glitter Paper, Hammermill – Premium Colour 100 lb. and Stampin’ Up – Snowflake Splendor Designer Series Paper. Penny Black – Winter Roof die was used to die cut the icicles. The snow drifts on the bottom of the card were die cut using dies from Lawn Fawn – Stitched Hillside Borders. Once the icicles and snow drifts were die cut, I used the Tattered Lace die cut again so that everything would layer to the shape of the smaller rectangle. I used my Cuttlebug and Cuttlebug – Snow Dots stencil twice to create the texture to the larger rectangle. Gina K Designs – Glitz Glitter Gel was added to the icicles and front layer of snow. Stickles – Diamond was used to add texture to the back snow drift. Once everything was dry, I inked around all of the outside edges of the snow, rectangular shapes and main background with Tim Holtz Distress Ink – Blueprint Sketch.

To assemble the card, I used double-sided tape to attach the large rectangle shape directly to the base card. The smaller rectangle shape was assembled separately, then attached to the larger rectangular shape using 3M VHB – 2 sided tape. Tombo glue was used to add the icicles and layers of snow to the smaller rectangluar shape. The image and sentiment were popped up using 3M VHB – 2 sided tape. To complete the card, Stickles – Diamond was added below the bear to create a shadow and also some streaks along the snow.

Card Recipe:

Stamp and Sentiments: Polar Bear and Friend (KLM Digital Designs)

Inks: HP Printer Grayscale, Tim Holtz Distress Ink – Blueprint Sketch

Paper: Copic Marker X-Press It Blending Card, Hammermill – Premium Colour 100 lb., Stampin’ Up – Snowflake Splendor Designer Series Paper, Recollections – Blue Ombre Cardstock, Recollections – White Cardstock, AC White Cardstock, Hot Buy Craft Smart – Holiday Glitz Glitter Paper 12″ x 12″

Die Cut: Essentials by Tattered Lace Dies – Easel Slider, Penny Black – Winter Roof – 51-475, Lawn Fawn – Stitched Hillside Borders

Stencil: Cuttlebug – Snow Dots

Tools: 3M VHB – 2 sided tape, Cuttlebug, Gina K Designs – Glitz Glitter Gel

Image coloured with Copic Markers:

Penguin: W9, W7, W5, W3, E15, Y17, YR16, YR15, E43, E42, E41, E40, R11, RV00, Colorless Blender, White Prismacolor Premier Pencil

Polar Bear: W9, BV20, C1, C00, R24, R22, R11, RV00, E35, E33, E31, C1, Colorless Blender

Hope you like it and have a great week!

You can find more cards to inspire you at KLM Designs, KLM Digital Design Team and KLM Digital Designs on the Facebook Fan page from the rest of our design team.

Check out some special savings for a limited time at KLM!!

Make A Wish!!!


Today I’m sharing this adorable Balloon Gnome (KLM Digital Designs) image and sentiments from KLM Digital Designs new release. This little gnome is on his way to bring a special someone their birthday balloon. Make a wish!!! It could be you. LOL!

I printed out the main image onto Copic Marker X-Press It Blending Card using my HP Printer. For the sentiment inside the balloon, I split it into 2 lines using Microsoft Word. I coloured in the image with Copic markers and then used my Brother Scan and Cut machine to cut it and the black background out behind it. I cut the main sentiment out by hand, glued it some black cardstock and cut around it again leaving a slim border.

For the main background, I used a card base of 5.5″ x 4.25″. I layered some balloon paper cut at the same size from Forever in Time – Birthday Blast. Then I added some blue cardstock cut at .5″ x 4.25″ inches and added it to the top and bottom of the base card after edging around it with Tim Holtz Distress Ink – Mermaid Lagoon and a small dauber. Once that was complete, I edged around the entire card with the same ink.

I popped up the image and sentiment with 3M VHB – 2 sided tape to complete the card.

Card Recipe:

Stamp and Sentiment: Balloon Gnome (KLM Digital Designs)

Inks: HP Printer Greyscale, Tim Holtz Distress Ink – Mermaid Lagoon

Paper: Copic Marker X-Press It Blending Card, Forever in Time – Birthday Blast – 6″x6″ paper, Recollections – Blue Ombre Cardstock, Recollections – Black Cardstock

Tools: 3M VHB – 2 sided tape, Brother Scan and Cut

Image coloured with Copic Markers:

Skin: E000, E00, E04, E11, E21

Beard: W5, W4, W3, W2, W1, W0, W00

Hat and Pocket: V17, V15, V12, V04

Shirt: BG18, BG15, BG13, C1, C0, Colorless Blender

Boots: E29, E27, E25, E23, E21

Balloon: Y17, Y08, Y06, Y02, Y000

Hope you like it and have a great week!

You can find more cards to inspire you at KLM Designs, KLM Digital Design Team and KLM Digital Designs on the Facebook Fan page from the rest of our design team.


Easter Masterpiece!


It’s Wednesday, and this week I used High Hopes Rubber Stamps Bunny Masterpiece – S063 for the main image and Egg-Stra Special -G243 for the sentiment. These little bunnies are getting prepared for Easter. I remember making painted eggs every year in the kitchen with my mom and brothers as a child. Do you have an Easter tradition of painting eggs too?

To create the card I coloured in the image and then popped it up using 3M VHB – 2 sided tape. I also popped up the sentiment. I found some old cardstock and cut out some of the little eggs and then edged around each of them with various Tim Holtz colours listed below. The card is 6″ x 6″.

Card Recipe:

Stamp:  Bunny Masterpiece – S063 (High Hopes Rubber Stamps)

Sentiment: Egg-Stra Special -G243 (High Hopes Rubber Stamps)

Inks: Memento – Tuxedo Black, Tim Holtz Distress Inks – Dusty Concord, Spun Sugar, Wilted Violet, Evergreen Bough, Shaded Lilac and Fossilized Amber

Paper: Copic Marker X-Press It Blending Card, Recollections – Blue Ombre Cardstock, Recollections – Purple Ombre Cardstock, Recollections – Easter Printed Cardstock

Die Cuts: My Creative Time -Stitched Squares Inside and Out

Tools: MISTI – Most Incredible Stamping Tool, Cuttlebug, 3M VHB – 2 sided tape

Image coloured with Copic Markers:

Bunnies: C3, C2, C1, C0, R30, R02, RV04

Overalls: B26, B23, B21, V09, V06, V04, BV04, BV02, BV01, BV000

Egg: Y08, Y06, Y02, BG13, BG11, BG10, RV04, RV02, RV00, G02, G00, G000, B41, B34, B32

Paintbrushes: N4, N0, E27, E23, BG13, BG11, BG10, B34, B41

Grass: G17, G14, G07

Sky: B02, B01, B00, B000

Hope you like it and have a fantastic week!

You can find lots of inspiration from the Design Team Divas at the High Hopes blog, and the High Hopes Rubber Stamps Facebook Fan page plus you can also follow us on
Instagram, Twitter and Pinterest.


Super Tall Cake!


Welcome Back Dreamerland Craft Fans!

Today, I’m sharing a card that I made using Dreamerland Crafts Clear Stamps  Super Tall Cake – D19017 for the main image and Birthday Sentiments – Set 002 (DS163007) for the sentiment!  This adorable little bear made a cake for someone very special! Hmmm! I wonder who that could be. LOL!

To make the card I first die cut Copic Marker X-Press It Blending Card with Craftin Desert Diva’s – Inside Scalloped Squares. Then using my MISTI and Memento – Tuxedo Black ink, I stamped the image onto the paper. I coloured in the image using Copic markers.

Next I cut out used some tape to inlay the image back into the frame that I had previously die cut to make it one piece again. I also die cut the yellow and aqua paper with the same die cut twice. Then I used the yellow to be the inlay for the aqua frame and taped it back together on the reverse. After that, I used my MISTI and Versa Fine – Onyx Black to apply the sentiment. The sentiment was then embossed with Ranger – Clear Super Fine Detail embossing powder and heated up using Marvy Uchida – Embossing Heat Tool.

Next, I edged around the borders of both frames with Tim Holtz Distress Ink – Evergreen Bough. I ran the base frame through Xyron Creative Station to make it into a sticker and so that the entire frame would lay flat. I mounted this onto 5″ x 5″ white cardstock. Then I popped up the smaller frame and image using 3M VHB – 2 sided tape.

Card Recipe:

Stamp: Super Tall Cake – D19017 (Dreamerland Crafts Clear Stamps)

Sentiments: Birthday Sentiments – Set 002 (DS163007) (Dreamerland Crafts Clear Stamps)

Inks: Memento – Tuxedo Black, Versa Fine – Onyx Black, Tim Holtz Distress Ink – Evergreen Bough

Embossing Powder: Ranger – Clear Super Fine Detail embossing powder

Paper: Copic Marker X-Press It Blending Card, Momenta – Cardstock, Recollections – Blue Ombre Cardstock, Recollections – White Cardstock

Die Cuts: Craftin Desert Diva’s – Inside Scalloped Squares

Tools: MISTI – Most Incredible Stamping Tool, Cuttlebug, 3M VHB – 2 sided tape, Marvy Uchida – Embossing Heat Tool, Xyron Creative Station

Image coloured with Copic Markers:

Bear: E53, E51, E50, E37, E35, E33, E31, R30, R22, R20, R02

Hat, Apron and Cart: C3, C2, C1, C0, Colorless Blender

Cake: E29, E27, E25, E23, B04, B02, Y35, Y08

Tablecloth: Mitts and Boots: B04, B02, B000

Icing: BG49, BG45, BG11

Bunny: C3, C1, C0, R22, R20

Whistle: G17, G14

Base: E15, E13, E11

Background: Y19, Y18, Y15, Y11


Hope you like it and have a great week!

You can find more cards to inspire you at Dreamerland Crafts on the Facebook Fan page from the rest of our design team.