Tag Archive | #WhimsyStamps

Penguin and Reindeer Friend!


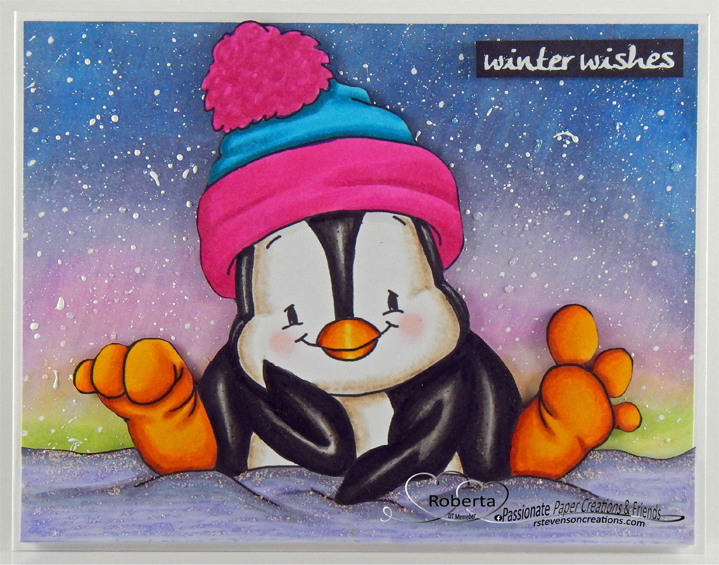
Today I’m sharing a Christmas card that I made using Whimsy StampsPenguin and Reindeer Friend and Penny Black Creative DiesAntique Frame.

The image was printed out with my HP Printer onto Copic Marker X-Press It Blending Card using High Quality Grayscale and coloured in with Copic markers. Once I finished colouring the image, I applied Copic B000 all around it and then fussy cut the image out leaving a slim border.

The base card was created to the size of 4.25″ x 5.5″ out of Hammermill – Premium 110 lb. cardstock. Stampin’ Up – Snowflake Splendor Designer Series Paper was cut to the same size as the base card. Using a Cuttlebug and Penny Black Creative Dies – Antique Frame, I die cut the centre of the paper, keeping the original size as well. The same dies were also used to cut out a larger rectangle out of Hot Buy – Recollections – Jewel Tones paper. To create the snow, I first die cut the snow drifts with Lawn Fawn – Sparkle Cardstock in “Pixie Dust” paper and Spellbinders – Color Block Scenic Scape dies. Next, so that I could keep the same shape as the snowflake die cut, I once again ran both of the snow die cuts through the cutting machine using the Penny Black dies. All of the die cuts were inked around the edges with a finger dauber and Tim Holtz Distress Ink – Salty Ocean. Tim Holtz Distress Inks – Tumbled Glass was applied to the top of the snow banks to give them some contrast.

The whole card was now ready to assemble.

Liquid glue was applied to the larger snowflake border and then applied directly onto the base card. U-Line Double-Sided Foam Tape was applied to the completed image, small snow drift and each of the rectangle die cuts. The larger die cut rectangle was popped up onto the centre of the snowflake base. Liquid glue was applied to the larger snow drift and it was applied directly to the smaller snowflake die cut. Another layer of U-Line Double-Sided Foam Tape and some liquid glue were applied to the smaller snow drift then it was popped up onto the larger snow drift. The penguin and reindeer image was popped up behind the smaller snowdrift. I also applied some liquid glue to the foam tape so that it would adhere better to the sparkle cardstock. Lastly, I fussy cut a sentiment from Creative Expressions – Wordies Sentiment Sheets – Christmas Script and popped it up onto the top of the card.

Card Recipe:

Stamp: Whimsy StampsPenguin and Reindeer Friend

Inks: HP Printer High Quality Grayscale, Tim Holtz Distress Ink – Salty Ocean, Tim Holtz Distress Inks – Tumbled Glass

Paper: Copic Marker X-Press It Blending Card, Hammermill – Premium Cardstock 110 lb., Lawn Fawn – Sparkle Cardstock in “Pixie Dust” (8.5″ x 11″), Stampin’ Up – Snowflake Splendor Designer Series Paper, Hot Buy – Recollections – Jewel Tones, Creative Expressions – Wordies Sentiment Sheets – Christmas Script (CEW022)

Die Cuts: Penny Black Creative DiesAntique Frame 51-937, SpellbindersColor Block Scenic Scape (S3-418)

Miscellaneous: U-Line Double-Sided Foam Tape, White Gelly Roll Sakura #10 Pen, Sakura Glaze – Black, Pigma Micron 03 black marker

Image coloured with Copic Markers:

Penguin: W9, W7, W5, W3, W00, E15, YR14, Y17, Y11, RV00, E43, E42, E41, E40, Colorless Blender, (Eyes – Sakura Glaze – Black, White Gelly Roll Sakura #10 Pen), Pigma Micron 03 black marker

Scarf and Hat: BG09, BG05, BG02, BG01

Reindeer: E35, E33, E31, E18, E15, R02, R01, R00, C1, C00, (Eyes and Nose – Sakura Glaze – Black, White Gelly Roll Sakura #10 Pen), Pigma Micron 03 black marker

Bells and Collars: YR23, Y15, Y11, Y00, R46, R14, R08

Leash: G16, YG25, YG23

Hope you like it and have a great week!

Penguin Candy Cane !


Today I’m sharing another Christmas card that I made using Whimsy StampsPenguin Candy Cane.

The image was printed out with my HP Printer onto Copic Marker X-Press It Blending Card using High Quality Grayscale and coloured in with Copic markers. Once I finished colouring the image, I fussy cut around it.

The base card was created to the size of 4.25″ x 5.5″ out of Hammermill – Premium 110 lb. cardstock. Creative Expressions – Christmas Wishes paper was cut to be the same size as the base and was applied directly to the card using double-sided tape. A finger dauber was used to apply Tim Holtz Distress Inks – Candied Apple around all of the edges of the card. Using a Cuttlebug, I die cut the larger snowflake with Creative Expressions – Festive Collection – Lace Snowflake Frame and the smaller snowflakes with Poppy – Simple Snowflakes out of Lawn Fawn – Sparkle Cardstock in “Pixie Dust” paper. The holly and leaves were die cut using dies from Spellbinders – Dancin’ Figgy Pudding and some scraps of Recollections – Green cardstock and Crafter’s Companion Luxury Cardstock – Red. I used a Copic marker G99 to make the veins darker in the leaves and a White Gelly Roll Sakura #10 Pen to add a highlight on the berries and then used liquid glue to assemble them.

The whole card was now ready to assemble. U-Line Double-Sided Foam Tape was applied to the completed image and it was popped up onto the centre of the large snowflake. U-Line Double-Sided Foam Tape was then applied to the large snowflake and it was popped up onto the centre of the card. Liquid glue was applied to the holly and berries and smaller snowflakes which were adhered directly to the card base. Lastly, I applied U-Line Double-Sided Foam Tape to the sentiment from Hunkydory Essential Book of Christmas Sentiments 2023 and popped it up onto the corner of the card to finish it off.

Card Recipe:

Stamp: Whimsy StampsPenguin Candy Cane

Inks: HP Printer High Quality Grayscale, Tim Holtz Distress Inks – Candied Apple

Paper: Copic Marker X-Press It Blending Card, Hammermill – Premium Cardstock 110 lb., Creative Expressions – Christmas Wishes (8″ x 8″), Crafter’s Companion Luxury Cardstock – Red – 8.5 x 11″, Lawn Fawn – Sparkle Cardstock in “Pixie Dust” (8.5″ x 11″), Hunkydory Essential Book of Christmas Sentiments 2023, Recollections – Green cardstock

Die Cuts: Spellbinders – Dancin’ Figgy Pudding – S4-1315, Creative Expressions – Festive Collection – Lace Snowflake Frame (CED3123), Poppy – Simple Snowflakes (Style 1931)

Miscellaneous: U-Line Double-Sided Foam Tape, White Gelly Roll Sakura #10 Pen

Image coloured with Copic Markers:

Penguin: W9, W7, W5, W3, W00, E15, YR14, Y17, Y11, RV00, E43, E42, E41, E40, Colorless Blender

Hat: R46, R14, R08, C01, C0

Candy Cane: G16, YG25, YG23, R46, R14, R08, C1, C0

Hope you like it and have a great week!

Old Fart!


Today I’m sharing a birthday card using Whimsy StampsOld Geezer and sentiments from their Old Fart stamp set and Old Fart Word Die that I made for my younger brother this week! Couldn’t resist teasing him about getting older and entering into his 60’s!. LOL!

I began making my card by creating a 5.5″ x 4.25″ base made from Hammermill – Premium Colour 100 lb. cardstock. I used 3 circles that were cut out with Photo-Play – Circle Windows Etched Dies and Echo Park – Birthday Girl – Bouncing Balloons from a previous card that I made. Tim Holtz Distress Inks: Salty Ocean and a blender brush were used to colour the white circle and then the same ink was used to ink the edges around the other 2 circles and card base.

The image was stamped onto Copic Marker X-Press It Blending Card with Memento – Tuxedo Black ink and a MISTI. It was coloured in with the Copics listed below and then fussy cut. Using the MISTI again for placement, I stamped the sentiments using Versa Fine – Onyx Black ink. This was then embossed with Ranger – Clear Super Fine Detail embossing powder and then heat embossed with a Marvy Uchida – Embossing Heat Tool. With a Cuttlebug and dies from Whimsy Stamps – Old Fart Word die set and Art ImpressionsJournal Letter Die Set, I die cut out the sentiments with black cardstock.

To assemble the card, I used liquid glue to attach the die cut wording and “60” onto the circles. All of the circles were applied to the base card using liquid glue. The main image was popped up onto the base card using U-Line Double-Sided Foam Tape. I also added a few more fun sentiments from the same stamp sets on the inside of the card too! LOL!  My brother loved his card and I hope you do too!

Card Recipe:

Stamp and Sentiments:  Whimsy StampsOld Geezer and Old Fart

Inks: Memento – Tuxedo Black, Tim Holtz Distress Inks: Salty Ocean, Versa Fine – Onyx Black

Paper: Copic Marker X-Press It Blending Card, Hammermill – Premium Colour 100 lb., Echo Park – Birthday Girl – Bouncing Balloons

Dies: Whimsy Stamps – Old Fart Word, Photo-Play – Circle Windows Etched Dies (#SIS2379),  Art ImpressionsJournal Letter Die Set (5562)

Embossing Powder: Ranger – Clear Super Fine Detail embossing powder

Miscellaneous: U-Line Double-Sided Foam Tape, Marvy Uchida – Embossing Heat Tool

Image coloured with Copic Markers:

Skin: E21, E11, E00, E000

Hair: YR12, C1, C00

Clothing and Slippers: B37, B14, B12, B00, C9

Toot: C1, C1, C00

Hope you like it and have a great week!

Gnome One Else – Valentine’s!


Today I’m sharing a Valentine’s card using Whimsy StampsGnome One Else Clear Stamps that I made for my husband this year!

The image and sentiments were stamped onto Copic Marker X-Press It Blending Card cut to the size of 7″ x 5″ using my MISTI and Memento – Tuxedo Black ink. I created a base card to be 7.25″ x 5.25 using Recollections – Red cardstock. I coloured in all of the images with Copic markers listed below. The hearts were applied using Kraftin Kimmie – Happy Hearts Stencil and Tim Holtz Distress Ink – Lumberjack Plaid using a blending brush. Once this was completed, using the MISTI for placement, I applied the sentiments using Versa Fine – Onyx Black from the same stamp set. Ranger – Clear Super Fine Detail embossing powder was applied and then heat embossed with a Marvy Uchida – Embossing Heat Tool. Using a finger dauber and Tim Holtz Distress Ink – Picked Raspberry, the edges of the Copic Marker X-Press It Blending Card were inked all around.  The coloured image was then applied to the base card using double-sided tape.

My husband loved his card and I hope you do too!

Image coloured with Copic Markers:

Card Recipe:

Stamps and Sentiments:  Whimsy StampsGnome One Else Clear Stamps

Inks: Memento – Tuxedo Black, Tim Holtz Distress Ink – Picked Raspberry, Versa Fine – Onyx Black, Tim Holtz Distress Ink – Lumberjack Plaid

Paper: Copic Marker X-Press It Blending Card, Recollections – Red cardstock

Embossing Powder: Ranger – Clear Super Fine Detail embossing powder

Stencil: Kraftin Kimmie – Happy Hearts Stencil

Miscellaneous: Marvy Uchida – Embossing Heat Tool, MISTI – Most Incredible Stamping Tool

Image coloured with Copic Markers:

Skin: E21, E11, E04, E00, E000

Hair: E99, YR24, YR23

Beard: E79, E70, E29, E27

Male – Clothing: B26, B23, B21

Male Hat: R59, R37, R35

Female – Clothing and Hat: BG32, BG15, BG09

Shoes: C3, C2, C1, C0, C00

Swing: E35, E33, E31, E25, Y17

Mushroom: E42, E40, E09, E08, E0000, BV31, R08

Grass and Boat: G16, YG25, YG23

Flower: V04, V01, V000, Y08, Y04, Y00, E13

Hope you like it and have a great week!

Added into contest: https://thefairyandtheunicornchallenge.blogspot.com/2023/12/hqfcb-is-formerly-known-tfatu-2-agf.html

Added into contest: https://hqcelebrationsoflovechallenges.blogspot.com/2024/02/hqcolcb-2-competition-of-ewa-with.html

YAY! My card was one of the TOP 3 for Heart’s Quest Celebrations of Love Challenge Blog. Feeling so grateful!


Birthday Ssschmirth-day!


Today, I’m sharing a fun birthday card using Whimsy StampsMe-Wow Cat Birthday that I made for my father-in-laws 80th Birthday. He’s wasn’t too keen on turning 80 so I thought I would make this fun card for him! He loved it and I hope that you do too!

To create the card, I began with a card base of 5.5″ x 5.5″ using Hammermill – Premium Colour 100 lb. cardstock. Echo Park Paper Co. – Happy Birthday Boy paper was cut to the same size as the base and adhered with double-sided tape. Using my Cuttlebug and My Creative Time – Stitched Squares Inside and Out, I die cut a 3.5″ x 3.5″ square out of Copic Marker X-Press It Blending Card and a 4″ x 4″ square out of Recollections – Black cardstock.

Using my MISTI and Memento – Tuxedo Black ink, I stamped the image from Whimsy StampsMe-Wow Cat Birthday. The image was coloured in with Copic markers and then I stamped the image again onto a Post-It note and fussy cut around the balloon and upper half of the kitty to use it as a mask. I placed it over top of the coloured image and created the party background using Tim Holtz Distress Ink – Salty Ocean, Tim Holtz Distress Ink – Squeezed Lemonade and Tim Holtz Distress Ink – Wilted Violet which I applied using Blending Brushes. After the first layers were added, I used the same colours,  but this time I used Hero Arts – Party Confetti Stencil (Crop & Create Exclusive) to create the streamers. I removed the mask and put the image into my MISTI once again and this time, I stamped the sentiment from the same stamp set using Versa Fine – Onyx Black ink and then heat embossed it using Ranger – Clear Super Fine Detail embossing powder and Marvy Uchida – Embossing Heat Tool. Lastly, U-Line double-sided tape was applied to the back of the image and the black square. These were then popped up onto the centre of the card.

Card Recipe:

Stamp: Whimsy StampsMe-Wow Cat Birthday – C1386

Inks: Memento – Tuxedo Black, Versa Fine – Onyx Black, Tim Holtz Distress Ink – Salty Ocean, Tim Holtz Distress Ink – Squeezed Lemonade and Tim Holtz Distress Ink – Wilted Violet

Paper: Copic Marker X-Press It Blending Card, Hammermill – Premium Colour 100 lb., Recollections – Black cardstock, Echo Park Paper Co. – Happy Birthday Boy 6″ x 6″

Dies: My Creative Time – Stitched Squares Inside and Out

Stencil: Hero Arts – Party Confetti Stencil (Crop & Create Exclusive)

Embossing Poweder: Ranger – Clear Super Fine Detail

Miscellaneous: U-Line double-sided tape, Marvy Uchida – Embossing Heat Tool, MISTI – Most Incredible Stamping Tool, Blending Brushes

Image coloured with Copic Markers:

Cat: C10, C8, C7, C6, C5, C4, R22, R02, 100, YG09, YG07, YG05

Hat: BG15, BG11, BG10, BG09, BG05, BG02, BG01

Balloon: BG09, BG05, BG02, BG01, BG0000

Lawn: YG25, YG23, YG21, YG03, YG01

Hope you like it and have a great week!

Christmas Cheer!!


Today we are having a sponsor day over at the Passionate Paper Creations & Friends FB group and I’m sharing a snowman card I made using this digital image from Whimsy Stamps – Snowman’s New Hope and clear stamp for the sentiment Dragon Christmas Cheer.

For the base card, I used AC Cardstock – White and cut it and scored it to be 6″ x 6″. The image was printed out using HP High Quality Grayscale onto Copic Marker X-Press It Blending Card. The background paper was cut to the size of 6″ x 6″ using Hot Buy – Recollections – Jewel Tones paper. This was applied directly to the base using double-sided tape. I die cut Doodlebug Design Inc. – Winter Wonderland paper using my Couture Creations – Go Power and Emboss and Creative Expression Craft Dies by Sue Wilson – Noble Dies – Double Pierced Squares – Set B. This was inked around the edges with Lawn Fawn – Peacock Ink and applied directly over top of the bottom layer using double-sided tape. The circles were cut with my Cuttlebug, various colours from Hot Buy – Recollections – Jewel Tones paper and Copic Marker X-Press It Blending Card using Lifestyle Crafts Cutting Dies – Nesting Circles. I applied the 1st 2 circles with double-sided tape over top of the snowman background.

The image was coloured in with Copic markers. I popped up the image and applied it to to the card using 3M double sided tape. I added snow to the bottom of the snowman using Stickles – Diamond to add texture. The snowy background was created with a Ranger – Emboss It Pen Clear and the sentiment was stamped with Versamark ink. Ranger Embossing Powder White – Extra Fine Detail was applied and heat embossed using Marvy Uchida – Embossing Heat Tool. I fussy cut around the sentiment and it was popped up using 3M double-sided tape onto the card to finish it off.

Card Recipe:

Stamp: Snowman’s New Hope – Whimsy Digital Stamps

Sentiment: Dragon Christmas Cheer Whimsy Clear Stamps

Inks: HP High Quality Grayscale, Lawn Fawn – Peacock Ink, Versamark, Ranger – Emboss It Pen Clear

Paper: Copic Marker X-Press It Blending Card, AC Cardstock – White, Hot Buy – Recollections – Jewel Tones, Doodlebug Design Inc. – Winter Wonderland (6″ x 6″)

Die Cuts: Creative Expression Craft Dies by Sue Wilson – Noble Dies – Double Pierced Squares – Set B, Lifestyle Crafts Cutting Dies – Nesting Circles

Embossing Powder: Ranger Embossing Powder White – Extra Fine Detail

Miscellaneous: Couture Creations – Go Power and Emboss, 3M double-sided tape, Stickles – Diamond, Marvy Uchida – Embossing Heat Tool

Image coloured with Copic Markers:

Snowman: YR18, YR15, YR12, R30, R20, B60, C0, C00, Colorless Blender

Hat and Scarf: B37, B26, B23, B21, B14, B12, BG72, BG57, BG34, BG11

Sky: BG10, BG000, BG0000

Hope you like it and have a great week!

Come and check us out on Passionate Paper Creations & Friends FB group
as we are currently sponsoring Whimsy Stamps until Sunday, October 31, 2021.

If you are a member of Passionate Paper Creations & Friends FB group
you can go to the top of the page and get a shopping discount.


If you are not a member just click join. We are a fun loving group with a lot of inspiration.

Penguin – Thinking of You!!


Hi everyone…today we are having a sponsor day over at the Passionate Paper Creations & Friends FB group site with Whimsy stamps!! Sharing a card I made today using this adorable image from Whimsy Stamps – Penguin Thinking of You and for the sentiment Penguins Winter Adventure.

For the base card, I used Hammermill – Premium Colour 100 lb. and cut it and scored it to be 5.5″ x 4.25″. I printed out the image using HP High Quality Grayscale onto Copic Marker X-Press It Blending Card. The image was coloured in with Copic markers and then fussy cut around the image and snow. I coloured in the background separately and then splattered some FolkArt – Extreme Glitter Acrylic Paint and Delta Ceramcoat – White onto the background. The background was cut down to 5.25″ x 4″ and was popped up onto the base using U-line double-sided tape. The image was then popped up onto the background using U-line double-sided tape and the sentiment was stamped with VersaMark ink and embossed with Ranger Embossing Powder White – Extra Fine Detail and my Marvy Uchida – Embossing Heat Tool. This was popped up using 3M double-sided tape and applied to the card to finish it off.

Card Recipe:

Stamps and sentiment: Penguin Thinking of You – Whimsy Stamps

Sentiment: Penguins Winter Adventure – Whimsy Stamps

Inks: HP High Quality Grayscale, Versamark

Paper: Copic Marker X-Press It Blending Card, Hammermill – Premium Colour 100 lb.

Embossing Powder: Ranger Embossing Powder White – Extra Fine Detail

Miscellaneous: 3M double-sided tape, Stickles – Diamond, FolkArt – Extreme Glitter Acrylic Paint, Delta Ceramcoat – White, Marvy Uchida – Embossing Heat Tool, U-Line double-sided tape

Image coloured with Copic Markers:

Penguin: W9, W7, W5, W3, W00, E15, YR14, Y17, Y11, R11, RV00, E43, E42, E41, E40

Hat: RV09, RV06, RV04, BG09, BG05, BG02, BG01

Sky and Snow: BV23, BV20, BV00, B97, B95, B63, B60, B45, B41, YG17, YG11, YG03, YG00, RV02, RV00, RV000

Hope you like it and have a great week!

Come and check us out on Passionate Paper Creations & Friends FB group
as we are currently sponsoring Whimsy Stamps until Saturday, October 31, 2021.

If you are a member of Passionate Paper Creations & Friends FB group
you can go to the top of the page and get a shopping discount.

If you are not a member just click join. We are a fun loving group with a lot of inspiration.

Dam Good Birthday!


Sharing a card I made for my younger brother’s birthday. He sometimes likes to use “choice” words, so I couldn’t resist  these little characters and sentiment from Whimsy Stamps called Beaver Birthday Clear Stamps. LOL! The little tree stump and stacked logs are from Your Next Stamp – Autumn Animals (CYNS605) and the larger log is from Craftin Desert Diva’s – Build A Scene (Retired).

To make this card, I first stamped all of the images onto Copic Marker X-Press It Blending Card using Memento – Tuxedo Black and my MISTI.  My Brother Scan and Cut was used to cut around all of the images, which were then coloured with copic markers. The sentiment was stamped with VersaMark ink and then heat embossed with Ranger Embossing Powder White – Extra Fine Detail and Marvy Uchida – Embossing Heat Tool.

The base card was created using Hammermill – Premium Colour 100 lb. cardstock folded to the size of 8-1/4″ x 3-1/4″. To create the clouds in the background, I used the same paper cut to the same size as the base and using a template that I had previously created using Whimsy Stamps – Grass and Cloud Edger Die Set and Tim Holtz Distress Oxide Inks – Broken China and Blueprint Sketch. For the slim-line die cut, I used Whimsy Stamps – Slimline Wave Dies and Craftsmart Hot Buy – Christmas Embossed paper. Then I inked around the entire die cut with Tim Holtz Distress Ink – Tea Dye to make it pop more. The tree along the left side and the long log along the bottom were drawn free hand and then coloured in with Copic markers.

To assemble the card, I first attached the cloudy background to the base of the card using double-sided tape. Next, I attached the slim-line die cut using some glue. The large tree, long log and small log pile were all attached using glue. The remainder of the images and sentiment were all attached using 3M VHB – 2 sided tape. I added some twine to the balloons and beaver to finish it off.

Card Recipe:

Stamp and Sentiments: Whimsy Stamps – Beaver Birthday (KHB157), Your Next Stamp – Autumn Animals (CYNS605), Craftin Desert Divas – Build A Scene (Retired)

Inks: Memento – Tuxedo Black, Tim Holtz Distress Ink – Tea Dye, Tim Holtz Distress Ink – Gathered Twigs, Tim Holtz Distress Oxide Ink – Broken China, Tim Holtz Distress Oxide Ink – Blueprint Sketch

Paper: Copic Marker X-Press It Blending Card, Craftsmart Hot Buy – Christmas Embossed, Hammermill – Premium Colour 100 lb.

Die Cuts: Whimsy Stamps – Slimline Wave Dies, Whimsy Stamps – Grass and Cloud Edger Die Set

Tools: MISTI – Most Incredible Stamping Tool, Couture Creations – Go Power and Emboss, 3M VHB – 2 sided tape, AC Premium Ribbon, Tombow – Multi Mono Liquid Glue

Beavers: E99, E97, E37, E35, E34, E33, E29, E25, E15, E09, E08, R30, R20

Balloons: B06, B04, B02, B00, G09, G07, G02, G00

Cake and Candle: YR19, Y08, R24, B28, B24, B14, B12, B04, B02, AtyouSpica: Skyblue (09), Baby Blue (18)

Logs and Stump: E49, E27, E25, E23, E21

Tree and Log along the bottom: E37, E35, E33, Tim Holtz Distress Ink – Gathered Twigs

Hope you like it and have a great week!