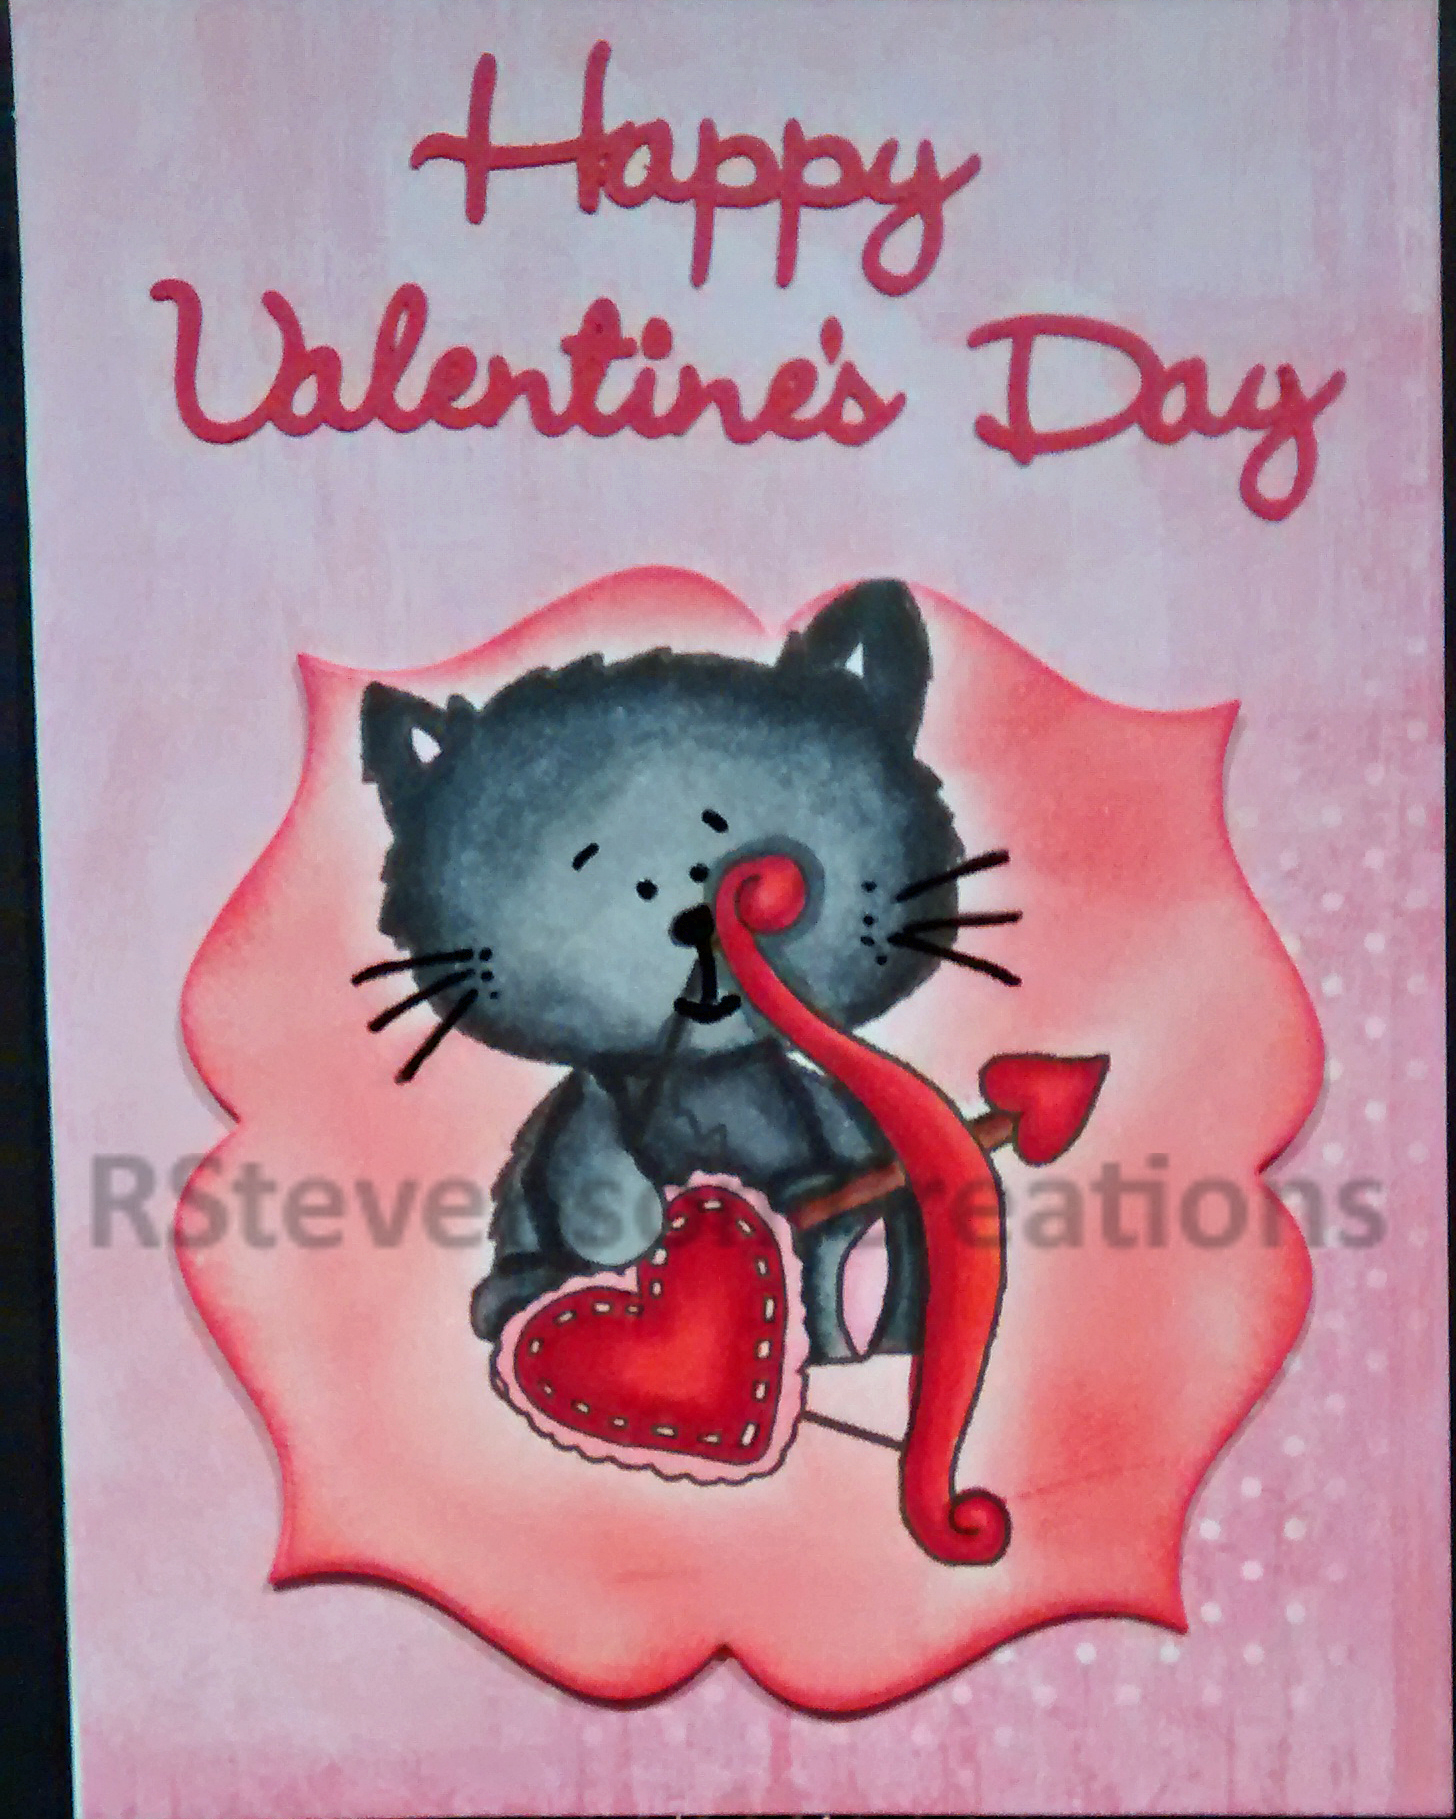
Tag Archive | Valentine’s Day

Every Little Moment!!


Today, I’m sharing a card using Dreamerland Crafts stamps called When You Love Someone – D20005 and Mix and Match Collection – Railing and Lampost – M18309 for the main images and Mix and Match – DCS19095 for the sentiment. Loved combining these stamps as they could be used for Valentine’s Day, Anniversary or just a note to let your special someone know how much you love them.

To make this card I used a base of 5.5″ x 4.25″ using Hammermill – Premium Colour 100 lb. cardstock. I die cut Copic Marker X-Press It Blending Card paper with my Cuttlebug and My Creative Time – Rectangle Frame Layers. Using my MISTI and Memento – Tuxedo Black ink, I stamped the Dreamerland image When You Love Someone – D20005 and then stamped it again onto Post-It Note paper. I cut around the image on the Post-It Note paper and applied it over top of my stamped image. Once this was in place, I used my MISTI and Memento – Tuxedo Black ink to stamp the Dreamerland image Mix and Match Collection – Railing and Lampost – M18309. The railings were stamped on both sides of the image and then again using my MISTI, I stamped the lamp posts multiple times. I also used Copic – W9 to make the bottom halves a little darker as well. This was done on both sides of the main image. I had used some Post-It note paper to put on both ends so that the fence wouldn’t go past the small border around the card when I was stamping. I coloured in the image with Copic Markers. Once the image and background were coloured in, I stamped the sentiment using VersaMark ink, my MISTI and Ranger Embossing Powder White – Extra Fine Detail. Lastly, some stars were added to the sky using Gelly Roll Sakura #5 Pen and Gelly Roll Sakura #10 Pen.  I adhered the completed image to some Recollections – Black cardstock using double-sided tape. To finish off the card, I applied U-Line double-sided tape and popped the completed image and matting onto the base card.

Card Recipe:

Stamps: When You Love Someone – D20005 – Dreamerland Crafts, Mix and Match Collection – Railing and Lampost – M18309 – Dreamerland Crafts

Sentiment: Mix and Match – DCS19095 – Dreamerland Crafts

Inks: Memento – Tuxedo Black, Versamark

Paper: Copic Marker X-Press It Blending Card, Hammermill – Premium Colour 100 lb., Recollections – Black cardstock

Die Cuts: My Creative Time – Rectangle Frame Layers

Embossing Powed: Ranger Embossing Powder White – Extra Fine Detail

Tools: MISTI – Most Incredible Stamping Tool, Gelly Roll Sakura #5 Pen, Gelly Roll Sakura #10 Pen

Image coloured with Copic Markers:

Skin: E21, E11, E00, E000, R30, R20, Eyes – Gelly Roll Sakura #10 Pen for highlight

Hair: E47, E44, E43, E41

Dress and Shoes: R83, R81, RV00, RV000, E23, 21

Jeans: B26, B23, B21

Boots: E27, E25, E23, E21

Shirt: BG99, YG67, YG17, G21

Walkway: E55, E53, E51, E50, W4, W3

Night Sky and Lights: B99, B97, B95, B93, Y02, Y000, Gelly Roll Sakura #5 Pen, Gelly Roll Sakura #10 Pen

Hope you like it and have a great week!

You can find more cards to inspire you at Dreamerland Crafts and Pointer Scrapbooking on the Facebook Fan pages from the rest of our design team.

Toad-ally In Love!!


It’s Wednesday, and this week, I made a card using High Hopes Rubber Stamps Toad-ally In Love – M127  for the image and sentiment. I toad-ally love this sweet image because it can be used for both Valentine’s Day, an Anniversary or just to let someone know that you love them.

To make my card this week, I began with a card base of Hammermill – Premium Colour 100 lb. cardstock, cut and scored to be 5″ x 5″. I used Picket Fence – Blending Brushes, Tim Holtz Distress Ink: Mowed Lawn, Crushed Olive, Peeled Paint, Festive Berries, Fired Brick and Barn Door and Lawn Fawn – Lots of Hearts Background Stencils to create my card background. Using Lawn Fawn – Valentine’s Hearts Border and my Cuttlebug, I die cut some Craft Smith – Hot Buy – Green and Forever In Time – Texture Rouge cardstock and adhered the 2 pieces together with some glue. I did this twice and then glued the 2 finished pieces to the base card. With my MISTI and Memento – Tuxedo Black ink, I stamped the image onto the Copic Marker X-Press It Blending Card cardstock. I then die cut it using Sizzix Framelets by Stephanie Barnard – 562676 – Hearts Dotted. The image was coloured in and popped up onto the background using U-line douhble-sided tape. I applied some glue onto the backs of 3 of the pre-cut hearts and placed them onto the base background to complete the card.

Card Recipe:

Stamp and Sentiment: Toad-ally In Love – M127 (High Hopes Rubber Stamps)

Inks: Memento – Tuxedo Black, Tim Holtz Distress Ink: Mowed Lawn, Crushed Olive, Peeled Paint, Festive Berries, Fired Brick and Barn Door

Paper: Copic Marker X-Press It Blending Card, Hammermill – Premium Colour 100 lb., Craft Smith – Hot Buy – Green, Forever In Time – Texture Rouge

Die Cuts: Sizzix Framelets by Stephanie Barnard – 562676 – Hearts Dotted, Lawn Fawn – Valentine’s Hearts Border

Stencils: Lawn Fawn – Lots of Hearts Background Stencils

Tools: MISTI – Most Incredible Stamping Tool, U-Line double-sided tape, Cuttlebug

Image coloured with Copic Markers:

Toad: YG17, YG06, YG03, YG00, E81, R30, BG99, E84, E81Colorless Blender (Eyes – Sakura Glaze – Black, Gelly Roll Sakura #5 Pen)

Hearts: R46, R14, R08, YG17, YG06, YG03

Big Heart Background: R27, R24, R22, R21, R20, (C3, C2, E23 – Shadow under Toad)


Hope you like it and have a fantastic week!

You can find lots of inspiration from the Design Team Divas at the High Hopes blog, and the High Hopes Rubber Stamps Facebook Fan page plus you can also follow us on
Instagram, Twitter and Pinterest.

When You Love Someone!


Today, I’m sharing a Valentine’s card that I made using Dreamerland Crafts stamps called When You Love Someone – D20005. I just love this adorable couple. This image could also be used for an Anniversary card too!

To make this card I used a base card of 6″ x 6″ using AC White cardstock. I added the base background using the paper from Stampin’ Up! – Have a Cuppa with double-sided tape. Then, I die-cut 4 hearts using my Cuttlebug and Sizzix Framelets by Stephanie Barnard – 562676 – Hearts Dotted. Tim Holtz Distress Ink – Worn Lipstick and Tim Holtz Distress Ink – Evergreen Bough were used to colour around the edges of the card and also all of the hearts.

I stamped the image using Memento – Tuxedo Black ink and my MISTI onto Copic Marker X-Press It Blending Card. I coloured in the image with Copic markers. Then I used my Brother Scan and Cut to cut around the image. I stamped the sentiment using Versa Fine – Onyx Black ink and my MISTI. I used Ranger – Clear Super Fine Detail embossing powder and then heat embossed the powder with Marvy Uchida – Embossing Heat Tool onto the smallest heart.

To assemble the card, the largest heart was attached directly to the base background using glue. I added 3M VHB – 2 sided tape to the backs of the remaining hearts and coloured image and then layered them on top of each other. To complete the card, I added in some hearts from Jot – Jewel Stickers.

Card Recipe:

Stamp and Sentiment:  When You Love Someone – D20005 (Dreamerland Crafts)

Inks: Memento – Tuxedo Black, Versa Fine – Onyx Black, Tim Holtz Distress Ink – Worn Lipstick, Tim Holtz Distress Ink – Evergreen Bough

Embossing Powder: Ranger – Clear Super Fine Detail embossing powder

Paper: Copic Marker X-Press It Blending Card, Stampin’ Up! – Have a Cuppa – 6″ x 6″, AC White cardstock, Hot Pink cardstock

Die Cuts: Sizzix Framelets by Stephanie Barnard – 562676 – Hearts Dotted

Tools: MISTI – Most Incredible Stamping Tool, Cuttlebug, Marvy Uchida – Embossing Heat Tool, 3M VHB – 2 sided tape, Jot – Jewel Stickers

Image coloured with Copic Markers:

Skin: E000, E00, E04, E11, E21, R22, R20

Hair:  E47, E44, E43, E15, Y38, Y21, YR23

Dress, Bow and Shoes: BG72, BG57, BG32, BG11

Shirt and Vest: G82, G46, G43, G40, E29, E27, E25, E23

Boots: E57, E55, E53, E51

Heart: BG57, BG45, BG34, R85, R83, R81, C3, C2, C1

Hope you like it and have a great week!

You can find more cards to inspire you at Dreamerland Crafts and Pointer Scrapbooking on the Facebook Fan pages from the rest of our design team.

Not Horsin’ Round


It’s Wednesday, and this week, I’m sharing another Valentine’s card I made using High Hopes Rubber Stamps Horsin’ Around Horsey – P130. This little horse and his little friend are trotting by to wish you a Happy Valentine’s Day.

To make my CAS card today, I used The Paper Studio – Primary Base Colours 4.25″ x 5.5″. I die cut the 2 background hearts papers from Martha Stewart Crafts – Enchanted Woodland, using my Cuttlebug and My Creative Time – Rectangle Frame Dies. I die cut Copic Marker X-Press It Blending Card using My Creative Time – Scalloped Stitched Oval Dies. The image was stamped onto the die cut using my Misti and Memento – Tuxedo Black ink. I coloured in the image using Copic Markers. Then I used Tim Holtz Distress Inks – Festive Berries to ink around the edges of all of the die cuts.

To assemble the card, double-sided tape was used to adhere the first layer directly to the card base. 3M VHB – 2 sided tape was added to the backs of the coloured image and second layer of pattened paper and then they were added to the base. To complete the card, I added 3 hearts from Buttons Galore & More – Heartfelt Shimmerz Embellishments.

Card Recipe:

Stamp:  Horsin’ Around Horsey – P130 (High Hopes Rubber Stamps)

Inks: Memento – Tuxedo Black, Tim Holtz Distress Inks – Festive Berries

Paper: Copic Marker X-Press It Blending Card, Martha Stewart Crafts – Enchanted Woodland 12″ x 12″, The Paper Studio – Primary Base Colours 4.25″ x 5.5″

Die Cuts: My Creative Time – Scalloped Stitched Oval Dies, My Creative Time – Rectangle Frame Dies

Tools: MISTI – Most Incredible Stamping Tool, Cuttlebug, 3M VHB – 2 sided tape, Buttons Galore & More – Heartfelt Shimmerz Embellishments

Images coloured with Copic Markers:

Horse: E37, E35, E33, E31, T6, T4, T2, R81

Mouse: W2, R81

Grass: YG17, YG13, YG03, YG01

Flower and Stem: G07, G03, RV06, RV04, Y15

Hearts: R39, R37, R35

Hope you like it and have a fantastic week!

You can find lots of inspiration from the Design Team Divas at the High Hopes blog, and the High Hopes Rubber Stamps Facebook Fan page plus you can also follow us on
Instagram, Twitter and Pinterest.

C’mon Baby Light My Fire!


It’s Wednesday, and this week, I used Walker Walter – TLF013 (High Hopes Rubber Stamps) and Walker Winnie – TLF012 (High Hopes Rubber Stamps) for the main images and Light My Fire – F154 (High Hopes Rubber Stamps) for the sentiment. I thought I would create a Senior’s Valentine’s card with these fun images. This could also be used for an Anniversary card too. After all, you’re never too old to be in love!!!

To make my card this week, I used Hammermill – Premium Colour 100 lb. for my base at 4.25″ x 5.5″. I taped down the card onto a glass mat and then used the stencils Flames – Honey Bee Stamps to create the background using various Tim Holtz Distress inks which I have listed below.

I stamped both the images and sentiment using my Misti and Memento – Tuxedo Black ink onto Copic Marker X-Press It Blending Card. I coloured in the images using Copic Markers. Then I fussy cut around both images and in between the walkers. The sentiment was also fussy cut and I cut into 2 pieces to fit my design better. I added 2-sided tape to the back of my sentiments and then attached them to a small piece of Martha Stewart Crafts – Enchanted Woodland paper. Ran this through my Xyron Create a Sticker and then fussy cut around the sentiment again. I found the white too bright when I added it to the card, so I used Copic Y11 to give it some colour.

For the main images, once coloured, I ran both of them through my Xyron Creative Station and adhered them directly to the base. I used my Cuttlebug to cut some hearts out of Martha Stewart Crafts – Enchanted Woodland paper using Sizzix Framelets – Hearts Dotted die. Then I ran them through my Xyron Create a Sticker to change them into stickers and placed them directly onto the base. For the few spots on the images that I didn’t fussy cut, I used Copic markers YR23, YR16 and YR15 to fill in the white spaces.

Card Recipe:

Stamp:  Walker Walter – TLF013 (High Hopes Rubber Stamps), Walker Winnie – TLF012 (High Hopes Rubber Stamps)

Sentiment Background: Light My Fire – F154 (High Hopes Rubber Stamps)

Inks: Memento – Tuxedo Black, Tim Holtz Distress Ink – Fossilized Amber, Tim Holtz Distress Ink – Barn Door, Tim Holtz Distress Ink – Fired Brick, Tim Holtz Distress Ink – Wild Honey, Tim Holtz Distress Ink – Carved Pumpkin

Paper: Copic Marker X-Press It Blending Card, Martha Stewart Crafts – Enchanted Woodland 12″ x 12″, Hammermill – Premium Colour 100 lb.

Die Cuts: Sizzix Framelets by Stephanie Barnard – 562676 – Hearts Dotted

Stencil: Flames – Honey Bee Stamps

Tools: MISTI – Most Incredible Stamping Tool, Cuttlebug, 3M VHB – 2 sided tape, Xyron Creative Station, Xyron Create a Sticker

Images coloured with Copic Markers:

Skin: E21, E11, E04, E00, E000, R22, R20

Hair: C5, C3, C1, Gelly Roll Sakura #8 Pen

Shirt, Dress, Earring, Lady’s Shoes, Horn: BG72, BG57, BG32, BG11, C3, C1

Pants: B26, B24, B21

Man’s Shoes: E27, E25, E23, E21, C3, C1

Blouse, Flowers and Socks: RV19, RV17, RV14, RV11, RV10, G09, G07, Y17, Y08

Tennis Balls: YG05, YG03, YG01

Walkers, Horns, Wheels and Grips: C9, C7, C5, C3, C1

Hope you like it and have a fantastic week!

You can find lots of inspiration from the Design Team Divas at the High Hopes blog, and the High Hopes Rubber Stamps Facebook Fan page plus you can also follow us on
Instagram, Twitter and Pinterest.

Hoppy Valentine’s Day


It’s Wednesday, and this week I’m sharing a Valentine’s Card featuring Bunny Love – S054 from (High Hopes Rubber Stamps) for the main image and Hoppy Valentines – F092 (High Hopes Rubber Stamps) for the sentiment. Love this adorable image and it can be used for so many different occasions, Valentine’s, which I’ve used here, Easter or even for an Anniversary card.

To create the card this week, I stamped the main image and sentiment onto Copic Marker X-Press It Blending Card using Memento – Tuxedo Black ink and my MISTI. I coloured in the main image with Copic Markers. Then I fussy cut around it. The sentiment was die cut using Whimsy Stamps – Quick Strips Die Set – WSD330.

To create the base I began with AC Cardstock – Christmas (6″ x 6″). Then I die cut K&Company – Kelly Panacci – KP Valentine – 30-599338 paper using My Creative Time -Stitched Squares Inside and Out. For the smaller heart, I used K&Company – Kelly Panacci – KP Valentine – 30-599345 paper and Sizzix Framelets by Stephanie Barnard – 562676 – Hearts Dotted dies. I also used the same dies to cut the larger heart using Recollections – Christmas Noel paper. I inked around all of the cut images with Tim Holtz Distress Ink – Aged Mahagony and also Tim Holtz Distress Ink – Barn Door.

To assemble the card, the large square was attached directly to the base using double side tape. All of the remaining layers were popped up using 3M VHB – 2 sided tape.

Card Recipe:

Stamp: Bunny Love – S054 from (High Hopes Rubber Stamps)

Sentiment: Hoppy Valentines – F092 (High Hopes Rubber Stamps)

Inks: Memento – Tuxedo Black, Tim Holtz Distress Ink – Barn Door, Tim Holtz Distress Ink – Aged Mahagony

Paper: Copic Marker X-Press It Blending Card, K&Company – Kelly Panacci – KP Valentine – 30-599345, K&Company – Kelly Panacci – KP Valentine – 30-599338, AC Cardstock – Christmas, Recollections –

Die Cuts: My Creative Time -Stitched Squares Inside and Out, Sizzix Framelets by Stephanie Barnard – 562676 – Hearts Dotted, Whimsy Stamps – Quick Strips Die Set – WSD330, Recollections – Christmas Noel

Tools and Miscellaneous: MISTI – Most Incredible Stamping Tool, Sakura Glaze – Black, 3M VHB – 2 sided tape

Image coloured with Copic Markers:

Bunnies: BV23, BV20, B60, E43, E42, E40, R85, R83, R81, Sakura Glaze – Black (Eyes)

Hope you like it and have a fantastic week!

You can find lots of inspiration from the Design Team Divas at the High Hopes blog, and the High Hopes Rubber Stamps Facebook Fan page plus you can also follow us on
Instagram, Twitter and Pinterest.

P.S. I Love You!!


Today, I’m sharing Loving Rat from KLM Digital Designs December Release. The image comes with 3 different sentiments, “Love You Most”, “Everything is Better with You” and “P.S. I Love You”. I was born in the Year of the Rat, so this image is extra special to me. Who couldn’t love that adorable face? LOL!

To make the card, I printed out the image onto Copic Marker X-Press It Blending Card using my HP Printer. I coloured in the image with Copic markers and then I used my Brother Scan N’ Cut to cut around it, leaving a small white border. After it was coloured, I used a Gelly Roll Sakura #8 Pen to trace over the sentiment and add a sparkle to the eyes. I felt the finished image still needed something to make it pop on the background, so I ran the image through my Xyron Creative Station and adhered it to some Recollections Black cardstock. Then I fussy cut around the image again.

To create the card, I began with a base card of 4.25″ x 5.5″ using Hammermill – Premium Colour 100 lb. paper. I cut K&Company – Kelly Panacci – KP Valentine – 30-599345 to the same size as the base and adhered it to the base using double-sided tape. I cut the top row of hearts from the same paper, added some glue to the back of it and placed it on the top of the card so that it matched the bottom pattern. Then I inked around all of the edges with Tim Holtz Distress Ink – Barn Door. I popped up the image onto the card using 3M VHB – 2 sided tape. I die cut some hearts using Sizzix Framelets by Stephanie Barnard – 562676 – Hearts Dotted, my Cuttlebug and Martha Stewart Crafts – Enchanted Woodland 12″ x 12″ paper. I really love the glitter of this paper. Lastly, I added the hearts with some glue to complete the card.

Card Recipe:

Stamp and Sentiment: Loving Rat (KLM Digital Designs)

Inks: HP Printer Grayscale, Tim Holtz Distress Ink – Barn Door

Paper: Copic Marker X-Press It Blending Card, Hammermill – Premium Colour 100 lb., Martha Stewart Crafts – Enchanted Woodland 12″ x 12″, K&Company – Kelly Panacci – KP Valentine – 30-599345, Recollections – Black cardstock

Die Cuts: Sizzix Framelets by Stephanie Barnard – 562676 – Hearts Dotted

Tools: Gelly Roll Sakura #8 Pen, 3M VHB – 2 sided tape, Cuttlebug, Brother Scan ‘N Cut

Image coloured with Copic Markers:

Rat: W3, W2, W1, W0, R30, R12, R11, R02, R01, R000, E23, PrismaColor Premier Pencils – 70% Warm Grey PC1056, 50% Warm Grey PC1054, 30% Warm Grey PC1052, 20% Warm Grey PC1051, 10% Warm Grey PC1050, Beige Sienna PC1080, Light Umber PC941

Eyes: YG17, YG13, YG03, C9, C1, Gelly Roll Sakura #8 Pen

Hearts: C2, R39, R37, R35

Hope you like it and have a great week!

You can find more cards to inspire you at KLM Designs, KLM Digital Design Team and KLM Digital Designs on the Facebook Fan page from the rest of our design team.

My Heart Led Me To You!


Welcome Back KLM Digital Designs Fans!

Today, I’m sharing a simple card that I made using the stamp and sentiment from Lovebug Gnome (KLM Digital Designs)! This little gnome driving his car and the sentiments with this stamp could be used for Valentine’s Day, Anniversary or just as a note to let someone you really care about how much you love them!

Card Recipe:

Stamp and Sentiment: Lovebug Gnome (KLM Digital Designs)

Inks: HP Printer GrayScale

Paper: Copic Marker X-Press It Blending Card, Crafter’s Companion – Luxury Cardstock – Ice Blue Pack

Image coloured with Copic Markers:

Skin: E000, E00, E11, E21

Hair and Beard: W5, W3, W1

Hat: R29, R27, R35

Car:  B39, B37, B34, B32, B000, Y15, Y08, Y00, C9, C7, C5, C3, C2, C1

Balloons:  R81, R35, R29, R24, R00, R000, B34, B32, B000, B0000

Background: B0000, C2, C1, C0, Colorless Blender

Hope you like it and have a great week!

You can find more cards to inspire you at KLM Digital Designs on the Facebook Fan page from the rest of our design team.

Cupid Didn’t Miss!


Welcome Back KLM Digital Designs Fans!

KLM Digital Designs released some brand new stamps recently and today, I’m combining Cupid Gnome and Cupid! The sentiment is also a part of the Cupid set. I thought these 2 stamps worked so well together to create a little Valentine Card scene! Can you just feel the love???

I know Cupid Gnome sure didn’t miss when he shot the love arrow into my husband’s heart many years ago. I couldn’t ask for a better man. He’s definitely 1 in a million and I wouldn’t trade him for the world. LOL!

To make the card, I brought the digital images into Microsoft Word and arranged them using a 5.5″ x 4.25″ rectangle box as my guide. Then I printed out the image onto Copic Marker X-Press It Blending Card using Grayscale using my HP Printer. (Grayscale prevents the image from smudging when you go to colour.)

I coloured in the images and added some Clear – Wink of Stella to the wing. (It doesn’t show up in the picture.) Then I trimmed the coloured images and mounted them onto Recollections – Cranberry cardstock. Lastly, I added some little hearts that I had die-cut earlier. I also added a heart above the “i” in Cupid.

Card Recipe:

Stamp: Cupid Gnome (KLM Digital Designs), Cupid (KLM Digital Designs)

Sentiments: Cupid (KLM Digital Designs)

Ink: HP Printer – Grayscale

Paper: Copic Marker X-Press It Blending Card, Recollections – Cranberry cardstock

Die Cuts: Sizzix Framelets by Stephanie Barnard – 562676 – Hearts Dotted

Tools: Cuttlebug, Xyron Create-A-Sticker, Wink of Stella – Clear

Image coloured with Copic Markers:

Skin: E000, E00, E04, E11, E21, R22, R20

Hair and Beard: E35, E34, E33

Hat: R59, R37, R35, R24

Pants: G99, G94, YG63, YG61

Bow: E55, E53, E51

Angel Wings: BG10, BV00, RV00

Cloud: BV0000, B0000, C0, Colorless Blender

Background: B0000, B000, E34, E33, E31

Hope you like it and have a great week!

You can find more cards to inspire you at KLM Digital Designs on Facebook.

Sweets for my Sooeet!!!


Valentine’s Day Is Almost Here!!! Who Wants Chocolate???

It’s Wednesday, and since Valentine’s Day is almost here, I thought I’d share this adorable little piggy called  Sow Soo-Eet Piggy (S091) from High Hopes Rubber Stamps! He sure does love his chocolate and so do I. LOL! I’m a choc-o-holic and so is my husband! I can give up many things, but not my chocolate. No way! LOL! And the sentiment Sweets for my Sooeet (G197) by High Hopes Rubber Stamps is the perfect fit for this card.

I decided to keep the card simple this week. I started off with a base of 5.5″ x 5.5″. I used double side tape and added the pretty heart ribbon to both the top and bottom of the card.

The die cuts for the main image are both from Craftin Desert Diva’s – Fancy Frames. I edged around the large die cut with Tim Holtz Distress Ink – Aged Mahagony to deepen the red. It was then attached to the card using 2 sided tape.

The main image was stamped onto Copic Marker X-Press It Blending Card and then coloured in with Copic Markers. I left the die cut metal frame on while I coloured the image. Once, the coloured image was done, I was ready to add some clouds. To do this, I stamped the image again onto some Post-It paper and then cut it out to create a masked image. I layered this on top of the pig and Valentine’s boxes and then created the clouds in the background using various blues from Tim Holtz Ranger Distress Ink and a stencil that I created using Avery Elle – D-05-01 PiercedCloudsDie.

Lastly, I stamped the sentiment onto white card stock. I die cut the frame for the sentiment with Craftin Desert Diva’s – Flag Banner Dies out of red cardstock. Then I used the same red cardstock, which I had just cut the banner out of to use as a stencil to trace around my sentiment.  I then used the trace marks as a guide to cut the sentiment out, moving just slightly inwards from my tracing to create the inner banner. This allowed me to have a nice red frame around the sentiment.

To finish the card I popped up the coloured image and sentiment with 3M VHB – 2 sided tape and added a couple of hearts.

Card Recipe:

Stamp: Sow Soo-Eet Piggy (S091) (High Hopes Rubber Stamps)

Sentiment: Sweets for my Sooeet (G197) (High Hopes Rubber Stamps)

Inks: Memento – Tuxedo Black, Tim Holtz Distress Ink – Salty Ocean, Tim Holtz Ranger Distress Ink – Broken China, Tim Holtz Distress Inks – Tumbled Glass, Tim Holtz Distress Ink – Aged Mahagony

Paper: Copic Marker X-Press It Blending Card, Red and White Cardstock

Die Cuts: Avery Elle – Custom Steel Dies – Made in the USA – D-05-01 PiercedCloudsDie, Craftin Desert Diva’s Fancy Frames, Craftin Desert Diva’s – Flag Banner Dies

Tools: MISTI – Most Incredible Stamping Tool, Cuttlebug

Miscellaneous: Kraftin Kimmie – Heart Krafty Dots, American Crafts Premium Ribbon

Image coloured with Copic Markers:

Pig: R22, R20, R000, R00, E93, E44, E43, E41, E04, E37, E35, E34

Shirt: B18, B16, B14, B12, R29, R27, R24

Valentine boxes: R29, R27, R24, R22, R17, R14, C1, C0

Chocolate Wrappers: E37, E34, E29, E25, E23

Ground: E99, E97, E33, E31, E30

Hope you like it and have a fantastic week!

You can find lots of inspiration from the Design Team Divas at the High Hopes blog, and the High Hopes Rubber Stamps Facebook Fan page plus you can also follow us on
Instagram, Twitter and Pinterest.


Nuts About You!


Welcome High Hopes Rubber Stamps Fans!

It’s Wednesday, and this week at High Hopes Rubber Stamps love is in the air! LOL! This week, I used this adorable little elephant called  Peeking Ellie With Heart – P127 for the main image and Nuts About You – F128 for the sentiment!

The card base is 5-1/2″ x 4-1/4 inches on white cardstock. I stamped the image using Memento – Tuxedo Black ink and then coloured in the image with Copic markers. Then I fussy cut around the image only leaving a thin slice of white in a few areas. Where I had trimmed the paper closest to the image, I outlined it with black marker.

Next, after running scrap pieces of paper through my Xyron Create a Sticker, I die cut the heart border using Sizzix Framelets by Stephanie Barnard – 562676 – Hearts Dotted. I also used the same die cut to cut out the big heart. Then I taped the metal die cut and the paper down onto a piece of cardboard so that I could colour the big heart and still leave a white border. Once the heart was coloured, I covered “about you” with some Scotch Tape and then stamped “I’m nuts”. I repeated the process only this time, I covered “I’m nuts” with the Scotch Tape and then stamped “about you” below it. Of course, I removed the tape each time before stamping.

I cut out the red contrasting paper and patterned paper with Your Next Stamp – Stitched Rectangle Die Set (YNSD214).

Now it was time to put it all together. I mounted the red rectangle directly onto the base. I mounted the patterned rectangle onto some white cardstock and used my cutter to create a thin white border all the way around it. Then, I popped up the rectangle, Ellie and the big heart with 3M VHB – 2 sided tape.

Lastly, to finish it off, I added the border sticker to the bottom of the first rectangle and hearts that I created earlier.

Card Recipe:

Stamp: Peeking Ellie With Heart – P127 (High Hopes Rubber Stamps)

Sentiment: Nuts About You – F128 (High Hopes Rubber Stamps)

Inks: Memento – Tuxedo Black

Paper: Copic Marker X-Press It Blending Card, K&C Company – Kelly Panacci – KP Valentine – 30-599345, K&C Company – Kelly Panacci – KP Valentine – 30-599338

Die Cuts: Sizzix Framelets by Stephanie Barnard – 562676 – Hearts Dotted, Your Next Stamp – Stitched Rectangle Die Set (YNSD214)

Tools: MISTI – Most Incredible Stamping Tool, Cuttlebug, Xyron Create a Sticker

Image coloured with Copic Markers:

Elephant: C5, C3, C2, C1, R30, R22, R20, R01, B00

Hearts: R29, R27, R24, R22

Hope you like it and have a fantastic week!

You can find lots of inspiration from the Design Team Divas at the High Hopes blog, and the High Hopes Rubber Stamps Facebook Fan page plus you can also follow us on
Instagram, Twitter and Pinterest.


Valentine for Vet 2017 from Boo


Hi There,

Sharing the card that I made for the vet from out black cat “Boo” for Valentine’s Day.

boovalentine2017fr

Here is a close-up:

boovalentine2017frcu

For the inside I wrote a little sentiment from “Boo” to our vet and his wonderful staff.

boovalentine2017in

Kittens are from Kadoodle Bug Designs – DS Cute Kitty Valentine.

For sentiment on front page used imported image from Cricut Cartrige –  Holiday Cakes  – Happy Valentine’s Day  #M3F6FB  into Cricut Design Space and then cut with Cricut Explore.

Cut out frame for image with Spellbinders S4-353 – Labels Twenty-Four and then edged with Tim Holtz – Festive Berries.

Coloured both images with a mixture of Copic and Spectrum Noir markers. Used Sakura Glaze – Black for his eyes, nose and whiskers.

They loved it! Hope you do too!

Sorry for the late posting!


Valentine’s Day 2017 – Hubby


Hi There,

Sharing the Valentine’s Card that I made for my
wonderful husband this year.

A little late in posting on-line.

toddvalentine2017fr

Here is a close-up:

toddvalentine2017fr-cu


On the inside:

toddvalentine2017in

Close-Up:

toddvalentine2017in-cu

All Images by: Simply Betty from her FanPageImages collection.

CupidBetty and CupidCorinne.

Used Cricut Design Studio to import image:  Gypsy Wanderings – Heart #M3FF59. Made a copy of the hear and then welded it together. Then used my Cricut Explore to cut out the pieces.

Stamped background – Local King Rubber Stamp – Words (1) on the white hearts.

Coloured image with Copic markers.

My husband loved it! Hope you do to.

Valentine’s Day 2017 – Mom


Sharing a Valentine’s Day card that I made for my
mom and dad this year.


momvalentine2017

Here is a close-up:

momvalentinecu2017

Image by: faeryink_doodlebug_vdaylollipop

Image coloured with Copic Markers and Gelly Roll Sakura #8 Pen for highlights on eyes.

Used Cricut Design Studio to import image:  Gypsy Wanderings – Heart #M3FF59. Made a copy of the hear and then welded it together. Then used my Cricut Explore to cut out the pieces.

Hope you like it!


Valentine’s Card for my Hubby


“Hi There,

Liked to share the card I made for my husband this year with you.

Forever Yours

For the front of the card, I used a design that I found in “Complete Cardmaking – Making Beautiful Cards with your PC” magazine.

The original design by Nancy Malaka can be found on page 27 and is called “Forever Yours”.

I uploaded the .jpg from the CD into Cricut Design Studio for the couple and then used the “Print and Cut” feature to print the image to my printer and then Cricut Explore to cut my image for me. Love this new feature!

Next, I used my Copic and Spectrum Noir markers to colour the image. PrismaColor Premier Pencils were used for creating more contrast and shadow.

Using Cricut Design Studio, I used the following cartridges:

Background: Paper Lace II – Gears

Lettering: Cricut Alphabet

Clock: Picturesque – Clockface Circle Card Seal

Clock Hands: Gypsy Wanderings – Clock Hand

Heart design: Elegant Edges – Heart Scallop Design Label

Scalloped Rectangles – Elegant Edges – Heart Rectangle Design Label (Removed Heart with Design Studio)

The following papers were used:

Scrap paper for wood background.

Light brown for gears background and went around edges with Walnut Stain Ranger Tim Holtz Distress Ink.

Greyish Blue was used for large scalloped label behind clock.

Newspaper cardstock for smaller scalloped label behind clock and went around edges with Walnut Stain Ranger Tim Holtz Distress Ink.

For the inside of the card:

Todd Valetine 2015

I stamped the images using Memento Tuxedo Black ink and Peachy Keen stamps from PKS-04 April 2012 for the clocks and sentiments. Cutting them after they were coloured.

The faces are from PKS-1357 Sweet on You Face Assortment.

Background paper is from K&C Company Kelly Panacci designer paper, KP  Valentine.

Copics and Spectrum Noir pens to colour faces and hearts in background.

Some pink chalk to colour cheeks.


Boo’s Valentine Card


This was Boo’s Valentine card to the vet this year. I make cards for all occasions for her vet.

This is a little late getting posted, but I thought I would share it with you anyways.

To make this easel card, I used my Cricut Explore to cut the heart out of the cardstock and the really adorable cat from Miss Kate Cuttables.

The cat was a free svg download from http://www.misskatecuttables.com/.

It can be found here: http://www.misskatecuttables.com/products/animals-pets/freebie-of-the-day-cute-valentine-kitty.php

I altered the pattern to give my cat pink paw pads and a tail that was all black.

The sentiment is from Peachy Keen stamps PKS-13 January 2103.

Boo V card

Above is a close up from my scanner of the finished image.

IMG_20150213_072807

This was taken with my phone to show how it stands as an easel card.

Materials used: Light and hot pink cardstock. Black, light and medium grey cardstock. Miniature green gems for the eyes. Background paper from K&C Company Kelly Panacci designer paper, KP  Valentine. Inkssentials Glossy Accents for the nose. A small piece of hot pink ribbon.