Tag Archive | Cricut Explore

Reindeer and Duck Christmas Cards


Hi There,

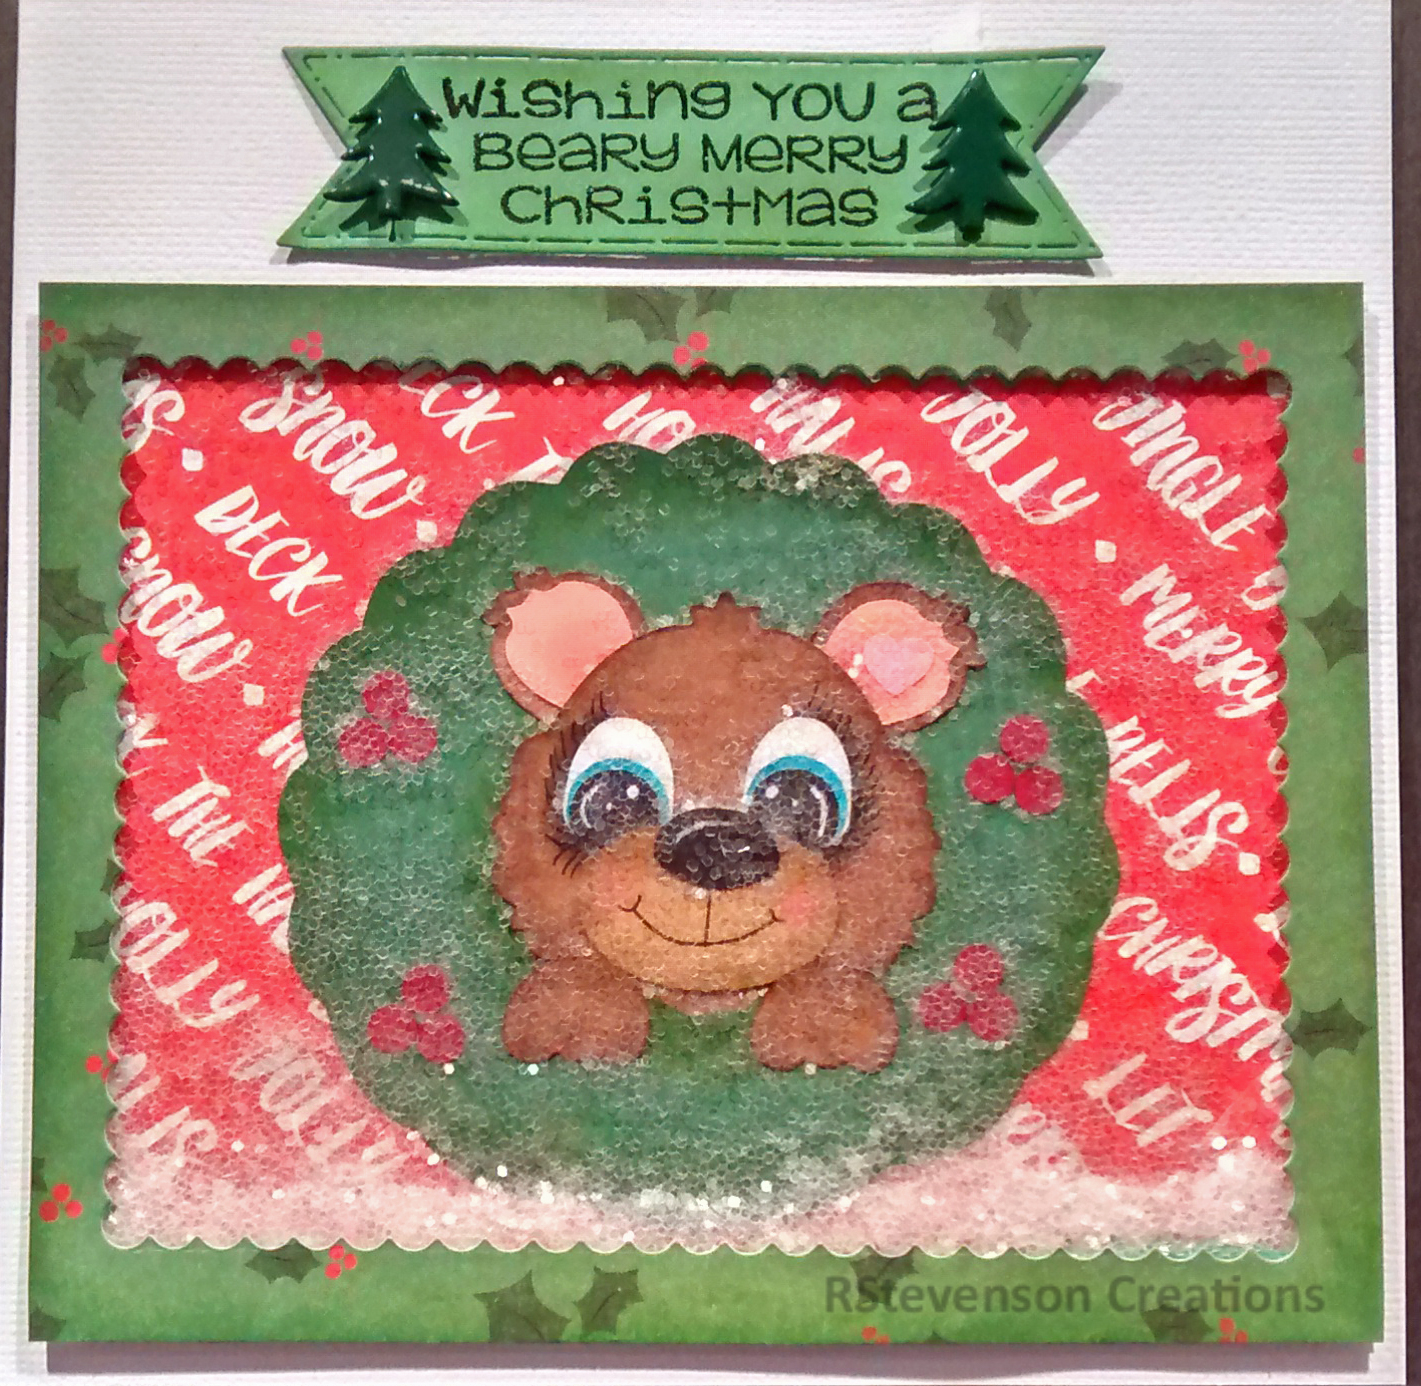
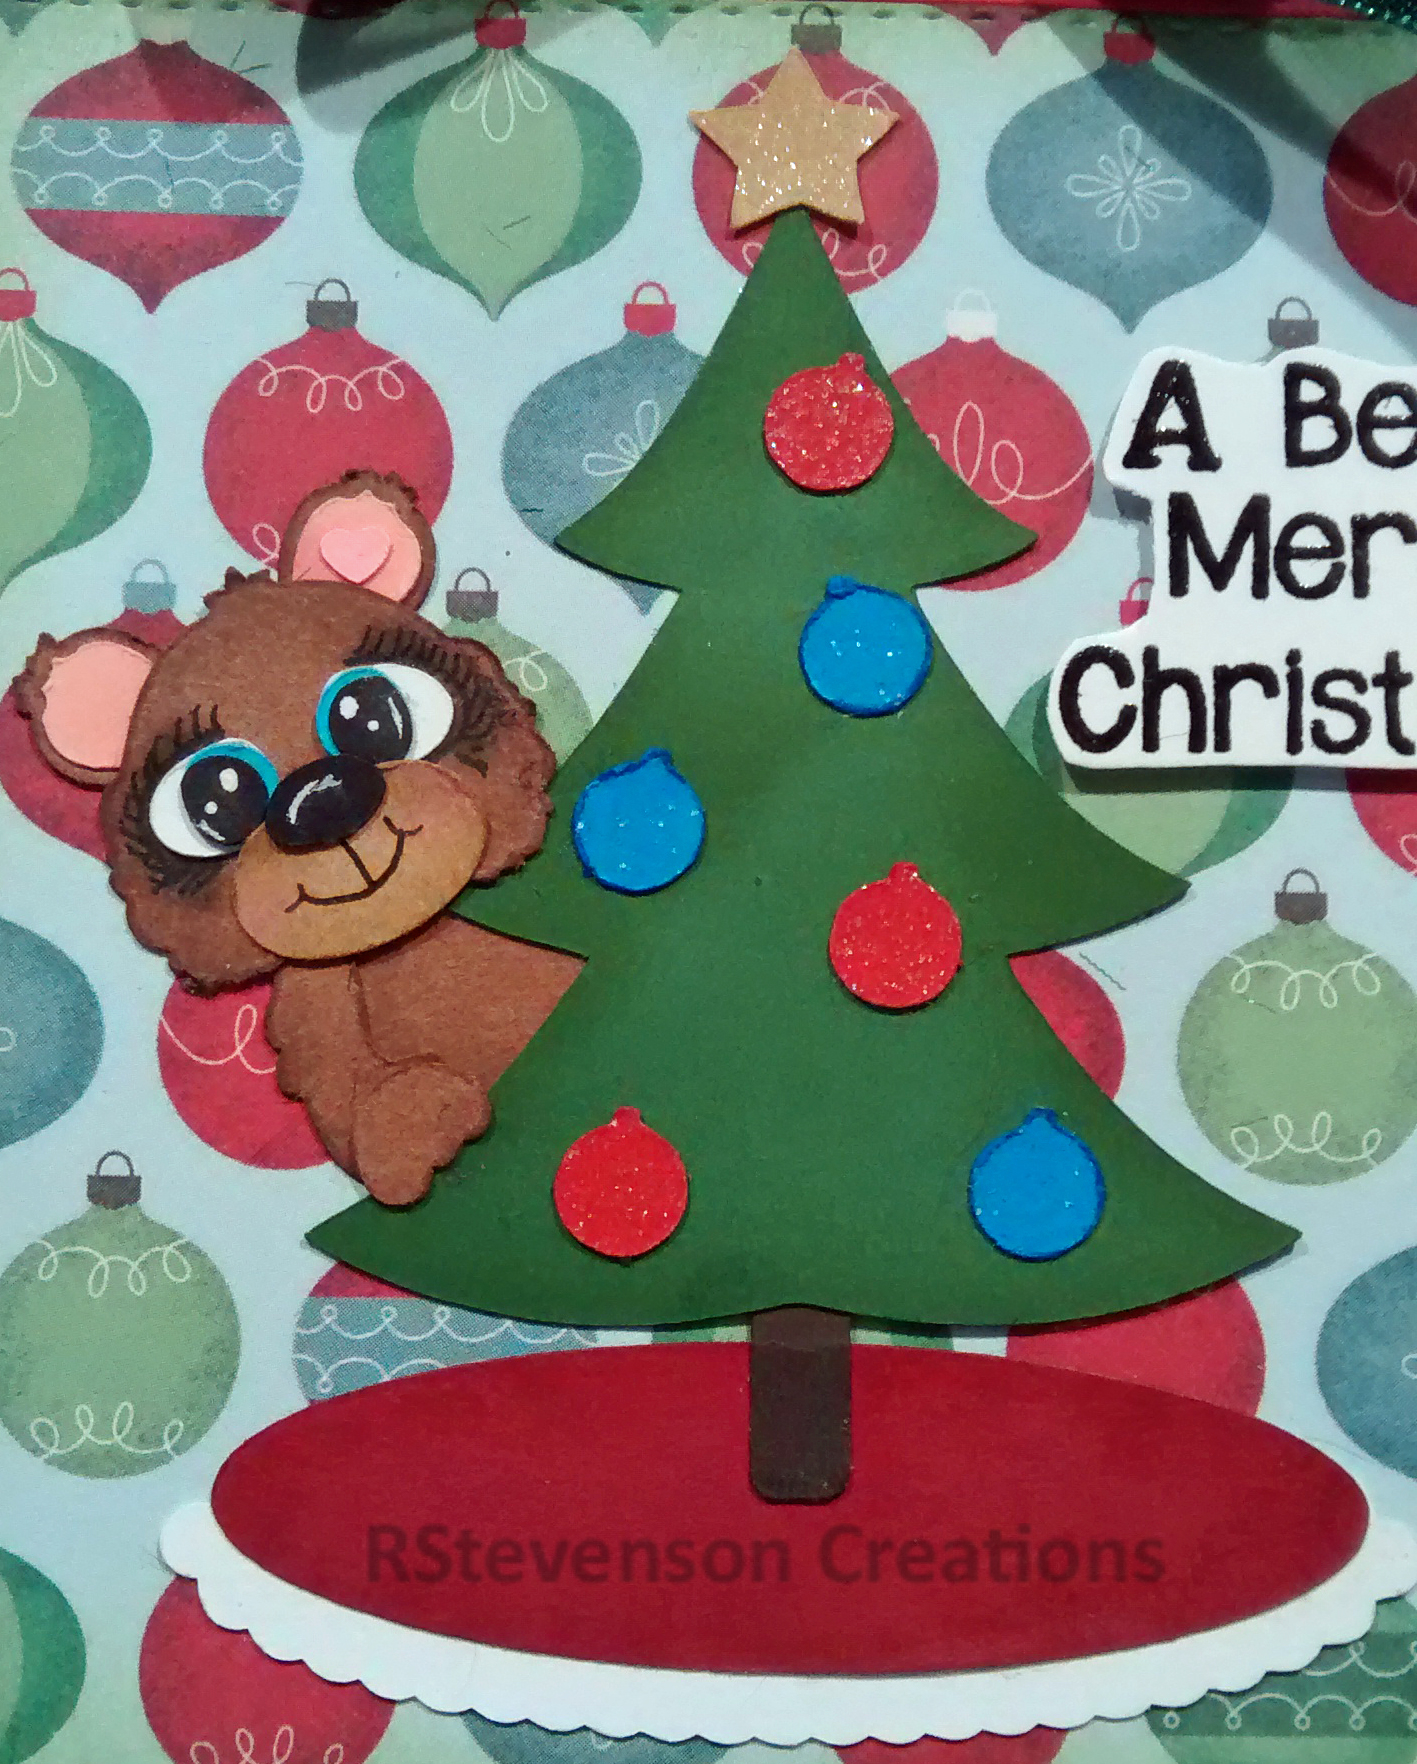
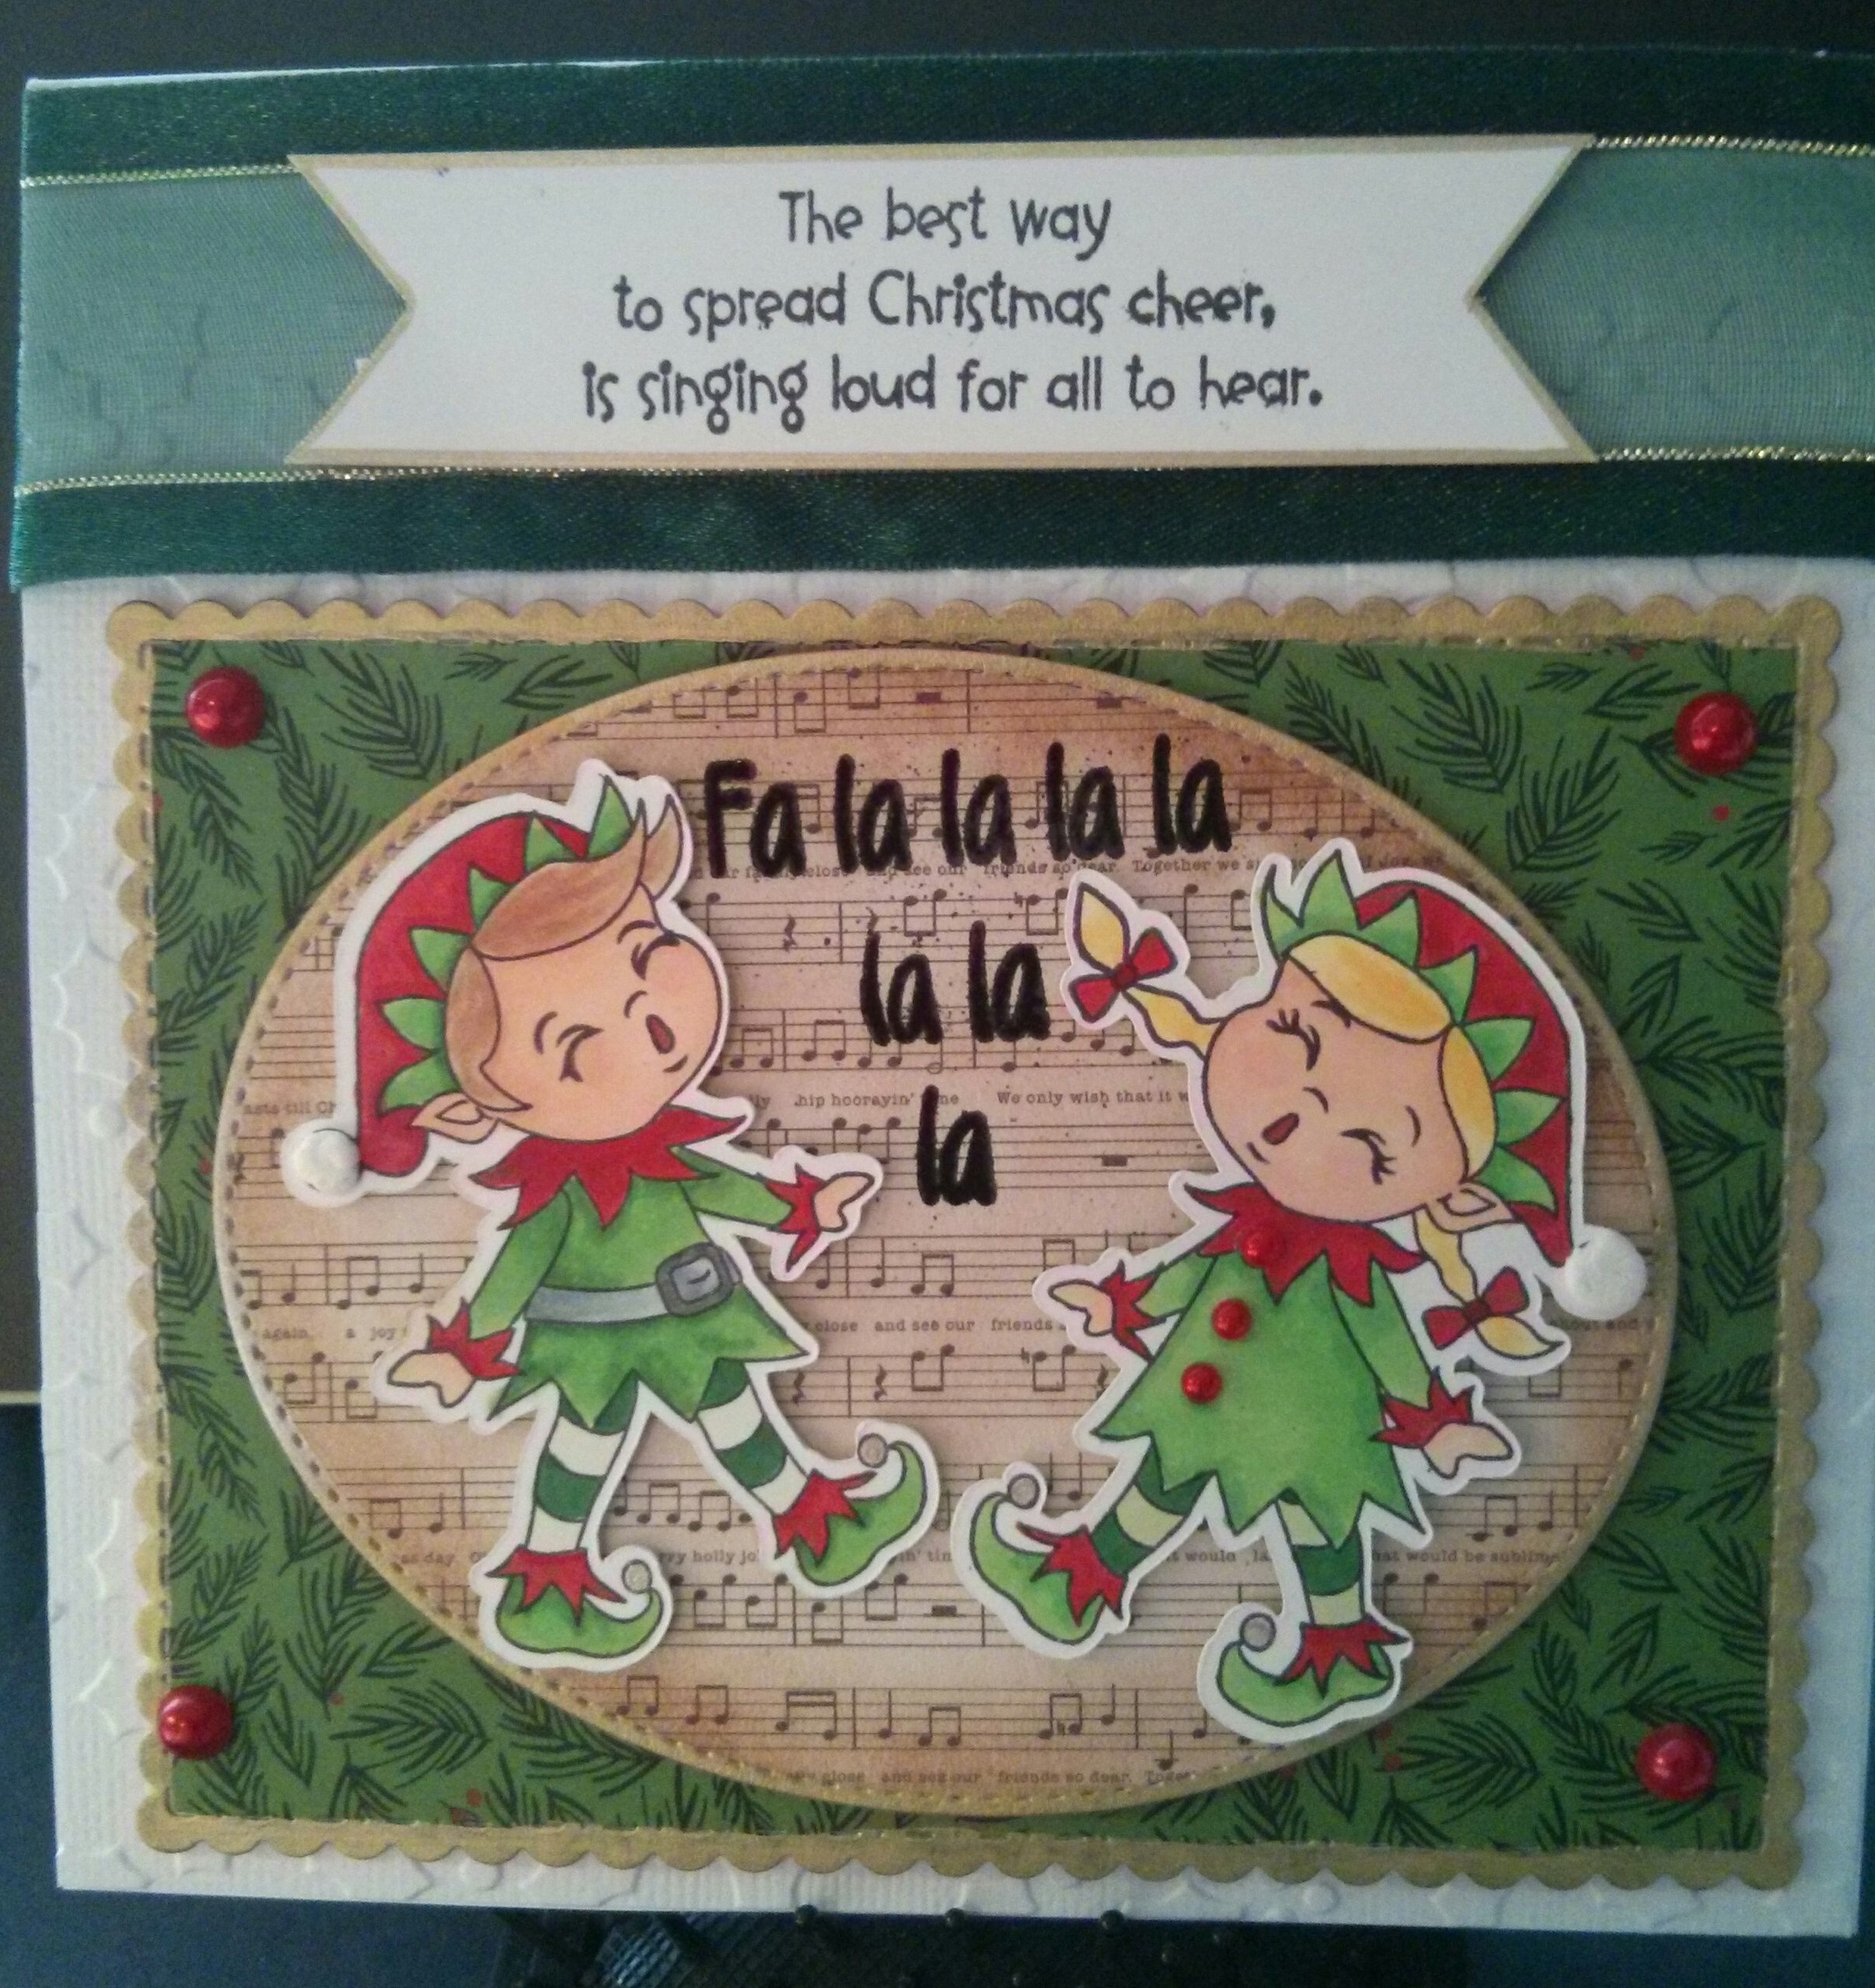
Sharing a couple of cards made from Too Cute By Jessica – Christmas Animals SVG Cuts designed by Jesssica Owens 2014.

Using my Cricut Explore and Cricut Design Space, I uploaded the images and then cut the pieces out for the little animals.

Reindeer

Here is a close-up of the image:

Reindeer-CU

For the eyes on both cards, I used Gelly Roll Sakura #8 Pen and General’s Charcoal White 558 Pencil, black chalk for the shadow and Pigma Micron 01 black marker for the eyelashes.

For the background snow, I used White Permanent Chalk Marker on blue cardstock.

The background papers are from Pebbles – Home for Christmas paper pad – 36 papers- 6 x 6 in (15.2 x 15.2 cm).

My Creative Time – Scalloped Stitched Oval Dies were used for framing the deer.

For the mound of snow I used Recollections – Christmas Inkjet Printable Glitter Paper – 8.5 x 11″ and Lawn Cuts – Simple Stitched Hillside Borders – Lawn Fawn.

Ribbon banner is from Craftin Desert Diva’s –  “Flag Banner Dies”

Sentiment – My Creative Time – Prehistoric Holidays Stamp Set.

Using the same die cut set, I also made this cute little duck card.
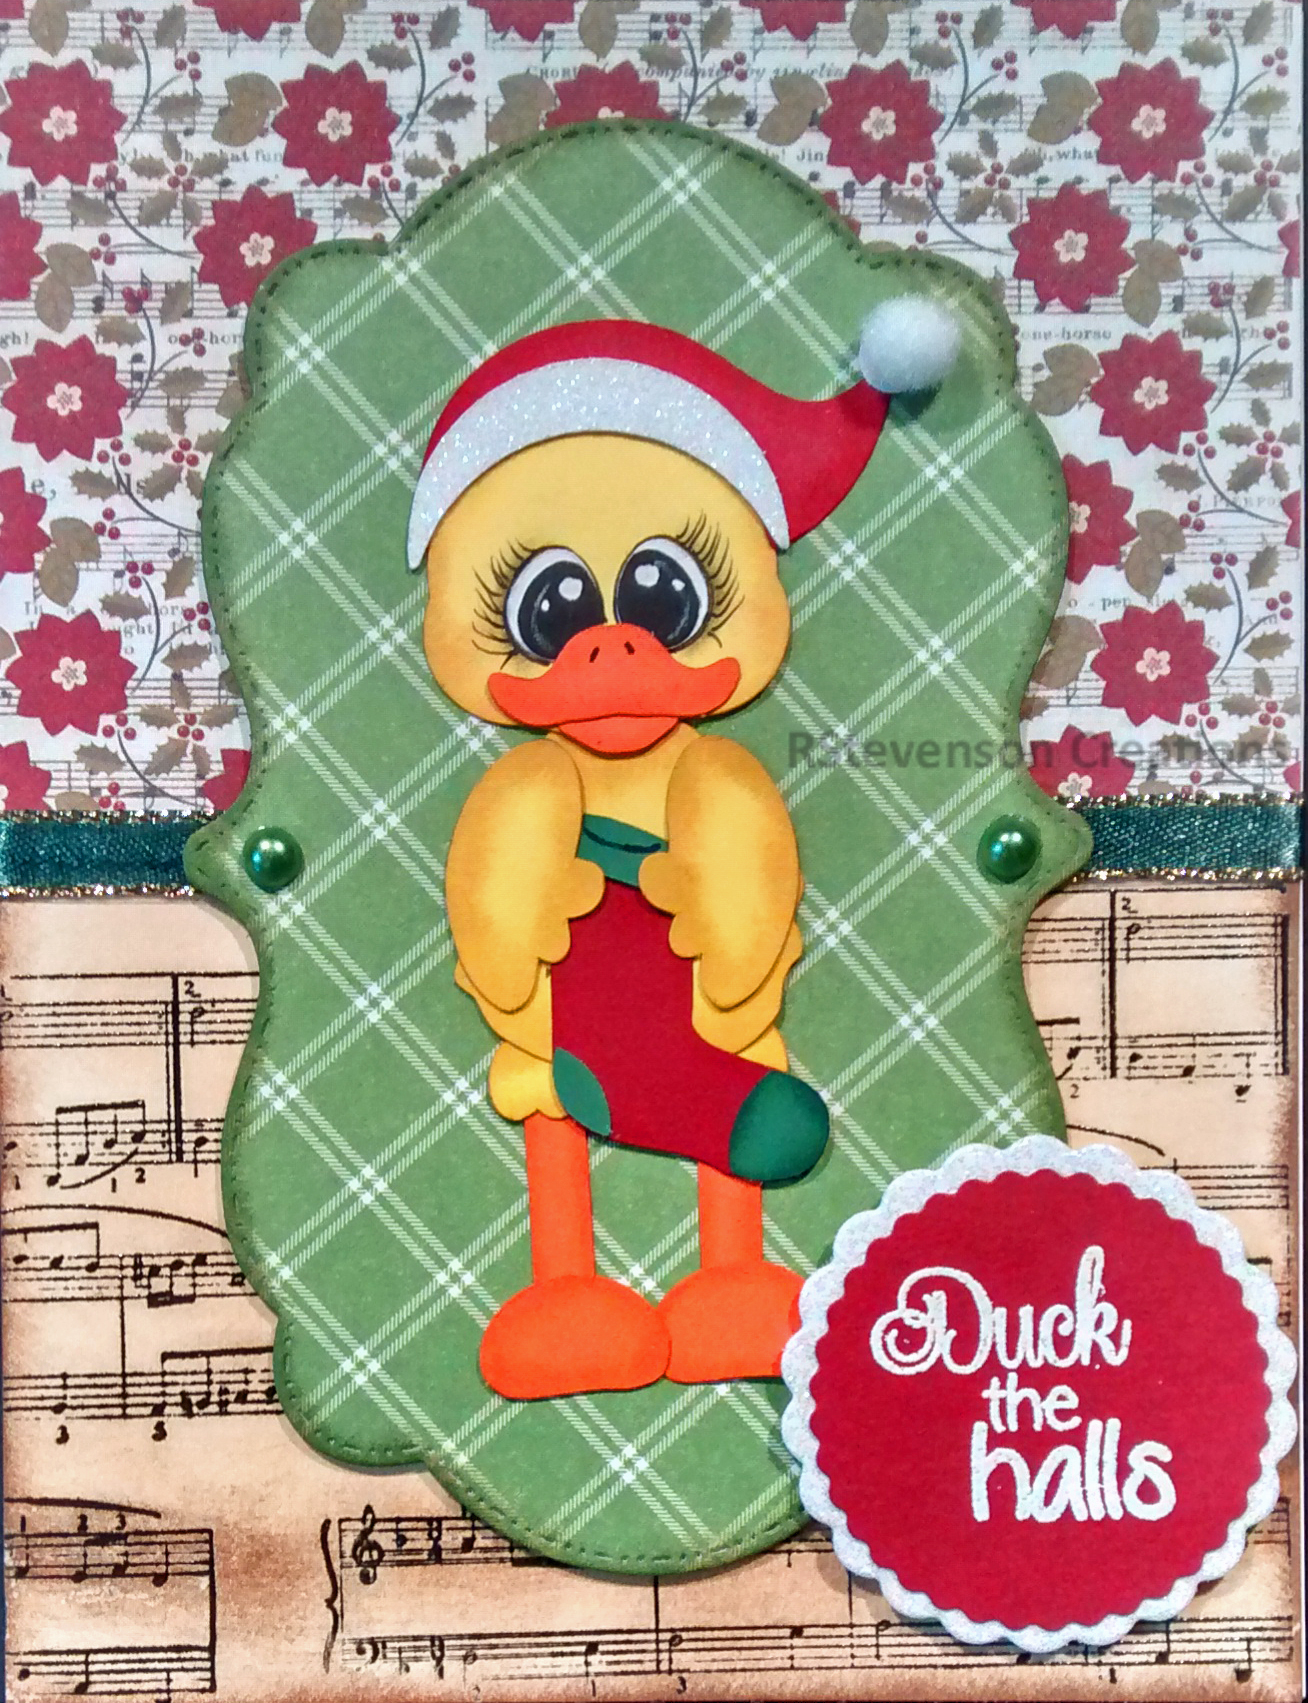
Xmasduck

Here is a close up:

Xmasduck-CU

For the music background paper, I stamped the musical notes with Recollections – Capturing Special Memories wooden stamp, Versa Fine – Onyx Black and Ranger – Clear Super Fine Detail embossing powder. Then I inked up the paper with Tim Holtz Distress Ink – Vintage Photo.

The patterned paper behind the duck is from American Crafts – “Holiday” 6″ x 6″ (15.2 x 15.2 cm).

The patterned paper above the musical notes is from Heidi Swapp – HS01073 – 6″ x 6″ (15.2 x 15.2 cm).

Sentiment – Craftin Desert Divas’s – Holly Day Punnies – VersaMark ink and Ranger Embossing Powder White – Extra Fine Detail.

Die Cuts used – Craftin Desert Diva’s – Fancy Stitched Label Dies.

Hope you like them!


Carousel Card


Hi There,

Stopping by to share a carousel card that I made using Too Cute by Jessica .svg cuts from Scrapbooking Mice – Jessica Owens 2016 and HB2U Car – Jessica Owens 2015.

I wanted to make a unique and different card using the Scrapbooking mice, so I decided to make it a step-by-step card using a carousel look.

Used largest die from Marianne Design CR1236 to make doilies for joining papers to make the carousel.

Here a few different views of the card.

Front – Closed and side view.

Carousel-Card-Front-with-Bo carousel-card-side-view

Open view – looking down.

Car-Card-OpenCarousel-TopViewCar-Top-Angle

Here are the steps on how I put this card together in more detail.

Uploaded all files into Cricut Design Space and then cut out pieces with Cricut Explore.

Front of card – HB2U Car.

Balloons from Craftin Desert Diva’s Party Dies. Balloon strings from My Creative Time – Stitched Circle Balloon Dies.

Background paper from Echo Parks Paper Co. – Birthday Wishes by Alisha Gordon – 6″ x 6″ Paper Pads.

HB2U-bear

All instructions – Typed out on laptop in word and then printed out. Die cut backgrounds using Craftin Desert Diva’s Fancy Frames. Smallest die cut from Your Next Stamp – Stitched Rectangle Die Set – (YNSD214) All highlights on eyes and nose are done using Gelly Roll Sakura #8 Pen.

Background frames for all Mice are from Cricut. Background papers are all from Doodle Bug Designs Inc. – Sugar Shoppe – 6″ x 6″ paper pad.

Stage 1 of Carousel. Mouse #1.  Put together.

Car-Step1

Stage 1 of Carousel. Mouse #1.  Separate pics before joining together.

Carousel-P1    Carousel-P2

Here is a close up of Mouse #1.

Carousel-P2-CU

Stage 2 of Carousel. Mouse # 2.  Put together.

Car-Step2

Stage 2 of Carousel. Mouse #2.  Separate pics before joining together.

Carousel-P3

Carousel-P4


Here is a close up of Mouse #2.

Carousel-P4-CU

Stage 3 of Carousel. Mouse #3.  Put together.

Car-Step3

Stage 3 of Carousel. Mouse #3.  Separate pics before joining together.

Carousel-P5

Carousel-P6

Here is a close up of Mouse #3.

Carousel-P6CU

Stage 4 of Carousel. Mouse #4.  Put together.

Car-Step4

Stage 4 of Carousel. Mouse #4.  Separate pics before joining together.

Carousel-P7

Carousel-P8

Here is a close up of Mouse #4. Carousel-P8-CU

Hope you like it!

 Entered into contest: http://cutitupchallenges.blogspot.com/2016/07/cut-it-up-100-anything-goes.html.

Winter Polar Bear


Hi There,

Thought I’d share another Christmas card that I just finished for this year. Only about 45 more to go!!!!

PolarBear-TCBJ

To make this card I used the .svg cut from Too Cute By Jessica called Winter Polar Bear – Designer Jessica Owens 2015 and cut it out on my Cricut Explore after I finished uploading the image in Cricut Design Space. Used Sharpie Water Based Paint – White – Extra Fine Point, General’s Charcoal white for the eyes and Pigma Micron 03 black marker for the eyelashes.

Added some Clear – Wink of Stella on the red portion of the candy cane and  Wink of Stella – Glitter White on the white pieces.

Ranger Stickles Yellow Glitter Glue for the centre of the pointsettia.

Here is a close-up of the bear.

PolarBearCUp-TCBJ

All patterened papers are from Pebbles – Home for Christmas paper pad – 36 papers- 6 x 6 in (15.2 x 15.2 cm).

Inked around the edges with Tim Holtz Distress Ink – Pine Needles and Memento Dew Drop – Lady Bug ink.

Sentiment is from Popcorn the Bear – Christmas Collection. Also used Craftin Desert Diva’s – Flag Banner Dies. Stamped sentiment with Versamark and then used Ranger Embossing Powder White – Extra Fine Detail.

My Creative Time – Scalloped Stitched Oval Dies were used for framing the bear.

Hope you like it!


Birthday Card for Brother


Hi There,

Sharing a card that I made for my younger brother’s birthday. I typed the sentiment for the front on my computer and printed it out.

The image is from Sassy Studio Designs – Sassy Police Officer. Printed it out on my computer and used Spectrum Noir Markers to colour it in.

Sassy-BirthdayBoy

Here is a close up:

Sassy-BirthdayBoy-CUP


For the road, I used My Creative Time – My Creative Time – More Stitched Edges.

Then I created the white lines using – Sharpie Water Based Paint – White – Extra Fine Point.

For the frame around the image, I used Craftin Desert Diva’s Fancy Frames.

For the frame around sentiment, used Craftin Desert Diva’s – Fancy Stitched Label Dies.

Clouds are made using Avery Elle – Custom Steel Dies – Made in the USA – D-05-01 Pierced Clouds Die and Tim Holtz Distress Ink – Salty Ocean.

Added in background birthday paper and some Birthday sequins to finish it off.

My brother like it, hope you do to!


Beary Merry Christmas Bears


Hi There,

Just getting an early start on this years Christmas cards. I make over 40 cards every year!

All cards are made using Too Cute By Jessica – Little Lovelies A Beary Merry Christmas. .svg design is by Jessica Owens.

I uploaded the patterns for the bears into Cricut Design Space and cut using my Cricut Explore.

Inked all of the edges for the bears and accessories and then ran the pieces through my Xyron’s for easy assembly. Highlighted the eyes with Gelly Roll Sakura #8 Pen.

For the first bear, sentiment was stamped using Versa Fine – Onyx Black and Ranger – Clear Super Fine Detail embossing powder. Sentiment is from Jaded Blossom – Season’s Tweetings.

Used Craftin Desert Diva’s – Flag Banner Dies. I ran the die half way through my Big Shot and then turned it around to get the ribbon edge on both sides.

Patterned Paper – American Crafts – Merry and Bright 6 x 6″ pad and American Crafts – Holiday 6 x 6″ pad. The top patterned paper was cut out using Craftin Desert Diva’s Fancy Frames. I also used the same die for the foam used to make this a shaker card. Filled the shaker card with Creatology Glitter.

BearyMerry1

Here is a close up:

BearyMerry1_CUP

For my second card, I used American Crafts – Peppermint Express 6 x 6″ paper pad and May Arts Ribbon.

Highlighted ribbon on bear and present with Wink of Stella – GL Green 040.

Edged  around large present with Tim Holtz Distress Ink – Mowed Lawn.

Sentiment is from the same .svg file.

BearyMerry2_CUP2

Here are a couple of close ups:

BearyMerry2_CUP2     BearyMerry2-CU

For the last bear, I used the paper from American Crafts – Peppermint Express 6 x 6″ paper pad as well. I inked around the edges with Tim Holtz Distress Ink – Mowed Lawn.

Put the green paper from Craft Smith Green through Cutttlebug using Snow Dots Embossing Folder.

Squares cut out with My Creative Time -Stitched Squares Inside and Out.

Sentiment from Craftin Desert Diva’s – Holly Day Punnies.

Bow – May Arts Ribbon.

BearyMerry3

Here is a close up:

Beary-Merry-CUP-3

Hope you like them!


Birthday Bears


Hi there,

Back to share a card that I made using Too Cute By Jessica Bears from  Too Cute by Jessica – Birthday-Girl-Bears

and Too Cute by Jessica –  Birthday Boy Bears for my Aunt’s birthday.

Sentiment on front of card is from JadededBlossom stamps “Party Animal”.

Dotted eyes with Gelly Roll Sakura #8 Pen. Used Wink of Stella – Clear on the pompoms and on the base of hat to add some extra sparkle.

I made the card so that the 2 front panels opened up to reveal the sentiment.

Here are some close-ups.

GirlBDyBear BDBoyBear

The bears were really fuzzy, but I put them through the Xyron, so they look a little bit scruffy. LOL! I still like how they turned out though. Hope you do too!

My aunt really loved her card. Made me very happy!

I used Cricut Design Space and my Cricut Explore to cut out all of the pieces. For the bears, I used the scoring tool and mulberry paper. Then I just outlined the pieces so that I could see them better. Wet around the outlines and pulled my bear pieces apart to make them fuzzy. Added some brown chalk to give the edges some added dimension.

On the inside, I added this sentiment from  “Whatnot Sentiments Set Three – Your Next Stamp”.

AVInside

Hope you like it too!!!

Graduation Card


Hi There,

Sharing a graduation card that I made using Too Cute By Jessica – Graduation Pals.

Boy-Graduate

I thought this file was so cute! Used Cricut Design Space and Cricut Explore to cut out the pieces. Then ran everything through my Xyron. Used some inks to ink the edges and put the card together on blue Recollections Card Stock. Lost his little nose somehow after I had cut it out! LOL! So, I used the cut out to draw it in with my Zig marker and then drew him a little mouth.

Used pink chalk for the cheeks.

The sentiment is from My Creative Time – Happy Everything Stamp Set. Used Versamark – Onyx black and then Ranger – Clear Super Fine Detail embossing powder for “graduation”.

Used Gelly Roll Sakura #8 Pen for the eyes.

Hope you like it!

Hubby Easter Card


Hi There,

Back again to share the Easter card that I had made for my husband from me and our cat “Boo”. He loved it!!!

I made the card using Too Cute by Jessica Hallowe’en Cats by Jessica Weible Illustrations, LLC. and DoodleBug Ballerina by Faery Ink.

BooEasterFaeryInk

The faces on the cat was stamped with Memento – Tuxedo Black ink using Peachy Keen Stamps PK-110 Here Kitty Kitty Face Assortment.

The ballerina was coloured in with Spectrum Noir markers. Used Gelly Roll Sakura #8 Pen for the whites on the eyes.

Background paper is from Recollections Easter Printed Stock and also Cardstock Paper – All Seasons 6 x 6″ (15.2 x 15.2 cm).

Used My Creative Time -Stitched Squares Inside and Out to cut out the borders.

Hope you like it!

Boo’s Easter Card for the Vet – 2016


Hi There,

Back to share a card I made for Easter to our vet and his staff from our black cat Boo for this year.

I made the card using 2 files from Too Cute By Jessica – JS Spring Animals by JessicaSawyerDesign and Hallowe’en Cats by Jessica Weible Illustrations, LLC.

Here is the front of the card.

Bunny2


To create this card I uploaded the .svg files into Cricut Design Space and the used Cricut Explore to cut each of the images.

Here is a close up:

BunnyCU1

This is the inside of the card.

EasterBoo2

Here is a close-up.

EasterBooCup

Made the bunny ears by using Cricut Cartridge – Stretch your Imagination – Bunny with Basket – #M46835. Deleted basket and the spliced the ears with a circle.

Grass: Background Cricut Cartridge – Grass #M44E6A – Disney® – Mickey and Friends

Grass: Foreground – Cricut Cartridge – Border #M34848 – Paper Dolls for Everyday

Clouds – Avery Elle – Custom Steel Dies – Made in the USA – D-05-01 PiercedCloudsDie – Cut out clouds using the die and then used that as a stencil for the clouds.

Sky- Tim Holtz Ranger Distress Ink – Broken China

Bunny Face – Peachy Keen Stamps PK-440 Cute & Cuddly Face Assortment

Cat Face and Whiskers for both animals – Peach Keen Stamps PK-110 Here Kitty Kitty Face Assortment

White on eyes and across noses – Sharpie Water Based Paint – White – Extra Fine Point

Sentiment on Front – Cricut Cartridge – Zoo Day; Patterned Paper – #Summer Paper Pad by American Crafts 6 x 6″ (15.2 x 15.2 cm) for the colourful lettering.

Sentiment on inside: My Creative Time – MCT-245 – Ears To You, “Boo” – Peachy Keen Stams PK-131 Happy Haunting Ghosts

Various ink pads for highlighting characters.

Hope you like it and Happy Easter everyone!


Easter Card – Lamb


Hi There,

Back to share the first of some new Easter Cards that I made using Too Cute By Jessica – JS Spring Animals by JessicaSawyerDesign.


EasterLamb1

To create this card I uploaded the .svg files into Cricut Design Space and the used Cricut Explore to cut each of the images.

Here is a close up:

LambCUp

Easter Basket – Treasure Box Gems

Basket Weave – Lifestyle Crafts – Embossing Folder

Here is a close up:

TBG-Basket

Grass: Background Cricut Cartridge – Grass #M44E6A – Disney® – Mickey and Friends

Grass: Foreground – Cricut Cartridge – Border #M34848 – Paper Dolls for Everyday

Clouds – Avery Elle – Custom Steel Dies – Made in the USA – D-05-01 PiercedCloudsDie – Cut out clouds using the die and then used that as a stencil for the clouds.

Sky- Tim Holtz Ranger Distress Ink – Broken China

White on eyes and across noses – Sharpie Water Based Paint – White – Extra Fine Point

Texture for lamb’s wool – Cuttlebug and D’Vine Swirl

Sentiment – Cricut Cartridge – Ashlyn’s Alphabet Block; Patterned Paper – #Summer Paper Pad by American Crafts 6 x 6″ (15.2 x 15.2 cm) for the colourful lettering.

Various ink pads for highlighting characters.

Hope you like it and Happy Easter everyone!


Easter Chicken Card


Hi There,

Back to share the first of some new Easter Cards that I made using Too Cute By Jessica – JS Spring Animals by JessicaSawyerDesign

EasterChick1


To create this card I uploaded the .svg files into Cricut Design Space and the used Cricut Explore to cut each of the images.
Here is a close up.

EasterChickCUP

Egg – Cricut Cartridge – Create A Critter – Shell – #M44F2A

Grass: Background Cricut Cartridge – Grass #M44E6A – Disney® – Mickey and Friends

Grass: Foreground – Cricut Cartridge – Border #M34848 – Paper Dolls for Everyday

Clouds – Avery Elle – Custom Steel Dies – Made in the USA – D-05-01 PiercedCloudsDie – Cut out clouds using the die and then used that as a stencil for the clouds.

Sky- Tim Holtz Ranger Distress Ink – Broken China

White on eyes and across noses – Sharpie Water Based Paint – White – Extra Fine Point.

Flower – Crafts – Fabric Flower Embellishment Kit 02-3001702 from Dollarama.

Sentiment – Cricut Cartridge – Ashlyn’s Alphabet Block; Patterned Paper – #Summer Paper Pad by American Crafts 6 x 6″ (15.2 x 15.2 cm) for the colourful lettering.

Various inks to ink around characters.

Hope you like it and Happy Easter everybody!


Easter Bunny Card


Hi There,

Back to share the first of some new Easter Cards that I made using Too Cute By Jessica – JS Spring Animals by JessicaSawyerDesign.

I have clouds in the background, but they aren’t showing up that great, unfortunately.

Easter3

To create this card I uploaded the .svg files into Cricut Design Space and the used Cricut Explore to cut each of the images.

Other images used were:

Easter Basket: Miss Kate Cuttables

Basket Weave – Lifestyle Crafts – Embossing Folder

Sentiment: Cricut Cartridge –  happy easter – #M41FC1 – Phrases

Grass: Background Cricut Cartridge – Grass #M44E6A – Disney® – Mickey and Friends

Grass: Foreground – Cricut Cartridge – Border #M34848 – Paper Dolls for Everyday

Eyes for Rabbit and Nose – Gelly Roll Sakura #8 Pen, Zig Writer – Baby Pink

Mouth: Zig Writer – Rose

Face – Peachy Keen Stamps PK-440 Cute & Cuddly Face Assortment

Whiskers – Peach Keen Stamps PK-110 Here Kitty Kitty Face Assortment

Here are some close ups:

BunnyCU2   BunnyCU1  BunnyCU3

Hope you like it and Happy Easter Everybody!

Birthday Party Hat


Hi There,

Back again to share a card that I made using one of last week’s Kadoodle Bug Designs Party freebies .svg’s called Party Hat Cutie by Melissa Deuss 2016.

KBBDCard

Here is a close up:

KB-BD-Closeup

To make this I uploaded the image into Cricut Design Space and used my Cricut Explore to cut out the images. Inked around all of the edges and then ran the pieces through my Xyron’s. Makes it so much easier to put the pieces together. LOL!

The background paper is Forever In Time Paper Craft Collection – Cupcake Craze, which I picked up from our local dollar store. I just love how it went with this card.

The lettering is from Forever in Time Scrapbook Collection – Sticker Trendz – SS460A.

I cut out the borders with Craftin Desert Diva’s Fancy Frames. This has to be one of my favourite cutting die sets that I own.

My Creative Time: Fun Vertical Greetings were used for the frames around the wording! I really love this set too!

I dotted the eyes using Gelly Roll Sakura #8 Pen. Lastly, I added in a little bit of  Craftin Desert Diva’s – Posies sequins.

Hope you like it!

Entered into Kadoodle Bug Designs March Challenge which can be found here: https://www.facebook.com/media/set/?set=oa.583318385160550&type=1


Kitty – Birthday Card


Hi There, Sharing a birthday card that I made for my sister-in-law, who’s name is “Kitty”. I thought Candio – SVG Cuts from the Miss Kitty blog hop would be perfect for her birthday. This .svg was only available during the blog hop.

KittyBDCard2016

I uploaded the file to Cricut Design Studio and cut out the image on my Cricut Explore. I inked around the edges of the kitty with Baby Blue Chalk ink.

The dress, sleeves and bow were inked with Dew Drop Memento – Rose Bud ink.

The sentiment is from “My Creative Time – You Had Me At Meow” stamp. Stamped with  VersaMark – Onyx Black and then embossed with Ranger – Clear Super Fine Detail embossing powder.

The balloons were cut out with my Cuttlebug and Craftin Desert Diva’s – Party Dies onto watercolour paper. I coloured the balloons with Talons Transparent Watercolours. Stamped the image on the top balloon with face from Peachy Keen Stamps – PKSC – 33 September 2014 with Memento – Tuxedo Black.

Used Gelly Roll Sakura #8 Pen for the eyes on the balloon and Candio. Also on the bow.

Then cut a small whole into the balloons and added some twine from American Crafts – Premium Ribbon.

The borders were cut with a combination of Craftin Desert Diva’s Fancy Frames and My Creative Time -Stitched Rectangular Frames and More. Used 3M VHB – 2 sided tape between the layers of the base card. Hope you like it!

Also entered into: http://svgcuttingfiles.blogspot.ca/2016/02/monthly-challenge-crafters-choice.html


St. Patrick’s Day


Hi There,

Like to share a card that I made for St. Patrick’s Day.

The file is from Too Cute By Jessica – Lucky Leprechauns

Lucky Leprachauns

Outlined hair – Classic Stampin Pot – Stampin’ Up – Tangerine Tango

Sky – Classic Stampin Pot – Stampin’ Up – Tempting Turquoise

Clouds – Used as a template – Craftin Desert Diva’s – Outdoor Landscape Dies

Pot of Gold Coins – Recollections – Gold Glitter Paper Roll

To outline various parts on the characters, I used various colours of chalk. Eyelashes were done with Pigma Micron 03 Archival Ink Pen. Eye highlights with Gelly Roll Sakura #8 Pen.

Buttons – Sakura Glaze – Black

Grass – Shamrocks from – Cricut Cartridge – A Child’s Year. “St. Patrick’s #M2F10F”. I inserted the image into Cricut Design Space and then ungrouped the image and deleted all parts except for the Shamrock. I then did a copy and paste twice. Making the shamrock into various sizes. Next, I copied and pasted all 3 images twice more. Then printed out to the Cricut Explore telling it to print the image 8 times.

Used my Xyron Creative Station  and Xyron Create a Sticker to for all of the pieces to make it easier to put everything together.

Paper – Watercolour paper.

Bears – SG Hugs and Kisses Bear


Hi There,

Like to share a special card I made for my dear sweet husband. I’ve been very sick over the past couple of weeks and he has been taking great care of me. Love him so much!

When we were married our theme was bears. So I thought this card was perfect.

I’ve included 2 images. The first image is before I put the shaker card together. The second image is the completed card.

BearyMuchFrt_300 dpi  BearyMuchFrt4_300 dpi

The bears are from Too Cute by Jessica – SG Hugs and Kisses Bear by Saskatoon Graphics.

I uploaded the bear into Cricut Design Space and then copied it and made a mirror image. For the girl bear I added a little bow. Cut the designs out with my Cricut Explore.

For the sentiment and lips and hearts on the background, I used Peachy Keen Stamps – PKS-13 January 2013.

I stamped the sentiment first with VersaMark and then embossed with Ranger – Super Fine Detail Clear.

Sequence is from Craftin Desert Diva’s – Heart Breaker.

Heart patterned paper is from K&C Company – KP Valentine.  Kelly Panacci.

Highlights on the eyes were done using Gelly Roll Sakura #8 Pen.

Craft foam was also used to make the shaker card.

Used Cricut Design Space and my Cricut Explore to create the window and frame border for the shaker card.

I am also happy to announce that I am now a Designer for Too Cute By Jessica. YAY!

It’s still not too late to join the current challenge. http://toocutebyjessicadt.blogspot.ca/2016/02/valentines-day-challenge.html


Panda Birthday Card


Hi There,

Back to share a card that I made for a dear friend of mine that loves Pandas.

PandaBDFrnt PandaBD-In

The pandas are from “Too Cute By Jessica – Cuddly Pandas”. As soon as I saw them, I knew I had to use them for her card.

I uploaded the svg’s to Cricut Design Space and cut the images with my Cricut Explore. Added some white chalk around the edges where it was black on black. For the white’s on the pupils, I used Gelly Roll Sakura #8 Pen.

I made the sky on the front with Craftin Desert Diva’s – Stitched Scallop Dies and using Stampin Up Baja Breeze and Pacific Point mini ink pads on watercolour paper.

The ground is made using Craftin Desert Diva’s – Outdoor Landscape Dies. I think this is one of my all time favourite dies.

The sentiments are from: Stampendous Clear Stamps – Birthday Wish

Bamboo stamp in background is from All Night Media.

The balloons are cut from birthday paper filled with balloons. I cut 3 out and layered them. Then I added a little bit of twine.

The hat is from Cricut – Sweet Treats Cartridge.

Hope you like it!


Valentine’s Day Card for my Hubby


Hi There,
Back again to share a Valentine’s card that I made for my wonderful husband of 25 years.
Love Bug Front   Card open

To make the shape of the card, I used Cricut Design Space and then cut the card layout and all of the images using my Cricut Explore.
I made the card 6″ x 6″ and cut 2″ off either side of the panels so that they would come together to make the front of the card.
I adhered the 2 (4″ x 3″ panels rectangles on both sides). I also used Cricut Design Space to cut the hearts directly in half so I knew they would match up on the front.
I duplicated the large hearts while they were still together and used them on the inside. The large hearts are both part of the Cricut Craft Room Basics.
The “Happy Valentine’s Day” is from Cricut – “Phrases” cartridge.

Love Bugs are all from Miss Kate Cuttables.
Valentine LadyBug Boy, Valentine Ladybug and Love Bug Title.

Here’s a closer look.

Girl Bug Mail Bug

Inside Bug

Paper background is from K@Company 12 x 12″ Designer Paper.
Wording is from Cricut – “Baby Steps Font”.

For the final touch, I added a some Clear “Wink of Stella” on the Lady and some of the hearts.
Hope you like it!

Entered this card into “Miss Kate Cuttables Galleria – January Challenge.”

Also entered into “https://www.facebook.com/groups/CricutLoversGuide/permalink/865475223573693/” – Cricut Lovers Guide to Design Space.

And: http://www.craftindesertdivasblog.com/2016/01/craftin-desert-divas-shaped-card-linky.html


Singing Elves


Back to share a couple of singing elves cards that I made.

Singing Elves1

Singing Elves2Here is a closer look.

Singing Elves Close Up

Used my Cricut Explore and Cricut Design Space to cut out the images for the elves using an .svg cut supplied by Peach Keen stamps when I purchased the set.

Stamped the images with Memento Tuxedo Black ink.

The elves and sentiment are from:

Peachy Keen Stamps – PKSC-31 July 2014.

I coloured them in with a mixture of my copic markers and Spectrum Noir Markers.

The “Fa la la la la” is heat embossed with VersaMark and Ranger Super Fine Detail Embossing Black Powder. Stamp is from Craftin Desert Diva’s “Rudy”.

Oval frame if from: Die-namics – Exclusive Designs for “My Favourite Things”.

Scalloped frame is from Craftin Desert Diva’s – Fancy Frames.

Gold around frames – Sharpie – Gold Medium Point.

Around oval – Tim Holtz Distress Ink – Vintage Photo.

Paper – Music – Pebbles – “Home for Christmas”

6 x 6 in. (15.2 cm x 15.2 cm)

1st card – Background paper – American Crafts – “Holiday”

6 x 6 in. (15.2 cm x 15.2 cm)

2nd card – Background paper – American Crafts – “Kringle and Co”

6 x 6 in. (15.2 cm x 15.2 cm)

White cardstock and some green and gold ribbon.

Hope you like it!


Cricut Snowman and Reindeer


Hi there again,

Cricut Snowman and Reindeer3


Made this card to enter into Kadoodle Bug Challenge.

To make my card, I used Cricut Design Space and Cricut Explore.

The .svg files for CK Cricut Snowman and CK Cute Little Deer are from Kadoodle Bug Designs.

Trees are from Miss Kate Cuttables.

Made the snow on ground with Craftin Desert Diva’s – Outdoor Landscape Dies and Recollections Christmas Ink Jet Printable Glitter Paper. Aleene’s Glitter Snow below snowman and reindeer.

Falling snow – Craftin Desert Diva’s – Across the Borders stamp and Ranger White Embossing Powder – Super Find Detail.

Background – Watercolour paper, Tim Holtz Distress Inks – Tumbled Glass, Peacock Feathers, Broken China and Shaded Lilac.

Background paper – American Crafts – Wish List Paper pad, 6×6 in. (15.2 x 15.2 cm)

Sentiment – Craftin Desert Diva’s – Polar Pals.

My Creative Time – Stitched Squares – Inside and Out.

Hope you like it.

Entered into contest – KBD Challenge.