Today I’m sharing a birthday card that I made for my manager who is an avid hunter using Art Impressions – Ole Buck Set.
AC White cardstock was used to create a 6″ x 6″ card base. I cut Creative Memories – Hot Fudge paper to the size of (6″ x 6″) and (3.75″ x 3.75″). Using the same paper, and my Cuttlebug, I die cut the larger circle using My Creative Time – Little Gift Tags – 1.25″. Photo-Play – Camp Happy Bear paper was cut to the size of 5.75″ x 5.75″. My Creative Time -Stitched Squares Inside and Out was die cut with my Cutttlebug to the size of (3.5″ x 3.5″ ) and a (1″) Circle using a circle punch from Copic Marker X-Press It Blending Card.
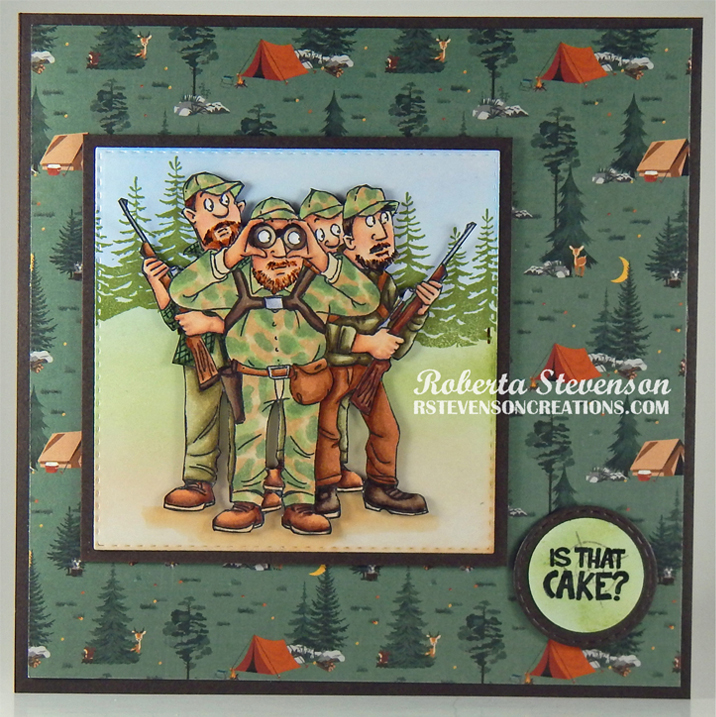
Using a MISTI and Memento – Tuxedo Black, I stamped the image onto the Copic paper. For the circle, I first stamped the Bull’s eye with Tim Holtz Distress Ink – Pumice Stone and then over top of this, I stamped the sentiment with Versa Fine – Onyx Black ink and then applied Ranger – Clear Super Fine Detail embossing powder. This was then heat embossed with a Marvy Uchida – Embossing Heat Tool and set aside.
To create the background, I first applied the blue sky using a blending brush that still had some blue ink on it from another project. Using Tim Holtz Distress Inks – Peeled Paint and Memory Box – Snowy Pine Landscape rubber stamp, I applied the trees in the background. Using a blending brush and the same ink, I applied the greenery below the trees and then blended in Krafty Kolours – Sandy Shores with another blending brush. The picture was coloured in with Copic markers and then I fussy cut all around it. Once I completed the cutting, I applied a black marker all around the edges to make it stand out more against the background.
The card was now ready to assemble. I attached the 6″ x 6″ paper directly onto the base and then centred the background paper over it using double-sided tape. The die cut square was applied directly to larger square using double-sided tape. This was then popped up onto the card using U-Line Double-Sided Foam Tape. I applied the U-Line Double-Sided Foam Tape to the back of the image and popped it up onto the coloured background. Using what was left on my blender brush, I coloured the copic paper green with a little touch of blue and the applied the 2 circles together with liquid glue. The larger circle was attached to the card using U-Line Double-Sided Foam Tape in the right corner.
On the inside of the card, I added the sentiment “Happy Birthday Ole Buck” and the dear from the same set.
Card Recipe:
Stamps: Art Impressions – Ole Buck Set – 5403, Memory Box – Snowy Pine Landscape (F1900)
Inks: Memento – Tuxedo Black, Tim Holtz Distress Inks – Peeled Paint, Tim Holtz Distress Ink – Pumice Stone, Krafty Kolours – Sandy Shores, Versa Fine – Onyx Black
Paper: Copic Marker X-Press It Blending Card, AC White Cardstock, Creative Memories – Hot Fudge (12″ x 12″), Photo-Play – Camp Happy Bear (6″ x 6″)
Dies: My Creative Time -Stitched Squares Inside and Out, My Creative Time – Little Gift Tags (Retired)
Embossing Powder: Ranger – Clear Super Fine Detail embossing powder
Miscellaneous: Marvy Uchida – Embossing Heat Tool, U-Line Double-Sided Foam Tape, Cuttlebug
Skin: E21, E11, E04, E00, E000, R22, R30
Greens: G99, G94, G82, G43
Browns: E87, E84, E81, E55, E50, E49, E47, E44, E43, E42, E41, E37, E35, E34, E31, E30, E27, E25, E23, E21
Hope you like it and have a great week!