Kit and Clowder – November Pencils 2016 Class


Hi There,

Sharing my finished card using the tutorial from Kit and Clowder using digital image “KC Mouse” from Polkadoodles.

kcnov2016pencils

Here is a close-up of the image.

kcnov2016pencilscu

Love how Alyce shows us how to colour this wintery scene using Prismacolor Premier coloured pencils.

Sentiment is from Jaded Blossom – Mouse Bites stamp set.

Embossed background using Stampin up – Bows and Berries embossing folder using

Coloured in berries using Autumn Red – Nuvo Crystal Drops.


Hope you like it!


Kit and Clowder – November 2016 Markers Class


Hi There,

Sharing with you my finished Christmas card after completing the November Markers class from Kit and Clowder. Image is called “North Pole” by Polkadoodles.

kc-nov2016-markers

Here is a close-up.

kc-nov2016-markerscu


For this project I used all Copic markers. Alyce from Kit and Clowder also teaches you how to use alternative markers as well. Which I really love, since I also have the full Spectrum Noir collection.

I had a lot of fun doing this class as it taught me a lot of new techniques. I especially loved learning how to colour the snow as I love making wintery scened Christmas cards. 🙂

Also, loved learning how to do the sky.

To frame the image I used Craftin Desert Diva’s Fancy Frames. One of my all time favourites. Then used Tim Holtz Distress Ink – Mermaid Lagoon to go around the border to deepen the colour.

Added in a little glitter to the snowy roofs and snow on the ground, just because I love sparkle. LOL!

Hope you like it!

Boo’s Hallowe’en Card to Vet 2016


Hi There,

For those of you that follow me, you all know that I have a cat named “Boo”.  She was a rescue cat and we were so lucky to get her. She was 6.5 years old at the time and is now a little over 13 years old. We love her sooo much! She turned out to be extremely loveable and we couldn’t be happier with her!

boo3

Since her name was “Boo” we didn’t change it and I made a card for the vet from her for Hallowe’en. How could I not?? She was the perfect Hallowe’en cat. LOL! As a result, it is now a tradition for me to make cards for the vet and his staff for all of the special holidays and occasions from “Boo”.

This is the card that I made for this year.

The front of the card is made using stamps from Hampton Art Clear Stamps and Recollections Clear Stamps.

Background papers are from Pebbles – Tricks and Treats – 6 x 6 Paper pad.

Sentiment is from Cricut – Autumn Celebrations – Happy Halloween #M38C94 and  My Creative Time – Too Cute to Spook.

boo2016-halloweenfront

This inside was made using .svg cuts from Marjorie Ann Designs \ Kristi W. Designs – Scaredy Cats and Little Scraps of Heaven “Boo Ghost”.

boo2016-halloweeninside

Here are some close-ups:

boo2016-halloweeninside-ca boo2016-halloweeninside-bo

On the back of the card,  I used an svg from Miss Kate Cuttables called “witch-in-moon-10-25-16”.

boo2016-halloween-back

Hope you like it! Happy Hallowe’en everyone!

Happy Hallowe’en Witch and Cauldron


Happy Hallowe’en!

Sharing a Hallowe’en card that I made using a digi stamp from Kenny K Stamps called “Spell Caster Digi Stamp Set” Halloween digi stamps by KennyK Stamps“. Sentiment is also from Kenny K Stamps (“Halloween Sassy Sentiments” digi stamps by KennyK Stamps”). I had entered into a contest and was one of the winners for the caption below. As a result, I won the image and the full set of captions from Kenny K Stamps. YAY!

kennygwitch

Used PrismaColor Premier Pencils to colour the image. Also used some Gamsol on the background.

For her skirt I used Sakura Glaze – Black.

My Creative Time -Stitched Squares Inside and Out was used to cut out the image. Background papers are from Doodlebug Design Inc. – Halloween Parade – 6 x 6 paper pad double-sided cardstock.


Entering into contest on Club Kenny K as well. 31 Days of Halloween: Challenge #4 – Something Wicked.

Happy Hallowe’en everybody!


Puppy Christmas


Sharing another Christmas card made from Too Cute By Jessica – Christmas Animals SVG Cuts designed by Jesssica Owens 2014.

xmasdog


Here is a close-up of the image.

xmasdog-cu


Using my Cricut Explore and Cricut Design Space, I uploaded the images and then cut the pieces.

For the eyes and cheeks, I used Gelly Roll Sakura #8 Pen.  Drew in some eyelashes with Pigma Micron 01 black marker.

Sentiment was stamped with VersaMark – Onyx Black ink and heat embossed with Ranger – Clear Super Fine Detail embossing powder using stamp from Jaded Blossom – “Season’s Tweetings”.

Die cut from My Creative Time – Sentiment Label Dies.

Die cuts are from My Creative Time -Stitched Squares Inside and Out.

Embossing folder used – Swiss Dots was then used on the small green square and red square.

Used some white ribbon to break up the background and make it look like a present.

Background paper is from American Crafts – Holiday – 6 x 6″ (15.2 x 15.2 cm) paper pack.


Hope you like it!

Meowy Christmas


Sharing a card made from Too Cute By Jessica – Christmas Animals SVG Cuts designed by Jesssica Owens 2014.

xmascat

Here is a close-up of the image.

xmascat-cu

Using my Cricut Explore and Cricut Design Space, I uploaded the images and then cut the pieces out for the cat and wreath.

I decided to add some layers to the wreath using Martha Stuart branch punch and then adding some Xmas Red stickles to make some holly.

For the eyes, I used Gelly Roll Sakura #8 Pen.  I drew in some eyelashes with Pigma Micron 01 black marker, but you can’t really see them. Thought it would be a cool idea to use black thread for the whiskers to show up.

Sentiment was stamped with VersaMark ink and heat embossed with Ranger Embossing Powder White – Extra Fine Detail.

Stamp used is from Jaded Blossom Stamps – Meow and Forever.

Die cuts are from My Creative Time – Scalloped Stitched Oval Dies.

Embossing folder used – Swiss Dots was then used on the scalloped die cut and on oval – Christmas Ornaments on Recollections – Christmas Inkjet Printable Glitter Paper – 8.5 x 11″.

Background paper is from American Crafts – Holiday – 6 x 6″ (15.2 x 15.2 cm) paper pack.

Hope you like it!


It’s all About You Birthday Card


Sharing a birthday card I made using my new digital stamps from Simply Betty.

jarret-2016-bd

jarret-2016-bd-cu


For this card, I decided to use:

Sentiment: Penny Black – “T for Transparent” – Sprinkles and Smiles clear set.

Squares are cut out using dies from My Creative Time -Stitched Squares Inside and Out.

Background paper for small square is from: Party Girl by Samantha Walker.

Main background paper is from DCWV – The Birthday Wishes Stack. 6 x 6″ paper pad.

Used Spectrum Noir Markers to colour the image:

Face: FS2, FS4, TN4, FS3, FS9

Eyes: GT1, GT2, GT3

Lips: DR4, DR6, CR7

Hair: TN2, TN4, TN9

Tongue: PP1


Birthday Rock Star


Back to share another birthday card that I made using a freebie from Kenny K Stamps called “Mad Skillz” Singer and Rapper.

samantha2016bd

Here is a close-up of the coloured image.

samantha2016bd-cu

Music notes are from Campin’ Critters Cricut Cartridge – Music Badge – #M31A26.

Sentiment is from Life’s A Party Cricut Cartridge – Party Like A Rock Star – #M37398.
Balloon Dies are from My Creative Time – Stitched Large Balloons.
Background paper – Doodle Bug Designs Inc. – Sugar Shoppe – 6″ x 6″ paper pad.
Background paper – Large balloon – My Mind’s Eye – Happy Day – 6″ x 6″ paper pad.
Small Balloon – Coloured in using Tim Holtz Distress Ink – Picked Rasberry.
Coloured image using Spectrum Noir Markers.
Skin: FS2, FS4, TN4, FS3, FS9

Eyes, Bangle and Top: GT1, GT2, GT3

Lips: DR4, DR6, CR7

Hair: TN2, TN4, TN9, OR1, OR3

Tongue: PP1, PP2, PP3

Pants and Hat: TB4, TB5, TB7

Mouth- CR1, CR2, CR3

Shoes – TB1, TB2, TB3, IG1, IG2, IG3

Hope you like it!


MKC Guest Designer


guest-dt-badge-2016


Surprise everybody!!! I am guest designer for today on Miss Kate Cuttables. I was so happy when I discovered her site a few years back. I check back everyday to see what the new Freebie file is and I use her cuts a lot in my cards. When I found out that I was being offered a guest spot on her site, I was SUPER excited. I love doing all kinds of crafts and especially cardmaking. I make a lot of Birthday and Christmas cards every year. For today, I decided to showcase some Christmas cards I made using these 2 files from Miss Kate Cuttables. (Santa Paws and Frosty Fun).

For the first card I used the files which can be found here (http://www.misskatecuttables.com/products/product/santa-paws-cat.php#).


santapaws-full-mkcbadge

Here is a closer look.

santapaws-mkcbadge

I cut out the images using my Cricut Explore and Cricut Design Space. Then used my Xyron to assemble the pieces easier. After assembling the items, I used Clear Wink of Stella on “Santa”, the holly and the bow. On the leaves, I used Wink of Stella – Green 040.

For the face on the cat, I used Peachy Keen Stamps – PK110 Here Kitty Kitty Face Assortment. Used StazOn – Jet Black ink and Ranger – Clear Super Fine Detail embossing powder. Brightened up the eyes using Gelly Roll Sakura #8 Pen. Adding a touch of pink, green and red markers to accentuate the eyes and mouth.

Patterned paper is from Bo Bunny –  Silver and Gold Collection Paper – 6 x 6 in pad.

Square stitched backgrounds is cut out using My Creative Time -Stitched Squares Inside and Out. Went around paper background edges with Tim Holtz Distress Ink – Vintage Photo.

For my next card, I used the files from “Frosty Fun” which can be found here (http://www.misskatecuttables.com/products/product/frosty-fun.php#)

frostyfun-mkcbadge

Here is a closer look.

frostyfun-cu-mkcbadge

Used Sharpie – Gold Medium Point – Water Based Paint to go around the edge of the card. Recollections Christmas Ink Jet Printable Glitter Paper for the snow scene and igloo. Aleene’s Glitter Snow below the feet and igloo. Extra snowflakes from Holiday Time – Snowflake Stickers – Forever in Time.

Background paper – Recollections – Blue Christmas – 6 x 6 in. paper pad. Edging – Tim Holtz Distress Inks – Tumbled Glass.

Below are the files that I used.

Santa Paws SVG cat clipart cat svg cute cat clip art christmas svg               Frosty Fun SVG cutting files snow svg files winter svg cut files penguin svg files cute clipart

Hope you like them!

Miss Kate Cuttables, thanks again so much for allowing me to be a Guest Designer on your site today. I enjoyed making the cards and had fun using the files.


26th Anniversary


Hi There,

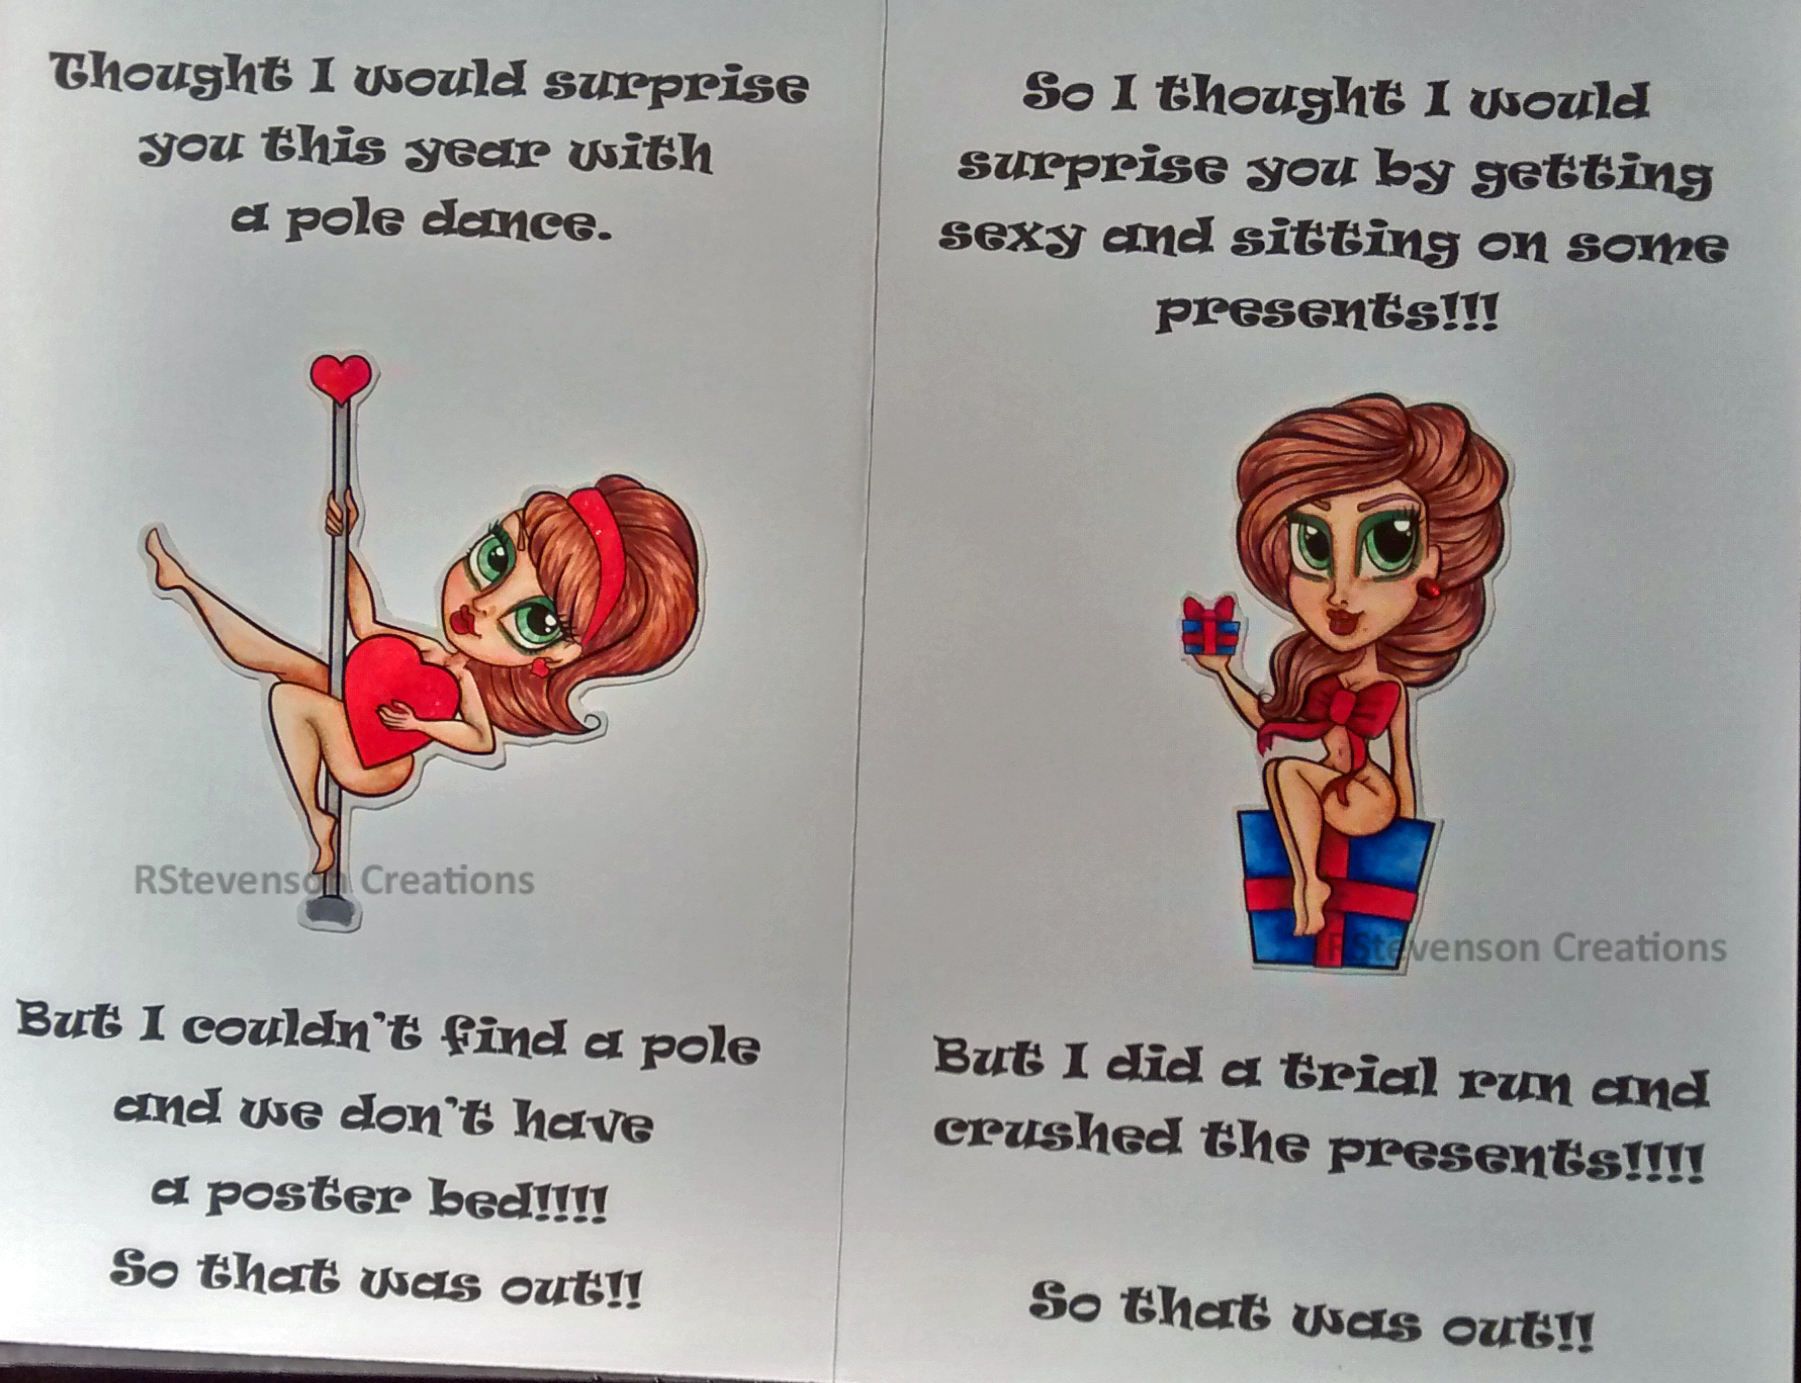
Today I’m sharing a card that I made for my wonderful husband for our 27th Wedding Anniversary. I took multiple images to make him up a funny card. Which he absolutely loved and hopefully you all will too!!! It was a lot of fun to make and I used a combination of Kenny K Stamps that were monthly freebies I had received and also Simply Betty Stamps which I recently purchased.

To make the card, I used Microsoft Word and my HP OfficeJet Pro 8710 which allows me to do double sided printing. YAY! I printed out the verses on 2 full pages and then glued the 2 backing together. I coloured all of the images and then fussy cut around them.

2016Anniv-pg1  2016Anniv-pg2-32016Anniv-pg4-5

All images were coloured with Spectrum Noir markers using Spectrum Noir Ultra Smooth Premium White Cardstock. Following are close-ups of the coloured images.

On the front I used Kenny K – Bathing Beauty.KennyK-Bathing-Beauty

On page 2, Simply Betty – Pole Dancing Veronica

SimplyB-PoleDancing-Veronic

On page 3, Simply Betty – Hubby BDay Betty

Simply-Betty---HubbyBdayBet

On page 4, Simply Betty – Martini Michelle

SimplyBetty-MartiniMichelle

On the final page of the card, Kenny K – Milkshake.

KennyK-Milkshake

Various Specrum Noir colours used for colouring consist of:

Skin: FS2, FS3, FS4, FS8, FS9, TN2

Hair: TN2, TN4, TN9

Eyes: LG2, LG3, LG5

Eye Liner: JG1, JG4, JG6

Clothing: CR8, CR10, CR11, CG1, DG2, DG4, TB3, TB5, TB6, LV1, LV2, LV3

Belt, Shoe Heel, Dress Sleeves – Sakura Black Glaze Pen

Polka dots and whites in eyes: Gelly Roll Sakura #8 Pen

Bow, Ribbon, Heart: CR8, CR10, CR11 (Added Wink of Stella – Clear on Heart and headband).

Present: TB3, TB5, TB6

Panelling: TN1, TN2, TN3, TN4, TN5, TN6

Table: BG1, BG2, BG4, IG1, IG3

Around all images: IG1

Hope you like it!


Seeanna


Hi There,

Sharing a new card that I made tonight – Stamp is called Seeanna by FaeryInk.

Mermaid

Here is a close-up.

Mermaid-CU

I coloured the image using Spectrum Noir Markers and then added some Clear Wink of Stella on the tail fin and scales.

Background paper is from Pebbles – Lakeside Paper Pad – 6 x 6″ (15.2 cm x 15.2 cm). Too darken it I used Tim Holtz – Walnut Stain.

For the waves I used Ken Oliver Crafts Color Burst – Lime Green and Turquoise on watercolour paper. Then cut out the waves using Craftin Desert Diva’s – Outdoor Landscape Dies.

For the portal I cut out the circles and the center using My Creative Time – More Stitched Circles. I then used Inka Gold – Copper to get the metallic look and added some pearls from Glitterazzi Embellishments.

Sentiment is from Craftin Desert Diva’s – Under the Sea. Stitched Oval is from Die-Namics – My Favorite Things – MFT-521.

Hope you like it!


Reindeer and Duck Christmas Cards


Hi There,

Sharing a couple of cards made from Too Cute By Jessica – Christmas Animals SVG Cuts designed by Jesssica Owens 2014.

Using my Cricut Explore and Cricut Design Space, I uploaded the images and then cut the pieces out for the little animals.

Reindeer

Here is a close-up of the image:

Reindeer-CU

For the eyes on both cards, I used Gelly Roll Sakura #8 Pen and General’s Charcoal White 558 Pencil, black chalk for the shadow and Pigma Micron 01 black marker for the eyelashes.

For the background snow, I used White Permanent Chalk Marker on blue cardstock.

The background papers are from Pebbles – Home for Christmas paper pad – 36 papers- 6 x 6 in (15.2 x 15.2 cm).

My Creative Time – Scalloped Stitched Oval Dies were used for framing the deer.

For the mound of snow I used Recollections – Christmas Inkjet Printable Glitter Paper – 8.5 x 11″ and Lawn Cuts – Simple Stitched Hillside Borders – Lawn Fawn.

Ribbon banner is from Craftin Desert Diva’s –  “Flag Banner Dies”

Sentiment – My Creative Time – Prehistoric Holidays Stamp Set.

Using the same die cut set, I also made this cute little duck card.

Xmasduck

Here is a close up:

Xmasduck-CU

For the music background paper, I stamped the musical notes with Recollections – Capturing Special Memories wooden stamp, Versa Fine – Onyx Black and Ranger – Clear Super Fine Detail embossing powder. Then I inked up the paper with Tim Holtz Distress Ink – Vintage Photo.

The patterned paper behind the duck is from American Crafts – “Holiday” 6″ x 6″ (15.2 x 15.2 cm).

The patterned paper above the musical notes is from Heidi Swapp – HS01073 – 6″ x 6″ (15.2 x 15.2 cm).

Sentiment – Craftin Desert Divas’s – Holly Day Punnies – VersaMark ink and Ranger Embossing Powder White – Extra Fine Detail.

Die Cuts used – Craftin Desert Diva’s – Fancy Stitched Label Dies.

Hope you like them!


Super Chunky – The East Wind Card


Hi There,

This sweet little image is from The East Wind called Super Chunky. They were offering it as part of the celebration going on at Kit and Clowder.

There is also a contest, which I will be entering the 10,000 Party – Colouring Challenge TEW on Kit and Clowder Facebook page.

Loved this image as soon as I saw it!!! Reminded me so much of my sweet little girl “Boo”.  As many of you know, I make cards for my vet for practically every occasion from “Boo” and the staff and vet love receiving them. (They’ve actually kept every card I’ve made for them and display them!!!) LOL! Does make me feel really good though! Thought this would be perfect for a Thanksgiving card this year from her, resting after a nice big meal.

I coloured this image using Spectrum Noir Markers and then added in a few shadows with PrismaColor Premier coloured pencils.

Super-Chunky-EastWinHere is a close-up:

Super-Chunky-EastWinCU


Basket – GB1, TN1, TN3, PC1003, PC943

Cat – IG4, IG6, IG8, PC935 (Ears – CR4)

Whiskers – Micron 01 Archival Ink Marker

Wool – PL2, PL4, PL5

Needles – BT1, BT2, BT4

Oranges – OR1, OR2, OR3

Bow – PL1, BP2, BP6, Permanent Chalk Markers – White for polka dots

Paper – Recollections Signature – Kaitlin – 12 x 12″

Pebbles – Harvest Paper Pad – 6 x 6″

Sentiment – My Creative Time – Belly Bands Sentiment Stamp Set

Hope you like it.


Santa’s Little Helper


Hi There,

Sharing a card I made using a file from Scrapper’s Delights called Santa’s Little Helper.

Santa-Little-Helper

Here is a close-up.

Santa-Little-Helper-CU

To colour the image, I used Spectrum Noir Markers and PrismaColor Premier Pencils.

Skin – TN1, TN2, FS1, FS7

Hair – TN2, TN4, TN6, PC941, PC943, PC945, PC942, PC938, PC947

Eye Shadow – GT2, GT3, JG1

Eyes – JG2

Lips and Nails – Atayou Spica – Red – 03

Boots – JG1, JG4, JG5

Bell – IG1, IG2, IG3, then went over it with Ataou Spica – Silver – 12 (Also used for little bells on sleeves)

Clothes and Hat – CR8, CR10, CR11

Stars – Atayou Spica – Buttermilk – 16

Bell and Merry Christmas – QuickKutz – 2008 Holiday Limited Edition Gift Set

Paper

Recollections – Sugarplums 12 x 12″

American Crafts – Heidi Swap – Marquee Love – Gold and Silver

Entered into Scrapper’s Delight July Face Book Challenge.

Hope you like it!

Bee Tag


Hi There,

Sharing a tag I made for the Challenge at JessicaLynn Original called Challenge #5 – Create Your Best Tag.

Bee-Tag

I work with a lady who is a beekeeper. I thought this would be perfect to give her the next time I purchase some more fresh honey. MMMMM, it is sooo good!!!

To make the tag, I used the bee from JessicaLynn Original Big Fat Bumble Bee digi. I sized it multiple times and arranged their position using Microsoft Word and then printed it out to colour.d

Used Spectrum Noir markers to colour bee and then added a little yellow texture with PrismaPremier coloured pencil.

The sentiment is from Craftin Desert Diva’s “Just Because” Stamps for “Buzzing by….” and “to say”. (I covered up the “hi” with tape before I stamped it.

The sentiment “Thank You!” is from My Creative Time – Hey There Little Lady.

For the tag, I used the tag die from SpellBinders “Tags and Flags” – S5-095 and shortened it.

Coloured around the edges with Tim Holtz Distress Ink – Mustard Seed and a little dauber.

Finished it off with some black and yellow ribbon.

Hope you like it!

Carousel Card


Hi There,

Stopping by to share a carousel card that I made using Too Cute by Jessica .svg cuts from Scrapbooking Mice – Jessica Owens 2016 and HB2U Car – Jessica Owens 2015.

I wanted to make a unique and different card using the Scrapbooking mice, so I decided to make it a step-by-step card using a carousel look.

Used largest die from Marianne Design CR1236 to make doilies for joining papers to make the carousel.

Here a few different views of the card.

Front – Closed and side view.

Carousel-Card-Front-with-Bo carousel-card-side-view

Open view – looking down.

Car-Card-OpenCarousel-TopViewCar-Top-Angle

Here are the steps on how I put this card together in more detail.

Uploaded all files into Cricut Design Space and then cut out pieces with Cricut Explore.

Front of card – HB2U Car.

Balloons from Craftin Desert Diva’s Party Dies. Balloon strings from My Creative Time – Stitched Circle Balloon Dies.

Background paper from Echo Parks Paper Co. – Birthday Wishes by Alisha Gordon – 6″ x 6″ Paper Pads.

HB2U-bear

All instructions – Typed out on laptop in word and then printed out. Die cut backgrounds using Craftin Desert Diva’s Fancy Frames. Smallest die cut from Your Next Stamp – Stitched Rectangle Die Set – (YNSD214) All highlights on eyes and nose are done using Gelly Roll Sakura #8 Pen.

Background frames for all Mice are from Cricut. Background papers are all from Doodle Bug Designs Inc. – Sugar Shoppe – 6″ x 6″ paper pad.

Stage 1 of Carousel. Mouse #1.  Put together.

Car-Step1

Stage 1 of Carousel. Mouse #1.  Separate pics before joining together.

Carousel-P1    Carousel-P2

Here is a close up of Mouse #1.

Carousel-P2-CU

Stage 2 of Carousel. Mouse # 2.  Put together.

Car-Step2

Stage 2 of Carousel. Mouse #2.  Separate pics before joining together.

Carousel-P3

Carousel-P4


Here is a close up of Mouse #2.

Carousel-P4-CU

Stage 3 of Carousel. Mouse #3.  Put together.

Car-Step3

Stage 3 of Carousel. Mouse #3.  Separate pics before joining together.

Carousel-P5

Carousel-P6

Here is a close up of Mouse #3.

Carousel-P6CU

Stage 4 of Carousel. Mouse #4.  Put together.

Car-Step4

Stage 4 of Carousel. Mouse #4.  Separate pics before joining together.

Carousel-P7

Carousel-P8

Here is a close up of Mouse #4. Carousel-P8-CU

Hope you like it!

 Entered into contest: http://cutitupchallenges.blogspot.com/2016/07/cut-it-up-100-anything-goes.html.

Coffee Time Kitty


Hi There,

Back to share another card with you. It is a freebie from Craftin Desert Diva’s called Coffee Time Kitty. I was hoping to share it in the Coffee Blog Hop too, but I was a little late! LOL!

Kitty-PerkUUp

Here is a close up:

Kitty-PerkUUpCU

To make this card, I printed out the image in grayscale and then coloured the image in using PrismaColor Premier pencils and Gamsol. I cut out the image using My Creative Time -Stitched Squares Inside and Out and then went around the edges with Tim Holtz Distress Inks – Dusty Concord.

For the fancy border, I used Spellbinders Lacy Squares – S4295.

The sentiment is from Craftin Desert Diva’s – Got Coffee stamps. Created flag by using die cut from Craftin Desert Diva’s – Flag Banner Dies.

Added in some ribbon on the side made by American Crafts.

Hope you like it!

Entered into Craftin Desert Diva’s Digi June Challenge which can be found here: https://www.facebook.com/groups/1428163220758119/. (Craftin Desert Diva’s Gallery).

Coffee Blog Hop – JessicaLynnOriginal


Hi There,

Sharing my card that I made for the JessicaLynnOriginal Coffee Blog Hop.

The digital stamp was a freebie for this contest located on JessicaLynn’s site.

JessicaBlogHop

Here is a close-up:

JessicaBlogHop-CU

Coloured the image with Spectrum Noir markers and then added in highlights \ shading with PrismaColor Premier pencils.

Created background behind owl with Craftin Desert Diva’s – Got Coffee stamps and VersaMark Ink.

Sentiment is also from the same set.

Other background paper is from: Teresa Collins – Summer Stories Designer Cardstock Paper – 6 x 6″ Designer Pad.

Die cuts are from: My Creative Time -Stitched Squares Inside and Out, My Creative Time – More Stitched Edges and

Craftin Desert Diva’s – Flag Banner Dies

Entered into contest for JessicaLynnOriginal Coffee Blog Hop.

Hope you like it!

Winter Polar Bear


Hi There,

Thought I’d share another Christmas card that I just finished for this year. Only about 45 more to go!!!!

PolarBear-TCBJ

To make this card I used the .svg cut from Too Cute By Jessica called Winter Polar Bear – Designer Jessica Owens 2015 and cut it out on my Cricut Explore after I finished uploading the image in Cricut Design Space. Used Sharpie Water Based Paint – White – Extra Fine Point, General’s Charcoal white for the eyes and Pigma Micron 03 black marker for the eyelashes.

Added some Clear – Wink of Stella on the red portion of the candy cane and  Wink of Stella – Glitter White on the white pieces.

Ranger Stickles Yellow Glitter Glue for the centre of the pointsettia.

Here is a close-up of the bear.

PolarBearCUp-TCBJ

All patterened papers are from Pebbles – Home for Christmas paper pad – 36 papers- 6 x 6 in (15.2 x 15.2 cm).

Inked around the edges with Tim Holtz Distress Ink – Pine Needles and Memento Dew Drop – Lady Bug ink.

Sentiment is from Popcorn the Bear – Christmas Collection. Also used Craftin Desert Diva’s – Flag Banner Dies. Stamped sentiment with Versamark and then used Ranger Embossing Powder White – Extra Fine Detail.

My Creative Time – Scalloped Stitched Oval Dies were used for framing the bear.

Hope you like it!


Sympathy Card


Hi There,

Back again to share another Sympathy card that I made using stamps and dies from My Creative Time – My Thoughts are With You and My Creative Time -Stitched Rectangular Frames and More.

I can’t take credit for the original design, as I was inspired by a card made by Brigit Mann who created a similar card during the blog hop for this stamp set back in July, 2015.

Sympathy-Card---Teresa

I coloured in all of the flowers and stems with Spectrum Noir markers. To give the water effect to the jar, I used Parchment Paper – Shaded Blue – Code 61582. I then used a stylus on the back of the paper to put in the jar lines like the actual stamp. To get the depth of the jar, I used some fun foam which I cut out with the die cut so that it would be the same shape and give the shaker a nice solid enclosure. Lastly, I added in some sequence to fill the bottom of the jar.

Background paper is from My Mind’s Eye – Summer Papers – Quite Contrary by Jen Allyson and Roe Pearn.

Hope you like it!