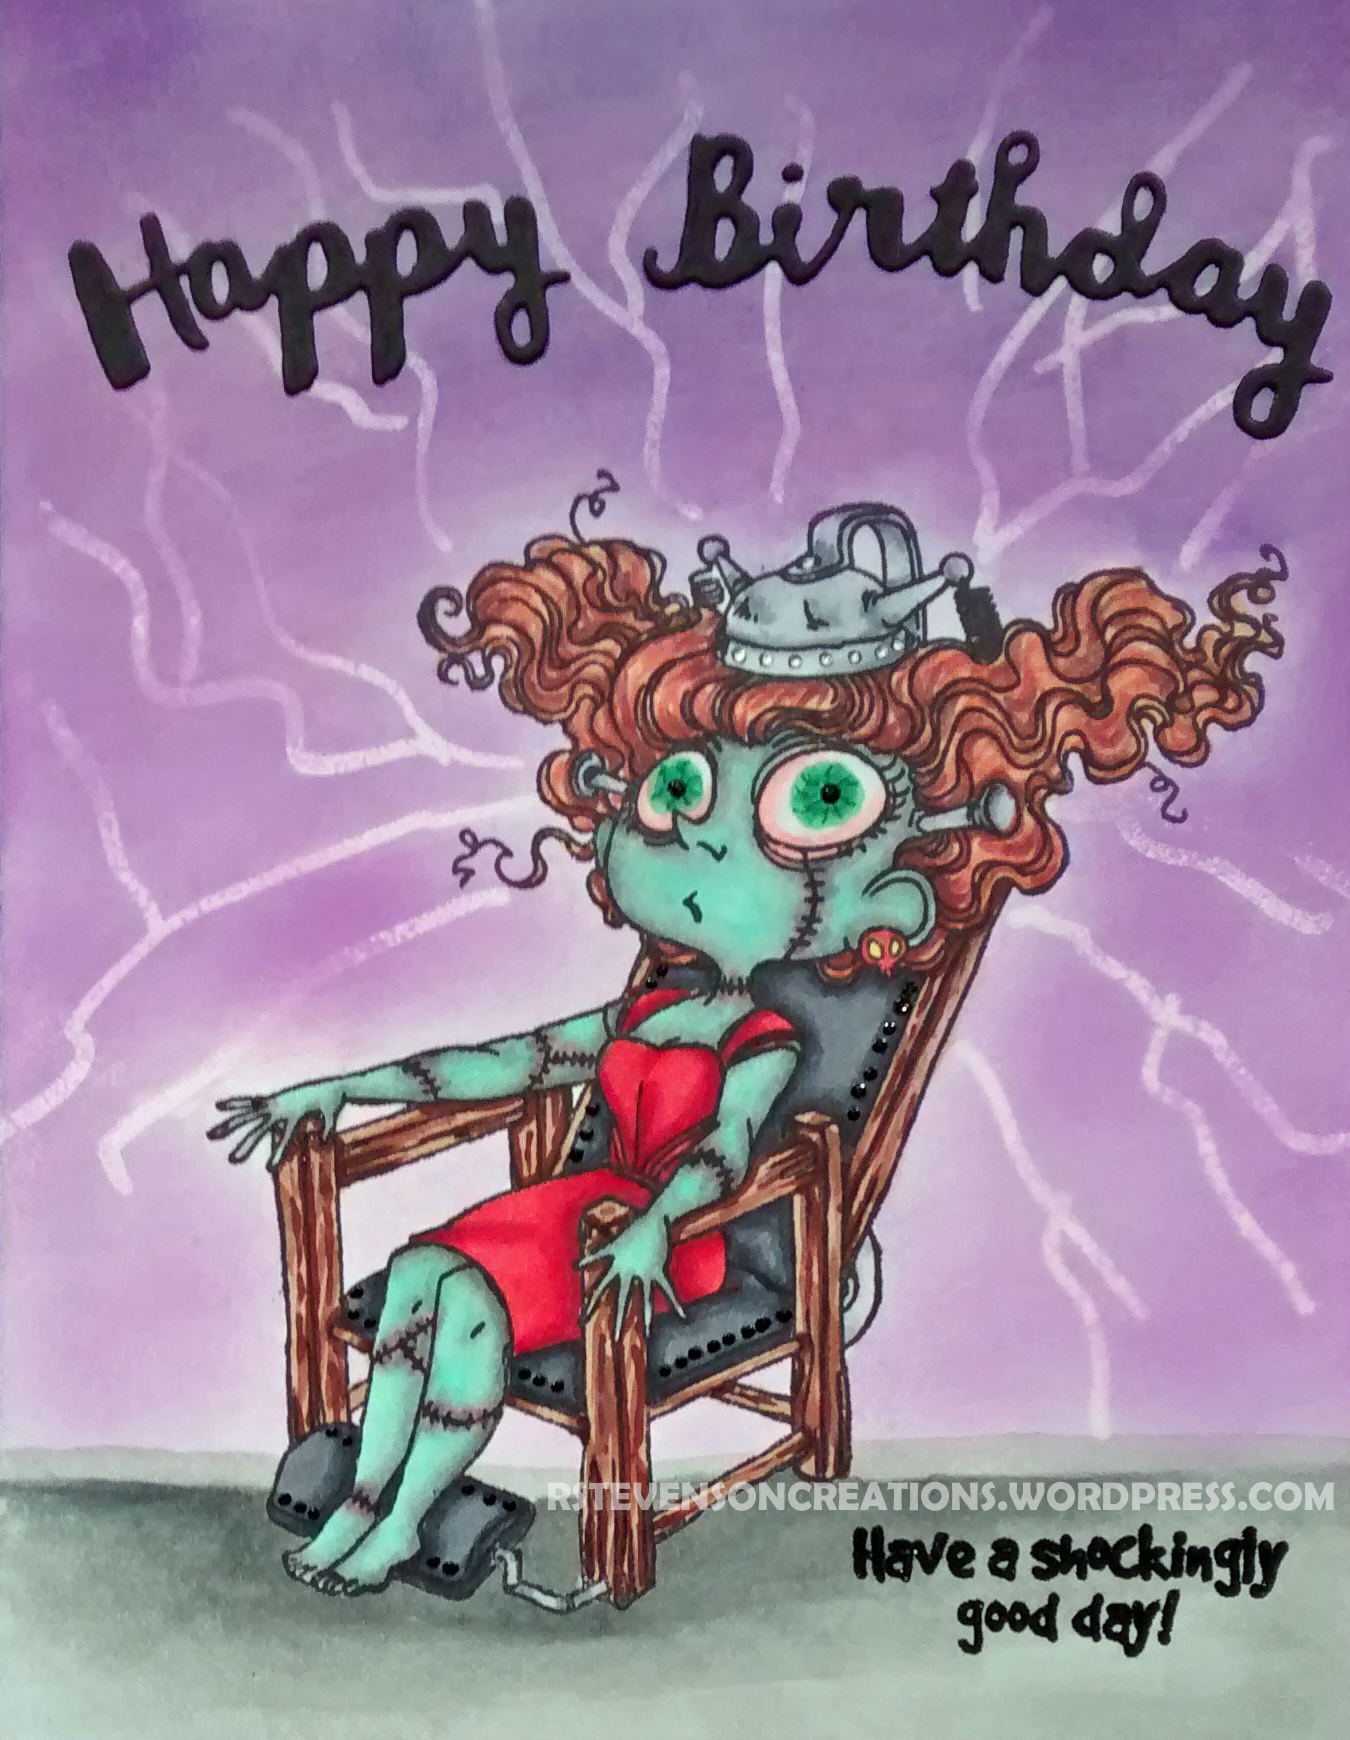
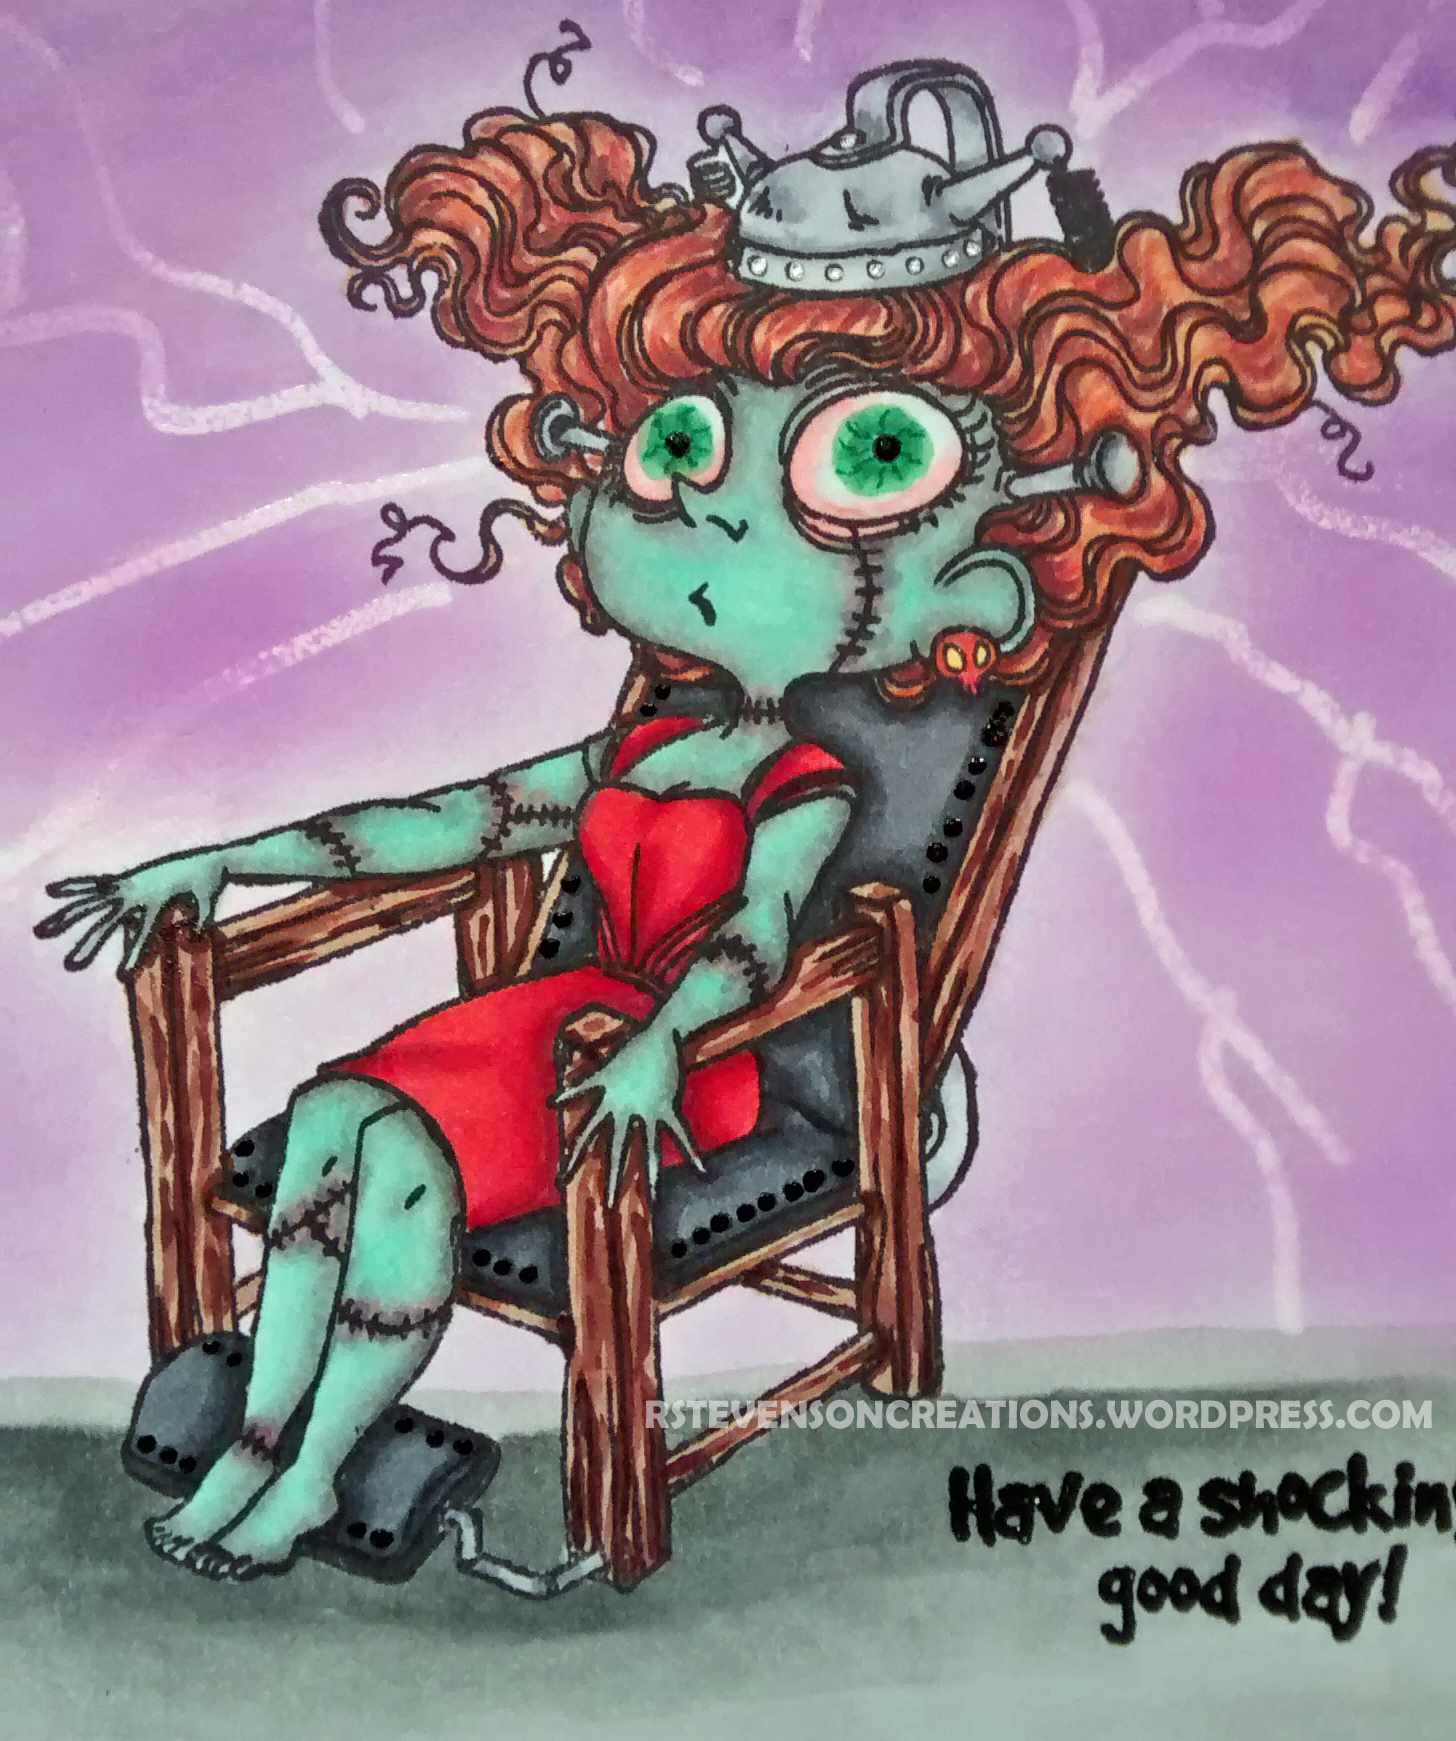
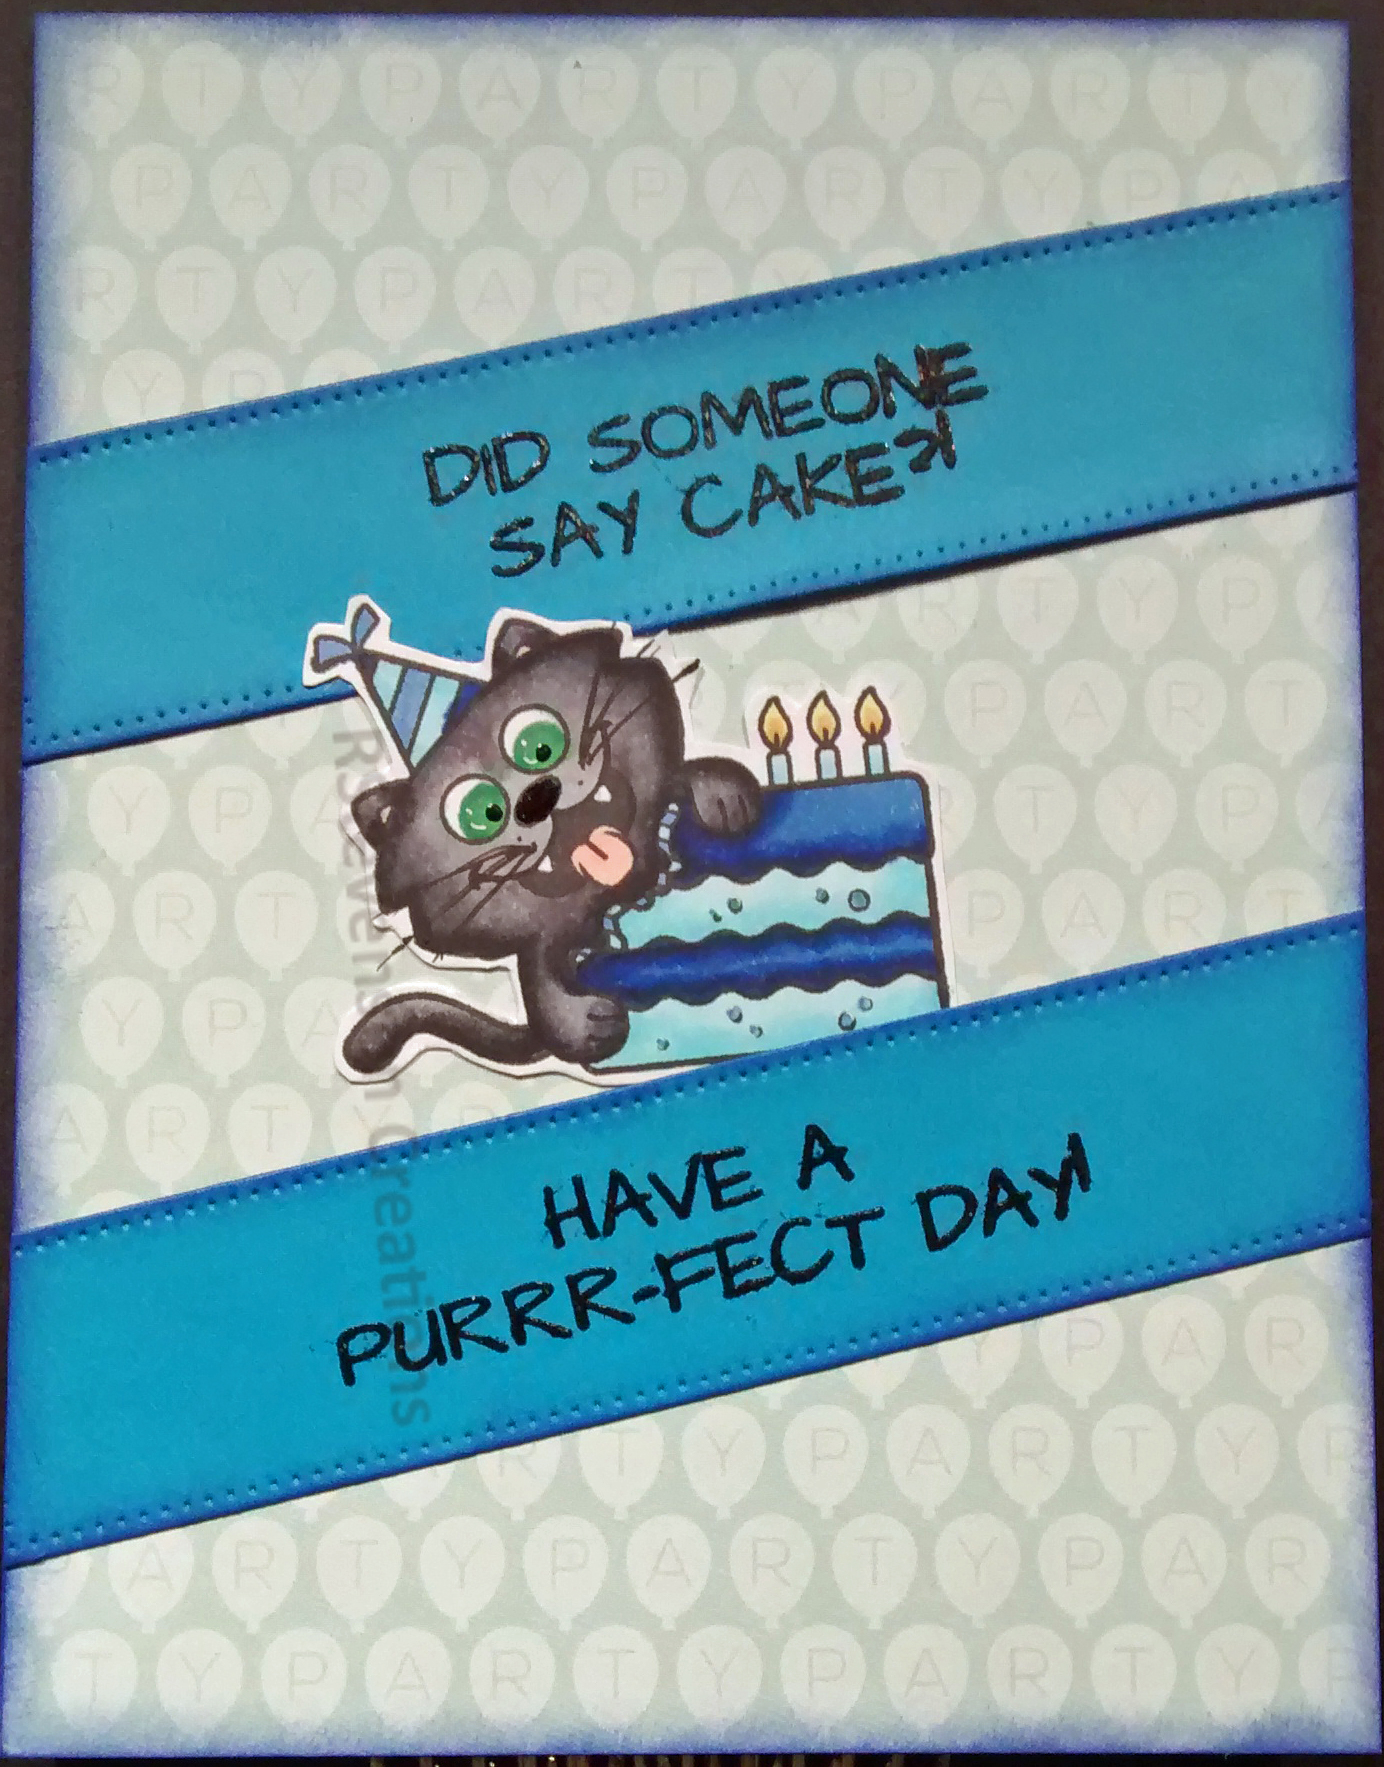
Tag Archive | Ranger – Clear Super Fine Detail embossing powder.

Happy St. Patty’s Day


Hi Everyone,

St. Patrick’s Day is coming up soon and so I thought I’d share this adorable little frog and an old Irish saying featuring High Hopes Rubber Stamps – Frog In Boxers Q018 and High Hopes Rubber Stamps – Irish Blessing2 P132 for the sentiment. My grandmother and her family came over from Ireland when they were very young so I am also part Irish.  When I saw these two stamps from High Hopes, I just knew that I had to put them together to make this card.

On the inside is the Irish saying:


Happy St. Paddy’s Day Everyone!


Card Recipe:

Paper for Image: Copic Marker X-Press It Blending Card

Die Cuts: My Creative Time -Stitched Squares Inside and Out, Cricut Cartridge – Phrases – Happy St. Patrick’s Day – #M406F6

Copics:

Frog: YG00, YG03, YG06, YG17, BG99, E81, Colourless Blender

Pants: YG00, YG01, G24, G94, G99, YG17

Background: G0000, G000

Background Paper: Lucky to Have – Little Scraps of Heaven – Clover Paper

Inks: Tim Holtz Distress Ink – Mowed Lawn, Tim Holtz Distress Inks – Peeled Paint, Memento – Tuxedo Black, VersaMark ink

Embellishments: Jot Stickers: Pop-Up, Ranger – Clear Super Fine Detail embossing powder

Miscellaneous Tools: Cricut Explore, Cuttlebug, MISTI – Most Incredible Stamping Tool, Marvy Heating Embossing Tool


Be sure to stop by the One Crazy Stamper and High Hopes Stamps blogs,  Facebook Page and Pinterest for some daily inspiration from the Design Team Divas.

Thanks for stopping by and have a terrific day!


Year of the Pig 2019


Hi There,

Happy Chinese New Year! It’s the year of the pig and to celebrate it this year I made all of my friends and a few co-workers a special card! 12 of them in total this year.

For the front of the card I used Polkadoodles Piggy 1 from their Work & Play10 Country Life – Digital Craft Collection. I created the sentiment using WordArt in Microsoft Word.

Here is a close-up of one card.

This is a close-up of the little pig.


On the inside I used my MISTI (Most Incredible Stamping Tool) and stamped the sentiments using Versa Fine – Onyx Black and Ranger – Clear Super Fine Detail embossing powder using Craftin Desert Diva’s Dragon Festival Stamps.

Dragon boat is also from the same stamp set. Little pig is from Lawn Fawn LF-1595 – Hay There!

This is a close-up of the dragon boat and little pig.

All images were stamped onto Copic Marker X-Press It Blending Card using Memento – Tuxedo Black ink and then coloured in with Copic markers.

They loved them and I hope you do too!

Copic Markers Used:

Pig: R000, R00, R01, R02, RV10, RV11, C1, R17, R20

Dragon: R39, R29, R27, R24, R17, E15, Y28, Y26, Y24

Border around die cut: Sharpie – Gold Medium Point – Water Based Paint

Die Cut: Your Next Stamp – Stitched Rectangle Die Set (YNSD214), Lawn Fawn LF1596 – Hay There


Birthday Elephant Card


Sharing a birthday card that I made for my sister-in-law.

On the front of the card I used the cute little elephant from Sasayaki Glitter – Elephant Birthday.

Here is a close-up.

On the inside I used the stamps from Craftin Desert Diva’s – It’s All About Zoo.

Hope you like it!

Background paper: Echo Parks Paper Co. – Birthday Wishes by Alisha Gordon – 6″ x 6″ Paper Pads

Other items:

Copic Marker X-Press It Blending Card

Copic Markers to colour

Memento – Tuxedo Black

VersaMark – Onyx Black and Ranger – Clear Super Fine Detail embossing powder for Sentiment.

MISTI – Most Incredible Stamping Tool for stamping small elephant.

Tim Holtz Distress Ink – Picked Rasberry – Edging

PaperCrafter Today – 15 Die Cut Sentiment Set – “Happy Birthday”

My Creative Time -Stitched Squares Inside and Out

Tweet Holiday Greetings


Hi There!

Sharing a Christmas card that I made using Your Next Stamp Set – Sharing Christmas Joy CYNS349 and for the sentiment Your Next Stamp Set – Home for the Holidays CYNS669.

Stamped the image using my MISTI – Most Incredible Stamping Tool and Memento – Tuxedo Black onto Copic Marker X-Press It Blending Card.

Coloured in the images with Copic markers and then used Spectrum Noir markers to create the background.

For the snow I used Gelly Roll Sakura #8 Pen, Gelly Roll Sakura #5 Pen and Gelly Roll Sakura #10 Pen.

Snow is Aleene’s Glitter Snow.

Die Cuts – Your Next Stamp – Stitched Rectangle Die Set (YNSD214)

Hope you like it!

Entered into http://yournextstamp.com/blog/fun-friday-challenge-102-its-a-sketch-one-week-to-go/. Fun Friday Challenge #102

Thank You Sew Much Card


Hi There!

My parents recently celebrated their 60th Wedding Anniversary! Such an accomplishment and we are all so proud of them! We had a wonderful celebration with close friends and family.

I wanted to make my parents something special and unique for their special anniversary and I knew a friend who did quilting. I’ve always wanted to learn how to hand quilt and so I approached her and asked her if she would teach me. She agreed and I was super excited, I was going to learn how to do quilting.

First thing!!!!! I have a lot more respect for all of you quilting ladies and gentlemen out there!!! I had no idea how much work went into it! LOL! However, I loved the final result and so did my parents and family and that made it all worth it!

As a thank you to my friend Marilyn who graciously put up with all my questions and who assisted me on how to cut the fabric and line it up as well as doing the 3 layer sandwich and then sewing the border, I made her this little thank you card.

Inside of card:

All of the stamps are from My Creative Time. The 2 stamps sets are called “My Creative Time – You’re Sew Special – MCT-317 and My Creative Time – Thanks Sew Much – MCT-318

Used MISTI – Most Incredible Stamping Tool and stamped images and sentiments with Versa Fine – Onyx Black and Tim Holtz Distress Inks – Dusty Concord. Embossed with Ranger – Clear Super Fine Detail embossing powder.

Inked around Edges of Die Cuts – Tim Holtz Distress Ink – Wilted Violet and Tim Holtz Distress Ink – Evergreen Bough.

Paper- Recollections – Petite Floral (12 x 12 in – 30.4 x 30.4 cm), Stamperi Lilac Flowers Scrapbooking – (12 x 12 in – 30.5 x 30.5 cm)

Die Cuts – My Creative Time -Stitched Squares Inside and Out

Penguin Pals Christmas Card


Hi There! Sharing a Christmas card that I made using the new “Kraftin’ Kimmie – Perky Penguins” stamp set.

Here is a close-up:


First I die cut the wreath and image with using Lea’bilities Frame Circle Ribbons out of Copic Marker X-Press It Blending Card.

Using the MISTI – Most Incredible Stamping Tool, I stamped the image using Memento – Tuxedo Black. Next, I coloured the image and die cut with Copic markers.

For the sentiment, I used new “Kraftin’ Kimmie – Super Cool Pals” stamp set.

Hope you like it!


Electrifying Birthday


Hi There!

Sharing a birthday card that I made for my wonderful niece. She loves “Chucky” and scary movies, so I thought this would be a fun card to make for her.

Here is a close-up:

Stamped the image called Kraftin’ Kimmie – Electric Evelyn using my MISTI – Most Incredible Stamping Tool and Memento – Tuxedo Black ink onto Copic Marker X-Press It Blending Card.

Coloured in the image with a mixture of Copic and Spectrum Noir markers. To make the lightening in the background I used Tsukineko VersaMarker Watermark Pen and Ranger – Clear Super Fine Detail embossing powder.

Sentiment is from same stamp set. Stamped sentiment with Versa Fine – Onyx Black and then embossed with Ranger – Clear Super Fine Detail embossing powder.

She loved her card and I hope you do too!


Golf Dog Zach – Birthday Card


Hi There!

Sharing a card that I made for my loving husband this year featuring Your Next Stamp – Golf Dog Zach – CYNS576.

Stamped the image using Memento – Tuxedo Black ink onto Copic Marker X-Press It Blending Card using my MISTI – Most Incredible Stamping Tool. Next, I coloured in the image with Copic Markers. I drew in the mound background and coloured it as well.

Next I stamped the sentiment from the same stamp set with Versa Fine – Onyx Black and then embossed it with Ranger – Clear Super Fine Detail embossing powder.

Background paper used:

Lime Twist – Fly a Kite – 6 x 6 Designer Paper Pad

My Mind’s Eye – Now and Then – 6 x 6 Designer Paper Pad

Lime Paper

Die Cuts:

My Creative Time -Stitched Squares Inside and Out

My Creative Time – Stitched Rectangular Frame Dies and More (Used both ends of die to make a shorter Rectangle)

Your Next Stamp – Stitched Rectangle Die Set (YNSD214) (Used both ends of die to make a shorter Rectangle)

Edge around edges with Tim Holtz Distress Ink – Rusty Hinge, Tim Holtz Distress Ink – Pine Needles and Tim Holtz Distress Ink – Twisted Citron.

On the inside of the card, I stamped the following Sentiments using Versa Fine – Onyx Black and then embossed it with Ranger – Clear Super Fine Detail embossing powder in the following order.

Party Animal – Jaded Blossom

Art Impressions – Par-Tee Golfers Set – 5902

Your Next Stamp – Golf Dog Zach – CYNS5576

My husband loved his card. He said he was laughing all day about the sentiment “May the course be with you!”

I hope you love it too!

Entered into:

http://yournextstamp.com/blog/sketch-and-color-challenge-96-more-inspiration/

Facebook Challenge #96

Happy Father’s Day


Sharing a card that I made for my dad for Father’s Day this year!

My dad is a magnificent carpenter and can build just about anything. He built our entire family home, my portable spinning wheel, and after building multiple miniature airplane models, decided to build a real one. He has also built many other items throughout the years.

He built his airplane in our basement along with my uncle and then had to remove a basement window and part of the front wall to get it out. LOL! It really was quite something to witness. He taught us that if you put your mind to it and you dream about it, then you could do it. Or at least try to do it.

The plane had passed inspection with flying colours and it was really a lot of fun going up into the air with him, as I love to fly too. Not a pilot, but I do love to fly! LOL!

On the front of the card I printed out the digital stamp from Lily of the Valley – The Workbench, then coloured it in with Copic markers using the lessons from Kit and Clowder Technique class taught by Alyce Keegan. I highly recommend Kit and Clowder tutorials as they have helped me come a long way in my colouring techniques over the past couple of years. She really does break it down and make it easy for you to follow.

Stamped the sentiment using Peachy Keen Stamps – PCSC-05 May 2012. Stamped with Tim Holtz Distress Inks – Ground Espresso and then heat embossed with Ranger – Clear Super Fine Detail embossing powder.

Included a close-up of the image.

On the inside I printed out the digital image from The Paper Shelter – The Aviator. I then coloured in the image using my Copic markers and did the background using my Spectrum Noir markers. I also created my own sentiment for my dad.

Included a close-up of the image.

Die CutsYour Next Stamp – Stitched Rectangle Die Set (YNSD214).

Memory Box – Scallopped Stitch Trimmings – Style 30091 Model

My Creative Time: Fun Vertical Greetings

He loved his card and I hope you do to!

Happy Father’s Day Fishes


Hi There!

Sharing a card that I made for my Father-In-Law for Father’s Day. He often talks about how he’d like to catch the big one someday, so I thought this would be a cute card to make for him.

Also including a close-up of the image.

The Digital stamp is from The Paper Shelter – TPS-WhenInDoubt-Exaggerate. Using my printer, I printed it out in Greyscale onto Copic Marker X-Press It Blending Card and then coloured it in with a mixture of Copic and Spectrum Noir markers.  Next, I fussy cut around the image and then popped it up onto the background.

Background – The Paper Shelter – TPS-WhenInDoubt-Exaggerate. Printed out image on my printer.

SentimentPeachy Keen Stamps – PCSC-05 May 2012. Stamped with Tim Holtz Distress Ink – Chipped Sapphire and then heat embossed with Ranger – Clear Super Fine Detail embossing powder.

Die Cut – My Creative Time: Fun Vertical Greetings

He loved it and I hope you do too!


Happy Birthday Chicks


Hi There!

Sharing a birthday card that I made using the music and cute chicks from Your Next Stamp Set – Music Chicks.

Including a close-up.

Stamped images using MISTI – Most Incredible Stamping Tool and Memento – Tuxedo Black ink to transfer images onto Copic Marker X-Press It Blending Card. Images were then coloured with Copic Markers. Background was done using Spectrum Noir Markers and then grass was added in using Prismacolor Premier Pencils.

Musical sentiment and notes were stamped using (MISTI), Versa Fine – Onyx Black ink and then heat embossed with Ranger – Clear Super Fine Detail embossing powder.

Background Paper: Echo Parks Paper Co. – Birthday Wishes by Alisha Gordon – 6″ x 6″ Paper Pads

Die Cut – Your Next Stamp – Stitched Rectangle Die Set (YNSD214). I used the same die for the small die cut as well. I just adjusted the die to fit the size of the sentiment by putting it through the Cuttlebug twice.

Entered into Your Next Stamp Sketch and Color Challenge #90 – http://yournextstamp.com/blog/sketch-and-color-challenge-90-more-inspiration/ and also YNS Social Media challenge  – Challenge #90.

Hope you like it!

Shades of Blue – Birthday Card


Hi There!

Sharing a birthday card that I made in shades of blue.

Also including a close up.

Stamped image onto Copic Marker X-Press It Blending Card with Memento – Tuxedo Black ink using my MISTI – Most Incredible Stamping Tool to get a nice clean inked image. Coloured in image using a combination of Copic and Specrum Noir Markers. Used Gelly Roll Sakura #8 Pen on eyes. Sentiment stamped with Versa Fine – Onyx Black and then embossed with Ranger – Clear Super Fine Detail embossing powder.

Image and Sentiment: Kraftin Kimmie Stamps – Birthday Bianca

Background Paper: Scrapberry’s – Rhapsody in Blue – 6″ x 6″ Paper Collection

Die Cut: My Creative Time – Scalloped Stitched Oval Dies.

Sparkle: Glitter Kiss – Blue Teal Kiss

Ink around Oval: Tim Holtz Distress Inks – Tumbled Glass

Ink around Card: Tim Holtz Distress Ink – Chipped Sapphire

Entered into Kraftin’ Kimmie Challenge #431 – Blue Colour Challenge – http://kraftinkimmiestamps.blogspot.ca/2018/05/challenge-431-blue-colour-challenge.html

Purrr-Fect Day!


Hi There!

Sharing a birthday card that I made using shades of blue.


Stamped image onto Copic Marker X-Press It Blending Card using Memento – Tuxedo Black ink.

Sentiments stamped with Versa Fine – Onyx Black and then embossed with Ranger – Clear Super Fine Detail embossing powder.

Used MISTI – Most Incredible Stamping Tool to get nice clean lines for image and sentiments.

Stamp and Sentiments: Your Next Stamp – Party Pets – CYNS586

Background Paper: Echo Parks Paper Co. – Birthday Wishes by Alisha Gordon – 6″ x 6″ Paper Pads

Die Cut: Die-Namics MFT-489 PCD Fishtail Figs STX

Hope you like it!

Entered into Your Next Stamp Challenges.

http://yournextstamp.com/blog/sketch-and-color-challenge-89-more-inspiration/

YNS Facebook “Challenge 89”

SplitcoastStampers Gallery “your next stamp” and “ynschallenge89”

Heavenly Holiday


Hi There!

Sharing a Christmas card that I made. I make over 50 cards every year, so this year I am starting early.

Included a close-up.

Stamped image onto Copic Marker X-Press It Blending Card using Memento – Tuxedo Black and my MISTI – Most Incredible Stamping Tool and then coloured it in with a mixture of Copic and Spectrum Noir Markers. Sentiment was stamped with Versa Fine – Onyx Black and Ranger – Clear Super Fine Detail embossing powder.

Image and Sentiment: Kraftin’ Kimmie Heavenly Holiday Stamp Set

Embossing: EFE 002 Christmas Oval -1 – Erwin Snellen

Glitter: Martha Stewart Crafts – Crystal Fine Glitter

Ribbon: Crafts 02-0201046

Hope you like it!


Mice Birthday


Hi There!

Sharing a card that I made for my friend’s birthday this year. First time in over 20 years that it actually arrived on time. LOL!

I’ve added a close-up for you to see the image bigger.

This was coloured up using the image from Di’s Digi Stamps – Cute as Cupcake Mice, instructions from Kit and Clowder’s April 2018 Markers monthly class and Copic markers.

Next I added in the sentiment from Stampendous – Mice Birthday – CS075-Stamps.

Background paper:  Doodle Bug Designs Inc. – Sugar Shoppe – 6″ x 6″ paper pad; Echo Parks Paper Co. – Birthday Wishes by Alisha Gordon – 6″ x 6″ Paper Pads

Ink around edges: Tim Holtz Distress Ink – Picked Rasberry.

My friend really loved her card. Hope you do too!

Beautiful Blooms


Hi There! Here is the card that I made with the new Kraftin’ Kimmie – Beautiful Blooms set.


I also used the new Kraftin’ Kimmie Purple Pansy and Kraftin’ Kimmie Lovely Lagoon inks to acentuate the veins in the leaves and petals in the flowers. Also around the borders of the card and die cut. Sentiment is from Kraftin’ Kimmiee – Tweetie Pies.

Background Paper: K&C Company – Susan Winget Specialty Paper – SW Botanical. Inked around card with Kraftin’ Kimmie Lovely Lagoon ink.

Die Cuts: Creative Expression – Craft Dies by Sue Wilson – Noble Dies – Double Pierced Ovals

Used my MISTI – Most Incredible Stamping Tool to stamp all of the images.

Centre flower was stamped with Versamark ink and then embossed with Adirondack Eggplant Embossing Powder.

Top and bottom flowers added in Kraftin’ Kimmie Purple Pansy in spots onto Momenta – Cardstock, then stamped with Versamark ink and embossed with Ranger – Clear Super Fine Detail embossing powder. Next I inked over the entire flowers with Kraftin’ Kimmie Purple Pansy!

For all of the leaves and stems, stamped the images onto Momenta – Cardstock, then stamped with Versamark ink and embossed with Ranger – Clear Super Fine Detail embossing powder. Next I inked over the entire flowers with Kraftin’ Kimmie Purple Pansy! All of the leaves were inked over with Kraftin’ Kimmie Lovely Lagoon. Just loved how the veins in the leaves turned out once I did that.

For the shaker portion, I used Judi-Kins Embossable Window Plastic 4.25 x 5.5 inches and a little bit of Martha Stewart Sour Apple, Limeade Glitter and Craftin Desert Diva’s Skyfall sequence.

Pearls – Crafts Pearl Halves 02-3019843

Hope you like it!

Magical Friends


Hi There!

I had a chance to work with the new Kraftin’ Kimmie – Magical Friends stamps. It was so much fun and I hope you love my creation.

I know that we all would love a cleaning fairy, so I used the sentiment from Kraftin’ Kimmie – Lorretta Laundry stamp set on the front.

I also thought the little Gnome and squirrel on the stump from the Kraftin’ Kimmie – Whimsical Gnomes stamp set fit well with the little scene that I was trying to create.


If you look closely at the paper in the background, you will also see some little fairies playing in the flowers.

Of course, I couldn’t resist putting in this little fairy playing with her kitty on the inside, which is also part of the new Kraftin’ Kimmie Magical Friends stamps set.

Here is a close-up:

She has no intention of doing any housework at all! LOL! Instead she is enjoying her day!!! Sentiments surrounding the image are from the new Kraftin’ Kimmie – Magical Friends stamps set.

Birthday wishes are from Kraftin’ Kimmie – Kick Assy Birthday stamp set.

All images were stamped onto Copic Marker X-Press It Blending Card using my  MISTI – Most Incredible Stamping Tool for precision stamping and Memento – Tuxedo Black ink. Then coloured in with Copic markers.

Sentiments were stamped with Versa Fine – Onyx Black and Ranger – Clear Super Fine Detail embossing powder.

Edged around die cuts and main card with Sharpie – Gold Medium Point – Water Based Paint.

Background Paper: Unique Papercrafting Graphics 45 – Fairie Dust Collection.

Die Cuts: Your Next Stamp – Stitched Rectangle Die Set (YNSD214); Spellbinders – Die D-Lites Conversation Bubble 3 Etched Dies

Hope you like it!


Parents Anniversary


Hi There!

Sharing a card that I made for my parents anniversary a while back last year. Been so busy that I’m just getting around to posting it now. LOL!

Here is a close-up:


I then put this on the back of the card to finish it off.


All stamps were stamped using MISTI – Most Incredible Stamping Tool. Images were stamped onto Copic Marker X-Press It Blending Card with Memento – Tuxedo Black and sentiments were stamped with Versa Fine – Onyx Black and then embossed with Ranger – Clear Super Fine Detail embossing powder. A mixture of Copic and Spectrum Noir alcohol markers were used to colour in the images.

Stamps: 

Images: Mo Manning – Young Love MO128 and Mo Manning – Jack and Ginger MM010

Sentiments: Peachy Keen Stamps – PKSC-04 April 2012

Background paper: Heartfelt Creations – Flowering Dogwood Collections – 12″ x 12″ Paper Pad – HCDP1-275

Die Cuts: My Creative Time -Stitched Squares Inside and Out, Crafter’s Companion – Die’sire – Mini Victoriana, Crafter’s Companion – Die’sire – Mini Victoriana


Tweetie Pie 2 – Bookmark


Sharing another bookmark that I made with Kraftin’ Kimmies – Tweetie Pie Stamp.

My friends always called me Birdie growing up, so I knew I had to make this.

Coloured in with Copic markers. Stamped image using my MISTI – Most Incredible Stamping Tool, Memento – Tuxedo Black and Copic Marker X-Press It Blending Card. Sentiment: Versa Fine – Onyx Black and Ranger – Clear Super Fine Detail embossing powder. Edging: Tim Holtz Distress Ink – Salty Ocean

Die Cut – Die-Namics MFT-489 PCD Fishtail Figs STX

Hope you like it!

Entered into http://kraftinkimmiestamps.blogspot.ca/2018/03/march-skrappy-challenge.html

Tweetie Pie1


Hi There!

Sharing a bookmark that I made with Kraftin’ Kimmies Tweetie Pie Stamp.

My friends always called me Birdie growing up, so I knew I had to make this.


Coloured in with Copic markers. Stamped image using my MISTI – Most Incredible Stamping Tool, Memento – Tuxedo Black and Copic Marker X-Press It Blending Card. Edging: Tim Holtz Distress Ink – Salty Ocean

Die Cut: Die-Namics MFT-489 PCD Fishtail Figs STX

Hope you like it!

Entered into http://kraftinkimmiestamps.blogspot.ca/2018/03/march-skrappy-challenge.html