Tag Archive | #Roberta

Bride To Be Gnome!


Today I’m sharing a Bride To Be card using KLM Digital DesignBridal Gnome II from the new March 2024 release. This image also comes with 3 more sentiments, “Congratulations”, “on your engagement” and “on your marriage”. My niece is getting married this year and I thought this would be a wonderful card for her.

The image and sentiment were imported into Microsoft Word and printed out onto Copic Marker X-Press It Blending Card. Using a Cuttlebug and dies from Spellbinders – Grand Arch 3D card, I die cut the image and Recollections – Matte Gold Foil cardstock was used to die cut the Trellis. The clouds were die cut using Hammermill – Premium Cardstock 110 lb. and Lawn Fawn – Platform Pop-Up Cloud Inserts dies. I created a base card using Hammermill – Premium Cardstock 110 lb. cardstock and for the front flap, I used Cuttlebug Embossing Folder – Swiss dots stencil and ran it through my Cuttlebug. The image was coloured in with the Copics listed below. The sentiment and gold background were cut and layered together using U-Line Double-Sided Foam Tape.

The card was now ready to assemble. Using liquid glue, I applied the gold trellis and coloured image directly to the base. The sentiment was popped up and centred onto the top of the card. Lastly, using some glue dots, I added in 3 flowers from my stash to both sides at the bottom of the card to give it some extra colour.

Card Recipe:

Stamp and Sentiment:  KLM Digital DesignBridal Gnome II

Inks: HP Printer Grayscale

Paper: Copic Marker X-Press It Blending Card, Hammermill – Premium Cardstock 110 lb., Recollections – Matte Gold Foil cardstock

Dies: Spellbinders – Grand Arch 3D card (S6-138), Lawn Fawn – Platform Pop-Up Cloud Inserts

Embossing Folder: Cuttlebug – Swiss dots

Miscellaneous: U-Line Double-Sided Foam Tape, Flowers from my stash

Image coloured with Copic Markers:

Skin: E21, E11, E00, E000

Hair: E08, YR18, YR16, YR12

Dress: C01, C00, Colorless Blender

Flowers, Hat and Leaves: Y17, Y08, Y02, R46, R14, R08, G16, G14, YG25, YG23, YG21

Sky: B04, B02, B01, B00, B60 on clouds

Grass: YG07, YG05, YG03, YG01

Hope you like it and have a great week!

You can find more cards to inspire you at KLM Designs, KLM Digital Design Team and KLM Digital Designs on the Facebook Fan page from the rest of our design team.

It’s Always Cupcake Time!!!


Today I am sharing a birthday card I made using Kraftin’ Kimmie StampsBirthday Lulu stamp and sentiment.

To make my cards this week, I began with a card base of Hammermill – Premium Cardstock 110 lb. cardstock, cut and scored to be 5.5″ x 4.25″.

With my MISTI and Memento – Tuxedo Black ink, I stamped the image onto Copic Marker X-Press It Blending Card and the sentiment directly onto the base card using Versa Fine – Onyx Black ink. I embossed the sentiment with Ranger – Clear Super Fine Detail embossing powder and then heat embossed it with a Marvy Uchida – Embossing Heat Tool. I coloured in the image with Copic markers and then fussy cut all around it. Spectrum Noir – Sparkles – Crystal Clear was applied to the icing and dots on Lulu’s hat.

With a Cuttlebug and We R Memory Keepers – Quickutz Nesting Scallops, I die cut the smaller scallop circle out of Doodlebug Design Inc. – Made With Love paper (3.5″) and the larger scallop circle out of Doodlebug Design Inc. – Spring Solid Assortment cardstock (3-7/8″). Doodlebug Design Inc. – Made With Love cardstock was cut to the size of 4/3-8″ x 1″ and Doodlebug Design Inc. – Spring Solid Assortment cardstock was cut to the size of 4.5″ x 1-1/8″ for the rectangles. Tim Holtz Distress Ink – Worn Lipstick was used to ink around the edges of both scallops and the smaller rectangles.

The card was now ready to assemble. With liquid glue, I applied the smaller rectangles onto the large rectangles. Then using double-sided tape, I applied each of the rectangles to the base card. U-Line Double-Sided Foam Tape was applied to both scallop circles and the coloured image. All 3 were centred and popped up on top of each other to complete the card.

Card Recipe:

Stamp and Sentiment: Kraftin’ Kimmie StampsBirthday Lulu

Inks: Memento – Tuxedo Black, Versa Fine – Onyx Black, Tim Holtz Distress Ink – Worn Lipstick

Paper: Copic Marker X-Press It Blending Card, Hammermill – Premium Cardstock 110 lb., Doodlebug Design Inc. – Made With Love (6″ x 6″), Doodlebug Design Inc. – Spring Solid Assortment (12″ x 12″)

Die Cuts: We R Memory Keepers – Quickutz Nesting Scallops (15 Dies)

Embossing Powder: Ranger – Clear Super Fine Detail embossing powder

Miscellaneous: MISTI – Most Incredible Stamping Tool, U-Line Double-Sided Foam Tape, Spectrum Noir – Sparkles – Crystal Clear, Marvy Uchida – Embossing Heat Tool

Image coloured with Copic Markers:

Skin: E21, E11, E00, E000, R37, R30, R22, Sakura Glaze – Black (Eyes)

Hair: YR31, YR24, YR23, E99

Dress, Socks and Shoes: BG72, BG57, BG32, BG11, BG10, N7

Cupcake Wrapping: RV29, RV25, RV23, RV21

Cupcake Icing and Sprinkles: Y08, Y06, Y04, Y02, BG57, BG32, RV29, RV23, Spectrum Noir – Sparkles – Crystal Clear

Party Hat: RV29, RV25, RV23, RV21, BG57, Spectrum Noir – Sparkles – Crystal Clear

Hope you like it and have a fantastic week!

Entered into: Kraftin’ Kimmie – Bday Krop Ch #1 – Birthday plus Dots!

Sweet Note of Thanks!


Today I’m sharing a Thank-you card using Your Next StampMusic Bunny – CYNS262. I was on a cruise last year and we met some wonderful couples that sat at the tables next to ours and we exchanged information. Unknown to us until the final evening, the couple that sat directly beside us was Steven Gilliland and his wonderful wife Diane. Steven happens to be a very well known acclaimed author and public speaker. My husband and I were so happy when Steven sent us a few of his books, “Making a Difference” and a “Cherry On Top”. Steven had personally autographed them to us as well. What a kind and awesome gesture and it was very much appreciated. We are currently reading his books and just love them. As a thank you for their kind generosity, I sent them this card from my husband and I.

To create the card, I began with a card base of 5.5″ x 5.5″ using Hammermill – Premium Colour 100 lb. cardstock. I cut Recollections – Matte Gold Foil cardstock to be the same size as the base card and applied double-sided tape to it. This was adhered directly to the base card. Next, I cut a piece of Hammermill – Premium Colour 100 lb. cardstock to the size of 5.25″ x 5.25″. I sprayed some water onto the paper and then using Kraftin’ Kimmie – Musical Melodies stencil I placed it on top of the paper and ran it through my Cricut Die Cutting machine to emboss the paper. Once the paper was dry, I placed the stencil over top of the paper again and this time, using Tim Holtz Distress Ink – Black Soot and a blending brush, I coloured in the musical notes. I also inked around the edges with the same ink and a mini dauber.

Using my Cuttlebug and PinkFresh Studio – Essentials – Blanket Stitched Square 4″ dies, I die cut Copic Marker X-Press It Blending Card. The main image was stamped onto this die cut using Memento – Tuxedo Black ink and my MISTI. I coloured in the image and created my own background. Once this was completed, I put the image back into my MISTI and stamped the sentiment using Versa Fine – Onyx Black ink. Ranger – Clear Super Fine Detail embossing powder was applied over top of the ink and then heat embossed with a Marvy Uchida – Embossing Heat Tool. The little notes were added with Versa Fine – Onyx Black ink and a miniature stamping block. I just chose several notes and stamped them randomly around the image. I felt like the image was still missing something, so I decided to take my Copic black marker (100) and using the lines from the die cut as a guide, coloured in every second stripe. I thought this made it look like a piano keyboard. Lastly, My Creative Time – Stitched Squares Inside and Out 4.5″ were used to die cut Recollections – Matte Gold Foil cardstock.

The card was now ready to assemble. I added U-Line Double-Sided Foam tape to the back of the music square, gold square and image. Each of them were popped onto each other and centred onto the base card.

Card Recipe:

Stamp: You’re Next StampMusic Bunny – CYNS262

Inks: Memento – Tuxedo Black, Tim Holtz Distress Ink – Black Soot, Versa Fine – Onyx Black

Paper: Copic Marker X-Press It Blending Card, Hammermill – Premium Colour 100 lb., Recollections – Matte Gold Foil cardstock

Dies: PinkFresh Studio – Essentials – Blanket Stitched Square, My Creative Time – Stitched Squares Inside and Out

Stencil: Kraftin’ Kimmie – Musical Melodies

Embossing Poweder: Ranger – Clear Super Fine Detail

Miscellaneous: U-Line Double-Sided Foam Tape, Marvy Uchida – Embossing Heat Tool, MISTI – Most Incredible Stamping Tool, Sakura Glaze – Black pen

Image coloured with Copic Markers:

Bunny: C3, C1, C0, C00, R30, R02, R00, Colorless Blender

Mice: W7, W5, W3, R30, R02, R00

Ribbon: R59, R37, R35

Flower: B29, B26, B23, Y17, Y11

Piano: W9, W7, W5, C9

Piano Chair: W9, W7, W5, R59, R37, R35

Floor: E49, E34, E29, E27, E25, E23

Wall: BG32, BG11, BG10

Border: 100

Hope you like it and have a great week!

Mandala #5


Today, I’m sharing a Thank You card using KLM Digital DesignMandala #5 from the new February 2024 release.

Hammermill – Premium Cardstock 110 lb. was used to create a 5.5″ x 4.25″ card base. Crafter’s Companion Luxury Cardstock – Silver was cut to the size of 4.25″ x 4.25″ and applied directly to the base using double-sided tape. Using a Cuttlebug and PaperCrafter Today – 15 Die Cut Sentiment Set, I die cut “Thank You” out of the same cardstock. With My Creative Time -Stitched Squares Inside and Out dies and Cuttlebug, I die cut a 4″ x 4″ square out of Craft Consortium – Ink Drops – Ocean Cardstock. Tim Holtz Distress Ink – Blueprint Sketch was applied all around the outside edges. I also cut 2 small strips of 3/8″x 4.25″ out of the same cardstock. U-Line Double-Sided Foam Tape was applied to the smaller square and it was popped up onto the silver background. Liquid glue was applied to the 2 smaller stripes and sentiment and they were all applied directly to the base card.

The image was imported into Microsoft Word and printed out onto Copic Marker X-Press It Blending Card. I coloured in the image with Copic markers listed below and then I fussy cut around it leaving a thin white border. The Mandala was popped up onto the top part of the card using U-Line Double-Sided Foam Tape. Lastly, using liquid glue, I attached gems from Buttons Galore and More to complete the card.

Card Recipe:

Stamp:  KLM Digital DesignMandala #5

Inks: HP Printer Grayscale, Tim Holtz Distress Ink – Blueprint Sketch

Paper: Copic Marker X-Press It Blending Card, Hammermill – Premium Cardstock 110 lb., Crafter’s Companion Luxury Cardstock – Silver – 8.5 x 11″, Craft Consortium – Ink Drops – Ocean Cardstock (6″ x 6″)

Dies: PaperCrafter Today – 15 Die Cut Sentiment Set, My Creative Time -Stitched Squares Inside and Out

Miscellaneous: U-Line Double-Sided Foam Tape, Buttons Galore and More Jewel Mix

Image coloured with Copic Markers:

Mandala: BG72, BG57, BG32, BG11, BG09, BG07, BG05, BG02, BG01, RV66, RV55, RV19, RV17, Y38, Y35, Y32

Hope you like it and have a great week!

You can find more cards to inspire you at KLM Designs, KLM Digital Design Team and KLM Digital Designs on the Facebook Fan page from the rest of our design team.

Gnome One Else – Valentine’s!


Today I’m sharing a Valentine’s card using Whimsy StampsGnome One Else Clear Stamps that I made for my husband this year!

The image and sentiments were stamped onto Copic Marker X-Press It Blending Card cut to the size of 7″ x 5″ using my MISTI and Memento – Tuxedo Black ink. I created a base card to be 7.25″ x 5.25 using Recollections – Red cardstock. I coloured in all of the images with Copic markers listed below. The hearts were applied using Kraftin Kimmie – Happy Hearts Stencil and Tim Holtz Distress Ink – Lumberjack Plaid using a blending brush. Once this was completed, using the MISTI for placement, I applied the sentiments using Versa Fine – Onyx Black from the same stamp set. Ranger – Clear Super Fine Detail embossing powder was applied and then heat embossed with a Marvy Uchida – Embossing Heat Tool. Using a finger dauber and Tim Holtz Distress Ink – Picked Raspberry, the edges of the Copic Marker X-Press It Blending Card were inked all around.  The coloured image was then applied to the base card using double-sided tape.

My husband loved his card and I hope you do too!

Image coloured with Copic Markers:

Card Recipe:

Stamps and Sentiments:  Whimsy StampsGnome One Else Clear Stamps

Inks: Memento – Tuxedo Black, Tim Holtz Distress Ink – Picked Raspberry, Versa Fine – Onyx Black, Tim Holtz Distress Ink – Lumberjack Plaid

Paper: Copic Marker X-Press It Blending Card, Recollections – Red cardstock

Embossing Powder: Ranger – Clear Super Fine Detail embossing powder

Stencil: Kraftin Kimmie – Happy Hearts Stencil

Miscellaneous: Marvy Uchida – Embossing Heat Tool, MISTI – Most Incredible Stamping Tool

Image coloured with Copic Markers:

Skin: E21, E11, E04, E00, E000

Hair: E99, YR24, YR23

Beard: E79, E70, E29, E27

Male – Clothing: B26, B23, B21

Male Hat: R59, R37, R35

Female – Clothing and Hat: BG32, BG15, BG09

Shoes: C3, C2, C1, C0, C00

Swing: E35, E33, E31, E25, Y17

Mushroom: E42, E40, E09, E08, E0000, BV31, R08

Grass and Boat: G16, YG25, YG23

Flower: V04, V01, V000, Y08, Y04, Y00, E13

Hope you like it and have a great week!

Added into contest: https://thefairyandtheunicornchallenge.blogspot.com/2023/12/hqfcb-is-formerly-known-tfatu-2-agf.html

Added into contest: https://hqcelebrationsoflovechallenges.blogspot.com/2024/02/hqcolcb-2-competition-of-ewa-with.html

YAY! My card was one of the TOP 3 for Heart’s Quest Celebrations of Love Challenge Blog. Feeling so grateful!


Flower Hexagon!


Today I’m sharing a Birthday card using KLM Digital DesignFeb Floral Hexagon from the new February 2024 release. This hexagon is very easy to colour and you can change the colours of the flowers and background to whatever pleases you!

I began with a base card of 5.5″ x 5.5″. Using my Cuttlebug and My Creative Time – Stitched Squares Inside and Out, I die cut the smaller K&Company – Kelly Panacci – KP Valentine square (4.5″ x 4.25″) out of the larger pink square (5-3/8″ x 5-3/8″) and also the green paper (5″ x 5″). I added some glue and attached the largest square (K&Company – Kelly Panacci – KP Valentine) directly to the base. Next, using double-sided tape, the green and blue square (4.75″ x 4.75″) were attached to the base.

The image was imported into Microsoft Word and printed out onto Copic Marker X-Press It Blending Card using a HP Printer.  I coloured in everything and then fussy cut around each hexagon. I took a picture first before I began cutting everything to know the proper placement. After cutting all of the pieces, I used my black Copic marker to go around all of the edges. Once this was done, I ran all of the pieces through my Xyron Creative Station to make stickers out of them. This made it very easy to place them on the smallest pink square. I arranged all of the pieces and then using a finger dauber, inked around all of the edges of the square with Tim Holtz Distress Ink – Picked Raspberry. U-Line Double-Sided Foam Tape was applied to the back of the finished piece and it was centred onto the card. Lastly, a few pop dots from Your Next Stamp  and “Happy Birthday” Starform Stickers were added to complete the card.

Card Recipe:

Stamp:  KLM Digital DesignFeb Floral Hexagon

Inks: HP Printer Grayscale, Tim Holtz Distress Ink – Picked Raspberry

Paper: Copic Marker X-Press It Blending Card, Hammermill – Premium Cardstock 110 lb., Green, Blue, K&Company – Kelly Panacci – KP Valentine – 30-599338

Dies: My Creative Time – Stitched Squares Inside and Out

Miscellaneous: Xyron Creative Station, U-Line Double-Sided Foam Tape, Your Next Stamp – Pop Dots, Starform Stickers

Image coloured with Copic Markers:

Background: B04

Flowers: RV66, RV63, RV55, Y15, Y02

Leaves and Stems: G16, YG25, YG23

Outline: Black (100)


Hope you like it and have a great week!

You can find more cards to inspire you at KLM Designs, KLM Digital Design Team and KLM Digital Designs on the Facebook Fan page from the rest of our design team.

Happy Chinese New Year Dragon 2024!!!


Today I’m sharing Chinese New Year cards I created for my friends and some co-workers using Whimsy StampsBirfday Party Dragons – DP1055, Craftin Desert Diva’s Dragon Festival Stamps (Retired),  SVG Year of the Dragon Alphabet by Sarah Christie and  Gina Marie Designs – Ric Rac Nested Circle Dies.

The same procedure below was used to create 10 semi-identical cards.

Recollections – Christmas Cards and Envelopes Set cardstock was used to create a 6.5″ x 5″ card base. Using my MISTI Craftin Desert Diva’s Dragon Festival Stamps and VersaMark ink, I stamped the dragons and sentiment at the top of the card and then embossed the ink with Ranger Super Fine Gold Embossing powder. This was then heat embossed with Marvy Uchida – Embossing Heat Tool. The MISTI really helped speed up this process because once I had positioned the stamps for the first card on the MISTI, I just had to keep adding and stamping each additional card.

For the next step, I die cut all of my gold scallops using Recollections – Matte Gold Foil cardstock and Copic Marker X-Press It Blending Card using my Cuttlebug and Gina Marie Designs – Ric Rac Nested Circle Dies. I stamped out one more image onto a piece of Post-It Note paper and fussy cut around it to create a mask. The mask was  applied over top of the dragon image. Next using a blender brush, Tim Holtz Distress Ink – Salty Ocean and stencils made from Avery Elle – Pierced Clouds Die (retired), I created the cloudy background sky. Once this was completed, I coloured in the image with the Copic markers listed below. U-Line Double-Sided Foam Tape was applied to the backs of each of the scallops. I applied the gold and coloured pieces together and then popped them up onto the centre of the cards.

Lastly, I used a freebie from Extraordinarychaos –  SVG Year of the Dragon Alphabet by Sarah Christie. I was so happy when I had seen this, as I knew I just had to used it on my cards this year. I uploaded the .SVG file into Cricut Design space and sized the numbers. The numbers were cut out on my Cricut Explore using Recollections – Matte Gold Foil cardstock. The die cut numbers were applied with glue and attached to the each of the cards to finish them off.

Card Recipe:

Stamps: Whimsy StampsBirfday Party Dragons – DP1055, Craftin Desert Diva’s Dragon Festival Stamps (Retired)

Inks: Memento – Tuxedo Black, VersaMark, Tim Holtz Distress Ink – Salty Ocean

Paper: Copic Marker X-Press It Blending Card, Recollections – Christmas Cards and Envelopes Set, Recollections – Matte Gold Foil cardstock

Dies: SVG Year of the Dragon Alphabet by Sarah ChristieGina Marie Designs – Ric Rac Nested Circle Dies, Avery Elle – Pierced Clouds Die (D-05-01) (Retired)

Embossing Powder: Ranger Super Fine Gold Embossing powder

Miscellaneous: MISTI – Most Incredible Stamping Tool, Marvy Uchida – Embossing Heat Tool, U-Line Double-Sided Foam Tape

Dragon: YR24, YR23, YR21, R56, R39, R37, R35

Balloons: YR24, YR23, YR21, YR20, R37, R27, R24

Hope you like it and have a great week!

Flower Pot Gnome – Girl!


Today I’m sharing a Thank You card using KLM Digital DesignFlower Pot Gnome – Girl from the new February 2024 release. This image also comes with 2 more sentiments, “You are loved” and “Carry on with courage“.

The image and sentiment were imported into Microsoft Word and printed out onto Copic Marker X-Press It Blending Card. I had created a 5.5″ x 4.25 frame around the image before printing it out with a HP Printer. I also printed out a second image onto plain photocopy paper and fussy cut around it. The image was coloured in with the Copics listed below and then I attached the mask that I had created out of the plain paper over top of the coloured image. Using some stencils that I had created previously with Avery Elle – Pierced Clouds Dies and Tim Holtz Distress Ink – Salty Ocean, I created the clouds with a blender brush. Once this was done, I coloured in the grass. The image was then cut to the size of 5.5″ x 4.25 and attached with double-sided tape to a card base of the same size using Hammermill – Premium Cardstock 110 lb.

Card Recipe:

Stamp and Sentiment:  KLM Digital DesignFlower Pot Gnome – Girl

Inks: HP Printer Grayscale, Tim Holtz Distress Ink – Salty Ocean

Paper: Copic Marker X-Press It Blending Card, Hammermill – Premium Cardstock 110 lb.

Dies: Avery Elle – Pierced Clouds Die (D-05-01)

Image coloured with Copic Markers:

Skin: E21, E11, E04, E00, E000

Hair: E08, YR18, YR16, YR12

Jeans and Hat: B26, B23, B21

Shoes: E27, E25, E23, E21

Shirt: BG72, BG57, BG32, BG11

Flower Pot, Flowers, Leaves: E13, E09, E08, V04, V01, V000, Y17, Y04, G16, YG25, YG23

Grass: G16, YG25, YG23, YG03, YG01

Hope you like it and have a great week!

You can find more cards to inspire you at KLM Designs, KLM Digital Design Team and KLM Digital Designs on the Facebook Fan page from the rest of our design team.

Is That Cake???


Today I’m sharing a birthday card that I made for my manager who is an avid hunter using Art ImpressionsOle Buck Set.

AC White cardstock was used to create a 6″ x 6″ card base. I cut Creative Memories – Hot Fudge paper to the size of (6″ x 6″) and (3.75″ x 3.75″). Using the same paper, and my Cuttlebug, I die cut the larger circle using My Creative Time – Little Gift Tags – 1.25″. Photo-Play – Camp Happy Bear paper was cut to the size of 5.75″ x 5.75″. My Creative Time -Stitched Squares Inside and Out was die cut with my Cutttlebug to the size of  (3.5″ x 3.5″ ) and a (1″) Circle using a circle punch from Copic Marker X-Press It Blending Card.

Using a MISTI and Memento – Tuxedo Black, I stamped the image onto the Copic paper. For the circle, I first stamped the Bull’s eye with Tim Holtz Distress Ink – Pumice Stone and then over top of this, I stamped the sentiment with Versa Fine – Onyx Black ink and then applied Ranger – Clear Super Fine Detail embossing powder. This was then heat embossed with a Marvy Uchida – Embossing Heat Tool and set aside.

To create the background, I first applied the blue sky using a blending brush that still had some blue ink on it from another project. Using Tim Holtz Distress Inks – Peeled Paint and Memory Box – Snowy Pine Landscape rubber stamp, I applied the trees in the background. Using a blending brush and the same ink, I applied the greenery below the trees and then blended in Krafty Kolours – Sandy Shores with another blending brush. The picture was coloured in with Copic markers and then I fussy cut all around it. Once I completed the cutting, I applied a black marker all around the edges to make it stand out more against the background.

The card was now ready to assemble. I attached the 6″ x 6″ paper directly onto the base and then centred the background paper over it using double-sided tape. The die cut square was applied directly to larger square using double-sided tape. This was then popped up onto the card using U-Line Double-Sided Foam Tape. I applied the U-Line Double-Sided Foam Tape to the back of the image and popped it up onto the coloured background. Using what was left on my blender brush, I coloured the copic paper green with a little touch of blue and the applied the 2 circles together with liquid glue. The larger circle was attached to the card using U-Line Double-Sided Foam Tape in the right corner.

On the inside of the card, I added the sentiment “Happy Birthday Ole Buck” and the dear from the same set.

Card Recipe:

Stamps: Art ImpressionsOle Buck Set – 5403, Memory Box – Snowy Pine Landscape (F1900)

Inks: Memento – Tuxedo Black, Tim Holtz Distress Inks – Peeled Paint, Tim Holtz Distress Ink – Pumice Stone, Krafty Kolours – Sandy Shores, Versa Fine – Onyx Black

Paper: Copic Marker X-Press It Blending Card, AC White Cardstock, Creative Memories – Hot Fudge (12″ x 12″), Photo-Play – Camp Happy Bear (6″ x 6″)

Dies: My Creative Time -Stitched Squares Inside and Out, My Creative Time – Little Gift Tags (Retired)

Embossing Powder: Ranger – Clear Super Fine Detail embossing powder

Miscellaneous: Marvy Uchida – Embossing Heat Tool, U-Line Double-Sided Foam Tape, Cuttlebug

Skin: E21, E11, E04, E00, E000, R22, R30

Greens: G99, G94, G82, G43

Browns: E87, E84, E81, E55, E50, E49, E47, E44, E43, E42, E41, E37, E35, E34, E31, E30, E27, E25, E23, E21

Hope you like it and have a great week!

Flower Pot Gnome!


Today I’m sharing a card using KLM Digital DesignFlower Pot Gnome from the new January 2024 release. This image also comes with 2 more sentiments, “Something about you made me feel a little more alive and a far less lost” and “You will forever be my always”. I love these sentiments because they can be used for Valentine’s Day, anniversaries or just to say “I love you”.

The image and sentiment were imported into Microsoft Word and printed out onto Copic Marker X-Press It Blending Card. I had created a 5.5″ x 4.25 frame around the image before printing it out with a HP Printer. I also printed out a second image onto plain photocopy paper and fussy cut around it. The image was coloured in with the Copics listed below and then I attached the mask that I had created out of the plain paper over top of the coloured image. Using some stencils that I had created previously with Avery Elle – Pierced Clouds Dies and Tim Holtz Distress Ink – Salty Ocean, I created the clouds with a blender brush. Once this was done, I coloured in the grass. The image was then cut to the size of 5.5″ x 4.25 and attached with double-sided tape to a card base of the same size using Hammermill – Premium Cardstock 110 lb.

Card Recipe:

Stamp and Sentiment:  KLM Digital DesignFlower Pot Gnome

Inks: HP Printer Grayscale, Tim Holtz Distress Ink – Salty Ocean

Paper: Copic Marker X-Press It Blending Card, Hammermill – Premium Cardstock 110 lb.

Dies: Avery Elle – Pierced Clouds Die (D-05-01)

Image coloured with Copic Markers:

Skin: E21, E11, E04, E00, E000

Beard: E08, YR18, YR16, YR12

Jeans and Hat: B26, B23, B21

Shoes: E27, E25, E23, E21

Shirt: BG72, BG57, BG32, BG11

Letter: C1, C00, Colorless Blender

Flower Pot, Ribbon, Flowers, Wrapping and Leaves: E95, E25, E19, E17, E16, E13, V04, V01, V000, Y17, Y15, Y08, Y04

Grass: G16, YG25, YG23, YG21, YG03, YG01

Hope you like it and have a great week!

You can find more cards to inspire you at KLM Designs, KLM Digital Design Team and KLM Digital Designs on the Facebook Fan page from the rest of our design team.

Happy Mail


Happy New Year Everyone! I hope you enjoyed the holidays and are looking forward to an amazing year ahead!

Today, I’m sharing a card using KLM Digital DesignFloral Envelope – Henna from the new January 2024 release. This stamp also comes with 2 other sentiments, “Sending you love and wishes” and “Just for you”. I chose to make the Happy Mail card, because who doesn’t love “Happy Mail’? I know I do.

Hammermill – Premium Cardstock 110 lb. was used to create a 5.5″ x 5.25″ card base.

The image was imported into Microsoft Word and I copied the image multiple times varying the size and changing the direction to create my own background using a 5.5″ x 4.25″ rectangle for the positioning of the graphics. A larger copy of the image was created and I added the wording on top of it in Microsoft word as well.  Once I was satisfied with the look, I printed everything out onto Copic Marker X-Press It Blending Card.

The image and background were coloured in with the Copic markers listed below and then a cutter was used to get nice clean lines. The rounded edges of the large envelope were fussy cut and then inked around the edges with a black Copic marker. The background was adhered to the base card with double-sided tape and the rounded corners were cut with a 1/2″ We R Memory Keepers Corner Chomper. U-Line Double-Sided Foam Tape was applied to the large envelope image and it was popped up onto the card. Lastly, PinkFresh Studio Essentials – Ombre Glitter Drops: Sparkle & Shine were added to the centres of the background flowers to give the card a little bit of sparkle and to finish it off.

Card Recipe:

Stamp:  Floral Envelope – Henna – KLM Digital Designs

Inks: HP Printer Grayscale

Paper: Copic Marker X-Press It Blending Card, Hammermill – Premium Cardstock 110 lb.

Miscellaneous: U-Line Double-Sided Foam Tape, 1/2″ We R Memory Keepers Corner Chomper, PinkFresh Studio Essentials – Ombre Glitter Drops: Sparkle & Shine (#PF113ES)

Image coloured with Copic Markers:

Flower: RV19, RV17, RV14, RV13, RV11, YR23, Y15, Y11, Y00

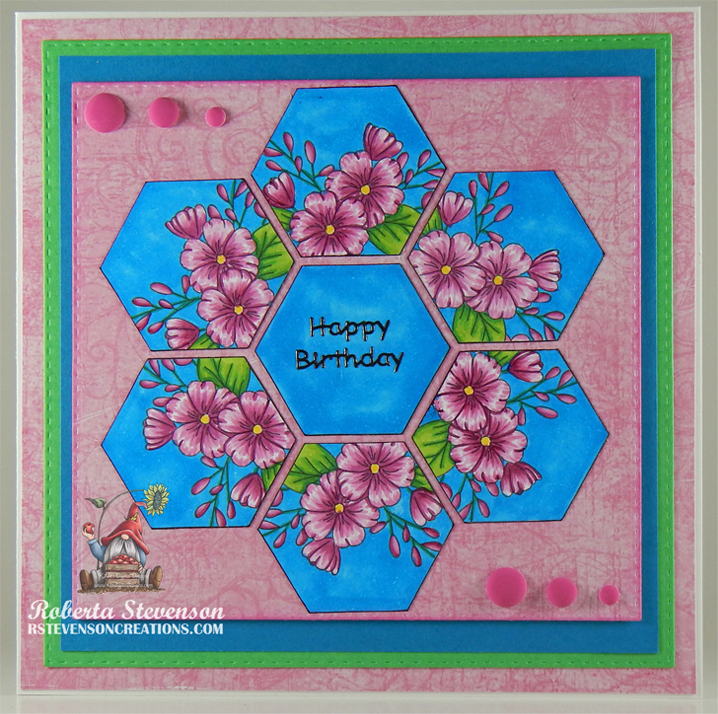
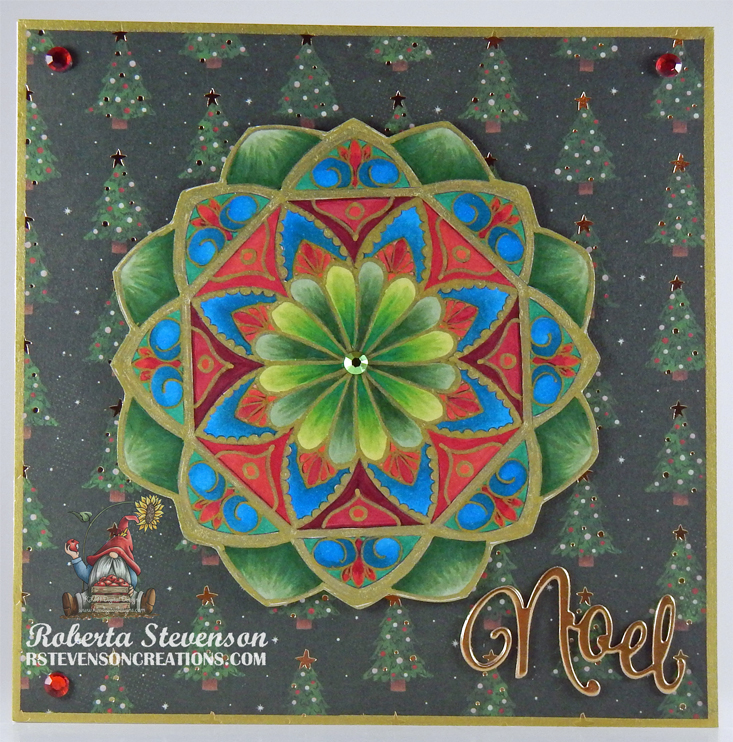
Leaves: G16, YG25, YG23, YG21

Shadow: C1, C0, C00, Colorless Blender

Background: RV00

Hope you like it and have a great week!

You can find more cards to inspire you at KLM Designs, KLM Digital Design Team and KLM Digital Designs on the Facebook Fan page from the rest of our design team.

Penguins Christmas!!!


Sharing another Christmas card I made using It’s Penguining To Look A Lot Like Christmas! by Kraftin’ Kimmie Stamps. Merry Christmas and A Happy New Year from our family to yours!

To make my card this week, I began with a Recollections – Winter 4.25″ x 5.5″ card base. I die cut Copic Marker X-Press It Blending Card and Recollections – Matte Gold Foil cardstock with my Cuttlebug and Creative Expressions – Industrial Chic – Gear Flower dies . With my MISTI and Memento – Tuxedo Black ink, I stamped the image onto the die cut. The sentiment was stamped using VersaMark ink and then embossed with Ranger Super Fine Gold Embossing powder. Marvy Uchida – Embossing Heat Tool was applied to the powder to heat emboss it. I cut some notches into the sentiment piece and then inked around the edges with some blue that I still had on a dauber.

The image was coloured in with Copic Markers listed below and then Stickles – Diamond was applied to the ground to add some extra sparkle. Wink of Stella – Clear was applied to the ribbon on the gift. U-Line double-sided foam tape was applied to the back of the die cuts and sentiment and they were all popped up onto the card. Lastly, I applied some small snowflakes from Recollections – Snowflake Specialty Polyester Glitter to complete the card.

Card Recipe:

Stamp and Sentiment: It’s Penguining To Look A Lot Like Christmas!Kraftin’ Kimmie Stamps

Inks: Memento – Tuxedo Black, VersaMark ink

Paper: Copic Marker X-Press It Blending Card, Recollections – Winter 4.25″ x 5.5″ (Assorted Box of Cards), Recollections – Matte Gold Foil cardstock

Die Cut: Creative Expressions – Industrial Chic – Gear Flower (CED3163)

Miscellaneous: MISTI – Most Incredible Stamping Tool, Gelly Roll Sakura #10 Pen, Wink of Stella – Clear, U-Line Double-Sided Foam Tape, Marvy Uchida – Embossing Heat Tool, Recollections – Snowflake Specialty Polyester Glitter

Image coloured with Copic Markers:

Penguins: W9, W7, W5, W3, W0, E15, YR14, Y17, Y11, RV00, E43, E42, E41, E40, R30, R22

Scarves: BG09, BG05, BG02, R85, R83, R81

Present: E15, YR27, YR24, YR13, Y04, R29, R27, R24, Wink of Stella – Clear

Globe: R39, R35, E35, Stickles – Diamond

Sky: B05, B04, B02, B01

Snow: B00, Stickles – Diamond, Gelly Roll Sakura #10 Pen

Hope you like it and have a fantastic week!

Mandala #3


Today, I’m sharing a Christmas card using KLM Digital DesignMandala #3 from the new December release. Being close to Christmas, I also made this to look like a Christmas ornament. Merry Christmas and A Happy New Year to everyone!

Hammermill – Premium Cardstock 110 lb. was used to create a 5.5″ x 5.5″ card base. DCWV – Holiday Cheer paper was cut to the same size and inked around the edges using a Sharpie – Gold Medium Point – Water Based Paint to create the gold border. This was applied directly to the base using double-sided tape.

The image was imported into Microsoft Word and printed out onto Copic Marker X-Press It Blending Card. I coloured in the image with Copic markers listed below and then traced around the entire image using a combination of Pental Slicci – Gold 8.0 pen for the thin lines and UNI Posca Pen – Gold for the thicker lines.

The Mandala was popped up onto the top part of the card using U-Line Double-Sided Foam Tape. With a Cuttlebug and Creative Expressions by Sue Wilson – Festive Collection – Ornate Holly Framed Noel die, I die cut the Noel out of Recollections – Matte Gold Foil 3 times. I layered the 3 pieces together with liquid glue and attached the sentiment to the card. Lastly, I added in some rhinestones to complete the card.

Card Recipe:

Stamp:  Mandala #3 – KLM Digital Designs

Inks: HP Printer Grayscale

Paper: Copic Marker X-Press It Blending Card, Hammermill – Premium Cardstock 110 lb., DCWV – Holiday Cheer (6″ x 6″), Recollections – Matte Gold Foil cardstock

Dies: Creative Expressions by Sue Wilson – Festive Collection – Ornate Holly Framed Noel – CED3073

Miscellaneous: U-Line Double-Sided Foam Tape, Pental Slicci – Gold 8.0 pen, UNI Posca Pen – Gold, Sharpie – Gold Medium Point – Water Based Paint

Image coloured with Copic Markers:

Mandala: BG09, BG07, BG05, B18, B16, G99, G16, YG67, YG63, YG61, YG25, YG23, YG21, R59, R37, R35, R29, R27, R24, R22

Hope you like it and have a great week!

You can find more cards to inspire you at KLM Designs, KLM Digital Design Team and KLM Digital Designs on the Facebook Fan page from the rest of our design team.

A Little Birdie Told Me…


Today, I’m sharing a masculine birthday card using KLM Digital DesignBirds Nest Gnome from the new December release. This image also comes with 2 more sentiments, “Spread your wings & fly” and “Just popping in to say hello“.  It looks like this little birdie told all of his friends too because they’re all ready to party with their hats on. LOL!

Hammermill – Premium Colour 100 lb. cardstock was used to create a 5.5″ x 4.25″ card base.  I cut the paper from Doodlebug Design Inc. – Party Time paper pack to the sizes of 5.5″ x .75″ and 5.5″ x 3.5″ and applied them directly to the base card. .5″ x 4.25″ was applied across the bottom and the thin stripe is 4-7/8″ x 1/8″.  The edges were inked around the card using  Tim Holtz Ranger Distress Ink – Chipped Sapphire.

The image and sentiment were imported into Microsoft Word and printed out onto Copic Marker X-Press It Blending Card. Using a Cuttlebug, I die cut the image using Lawn Fawn – Zig Zag Rectangle Stackables. The image was coloured in with Copic Markers listed below and then popped up onto the base using U-Line double-sided foam tape. The sentiment was fussy cut and then applied with glue to a scrap piece of navy blue cardstock. Once again, I fussy cut around it and then applied U-Line double-sided foam tape and popped it up onto the card. Lastly, I added some Stickles – Diamond to the pompoms on the hats.

Card Recipe:

Stamp and Sentiment:  KLM Digital DesignBirds Nest Gnome

Inks: HP Printer Grayscale, Tim Holtz Distress Ink – Chipped Sapphire

Paper: Copic Marker X-Press It Blending Card, Hammermill – Premium Colour 100 lb., Doodlebug Design Inc. – Party Time (6″ x 6″)

Dies: Lawn Fawn – Zig Zag Rectangle Stackables

Miscellaneous: U-Line double-sided foam tape, Cuttlebug, Stickles – Diamond

Image coloured with Copic Markers:

Skin: E21, E11, E04, E00, E000

Beard: E08, YR18, YR16, YR12

Shoes: E27, E25, E23, E21

Clothing: BG72, BG57, BG32, BG11, B93, B52, B45

Hat: R46, R14, R08

Bird: E35, E34, E31, R02, R00

Egg and Nest: B00, Y26, Y23, Y21, E23

Sky and Clouds: B60, B04, B02, B01, B00, C00

Grass: G16, YG25, YG23

Hope you like it and have a great week!

You can find more cards to inspire you at KLM Designs, KLM Digital Design Team and KLM Digital Designs on the Facebook Fan page from the rest of our design team.

Sweater Weather!!!


I went to an amazing Ugly Sweater crop this week at The Scrap Club and I thought it would be fun to make a Christmas card for a few of the ladies using New Sweater Weather and New Ugly Sweater Stencil by Kraftin’ Kimmie Stamps.

To make my cards this week, I began with a card base of Hammermill – Premium Colour 100 lb. cardstock, cut and scored to be 5.5″ x 4.25″. Hammermill – Premium Colour 100 lb. cardstock was also cut to the same size. Kraftin’ Kimmie StampsNew Ugly Sweater Stencil were applied to the paper using blending brushes and Krafty Kolours – Flirty Flamingo, Krafty Kolours – Ocean Opulence. I wanted to keep the background soft.

With my MISTI and Memento – Tuxedo Black ink, I stamped the images and the sentiment onto Copic Marker X-Press It Blending Card. Memento – Summer Sky ink was used to stamp the image of the pond. I coloured the images in with Copic markers and fussy cut all around them. I glued the stump and pond directly to the base. The mouse and bear were attached directly on top of the pond with glue. U-Line Double-Sided Foam Tape was attached to the bunny, penguin and sentiment and they were all popped up onto the card. Krafty Kolours – Ocean Opulence ink was applied around the sentiment before adding it to the card.

Cosmic Shimmer Fluffy Stuff was applied around the stump and the pond and then heat embossed with a Marvy Uchida – Embossing Heat Tool. Lastly, I added Stickles – Diamond for the snow on the top and side of the stump and to add some sparkle to the ice.

Card Recipe:

Stamp and Sentiment: New Sweater WeatherKraftin’ Kimmie Stamps

Inks: Memento – Tuxedo Black, Memento – Summer Sky, Krafty Kolours – Flirty Flamingo, Krafty Kolours – Ocean Opulence

Paper: Copic Marker X-Press It Blending Card, Hammermill – Premium Cardstock 110 lb., Hammermill – Premium Colour 100 lb.

Stencils: Kraftin’ Kimmie StampsNew Ugly Sweater Stencil

Miscellaneous: MISTI – Most Incredible Stamping Tool, Gelly Roll Sakura #10 Pen,  U-Line Double-Sided Foam Tape, Cosmic Shimmer Fluffy Stuff, Blending Brushes

Image coloured with Copic Markers:

Mouse: W7, W5, W3, R30, R22, R02

Penguin: W9, W7, W5, W3, W00, E15, YR14, Y17, E42, E41, E40, R30, R22, Colorless Blender

Bear and Rabbit: E55, E53, E51, E50, R30, R22, R02

Penguin and Rabbit Sweater, Mug, Earmuffs: BG32, BG11, BG10, B0000, R85, R81, RV00, E13, Gelly Roll Sakura #10 Pen

Bear and Mouse Sweater and Scarves: BG32, BG11, BG10, BG02, BG01, BG000

Ice: B0000, Stickles – Diamond

Stump: E27, E25, E23, E21

Snow: B000, Stickles – Diamond

Hope you like it and have a fantastic week!

Hula Hoop Gnome!


Today I’m sharing a card using KLM Digital DesignHula Gnome from the new December release. This image also comes with 2 more sentiments, “Your so much fun to be around” and “I like being around you”.  This hip gnome knows how to use a Hula Hoop! I did too in my younger days, now, not so much! LOL! For some strange reason, I just can’t seem to find the rhythm! How about you?

Hammermill – Premium Colour 100 lb. cardstock was used to create a 5.5″ x 4.25″ card base.  I inked around all of the edges with blender brushes and a mixture of Tim Holtz Ranger Distress Ink – Wilted Violet, Tim Holtz Distress Ink – Fossilized Amber and Tim Holtz Distress Ink – Prize Ribbon.

The image and sentiment were imported into Microsoft Word and printed out onto Copic Marker X-Press It Blending Card. Using a Cuttlebug, I die cut the image using My Creative Time – Rectangle Frame Die Layers. The image was coloured in with Copic Markers listed below and then popped up onto the base using U-Line double-sided foam tape. To finish off the card, I added in some Kraftin’ Kimmie dots.

Card Recipe:

Stamp and Sentiment:  KLM Digital DesignHula Gnome

Inks: HP Printer Grayscale, Tim Holtz Ranger Distress Ink – Wilted Violet, Tim Holtz Distress Ink – Fossilized Amber, Tim Holtz Distress Ink – Prize Ribbon

Paper: Copic Marker X-Press It Blending Card, Hammermill – Premium Colour 100 lb.

Dies: My Creative Time – Rectangle Frame Die Layers – MCT-D274

Miscellaneous: U-Line double-sided foam tape, Cuttlebug, Kraftin Kimmie Dots

Image coloured with Copic Markers:

Skin: E21, E11, E04, E00, E000

Beard: E08, YR18, YR16, YR12

Jeans: B26, B23, B21

Shoes: E33M E31, E30, E27, E25, E23

Shirt: BG72, BG57, BG32, BG11

Hat: R46, R14, R08

Hoola Hoop: V17, V15, V12, B69, B66, B63, Y17, Y15, Y11

Shadow: B00, Colorless Blender, C3, C2, C1

Hope you like it and have a great week!

You can find more cards to inspire you at KLM Designs, KLM Digital Design Team and KLM Digital Designs on the Facebook Fan page from the rest of our design team.

Owl Carol


Today, I’m sharing a Christmas card that I made using a retired image from Di’s Digistamps called Owl Carol.

For the base card, I used Hammermill – Premium Cardstock 110 lb. and cut it and scored it to be 5.5″ x 5.5″. For the background, I cut Hunkydory Adorable Scorable Pattern Packs – Let It Snow paper to the same size as the base card and inked around the edges and along the bottom with Tim Holtz Distress Ink – Prize Ribbon. I adhered this to the base card with double-sided tape. Washi Tape was then applied directly to the left side of the card base. Waffle Flower – Nesting Square dies and Cuttlebug were used to die cut a 4.25″ x 4.25″ piece of dark blue cardstock.  Precision Cutting Dies by Frantic Stamper Inc. “Falalalala” was used to die cut the sentiment 4 times. 3 times with the dark blue cardstock and 1 time using Recollections – Matte Gold Foil cardstock.

The image using HP High Quality Grayscale was printed onto Copic Marker X-Press It Blending Card and die cut using Cuttlebug and My Creative Time -Stitched Squares Inside and Out. The image was coloured in with Copic markers and Cosmic Shimmer Fluffy Stuff was added to the bottom of the image for the snow. Marvy Uchida – Embossing Heat Tool was applied to the snow to puff it up. Stickles – Diamond was applied to the puffy snow to add a little more sparkle and also to the top of the lantern and tree branch. Gelly Roll Sakura #10 Pen was applied in the sky to create a snowy background. Sakura Glaze – Black and Gelly Roll Sakura #5 Pen were added to the noses on the mouse and rabbit. The finished image was popped up onto the blue square cardstock using 3M – double-sided foam tape and then this was attached to the base card using U-Line Double-Sided Foam Tape. The “Falalalala” sentiments were attached together to give the illusion of being 3-D and applied to the card using liquid glue to finish it off.

Card Recipe:

Stamp: Di’s DigistampsOwl Carol

Inks: HP High Quality Grayscale, Tim Holtz Distress Ink – Prize Ribbon

Paper: Copic Marker X-Press It Blending Card, Hammermill – Premium Cardstock 110 lb., Hunkydory Adorable Scorable Pattern Packs – Let It Snow, Recollections – Matte Gold Foil cardstock

Die Cuts: Waffle Flower – Nesting Square dies, My Creative Time -Stitched Squares Inside and Out, Precision Cutting Dies by Frantic Stamper Inc. “Falalalala”, My Creative Time -Stitched Squares Inside and Out

Miscellaneous: U-Line Double-Sided Foam Tape, Stickles – Crystal, Gelly Roll Sakura #10 Pen, Gelly Roll Sakura #5 Pen, Sakura Glaze – Black, Cosmic Shimmer Fluffy Stuff, Marvy Uchida – Embossing Heat Tool, 3M – double-sided foam tape, Stickles – Diamond

Image coloured with Copic Markers:

Owl: C1, C0, E23, YR15, YR12

Mouse: W7, W5, W3, W2, R30, R24, R02, Sakura Glaze – Black, Gelly Roll Sakura #5 Pen

Mouse Scarf: BG72, BG57, BG32, BG11

Rabbit: E55, E53, E51, R30, R02, C0, C00, Sakura Glaze – Black, Gelly Roll Sakura #5 Pen

Rabbit Scarf: G16, YG25, YG21

Guitar: E55, E53, E51, E35, E33

Tree Branch: E29, E25, E23

Lantern and Candle: R46, R14, R08, YR16, Y08, Y00, C8, C6, C4

Sky: B99, B97, B95, B93

Snow: Cosmic Shimmer Fluffy Stuff, Stickles – Diamond

Hope you like it and have a great week!

Added into Challenge:

Challenge #81 – Anything Goes with a Featured Critter

Mandala #2


Today I’m sharing a Thank You card using KLM Digital DesignMandala #2 from the new November release. Mandala’s are always fun to colour because you have so many colour choices to choose from. Each can be unique!

Hammermill – Premium Cardstock 110 lb. was used to create a 5.5″ x 4.25″ card base. The image was imported into Microsoft Word and printed out onto Copic Marker X-Press It Blending Card. I coloured in the image with Copic markers listed below and then traced around the entire image using a PrismaColor Premier Black  pencil to make the colours pop. Wink of Stella – Clear was added to some of the purple and little orange pieces in the Mandala. Then I fussy cut around the entire Mandala leaving just a little bit of white space.

I decided to create my own background and to that I used, Recollections – Black cardstock cut to the same size as the base.  Another piece was also cut to 1″ x 4.25″ and placed over top of the black cardstock so that when I coloured in the stencil, that part would remain solid black. I placed the Heffy Doodle – Fancy Foliage on top of the cardstock and then using a finger dauber applied Lisa Horton Crafts – Cloud 9 Interference – Sapphire Gold Shimmer ink to create the glittery background. Couture Creations – You Go Girl – 2 Leaves was die cut from Forever In Time – Glam Glitter Cardstock – Ombre Pastel using a Cuttlebug. “Thank You” was die cut using PaperCrafter Today – 15 Die Cut Sentiment Set dies and Recollections – Matte Gold Foil cardstock.

The background was applied directly to the base card using double-sided tape. The Mandala was popped up onto the top part of the card using 3M Double-Sided Foam Tape. The leaves were cut into 2 and then placed around the Mandala using liquid glue. A PinkFresh Essentials Glitter Drop: Lagoon was applied to the centre of the Mandala and the “Thank You” sentiment was applied to the base using liquid glue.

Card Recipe:

Stamp:  Mandala #2 – KLM Digital Designs

Inks: HP Printer Grayscale, Lisa Horton Crafts – Cloud 9 Interference – Sapphire Gold Shimmer

Paper: Copic Marker X-Press It Blending Card, Hammermill – Premium Cardstock 110 lb., Recollections – Black cardstock, Forever In Time – Glam Glitter Cardstock – Ombre Pastel, Recollections – Matte Gold Foil cardstock

Dies: Couture Creations – You Go Girl – 2 Leaves (CO728374), PaperCrafter Today – 15 Die Cut Sentiment Set

Stencil: Heffy Doodle – Fancy Foliage

Miscellaneous: 3M Double-Sided Foam Tape, Cuttlebug, Wink of Stella – Clear, PinkFresh Essentials Glitter Drop: Lagoon

Image coloured with Copic Markers:

Mandala: B69, B66, B39, B18, B16, V17, V15, V12, YR16, YR09, YR07, YR04, Y08, R85, R83, R81, R49, R14, R08, RV00, Wink of Stella – Clear

Hope you like it and have a great week!

You can find more cards to inspire you at KLM Designs, KLM Digital Design Team and KLM Digital Designs on the Facebook Fan page from the rest of our design team.

Caught A Bug?


Today I’m sharing a Get Well card using KLM Digital DesignSitting Gnome from the new November release. This image also comes with 2 more sentiments, “Don’t let the little things bug you” and “Feel better soon”. This is the time of year when a lot of people start catching colds. This little gnome card would definitely cheer me up if I wasn’t feeling well and I hope that it cheers up some others as well!

Hammermill – Premium Cardstock 110 lb. was used to create a 5.5″ x 4.25″ card base.

The image and sentiment were imported into Microsoft Word, printed out onto Copic Marker X-Press It Blending Card and then die cut using My My Creative Time – Rectangle Frame Die Layers. I coloured in the image with Copic markers listed below and then added Pink & Main – Touch of Gloss to the bottle. Lastly, I die cut 3 clouds using some scrap Hammermill – Premium Colour 100 lb. cardstock with Lawn Fawn – Pivot Pop-Up dies. I added a touch of colour to them with the Copic markers and then popped up 2 of the clouds using U-Line Double-Sided Foam Tape and glue for the other cloud. The finished image was then attached directly to the base using double-sided tape.

Card Recipe:

Stamp and Sentiment:  Sitting Gnome – KLM Digital Designs

Inks: HP Printer Grayscale

Paper: Copic Marker X-Press It Blending Card, Hammermill – Premium Cardstock 110 lb., Hammermill – Premium Colour 100 lb. cardstock

Dies: Lawn Fawn – Pivot Pop-Up, My Creative Time – Rectangle Frame Die Layers – MCT-D274

Miscellaneous: U-Line Double-Sided Foam Tape, Cuttlebug, Pink & Main – Touch of Gloss

Image coloured with Copic Markers:

Skin: E21, E11, E04, E00, E000

Beard: E08, YR18, YR16, YR12

Jeans: B26, B23, B21

Shoes: E29, E27, E25, E23

Shirt: BG72, BG57, BG32, BG11

Hat: R59, R46, R14, R08

Mushroom: R46, R14, R08, YR31, YR30, YR12, E42, E41, E40

Grasshopper: YG05, YG03, YG01

Sky: B04, B02, B01, B00

Grass: YG17, YG13, YG03, YG01

Bottle: C1, C0, B000, Pink & Main – Touch of Gloss

Clouds: B60, C00, Colorless Blender

Hope you like it and have a great week!

You can find more cards to inspire you at KLM Designs, KLM Digital Design Team and KLM Digital Designs on the Facebook Fan page from the rest of our design team.

How Ya Bean??


Today I’m sharing a card using KLM Digital DesignCoffee Gnome from the new November release. This image also comes with 2 more sentiments, “Your a special blend” and “You are the cream to my …”. I’m personally not a coffee lover, but I do believe this is the perfect image and sentiment to send a little note to a friend.

Hammermill – Premium Cardstock 110 lb. was used to create a 5.5″ x 4.25″ card base. Creative Memories – Hot Fudge paper was die cut to the size of 5.25″ x 4″. Using Tim Holtz Distress Inks – Ground Espresso and a blending brush, I created my own background using the stencil from Coffee Break – Practical Publishing 2017. With a sponge dauber, the edges were also inked all around. The finished background was then applied directly to the card using double-sided tape.

The image and sentiment were imported into Microsoft Word and printed out onto Copic Marker X-Press It Blending Card and coloured in with Copic markers. Both the sentiment and image were then fussy cut all around leaving a small border surrounding them. U-Line Double-Sided Foam tape was applied to both and they were popped up onto the card.

Card Recipe:

Stamp and Sentiment:  Coffee Gnome – KLM Digital Designs

Inks: HP Printer Grayscale, Tim Holtz Distress Inks – Ground Espresso

Paper: Copic Marker X-Press It Blending Card, Hammermill – Premium Cardstock 110 lb.

Dies: My Creative Time – Rectangle Frame Die Layers – MCT-D274

Stencils: Coffee Break – Practical Publishing 2017

Miscellaneous: U-Line Double-Sided Foam Tape, Cuttlebug, Blending Brush, Dauber

Image coloured with Copic Markers:

Skin: E21, E11, E04, E00, E000

Beard: C7, C6, C5, C3

Pants, Hat and Shoes: E89, E87, E84

Shirt and Socks: E49, E39, E37, E35

Coffee Sack: E43, E42, E41, E37, E19, E18, E17, E15, E13

Coffee Cup: E43, E42, E41, E19, E18, E17

Shadow: C3, C2, C1, C0

Sentiment: E40

Hope you like it and have a great week!

You can find more cards to inspire you at KLM Designs, KLM Digital Design Team and KLM Digital Designs on the Facebook Fan page from the rest of our design team.