Tag Archive | Crafts – Sparkling Stickers – 02-3068629

Snowy Smiles!!!


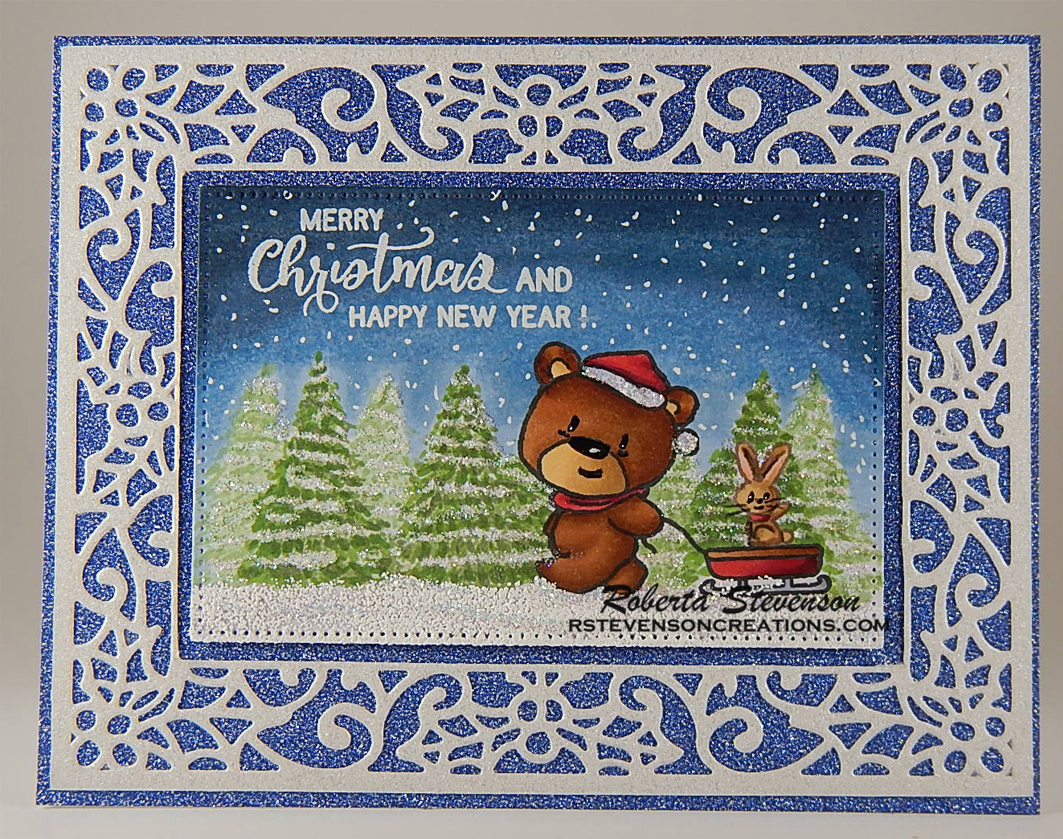
It’s Wednesday, and this week, I made a Christmas card using High Hopes Rubber Stamps Snowy Smiles – RR003 for the main image. Winter is one of my favourite times of the year and the beauty of fresh snowfalls always make me happy as long as I don’t need to shovel. LOL!

To make my card this week, I began with a card base of 5.5″ x 4.25″ using Hammermill – Premium Colour 100 lb. cardstock. Crafts – Sparkling Stickers – 02-3068629 was applied to the base card. I cut out Heartfelt Creations – Celebrate the Season Collection paper and inked around the edges with Tim Holtz Distress Ink – Wilted Violet and a finger dauber. This was popped up onto the base card using U-Line double-sided tape.

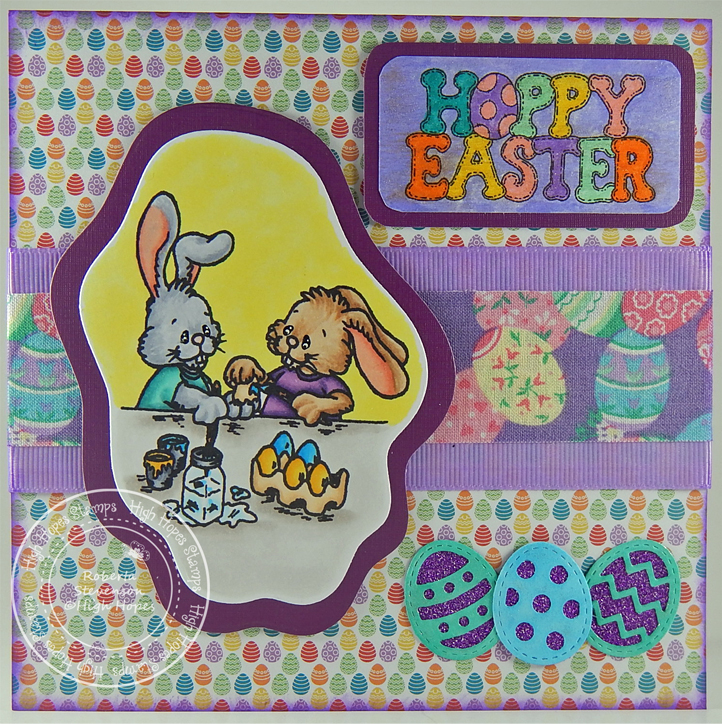
The image was stamped using my MISTI and Memento – Tuxedo Black ink onto Copic Marker X-Press It Blending Card cardstock. I coloured in the image and then fussy cut around it. With a black marker, I inked around the outside of the image and then added U-Line double-sided tape and popped it up into the centre of the circle on the patterned paper. I applied the Crafts – Sparkling Stickers – 02-3068629 to a scrap piece of Hammermill – Premium Colour 100 lb. cardstock to match the background base paper.

With my Cuttelbug and Birch Press Designs – Big Joy dies, I die cut the sparkly scrap piece of paper and another scrap piece of Hammermill – Premium Colour 100 lb. cardstock. I coloured in the larger die cut with Copic markers and then attached the 2 pieces using liquid glue. U-Line double-sided tape was added to the combined piece and it was popped up onto the card under the snowlady.

I cut off the backs to 3 buttons from the Dress It Up – Holiday Collection – It’s Cold Outside and then applied Nuvo – Glacier Paste – Pixie Wings to them to give them a purple shimmer. Once the glacier paste was dry, I attached them to the card with liquid glue.

Card Recipe:

Stamp: Snowy Smiles – RR003 (High Hopes Rubber Stamps)

Inks: Memento – Tuxedo Black, Tim Holtz Distress Ink – Wilted Violet

Paper: Copic Marker X-Press It Blending Card, Hammermill – Premium Colour 100 lb., Heartfelt Creations – Celebrate the Season Collection (12″ x 12″), Crafts – Sparkling Stickers – 02-3068629

Die Cuts: Birch Press Designs – Big Joy (57164)

Tools and Embellishments: MISTI – Most Incredible Stamping Tool, U-Line double-sided tape, Nuvo – Glacier Paste – Pixie Wings, Dress It Up – Holiday Collection – It’s Cold Outside

Image coloured with Copic Markers:

Snowlady: BV20, B0000, YR68, YR31, YR18, Y38, R59, R35, R30, R21, Colorless Blender

Hat and Scarf: BG72, BG57, BG32, BG11, BG10, BG000, Colorless Blender

Circle Framing Snowlady: V17, V15, V12, BG000

Shadow Die Cut: V17, V15, V12

Hope you like it and have a fantastic week!

You can find lots of inspiration from the Design Team Divas at the High Hopes blog, and the High Hopes Rubber Stamps Facebook Fan page plus you can also follow us on
Instagram, Twitter and Pinterest.

Easter Fun!


It’s Wednesday, and this week, I made an Easter card using Easter Fun – Q023 by High Hopes Rubber Stamps for the main image and Hoppy Easter – H245 (High Hopes Rubber Stamps) for the sentiment. This image reminds me so much of when I was younger. Every year, my mom would make boiled eggs and then we would all sit around the table and put them in the various dies to make some cool colourful eggs. It was always so much fun.

To make my card this week, I used AC White Paper for my base folded at 6″ x 6″. I combined 2 separate pieces of purple ribbon and some patterned ribbon eggs together using double sided tape. I attached this to Your Next Stamp Designer – Happy Spring paper. Then I attached this directly to the base using double-side tape. The sides were all inked with Tim Holtz Distress Ink – Wilted Violet. The egg embellishments were die cut using my Cuttlebug and Lawn Fawn – Mini Easter Eggs. The top layers were cut from Copic Marker X-Press It Blending Card and coloured with Copic B01 and BG32. The bottom layers were cut from Crafts – Sparkling Stickers  – 02-3068629. I added some glue to the top layer and attached them to the base egg. I attached these directly to the base.

The background for the bunny image was cut using Whimsy – Nested Frames Die Set. The background die was cut from Hot Buy – Recollections – Jewel Tones and them main image cut was from Copic Marker X-Press It Blending Card. The base frames were attached to the background using 3M VHB – 2 sided tape. The main image Easter Fun – Q023 (High Hopes Rubber Stamps) and Hoppy Easter – H245 sentiment were stamped using my MISTI and Memento – Tuxedo Black ink. The main image was coloured in with Copic Markers and the sentiment was coloured in using Zig Clean Color Real Brush Markers. Clear – Wink of Stella was brushed over top to make it sparkle.

To assemble the remainder of my card, I ran the coloured image and sentiment through my Xyron’s and then attached them to the base shapes on the card.

Card Recipe:

Stamp: Easter Fun – Q023 (High Hopes Rubber Stamps)

Sentiment: Script Easter Greetings – F093 (High Hopes Rubber Stamps)

Inks: Memento – Tuxedo Black, Tim Holtz Distress Ink – Wilted Violet

Paper: Copic Marker X-Press It Blending Card, AC White, Hot Buy – Recollections – Jewel Tones, YNS Designer Paper Pad – Happy Spring, Crafts – Sparkling Stickers  – 02-3068629

Die Cuts: Whimsy – Nested Frames Die Set, Lawn Fawn – Mini Easter Eggs

Tools: MISTI – Most Incredible Stamping Tool, Cuttlebug, 3M VHB – 2 sided tape, Clear – Wink of Stella, Xyron Create a Sticker, Xyron Creative Station

Image coloured with Copic Markers:

Bunnies: E35, E34, E33, E31, E30, R30, R20, C2, C1, C0, Eyes (Sakura Glaze – Black, Gelly Roll Sakura #8 Pen)

Shirts: BG72, BG57, BG32, BG11, V17, V15, V12

Eggs and Paint Tins: BG32, B04, B02, B01, Y17, Y13, C5, C3, C1, E53, E51, E50

Water and Egg Carton: E53, E51, E50, B000, B0000

Table and Shadow: W2, W1, W0

Background: Y02

Sentiment: Zig Clean Color Real Brush Markers – English Lavender (803), Lilac (083), Yellow (050), Orange (070), Turquoise Green (042), Green Shadow (049), Light Pink (026)

Hope you like it and have a fantastic week!

You can find lots of inspiration from the Design Team Divas at the High Hopes blog, and the High Hopes Rubber Stamps Facebook Fan page plus you can also follow us on
Instagram, Twitter and Pinterest.

HoHoHoHoHo!!


Today I’m sharing  Santa Gnome (KLM Digital Designs) image from the new November release. This adorable little Gnome comes with 3 different sentiments. “Believe In The Magic”, “Happy Holidays” and “Christmas Blessing”.

I printed out the main image onto Copic Marker X-Press It Blending Card using my HP Printer. I used my Brother Scan and Cut to cut around the image and coloured it in with Copic markers. The background was die cut using Hot Buy Craft Smart – Holiday Glitz Glitter Paper and Hammermill – Premium Colour 100 lb. paper. I coloured the vines and leaves from the Hammermill die cut with various Tim Holtz Distress inks listed below and then fussy cut them out. Glue was applied to the reverse side of the die cut and then it was placed on top of the original Glitz Paper die cut. Crafts – Self-Adhesive Rhinestones were then applied to the berries on the vine.

For the background, I used the Hammermill paper to create a card base of 5.5″ x 4.25″. Then I applied Crafts – Sparkling Stickers red paper to the base. I then adhered the vine and frame directly to the background using glue. Lastly, I die cut the sentiment 5 times using black cardstock and the 1 time with Tonic Studios – Craft Perfect – Onyx Black Pearlescent. I ran all off the die cuts through my Xyron Create a Sticker to make it easier to apply them on top of each other. This created an embossed effect. I then added this on top of the vine base. The main image was then added to the card using 3M VHB – 2 sided tape.

To finish off the card, I added some Marvy – Liquid Applique to the big pom-pom and heat set it with my Marvy Uchida – Embossing Heat Tool to puff it up. Lastly, some Stickles – Frosted Lace was added to the hat, cuffs and coat trim.

Card Recipe:

Stamp: Santa Gnome (KLM Digital Designs)

Inks: HP Printer Grayscale, Tim Holtz Distress Ink – Evergreen Bough, Tim Holtz Distress Ink – Mowed Lawn, Tim Holtz Distress Ink – Pine Needles

Paper: Copic Marker X-Press It Blending Card, Hammermill – Premium Colour 100 lb., Tonic Studios – Craft Perfect – Onyx Black Pearlescent, Hot Buy Craft Smart – Holiday Glitz Glitter Paper 12″ x 12″, Crafts – Sparkling Stickers – 02-3068629

Die Cut: Poppystamps – Holly Vine Sidekick Frame – Christmas Craft Die

Tools: 3M VHB – 2 sided tape, Stickles – Frosted Lace, Marvy – Liquid Applique, Crafts – Self-Adhesive Rhinestones – 02-3006207, Xyron Create a Sticker, Marvy Uchida – Embossing Heat Tool

Image coloured with Copic Markers:

Skin: E000, E00, E04, E11, E21

Beard: W3, W2, W1, W0, W00

Hat and Coat: E59, E39, E37, E35, Stickles – Frosted Lace, Marvy – Liquid Applique

Mitts: YG67, YG63, G28

Holly Leaves and Stems: Tim Holtz Distress Ink – Evergreen Bough, Tim Holtz Distress Ink – Mowed Lawn, Tim Holtz Distress Ink – Pine Needles, Atayou Spica – Twinkling Like The Stars – Melon – 06, Atayou Spica – Twinkling Like The Stars – Mint – 17, Atayou Spica – Twinkling Like The Stars – Olive – 07

Hope you like it and have a great week!

Check out KLM Designs for some great savings this month.

Wrap up your holiday cards! Offer good until 11/27/20
25% OFF ALL DIGITAL STAMPS
USE COUPON CODE: PRETURKERY

You can find more cards to inspire you at KLM Designs, KLM Digital Design Team and KLM Digital Designs on the Facebook Fan page from the rest of our design team.

Gnome – Merry Christmas!


It’s Wednesday, and this week I’m featuring a Christmas card I made using the image Flying Gnome – TLF008 and sentiment Sm Christmas Script – F051 from (High Hopes Rubber Stamps).  I just love colouring these adorable little gnomes. Also, it’s always good to make Christmas cards a little at a time throughout the year so that you are not rushing to get them all done in December. LOL! Have you started making your Christmas cards yet this year?

To create the card this week, I first used the die cut from Creative Expressions by Sue Wilson – Festive Collection – Pointsettia Mini Background – CED3049 to cut some Copic Marker X-Press It Blending Card using my Cuttlebug. I stamped the main image and then coloured it with Copic Markers. I started off doing the sky first as I didn’t want any of the Reds smearing into it. (This happens sometimes if you are not careful.) Once the image was all coloured in, I used Sakura Glaze – Black and Gelly Roll Sakura #8 Pen to increase the intensity of the eye on the bird. I outlined the entire image with Pigma Micron 03 black marker to make it stand out more against the sky. Lastly, I used a mixture of Gelly Roll Sakura #8 Pen and Gelly Roll Sakura #10 Pen to create the snow and stars in the sky.

For the base of the card, I began with a standard white card base of 4.25″ x 5.5″. I cut another piece of white cardstock the same size and applied the red shimmer topping on it using Crafts – Sparkling Stickers – 02-3068629. I used the same die cut listed above to cut out the intricate design using my Cuttlebug and the gold paper from Hot Buy Craft Smart – Holiday Glitz Glitter Paper. I had put the gold paper through my Xyron Creative Station before I die cut it. This made it easier to just peel and stick onto the base.

For the sentiment, I die cut some spare red cardstock using Craftin Desert Diva’s – Flag Banner Dies. Using my MISTI and VersaMark ink, I stamped the sentiment onto the die cut and embossed it using Ranger Super Fine Gold Embossing powder. This was heated with my Marvy Uchida – Embossing Heat Tool. The image and the sentiment were both popped up with 3M VHB – 2 sided tape to complete the card.

Card Recipe:

Stamp: Flying Gnome – TLF008 (High Hopes Rubber Stamps)

Sentiment: Sm Christmas Script – F051 (High Hopes Rubber Stamps)

Inks: Memento – Tuxedo Black, VersaMark

Paper: Copic Marker X-Press It Blending Card, Hot Buy Craft Smart – Holiday Glitz Glitter Paper 12″ x 12″, Crafts – Sparkling Stickers – 02-3068629

Die Cut: Creative Expressions by Sue Wilson – Festive Collection – Pointsettia Mini Background – CED3049, Craftin Desert Diva’s – Flag Banner Dies (Retired)

Embossing Powder: Ranger Super Fine Gold

Tools and Miscellaneous: MISTI – Most Incredible Stamping Tool, Cuttlebug, Pigma Micron 03 black marker, Xyron Creative Station, Marvy Uchida – Embossing Heat Tool

Image coloured with Copic Markers:

Skin: E21, E11, E04, E00, E000

Beard: W5, W4, W3, W2, W1, W0, W00

Hat and Outfit: R59, R39, R37, R35, YG97, YG95, YG93, G43

Cardinal Bird: R37, R35, R24, R22, R17, R14, R08, R05, R02, R000, YR15, YR12, C3, N10, N8, Gelly Roll Sakura #8 Pen, Sakura Glaze – Black

Leaves and Holly: R59, R37, R24, YG97, YG95, YG93, YG05, G43

Shoe: E34, E33, E31

Sky: B99, B97, B95, B93, Gelly Roll Sakura #8 Pen, Gelly Roll Sakura #10 Pen

Hope you like it and have a fantastic week!

You can find lots of inspiration from the Design Team Divas at the High Hopes blog, and the High Hopes Rubber Stamps Facebook Fan page plus you can also follow us on
Instagram, Twitter and Pinterest.


Time to Smell the Flowers!


It’s Wednesday, and this week, I used Daffodil Bunny – SLF006 (High Hopes Rubber Stamps) for the main image from the new August 2020 release and Smell The Flowers – G189 (High Hopes Rubber Stamps) for the sentiment. This adorable little bunny is taking time out to smell the flowers. We have a really nice garden of flowers that my husband takes care of. I’m not a green thumb at all. LOL! It’s always nice to take a moment and enjoy the beauty of them.

To make my card this week, I started out with a simple white card base, sized at 6″ x 6″. The base background was also cut at 6″ x 6″ using Craft Consortium – Cottage Garden paper and then inked around the edges with Tim Holtz Distress Ink – Fossilized Amber. I just thought this paper went so well with this adorable image. I added the 2 colours of ribbon with some 2-sided tape and then adhered the entire background paper to the base with 2-sided tape.

The scalloped circle and inside image circle were both die cut using my Cuttlebug and Craftin Desert Diva’s Stitched in Circle Dies. The circle in between the 2 of them was die cut with Lifestyle Crafts Cutting Dies – Nesting Circles. The edges of the large scalloped circle were inked with Tim Holtz Distress Ink – Picked Raspberry. For the sentiment, My Creative Time – Rectangle Frame Dies were used. The die was larger in depth, so I just die cut one side and then turned it around and only put it part way through my Cuttlebug to cut the other edge. It too, was then inked around the edges with Tim Holtz Distress Ink – Fossilized Amber. The image was coloured with Copic Markers.

To assemble the remainder of the card, the mid circle was attached directly to the large scalloped circle and then popped up with 3M VHB – 2 sided tape. The image and sentiment were popped up on top with 3M VHB – 2 sided tape as well.

Card Recipe:

Stamp: Daffodil Bunny – SLF006 (High Hopes Rubber Stamps)

Sentiment: Smell The Flowers – G189 (High Hopes Rubber Stamps)

Inks: Memento – Tuxedo Black, Tim Holtz Distress Ink – Fossilized Amber, Tim Holtz Distress Ink – Picked Raspberry

Paper: Copic Marker X-Press It Blending Card, Momenta – Cardstock, Crafts Sparkling Stickers – 02-3068629, Craft Consortium – Cottage Garden 6″x6″

Die Cuts: Craftin Desert Diva’s Stitched in Circle Dies, Lifestyle Crafts Cutting Dies – Nesting Circles, My Creative Time – Rectangle Frame Dies

Tools: MISTI – Most Incredible Stamping Tool, Cuttlebug, 3M VHB – 2 sided tape

Image coloured with Copic Markers:

Bunny: E37, E35, E34, E33, E31, E30, R11, R02, R000

Bow: RV19, RV17, RV13

Grass and Greenery for Plants: BG99, BG97, G21, YG17, YG13, YG07, YG03, YG01

Daffodil: E15, Y38, Y18, Y04

Clouds and Sky: B60, B01, B00, B000, B0000, C0, Colorless Blender

Hope you like it and have a fantastic week!

You can find lots of inspiration from the Design Team Divas at the High Hopes blog, and the High Hopes Rubber Stamps Facebook Fan page plus you can also follow us on
Instagram, Twitter and Pinterest.


Birthday Wishes!!


Welcome Back Dreamerland Craft Fans!

Today, I’m sharing a birthday card that I made using Dreamerland Crafts stamp Together for the Holidays – DS19048 for my main image and Birthday 08 – DS17059 (Dreamerland Crafts) for the sentiment.


To make this card I used a base card of 4.25″ x 5.5″. I die cut X-Press It Blending Card using my Cuttlebug and die cut from Papercraft Inspirations. Then I stamped the image using Memento – Tuxedo Black ink and my MISTI. The original stamp also has snowflakes. I removed them for this card. I coloured in the image with Copic markers and then I used the same die cut to make the frame using Crafts – Sparkling Stickers – 02-3068629. I also used the same paper for my base background colour.

I used Your Next Stamp – Stitched Rectangle Die Set to die cut Echo Park Paper Co. – Happy Birthday Girl paper and then inked around the edges using Tim Holtz Distress Ink – Fossilized Amber. Next, I stamped the sentiment using Versa Fine – Onyx Black ink and my MISTI. I used Ranger – Clear Super Fine Detail embossing powder and then heat embossed the powder with Marvy Uchida – Embossing Heat Tool. Then I adhered this to the base of the card. Lastly, I used 3M VHB – 2 sided tape to pop up the image and added a few pop dots from Kraftin’ Kimmie to complete the card.

Card Recipe:

Stamp:  Together For the Holidays – DS19048 (Dreamerland Crafts)

Sentiment: Birthday 08 – DS17059 (Dreamerland Crafts)

Inks: Memento – Tuxedo Black, Versa Fine – Onyx Black, Tim Holtz Distress Ink – Fossilized Amber

Embossing Powder: Ranger – Clear Super Fine Detail embossing powder

Paper: Copic Marker X-Press It Blending Card, Echo Park Paper Co. – Happy Birthday Girl 6″ x 6″, Crafts – Sparkling Stickers – 02-3068629

Die Cuts: Your Next Stamp – Stitched Rectangle Die Set (YNSD214), Papercraft Inspirations

Tools: MISTI – Most Incredible Stamping Tool, Cuttlebug, Marvy Uchida – Embossing Heat Tool, 3M VHB – 2 sided tape, Kraftin’ Kimmie – Under Water Dots

Image coloured with Copic Markers:

Skin: E000, E00, E04, E11, E21, R22, R20

Hair:  E47, E44, E43, E41

Dress: BG18, BG15, BG13, BG11, BG10

Bear: E35, E33, E31, E29, E27, E25, E23, Sakura Glaze – Black Pen

Present: BG15, BG13, BG11, Y08, Y04, Y00

Swing: E35, E33, E31, E17, E15

Hope you like it and have a great week!

You can find more cards to inspire you at Dreamerland Crafts and Pointer Scrapbooking on the Facebook Fan pages from the rest of our design team.

Have A Beary Special Day!


Welcome Back Dreamerland Craft Fans!

Today, I’m sharing a birthday card that I made with Dreamerland Crafts stamp called With My Love – D19024. This little bear is on his way to wish someone a “Beary Good Birthday”!


To make this card I used a base card of 4.25″ x 5.5″. I stamped the image onto Copic Marker X-Press It Blending Card using Memento – Tuxedo Black ink and my MISTI. I coloured in the image and background with Copic markers and then used my Brother Scan and Cut to cut around it.

I cut out at rectangle 4.25″ x 5.5″ from Hammermill – Premium Colour 100 lb. paper and then I used various dies and Tim Holtz inks to create the background. I have listed them below. I had die cut templates using the dies which makes it really easy to create the backgrounds.

I stamped the sentiment from Jaded Blossom – Forest Friends using Versa Fine – Onyx Black ink and my MISTI onto some Turquoise Cardstock. I used Ranger – Clear Super Fine Detail embossing powder and then heat embossed the powder with Marvy Uchida – Embossing Heat Tool. Next, I edged around the background sentiment outer edges with Tim Holtz Distress Ink – Peacock Feathers. I went around the main image outline with Copic Markers – B000 and YG03. Then, I popped up the image with 3M VHB – 2 sided tape and added in some balloons which I die-cut using Your Next Stamp – Mini Balloon Trio Die Set and drew little strings from them.

Card Recipe:

Stamp:  With My Love – D19024 (Dreamerland Crafts)

Sentiment: Jaded Blossom – Forest Friends

Inks: Memento – Tuxedo Black, Versa Fine – Onyx Black, Tim Holtz Distress Ink – Mermaid Lagoon, Tim Holtz Distress Ink – Mowed Lawn, Tim Holtz Distress Inks – Peeled Paint, Tim Holtz Distress Ink – Crushed Olive, Tim Holtz Distress Inks – Peacock Feathers

Embossing Powder: Ranger – Clear Super Fine Detail embossing powder

Paper: Copic Marker X-Press It Blending Card, Crafts – Sparkling Stickers – 02-3068629, Hammermill – Premium Colour 100 lb.

Die Cuts: Your Next Stamp – Mini Balloon Trio Die Set (YNSD241), Avery Elle – Custom Steel Dies – Made in the USA – D-05-01 PiercedCloudsDie, Lawn Fawn – Grassy Hillside Borders

Tools: MISTI – Most Incredible Stamping Tool, Cuttlebug, Marvy Uchida – Embossing Heat Tool, 3M VHB – 2 sided tape

Image coloured with Copic Markers:

Bear: E33, E31, E30, E29, E27, E25, E23, R22, R20

Balloon: R59, R37, R35, R24

Hope you like it and have a great week!

You can find more cards to inspire you at Dreamerland Crafts and Pointer Scrapbooking on the Facebook Fan pages from the rest of our design team.

Be My Valentine???


Welcome KLM Digital Design Fans!!

Hi There! Katy the owner of KLM Digital Designs asked me to join her Design Team. YAY!


So today, I’m sharing my first creation that I made using several of KLM Digital Designs’ new stamps.

I decided to create a little love scene using Girl Window Gnome and Bouquet Gnome. The sentiment is from Cupid Gnome set. I thought these 2 little Gnomes made such an adorable couple and it looks like love is in the air. LOL!

I made the card on 5″ x 5″ red card base and then for the background, I die cut paper from 49 and Market – Tattered Garden using My Creative Time -Stitched Squares Inside and Out. I loved the way the paper resembled a building wall. Next I fussy cut around all of the images and sentiment and popped them up on the card using 3M VHB – 2 sided tape. For the sentiment, I ran it through my Xyron Create a Sticker and then placed it on the card.

For the final step, I used Sizzix Framelets by Stephanie Barnard – 562676 – Hearts Dotted to die cut Crafts – Sparkling Stickers – 02-3068629 and then added the little hearts above the male Gnome.

Recipe for Card:

Stamps: Girl Window Gnome (KLM Digital Designs), Bouquet Gnome (KLM Digital Designs)

Sentiment: Cupid Gnome (KLM Digital Designs)

Paper: Copic Marker X-Press It Blending Card, 49 and Market Tattered Garden – 6 x 6 Collection Pack, Crafts – Sparkling Stickers – 02-3068629, Recollections – Cranberry

Die Cuts: Sizzix Framelets by Stephanie Barnard – 562676 – Hearts Dotted, My Creative Time -Stitched Squares Inside and Out

Miscellaneous: 3M VHB – 2 sided tape, Cutttlebug

All images coloured with Copic Markers:

Skin: E21, E11, E04, E00, E000

Gnome – Male

Beard: W3, W1, W0

Hat: R59, R37, R35

Shirt: B28, B26, B23

Pants: E27, E25, E23

Shoes: C10, C8, C6, C4, C2

Flowers and Leaves: G17, G14, G07, R43, R34, R24, R20, N34, B21

Gnome – Female

Hair: E47, E44, E43

Inside Window and Frame: Y19, Y18, Y15, W3, W2, W1

Dress and Bows: B28, B26, B24, B23, Gelly Roll Sakura #5 Pen

Hope you like it and have a great week!!

You can also find more inspiration on KLM Digital Designs and KLM Digital Designs Facebook page.


Walking in a Winter Wonderland


Welcome Back Dreamerland Craft Fans!

Today, I’m sharing a card with you that I made using DCS19089 – Mix and Match Clear Stamp  (Dreamerland Crafts Clear Stamps) for the main image and sentiment and 2018 Christmas Trees & Houses – M18312 (Dreamerland Crafts Clear Stamps) for the trees in the background! I thought this little bear was just so adorable, so I thought I would make him pulling his little forest friend on a little walk through the forest!

I used the centre die cut from Creative Expressions by Sue Wilson – Festive Collection – Pointsettia Mini Background – CED3049 to cut out the area I wanted to stamp my image on. I used Copic Marker X-Press It Blending Card, Memento – Tuxedo Black ink and my MISTI to get a nice clean image. The first step was to stamp the bear, sled and bunny. Next I used Inkadoo Stamping Mask Paper and stamped the 3 images again. Next, I added the masked images over top of the images that were previously stamped on the base image.

The second step was to stamp in the trees. I wanted to give the impression that some trees were further back, so I inked the tree stamp with Memento – Bamboo Leaves and stamped once and then immediately again using the same stamp. I performed this several times across the background. Once all of the trees were in place, I removed the masking and was ready to colour in my images.

Before adding snow to the sky, I stamped on the sentiment using VersaMark ink and Ranger Embossing Powder White – Extra Fine Detail. Then I added in the snow flakes using Gelly Roll Sakura #8 Pen.

The colours used for each character and the trees are listed below. The final step for the main image was to add in some sparkle on the trees and snow on the ground. For the glitter on the trees I used Quickie Glue and DecoArt Glamour Dust. For the snow below the trees, sled and bear, I used VersaMark ink and WOW! Embossing Glitter – White Puff Twinkle and touches of Stickles – Diamond.

Lastly, I die cut the background frame using Recollections – Christmas Inkjet Printable Glitter Paper and Creative Expressions by Sue Wilson – Festive Collection – Pointsettia Mini Background. I added glue to the back of the die cut and mounted it on top of Crafts Sparkling Stickers – 02-3068629. Then I popped up the main image in the centre using 3M VHB – 2 sided tape.

Card Recipe:

Stamps: 2018 Christmas Trees & Houses – M18312 (Dreamerland Crafts Clear Stamps), DCS19089 – Mix and Match Clear Stamp (Dreamerland Crafts Clear Stamps)

Sentiments: DCS19089 – Mix and Match Clear Stamp (Dreamerland Crafts Clear Stamps)

Inks: Memento – Tuxedo Black, Memento – Bamboo Leaves, Memento – Rich Cocoa, VersaMark ink

Embossing Powder: Ranger Embossing Powder White – Extra Fine Detail, WOW! Embossing Glitter – White Puff Twinkle

Paper: Copic Marker X-Press It Blending Card, Crafts Sparkling Stickers – 02-3068629, Recollections – Christmas Inkjet Printable Glitter Paper – 8.5 x 11″

Die Cuts: Creative Expressions by Sue Wilson – Festive Collection – Pointsettia Mini Background – CED3049,

Tools: MISTI – Most Incredible Stamping Tool, Cuttlebug, 3M VHB – 2 sided tape, Inkadoo Stamping Mask Paper, Stickles – Diamond

Image coloured with Copic Markers:

Bear: E57, E55, E53, E39, E37, E35, E34, R59, R37, R35, Sakura Glaze – Black (Nose and Eyes), Gelly Roll Sakura #5 Pen

Bunny: E57, E55, E53, E51, R20, R00, Sakura Glaze – Black (Eyes), Gelly Roll Sakura #5 Pen

Sleigh: R59, R37, R35, C3, C2, C1, E39, E37, E35

Trees: BG96, YG67, YG17, G21, G20, G00, G0000

Background Sky: B99, B97, B95, B93, B91


Hope you like it and have a great week!

You can find more cards to inspire you at Dreamerland Crafts on the Facebook Fan page from the rest of our design team.

Bearing Gifts!


Welcome One Crazy Stamper Fans!

It’s Wednesday, and this month at One Crazy Stamper we are celebrating Christmas in July with High Hopes Rubber Stamps.  I used Teddy Gift (High Hopes Rubber Stamps) for my second card this month. He comes bearing gifts for you!!!

Card Recipe:

Stamp: Teddy Gift (High Hopes Rubber Stamps)

Die Cut: Creative Expressions by Sue Wilson – Festive Collection – Ornate Holly Framed Noel

Paper: Copic Marker X-Press It Blending Card, Crafts – Sparkling Stickers – 02-3068629, Crafts – Glitter Cardstock – 02-3068425, Aqua cardstock

Ribbon: Celebrate It – Holiday Ribbon Bow-Tique – 118164

Embellishments: Crafts – Rhinestones – Crafts – 02-3030386, Stickles – Star Dust, Nuvo Glitter Accents – Fresh Snowfall, Spectrum Noir  Sparkles – Crystal Clear

Tools: MISTI – Most Incredible Stamping Tool, Cuttlebug

Coloured with Copic Markers:

Bear: E29, E27, E25, E23, E55, E53, E51, Sakura Glaze – Black, Gelly Roll Sakura #5 Pen

Hat: R59, R39, R29, R27, R24

Holly and Leaves: YG99, YG93, R39

Vest: YG99, YG93, G14, YG09, R59, R39, R29, R27, R24

Gift: BG18, BG15, BG13, BG11

Ribbon: E15, YR38, YR24, YR23


Hope you like it and have a fantastic week!

You can find lots of inspiration from the Design Team Divas at the One Crazy Stamper blog, and the One Crazy Stamper Facebook Fan page plus you can also follow us on Instagram, Twitter and Pinterest.