Tag Archive | U-Line Double-Sided Foam Tape

Kraftin Kimmie – Merry Christ-Moose!


Sharing another Christmas card I made using Merry Christ-Moose! by Kraftin’ Kimmie Stamps.

To make my card this week, I began with a Recollections – Christmas Cards 4.25″ x 5.5″ card base. I die cut Copic Marker X-Press It Blending Card and Scrapbook.com – Jewels Smooth Cardstock with my Cuttlebug and dies from Moonstone – Hunkydory – Vintage Filigree Frame, Waffle Flower Crafts – Nesting Squares. With my MISTI and Memento – Tuxedo Black ink, I stamped the image onto the square die cut. The sentiment was stamped using VersaMark ink and then embossed with Ranger Embossing Powder White – Extra Fine Detail. Marvy Uchida – Embossing Heat Tool was applied to the powder to heat emboss it.

The image was coloured in with Copic Markers listed below and the snow in the sky was applied with a Gelly Roll Sakura #10 Pen. This pen was also applied to the Moose’s eyes. Sakura Glaze – Black pen was applied to the eyes of all of the characters and also to the dog’s nose. UNIPosca PC-3M White marker was applied to the snow in spots to give it a little more texture. U-Line double-sided foam tape was applied to the back of the die cut and sentiment and they were both popped up onto the card.

Card Recipe:

Stamp and Sentiment: Kraftin’ Kimmie Stamps – Merry Christ-Moose! by Cheryl Grant (Retired)

Inks: Memento – Tuxedo Black, VersaMark ink

Embossing Powder: Ranger Embossing Powder White – Extra Fine Detail

Paper: Copic Marker X-Press It Blending Card, Recollections – Christmas Cards and Envelopes, Scrapbook.com – Jewels Smooth Cardstock (4.25″ x 5.5″)

Die Cuts: Moonstone – Hunkydory – Vintage Filigree Frame, Waffle Flower Crafts – Nesting Squares, Waffle Flower Crafts – Nesting Squares

Tools: MISTI – Most Incredible Stamping Tool, Cuttlebug, U-Line Double-Sided Foam Tape, Gelly Roll Sakura #10 Pen, Sakura Glaze – Black, UNIPosca PC-3M White marker, (Quickie Glue Pen, Mixed Glitter for some areas in snow and on snowman).

Image coloured with Copic Markers:

Skin: E21, E11, E04, E00, E000, R22, R20

Hair: E47, E44, E43, Y26

Moose, Hoofs and Antlers: E53, E51, E50, E39, E37, E35, E33, E31, R22, R20

Birds: R46, R14, R08

Jeans: B99, B97, B95, B91

Sweater: BG49, BG45, BG34, C2, C00, Y04

Shoes: C9, C7, C5, C5, C3

Dog and Collar: T5, T3, T1, 100, E39

Star: Y17, Y15, Y11

Lights: B96, R14, R12, G03, G00, Y13, Y04

Candy Cane: R37, R35

Shadows in Snow: C1, C00, B000,

Sky: BG05, BG02, BG01


Hope you like it and have a great week!

Kit and Clowder – Penguin Bauble!


Today I’m sharing a Christmas card that I made following a video for the Penguin Bauble Colouring class by Alyce Keegan at Kit and Clowder during the November Summit Class.

The image provided by Alyce was printed out with my HP Printer onto Copic Marker X-Press It Blending Card using High Quality Grayscale and coloured in with Copic markers. Once I finished colouring the image, it was fussy cut leaving a slim border. The sentiment was stamped onto some white cardstock in my stash using VersaFine – Majestic Blue ink, MISTI and Kraftin’ Kimmie – It’s Penguining To Look A Lot Like Christmas!  stamp. Ranger – Clear Super Fine Detail embossing powder was applied over top of the ink and it was heat embossed with a Marvy Uchida – Embossing Heat Tool. Lastly, I used a Sharpie – Gold Medium Point – Water Based Paint pen to go around the edges.

The base card was created to the size of 6″ x 6″ out of Hammermill – Premium 110 lb. cardstock. Gold cardstock from Chloe’s Crafts Paper Pad was applied directly to the base of the same size using liquid glue. Waffle Flower Crafts – Nesting Squares were used to die-cut Crafter’s Companion – Snowflake Swirls designer paper for the background and Moonstone – Hunkydory – Vintage Filigree Frame die was used to die cut Chloe’s Crafts Paper Pad – Navy Blue paper. I applied both of these directly to the the front of the card using liquid glue and then popped up the finished image and sentiment onto the card using U-Line double-sided foam tape.

Below is the original coloured image before creating the card to go with it.

Card Recipe:

Stamp: Kit and Clowder – Penguin Bauble

Sentiment: Kraftin’ Kimmie – It’s Penguining To Look A Lot Like Christmas!

Inks: HP Printer High Quality Grayscale, VersaFine – Majestic Blue

Paper: Copic Marker X-Press It Blending Card, Hammermill – Premium Cardstock 110 lb., Chloe’s Crafts Paper Pad – 02-3129420 (6″ x 6″), Crafter’s Companion – Snowflake Swirls (12″ x 12″)

Die Cuts: Moonstone – Hunkydory – Vintage Filigree Frame, Waffle Flower Crafts – Nesting Squares

Miscellaneous: U-Line Double-Sided Foam Tape, White Gelly Roll Sakura #10 Pen, Ranger – Clear Super Fine Detail embossing powder, Marvy Uchida – Embossing Heat Tool, Sharpie – Gold Medium Point – Water Based Paint pen, U-Line Double-Sided Foam Tape


Hope you like it and have a great week!

Wyatt’s 1st Birthday!


Hi There!

It’s been awhile since I’ve posted anything as the first half of this year was not the greatest for me! So let me catch you up a bit.

In January, my husband and I went on a cruise. It rained almost everyday and so 2 of the ports that we were supposed to go to didn’t happen, but we still tried to make the best of it and were both very happy to at least get to hold a baby sloth which ended up being the highlight of of our trip. On the last day, I connected to Wi-Fi, only to find out that my mom had been admitted to the hospital on the 2nd day of our trip back home. She has Dementia and Alzheimer’s disease and is now permanently in a very nice home since the end of February. I have been travelling back home to see her whenever I can and also staying with family. My dad turned 90 years old this year in April and we had a very nice party with friends and family and he was so happy! However, after his birthday, he was not doing well and sadly passed away suddenly 2 weeks later. Therefore, I wasn’t feeling very creative for most of the 1st half of the year.

July and the first part of August became a time for visiting my immediate family, my mom, my mom’s sisters here in Ontario and my husband’s family in Calgary, Alberta.

During our July vacation in Calgary, Alberta, we met up with members from my husband’s family and some old friends. It was a wonderful time and great to see everyone after so many years! We also did some wonderful sightseeing as well! While we were there, our new great nephew Wyatt was celebrating his 1st birthday!

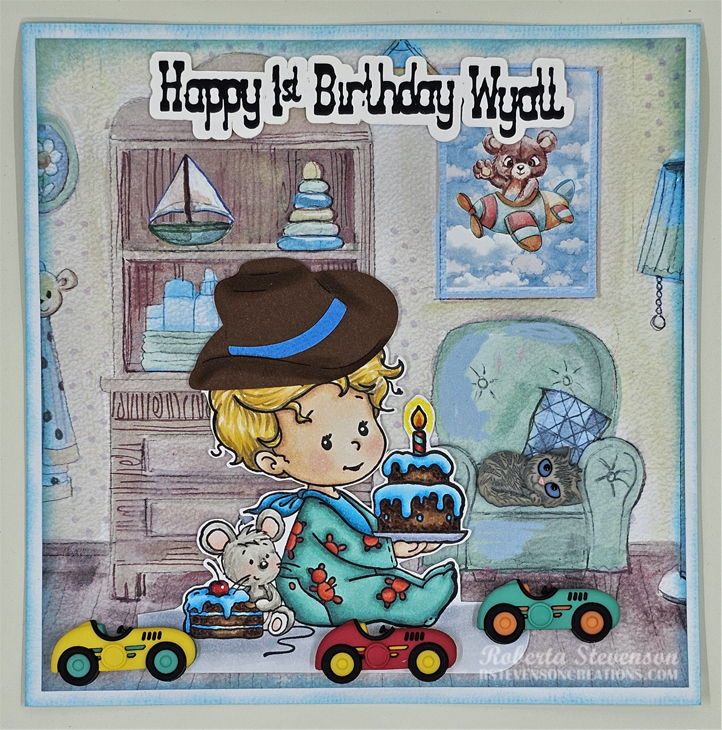
Today I’m sharing the Birthday card that I made for my nephew’s Birthday using the image from Whimsy StampsBirthday Baby Boy Rubber Stamp and Sentiment and hat from Cricut Cartridge – Old West using Cricut Design Studio and Cricut Explore.

To create the card, I began with the card base of 6″ x 6″ using AC Cardstock – White and FINDit Trading – Hello World watercolor collection – Yvonne Creations cardstock cut to the size of 5.75″ x 5.75″. I thought it created the perfect background for this adorable stamp. The edges were inked with Tim Holtz Distress Inks – Tumbled Glass and it was adhered to the base card with liquid glue.

With Memento – Tuxedo Black ink and my MISTI, I stamped the rubber image onto Copic Marker X-Press It Blending Card and then coloured it in. Once this was completed, I then fussy cut around the entire image. I glued the black lettering onto the white outline I die cut for the sentiment and popped up both the image and sentiment onto the card using U-Line Double-Sided Foam Tape. Once that was done, I glued the little cowboy hat onto the baby boy.

Lastly, I added in the little kitty cat on the chair using the Kitten from Dress It Up – Kitten Kaboodle button after removing the backing with liquid glue. The 3 cars were added in the same way which were from Dress It Up – Speed Racers.

My niece and nephew loved the card and I hope you do too!

Card Recipe:

Stamp: Whimsy StampsBirthday Baby Boy Rubber Stamp

Sentiment: Cricut – Old West Font from Old West Cartridge

Inks: Memento – Tuxedo Black

Paper: Copic Marker X-Press It Blending Card, AC Cardstock – White, FINDit Trading – Hello World watercolor collection – Yvonne Creations

Miscellaneous: MISTI – Most Incredible Stamping Tool, Cricut, Cricut Explore, U-Line Double-Sided Foam Tape, Dress It Up – Speed Racers, Dress It Up – Kitten Kaboodle

Image coloured with Copic Markers:

Skin: E21, E11, E04, E00, E000, R30, R30, R20

Hair: E50, E44, YR21, Y26

Pajamas: BG72, BG57, BG32, BG11, R46, R14, R08

Bib: BG09, BG05, BG02, BG01

Mouse: W5, W3, W1, W0, R30, R20, R02, R00

Cake, Candle and Cherry: E29, E27, E25, E23, B05, B04, B01, B00, BG32, BG11, R59, R46, R37, R35, R14, YR16, Y08

Plate: BV23, BV20

Hope you like it and have a great week!

Dad’s 90th Birthday!


Today I’m sharing a Birthday card that I made for my dad’s 90th Birthday last week using the image and sentiments from Art ImpressionsDance It Out – 5278. We had a nice party for him surrounded by family and close friends and he enjoyed every minute of it. 🙂 I created the fishes on the shirt because my dad has always loved fishing and I thought it would be fun to do.

To create the card, I began with the card base of 3.75″ x 9″ using Hammermill – Premium Colour 100 lb. cardstock. With a Cuttlebug, I die cut the sentiment using Spellbinders – Phrase Set 1 and the numbers with Lawn Fawn Lawn Cuts – Henry’s 123s and then adhered them directly to the card using liquid glue. With a stamping block and Versa Fine – Onyx Black, several sentiments were stamped using the Art ImpressionsDance It Out – 5278 set.

Once this was completed, it was time to create the background. To do this,  I placed down the stencil from Lawn Fawn – Confetti Stencils and applied multiple Tim Holtz Distress inks with some small blending brushes. I continued to do this until, I covered the entire card, being sure to not colour over any of the lettering.

With Memento – Tuxedo Black ink and my MISTI, I stamped the image onto Copic Marker X-Press It Blending Card and then coloured it in. Once this was completed, I then fussy cut around the entire image and popped it up onto the card using U-Line Double-Sided Foam Tape.

I applied some small balloons with some die cuts that I had cut out earlier using Your Next Stamp – Mini Balloon Trio Die Set and then added in the “th”, strings for the balloons and eyes for the fish with a Sakura Glaze – Black pen. The inside of the card also had a lot of fun sayings.

I made my dad this fun T-shirt too using my Cricut. He loved his card and shirt an I hope you do too!

Card Recipe:

Stamps and Sentiment: Art ImpressionsDance It Out – 5278,

Inks: Memento – Tuxedo Black, Versa Fine – Onyx Black, Tim Holtz Distress Ink: Carved Pumpkin, Cracked Pistachio, Mermaid Lagoon, Squeezed Lemonade, Wilted Violet, Festive Berries

Paper: Copic Marker X-Press It Blending Card, Hammermill – Premium Cardstock 110 lb.

Dies: Spellbinders – Phrase Set 1 S4-563, Lawn Fawn Lawn Cuts – Henry’s 123s, Your Next Stamp – Mini Balloon Trio Die Set (YNSD241)

Stencil: Lawn Fawn – Confetti Stencils (6″ x 6″)

Miscellaneous: MISTI – Most Incredible Stamping Tool, Cuttlebug, U-Line Double-Sided Foam Tape, Sakura Glaze – Black pen

Image coloured with Copic Markers:

Skin: E21, E11, E04, E00, E000, R30, R24, R20

Hair: W10, W8

Shirt: YR14, B37, B14, B12

Jeans: B99, B97, B95, B91

Shoes: W10, W8, W6, W4

Belt and Buckle: W10, W9, W7, YR23, Y15

Hope you like it and have a great week!

Happy Valentine’s Day Bear!


Today, I’m sharing a Valentine’s Day card that I made for my husband this year using Kit and Clowder – January – February 2024 Markers – Valentine’s Bear Bonus Class on-line colouring class taught by Alyce Keegan for the front of the card and Kraftin’ Kimmie Stamps  – Your Gnaw-some! by Neda Sadreddin for the inside of the card.

The base card was created to the size of 5.5″ x 5.5″ out of Recollections – Red cardstock.  I printed out the image for the cup and bear from the card class using a HP Printer onto Copic Marker X-Press It Blending Card.  The bear, cup and hearts were coloured in following the instructional video by Alyce Keegan from Kit and Clowder. Once this was completed, using a Cuttlebug and Waffle Flower – Nesting Square dies, I die cut the image using the 4.25″ x 4.25″ die. The background was coloured in with a BG000 marker and then I added in the sentiments using Cloud 9 – Matt Blending Ink – Strawberry Sundae for the “I Love You” and then restamping it again using VersaMark. Versa Fine – Onyx Black was used for the “Happy Valentine’s Day” sentiment. Both sentiments were embossed with Ranger – Clear Super Fine Detail Embossing Powder and then heat embossed using a Marvy Uchida – Embossing Heat Tool. Anna Griffin – 3D Square Cardcentric Compendium Dies were die cut using the Cuttlebug and the 5-1/8″ x 5-1/8″ die out of Recollections – Matte Gold Foil cardstock. I applied the finished image onto the frame with liquid glue. U-Line Double-Sided Foam Tape was applied to the back of frame and it was centered onto the front of the card.

For the inside of the card, the image for the beavers was stamped onto the same Copic paper using Memento – Tuxedo Black ink and a MISTI. This was coloured in with Copic markers listed below and then fussy cut. The sentiments were all stamped using the same method and inks as above that were used for “The Happy Valentine’s Day” sentiment. I coloured in the heart and the lettering with Copic markers and then fussy cut around all of the sentiments. Liquid glue was applied to all of the pieces and they were adhered onto the card. Lastly, to finish everything off, some Kraftin’ Kimme Hearts Krafty Dots were added.

Card Recipe:

Stamp Class and image front: Kit and Clowder – January – February 2024 Markers – Valentine’s Bear Bonus Class on-line colouring class taught by Alyce Keegan

Stamp Sentiments: Art Impressions – Valentine Critters Set – 5117 and Lawn Fawn – Your Just My Type

Stamp Image and Sentiment Inside of card:  Kraftin’ Kimmie Stamps – Your Gnaw-some! by Neda Sadreddin (Retired)

Paper: Copic Marker X-Press It Blending Card, Recollections – Matte Gold Foil cardstock, Recollections – Red cardstock

Inks: Cloud 9 – Matt Blending Ink – Strawberry Sundae, VersaMark, Versa Fine – Onyx Black, Memento – Tuxedo Black, HP Printer 

Die Cuts: Waffle Flower – Nesting Square diesAnna Griffin – 3D Square Cardcentric Compendium Dies

Embossing Powder: Ranger – Clear Super Fine Detail

Miscellaneous: Marvy Uchida – Embossing Heat Tool, Kraftin’ Kimmie – Hearts Dots, U-Line Double-Sided Foam Tape, MISTI – Most Incredible Stamping Tool

Copic Markers:

Beavers: E79, E27, E25, E23, E21, R02, C1, C00

Flower and Lettering: R59, R37, R24

Hope you like it and have a great week!

Yarn Bundles!


Today, I’m sharing a birthday card that I made using Kit and Clowder – December 2024 Markers – Yarn Bundles on-line colouring class taught by Alyce Keegan. Love this adorable puppy all wrapped up in the wool. After colouring in the image, I thought this birthday sentiment matched the expression of the puppy perfectly. LOL!

The base card was created to the size of 5″ x 5″ out of Hammermill – Premium 110 lb. cardstock. Hot Buy – Recollections – Jewel Tones paper was cut to the same size and glued onto the base card. The image was die cut with a Cuttlebug and My Creative Time -Stitched Squares Inside and Out (4.75″ x 4.75″) and then popped up onto the card using U-Line Double-Sided Foam Tape. Lastly, Kraftin’ Kimmie – Festive Dots were added to finish it off.

Card Recipe:

Stamp Class and image: Kit and Clowder – December 2024 Markers – Yarn Bundles

Stamp Sentiment: Whimsy Stamps – Me-Wow Cat Birthday – C1386 

Paper: Hammermill – Premium Cardstock 110 lb., Copic Marker X-Press It Blending Card, Hot Buy – Recollections – Jewel Tones

Die Cuts: My Creative Time -Stitched Squares Inside and Out

Embossing Powder: Ranger – Clear Super Fine Detail

Miscellaneous: Marvy Uchida – Embossing Heat Tool, Kraftin’ Kimmie – Festive Dots, U-Line Double-Sided Foam Tape

Hope you like it and have a great week!

Dancing Gingerbread !


Today I’m sharing an interactive Christmas card that I made using Spellbinders – Dancin’ Gingerbread – S5-609 and Dancin’ Christmas Sentiments – STP-216. I could play with this card all day watching them swinging them back and forth! LOL!

Love these fun dies and just had to try them out. Using the die cuts, I cut all of the body pieces for the Gingerbread man and woman using the dies and a Cuttlebug. Tim Holtz Distress Ink – Rusty Hinge was then applied all around the edges with a finger dauber. All of the reds were die cut using Recollections – Red cardstock and then inked around the edges with Tim Holtz Distress Ink – Aged Mahogony. Just to give the pieces a little depth. For the cheeks, I added a little bit of pink chalk to make them rosier. All of the sparkle white pieces were die cut using Lawn Fawn – Sparkle Cardstock in “Pixie Dust”. I really love the glitter of this paper. The scarf pattern pieces were die cut out of Hammermill – Premium Cardstock.

The base card was created to the size of 4.25″ x 5.5″ out of Hammermill – Premium 110 lb. cardstock. Recollections – Red cardstock was cut to the same size as the base. Next, I cut 2 pieces of Recollections – Holiday Basics paper to the size of 4-1/8″ x 7/8″ and applied these to the top and bottom of the card. The centre piece was cut to the size of 4.25″ x 3.5″ and then inked around the edges with a finger dauber and Tim Holtz Distress Ink – Worn Lipstick. All of the paper pieces were adhered to the base card using liquid glue.

The Gingerbread were assembled along with some small scraps used to create the cheeks and eyes. White Gelly Roll Sakura #10 Pen was applied to each of the eyes to give them a little more character. The swinging mechanism was applied to the backs of the Gingerbread and My Favourite Things – Spin & Slide Discs were attached to the card using liquid glue and double-sided tape.

Lastly, I stamped the sentiment onto Hammermill – Premium Cardstock with VersaMark ink and applied Ranger – Rich Red Embossing Powder to it. A Marvy Uchida – Embossing Heat Tool was applied to the powder to heat emboss it.  This was cut down to 3-1/8″ x .75″ and both sides were notched with scissors and Tim Holtz Distress Ink -Worn Lipstick was applied around the edges with a finger dauber. U-Line Double-Sided Foam Tape was applied to the sentiment and it was popped up on the card to complete it.

Card Recipe:

Stamp Sentiment: SpellbindersDancin’ Christmas Sentiments – STP-216

Inks: Tim Holtz Distress Ink – Rusty Hinge, Tim Holtz Distress Ink – Aged Mahogony, Tim Holtz Distress Ink -Worn Lipstick, VersaMark

Paper: Hammermill – Premium Cardstock 110 lb., Recollections – Holiday Basics (12″ x 12″), Crafter’s Companion – Snowflake Swirls (12″ x 12″), Recollections – Red cardstock, Recollections Kraft Cardstock, Lawn Fawn – Sparkle Cardstock in “Pixie Dust” (8.5″ x 11″), scraps of pink and dark brown cardstock for cheeks, eyes and mouth

Die Cuts: Spellbinders – Dancin’ Gingerbread – S5-609

Embossing Powder: Ranger – Rich Red

Miscellaneous: U-Line Double-Sided Foam Tape, White Gelly Roll Sakura #10 Pen, My Favourite Things – Spin & Slide Discs, Marvy Uchida – Embossing Heat Tool

Hope you like it and have a great week!

Penguin and Reindeer Friend!


Today I’m sharing a Christmas card that I made using Whimsy StampsPenguin and Reindeer Friend and Penny Black Creative DiesAntique Frame.

The image was printed out with my HP Printer onto Copic Marker X-Press It Blending Card using High Quality Grayscale and coloured in with Copic markers. Once I finished colouring the image, I applied Copic B000 all around it and then fussy cut the image out leaving a slim border.

The base card was created to the size of 4.25″ x 5.5″ out of Hammermill – Premium 110 lb. cardstock. Stampin’ Up – Snowflake Splendor Designer Series Paper was cut to the same size as the base card. Using a Cuttlebug and Penny Black Creative Dies – Antique Frame, I die cut the centre of the paper, keeping the original size as well. The same dies were also used to cut out a larger rectangle out of Hot Buy – Recollections – Jewel Tones paper. To create the snow, I first die cut the snow drifts with Lawn Fawn – Sparkle Cardstock in “Pixie Dust” paper and Spellbinders – Color Block Scenic Scape dies. Next, so that I could keep the same shape as the snowflake die cut, I once again ran both of the snow die cuts through the cutting machine using the Penny Black dies. All of the die cuts were inked around the edges with a finger dauber and Tim Holtz Distress Ink – Salty Ocean. Tim Holtz Distress Inks – Tumbled Glass was applied to the top of the snow banks to give them some contrast.

The whole card was now ready to assemble.

Liquid glue was applied to the larger snowflake border and then applied directly onto the base card. U-Line Double-Sided Foam Tape was applied to the completed image, small snow drift and each of the rectangle die cuts. The larger die cut rectangle was popped up onto the centre of the snowflake base. Liquid glue was applied to the larger snow drift and it was applied directly to the smaller snowflake die cut. Another layer of U-Line Double-Sided Foam Tape and some liquid glue were applied to the smaller snow drift then it was popped up onto the larger snow drift. The penguin and reindeer image was popped up behind the smaller snowdrift. I also applied some liquid glue to the foam tape so that it would adhere better to the sparkle cardstock. Lastly, I fussy cut a sentiment from Creative Expressions – Wordies Sentiment Sheets – Christmas Script and popped it up onto the top of the card.

Card Recipe:

Stamp: Whimsy StampsPenguin and Reindeer Friend

Inks: HP Printer High Quality Grayscale, Tim Holtz Distress Ink – Salty Ocean, Tim Holtz Distress Inks – Tumbled Glass

Paper: Copic Marker X-Press It Blending Card, Hammermill – Premium Cardstock 110 lb., Lawn Fawn – Sparkle Cardstock in “Pixie Dust” (8.5″ x 11″), Stampin’ Up – Snowflake Splendor Designer Series Paper, Hot Buy – Recollections – Jewel Tones, Creative Expressions – Wordies Sentiment Sheets – Christmas Script (CEW022)

Die Cuts: Penny Black Creative DiesAntique Frame 51-937, SpellbindersColor Block Scenic Scape (S3-418)

Miscellaneous: U-Line Double-Sided Foam Tape, White Gelly Roll Sakura #10 Pen, Sakura Glaze – Black, Pigma Micron 03 black marker

Image coloured with Copic Markers:

Penguin: W9, W7, W5, W3, W00, E15, YR14, Y17, Y11, RV00, E43, E42, E41, E40, Colorless Blender, (Eyes – Sakura Glaze – Black, White Gelly Roll Sakura #10 Pen), Pigma Micron 03 black marker

Scarf and Hat: BG09, BG05, BG02, BG01

Reindeer: E35, E33, E31, E18, E15, R02, R01, R00, C1, C00, (Eyes and Nose – Sakura Glaze – Black, White Gelly Roll Sakura #10 Pen), Pigma Micron 03 black marker

Bells and Collars: YR23, Y15, Y11, Y00, R46, R14, R08

Leash: G16, YG25, YG23

Hope you like it and have a great week!

Pre-Colored Snowflake Gnome!


Today I’m sharing a Christmas CAS card that I made using KLM Digital DesignsPre-Colored Snowflake Gnome from the new December 2024 Release. This pre-coloured image makes it very easy to create lots of last minute Christmas cards.

The base card was created to the size of 4.25″ x 5.5″ out of Hammermill – Premium 110 lb. cardstock. Whimsy Stamps – Blurry Flurries paper was cut to the same size and applied to the base card using double-sided tape.

The image was printed out onto Copic Marker X-Press It Blending Card and fussy cut. Joy Crafts – Merry Christmas Cutting Stencil was die cut using a Cuttlebug and Lawn Fawn – Sparkle Cardstock in “Pixie Dust” paper. This was applied along the top of the card using liquid glue. With a spatula, DecoArt Snow-Tex was applied along the bottom of the card and then some glitter was sprinkled onto it while it was still wet. Gentle pressure was used to push the glitter into the DecoArt Snow-Tex. U-Line Double-Sided Foam Tape was applied to the upper part of the image and it was popped up onto the card. Lastly, Stickles – Diamond was applied along the bottom of the feet.

Card Recipe:

Stamp: KLM Digital DesignsPre-Colored Snowflake Gnome

Sentiment Die: Joy Crafts – Merry Christmas Cutting Stencil (6002/0683)

Inks: HP Printer

Paper: Copic Marker X-Press It Blending Card, Hammermill – Premium Cardstock 110 lb., Whimsy Stamps – Blurry Flurries WSDP25 (6″ x 6″), Lawn Fawn – Sparkle Cardstock in “Pixie Dust” (8.5″ x 11″)

Miscellaneous: U-Line Double-Sided Foam Tape, DecoArt Snow-Tex, Stickles – Diamond

Hope you like it and have a great week!

You can find more cards to inspire you at KLM Designs, KLM Digital Design Team and KLM Digital Designs on the Facebook Fan page from the rest of our design team.

NOTE: KLM Designs will be closing as of January 1st, 2025. All physical stamps are now $2.50!
Stock up while supplies last!


Sitting Gnome – Flower Pot!


Today I’m sharing a Spring card that I made using KLM Digital DesignsSitting Gnome – Flower Pot from the new December 2024 Release.

The base card was created to the size of 4.25″ x 5.5″ out of Hammermill – Premium 110 lb. cardstock. Using Tim Holtz Distress Oxide Ink – Salty Ocean and a blending brush, I applied the clouds in the sky with stencils that I had made previous using Avery Elle – Pierced Clouds Die. The grass was added in using Tim Holtz Distress Oxide Inks – Mowed Lawn and Lawn Fawn – Clippings – Slimline Grassy Hillside Stencils.

The image was printed out onto Copic Marker X-Press It Blending Card using High Quality Grayscale and coloured in with Copic markers listed below.  Using a Quickie Glue pen, I added some glitter to the butterfly dots, leaves and petals on the flowers. The image was fussy cut and a black marker was applied around the entire image. I applied a shadow in the grass where I knew I was going to position the flower pot. Then using stamps from Lawn Fawn – Garden Before ‘n Afters, I applied the sentiment with Versa Fine – Onyx Black ink. Ranger – Clear Super Fine Detail embossing powder was applied over top of the ink and then heat embossed using a Marvy Uchida – Embossing Heat Tool. U-Line Double-Sided Foam Tape was applied to the image and it was popped up onto the card.

Card Recipe:

Stamp: KLM Digital DesignsSitting Gnome – Flower Pot

Sentiment: Lawn Fawn – Garden Before ‘n Afters

Inks: HP Printer High Quality Grayscale, Tim Holtz Distress Oxide Ink – Salty Ocean, Tim Holtz Distress Oxide Inks – Mowed Lawn,

Paper: Copic Marker X-Press It Blending Card, Hammermill – Premium Cardstock 110 lb.

Stencils: Avery Elle – Pierced Clouds Die (D-05-01), Lawn Fawn – Clippings – Slimline Grassy Hillside Stencils

Miscellaneous: U-Line Double-Sided Foam Tape, Quickie Glue, Glitter, Ranger – Clear Super Fine Detail embossing powder, Marvy Uchida – Embossing Heat Tool

Image coloured with Copic Markers:

Skin: E21, E11, E00, E000

Beard: YR68, YR31, YR18, Y38

Shirt: BG09, BG05, BG02, BG01

Pants: B99, B97, B95, B91

Socks: BG09, BG05, BG02, BG01, R46, R14, R08, C02, C01, C00

Hat: R46, R24, R14, R08

Shoes: 100, W9, W7, W5

Flower Pot: E57, E35, E33, E31

Leaves: G16, YG25, YG23

Flower and Buds: YR16, YR12, Y38, Y35, Y17, Y15, Y11, Y06, E15

Butterfly: Y35, Y15, Y08, E27, W9

Grass Shadow: YG25, YG23, YG03

Hope you like it and have a great week!

You can find more cards to inspire you at KLM Designs, KLM Digital Design Team and KLM Digital Designs on the Facebook Fan page from the rest of our design team.

Owl – St. Patrick’s Day!


Today I’m sharing a St. Patrick’s Day card that I made using KLM Digital DesignsOwl – St. Patrick’s Day from the new December 2024 Release.

The image was printed out with my HP Printer onto Copic Marker X-Press It Blending Card using High Quality Grayscale and coloured in with Copic markers, then fussy cut. I stamped the sentiment from Lawn Fawn – Celebration Scripty Sentiments using my MISTI and Tim Holtz Distress Oxide Ink – Lucky Clover onto Hammermill – Premium Cardstock 110 lb., then fussy cut around it. With a Cuttlebug and dies from Spellbinders Nestabilities – Classic Scalloped Ovals (LG) and Lawn Fawn – Magic Iris Behive Add-on, I die cut the large oval and tree branch. A Copic MultiLiner Sepia 0.1 was then applied to the branch to create some bark lines and Tim Holtz Distress Ink – Pine Needles was applied all around the oval die cut using a sponge dauber.

The base card was created to the size of 4.25″ x 5.5″ out of Hammermill – Premium 110 lb. cardstock. Green cardstock from my stash was cut to the same size as the base and applied with double-sided tape. Doodlebug – Happy-Go-Lucky paper was cut to the size of 4-1/8″ x 5-3/8″. Tim Holtz Distress Inks – Peeled Paint was applied all around the edges and the it was popped up onto the centre of the card using U-Line Double-Sided Foam Tape. U-Line Double-Sided Foam Tape was applied to the backs of the coloured image, oval, tree branch and sentiment and then they were popped up onto the card. Lastly, Kraftin’ Kimmie Fruity dots were added to complete the card.

Card Recipe:

Stamp: KLM Digital DesignsOwl – St. Patrick’s Day

Sentiment: Lawn Fawn – Celebration Scripty Sentiments

Inks: HP Printer High Quality Grayscale, Tim Holtz Distress Ink – Pine Needles, Tim Holtz Distress Inks – Peeled Paint, Tim Holtz Distress Oxide Ink – Lucky Clover, Green and Brown cardstock from stash

Paper: Copic Marker X-Press It Blending Card, Hammermill – Premium Cardstock 110 lb., Doodlebug – Happy-Go-Lucky (12″ x 12″)

Die Cuts: Spellbinders Nestabilities – Classic Scalloped Ovals (LG), Lawn Fawn – Magic Iris Behive Add-on

Miscellaneous: U-Line Double-Sided Foam Tape, Pental Slicci – Gold 8.0 pen, Copic MultiLiner Sepia 0.1, Kraftin’ Kimmie Fruity dots

Image coloured with Copic Markers:

Owl: YR23, Y15, Y11, Y00, E53, E43, E42, E41, E40, E37, E35, E34, B39, B37, BV25, W9, W7,

Hat: G07, YG25, YG23, YG11, W9, W7, W5, Colorless Blender, Pental Slicci – Gold 8.0 pen (Gold band on hat)

Hope you like it and have a great week!

You can find more cards to inspire you at KLM Designs, KLM Digital Design Team and KLM Digital Designs on the Facebook Fan page from the rest of our design team.

Penguin Candy Cane !


Today I’m sharing another Christmas card that I made using Whimsy StampsPenguin Candy Cane.

The image was printed out with my HP Printer onto Copic Marker X-Press It Blending Card using High Quality Grayscale and coloured in with Copic markers. Once I finished colouring the image, I fussy cut around it.

The base card was created to the size of 4.25″ x 5.5″ out of Hammermill – Premium 110 lb. cardstock. Creative Expressions – Christmas Wishes paper was cut to be the same size as the base and was applied directly to the card using double-sided tape. A finger dauber was used to apply Tim Holtz Distress Inks – Candied Apple around all of the edges of the card. Using a Cuttlebug, I die cut the larger snowflake with Creative Expressions – Festive Collection – Lace Snowflake Frame and the smaller snowflakes with Poppy – Simple Snowflakes out of Lawn Fawn – Sparkle Cardstock in “Pixie Dust” paper. The holly and leaves were die cut using dies from Spellbinders – Dancin’ Figgy Pudding and some scraps of Recollections – Green cardstock and Crafter’s Companion Luxury Cardstock – Red. I used a Copic marker G99 to make the veins darker in the leaves and a White Gelly Roll Sakura #10 Pen to add a highlight on the berries and then used liquid glue to assemble them.

The whole card was now ready to assemble. U-Line Double-Sided Foam Tape was applied to the completed image and it was popped up onto the centre of the large snowflake. U-Line Double-Sided Foam Tape was then applied to the large snowflake and it was popped up onto the centre of the card. Liquid glue was applied to the holly and berries and smaller snowflakes which were adhered directly to the card base. Lastly, I applied U-Line Double-Sided Foam Tape to the sentiment from Hunkydory Essential Book of Christmas Sentiments 2023 and popped it up onto the corner of the card to finish it off.

Card Recipe:

Stamp: Whimsy StampsPenguin Candy Cane

Inks: HP Printer High Quality Grayscale, Tim Holtz Distress Inks – Candied Apple

Paper: Copic Marker X-Press It Blending Card, Hammermill – Premium Cardstock 110 lb., Creative Expressions – Christmas Wishes (8″ x 8″), Crafter’s Companion Luxury Cardstock – Red – 8.5 x 11″, Lawn Fawn – Sparkle Cardstock in “Pixie Dust” (8.5″ x 11″), Hunkydory Essential Book of Christmas Sentiments 2023, Recollections – Green cardstock

Die Cuts: Spellbinders – Dancin’ Figgy Pudding – S4-1315, Creative Expressions – Festive Collection – Lace Snowflake Frame (CED3123), Poppy – Simple Snowflakes (Style 1931)

Miscellaneous: U-Line Double-Sided Foam Tape, White Gelly Roll Sakura #10 Pen

Image coloured with Copic Markers:

Penguin: W9, W7, W5, W3, W00, E15, YR14, Y17, Y11, RV00, E43, E42, E41, E40, Colorless Blender

Hat: R46, R14, R08, C01, C0

Candy Cane: G16, YG25, YG23, R46, R14, R08, C1, C0

Hope you like it and have a great week!

Sleeping Polar Bear!


Today I’m sharing a Christmas card that I made using Pink Gem DesignsSleeping Polar Bear and a mixture of sentiments from Lawn FawnPenguin Party and Lawn FawnWinter Skies which I thought went great with this super adorable image!

The image was printed out with my HP Printer onto Copic Marker X-Press It Blending Card using High Quality Grayscale and then die cut using a Cuttlebug and My Creative Time – Rectangle Frame Layers. The image was coloured in with Copic markers and then a White Gelly Roll Sakura #10 Pen was applied to create the snow falling from the sky. Stickles – Frosted Lace was applied to the top of the snow, snow drifts, igloo and on the white parts of the hat. I just love the way it glistens!

The base card was created to the size of 4.25″ x 5.5″ out of Hammermill – Premium 110 lb. cardstock. Using some scrap Hammermill – Premium Cardstock 110 lb., I inked the paper using a finger dauber with Tim Holtz Distress Inks – Festive Berries that I still had on it. Then using a MISTI and VersaMark ink, I used Lawn FawnPenguin Party for the “Merry Christmas” sentiment and Lawn FawnWinter Skies for the “Hope your dreams come true” sentiment. Ranger Embossing Powder White – Extra Fine Detail was applied to both sentiments and then the embossing powder was heated with a Marvy Uchida – Embossing Heat Tool. Next, I used a cutter to cut close to the sentiment on the Recollections – Black cardstock and a Cuttlebug with Nellie’s Choice Multi Frame Die – Round Lily – MFD030 to cut the smaller sentiment. Gina Marie Designs – Nested Scalloped Stitched Rectangles were used to die cut the background border out of Crafter’s Companion Luxury Cardstock – Red Matte finish. Lastly, with a cutter, Stampin’ Up – Snowflake Splendor Designer Series Paper was cut to the same size as the base card and then edges were inked around using a finger dauber and Tim Holtz Distress Ink – Blueprint Sketch.

The card was now read to assemble. U-Line Double-Sided Foam Tape was applied all of the die cuts and sentiments. They were then popped up and layered onto the card and image.

Card Recipe:

Stamp: Pink Gem DesignsSleeping Polar Bear

Sentiments: Lawn FawnPenguin Party, Lawn FawnWinter Skies

Inks: HP Printer High Quality Grayscale, Tim Holtz Distress Inks – Festive Berries, Tim Holtz Distress Ink – Blueprint Sketch, VersaMark

Paper: Copic Marker X-Press It Blending Card, Hammermill – Premium Cardstock 110 lb., Stampin’ Up – Snowflake Splendor Designer Series Paper, Crafter’s Companion Luxury Cardstock – Red – 8.5 x 11″, Recollections – Black cardstock

Dies: Gina Marie Designs – Nested Scalloped Stitched Rectangles, Nellie’s Choice Multi Frame Die – Round Lily – MFD030, My Creative Time – Rectangle Frame Layers

Embossing Powder: Ranger Embossing Powder White – Extra Fine Detail

Miscellaneous: U-Line Double-Sided Foam Tape, White Gelly Roll Sakura #10 Pen, Stickles – Frosted Lace, Marvy Uchida – Embossing Heat Tool

Image coloured with Copic Markers:

Polar Bear: B91, C1, C0, Colorless Blender, R02, R01, R00

Hat: R59, R37, R35, R24, B91, C01, C0, Colorless Blender, Stickles – Frosted Lace

Presents and Bows: BG09, BG05, BG02, BG01, E15, YR24, Y35, Y08, R59, R37, R35

Lollipops: G16, YG25, YG23, R46, R14, R08, R37, R35, C1, C0

Santa Sign: R59, R46, R14, R08, C1, C0

Sky: B29, B28, B26, B24, Gelly Roll Sakura #10 Pen

Snow: B91, C1, C0, Colorless Blender, Stickles – Frosted Lace

Hope you like it and have a great week!

Happy Pawlidays!


Today I’m sharing another Christmas card that I made using KLM Digital DesignsKitty – Santa Hat from the new November 2024 Release. This image also comes with the 2 other sentiments, “Merry Christmas” and “Santa Paws is Comin’ to town”. Purrrfect for all of the cat lovers out there or for your own little kitty cat! LOL!

The image and sentiment were printed out with my HP Printer onto Copic Marker X-Press It Blending Card using High Quality Grayscale. The image was coloured in with Copic markers and a Prismacolor Premier black pencil was used to colour in the eyes and the whiskers.  Sakura Glaze – Black Pen was used to colour in the nose and a White Gelly Roll Sakura #10 Pen was used to create the highlight. The White Gelly Roll Sakura #10 Pen was also applied to the sky and highlights on the snow drifts. Stickles – Diamond was applied to the top of the snow and on the white parts of the hat.

The base card was created to the size of 4.25″ x 5.5″ out of Hammermill – Premium 110 lb. cardstock. Recollections – Navy Cardstock was cut to the same size as the base card and it was adhered to it with liquid glue. U-Line Double-Sided Foam Tape was applied to the completed image and it was popped up onto the  centre of the card.

Card Recipe:

Stamp and Sentiment: KLM Digital DesignsKitty – Santa Hat

Inks: HP Printer High Quality Grayscale

Paper: Copic Marker X-Press It Blending Card, Hammermill – Premium Cardstock 110 lb., Recollections – Navy Cardstock

Miscellaneous: U-Line Double-Sided Foam Tape, Sakura Glaze – Black Pen, White Gelly Roll Sakura #10 Pen, Stickles – Diamond

Image coloured with Copic Markers:

Cat: C8, C7, C6, C5, C4, C3, R29, R27, R24, R02, R01, R00, PrismaColor Premier Pencil – Black, Sakura Glaze – Black Pen, Gelly Roll Sakura #10 Pen (Nose)

Hat: R59, R37, R35, R24, B91, C01, C0, Colorless Blender, Stickles – Diamond

Sky: B04, BO2, B01, B00, Gelly Roll Sakura #10 Pen

Snow: B91, C1, C0, Colorless Blender, Gelly Roll Sakura #10 Pen, Stickles – Diamond

Hope you like it and have a great week!

You can find more cards to inspire you at KLM Designs, KLM Digital Design Team and KLM Digital Designs on the Facebook Fan page from the rest of our design team.

Christmas Tree Gnome!


Today I’m sharing a Christmas card that I made using KLM Digital DesignsChristmas Tree Gnome II from the new November 2024 Release.

The base card was created to the size of 4.25″ x 5.5″ out of Hammermill – Premium 110 lb. cardstock.  The image was printed out onto Copic Marker X-Press It Blending Card using High Quality Grayscale and then it was die cut using a Cuttlebug and My Creative Time – Rectangle Frame Die Layers (3.5″ x 4.75″). The image was then coloured in with Copic markers listed below.  A white Gelly Roll Sakura #10 Pen was used to create the white snow in the sky and also the sparkles on the snow drifts on the ground. Recollections – Red cardstock was cut to the size of approximately x 3.75″ x 5″ and the finished image was directly applied to this using liquid glue. Once again, liquid glue was applied to the red rectangle and it was adhered directly to the base card. Finally to finish it off, I popped up a sentiment from Creative Expressions – Wordies Sentiment Sheets – Christmas Script (CEW022) using U-Line Double-Sided Foam Tape.

Card Recipe:

Stamp: KLM Digital DesignsChristmas Tree Gnome II

Inks: HP Printer High Quality Grayscale

Paper: Copic Marker X-Press It Blending Card, Hammermill – Premium Cardstock 110 lb., Recollections – Red cardstock

Die Cut: My Creative Time – Rectangle Frame Die Layers – MCT-D274

Miscellaneous: U-Line Double-Sided Foam Tape, Gelly Roll Sakura #10 Pen, Creative Expressions – Wordies Sentiment Sheets – Christmas Script (CEW022)

Image coloured with Copic Markers:

Skin: E21, E11, E04, E00, E000, R24, R22

Sweater:  R59, R37, R35, BG09, BG05, BG02, BG01, C2, C1

Pants: B99, B97, B95, B91

Hat: R59, R37, R35

Boots: C9, C7, C7, C3

Mitten: R59, R37, R35, BG09, BG05, Gelly Roll Sakura #10 Pen

Tree and Branches: E59, E29, E27, E25, E21, G99, YG67, YG63, YG61

Sky: B06, B05, B04, B02

Snow: B91, C1, C0, Colorless Blender, Gelly Roll Sakura #10 Pen

Hope you like it and have a great week!

You can find more cards to inspire you at KLM Designs, KLM Digital Design Team and KLM Digital Designs on the Facebook Fan page from the rest of our design team.

Christmas Wagon Kitty!


Today I’m sharing a Christmas card that I made using Dis Digi StampsChristmas Wagon Kitty (Retired).

The base card was created to the size of 4.25″ x 5.5″ out of Hammermill – Premium 110 lb. cardstock. Craft Smart – Hot Buy – Happy Pawlidays paper was cut to the same size and adhered to the base using double-sided tape. Tim Holtz Distress Ink – Rustic Wilderness was inked around all of the edges of the card using a finger dauber. I chose a sentiment from Photo-Play Santa Paws Cats – Stickers and applied it to some red cardstock from my stash and then fussy cut around it and set it aside. With my Cuttlebug, I die cut Crafter’s Companion Luxury Cardstock – Red matte finish with PinkFresh Studio – Essentials: Folk Edge Squares.

The image was printed out with my HP Printer onto Copic Marker X-Press It Blending Card using High Quality Grayscale. The image was coloured in with Copic markers. Sakura Glaze – Black Pen was used to colour in the eyes and nose. The eyebrows, mouth, tail and finer details on mouse were enhanced using a PrismaColor Black pencil. The whiskers were also added using the black pencil. Gelly Roll Sakura #5 Pen was applied to create the dots in the eyes and on the nose. To create the snow in the sky, Gelly Roll Sakura #10 Pen was applied to make some snowflakes larger and smaller than others. On the presents, a UNI Posca Pen – Gold was used on the ribbon and dots on the presents. Lastly, Stickles – Diamond was applied to the cuff of the hats, pompoms and snow on the ground.

The card was now ready to assemble. U-Line Double-Sided Foam Tape was applied to the image and it was popped up onto the red square die cut. Once again, it was applied to the die cut and the sentiment. Both items were then popped up onto the card to complete it.

Card Recipe:

Stamp and Sentiment: Dis Digi StampsChristmas Wagon Kitty (Edited -2) (Retired)

Inks: HP Printer High Quality Grayscale, Tim Holtz Distress Ink – Rustic Wilderness

Paper: Copic Marker X-Press It Blending Card, Hammermill – Premium Cardstock 110 lb., Crafter’s Companion Luxury Cardstock – Red, Craft Smart – Hot Buy – Happy Pawlidays (12″ x 12″), Photo-Play Santa Paws Cats – Stickers

Dies: PinkFresh Studio – Essentials: Folk Edge Squares

Miscellaneous: U-Line Double-Sided Foam Tape, Sakura Glaze – Black Pen, UNI Posca Pen – Gold, Stickles – Diamond

Image coloured with Copic Markers:

Kitty Cat: YR68, YR18, YR31, Y38, R02, R01, R00, PrismaColor Premier Pencil – Black, Sakura Glaze – Black Pen (Nose)

Mouse: W3, W1, W0, R02, R01, R00, PrismaColor Premier Pencil – Black, Sakura Glaze – Black Pen (Nose)

Hats and Bows: R59, R37, R35

Presents: BG72, BG57, BG32, BG11, G16, YG25, YG23, Y19, Y17, Y15, UNI Posca Pen – Gold, Gelly Roll Sakura #5 Pen, Gelly Roll Sakura #10 Pen

Wagon and Wheels: E27, E25, E23, E21, C9, C7, C5, CC, C1, C0

Sky: B05, B04, B02, B01, Gelly Roll Sakura #10 Pen (Snow)

Snow and Shadows: BG000, BG0000

Hats and Sparkle on Snow: Stickles – Diamond

Hope you like it and have a great week!

Thankful for You!


Today I’m sharing a simple Thanksgiving card that I made using KLM Digital DesignsPre-Colored Dinosaur Pumpkin from the new November 2024 Release. Our Canadian Thanksgiving has past, but the American Thanksgiving is happening soon!

The base card was created to the size of 4.25″ x 5.5″ out of Hammermill – Premium 110 lb. cardstock.  Chocolate brown paper from the Creative Memories – Croptoberfest 2021 Sampler Pack , was cut to the same size as the base and adhered to the card. Next, I cut 2 strips from PhotoPlay – Gnome for the Holidays Thanksgiving paper to the size of 4-1/8″ x 1″ and some Thanksgiving paper 4-1/8″ x 3-3/8″ from my scrap stash paper. The followings inks were used to apply ink around the edges of the papers: Tim Holtz Distress Ink – Carved Pumpkin, Tim Holtz Distress Ink – Aged Mahogony and Tim Holtz Distress Inks – Peeled Paint. All of the pieces were adhered to the base with liquid glue.

I chose a sentiment from PhotoPlay – Autumn Greetings by Becky Moore – Element Stickers and applied it to some regular cardstock and then fussy cut around it. U-Line Double-Sided Foam Tape was applied to the image and sentiment and both items were popped up onto the card. Kraftin’ Kimmie  Dots were added to the bottom to complete the card.

Card Recipe:

Stamp: KLM Digital DesignsPre-Colored Dinosaur Pumpkin

Sentiment: PhotoPlay – Autumn Greetings by Becky Moore – Element Stickers

Inks: HP Printer, Tim Holtz Distress Ink – Carved Pumpkin, Tim Holtz Distress Ink – Aged Mahogony, Tim Holtz Distress Inks – Peeled Paint

Paper: Copic Marker X-Press It Blending Card, Hammermill – Premium Cardstock 110 lb., Creative Memories – Croptoberfest 2021 Sampler Pack (12″ x 12″), PhotoPlay – Gnome for the Holidays Thanksgiving

Miscellaneous: U-Line Double-Sided Foam Tape, Kraftin’ Kimmie Dots

Hope you like it and have a great week!

You can find more cards to inspire you at KLM Designs, KLM Digital Design Team and KLM Digital Designs on the Facebook Fan page from the rest of our design team.

Purfect Birthday!


Today I’m sharing a birthday card that I made using KLM Digital DesignsKitty – Flower Pot from the new October 2024 Release. This image also comes with the 2 other sentiments, “Let’s Pawty!” and “Hugs, kisses and a lot of Birthday wishes“.

The base card was created to the size of 4.25″ x 5.5″ out of Hammermill – Premium 110 lb. cardstock. Forever in Time – Birthday Blast was cut to the size of 2″ x 5.5″ and adhered to the base with liquid glue.

The image and sentiment were printed out with my HP Printer onto Copic Marker X-Press It Blending Card using High Quality Grayscale. The image was coloured in with Copic markers and a Prismacolor Premier black pencil was used to colour in the eyes, the whiskers and add some deeper definition to the cat’s facial features and flower centres. Sakura Glaze – Black Pen was used to colour in the nose. Once the colouring of the image was completed, Copic marker BG000 was used to colour around the entire image and then it was fussy cut leaving a slim border. The sentiment was fussy cut and then attached to a scrap piece of Recollections – Matte Gold Foil cardstock using liquid glue. Once again, the sentiment was fussy cut.

The card was now ready to assemble. U-Line Double-Sided Foam Tape was applied to the image and sentiment. Both items were popped up onto the card. Kraftin’ Kimmie – Fruity Dots were added to complete the card.

Card Recipe:

Stamp and Sentiment: KLM Digital DesignsKitty – Flower Pot

Inks: HP Printer High Quality Grayscale

Paper: Copic Marker X-Press It Blending Card, Hammermill – Premium Cardstock 110 lb., Forever in Time – Birthday Blast – 6″x6″ paper, Recollections – Matte Gold Foil cardstock

Miscellaneous: U-Line Double-Sided Foam Tape, Kraftin’ Kimmie – Fruity Dots, Sakura Glaze – Black Pen

Image coloured with Copic Markers:

Cat: C8, C7, C6, C4, C3, R29, R27, R24, R02, R01, R00, PrismaColor Premier Pencil – Black, Sakura Glaze – Black Pen (Nose)

Flower Pot: E99, E97, E95, Colorless Blender

Flowers and Leaves: E15, Y19, Y17, Y15, Y11, Y08, G16, YG25, YG23

Hope you like it and have a great week!

You can find more cards to inspire you at KLM Designs, KLM Digital Design Team and KLM Digital Designs on the Facebook Fan page from the rest of our design team.

Sweet As Candy Canes!


Today I’m sharing a Christmas card that I made using KLM Digital DesignsCandy Cane Gnome II from the new October 2024 Release. This image also comes with 2 more sentiments, “Sugar & Stripes and everything nice!” and “Cane you believe it’s Christmas?”.

The base card was created to the size of 4.25″ x 5.5″ out of Hammermill – Premium 110 lb. cardstock. I had some dark green cardstock in my stash and decided to cut it to the same size as the base and glue it on. I loved the beautiful patterned paper from Craft Smith – Peppermint Twist and thought it went great with the image, so I cut that to be 4.25″ x 4.25″. The edges were inked around with Tim Holtz Distress Inks – Festive Berries and it was adhered to the centre of the card. AC Premium Candy Cane Ribbon was applied to the top and bottom of the card using double-sided tape.

The image and sentiment were printed out with my HP Printer onto Copic Marker X-Press It Blending Card using High Quality Grayscale and the image was coloured in with Copic markers listed below. Clear – Wink of Stella was then applied over all of the candy cane to make it sparkle. Both the image and the sentiment were fussy cut leaving a small white border around the image. The sentiment was coloured with YG61 Copic marker and then edged with a finger dauber and Tim Holtz Distress Ink – Rustic Wilderness.

The card was now ready to assemble. U-Line Double-Sided Foam Tape was applied to the image and sentiment and they were popped up onto the card. To finish it off 3 candy canes were added from Eyelet Outlet & Brads – Candy Cane using 2 layers of U-Line Double-Sided Foam Tape after I had removed the back tabs from them.

Card Recipe:

Stamp and Sentiment: KLM Digital DesignsCandy Cane Gnome II

Inks: HP Printer High Quality Grayscale, Tim Holtz Distress Ink – Rustic Wilderness, Tim Holtz Distress Inks – Festive Berries

Paper: Copic Marker X-Press It Blending Card, Hammermill – Premium Cardstock 110 lb., Craft Smith – Peppermint Twist (6″x6″), Green Cardstock

Miscellaneous: U-Line Double-Sided Foam Tape, AC Premium Ribbon, Eyelet Outlet & Brads – Candy Cane, Clear – Wink of Stella

Image coloured with Copic Markers:

Skin: E21, E11, E04, E00, E000

Beard and Hair:  C5, C4, C3, C2, C1

Hat and Pants: R46, R14, R08

Mittens and Leaves: G99, YG67, YG63, YG61

Candy Cane: R46, R14, R08, C1, C0, Colorless Blender

Shoes: 100, C9, C7, C5, C4, C2

Berries: R89, R37

Hope you like it and have a great week!

You can find more cards to inspire you at KLM Designs, KLM Digital Design Team and KLM Digital Designs on the Facebook Fan page from the rest of our design team.

Fa La La La!


Today I’m sharing a Christmas card that I made using KLM Digital DesignsWindow Kitty from the new September 2024 Release.

The base card was created to the size of 4.25″ x 5.5″ out of Hammermill – Premium 110 lb. cardstock. Tim Holtz Distress Ink – Evergreen Bough was applied around the outside edges with a finger dauber and a blender brush was used to apply ink around the inner edges of the card base.

The image was printed out with my HP Printer onto Copic Marker X-Press It Blending Card using High Quality Grayscale. With a Cuttlebug, Sizzix Rounded Tags were used to die cut the image and Recollections – Black cardstock. The image was coloured in with Copic markers and a Prismacolor Premier black pencil was used to add in some finer fur lines, the whiskers and to blacken around the mouth, nose and eyes.

The card was now ready to assemble. U-Line Double-Sided Foam Tape was applied to the image and large rounded tag. Both were applied together and popped up onto the card. A sentiment from Creative Expressions – Wordies Sentiment Sheets – Traditional Christmas was cut out and adhered to the card using Scrapbook Adhesives – 3D Foam Strips. Lastly, the snow flakes were added with a Gelly Roll Sakura #10 Pen.

Card Recipe:

Stamp and Sentiment: KLM Digital DesignsWindow Kitty

Inks: HP Printer High Quality Grayscale, Tim Holtz Distress Ink – Evergreen Bough

Paper: Copic Marker X-Press It Blending Card, Hammermill – Premium Cardstock 110 lb., Recollections – Black cardstock

Die Cuts: Sizzix Rounded Tags – 8 dies

Miscellaneous: U-Line Double-Sided Foam Tape, Creative Expressions – Wordies Sentiment Sheets – Traditional Christmas (CEW008), Gelly Roll Sakura #10 Pen, Scrapbook Adhesives – 3D Foam Strips

Image coloured with Copic Markers:

Cat: BV29, BV25, C4, W9, R89, R59, R56, R46, R29, R27, R24, R02, R01, R00

Brick Wall and Mortar: E19, E17, E13, C5, C3, C1

Drapes: BG72, BG57, BG32, BG11

Floor and Wall: E29, E27, E25, E23, Y17, Y15, C3, C1, R27

Window, Window Sill and Window Frame: BG000, C9, C7

Hope you like it and have a great week!

You can find more cards to inspire you at KLM Designs, KLM Digital Design Team and KLM Digital Designs on the Facebook Fan page from the rest of our design team.