Archives

Monday – Friday


Sharing a card I made for the Spring / Summer Coffee Lovers Hop using Cool Tees (CYNS714) (Your Next Stamp)!

The image was coloured with copic markers. I kept this fun card simple as the expressions on the cups say everything there is to say. LOL! I chose green shades for the Monday T-Shirt, because after the weekend, it’s always a little rough and you feel blah! Friday, is bright and sunny because, hey! Who doesn’t love the weekend????

Card Recipe:

Stamp and Sentiments: Cool Tees (CYNS714) – Your Next Stamp, Got Coffee – Craftin Desert Diva’s (Retired)

Inks: Memento – Tuxedo Black, Tim Holtz Distress Inks – Ground Espresso

Paper: Copic Marker X-Press It Blending Card, Your Next Stamp – The Perfect Blend (6″ x 6″)

Stencil: Coffee Break – Practical Publishing 2017

Tools: MISTI – Most Incredible Stamping Tool, Cuttlebug, 3M VHB – 2 sided tape, Brother Scan and Cut

Hope you like it and have a great week!

My Cup of Tea


Sharing a card I made for the Spring / Summer Coffee Lovers Hop using You’re A Squeak-Heart! (Kraftin’ Kimmie Stamps)!

The image was coloured with copic markers.

Card Recipe:

Stamp and Sentiment: You’re A Squeak-Heart! (Kraftin’ Kimmie Stamps)

Inks: Memento – Tuxedo Black, Tim Holtz Distress Ink – Picked Raspberry, Tim Holtz Distress Ink – Fossilized Amber, VersaMark

Embossing Powder: Ranger Embossing Powder White – Extra Fine Detail

Paper: Copic Marker X-Press It Blending Card, Stampin’ Up! – Have a Cuppa – 6″ x 6″

Die Cuts: My Creative Time – Rectangle Frame Dies, My Creative Time – Rectangle Frame Layers, Poppystamps – Christmas Quotes

Tools: MISTI – Most Incredible Stamping Tool, Cuttlebug, 3M VHB – 2 sided tape, Brother Scan and Cut


Hope you like it and have a great week!

Might Need Some Help!!


My older brother is a retired fireman. Today, I’m sharing this fun image and sentiment from KLM Digital Designs called Fireman Gnome that I made for his birthday.

To make the card, I first imported the image and sentiment into Microsoft Word. I sized both the image and sentiment to fit 5.5″ x 4.25″ and printed everything out onto Copic Marker X-Press It Blending Card using my HP Printer. I printed out a second image onto regular paper with just the fireman and then used my Brother Scan and Cut to cut around the image. The cut out image was used as a mask over top of the main image while I created the flames in the background. I used a variety of Tim Holtz inks listed below and the stencil from Honey Bee Stamps – Flames.

Once the background was completed, I coloured in the image with Copic markers. Then, I attached the image to the base using double-sided tape. My brother loved his card and I hope you do too!

Card Recipe:

Stamp and Sentiments: Fireman Gnome (KLM Digital Designs)

Inks: HP Printer Grayscale, Tim Holtz Distress Ink: Carved Pumpkin, Fired Brick, Fossilized Amber, Ripe Persimmon, Spiced Marmalade, Wild Honey

Paper: Copic Marker X-Press It Blending Card, Hammermill – Premium Colour 100 lb.

Stencil: Flames – Honey Bee Stamps

Image coloured with Copic Markers:

Skin: E21, E11, E04, E00, E000

Beard: E49, E47, E45, E42

Axe: E49, E47, E44, E23, C7, C5, C3, C1

Hat and Oufit: R39, R37, R35, C2, Y19, Y17, Y15, Y11

Shadow: C3, C2, C1, C0

Hope you like it and have a great week!

You can find more cards to inspire you at KLM Designs, KLM Digital Design Team and KLM Digital Designs on the Facebook Fan page from the rest of our design team.

Mother’s Love!!


Sharing this adorable image and sentiment from KLM Digital Designs today from the new March release called Infant Mom & Gnome. I really love this sentiment as it is so true. I was thinking of Mother’s Day coming up soon when I made this card. This stamp also comes with 2 other amazing sentiments that could be used for new moms. “Welcome Baby” and “Congratulations. You will make amazing parents!”.

To make my CAS card, I first imported the image and sentiment into Microsoft Word. I sized both the image and sentiment to fit 5.5″ x 4.25″ and printed everything out onto Copic Marker X-Press It Blending Card using my HP Printer. The image was coloured in with Copic markers. It was mounted onto Hammermill – Premium Colour 100 lb. paper sized at 5.5″ x 4.25″ with double-sided tape.

Card Recipe:

Stamp and Sentiments: Infant Gnome & Mom (KLM Digital Designs)

Inks: HP Printer Grayscale

Paper: Copic Marker X-Press It Blending Card, Hammermill – Premium Colour 100 lb.

Image coloured with Copic Markers:

Skin: E21, E11, E04, E00, E000

Hair: YR18, YR14, E18, E08

Clothing and Bow: YG97, YG95, YG93

Hat and Apron: Y19, Y17, Y13

Shoes: R27, R25, R23

Baby Blanket and Hat: BG72, BG57, BG32, BG11

Hope you like it and have a great week!

You can find more cards to inspire you at KLM Designs, KLM Digital Design Team and KLM Digital Designs on the Facebook Fan page from the rest of our design team.

Come To Save The Day!


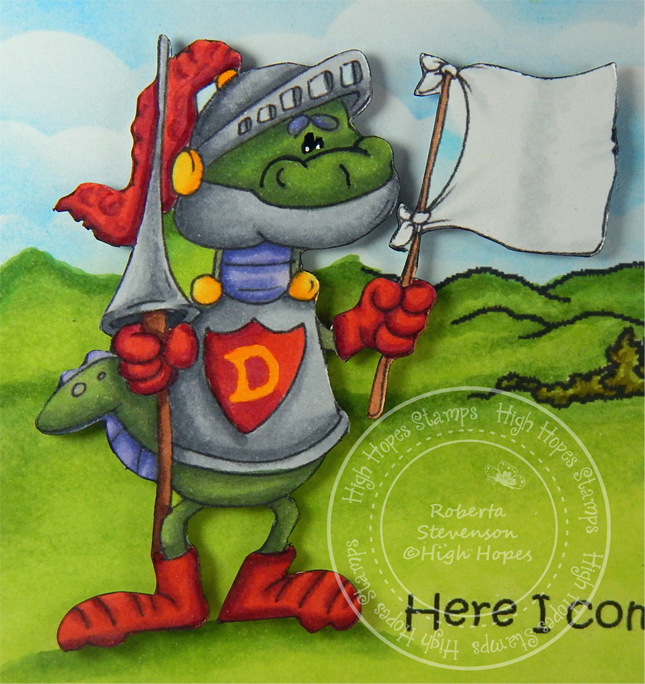
It’s Wednesday, and this week using High Hopes Stamps, I made a slim line card using  Sir Dustin – T177Jousting Dragon – S221 and Castle – R092 images and Here I Come…. – F248 for the sentiment. I love fantasy and dragons and thought these images were so much fun to play with.

I made my slim line card using Hammermill – Premium Colour 100 lb. cardstock for my base folded at 4″ x 9″.

I stamped the images and sentiment using Memento – Tuxedo Black using my MISTI onto Copic Marker X-Press It Blending Card. I die cut the Copic paper with PinkFresh Studio – Essential Slim Cuts to use for the background. I decided to stamp the castle and sentiment directly onto the background. The other 2 images were stamped separately and then I used my Brother Scan and Cut to cut around them and fussy cut where they still had some white around the images.

I coloured in the Castle – R092 using Royal Blue colours for the flags, the same as Sir Dustin – T177 who I coloured in as the Blue Knight. I added some extra bricks onto the castle to give it some more texture. Using Tim Holtz Distress Ink – Salty Ocean and Avery Elle – Pierced Clouds Die stencils that I made using the die cuts, I coloured in the sky. To give some texture to the grass, I first used a mixture of Tim Holtz Distress Ink – Crushed Olive and Tim Holtz Distress Ink – Mowed Lawn. Then I enhanced the colours using my Copic markers. I added some glue onto the back of the coloured image and attached it directly to the base card.

Sir Dustin – T177 was coloured in with Copic Markers and then I used a black marker to go around the entire image. This was popped up using 3M VHB – 2 sided tape to the background. I used Royal Blues for his outfit and Royal Purples and gold for his dragon.

Lastly, I coloured in Jousting Dragon – S221 as the Red Knight with Copic Markers and then I went around the image with a black marker. I decided to make him the Red Knight and added a “D” to his shield for “Dragon”. LOL! The image was popped up with 3M VHB – 2 sided tape to complete the card.

Card Recipe:

Stamps: Sir Dustin – T177 (High Hopes Rubber Stamps), Jousting Dragon – S221 (High Hopes Rubber Stamps), Castle – R092 (High Hopes Rubber Stamps)

Sentiment Background: Here I Come… – F248 (High Hopes Rubber Stamps)

Inks: Memento – Tuxedo Black, Tim Holtz Distress Ink – Salty Ocean, Tim Holtz Distress Ink – Crushed Olive, Tim Holtz Distress Ink – Mowed Lawn

Paper: Copic Marker X-Press It Blending Card, Hammermill – Premium Colour 100 lb.

Die Cuts: Avery Elle – Custom Steel Dies – Made in the USA – D-05-01 PiercedCloudsDie, PinkFresh Studio – Essential Slim Cuts

Tools: MISTI – Most Incredible Stamping Tool, Cuttlebug, 3M VHB – 2 sided tape, Xyron Create a Sticker

Images coloured with Copic Markers:

Armour, Sword and Lance: C7, C5, C3, C2, C1, E29, E25, E23

Eyes: Sakura Glaze – Black, Gelly Roll Sakura #8 Pen

Knight With Dragon:

Skin: E21, E11, E04, E00, E000, R22, R20

Pants: YG67, YG63, YG61

Shirt, Plume, Shoes: B37, B14, B12

Dragon: YR23, Y15, Y11, Y00, BV08, BV000, V17, V15

Jousting Dragon:

Body: G94, G85, G46, G43, BV04, BV02, BV000

Plume, Gloves, Shoes and Tops of Armour: Y17, Y15, Y11, C2, R39, R37, R24

Flag and Pole: E23, C1, C0, C00, Colorless Blender

Castle: C5, C3, C1, C0, B37, B14, B12, B000, Y08, E25, E23, E21

Shrubs and Trees: YG97, YG95, YG23

Grass: YG17, YG13, YG03, YG01

Hope you like it and have a fantastic week!

You can find lots of inspiration from the Design Team Divas at the High Hopes blog, and the High Hopes Rubber Stamps Facebook Fan page plus you can also follow us on
Instagram, Twitter and Pinterest.

Birthday Girl!!


Sharing image and sentiment from KLM Digital Designs today from the new February release called Karah’s Cupcake. This stamp set comes with 3 sentiments. This image brings back memories of when I was little and my mom used to bake us fancy cakes and cupcakes for our birthdays every year.

To make the card, I first imported the image and sentiment into Microsoft Word. I sized both the image and sentiment to fit 5″ x 3.6″ and printed everything out onto Copic Marker X-Press It Blending Card using my HP Printer. The image was coloured in with Copic markers. I had a few issues with her hair using my markers, so I used PrismaColor pencils to try and fix it. For the shadow behind the girl, I just used the same 2 markers several times on the background wall. I die cut some pink cardstock using Your Next Stamp – Stitched Rectangle Die Set and then inked around the edges using Tim Holtz Distress Ink – Picked Raspberry.

I used Hot Buy Recollections Card base of 5.25″ x 4.25″ for the base and attached the die cut directly to the base using double-sided tape. The completed image was popped up using 3M VHB – 2 sided tape to finish off the card.

Card Recipe:

Stamp and Sentiments: Karah’s Cupcake (KLM Digital Designs)

Inks: HP Printer Grayscale, Tim Holtz Distress Ink – Picked Raspberry

Die Cuts: Your Next Stamp – Stitched Rectangle Die Set (YNSD214)

Paper: Copic Marker X-Press It Blending Card, Hot Buy Recollections

Image coloured with Copic Markers:

Skin: E21, E11, E04, E00, E000

Hair: E47, E44, E43, PrismaColor Pencils – Eggshell PC140, Ginger Root PC1084, Chocolate PC1082, Light Umber PC941

Eyes: E43, C0, G07, G03, G00, Sakura Glaze – Black, Gelly Roll Sakura #10 Pen, Gelly Roll Sakura #8 Pen

Blouse Headband, Bow, Lips, Cupcake Wrapper: R85, R81, RV00, RV000

Cupcake and Dish: RV09, RV04, RV02, BV23, BV20, BV000, Atayou Spica – Pink 02, Atayou Spica – Blossom 14, Wink of Stella – Clear

Cherry and Stem: R37, R35, R24, G99

Table Top: E47, E39, E37, E35, E33, E31

Wall: BG32, BG10

Hope you like it and have a great week!

You can find more cards to inspire you at KLM Designs, KLM Digital Design Team and KLM Digital Designs on the Facebook Fan page from the rest of our design team.


Your Dino-Mite!!


Sharing the third and last image and sentiment from KLM Digital Designs today from the new February release called Dinosaur Collection. The images are great for masculine cards! This image and sentiment is also great for a young person’s birthday too!

To make the card, I first imported the image and sentiment into Microsoft Word. I sized both the image and sentiment to fit 5.5″ x 4.25″ and printed everything out onto Copic Marker X-Press It Blending Card using my HP Printer. The image was coloured in with Copic markers. The eyes were all black in the original image. I used Sakura Glaze – Black to make the eyes stand out more. Gelly Roll Sakura #10 Pen was then used to create the whites of the eyes and Copic marker G07 was added to give them some colour. Finally, Pigma Micron 03 black marker was used to give the dinosaur some eyelashes. Once all of the colouring was completed, I attached the image to the base using double-sided tape.

As a side note, I used Jess Crafts – Colouring Mountains at Dawn Youtube video for some inspiration on colouring the mountains in the background.

Card Recipe:

Stamp and Sentiments: Dinosaur Collection (KLM Digital Designs)

Inks: HP Printer Grayscale

Paper: Copic Marker X-Press It Blending Card, Hammermill – Premium Colour 100 lb.

Image coloured with Copic Markers:

Dinosaur: YG97, G85, G82, E89, E87, E84, Sakura Glaze – Black, Gelly Roll Sakura #10 Pen, Pigma Micron 03 black marker

Mountains: C7, C5, C3

Ground: E37, E35, E33, E31

Sky and  Clouds: B60, B02, B01, B00, B000, C0, Colorless Blender

Hope you like it and have a great week!

You can find more cards to inspire you at KLM Designs, KLM Digital Design Team and KLM Digital Designs on the Facebook Fan page from the rest of our design team.


More Bubbles!


It’s Wednesday, and this week, I made a fun card using  Burts Bath – R103 (High Hopes Rubber Stamps) for the main image and Filled With Bubbles – H119 (High Hopes Rubber Stamps) for the sentiment. Burt sure looks happy as he’s letting all of his troubles float away! LOL!

To make my card this week, I used Hammermill – Premium Colour 100 lb. cardstock for my base folded at 5.5″ x 4.25″. For the main background, I used Doodlebug Design Inc. – Under The Sea paper cut to the same size as the base and attached it using double-sided tape. Tim Holtz Distress Ink – Picked Raspberry was used to ink around all of the edges. Whimsy Stamps – Slimline Pillows Die was used to cut out the shape for the sentiment and Die-Namics My Favourite Things – PCD Fishtail Figs STX for the flag behind the sentiment. I inked around the edges of the sentiment die cut with Copic Marker – BV04 to frame it. Tim Holtz Distress Inks – Peacock Feathers was used to ink around the edges of the flag. Avery Elle – Wonky Stitches Die was used to die cut Copic Marker X-Press It Blending Card.

I stamped the image and sentiment using Memento – Tuxedo Black using my MISTI and coloured in the image using Copic markers. I added 3M VHB – 2 sided tape to the back of the coloured image and attached it to the base card. I ran the flag through my Xyron Create a Sticker as I wanted it to lay completely flat against the background. I attached this to the base and then added 3M VHB – 2 sided tape to the back of the sentiment and attached it over top of the flag and the base. To complete the card, I added a few bubble embellishments from The Robin’s Nest – Peony using Ranger Glossy Accents.

Card Recipe:

Stamp: Burts Bath – R103 (High Hopes Rubber Stamps)

Sentiment Background: Filled With Bubbles – H119 (High Hopes Rubber Stamps)

Inks: Memento – Tuxedo Black, Tim Holtz Distress Inks – Peacock Feathers, Tim Holtz Distress Ink – Picked Raspberry

Paper: Copic Marker X-Press It Blending Card, Doodlebug Design Inc. – Under The Sea – 6″x6″, Hammermill – Premium Colour 100 lb.

Die Cuts: Avery Elle – Wonky Stitches Die – D-04-11, Whimsy Stamps – Slimline Pillows Die – WSD473, My Creative Time – Rectangle Frame Dies, Die-Namics MFT-489 PCD Fishtail Figs STX

Tools: MISTI – Most Incredible Stamping Tool, Cuttlebug, 3M VHB – 2 sided tape, Xyron Create a Sticker, Ranger Glossy Accents, The Robin’s Nest – Peony – dd-8

Images coloured with Copic Markers:

Duck: Y19, Y18, Y15, Y13, Y08, YR16, YR14, YR12, YR07

Brush: E59, E39, E35, E31, Copic Multiliner – Sepia – 0.1

Hat: BG15, BG13, BG11, BV04, BV02, BV00, RV04, RV02, RV000, Y17

Bird Bath: C7, C5, C3, C2, C1, C0

Bubbles: BG15, BG13, BG11, BG10, BV04, BV02, BV00, BV0000, RV02, RV00, RV000, Y11, Y000, Y0000

Grass: YG13, YG11, YG03, YG01

Sky: B02, B01, B00, B000

Wonky Border: BV04, BV02, BG15

Hope you like it and have a fantastic week!

You can find lots of inspiration from the Design Team Divas at the High Hopes blog, and the High Hopes Rubber Stamps Facebook Fan page plus you can also follow us on
Instagram, Twitter and Pinterest.

Old – Not Extinct!!


Sharing the second image and sentiment from KLM Digital Designs today from the new February release called Dinosaur Collection. Love this collection and the images are great for masculine cards too! This is perfect some of your friends reaching a milestone birthday, like 40, 50 or 60 or older. LOL!

To make the card, I first imported the image and sentiment into Microsoft Word. I sized both the image and sentiment to fit 5.5″ x 4.25″ and printed everything out onto Copic Marker X-Press It Blending Card using my HP Printer. The image was coloured in with Copic markers and Tim Holtz Distress Ink – Salty Ocean and a mixture of cloud dies were used to create the sky.

Once all of the colouring was completed, I attached the image to the base using double-sided tape.

Card Recipe:

Stamp and Sentiments: Dinosaur Collection (KLM Digital Designs)

Inks: HP Printer Grayscale, Tim Holtz Distress Ink – Salty Ocean

Paper: Copic Marker X-Press It Blending Card, Hammermill – Premium Colour 100 lb.

Clouds Die Cuts: Whimsy Stamps – Grass and Cloud Edger Die Set, Avery Elle – Custom Steel Dies – Made in the USA – D-05-01 PiercedCloudsDie

Image coloured with Copic Markers:

Dinosaur Skull and  Bones: E55, E53, E51, E50, E40, E30

Mountain: E39, E37, E35, E33, E31, E33

Stones: C5, C3, C1

Sky: Tim Holtz Distress Ink – Salty Ocean

Hope you like it and have a great week!

You can find more cards to inspire you at KLM Designs, KLM Digital Design Team and KLM Digital Designs on the Facebook Fan page from the rest of our design team.

You still have some time to take advantage of this great deal at KLM Designs.

Over The Hill Dinosaur!!


Sharing the first image and sentiment from KLM Digital Designs today from the new February release called Dinosaur Collection. Love this collection and the images are great for masculine cards too! Over the next few days, more images and sentiments from this set will be posted. Watch for them! LOL!

To make the card, I printed out the main image onto Copic Marker X-Press It Blending Card using my HP Printer and coloured it in with Copic markers. Microsoft Word was used to import the shape and line weight of 3 was used for the thickness. I imported the sentiment and sized it to fit inside the shape. This was printed out on Recollections – White cardstock and then I used my cutter to keep the lines straight.

To add some dimension to the card, I die cut some small clouds using Nellie’s Choice – Nature Scene Dies – NSD002 – Sky using Hammermill – Premium Colour 100 lb. paper. Copic markers were used to add some colour to them. My Creative Time – Stitched Squares Inside and Out die was used to cut out the main image and Creative Expression Craft Dies by Sue Wilson – Noble Dies – Double Pierced Squares – Set B were used to die cut the larger square using Recollections – Black cardstock.

To assemble the card, the 2 squares were attached using double-sided tape. The clouds and sentiment were popped up using 3M VHB – 2 sided tape. Larger cloud was attached with Tombow glue.

Card Recipe:

Stamp and Sentiments: Dinosaur Collection (KLM Digital Designs)

Inks: HP Printer Grayscale

Paper: Copic Marker X-Press It Blending Card, Hammermill – Premium Colour 100 lb., Recollections – White, Recollections – Black

Die Cut: Nellie’s Choice – Nature Scene Dies – NSD002 – Sky, Creative Expression Craft Dies by Sue Wilson – Noble Dies – Double Pierced Squares – Set B

Tools: 3M VHB – 2 sided tape, Cuttlebug

Image coloured with Copic Markers:

Dinosaur: E89, E87, E84, E81

Mountain: E89, E59, E53, E49, E35, E33, E27, E23, Colorless Blender

Sky: R32, R11, R00, B91, B01, B00, B000, BG70,

Clouds: B60, C1, C0, Colorless Blender

Hope you like it and have a great week!

You can find more cards to inspire you at KLM Designs, KLM Digital Design Team and KLM Digital Designs on the Facebook Fan page from the rest of our design team.

Polar Bear and Friend!!


Sharing this adorable image called Polar Bear and Friend from KLM Digital Designs today from the January release. This set comes with 3 sentiments, “You are Amazing”, “You’re My Sunshine on a Rainy Day” and “Best Friends Forever”, which I used on my card.

To make the card, I printed out the main image onto Copic Marker X-Press It Blending Card using my HP Printer. I used my Brother Scan and Cut to cut around the image and coloured it in with Copic markers. The sentiment was brought into Microsoft Word.  I imported the shape within Microsoft Word and used a weight of 3 for the solid line. Then, I brought the sentiment to the front and centred it in the middle of the shape. I printed this out on Recollections White cardstock and then just fussy cut around it.

I used AC White paper to create the base shape of the card 12″ x 6″. I scored the paper at 6″. I used Recollections – Blue Ombre Cardstock for the main background, cut to the same size as the base card. This was attached using double-sided tape.

Essentials by Tattered Lace Dies – Easel Slider dies and my Cuttlebug were used to die cut Hot Buy Craft Smart – Holiday Glitz Glitter Paper, Hammermill – Premium Colour 100 lb. and Stampin’ Up – Snowflake Splendor Designer Series Paper. Penny Black – Winter Roof die was used to die cut the icicles. The snow drifts on the bottom of the card were die cut using dies from Lawn Fawn – Stitched Hillside Borders. Once the icicles and snow drifts were die cut, I used the Tattered Lace die cut again so that everything would layer to the shape of the smaller rectangle. I used my Cuttlebug and Cuttlebug – Snow Dots stencil twice to create the texture to the larger rectangle. Gina K Designs – Glitz Glitter Gel was added to the icicles and front layer of snow. Stickles – Diamond was used to add texture to the back snow drift. Once everything was dry, I inked around all of the outside edges of the snow, rectangular shapes and main background with Tim Holtz Distress Ink – Blueprint Sketch.

To assemble the card, I used double-sided tape to attach the large rectangle shape directly to the base card. The smaller rectangle shape was assembled separately, then attached to the larger rectangular shape using 3M VHB – 2 sided tape. Tombo glue was used to add the icicles and layers of snow to the smaller rectangluar shape. The image and sentiment were popped up using 3M VHB – 2 sided tape. To complete the card, Stickles – Diamond was added below the bear to create a shadow and also some streaks along the snow.

Card Recipe:

Stamp and Sentiments: Polar Bear and Friend (KLM Digital Designs)

Inks: HP Printer Grayscale, Tim Holtz Distress Ink – Blueprint Sketch

Paper: Copic Marker X-Press It Blending Card, Hammermill – Premium Colour 100 lb., Stampin’ Up – Snowflake Splendor Designer Series Paper, Recollections – Blue Ombre Cardstock, Recollections – White Cardstock, AC White Cardstock, Hot Buy Craft Smart – Holiday Glitz Glitter Paper 12″ x 12″

Die Cut: Essentials by Tattered Lace Dies – Easel Slider, Penny Black – Winter Roof – 51-475, Lawn Fawn – Stitched Hillside Borders

Stencil: Cuttlebug – Snow Dots

Tools: 3M VHB – 2 sided tape, Cuttlebug, Gina K Designs – Glitz Glitter Gel

Image coloured with Copic Markers:

Penguin: W9, W7, W5, W3, E15, Y17, YR16, YR15, E43, E42, E41, E40, R11, RV00, Colorless Blender, White Prismacolor Premier Pencil

Polar Bear: W9, BV20, C1, C00, R24, R22, R11, RV00, E35, E33, E31, C1, Colorless Blender

Hope you like it and have a great week!

You can find more cards to inspire you at KLM Designs, KLM Digital Design Team and KLM Digital Designs on the Facebook Fan page from the rest of our design team.

Check out some special savings for a limited time at KLM!!

Kit and Clowder – January 2021 Markers Class


Hi There,

Sharing with you my finished Melting Moments card after completing the January 2021 Markers class from Kit and Clowder. Image is called “Melting Moments – Agnes Elephant” by Polkadoodles.

For this project I used Copic markers. Alyce from Kit and Clowder also teaches you how to use alternative markers as well. Which I really love, since I also have the full Spectrum Noir collection.

I had a lot of fun doing this class as it taught me a lot of new techniques. Loved creating the details for the shoes and flowers on the cup. Also, the bricks were much easier to do than I would have thought.

I framed the picture with some black cardstock and added Forever In Time – Ribbons and Trims Sticker on the left hand side of the card.

Hope you like it!

Happy Bee-lated!!


Sharing a bee-lated birthday card I made using this adorable image called Bee Gnome from KLM Digital Designs today. This adorable image also comes with 3 sentiments.

To make the card, I printed out the main image onto Copic Marker X-Press It Blending Card using my HP Printer. I used my Brother Scan and Cut to cut around the image and coloured it in with Copic markers. To add some honey coming out of the large jar, I used a Q-Tip and VersaMark ink to create the overflow and then added Emerald Creek – Seth Apter – Vintage Beeswax Baked Texture embossing powder. This was heat set using my Marvy Uchida – Embossing Heat Tool. I did this twice. The image was put through my Xyron Creative Station to turn the image into a sticker. I attached the image to some black cardstock and fussy cut around the image again.

I used Hammermill paper to create the base shape of the card 8.5″ x 4.25″. I scored the paper at 4.25″. I opened up Microsoft Word and imported the background papers from Bee Digital Paper – Digital Designs and Art. For the main background I sized the image to to 5.25″ x 4″. I drew 2 large ovals within the Microsoft Word application and made 1 black and the other a honey yellow colour. I imported the sentiment from Bee Gnome (KLM Digital Designs) and placed it in front of the smaller oval. Then I printed out everything on my printer. Tim Holtz Distress Ink – Fossilized Amber was used to ink around all of the sides of the background paper.

To assemble the card, I added double-sided tape to the back of the background paper and attached it directly to the base. 3M VHB – 2 sided tape was added to the back of the image then popped up on the front of the card. Lastly, I added some bee embellishments from Buttons Galore & More – Spring Fling Collection – SF100 Busy Bees using 3M VHB – 2 sided tape.

Card Recipe:

Stamp and Sentiments: Bee Gnome (KLM Digital Designs)

Inks: HP Printer Grayscale, HP Printer – Colour, Tim Holtz Distress Ink – Fossilized Amber, VersaMark

Paper: Copic Marker X-Press It Blending Card, Hammermill – Premium Colour 100 lb., Bee Digital Paper – Digital Designs and Art

Embellishments: Buttons Galore & More – Spring Fling Collection – SF100 Busy Bees

Embossing Powder: Emerald Creek – Seth Apter – Vintage Beeswax Baked Texture

Tools: 3M VHB – 2 sided tape, Cuttlebug, Xyron Creative Station, Marvy Uchida – Embossing Heat Tool

Image coloured with Copic Markers:

Skin: E000, E00, E04, E11, E21

Beard: E49, E47, E44, E42

Shirt: E87, E84, E81

Pants: E27, E25, E23

Hat and Jar: Y38, Y18, Y17, Y35, YR21, Y11

Socks: Y38, Y17, Y18, C9, C7, C5

Shoes: C9, C7, C5, C2

Honey Dipper Stick: YR23, YR21, YR20, E42, E41, E40

Hope you like it and have a great week!

You can find more cards to inspire you at KLM Designs, KLM Digital Design Team and KLM Digital Designs on the Facebook Fan page from the rest of our design team.

Thundering Rogue


Yo Ho Maties, today I’m sharing a Pirate card that I made using The Thundering Rogue – T053 (High Hopes Rubber Stamps) for the main image and Yo Ho – H179 (High Hopes Rubber Stamps) for the sentiment. This image is perfect for a little boy’s card.

To make my CAS card today, I used AC White cardstock cut at 12″ x 6″ and then scored at 6″ to create a base of 6″ x 6″. Using double-sided tape I attached the background using Scrapberry’s – The Pirate’s Treasure paper. I thought it went perfectly with this image.

I stamped both the image and sentiment using my Misti and Memento – Tuxedo Black ink onto Copic Marker X-Press It Blending Card. I coloured in the images using Copic Markers. Then I fussy cut around the main images and coloured in the interior with Copic markers B97, B95 and BG11 to match the colours of the background. Using My Creative Time – Ribbon End Dies and my Cuttlebug, I die cut the sentiment and then inked around the edges with Tim Holtz Distress Ink – Faded Jeans. I added some Copic Opaque White to the tops of the ocean waves to give it that frothy texture.

To complete my card, I used 3M VHB – 2 sided tape and popped up both the image and sentiment to complete the card.

Card Recipe:

Stamp:  The Thundering Rogue – T053 (High Hopes Rubber Stamps)

Sentiment Background: Yo Ho – H179 (High Hopes Rubber Stamps)

Inks: Memento – Tuxedo Black, Tim Holtz Distress Ink – Faded Jeans

Paper: Copic Marker X-Press It Blending Card, Scrapberry’s – The Pirate’s Treasure (6×6 Paper Collection), AC White Cardstock

Die Cuts: My Creative Time – Ribbon End Dies

Tools: MISTI – Most Incredible Stamping Tool, Cuttlebug, 3M VHB – 2 sided tape

Images coloured with Copic Markers:

Ship and Masts: E25, E23, E21, E18, E15, E13, E11, Y19, Y17, Y08

Sails: C9, C7, C5, C3, R39, R37, R35, E41, E40, Colorless Blender

Waves: BG05, B16, B12, Copic Opaque White

Sky: B97, B95, BG11

Hope you like it and have a fantastic week!

You can find lots of inspiration from the Design Team Divas at the High Hopes blog, and the High Hopes Rubber Stamps Facebook Fan page plus you can also follow us on
Instagram, Twitter and Pinterest.

Happy Birthday Flower Frame


Today, I’m sharing Floral Window 1 from KLM Digital Designs January Release. The image comes with 3 different sentiments, “You’re so Sweet”, “You’re the Best” and “Happy Birthday”. I really love how the frame comes with this image. It makes it so easy to create cards for multiple occasions and the design makes it so easy to make a quick card for someone special.

To make the card, I printed out the image onto Copic Marker X-Press It Blending Card using my HP Printer. I coloured in the image with Copic markers and then I used my Brother Scan ‘N Cut to cut around the image. A black marker was used to go around all of the edges of the flower and outer leaf. The image frame was coloured in with Sharpie – Gold Medium Point – Water Based Paint.

For the base card, Hammermill – Premium Colour 100 lb. was folded to the size of 5.5″ x 5.5″. I cut Heartfelt Creations – Winter’s Eve Collection paper to the same size as the base card. I inked around the edges with Sharpie – Gold Medium Point – Water Based Paint and adhered it directly to the base using double-sided tape. Hot Buy Craft Smart – Holiday Glitz Glitter Paper was die cut with my Cuttlebug and My Creative Time -Stitched Squares Inside and Out and attached with double-sided tape. The main image was popped up using 3M VHB – 2 sided tape. A little bit of Stickles – Yellow was added to the centre of the flower and some dots were added to finish off the card.

Card Recipe:

Stamp and Sentiment: Floral Window 1 (KLM Digital Designs)

Inks: HP Printer Grayscale

Paper: Copic Marker X-Press It Blending Card, Hammermill – Premium Colour 100 lb., Hot Buy Craft Smart – Holiday Glitz Glitter Paper 12″ x 12″, Heartfelt Creations – Winter’s Eve Collection – HCDP1-281

Die Cuts: My Creative Time -Stitched Squares Inside and Out

Tools: Brother Scan ‘N Cut, Stickles – Yellow, Cuttlebug, 3M VHB – 2 sided tape

Image coloured with Copic Markers:

Flower: R89, R85, R83, R81, Y17, Y15, Y08, R23

Leaves: YG17, YG13, YG03, YG01

Gold Frame: Sharpie – Gold Medium Point – Water Based Paint

Hope you like it and have a great week!

You can find more cards to inspire you at KLM Designs, KLM Digital Design Team and KLM Digital Designs on the Facebook Fan page from the rest of our design team.

Darcy the Dinosaur!!


Today, I’m sharing Darcy the Dinosaur from KLM Digital Designs December Release. The image comes with 4 different sentiments, “I think you’re dino-mite”, “Happy Anniver-Saury”, “Heard You’re Jurassick” and “Have a Rawrsome Birthday”. I decided to create my own Jurasic scene for Darcy this week and added the sentiment on the inside of the card.

To make the card, I printed out the image onto Copic Marker X-Press It Blending Card using my HP Printer. I coloured in the image with Copic markers and then I fussy cut around the image. A black marker was used to go around all of the edges. Then I put it through my Xyron Creative Station, as I wanted it to lay completely flat on the finished background. The sentiment was printed out and added to the inside of the card. I chose “Have a Rawrsome Birthday”.

For the background scene I cut Copic Marker X-Press It Blending Card to the size of 4.25″ x 5.5″ and drew in my own scene. I also used Kraftin’ Kimmie – Krafty Scenery 3 stencil for the basic outline of the palm tree and leaves. To add some added texture to the grass, I used a piece of old rag with little bumps on it and some Isopropyl Alcohol. Once the background was completed, I added the Dinosaur directly on top of it. I glued the back and then adhered the entire finished piece to my base card cut to 4.25″ x 5.5″.

Card Recipe:

Stamp and Sentiment: Darcy the Dinosaur (KLM Digital Designs)

Inks: HP Printer Grayscale

Paper: Copic Marker X-Press It Blending Card, Hammermill – Premium Colour 100 lb.

Tools: Xyron Creative Station, Kraftin’ Kimmie – Krafty Scenery 3 Stencil

Image coloured with Copic Markers:

Dinosaur: E89, E87, E84, E81, BV29, BV25, BV23, C2, C1, C0

Flowers: V09, V06, V04, Y17, Y08, YG09, YG05

Palm Tree: E43, E42, E41, G28, G07, YG17

Mountains: E55, E49, E47, E44, E35, E34, BV20

Grass: YG17, YG13, YG03, YG01, Piece of rag, Isopropyl Alcohol for added texture

Water: B00, B000

Sky and Clouds: B04, B02, B01, B60, C1, Colorless Blender

Hope you like it and have a great week!

You can find more cards to inspire you at KLM Designs, KLM Digital Design Team and KLM Digital Designs on the Facebook Fan page from the rest of our design team.

Fragrant Garden


Today, I’m featuring a card I made using Kit and Clowder September 2020 – Markers – Fragrant Garden class from Kit and Clowder.  I love these monthly classes by Alyce Keegan. She has taught me so much about colouring over the past few years. Her lessons are fantastic as she breaks down everything into small chapters and they are easy to follow. Here is my finished image from the September class. The image was coloured in with Copic markers.

I mounted it onto a white base card from of 5.5″ x 4.25″ with double-sided tape.

Hope you like it and have a great week!

Reading Away The Afternoon!


Today, I’m featuring a CAS card I made using Reading Away The Afternoon – D19043  from Dreamerland Crafts.  These 2 little friends are enjoying a wonderful day just relaxing and sharing time together! There’s nothing like holding a real book in your hands. I know that today there a lot of e-books, but I’m old fashioned and still love to sit back and relax and hold onto a real book. How about yourself? Do you prefer a real book or e-books?

To make this card I used a white base card from “Studio g” of 5″ x 5″. The sentiment was stamped directly to the base using my MISTI, Versa Fine – Onyx Black and Kraftin’ Kimmie – Reading Lexi stamp. The sentiment was then embossed with Ranger – Clear Super Fine Detail embossing powder and Marvy Uchida – Embossing Heat Tool was used to heat set the embossing powder.

The background and image were die cut using my Cuttlebug and Essentials by Tattered Lace Dies – Easel Slider dies. I adhered the larger die cut directly to the base using double-sided tape.

I stamped the image onto the smaller die-cut and then stamped it again on some Post-it note to create a mask. Tim Holtz Distress Ink – Salty Ocean was used along with stencils I created from Avery Elle – Pierced Cloud Die. Then the grass was added in. To create texture on the grass, I used some rubbing alcohol and a piece of old rag with some ridges on it.

Once the background was completed, I coloured in the main image with Copic markers. The grass had also been coloured in with the same markers. The image was then popped up onto the base using 3M VHB – 2 sided tape.

Card Recipe:

Stamp:  Reading Away the Afternoon – D19043 (Dreamerland Crafts)

Sentiment: Kraftin’ Kimmie – Reading Lexi

Inks: Memento – Tuxedo Black, Tim Holtz Distress Ink – Salty Ocean, Versa Fine – Onyx Black

Paper: Copic Marker X-Press It Blending Card, Studio g – AC0225, Green Cardstock

Die Cuts: Avery Elle – Custom Steel Dies – Made in the USA – D-05-01 PiercedCloudsDie, Essentials by Tattered Lace Dies – Easel Slider

Embossing Powder:  Ranger – Clear Super Fine Detail embossing powder

Tools: MISTI – Most Incredible Stamping Tool, Cuttlebug, Marvy Uchida – Embossing Heat Tool, 3M VHB – 2 sided tape

Image coloured with Copic Markers:

Face: E21, E11, E04, E00, E000

Hair: E47, E44, E43

Shirt:  YG97, YG95, G24, E23

Pants: B26, B24, B21

Boots: E27, E25, E23, E21

Rabbit: N0, R30, Colorless  Blender

Books: BG15, BG13, BG11, R08, R05, R02, BG02, BG01, BG00, C2, C1, C0

Tree: E57, E55, E37, E35, E34, E25, E23

Grass: YG17, YG13, YG03, YG01

Sky: Tim Holtz Distress Ink – Salty Ocean, Avery Elle – Custom Steel Dies – Made in the USA – D-05-01 PiercedCloudsDie

Hope you like it and have a great week!

You can find more cards to inspire you at Dreamerland Crafts and Pointer Scrapbooking on the Facebook Fan pages from the rest of our design team.

Dreams Take Flight!!


Today, I’m featuring a card I made using Embrace Your Dream – D19039  from Dreamerland Crafts. My dad always dreamed of flying and he would build all kinds of model airplanes. Then one day he decided to build a real plane with the assistance of his brother and a friend. It took them a long time, but in the end it was a beautiful plane and the best part was that we were all taken for rides in it. It’s an experience we will never forget. So just as my dad followed his dreams, he taught us all to follow our dreams as well. If you dream about something long enough, eventually it will become a reality for you. So never be afraid to follow your dreams.


To make this card I used a white base card of 4.25″ x 5.5″. The background was die cut using My Creative Time – Rectangle Frame Die Layers – MCT-D274 and my Cuttlebug. The paper is from Doodlebug Design Inc. – I Love Travel. Once die cut, the edges were inked around using Tim Holtz Distress Ink – Salty Ocean. I also used this colour to do the clouds in the sky on the image. I adhered the background to the base using glue so that I could move it around to fit better.

The sentiment was stamped using my MISTI, VersaMark ink and Ranger Embossing Powder White – Extra Fine Detail and the stamp from Kraftin’ Kimmie – Sky’s The Limit. The powder was then heat embossed with Marvy Uchida – Embossing Heat Tool. It was die cut using My Creative Time – Sentiment Label Dies.

The image was die cut using My Creative Time – Bunch of Fun Circle Dies from Copic Marker X-Press It Blending Card. The circle behind the main image was die cut with My Creative Time – More Stitched Circles MCT-D136 from black cardstock. I coloured in the entire image with Copic markers and then created a mask. I added in the clouds and used a small piece of old rag and some rubbing alcohol to create some texture in the grass.

To assemble the card, I ran the main image through Xyron Creative Station to make like a sticker and so that it would lay completely flat on the black circle. 3M VHB – 2 sided tape was used to pop up the main image and sentiment to complete the card.

Card Recipe:

Stamp:  Embrace Your Dream – D19039 (Dreamerland Crafts)

Sentiment: Kraftin’ Kimmie – Sky’s The Limit

Inks: Memento – Tuxedo Black, Tim Holtz Distress Ink – Salty Ocean, VersMark

Paper: Copic Marker X-Press It Blending Card, Doodlebug Design Inc. – I Love Travel (6 x 6), Black cardstock White cardstock

Die Cuts: My Creative Time – Bunch of Fun Circle Die, Avery Elle – Custom Steel Dies – Made in the USA – D-05-01 PiercedCloudsDie, My Creative Time – Rectangle Frame Die Layers – MCT-D274, My Creative Time – Sentiment Label Dies – MCT-D139, My Creative Time – More Stitched Circles MCT-D136

Embossing Powder: Ranger Embossing Powder White – Extra Fine Detail

Tools: MISTI – Most Incredible Stamping Tool, Cuttlebug, Marvy Uchida – Embossing Heat Tool, Xyron Creative Station, 3M VHB – 2 sided tape

Image coloured with Copic Markers:

Face: E21, E11, E04, E00, E000

Hair: E47, E44, E43

Jacket:  E37, E35, E34, E33

Pants: E87, E84, E81

Boots: N8, N6, N4, E53, E51, E50

Goggles: E37, E35, E33

Scarf and Helmet: E33, E31, E30

Gloves: E79, E77, E74

Airplane: C5, C3, C1, C0, Y08, Y04

Grass: YG17, YG13, YG03, YG01

Sky: Tim Holtz Distress Ink – Salty Ocean, Avery Elle – Custom Steel Dies – Made in the USA – D-05-01 PiercedCloudsDie

Hope you like it and have a great week!

You can find more cards to inspire you at Dreamerland Crafts and Pointer Scrapbooking on the Facebook Fan pages from the rest of our design team.

Basketball Birthday!!


Today I’m sharing  Basketball Player (KLM Digital Designs) image from the September release. When creating this card, I thought of my younger brother who used to eat, sleep and dream about basketball all the time when he was young. You barely ever saw him without a basketball in his hand. He was always on the basketball court, shooting hoops or playing games. He actually excelled in a lot of sports and won the trophy for all around athlete in High School. Of course, that was many, many, many years ago. LOL!

I printed out the main image onto Copic Marker X-Press It Blending Card using my HP Printer. The image was then die cut with my Cuttlebug and My Creative Time – Rectangle Frame Dies Layers and then coloured in with Copic markers.  For the sentiment, I brought the original digital image into Microsoft Word and then used the developer tools to crop it so that it went into 3 lines to fit my image better. Then I printed it out and fussy cut around it. The sentiment was then layered onto some chocolate brown cardstock and fussy cut again.

For the basketball background paper, I downloaded from the site listed below and then printed it out on my printer. I die cut it with My Creative Time – Rectangle Frame Dies then glued directly onto the The Paper Studio – Primary Base Colours 5.5″ x 4.25″ cardstock base. The main image was adhered directly to the chocolate brown cardstock. I added a small basketball brad and then popped up the entire image onto the background using 3M VHB – 2 sided tape. The sentiment was also popped up.

Card Recipe:

Stamp and Sentiment: Basketball Player (KLM Digital Designs)

Inks: HP Printer Grayscale

Paper: Copic Marker X-Press It Blending Card, http://www.printablepapertreats.com/slam-dunk-silhouette-digital-papers, The Paper Studio – Primary Base Colours

Die Cuts: My Creative Time – Rectangle Frame Dies, My Creative Time – Rectangle Frame Layers

Tools: 3M VHB – 2 sided tape, Cuttlebug

Image coloured with Copic Markers:

Skin: E000, E00, E04, E11, E21, R22, R20

Hair: E47, E44, E43

Clothing and Shoes: E29, E27, E25, E23, E15, YR24, Y35, Y115

Basketball: E08, YR18, YR16, YR12

Shadow: W5, W3, W1

Background around boy: Y04, Y02, Y00, Y000

Hope you like it and have a great week!

You can find more cards to inspire you at KLM Designs, KLM Digital Design Team and KLM Digital Designs on the Facebook Fan page from the rest of our design team.