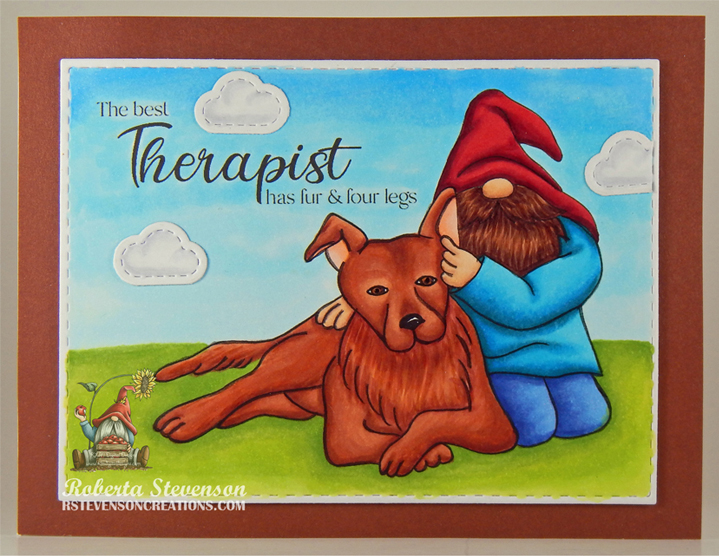
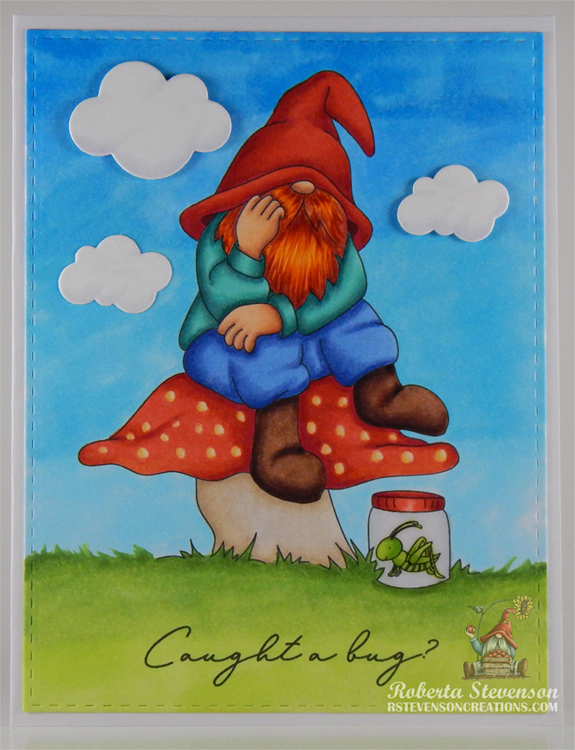
Todd’s 60th Birthday!


Today I’m sharing a Birthday card that I made for my husband’s 60th Birthday using the image and sentiments from Art ImpressionsDance It Out – 5278 and image from Cake Popper Set (4475) (Retired). He hated the thought of turning sixty and being a few years older than him, I couldn’t resist doing a funny card for his birthday.

To create the card, I began with the card base of 5.5″ x 4.25″ using Hammermill – Premium Colour 100 lb. cardstock.  I cut Your Next Stamp Designer Pad – Birthday Boy paper to the size of 5.5″ x 1.75″ and 5.5″ x 2.5″ and adhered it to the base using double-sided tape. Lastly, Tim Holtz Distress Ink – Blueprint Sketch was applied around the edges of the card using a finger dauber.

With Memento – Tuxedo Black ink and my MISTI, I stamped all of the images onto Copic Marker X-Press It Blending Card. I coloured in all of the images and then fussy cut around them. For the image on the front of the card. I popped it up onto black cardstock using U-Line Double-Sided foam tape and then fussy cut around it again.

For the front of the card, with my Cuttlebug and Sizzix Thinlets – Balloon Occasions, I die cut the “Happy” and “birthday” twice. I ran the blue “Happy” through my Xyron Create a Sticker and attached it directly to the card. The Yellow and Blue inlays were added from the die cut pieces using liquid glue. Liquid glue was also appplied to the 2 “Birthday” die cuts and attached to the card. U-Line Double-Sided foam tape was applied to the back of the man image and popped up onto the card. I stamped the sentiment using Versafine – Majestic Blue with my MISTI. Ranger – Clear Super Fine Detail embossing powder was applied and then heat embossed with Marvy Uchida – Embossing Heat Tool. Poppystamps – Christmas Quotes dies were used to die cut the sentiment. Using a blending brush with some yellow ink still on it, I applied it and then added some U-Line Double-Sided foam tape to pop it up on the card.


For the inside of the card, the image was applied using liquid glue. The sentiments were stamped using Versafine – Onyx Black ink with my MISTI. Ranger – Clear Super Fine Detail embossing powder was applied and then heat embossed with Marvy Uchida – Embossing Heat Tool. Lastly, I thought it would be fun to add in his age onto the balloons. Using Die-Namics – Frosted Alphabet, and my Cuttlebug, I die cutted the numbers and frosting out of Copic Marker X-Press It Blending Card. The numbers were coloured in with the same colours as the cake and then Stickles – Diamond was added to the icing. Once the stickles was dry I applied the 2 pieces together with liquid glue and attached them to the balloons.


My husband loved his card and I hope you do too!

Card Recipe:

Stamps and Sentiment: Art ImpressionsDance It Out – 5278, Cake Popper Set (4475) (Discontinued)

Inks: Memento – Tuxedo Black, Tim Holtz Distress Ink – Blueprint Sketch, Versafine – Majestic Blue, Versa Fine – Onyx Black

Paper: Copic Marker X-Press It Blending Card, Hammermill – Premium Colour 100 lb., Your Next Stamp Designer Pad – Birthday Boy (6″ x 6″)

Dies: Sizzix Thinlets – Balloon Occasions (666014), Poppystamps – Christmas Quotes, Die-Namics – Frosted Alphabet

Miscellaneous: MISTI – Most Incredible Stamping Tool, Cuttlebug, Ranger – Clear Super Fine Detail embossing powder, Marvy Uchida – Embossing Heat Tool, Stickles – Diamond, U-Line Double-Sided Foam Tape

Image coloured with Copic Markers:

Skin: E21, E11, E04, E00, E000, R30, R24, R20

Man

Hair: C7, C5, C3, C2, C1, C0, C00

Shirt: B06, B04, B02, B00, Colorless Blender

Pants, Shoes and Belt: E59, E57, E29, E27, E25, E23, Y19

Woman

Hair: Y38, Y19, Y15, Y11

Dress and Earrings: BV08, BV04, BV02, BV01

Cake, Flowers and Ribbons: G99, G24, B06, B02, B00, B000, B0000,  BV04, BV02, BV01

Balloons, Numbers, Hat and Whistle: B06, B04, B02, B01, B00, B0000, BV08, BV04, BV02, BV01, BV0000

Hope you like it and have a great week!

Workout Wheelie!!


Sharing a birthday card I made using Art Impressions Workout Gal Wheelie  for the main image and sentiment. My colleague loves to workout and I thought this would be a fun card to make for her. There is a tab on the inside of the card which makes the wheels turn as she pedals.

To make my card, I began with a card base of Hammermill – Premium Colour 100 lb. cardstock, cut and scored to be 5.5″ x 4.25″. Using my Cuttlebug and Gina Marie Designs – Nested Scalloped Stitched Rectangles, I die cut Scrapbook.com – Rainbow Smooth cardstock. Then, using my Cuttlebug again and this time Momenta – Cardstock, I die cut the inside rectangle with My Creative Time – Rectangle Frame Layers.

Using my MISTI and Memento – Tuxedo Black ink, I stamped the image onto Copic Marker X-Press It Blending Card cardstock. The image was coloured in with Copic markers and then die cut with the dies that came with the stamp set.  The backgrounds and base card were also die cut to match where the wheel would be turning. Using double-sided tape, the 2 large die cuts were attached to the base card centering the holes for each of them. The brads were inserted into the holes of the die cuts for the body and wheel assembly. This was glued onto the background rectangle. I positioned the sentiments around the image using a MISTI and Versa Fine – Onyx Black ink. They were embossed using my Marvy Uchida – Embossing Heat Tool and Ranger – Clear Super Fine Detail embossing powder.  Lastly, a 1/4″ foam circle was attached to the wheel from inside the card and the cover circle and tab were added to it. This mechanism allows the card holder to turn the wheel. So much fun!

Card Recipe:

Stamp and Sentiment: Workout Gal Wheelie  (Art Impressions) (Retired)

Inks: Memento – Tuxedo Black, Versa Fine – Onyx Black

Paper: Copic Marker X-Press It Blending Card, Hammermill – Premium Colour 100 lb., Scrapbook.com – Rainbow Smooth Cardstock (4.25″ x 5.5″), Momenta – Cardstock

Dies: Gina Marie Designs – Nested Scalloped Stitched Rectangles, My Creative Time – Rectangle Frame Layers

Embossing Powder: Ranger – Clear Super Fine Detail embossing powder

Tools: MISTI – Most Incredible Stamping Tool, Cuttlebug, Marvy Uchida – Embossing Heat Tool

Image coloured with Copic Markers:

Skin: E21, E11, E04, E00, E000, R46, R89, R83, R22, R20

Hair: E47, E44, E43

Outfit: Y38, RV66, RV55, RV52, BG72, BG57, BG32, BG11

Headband and Slipper: RV66, RV55, RV52, N2, N1, N0

Towel: BG09, BG05, BG02, BG01, Y38, Y35, Y32

Earing, Glasses and Mirror: BG72, BG57, BG32

Bike, Pedal and Wheel: W9, W7, W5, C5, C4, C3, C1

Wine Glass: R89, R85, R59, R56, BG0000

Hope you like it and have a great week!

Birthday Present Girl!!


Today, I’m sharing a birthday card that I made using this fun image from Polkadoodles called Surprise Gift Digi – Winnie Celebrations 2.

To make the card, I first imported the image and sentiment into Microsoft Word. I sized the image to fit 3.75″ x 2.5″ and printed it out onto Copic Marker X-Press It Blending Card using my HP Printer. Using my Cuttlebug and My Creative Time – Rectangle Frame Dies, I die-cut the image out. The frame was die cut using Hot Buy – Recollections – Jewel Tones paper and Gina Marie Designs – Loopy Rectangle Die Set. Hammermill – Premium Colour 100 lb. cardstock was used to create the base card at the size of 5.5″ x 4.25″. Doodlebug – hey cupcake paper was cut to the same size as the base and applied using double-sided tape. Tim Holtz Distress Ink – Picked Raspberry and a finger dauber were used to ink around all of the 4 sides of the card.

The image was coloured in with Copic markers and 3M double-sided pop-up tape were applied to the back of the image and Loopy rectangle. Both were attached to the centre of the card. The sentiment was stamped onto Fuschia paper using my MISTI and then die cut with a circle punch. Using a white gel pen, I created stitched lines. 2 layers of 3M double-sided popup tape were added to the back of the circle on one side and then glue on the other half and it was popped up onto the card. Lastly, I added a few Kraftin’ Kimmie – Festive Dots just to add a little bit more colour!

Card Recipe:

Stamp: Surprise Gift Digi Stamp – Winnie Celebrations 2Polkadoodles

Inks: HP Printer Grayscale, Tim Holtz Distress Ink – Picked Raspberry

Paper: Copic Marker X-Press It Blending Card, Hammermill – Premium Colour 100 lb., Doodlebug – hey cupcake (6″x6″) paper pad, Hot Buy – Recollections – Jewel Tones

Die Cuts: Gina Marie Designs – Loopy Rectangle Die Set, My Creative Time – Rectangle Frame Dies

Miscellaneous: Kraftin’ Kimmie – Festive Dots

Image coloured with Copic Markers:

Skin: E21, E11, E00, E000, R22, R20, Eyes (Gelly Roll Sakura #8 Pen, Sakura Glaze – Black)

Hair: E47, E44, E43, E40

Dress and Shoes: BG09,  BG05, BG02, BG01

Ribbons and Dress Trim: RV04, RV02, RV00

Presents and Bows: E15, Y35, Y17, Y08, G02, G00, G000

Shadow: C3, C2, C1, Colorless Blender

Hope you like it and have a great week!

Matchbook Get Well!


Today I’m sharing a miniature Get Well card using Art ImpressionsMB Get Well – 5499MB Template Dies (5317), MB Envelope Die (5318) and MB Wall Accessories (5323) that I made for a friend that had just had surgery. Love these little cards as they are so fun to make.

To create the card, I began with the card base using Carta Bella Paper Co. – Botanical Garden double-sided paper, Cuttlebug die-cutting machine and the Art ImpressionsMB Template Dies (5317). From the same die set, the windows and window frames were cut out using Hammermill – Premium Colour 100 lb. cardstock. Lastly, with the same dies, I cut out the floor using Joy Crafts – Artist Trading Card – Wood Texture paper.

With Memento – Tuxedo Black ink and my MISTI, I stamped all of the images and the sentiment onto Copic Marker X-Press It Blending Card. I coloured in all of the images and then, using the Cuttlebug again, I die cut all of the inside pop-ups using Art ImpressionsMB Get Well – 5499 and added features using MB Wall Accessories (5323). Lastly, I die cut the envelopes out of some scrap double-sided paper that I had in my stash using the Art ImpressionsMB Envelope Die (5318).

Double-sided tape was applied to do the assembly on the tabs and wall items. They were then all adhered to the base card.  Double-side tape was also applied to the flaps of the larger envelope to complete the assembly. For the small envelope, I used the little bow and a pop-dot to close it so that it could be opened easily.

Card Recipe:

Stamps and Sentiment: Art ImpressionsMB Get Well – 5499, MB Wall Accessories (5323)

Inks: Memento – Tuxedo Black

Paper: Copic Marker X-Press It Blending Card, Hammermill – Premium Colour 100 lb., Carta Bella Paper Co. – Botanical Garden (6″ x 6″)

Dies: Art ImpressionsMB Get Well – 5499MB Template Dies (5317)MB Envelope Die (5318) and MB Wall Accessories (5323)

Miscellaneous: MISTI – Most Incredible Stamping Tool, Cuttlebug

Image coloured with Copic Markers:

Side Tables: C1, C0, C00

Bed Frame and Wheels: C7, C5, C3, C2, C1, C0, C00

Bed Sheets and Pillow: C1, C0, C00, RV01, RV00, RV000

Kleenex Box, Card, Blanket, Slippers: RV66, RV63, RV55, R27, R22

Flowers, Stems and Flower Pot: Y17, Y13, YG17, YG13, R27, R22, E99, E97, E00

Chair: E44, E43, W7, W5, W3, W1

Glass: B000

White Board: C3, C2, C1, C0, C00, R27, Y17

Clock: C3, C1, C00

Hope you like it and have a great week!

Birthday Ssschmirth-day!


Today, I’m sharing a fun birthday card using Whimsy StampsMe-Wow Cat Birthday that I made for my father-in-laws 80th Birthday. He’s wasn’t too keen on turning 80 so I thought I would make this fun card for him! He loved it and I hope that you do too!

To create the card, I began with a card base of 5.5″ x 5.5″ using Hammermill – Premium Colour 100 lb. cardstock. Echo Park Paper Co. – Happy Birthday Boy paper was cut to the same size as the base and adhered with double-sided tape. Using my Cuttlebug and My Creative Time – Stitched Squares Inside and Out, I die cut a 3.5″ x 3.5″ square out of Copic Marker X-Press It Blending Card and a 4″ x 4″ square out of Recollections – Black cardstock.

Using my MISTI and Memento – Tuxedo Black ink, I stamped the image from Whimsy StampsMe-Wow Cat Birthday. The image was coloured in with Copic markers and then I stamped the image again onto a Post-It note and fussy cut around the balloon and upper half of the kitty to use it as a mask. I placed it over top of the coloured image and created the party background using Tim Holtz Distress Ink – Salty Ocean, Tim Holtz Distress Ink – Squeezed Lemonade and Tim Holtz Distress Ink – Wilted Violet which I applied using Blending Brushes. After the first layers were added, I used the same colours,  but this time I used Hero Arts – Party Confetti Stencil (Crop & Create Exclusive) to create the streamers. I removed the mask and put the image into my MISTI once again and this time, I stamped the sentiment from the same stamp set using Versa Fine – Onyx Black ink and then heat embossed it using Ranger – Clear Super Fine Detail embossing powder and Marvy Uchida – Embossing Heat Tool. Lastly, U-Line double-sided tape was applied to the back of the image and the black square. These were then popped up onto the centre of the card.

Card Recipe:

Stamp: Whimsy StampsMe-Wow Cat Birthday – C1386

Inks: Memento – Tuxedo Black, Versa Fine – Onyx Black, Tim Holtz Distress Ink – Salty Ocean, Tim Holtz Distress Ink – Squeezed Lemonade and Tim Holtz Distress Ink – Wilted Violet

Paper: Copic Marker X-Press It Blending Card, Hammermill – Premium Colour 100 lb., Recollections – Black cardstock, Echo Park Paper Co. – Happy Birthday Boy 6″ x 6″

Dies: My Creative Time – Stitched Squares Inside and Out

Stencil: Hero Arts – Party Confetti Stencil (Crop & Create Exclusive)

Embossing Poweder: Ranger – Clear Super Fine Detail

Miscellaneous: U-Line double-sided tape, Marvy Uchida – Embossing Heat Tool, MISTI – Most Incredible Stamping Tool, Blending Brushes

Image coloured with Copic Markers:

Cat: C10, C8, C7, C6, C5, C4, R22, R02, 100, YG09, YG07, YG05

Hat: BG15, BG11, BG10, BG09, BG05, BG02, BG01

Balloon: BG09, BG05, BG02, BG01, BG0000

Lawn: YG25, YG23, YG21, YG03, YG01

Hope you like it and have a great week!

Happy Pride Day!


Today, I’m sharing a Happy Pride Day card using Craft With SarahRainbow Gnomes from the free SVG April 21st – April 30th, 2023 Gnome Craft Countdown event. The Rainbow Gnomes were offered on day 6. The sentiment is a free sentiment that can be found on Cricut Design Space. My friend and his partner are celebrating this month along with many of their friends and I’m hoping this card puts an added smile on their faces.

To create the card, I began with a card base of 4.25″ x 5.5″ using Hammermill – Premium Colour 100 lb. cardstock.  Using Lawn Fawn CutsCloudy Stencil, multiple blending brushes and multiple Tim Holtz Distress Inks, I created the clouds. With Tim Holtz Distress Ink – Mowed Lawn, I gently blended the grass into the base of the clouds.

I imported the .SVG file into Cricut Design Space and created a mirror image of the .svg so that I could have the gnomes facing in opposite directions. I cut out all of the different layers using various cardstock colours along with the sentiment with my Cricut Explore. Once the pieces were all cut out, I glued them all together as per the instructions from Craft With Sarah instructions associated with the .SVG file. These were then added to the front of the card to finish it off.

Card Recipe:

Cricut Explore, Cricut Design Space – WWW.CRAFTWITHSARAH.COM \ Gnomes – gcc-day-06-rainbow (W2.944 x H3.211, Happy Pride Day (#M278417D3) (1.755 x 1.755)

Inks: Grass: Tim Holtz Distress Ink – Mowed Lawn, Sky: Tim Holtz Distress Ink – Salty Ocean, Aged Mahagony, Squeezed Lemonade, Wilted Violet

Paper: Hammermill – Premium Colour 100 lb., miscellaneous card stock

Die Cuts: Lifestyle Crafts Cutting Dies – Nesting Circles – Size 2″

Stencil: Lawn Fawn Cuts Cloudy Stencil

Miscellaneous: Cricut Explore, Cuttlebug, Blending Brushes

Hope you like it and have a great week!

Father’s Day Fisherman!


Today, I’m sharing a Father’s Day card using HunkydoryMoonstone – What A Catch Card – MSTONE537 die that I made for our dads. Both of our dads love to fish and I thought this was the perfect die set when I saw it. Wishing everyone’s dad a very Happy Father’s Day today and everyday!

To create the card, I began with a card base of 6″ x 6″ using AC Cardstock – White. For the main background I attached Stampin’ UP! – Whale of a Time Designer Series Paper cut to the same size as the base with double-sided tape. Tim Holtz Distress Ink – Blueprint Sketch and a finger dauber were used to ink around all of the edges. Using a combination of my Cuttlebug, My Creative Time -Stitched Squares Inside and Out – 4.5″ x 4.5″ and Moonstone – What A Catch Card die, I die cut the image out of Recollections – Black cardstock.

Forever In Time – Glam Glitter Cardstock – Ombre Pastel was cut to be just slightly smaller than 4.5″ x 4.5″ and then U-Line double-sided pop-up tape was added to the back of the die-cut image. I removed the tape and then attached the Glitter cardstock on top. This allowed me to line up the 2 pieces easier. For the sentiment, I decided to use my Cricut Explore and Cricut Design Space to create the text and shadow, using some spare blue cardstock and Recollections – Black cardstock. Once the sentiment and shadow were die-cut, I ran the lettering through my Xyron Create a Sticker and attached the 2 pieces together.

U-Line double sided tape was attached to the back of the combined image and it was popped up onto the card. Scrapbook Adhesives – 3D Foam Strips – Permanent Black was added to the back of the sentiment pieces and they were popped up onto the card to finish it off.

Card Recipe:

Dies: My Creative Time -Stitched Squares Inside and Out, Moonstone – What A Catch Card – MSTONE537 (3.8″ x 3.8″), Cricut Explore

Inks: Memento – Tuxedo Black, Tim Holtz Distress Ink – Blueprint Sketch

Paper: Copic Marker X-Press It Blending Card, AC Cardstock – White, Stampin’ UP! – Whale of a Time Designer Series Paper (6″ x 6″), Forever In Time – Glam Glitter Cardstock – Ombre Pastel, Recollections – Black cardstock

Cricut Explore and Cricut Design Space: Lettering and Shadow

Miscellaneous: U-Line double-sided tape, Cricut Explore, Cuttlebug, Xyron Create a Sticker, Scrapbook Adhesives – 3D Foam Strips

Hope you like it and have a great week!

Unicorn Birthday!


Today, I’m sharing a slim-line birthday card using Gerda Steiner DesignsMoody Unicorns (GSD471) for the May Share Your Designs Challenge.


To create the card, I began with a card base of 9.5″ x 7″ using Hammermill – Premium Colour 100 lb. cardstock. I searched my die collection to find the perfect oval and couldn’t find any to fit the images that I had in mind. Since I own a Cricut Explore machine, I thought why not make my own front panel? To do this, I signed into Cricut Design Space to create the slim-line design.

I used the free shapes and selected the square, which I re-porportioned to be 9.5″ x 7″. I imported Scalloped Oval (#M41B9A) from the Baby Steps cartridge. I then duplicated this image several times and used the slice tool to die cut the rectangle in 3 places and the ovals in several places until I was satisfied with the final result. Once I loaded my mat and had selected “Make it”, I chose 2 patterned papers from Craft Smart – Hot Buy – Kawaii Dream. The Unicorns were used for the main panel and the purple pattern was used for the back panel. For the larger scalloped oval,Hot Buy – Recollections – Jewel Tones paper was used and for the smaller scalloped oval, Recollections – Purple Passions was used.

Using my MISTI and Memento – Tuxedo Black ink, I stamped the image from Gerda Steiner DesignsMoody Unicorns (GSD471). The images were coloured in with Copic markers  and then Stickles – Diamond was applied to the manes, tails and cupcake icing. With my MISTI and VersaMark ink various sentiments from the same stamp set were stamped onto Recollections – Purple Passions paper. These were then embossed with Ranger Embossing Powder White – Extra Fine Detail. Marvy Uchida – Embossing Heat Tool was then used to heat emboss the embossing powder. All of the sentiments were then cut using a small slicer device.

To assemble the card, I applied liquid glue to the large patterned purple rectangle and applied it directly to the base card. For the front panel, I first glued on the larger scalloped ovals and then applied the smaller scallops in the same way. The completed piece was then glued on top of the purple patterned paper. Each of the little unicorns and the sentiments were popped up onto the card using U-Line double-sided tape. Lastly, Tim Holtz Distress Ink – Evergreen Bough was applied around the edges of the card with a small finger dauber and Stickles – Diamond was added to the hearts to make them sparkle.

Card Recipe:

Stamp: Gerda Steiner Designs – Moody Unicorns (GSD471)

Inks: Memento – Tuxedo Black, Tim Holtz Distress Ink – Evergreen Bough

Paper: Copic Marker X-Press It Blending Card, Hammermill – Premium Colour 100 lb., Recollections – Purple Passions 8.5″ x 11″, Craft Smart – Hot Buy – Kawaii Dream (12″ x 12″), Hot Buy – Recollections – Jewel Tones (12″ x 12″)

Cricut Explore and Cricut Design Space: Scalloped Oval (#M41B9A) – Baby Steps, Shapes – Rectangle

Embossing Powder: Ranger Embossing Powder White – Extra Fine Detail

Miscellaneous: U-Line double-sided tape, Marvy Uchida – Embossing Heat Tool, MISTI – Most Incredible Stamping Tool, Stickles – Diamond

Image coloured with Copic Markers:

Unicorns:

Tail and Mane: RV14, RV13, BG15, BG13, Y15, Y13, B14, B12, V15, V12

Hooves: C9, C7, C5, C3

Body: C1, C0, C00, Colorless Blender, R02, R00

Eyes: B14, B12, B01

Hope you like it and have a great week!

Entered into: https://gsd-stamps.com/blogs/share-your-designs/play-along-in-our-syd-challenge-may-2023

Mother’s Hug!


Today, I’m sharing a Mother’s Day card that I made for my mom this year using StampingbellaCurvy Girl BIG HUG (eb1019). Our mom is very special to all of us and she was like a mom to several other families growing up as well. She has a heart of gold and is loved by everyone. She loved her card and I hope you do too!

To create the card, I began with a card base of 6″ x 6″ using AC Cardstock – White. Recollections – Matte Gold Foil cardstock was cut to the same size as the base and adhered with double-sided tape. Dollarama – Crafts Designer Paper – 02-3093268 was cut to the size of 5.75″ x 5.75″. The edges were inked with Tim Holtz Distress Ink – Saltwater Taffy and then I popped this piece onto the base card using U-Line Double-Sided tape.

Using my Cuttlebug and Gina Marie Designs – Nested Scalloped Stitched Rectangles , I die cut Recollections – Matte Gold Foil cardstock and Copic Marker X-Press It Blending Card cardstock. I used the dotted lines as a guideline and cut away the outer edges from the Copic Marker X-Press It Blending Card cardstock so that it would fit perfectly inside the gold frame.

Using my MISTI and Memento – Tuxedo Black ink, I stamped the image from StampingbellaCurvy Girl BIG HUG. The image was coloured in with Copic markers. With my MISTI, I stamped the sentiment from the same stamp set using VersaMark ink and then heat embossed it using Ranger – Super Fine Gold embossing powder and Marvy Uchida – Embossing Heat Tool. I cut around the sentiment and then used a UNI Posca Pen – Gold to go around the edges.

U-Line Double-Sided tape was added to the gold rectangle frame, coloured image and sentiment. All were then popped up onto the card. To finish it off, a few PinkFresh Studio Essentials – Ombre Glitter Drops: Sparkle & Shine (#PF113ES) were added around the image and the card.

Card Recipe:

Stamp: StampingbellaCurvy Girl BIG HUG (eb1019)

Inks: Memento – Tuxedo Black, Tim Holtz Distress Ink – Saltwater Taffy, VersaMark

Paper: Copic Marker X-Press It Blending Card, Hammermill – Premium Colour 100 lb., Dollarama – Crafts Designer Paper – 02-3093268, AC Cardstock – White, Recollections – Matte Gold Foil cardstock

Dies: Gina Marie DesignsNested Scalloped Stitched Rectangles

Embossing Poweder: Ranger Super Fine Gold Embossing powder

Miscellaneous: U-Line double-sided tape, Marvy Uchida – Embossing Heat Tool, MISTI – Most Incredible Stamping Tool, PinkFresh Studio Essentials – Ombre Glitter Drops: Sparkle & Shine (#PF113ES), UNI Posca Pen – Gold

Image coloured with Copic Markers:

Skin: E21, E11, E04, E00, E000, R30, R20

Hair: E29, E27, E25, E23, E15, Y38, Y21, YR23

Mother’s Dress: Y19, Y15, Y13, Y02

Daughter’s Dress and Mom’s Shoes: B06, B04, B02, B00

Flowers: R85, R83, R81, RV02, RV000, E13, Y17, Y08

Leaves: G99, G94, G85, YG17, YG13, YG01

Background and Shadow: BG0000, W2, W1, W0, W00

Hope you like it and have a great week!

Hero Dad!


Today I’m sharing a Father’s Day card using KLM Digital DesignWheelbarrow Gnome from the new April 2023 release. This image also comes with 2 more sentiments, “Dad, you’re someone to look up to no matter how tall I grow!” and “Any man can be a Father, but it takes someone special to be a Dad”. I know that my dad will always be my hero no matter how old I get. 🙂

Hammermill – Premium Colour 100 lb. cardstock was used to create a 5.5″ x 5.5″ card base. Using my Cuttlebug and My Creative Time -Stitched Squares Inside and Out dies, I die cut a 5″ x 5″ square out of Recollections – Black cardstock and a 4″ x 4″ square out of Copic Marker X-Press It Blending Card. The black square was applied directly to the base card using double-sided tape.

The image and sentiment were imported into Microsoft Word and printed out onto Copic Marker X-Press It Blending Card prior to me cutting out the 4″ square. The image was coloured in with Copic markers. I decided I wanted some puffy clouds, so I printed out the image again, but this time it was printed onto regular copy paper and then I fussy cut around the top part of it. It was placed over top of the coloured image with some washi tape to secure it in place. I took another piece of paper and created a wavy background and placed that down over the image too! Then, with Tim Holtz Distress Ink – Salty Ocean and a blender brush, I proceeded to create the cloudy sky using a stencil that I had made earlier using Avery Elle – Pierced Clouds Dies. Once the sky was complete, I added in the dirt path and the farm field to finish off the image. U-Line double-sided tape was added to the back of the completed coloured image and it was popped up onto card to finish it off.

Card Recipe:

Stamp and Sentiment:  Wheelbarrow Gnome – KLM Digital Designs

Inks: HP Printer Grayscale. Tim Holtz Distress Ink – Salty Ocean

Paper: Copic Marker X-Press It Blending Card, Hammermill – Premium Colour 100 lb., Recollections – Black cardstock

Dies: My Creative Time -Stitched Squares Inside and Out, Avery Elle – Pierced Clouds Die (D-05-01)

Miscellaneous: U-Line double-sided tape, Cuttlebug, Blending Brush

Image coloured with Copic Markers:

Skin: E21, E11, E00, E000

Beard: E29, E27, E25, E23

Hats and Boots: C8, C6, C4, C2

Shirts: BG72, BG57, BG32, BG11

Jeans: B26, B23, B21, E23

WheelBarrow: C10, C8, C6, C3, C2, C1, R56, R37, R35, E29, E25, E23

Lawn \ Farm Field: YG25, YG23, YG21, YG17, YG13, YG03, YG01

Dirt Path: E37, E35, E33, E31

Hope you like it and have a great week!

You can find more cards to inspire you at KLM Designs, KLM Digital Design Team and KLM Digital Designs on the Facebook Fan page from the rest of our design team.

Matchbook Craft Room!


Today I’m sharing a miniature Birthday card using Art ImpressionsMB Craft Room Set – 5321MB Template Dies (5317) and MB Envelope Die (5318) that I made for my Aunt’s Birthday in April. My aunt is a crafter like myself. When I first handed the card to her, she looked at me as if to say “What is this?” I started to laugh and said, “It’s your Birthday Card”. The card is the size of a matchbook. LOL! She couldn’t believe how tiny it was. I wrote the sentiment on the inside of the smaller envelope. When she opened her card, she fell in love with it and I hope that you do too! Proof that some big things do come in small packages!!!! 🙂

To create the card, I began with the card base using Hammermill – Premium Colour 100 lb. cardstock, Cuttlebug die-cutting machine and the Art ImpressionsMB Template Dies (5317). I used this same die cut again to add the paper background for the inside of the card and adhered them together using liquid glue. From the same die set, the windows, window frames, hearts and bow were also cut out. Lastly, with the same dies, I cut out the floor using Joy Crafts – Artist Trading Card – Wood Texture paper.

With Memento – Tuxedo Black ink and my MISTI, I stamped all of the images and the sentiment onto Copic Marker X-Press It Blending Card. I coloured in all of the images and then, using the Cuttlebug again, I die cut all of the inside pop-ups using Art ImpressionsMB Craft Room Set – 5321. Lastly, I die cut the envelopes out of some scrap double-sided paper that I had in my stash using the Art ImpressionsMB Envelope Die (5318).

Double-sided tape was applied to do the assembly on the tabs and they were adhered to the base card. I wanted to create a small picture frame, so I drew one onto Copic Marker X-Press It Blending Card cardstock, coloured it in with Copic markers and then cut around the frame. The heart was then adhered into the centre of the frame with some liquid glue. A few small gems were also added above and below the heart.

Double-side tape was applied to the flaps of the larger envelope to complete the assembly. For the small envelope, I used the little bow and a pop-dot to close it so that it could be opened easily.

Card Recipe:

Stamps and Sentiment: Art ImpressionsMB Craft Room Set – 5321

Inks: Memento – Tuxedo Black

Paper: Copic Marker X-Press It Blending Card, Hammermill – Premium Colour 100 lb., Miscellaneous cardstock from stash, Joy Crafts – Artist Trading Card – Tough Texture (3.25″ x 2-3/8″)

Dies: Art ImpressionsMB Craft Room Set – 5321MB Template Dies (5317) and MB Envelope Die (5318)

Miscellaneous: MISTI – Most Incredible Stamping Tool

Image coloured with Copic Markers:

Craft Bag, Paint Can Container and Pen Container: B06, B04, B02

Cutting Machine: B06, B02, N9, N7, N3, C1, C00

Shelves and Cabinets: C2, C1, C0, C00, Colorless Blender

Boxes and Bins: E55, E53, E51

Books: W9, W7, W5, C9, Y19, Y17, G07, G03, G00, B04. B01, Y23, R37, R35

Glue Bottle: C1, C0, YR16, YR14, YR12

Chair: N9, N7, N5, N3, C1, C00

Vase and Flowers: RV63, RV52, G03, V09, V04

Markers and Brushes: V06, V04, YR18, YR12, C5, C3, R37, R35

Sign: E25, E23, BG000

Hope you like it and have a great week!

The Best Therapist!


Today is Tuesday and I’m sharing an Inspirational card using KLM Digital DesignGnomes Best Friend from the new April 2023 release. This image also comes with 2 more sentiments, “Thinking of You” and “Just Smile”. Pets make the perfect companions because they will always listen and never judge you. They sense when you are happy or sad and always make you feel wonderful! Also, your secrets are always safe with them! 🙂

Hammermill – Premium Colour 100 lb. cardstock was used to create a 5.5″ x 4.25″ card base. Scrapbook.com – Roses Smooth Cardstock – 5.5″ x 4.25″ was applied directly to the base card using double-sided tape.

The image and sentiment were imported into Microsoft Word and printed out onto Copic Marker X-Press It Blending Card. With my Cuttlebug, I die cut the image using My Creative Time – Rectangle Frame Layers to the size of 4.75″ x 3.5″. The image was coloured in with Copic Markers listed below. Some small clouds were die-cut using Lawn Fawn – Platform Pop-Up Inserts and coloured in with Copic Markers. I applied these to the coloured image with liquid glue. U-Line double-sided tape was added to the back of the completed coloured image and it popped it up onto card.

Card Recipe:

Stamp and Sentiment:  Gnomes Best Friend – KLM Digital Designs

Inks: HP Printer Grayscale

Paper: Copic Marker X-Press It Blending Card, Hammermill – Premium Colour 100 lb., Scrapbook.com – Roses Smooth Cardstock – 4.25″ x 5.5″

Dies: My Creative Time – Rectangle Frame Layers, Lawn Fawn – Platform Pop-Up Inserts

Miscellaneous: U-Line double-sided tape, Cuttlebug,

Image coloured with Copic Markers:

Skin: E21, E11, E04, E00, E000

Beard: E29, E27, E25, E23

Hat: R59, R37, R35

Clothing: BG09, BG05, BG02, BG01

Jeans: B26, B23, B21

Dog: E99, E97, E25, E23, E13, E11, E07, Y38, 100, R02, R00

Lawn: YG25, YG23, YG21, YG03, YG01

Sky: B02, B01, B00, B000

Clouds: C1, C00, B60

Hope you like it and have a great week!

You can find more cards to inspire you at KLM Designs, KLM Digital Design Team and KLM Digital Designs on the Facebook Fan page from the rest of our design team.

American Flag Gnome


Today is Thursday and I’m sharing an American Celebration card using KLM Digital DesignAmerican Flag Gnome from the new April 2023 release. This image also comes with 2 more sentiments, “Let Freedom Ring” and “Home of The Brave – America”.

Hammermill – Premium Colour 100 lb. cardstock was used to create a 5.5″ x 4.25″ card base. I found some navy blue cardstock with stars from my scrap stash and thought it went perfect with this card. I cut it to be the same size as the base and adhered it directly to base card. Tim Holtz Distress Ink – Chipped Sapphire and a finger dauber were used to ink around all of the edges of the card.

The image and sentiment were imported into Microsoft Word and printed out onto Copic Marker X-Press It Blending Card and 1 extra copy of the image was printed onto plain copy paper to be used for masking later. With my Cuttlebug, I die cut the image using My Creative Time – Rectangle Frame Layers. The image was coloured in with Copic Markers listed below. I fussy cut around the image that I had cut out from the plain copy paper and adhered it to the card with some Washi tape as a mask.

Using a blender brush, I created the clouds in the sky with Avery Elle – Pierced Clouds Die (D-05-01) which I had die cut to create stencils. The lawn was created using a blender brush, Tim Holtz Distress Ink – Mowed Lawn and Lawn Fawn – Slimline Hillside Stencils. I also used the stencils to be a mask for adding in the pathway using a blender brush and Krafty Kolours – Sandy Shores.

Once all of the background was completed, I removed the mask from the image and created a shadow under the gnome using Copic markers E33, E31 and E30. Some of the hills were made a little bit darker using Copic marker G20.

I added U-Line double-sided tape to the back of the coloured image then popped it up onto card.

Card Recipe:

Stamp and Sentiment:  American Flag Gnome – KLM Digital Designs

Inks: HP Printer Grayscale, Tim Holtz Distress Inks – Salty Ocean, Krafty Kolours – Sandy Shores, Tim Holtz Distress Ink – Chipped Sapphire, Tim Holtz Distress Ink – Mowed Lawn

Paper: Copic Marker X-Press It Blending Card, Hammermill – Premium Colour 100 lb.

Dies: My Creative Time – Rectangle Frame Layers, Avery Elle – Pierced Clouds Die (D-05-01)

Stencils: Lawn Fawn – Slimline Hillside Stencils

Miscellaneous: U-Line double-sided tape, Cuttlebug, Blending Brushes

Image coloured with Copic Markers:

Skin: E21, E11, E04, E00, E000

Beard: E29, E27, E25, E23

Hat: R59, R37, R35

Clothing: B39, B37, B29

Boots: E49, E35, E34, E31, C9, C7, C5, C4

Flag: R59, R37, R35, B39, B37, B29

Path: E33, E31, E30 and Krafty Kolours – Sandy Shores for base

Hope you like it and have a great week!

You can find more cards to inspire you at KLM Designs, KLM Digital Design Team and KLM Digital Designs on the Facebook Fan page from the rest of our design team.

Card of the Month – Round 1 – You Did It!


Yippee! I am thrilled to have been asked to enter my card into the Creative Scrapbooker Magazine’s Card of the Month Contest for April! I would love it if you voted for me! Thank you! 🙏🏻 😘💙
Here is the link on Facebook:

https://creativescrapbooker.ca/card-of-the-month-april-2023/?fbclid=IwAR3vXUqlRBglU91NoJldQ6QCgmgcI4C2ORT158UZ-ISyx7rNHNdVTyDo-L0#/bracket/4416181


The original post where I created this card can be found here. https://rstevensoncreations.com/2023/03/10/you-did-it/

Hope you like it and have a great week!

You can find more cards to inspire you at KLM Designs, KLM Digital Design Team and KLM Digital Designs on the Facebook Fan page from the rest of our design team.

Music Speaks!


Today I’m sharing a music card using KLM Digital DesignKeyboard Gnome from the new March release. This image also comes with 2 more sentiments, “Turn up the volume close your eyes and let the music take over your soul” and “Music is the voice of the soul”. No words were truer spoken, music is all around us and there is something out there for everyone to listen to!

Hammermill – Premium Colour 100 lb. cardstock was used to create a 5.5″ x 5.5″ card base. Anna Griffin – Musical Cardstock & Vellum paper was cut to the same size as the base card. Using a Sharpie – Gold Medium Point – Water Based Paint pen, I inked around all of the edges and then adhered it to the base card with double-sided tape. Recollections – Matte Gold Foil cardstock was die cut 5 times using my Cuttlebug and Joy! Crafts – Cutting and Embossing Dance to the Music die. Using liquid glue, I applied each layer on top of each other and then glued it to the bottom of the card base.

The image and sentiment were imported into Microsoft Word and printed out onto Copic Marker X-Press It Blending Card. I coloured in the image and fussy cut around it and the sentiment. The edges of the image were inked around with a black marker and the sentiments were adhered onto Recollections – Matte Gold Foil cardstock and then fussy cut again.

The card was now ready to assemble. I added 3M VHB – 2 sided pop-up tape to the backs of the sentiments and image and then popped up all of the pieces onto the card to complete it.

Card Recipe:

Stamp and Sentiment:  Keyboard Gnome – KLM Digital Designs

Inks: HP Printer Grayscale

Paper: Copic Marker X-Press It Blending Card, Hammermill – Premium Colour 100 lb., Anna Griffin – Musical Cardstock & Vellum, Recollections – Matte Gold Foil cardstock

Dies: Joy! Crafts – Cutting and Embossing Dance to the Music

Miscellaneous: Cuttlebug, Sharpie – Gold Medium Point – Water Based Paint, 3M VHB – 2 sided tape

Image coloured with Copic Markers:

Skin: E21, E11, E04, E00, E000

Hair: E15, YR23, Y38, Y21

Dress and Hat: BG09, BG05, BG02, BG01

Ribbon Sash: R46, R14, R08

Shoes: C10, C8, C6, C5, C3, C2, C1, E55, E53, E51

Keyboard Instrument and Stand: R46, R14, R08, C3, C2, C1

Hope you like it and have a great week!

You can find more cards to inspire you at KLM Designs, KLM Digital Design Team and KLM Digital Designs on the Facebook Fan page from the rest of our design team.

You Did It!


Today I’m sharing a graduation card using KLM Digital DesignGraduation Gnome II from the new March release. This image also comes with 2 more sentiments, “Be the change that you want to see in this world” and “And so the adventure begins”. This little gnome is glowing with pride after graduating and accepting his diploma. Congratulations to all of the new graduates out there this year!

Hammermill – Premium Colour 100 lb. cardstock was used to create a 4.25″ x 5.5″ card base. Recollections – Black cardstock was cut to the size of 4″ x 4-5/8″ and Recollections – Patterned paper was cut to the size of 3″ x 4.25″ using My Creative Time – Rectangle Frame Layers and my Cuttlebug. Using a Sharpie – Gold Medium Point – Water Based Paint pen, I inked around all of the edges of both pieces.

The image and sentiment were imported into Microsoft Word and printed out onto Copic Marker X-Press It Blending Card. I coloured in the image and fussy cut around it and the sentiment. Both were adhered onto Recollections Black cardstock and then fussy cut again.

The card was now ready to assemble. I added U-Line double-sided pop-up tape to the backs of the sentiment, image and both rectangular pieces. All pieces were then popped up onto card to complete it.

Card Recipe:

Stamp and Sentiment:  Graduation Gnome II – KLM Digital Designs

Inks: HP Printer Grayscale

Paper: Copic Marker X-Press It Blending Card, Hammermill – Premium Colour 100 lb., Recollections Grad Paper, Recollections Black cardstock

Dies: My Creative Time – Rectangle Frame Layers

Miscellaneous: U-Line double-sided tape, Cuttlebug, Sharpie – Gold Medium Point – Water Based Paint, Xyron Create a Sticker

Image coloured with Copic Markers:

Skin: E21, E11, E04, E00, E000

Beard: E29, E27, E25, E23

Gown and Hat: C10, C8, C6, C5, C4

Boots: 100, C10, C8, C6, C5, C4

Scroll: C1, C0

Ribbon and Tassel: YR23, Y15, Y11, Y00

Glow around image: Y00

Hope you like it and have a great week!

You can find more cards to inspire you at KLM Designs, KLM Digital Design Team and KLM Digital Designs on the Facebook Fan page from the rest of our design team.

Sweet Note of Thanks!


Today I’m sharing a Thank-you card using Your Next StampMusic Bunny – CYNS262. I was recently on a cruise and we met some new wonderful couples that sat at the tables next to ours and we exchanged information. Unknown to us until the final evening, the couple that sat directly beside us was Steven Gilliland and his wonderful wife Diane. Steven happens to be a very well known acclaimed author and public speaker. My husband and I were so happy when Steven sent us a few of his books, “Making a Difference” and a “Cherry On Top”. Steven had personally autographed them to us as well. What a kind and awesome gesture and it was very much appreciated. We are currently reading his books and just love them. As a thank you for their kind generosity, I sent them this card from my husband and I.

To create the card, I began with a card base of 5.5″ x 5.5″ using Hammermill – Premium Colour 100 lb. cardstock. I cut Recollections – Matte Gold Foil cardstock to be the same size as the base card and applied double-sided tape to it. This was adhered directly to the base card. Next, I cut a piece of Hammermill – Premium Colour 100 lb. cardstock to the size of 5.25″ x 5.25″. I sprayed some water onto the paper and then using Kraftin’ Kimmie – Musical Melodies stencil I placed it on top of the paper and ran it through my Cricut Die Cutting machine to emboss the paper. Once the paper was dry, I placed the stencil over top of the paper again and this time, using Tim Holtz Distress Ink – Black Soot and a blending brush, I coloured in the musical notes. I also inked around the edges with the same ink and a mini dauber.

Using my Cuttlebug and PinkFresh Studio – Essentials – Blanket Stitched Square 4″ dies, I die cut Copic Marker X-Press It Blending Card. The main image was stamped onto this die cut using Memento – Tuxedo Black ink and my MISTI. I coloured in the image and created my own background. Once this was completed, I put the image back into my MISTI and stamped the sentiment using Versa Fine – Onyx Black ink. Ranger – Clear Super Fine Detail embossing powder was applied over top of the ink and then heat embossed with a Marvy Uchida – Embossing Heat Tool. The little notes were added with Versa Fine – Onyx Black ink and a miniature stamping block. I just chose several notes and stamped them randomly around the image. I felt like the image was still missing something, so I decided to take my Copic black marker (100) and using the lines from the die cut as a guide, coloured in every second stripe. I thought this made it look like a piano keyboard. Lastly, My Creative Time – Stitched Squares Inside and Out 4.5″ were used to die cut Recollections – Matte Gold Foil cardstock.

The card was now ready to assemble. I added U-Line double-sided pop-up tape to the back of the music square, gold square and image. Each of them were popped onto each other and centred onto the base card.

Card Recipe:

Stamp: You’re Next StampMusic Bunny – CYNS262

Inks: Memento – Tuxedo Black, Tim Holtz Distress Ink – Black Soot, Versa Fine – Onyx Black

Paper: Copic Marker X-Press It Blending Card, Hammermill – Premium Colour 100 lb., Recollections – Matte Gold Foil cardstock

Dies: PinkFresh Studio – Essentials – Blanket Stitched Square, My Creative Time – Stitched Squares Inside and Out

Stencil: Kraftin’ Kimmie – Musical Melodies

Embossing Poweder: Ranger – Clear Super Fine Detail

Miscellaneous: U-Line double-sided tape, Marvy Uchida – Embossing Heat Tool, MISTI – Most Incredible Stamping Tool, Sakura Glaze – Black pen

Image coloured with Copic Markers:

Rabbit: C3, C2, C1, C0, C00, R30, R02

Mice: W3, W2, W1, R30, R02, (Eyes and Nose – Sakura Glaze – Black pen)

Ribbon: R59, R37, R35

Flower: B29, B26, B23, Y17, Y11

Piano: W9, W7, W5, C9

Piano Chair: W9, W7, W5, R59, R37, R35

Floor: E49, E34, E29, E27, E25, E23

Wall: BG32, BG11, BG10

Border: 100

Hope you like it and have a great week!

Peace Dude!


Today I’m sharing an inspirational \ birthday card using KLM Digital DesignPeace Gnome from the new March release. This image also comes with 2 more sentiments, “Peace begins with a smile” and “There is peace even in the storm”. Seeing this image made me feel nostalgic for my younger days in the 60’s and 70’s. I still remember how excited I was to get my very first pair of GWG bell bottom jeans and then LEVIS. LOL! Flower power was all the rage and there were flowers and peace signs everywhere. I was still young, but it was a really cool time to grow up.

AC Cardstock – White was used to create a 6″ x 6″ card base. BasicGrey – Lauderdale Patterned paper was cut to the same size as the base card and adhered with double-sided tape. Tim Holtz Distress Inks – Villainous Potion was used to ink around all of the edges.

The image and sentiment were imported into Microsoft Word and printed out onto Copic Marker X-Press It Blending Card and 2 extra copies of the image were printed onto plain copy paper to be used for masking later. With my Cuttlebug, I die cut the image and the purple background layer using Quickutz Nesting Frame 7 dies. I fussy cut around the sentiment and then inked it very lightly with some purple that I had left on my blending brush. I ran it through my Xyron Create a Sticker and attached it to a scrap piece of Recollections – Purple Passions paper. Once again, I fussy cut around the sentiment. The larger frame and sentiment edges were inked around the edges with the same ink as the base card.

The image was coloured in with Copic Markers listed below. The top portion of the image was fussy cut and I applied some Washi Tape to the back of it to create a hinge and to mask the image. Using blender brushes and multiple Tim Holtz Distress Inks, I created the clouds in the sky with Lawn Fawn Cuts – Cloudy Stencil.

Once I completed the sky, I used second image that I had printed out onto the copy paper for 2 purposes. The first purpose was to use a stylus and tracing paper to transfer the image onto the patterned paper from BasicGrey – Lauderdale Paper Pad for paper piecing the gnome’s shirt. I loved the wild flower pattern and thought it was perfect for this hippie gnome. Once the pattern was transfered, I fussy cut it out. I used my Copic markers to create a small shadow on various parts of the shirt. With a Pigma Micron 03 black marker, I drew the lines in darker so that they would stand out on the shirt and then used a black marker to go around all of the pieces. Once completed, all of the pieces were put through a Xyron Create a Sticker to make it easier to stick to them to the coloured image and also so that they would lay flat. I then added the pieces to the main image.

The printed image was then fussy cut and the sand was added using a blender brush, Krafty Kolours – Sandy Shores for the base and a mixture of Copic markers listed below.

The remainder of the card was now ready to assemble. I added U-Line double-sided tape to the backs of the sentiment, large purple frame and image. They were all then popped up onto card.

Card Recipe:

Stamp and Sentiment:  Peace Gnome – KLM Digital Designs

Inks: HP Printer Grayscale, Tim Holtz Distress Inks – Salty Ocean, Wilted Violet, Aged Mahagony, Abandoned Coral, Kitsch Flamingo, Spiced Marmalade, Mustard Seed, Twisted Citron, Villainous Potion, Krafty Kolours – Sandy Shores

Paper: Copic Marker X-Press It Blending Card, AC Cardstock – White, BasicGrey – Lauderdale Paper Pad (6″ x 6″), Recollections – Purple Passions 8.5″ x 11″

Dies: Quickutz Nesting Frame 7

Stencils: Lawn Fawn Cuts – Cloudy Stencil

Miscellaneous: U-Line double-sided tape, Cuttlebug, Blending Brushes, Xyron Create a Sticker

Image coloured with Copic Markers:

Skin: E21, E11, E04, E00, E000

Beard: E29, E27, E25, E23, E21

Jeans and Hat: B26, B23, B21

Boots: E49, E35, E34, E31, E29, E27, E25, E23, E21

Shirt: Y17, Y11 (Lauderdale – Basic Grey Designer Paper)

Peace Sign: Y19, Y15, Y11

Sand: E37, E35, E34, E33, E31, E30 and Krafty Kolours – Sandy Shores for base

Glasses: N10, N9, N7, Colorless Blender

Hope you like it and have a great week!

You can find more cards to inspire you at KLM Designs, KLM Digital Design Team and KLM Digital Designs on the Facebook Fan page from the rest of our design team.

Do Not Stop!


Today I’m sharing an inspirational card using KLM Digital DesignSlow Ride Gnome from the new February release. This image also comes with 2 more sentiments, “Travel at your own pace” and “Life is a journey, not a race”.  It was hard for me to pick which sentiment to use as I loved them all. They are all so true to life.

Hammermill – Premium Colour 100 lb. cardstock was used to create a 5.5″ x 4.25″ card base. I had found Crafts Designer Paper – 02-3080678 at Dollarama and thought this paper was perfect for this card. It was cut to the same size as the base card and adhered with double-sided tape.

The image and sentiment were imported into Microsoft Word and printed out onto Copic Marker X-Press It Blending Card. With my Cuttlebug, I die cut the image using My Creative Time – Bunch of Fun Circle 3.25″ Dies. The larger circle was die cut using Recollections – Blue Ombre Cardstock and Lifestyle Crafts Cutting Dies – Nesting 3.5″ Circle. I trimmed down the sentiment to be 2.25″ x 1.5″. Using what was left on a blending brush that I used for blues, I lightly went over the paper to give it a light blue hue. Tim Holtz Distress Ink – Salvaged Patina was then inked around the 3 edges.

The image was coloured in with Copic Markers listed below. I printed out another copy of the image onto plain paper and fussy cut around the top portion. I applied some Washi Tape to the back of it to create a hinge and to mask the image. Using a blender brush, Tim Holtz Distress Ink – Salty Ocean and Lawn Fawn Cuts – Cloudy Stencil, I created the clouds in the sky.

For the assembly of the card, I added double-sided tape to the back of the sentiment and adhered it directly to the card. U-Line double-sided tape was added to the backs of the larger and smaller circle and both were popped up onto each other and the card. Lastly, to finish off everything, I added in some YNS Gumdrops – Tropical Paradise.

Card Recipe:

Stamp and Sentiment:  Slow Ride Gnome – KLM Digital Designs

Inks: HP Printer Grayscale, Tim Holtz Distress Ink – Salty Ocean, Tim Holtz Distress Ink – Salvaged Patina

Paper: Copic Marker X-Press It Blending Card, Hammermill – Premium Colour 100 lb., Crafts Designer Paper – 02-3080678, Recollections – Blue Ombre Cardstock

Dies: My Creative Time – Bunch of Fun Circle Dies, Lifestyle Crafts Cutting Dies – Nesting Circles

Stencils: Lawn Fawn Cuts – Cloudy Stencil

Miscellaneous: U-Line double-sided tape, Cuttlebug, Blending Brush, YNS Gumdrops – Tropical Paradise

Image coloured with Copic Markers:

Skin: E21, E11, E04, E00, E000

Beard: E08, YR18, YR16, YR12

Jeans: B26, B23, B21

Shoes: C9, C7, C5, C1

Shirt: B69, B63, C3, R46

Hat: BG09, BG05, BG02, BG01

Turtle: E47, E44, E43, E42, E40, BG99, BG96, BG93, BG90, G07, YG07, Y35, C1, C00, 100

Sand: E37, E35, E33, E31

Flower and Stem: G14, YG23, YG11, E33, Y38, Y35, Y32

Hope you like it and have a great week!

You can find more cards to inspire you at KLM Designs, KLM Digital Design Team and KLM Digital Designs on the Facebook Fan page from the rest of our design team.

Special Thank You!


Today I’m sharing a Thank-you card using Stampin’ UpBella and Friends. I was recently on a cruise and forgot to bring a Thank-you card for our Stateroom Attendant. Her name was Monalisa and she was such a super nice lady who was always smiling and super nice.  I told her that I made homemade cards and wanted to make sure that I sent her a special one just for her. Monalisa told me that she loved Lhasa Aspos and so I tried to make this little puppy look like one.

Anna Griffin – Shaker Card Kit was used to make the base and front of the card. The size was 5″ x 5″. I applied the pre-made shaker envelope directly to base card using double sided tape. Once again, I applied double-sided tape to the the shaker bag and then applied the top part of the card from the kit. From the same kit, I also added some liquid glue to the back of the large fancy heart and applied it directly over top of the heart shape on the front of the card.

With a stamping block and little dog stamp from Stampin’ Up – Bella and Friends, I inked the stamp with Memento – Tuxedo Black ink and then stamped it twice off to the side on some spare paper and then onto Copic Marker X-Press It Blending Card. This left the outline nice and light, almost like a no-line stamped image. I wanted it this way as most of the puppy was white and I just wanted the furry outline to look like a shadow. Once the puppy was coloured, I fussy cut around it and added some U-Line Double-Sided tape and popped it up onto the front of the card.

With my Cuttlebug and dies from PaperCrafter Today – 15 Die Cut Sentiment Set, I die cut the words “Thank You” from some scrap Hammermill – Premium Colour 100 lb. cardstock and Recollections – Matte Gold Foil cardstock. I applied some liquid glue to the backs of the 2 die cuts and after joining the 2 cuts together, applied them to the front of the card as well. Lastly, to complete the card, I added some little hearts from Doodlebug Design Inc. – Shape Sprinkles – love this! and rainbow hearts.

Card Recipe:

Stamp: Stampin’ UpBella and Friends

Inks: Memento – Tuxedo Black

Paper: Copic Marker X-Press It Blending Card, Hammermill – Premium Colour 100 lb., Recollections – Matte Gold Foil cardstock, Anna Griffin – Shaker Card Kit

Dies: PaperCrafter Today – 15 Die Cut Sentiment Set

Miscellaneous: U-Line double-sided tape, Doodlebug Design Inc. – Shape Sprinkles – love this! and Doodlebug Design Inc. – Shape Sprinkles – rainbow hearts

Image coloured with Copic Markers:

Puppy: E33, E23, E21, E000, N1, N0, Colorless Blender (Eyes and Nose – Sakura Glaze – Black, Gelly Roll Sakura #8 Pen)

Collar and Heart: R46, R14, R08

Hope you like it and have a great week!